This survey will take about 1 minute.
Your answers will help us to improve our website.
Outer Worlds 2
Sins of the Past on the Precipice of the Future Walkthrough
This is a walkthrough for the Sins of the Past on the Precipice of the Future main quest in Outer Worlds 2. Read on for a complete Sins of the Past on the Precipice of the Future walkthrough, including the choices you can make and the endings for completing the final main quest.
| ◀ Previous Mission | Next Mission ▶ |
|---|---|
| An Instrument to Unfold Space & Time A Complication with the Computronic Cerebrum |
- |
List of Contents
Sins of the Past on the Precipice of the Future Walkthrough
Click on a step to jump to its section in the walkthrough!
Travel to the Reconstituted Horizon Point
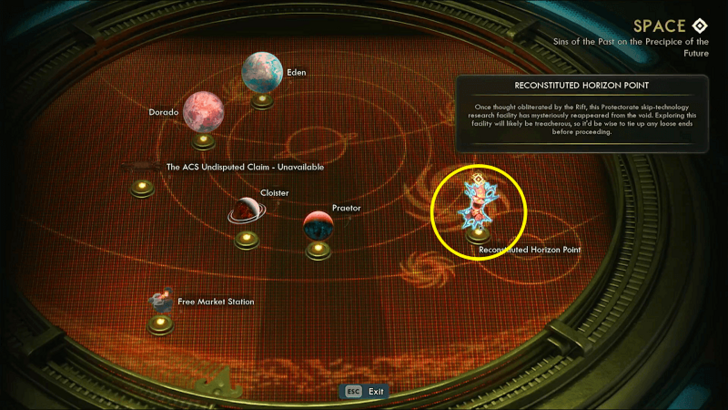
After receiving the quest, speak with VAL in the Incognito. Once the briefing with your team is complete, travel to the Reconstituted Horizon Point on the ship's navigation system.
Note that this marks the final point of no return in the game, as completing this quest triggers the ending and prevents you from returning to Arcadia.
List of All Missables and Points of No Return
Regroup With Your Allies
| Walkthrough | |
|---|---|
| 1 | After landing at the point and briefing with your team once more, exit the Incognito to enter the final zone and select your squad.
You can only bring companions whose questlines you have completed, except for VAL and Marisol, who can be brought freely. ▶︎ List of Companion Quests |
| 2 | 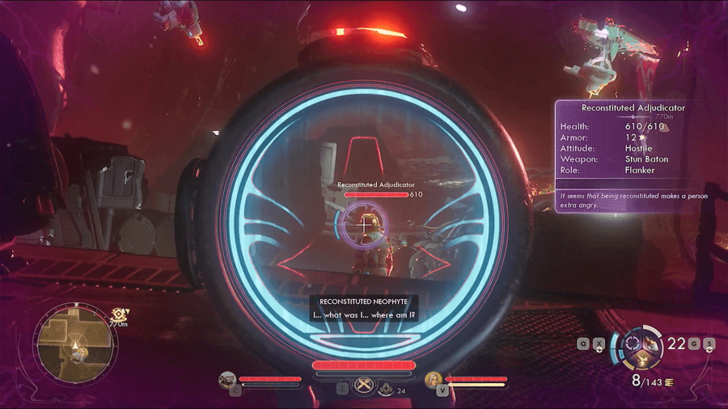 As you exit the ship, you will be greeted by Reconstituted Protectorate Troops and Automechs to fight. Defeat the waves of enemies as you push forward. |
| 3 | 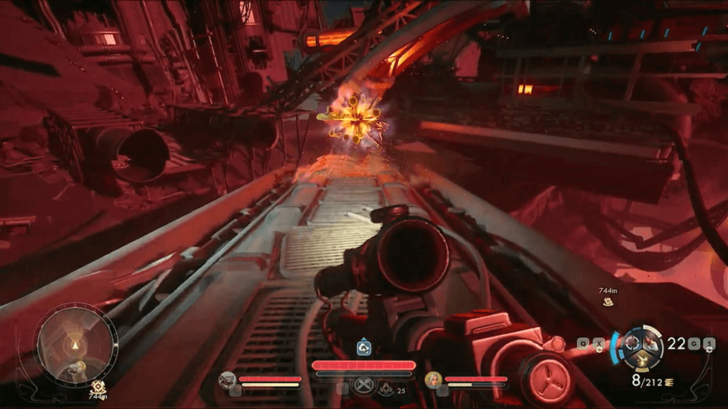 Continue along the path ahead toward your allies, fighting off the enemy resistance. Use the Rift Device on any Rift Anomalies you encounter to create platforms that let you move forward. |
| 4 | Reach your allies deep in the point (Order, Auntie's Choice, or Both) and fight off the enemies in the area. Then, proceed inside the crashed ship where Helen Pascal is, one of your agents in the prologue. You can choose to comfort the reconstituted Helen Pascal. She will eventually ask you to end her suffering. If you spared de Vries during Fiends in High Places, she will offer to stay and comfort Pascal. |
| 5 | Past the crashed ship where Pascal is located, you will find a camp with your Order or Auntie’s Choice allies. You can resupply here, as they provide free ammo and healing items, and you can also buy additional supplies from the quartermaster. |
Head to the Rift Hazard and Stabilize It
| Walkthrough | |
|---|---|
| 1 | 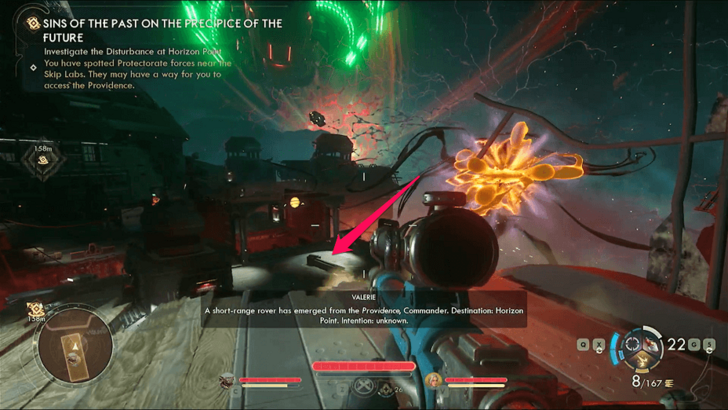 Continue south from the ally outpost towards another Rift Anomaly. Use the Rift Device on it to head down to the connecting area. There will be more reconstituted enemy troops down there, so dispatch them accordingly. |
| 2 | Once the area is clear, use the next Rift Anomaly to reach the next building. At the end of the platform path, activate the switch nearby to lower the bridge. |
| 3 | Hit the switch to lower the bridge. After you do, a group of Elite Protectorate Automechs and Troops will appear ahead, and you must fight through them to proceed. |
| 4 | After clearing the enemies, head toward the central Rift Hazard. Do not enter the room immediately, as the hazard will kill you instantly. Instead, go up the narrow ramp behind the large door leading into the hazard room. |
| 5 | Past the ramp, follow the path to the inner building, where you can find the solution to stabilize the hazard. Inside, you will face additional hostile troops. |
| 6 | At the end of the hall is a locked door leading to the office with an equation needed to neutralize the hazard. You can open it using Lockpick 18 or Explosives 18, or simply enter the storage room to the left and crawl through the vent to reach the office. |
| 7 | 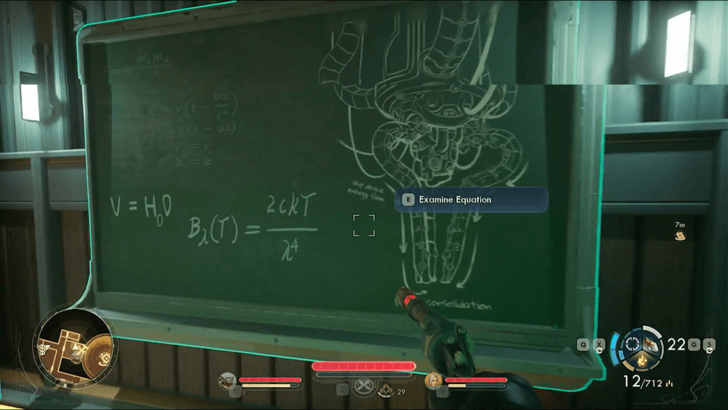 Examine the equation on the chalkboard, which will give you the Required Info to deal with the Rift Hazard. |
| 8 | 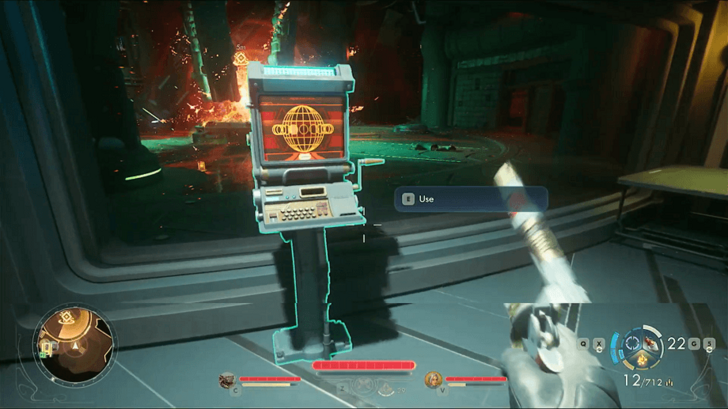 Return to the hazard room entrance and use the terminal to the left of the large door. Enter the equation to stabilize the Rift, allowing you to enter the room without dying. |
| 9 | Use the Rift Device on the anomaly in the center of the room, then turn right and use the new platforms to get to the next area. |
Get Inside the Sovereign's Ship
| Walkthrough | |
|---|---|
| 1 | 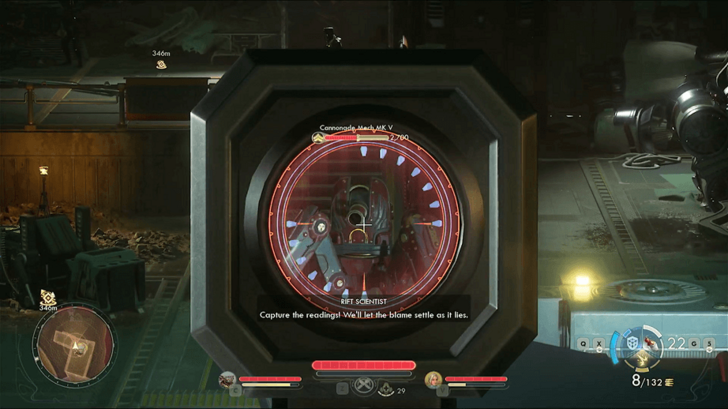 After crossing the platforms, a Cannonade Mech MK V lies awaiting alongside real Protectorate Troops. Defeat them to continue. |
| 2 | 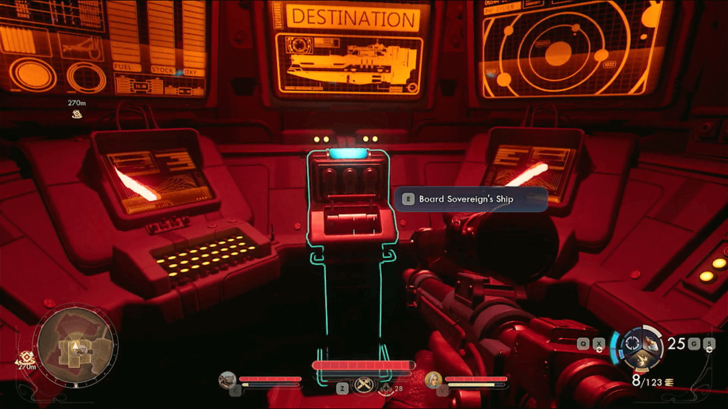 Use the small ship past the defeated enemies to board the Sovereign's Ship by activating the switch inside. |
| 3 | Once inside, head up the stairs to reach a terminal. Use it to lower the hangar doors, allowing you to advance further into the ship. |
Find the Rift Modulator
| Walkthrough | |
|---|---|
| 1 | Defeat the Bunker Mech MK V, a powerful automech with very high HP. It is accompanied by numerous troops on the ground and snipers on the rafters above the arena. Clear the room to proceed. |
| 2 | Proceed through the hall to the right of the arena, where a mech vendor is located. Past the vendor, a small door leads further into the ship’s halls, where you will need to fight through more troops and go to the Lift Transport hall. |
| 3 | In the Lift Transport hall, a door straight ahead leads to a room with Dragoons, Security Turrets, and lethal laser traps. Sneak past or destroy the Dragoons, and carefully time your jumps to avoid the lasers, which are instant-kill on hit. Use the stairs in the room to continue upward. |
| 4 | 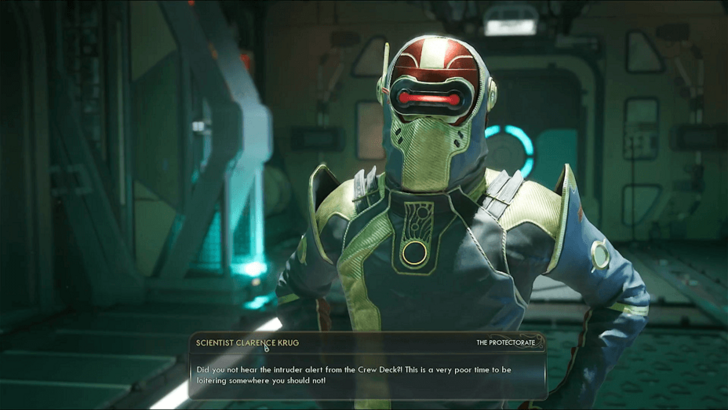 On the top floor, pass the elevator and enter the next hall. You will encounter either Pauline Adeyemi or Clarence Krug. Neither one is immediately hostile and can be spoken to. With Speech 7, you can convince either one that you are a scientist, preventing them from sounding the alarm and allowing you to proceed without combat. If you do not have the speech, you can go guns blazing and kill the hostiles there, sounding the alarm, spawning Sentry Turrets and armed Troops. |
| 5 | Head to the room with the Rift Modulator and approach the large central terminal. If you entered covertly, speak with Chief Scientist Jude Monserrate, who will willingly give you his keycard to upload to the terminal and proceed. If you entered with violence, loot the note from Monserrate's body to access the terminal in the same way. |
| 6 | After viewing the message on the terminal, return to the elevator you passed earlier to begin your final confrontation with the Consul. |
Confront Consul Emory Thoreau
| How to Deal With the Consul | |
|---|---|
| Fight the Consul | Convince the Consul to Stand Down |
Use the elevator to reach the Command Deck level. Before entering the room with the Consul, you can access a supplies vending machine, workbench, and AutoDoc to prepare for the confrontation.
You can attempt to persuade the Consul to stand down, which requires a high Speech skill and the required information, or prepare for a final boss battle against him.
Fight the Consul
You can initiate combat with the Consul by selecting hostile dialogue options, or later in the conversation if you fail the required Speech checks. He is a powerful opponent with high HP, supported by elite Protectorate Troops.
Convince the Consul to Surrender
| This section is still under construction. Additional info on how to spare the Consul will be added soon! |
During the confrontation with the Consul, you can convince him to surrender by reasoning that his plans to save Arcadia will fail. The Rift Modulator Schematics and Report (Required Info) given by Chief Scientist Jude Moserrate is needed, as well as passing a skill check of Speech 20. Another required info is knowing that the Matriarch did not discover skip drives which you get by completing Do More Harm.
If Marisol is in your party, she can contribute in convincing the Consul. Additionally, finding J. Moserrate's Private Log in a room on the Science Deck will also unlock one of the required info to convince the Consul.
Once the Consul stands down, he is willing to sacrificing himself to close the exploding rift. If Augustine de Vries is spared and present during the confrontation, she will volunteer herself as well.
Choose Who to Sacrifice to Save Arcadia
After dealing with the Consul, you must choose one person to pilot the ship with the Rift Modulator into the exploding rift to stop it. Your choice will determine the outcome of the following ending slides.
| Option | How to Sacrifice |
|---|---|
| Yourself (Commander) |
You can easily volunteer yourself to be the sacrifice. |
| de Vries | If you spared de Vries during Fiends in High Places, she will volunteer herself to be the sacrifice. |
| One of Your Companions | Companions whose questlines you have completed will be present. You can either persuade a high Speech check or force one of them to be the sacrifice. |
| The Consul | The Consul can be convinced to be the sacrifice if you have the following requirements: 1. Speech Level 20 2. The Rift Modulator Schematics and Report from Chief Scientist Jude Moserrate 3. Completed Do More Harm Niles Companion Quest 4. Completed either the Escape from Placid Waters or Mysteries of the Mental Modulators side quests. |
| Select Nobody | This is the worst ending. If you do not make a decision, Arcadia will be destroyed. |
Sins of the Past on the Precipice of the Future Choices
Who Should You Sacrifice to Pilot the Ship?
You may have up to five sacrifice candidates, depending on prior decisions, completed side quests and companion quests, and your Speech skill.
Choose to sacrifice yourself, de Vries, a companion, the Consul, or nobody. Each choice significantly impacts the following ending slides.
Sins of the Past on the Precipice of the Future Rewards
No New Game Plus
Despite finishing the game, Outer Worlds 2 doesn't feature a new game plus, and reloading will only take you back to your most recent save just before picking who to sacrifice to save Arcadia.
Sins of the Past on the Precipice of the Future Info
| Sins of the Past on the Precipice of the Future Info | |||||
|---|---|---|---|---|---|
| Type | Main Quest | ||||
| Location | The Incognito | ||||
| How to Start | |||||
| Obtained after finishing both An Instrument to Unfold Space & Time and A Complication with the Computronic Cerebrum. | |||||
The Outer Worlds 2 Related Guides
All Main Quests
| # | Main Quests |
|---|---|
| 1 | A Cause Worth Killing For |
| 2 | Recalling the Score |
| 3 | The Saboteur of Paradise |
| 4 | On the Trail of the Traitor ┗ Discrete Mathematics |
| 5 | Fiends in High Places |
| 6 | An Instrument to Unfold Space & Time |
| 7 | A Complication with the Computronic Cerebrum |
| 8 | Sins of the Past on the Precipice of the Future |
Author

Sins of the Past on the Precipice of the Future Walkthrough
Please participate in our site
improvement survey
04/2026
improvement survey
04/2026
Would you assist in
improving Game8's site?
improving Game8's site?

×
We are listening to our users' valuable opinions and discussing how to act on them.
The information collected through this survey will be used for the purpose of improving our services. In addition, the information will only be disclosed a part of a statistic in a format that will not allow identification of personal information.
Begin Survey
Not Now
×
Please rate each item regarding Game8.co's Advertisements.
Amount of Ads
Very Dissatisfied
Somewhat Dissatisfied
Fine
Somewhat Satisfied
Highly Satisfied
Placement of Ads
Timing of Ad Display
Ad Loading Speed
Safeness of Ads
Content of Ads
×
Please rate each item regarding Game8.co's Quality of Articles.
Amount of information
Very Dissatisfied
Somewhat Dissatisfied
Fine
Somewhat Satisfied
Highly Satisfied
Frequency of updates
Speed of new information
Accuracy of articles
Understandibility of articles
Readability of sentences
×
Please rate each item regarding Game8.co's Usability of the Site.
Ease of finding information
Very Dissatisfied
Somewhat Dissatisfied
Fine
Somewhat Satisfied
Highly Satisfied
Loading Speed
Use of Color
Font Size
Visibility of Images
Easy to Understand Layout
×
Please rate each item regarding Game8.co's Message Boards, Comments.
Ease of Writing
Very Dissatisfied
Somewhat Dissatisfied
Fine
Somewhat Satisfied
Highly Satisfied
Readability
Ease in Finding Information
Comment Quality
Comment Quantity
Admin Response
×
Please rate each item regarding Game8.co's Site's new design.
Please rate our site's new design
Very Dissatisfied
Somewhat Dissatisfied
Fine
Somewhat Satisfied
Highly Satisfied
Do you think that the website's design change makes the site easier to use?
Has the new design made it easier for you to find information on the site?
Has the new design improved the overall visual appeal of the site?
How would you rate your overall satisfaction with the new design of the site?
×
How likely are you to recommend Game8 to someone you know?
Very Unlikely
0
1
2
3
4
5
6
7
8
9
10
Very Likely
If you have other opinions regarding potential improvement to the website, please share them with us. We would appreciate your honest opinion.
Note: This is a free response section, so you can proceed without entering anything.
Note: Please be sure not to enter any kind of personal information into your response.
Note: Please be sure not to enter any kind of personal information into your response.
×
Thank You
×
Thank you for participating in our survey! Your answers will help us to improve the quality of our website and services.
We hope you continue to make use of Game8.
We hope you continue to make use of Game8.
Close
Rankings
- We could not find the message board you were looking for.
Gaming News

![Forza Horizon 6 Review [Preview] | Beautiful Roads With a Whole Lot of Oversteer](https://img.game8.co/4460981/a7254c24945c43fbdf6ad9bea52b5ce9.png/show)

![Forza Horizon 6 Review [Preview] | Beautiful Roads With a Whole Lot of Oversteer](https://img.game8.co/4460981/a7254c24945c43fbdf6ad9bea52b5ce9.png/thumb)
![Borderlands Mobile Review [Playtest] | The Same Borderlands Made Easy](https://img.game8.co/4465500/aac0c880a39ec5cd46073e49d18f3ed5.png/thumb)
Popular Games

Genshin Impact Walkthrough & Guides Wiki
Crimson Desert Walkthrough & Guides Wiki
Umamusume: Pretty Derby Walkthrough & Guides Wiki
Honkai: Star Rail Walkthrough & Guides Wiki
Monster Hunter Stories 3: Twisted Reflection Walkthrough & Guides Wiki
Wuthering Waves Walkthrough & Guides Wiki
The Seven Deadly Sins: Origin Walkthrough & Guides Wiki
Pokemon TCG Pocket (PTCGP) Strategies & Guides Wiki
Pokemon Pokopia Walkthrough & Guides Wiki
Zenless Zone Zero Walkthrough & Guides Wiki


Recommended Games
Fire Emblem Heroes (FEH) Walkthrough & Guides Wiki
Pokemon Brilliant Diamond and Shining Pearl (BDSP) Walkthrough & Guides Wiki
Super Smash Bros. Ultimate Walkthrough & Guides Wiki
Diablo 4: Vessel of Hatred Walkthrough & Guides Wiki
Cyberpunk 2077: Ultimate Edition Walkthrough & Guides Wiki
Yu-Gi-Oh! Master Duel Walkthrough & Guides Wiki
Elden Ring Shadow of the Erdtree Walkthrough & Guides Wiki
Monster Hunter World Walkthrough & Guides Wiki
The Legend of Zelda: Tears of the Kingdom Walkthrough & Guides Wiki
Persona 3 Reload Walkthrough & Guides Wiki


All rights reserved
© 2025 Obsidian Entertainment, Inc. Obsidian Entertainment, the Obsidian Entertainment logo, The Outer Worlds 2, and The Outer Worlds 2 logos are trademarks or registered trademarks of Obsidian Entertainment, Inc. All rights reserved.
The copyrights of videos of games used in our content and other intellectual property rights belong to the provider of the game.
The contents we provide on this site were created personally by members of the Game8 editorial department.
We refuse the right to reuse or repost content taken without our permission such as data or images to other sites.
I was able to selection Auntie Clio to fly the ship at the end, is this something a lot has missed?