This survey will take about 1 minute.
Your answers will help us to improve our website.
Outer Worlds 2
Beginning at the Endpoint Walkthrough
Beginning at the Endpoint is a Golden Ridge side quest in the Outer Worlds 2. Read on for a full walkthrough of the quest, including info on how to unlock the quest and its rewards.
| ◀ Previous Mission | Next Mission ▶ |
|---|---|
| - | The Midpoint to the Endpoint |
List of Contents
How to Unlock Beginning at the Endpoint
Present the Writ of Investigative Inquiry at the Zyranium Manufactory
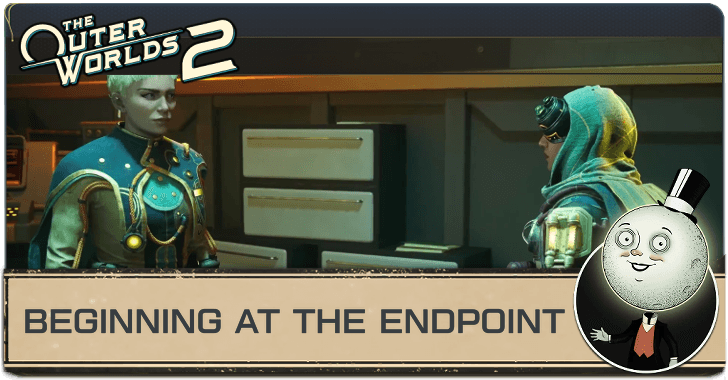
Beginning at the Endpoint is a mandatory side quest that occurs during the main quest, On the Trail of the Traitor. You can trigger this side quest by presenting the Writ of Investigative Inquiry at the gate of Zyranium Manufactory VII in Golden Ridge.
Beginning at the Endpoint Walkthrough
Click on a step to jump to its section in the walkthrough!
Acquire the Writ of Investigative Inquiry
| Step-by-step Walkthrough | |
|---|---|
| 1 | As soon as you land in Golden Ridge, head down to the Incognito hangar and select the companions that'll accompany you. Once you're ready, exit the Incognito. |
| 2 | 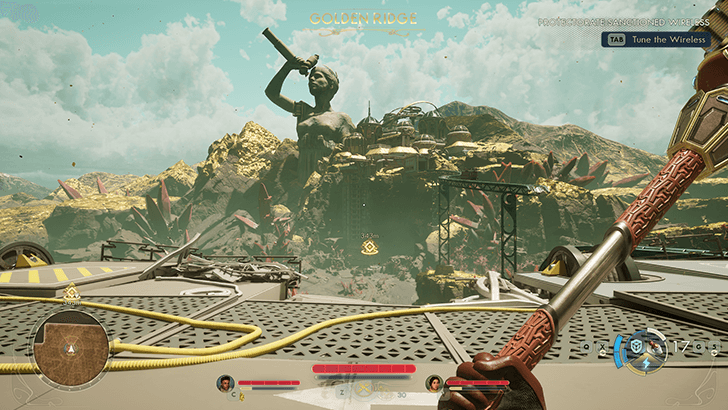 At the landing pad, you'll see Matriarch's Mercy off to the distance. Instead of going towards it, go left and follow the ruined walkway around the side of the ship to reach the back of the landing pad. |
| 3 |  From the back of the landing pad you should see the ruins of the Alexandra Station. Head inside then cross over the train tracks to reach the elevators on the other side. |
| 4 | 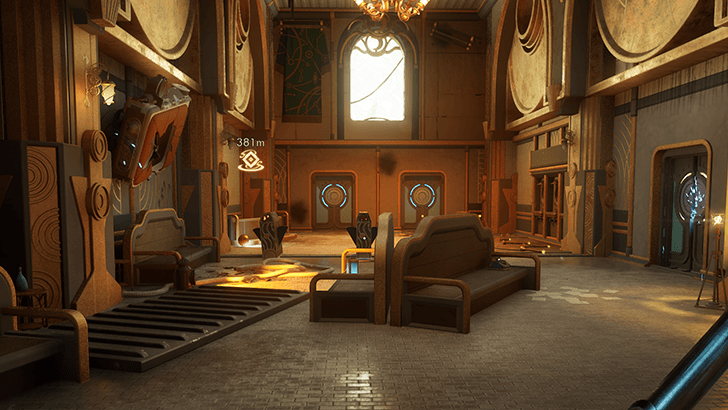 Upon reaching the ground floor, exit through the doors of the station to reach the Alexandra Station Entrance. |
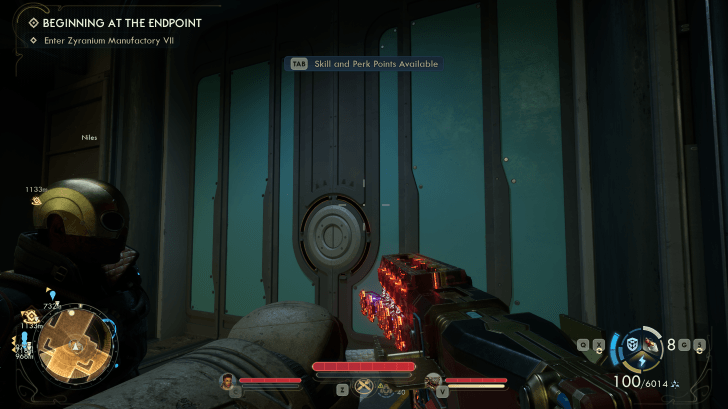
| 5 | 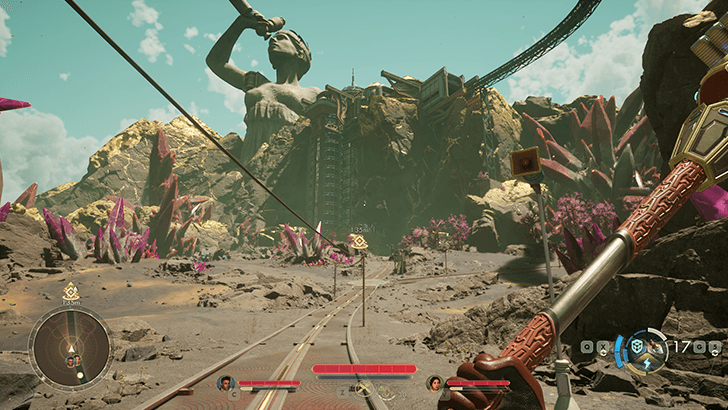 From here, simply follow the road towards the large human statue that you see off in the distance to reach Matriarch's Mercy. |
| 6 | 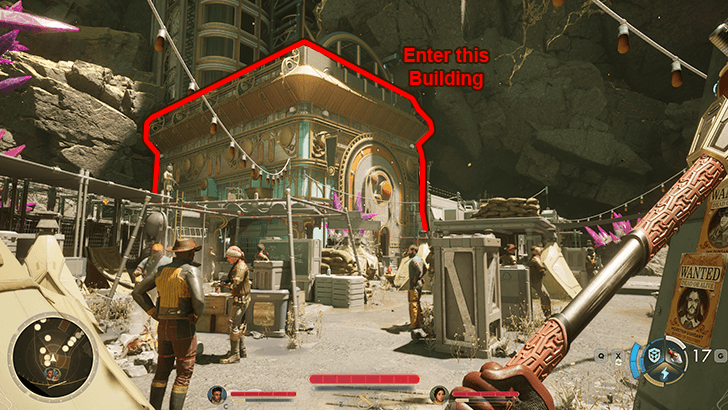 Once you arrive at Matriarch's Mercy, head over to the large building connected to an elevator. Look for Abbot Newell. |
| 7 |  Speak to Abbot Josef Newell and he will tell you about Victor. In exchange, he will ask you to investigate two places; one of them being Zyranium Manufactory VII. Note: Speaking to Abbot will also update the main quest On the Trails of the Traitor, but it is not required to finish in order to progress this side quest. |
| 8 | 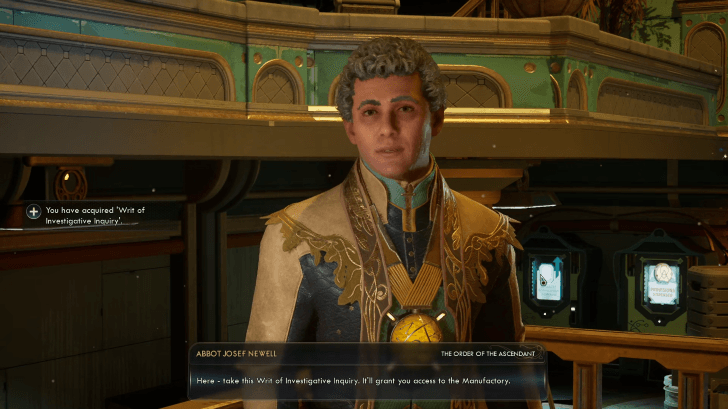 Abbot will give you the Writ of Investigative Inquiry that you can use to enter the Manufactory. Leave Matriarch's Mercy and head north east to Zyranium Factory VII. |
Investigate Zyranium Manufactory VII
| Step-by-step Walkthrough | |
|---|---|
| 1 | 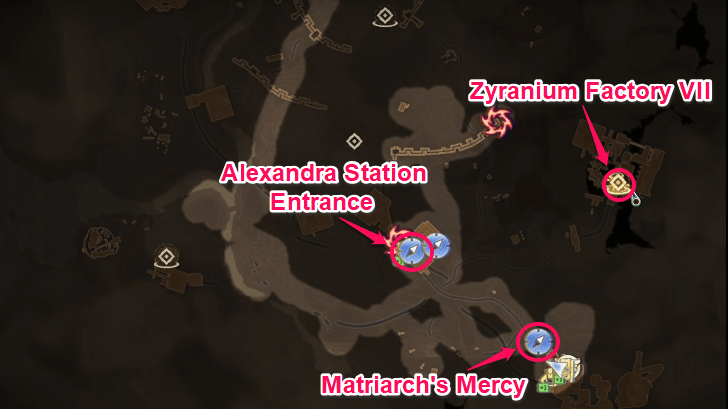 From Matriarch's Mercy, head north east to Zyranium Manufactory VII. You can also fast travel back to Alexandra Station Entrance and follow the road to Matriarch's Mercy. However, once you reach a fork, take the path to your left. Follow this road to reach Zyranium Manufactory VII. |
| 2 | 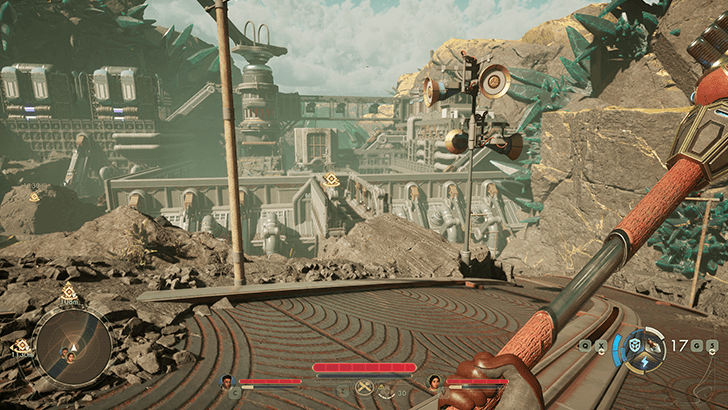 During your approach, you'll be warned away from entering. Press forward until you reach the gates of the Manufactory. |
| 3 | 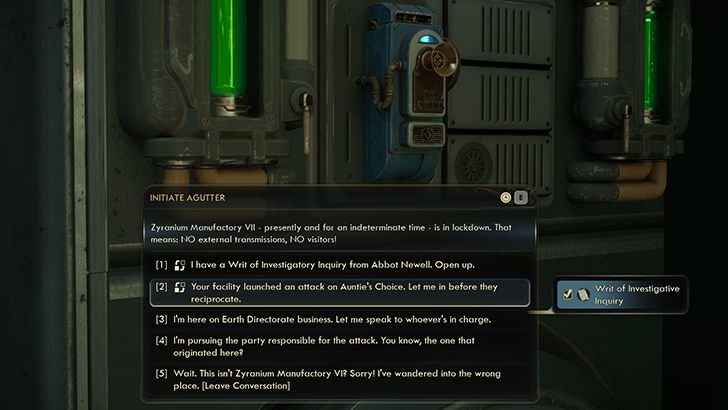 Look for the Intercom on the right side of the gate. Use it to speak to Initiate Agutter. Present your Writ of Investigate Inquiry to get them to open the door. |
| 4 | 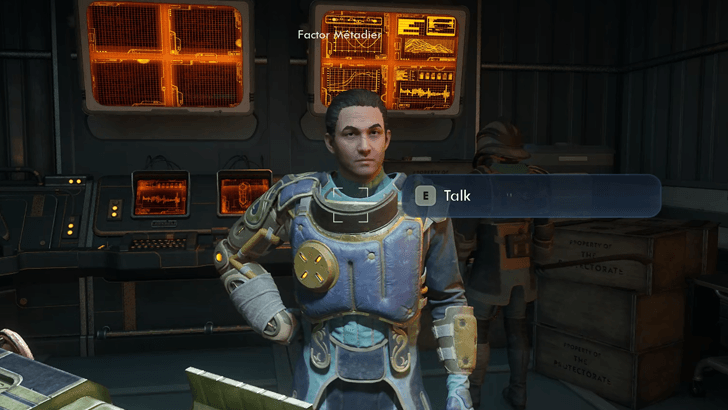 After passing through the door, head inside the small structure to your immediate left and speak to Factor Métadier. Show him the Writ of Investigate Inquiry and he'll allow you to head into Zyranium Manufactory VII. Exit the structure and go through the double doors leading to the Manufactory elevator. Use it to go down to the Manufactory floor. |
| 5 | 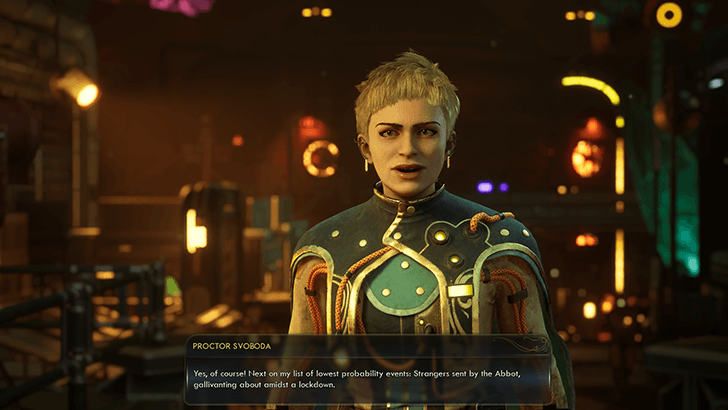 After passing through the decontamination room, head onto the main Manufactory floor and speak to Proctor Svoboda. Tell her you're here to investigate what happened without committing to blaming Initiate Alva. |
Speak to Initiate Alva in Operations
| Step-by-step Walkthrough | |
|---|---|
| 1 | 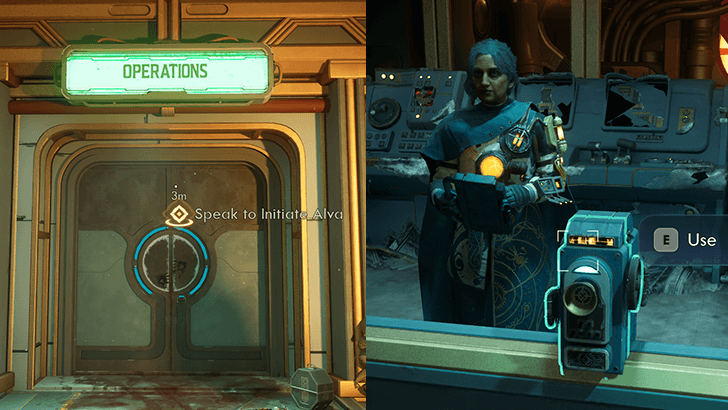 Once Svoboda lets you go, head towards the Operations building. Inside, go over to the large glass window with an intercom and speak to Initiate Alva. Tell her you're here to investigate and she'll cooperate with you by unlocking the Records Repository nearby. Note: You can examine the bodies of the dead Order troops using Observation 5 or Medical 5 but this isn't required to complete the quest. |
| 2 | 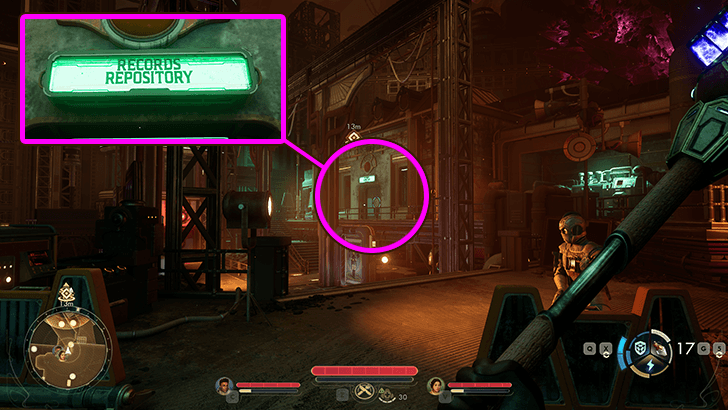 When ready, head over to the Records Repository. |
| 3 | 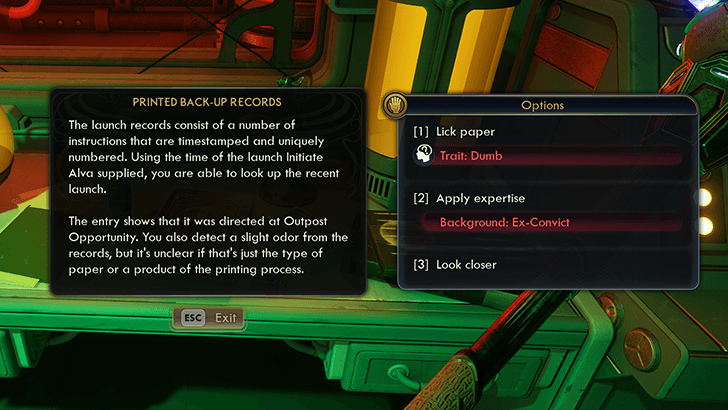 On one of the tables, you'll find the Printed Back-Up Records. Examine it to learn more about what happened. You can choose 1 of 3 options to examine it: ① Lick Paper (Trait: Dumb) ② Apply expertise (Background: Ex-Convict) ③ Look closer There will be multiple checks like this during this quest. However, you won't really lose out if you always choose the Look closer option for all of them. |
| 4 | 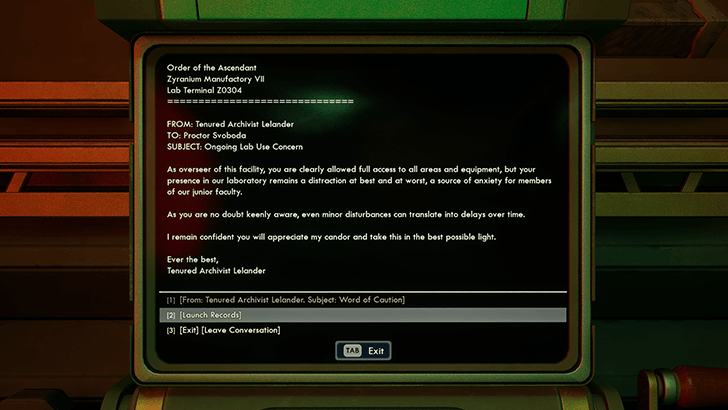 After examining the records, head over to the Terminal and read all the memos stored on it. |
| 5 | 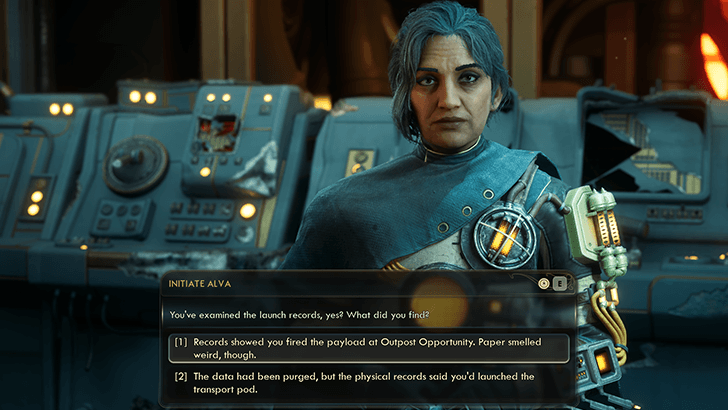 Return to Initiate Ava in Operations to find her talking to Factor Métadier. Report your findings back to both of them and they'll agree that something is fishy. This triggers your next set of objectives. Métadier will tell you to investigate Central Processing while Ava will direct you towards Refinement Logistics to investigate the zyranium leak. |
Investigate Central Processing
| Step-by-step Walkthrough | |
|---|---|
| 1 | 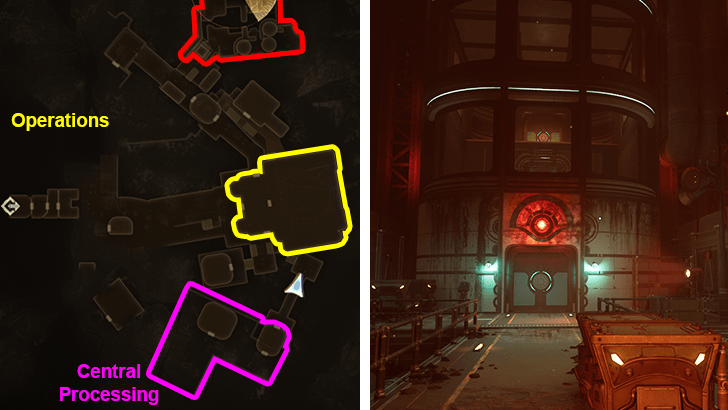 To start, head over to Central Processing first. Take the elevator up to reach it. |
| 2 |  At the top, you'll be met by multiple Webweavers. Kill all of them to clear the area. |
| 3 |  Next, head over to the structure with the jammed door. Speak to Archivist Conkling and he'll offer to answer your questions as long as you get him out. |
| 4 | 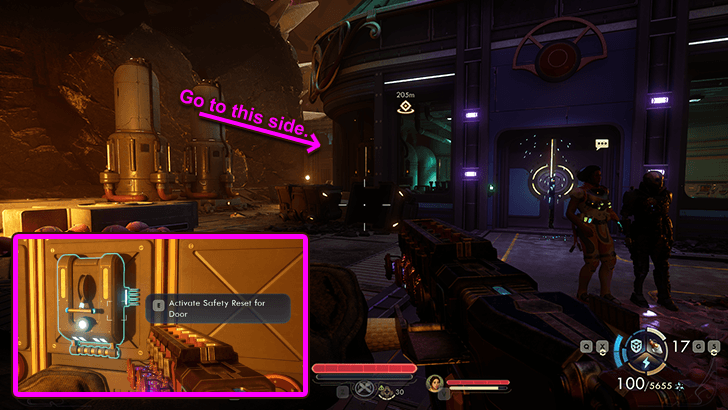 If you have Trait: Brawny or Engineering 3, you can unjam the door right then and there. If you have neither, head over to the left side of the building. Flip the switch here to override the door. |
| 5 | 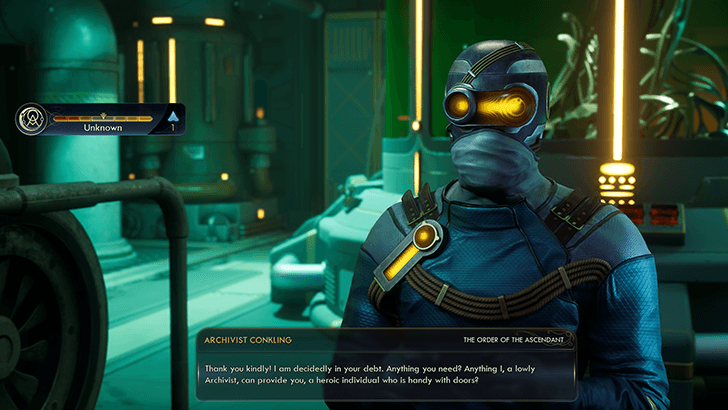 Once the door is open, speak to Archivist Conkling and ask him about the incidents leading up to the launch of the Zyranium bomb. |
| 6 | 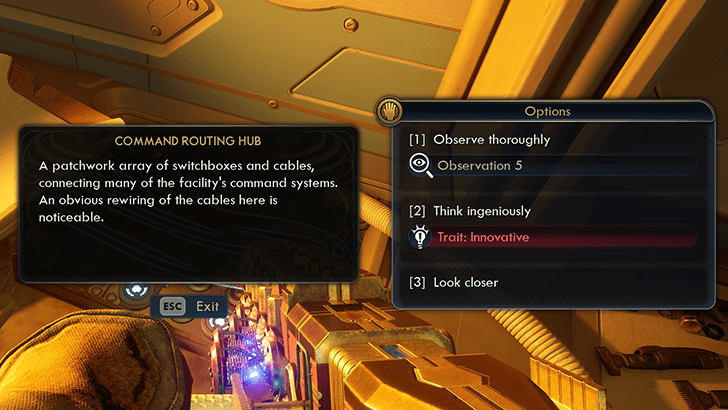 Next, head over to the back of the room and look for a broken floor panel with exposed wiring. Examine this Command Routing Hub to learn more about what happened. Again, you can use Observation 5 or Trait: Innovative to get more info, but Look closer works just as well. |
| 7 | With more info secured, head back out towards the elevator. You'll get ambushed by more Webweavers in transit, so deal with them before taking the elevator back down to the operations floor. |
Investigate Refinement Logistics
| Step-by-step Walkthrough | |
|---|---|
| 1 | 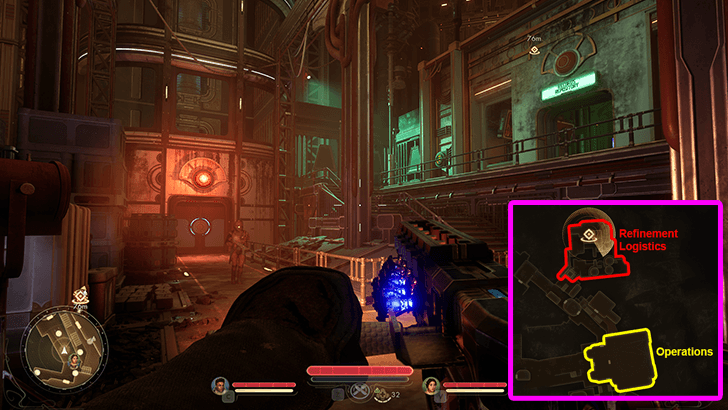 Next, head over to the opposite end of the manufactory and use the elevator there to reach Refinement Logistics. |
| 2 | 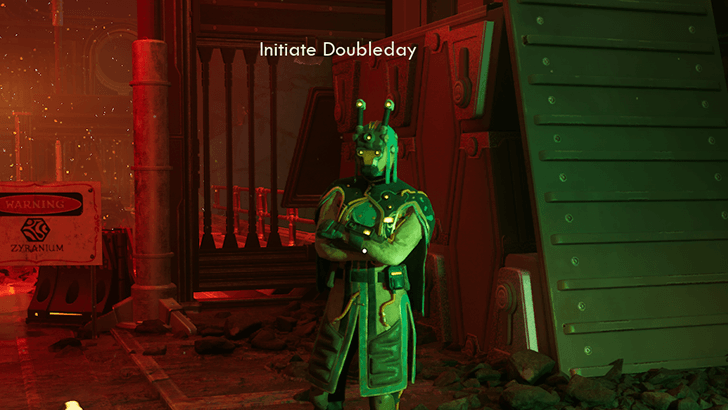 Once you arrive at the site of Zyranium gas leak, speak to Initiate Doubleday. Strike a deal so that you get the High Security Access Card as a reward for stopping the Zyranium leak. |
| 3 | When ready, head up the stairs and platform your way over to the Refinement Logistics control room. |
| 4 | 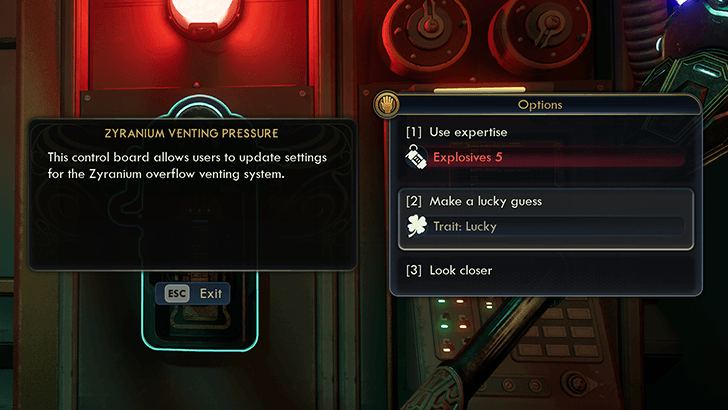 Before venting the zyranium, examine a nearby wall panel to learn what happened in the moments leading up to the disaster. Similarly, you can use Explosives 5 or Trait: Lucky to learn more about the overflow, but Look closer works just fine. |
| 5 | 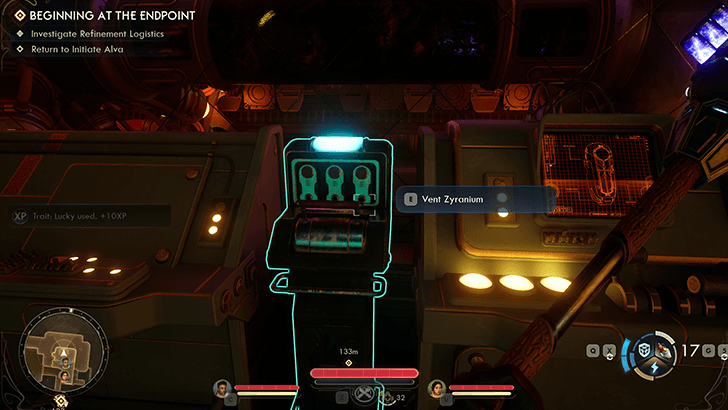 Finish up your investigation before flipping the nearby switch to vent the Zyranium. |
| 6 | 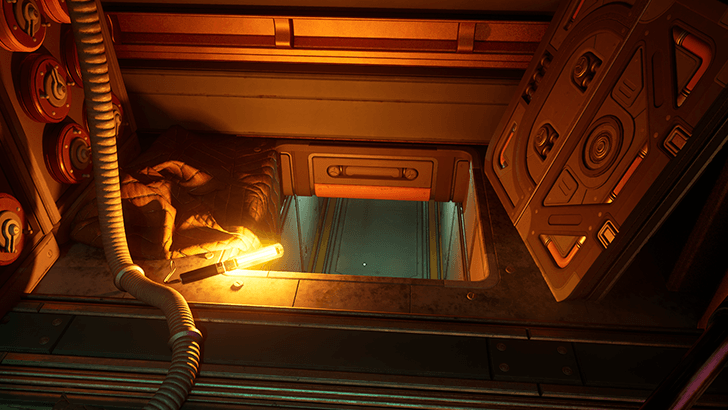 Exit through the nearby floor vent. |
| 7 | 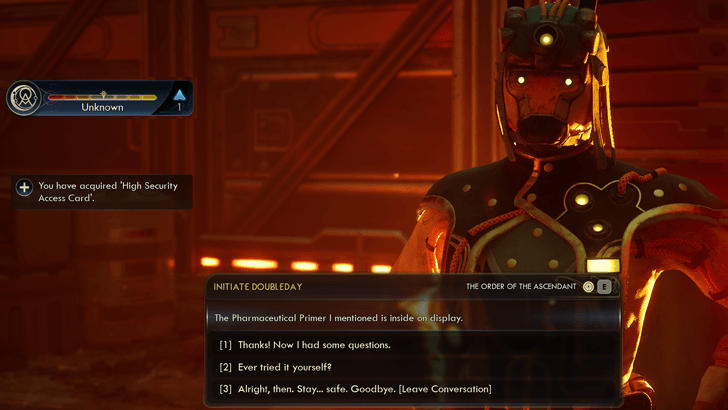 As soon as you emerge from the vents, make your way back to Initiate Doubleday to receive the High Security Access Card and +1 Order Rep. Go back to Initiate Alva in Operations to initiate the end of the quest. |
Return to Initiate Alva and Confront Proctor Svoboda
| Step-by-step Walkthrough | |
|---|---|
| 1 | Once you go back to Initiate Alva, do not speak with her yet. Instead, pick up the Essence of Vigor Kilo in the Evaluational Dithering building. From Initiate Alva's room, head out of Operations using the door on the left. Once outside, turn right into the Evaluation Dithering building. Unlock the large door with the High Security Access Card and The Essence of Vigor Kilo will be on the table near the window. |
| 2 | 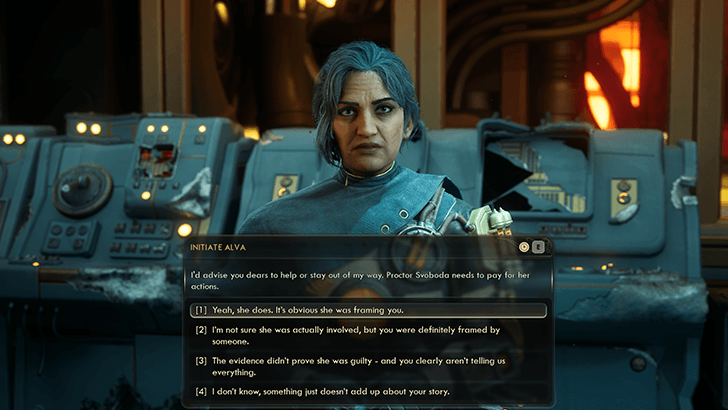 Speak to Initiate Ava and present your evidence after which she'll reveal that she was, in fact, Marisol all along. She concludes that Svoboda was the culprit and you can either side with her or side with Svoboda. WARNING: While valid, you do not get any benefits for siding with Svoboda. It's better for everyone that you side with Marisol. |
| 2 | 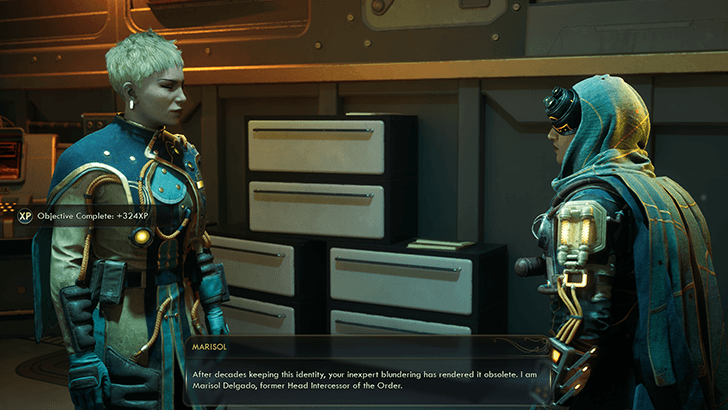 After confirming that you agree with Marisol, you'll immediately be teleported to Svoboda's Office where Marisol executes her. In doing so, you gain access to her Terminal. |
| 3 | 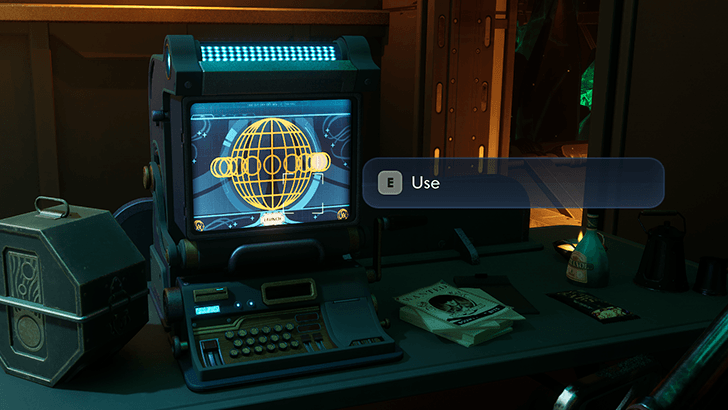 Use the deceased Svoboda's terminal to unlock the way to the Toxic Effluvium Repository. Make sure to read everything on the terminal as well to get an optional objective related to Abbot Newell and Seer Wiley. |
| 4 | 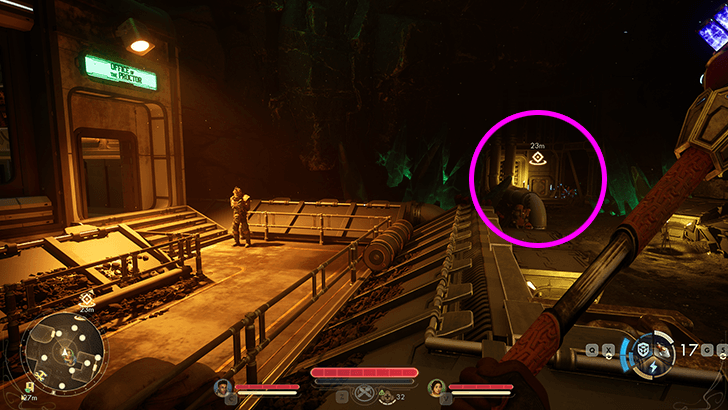 Exit the Proctor's Office then head over to the nearby vent. Go through it to reach the Toxic Effluvium Repository. |
| 5 |  From here, enter through the double doors to find the terminal detailing the correspondence between Svoboda and De Vries. Finding the terminal concludes the side quest, Beginning at the Endpoint. This room will also have a special weapon called the Zyranium Ray. Make sure to pick it up before leaving. |
| 6 |  Once you exit the terminal interface, Marisol will confront you. Let her tag along or join your crew to unlock her as a companion. |
| 7 | 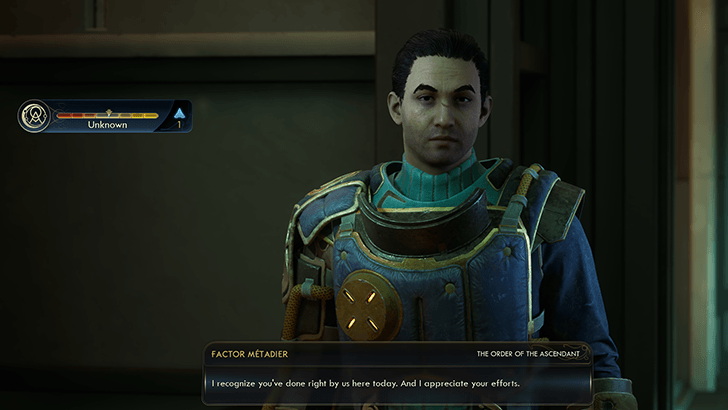 Exit the Toxic Effluvium Repository then start making your way back up to the surface. Factor Métadier will speak to you before the elevator to reward you with +1 Order rep before you leave. |
Beginning at the Endpoint Choices
Side with Marisol or Svoboda
| Choice | Result |
|---|---|
| Side with Marisol | Marisol executes Proctor Svoboda. Allows you to recruit Marisol. You gain access to Svoboda's Terminal which contains dirt on Abbot Newell (used during On the Trail of the Traitor). |
| Side with Svoboda | Marisol will turn hostile. You'll have to kill her but the guards will be your allies. Marisol can no longer be recruited. Marisol drops a Cloak Driver helmet mod. Svoboda's terminal will be inaccessible, locking you out of getting info on Abbot Newell's secret. |
After investigating Central Processing and Refinement Logistics, you'll have to report your findings to Initiate Alva (who then reveals that she is Marisol). Here, you'll have to choose between accusing Marisol or accusing Svoboda.
We recommend siding with Marisol since it allows you to recruit her while also granting you to access Svoboda's terminal (after Marisol executes her). In the terminal, you'll find info on Abbot Newell's secret - info that you need if you don't want to kill the final boss of On the Trail of the Traitor.
Recruit Marisol
| Choice | Result |
|---|---|
| Agree to Marisol's Proposal | Marisol can be recruited as a companion. |
| Deny Marisol's Proposal | Marisol will say her farewells and she will not be available as a companion. |
After siding with Marisol and checking the terminal in the Toxic Effluvium Repository, she'll speak to you and propose a strategic partnership. Accept and she becomes one of your companions. Deny her request and she will no longer be recruitable.
Beginning at the Endpoint Rewards
| Quest Completion Rewards | |
|---|---|
|
・2484 XP ・Zyranium Ray (Optional) ・Essence of Vigor Kilo (Optional) |
After choosing to side with either Marisol or Proctor Svaboda, the Zyranium Ray can be looted on the table inside the Toxic Effluvium Repository.
An Essence of Vigor Kilo can also be found inside Evaluational Dithering. Unlock the double doors using the High Security Access card given as a reward for cleaning the Zyranium leak in Refinement Logistics.
Beginning at the Endpoint Info
| Beginning at the Endpoint Info | |||||
|---|---|---|---|---|---|
| Type | Side Quest | ||||
| Location | Zyranium Manufactory VII, Golden Ridge | ||||
| Quest Giver | Factor Métadier | ||||
| How to Start | |||||
| Investigate Zyranium Manufactory VII and learn about the perpetrator of the attack at Outpost Opportunity. | |||||
Outer Worlds 2 Related Guides
All Quests by Location
| Quest Guides by Location | ||
|---|---|---|
| Paradise Island | Golden Ridge | Free Market Station |
| Praetor | Cloister | Undisputed Claim |
All Side Quest Guides
Comment
Author

Beginning at the Endpoint Walkthrough
Please participate in our site
improvement survey
04/2026
improvement survey
04/2026
Would you assist in
improving Game8's site?
improving Game8's site?

×
We are listening to our users' valuable opinions and discussing how to act on them.
The information collected through this survey will be used for the purpose of improving our services. In addition, the information will only be disclosed a part of a statistic in a format that will not allow identification of personal information.
Begin Survey
Not Now
×
Please rate each item regarding Game8.co's Advertisements.
Amount of Ads
Very Dissatisfied
Somewhat Dissatisfied
Fine
Somewhat Satisfied
Highly Satisfied
Placement of Ads
Timing of Ad Display
Ad Loading Speed
Safeness of Ads
Content of Ads
×
Please rate each item regarding Game8.co's Quality of Articles.
Amount of information
Very Dissatisfied
Somewhat Dissatisfied
Fine
Somewhat Satisfied
Highly Satisfied
Frequency of updates
Speed of new information
Accuracy of articles
Understandibility of articles
Readability of sentences
×
Please rate each item regarding Game8.co's Usability of the Site.
Ease of finding information
Very Dissatisfied
Somewhat Dissatisfied
Fine
Somewhat Satisfied
Highly Satisfied
Loading Speed
Use of Color
Font Size
Visibility of Images
Easy to Understand Layout
×
Please rate each item regarding Game8.co's Message Boards, Comments.
Ease of Writing
Very Dissatisfied
Somewhat Dissatisfied
Fine
Somewhat Satisfied
Highly Satisfied
Readability
Ease in Finding Information
Comment Quality
Comment Quantity
Admin Response
×
Please rate each item regarding Game8.co's Site's new design.
Please rate our site's new design
Very Dissatisfied
Somewhat Dissatisfied
Fine
Somewhat Satisfied
Highly Satisfied
Do you think that the website's design change makes the site easier to use?
Has the new design made it easier for you to find information on the site?
Has the new design improved the overall visual appeal of the site?
How would you rate your overall satisfaction with the new design of the site?
×
How likely are you to recommend Game8 to someone you know?
Very Unlikely
0
1
2
3
4
5
6
7
8
9
10
Very Likely
If you have other opinions regarding potential improvement to the website, please share them with us. We would appreciate your honest opinion.
Note: This is a free response section, so you can proceed without entering anything.
Note: Please be sure not to enter any kind of personal information into your response.
Note: Please be sure not to enter any kind of personal information into your response.
×
Thank You
×
Thank you for participating in our survey! Your answers will help us to improve the quality of our website and services.
We hope you continue to make use of Game8.
We hope you continue to make use of Game8.
Close
Rankings
- We could not find the message board you were looking for.
Gaming News

![Forza Horizon 6 Review [Preview] | Beautiful Roads With a Whole Lot of Oversteer](https://img.game8.co/4460981/a7254c24945c43fbdf6ad9bea52b5ce9.png/show)

![Forza Horizon 6 Review [Preview] | Beautiful Roads With a Whole Lot of Oversteer](https://img.game8.co/4460981/a7254c24945c43fbdf6ad9bea52b5ce9.png/thumb)
![Borderlands Mobile Review [Playtest] | The Same Borderlands Made Easy](https://img.game8.co/4465500/aac0c880a39ec5cd46073e49d18f3ed5.png/thumb)
Popular Games

Genshin Impact Walkthrough & Guides Wiki
Crimson Desert Walkthrough & Guides Wiki
Umamusume: Pretty Derby Walkthrough & Guides Wiki
Honkai: Star Rail Walkthrough & Guides Wiki
Monster Hunter Stories 3: Twisted Reflection Walkthrough & Guides Wiki
Wuthering Waves Walkthrough & Guides Wiki
The Seven Deadly Sins: Origin Walkthrough & Guides Wiki
Pokemon TCG Pocket (PTCGP) Strategies & Guides Wiki
Pokemon Pokopia Walkthrough & Guides Wiki
Zenless Zone Zero Walkthrough & Guides Wiki


Recommended Games
Fire Emblem Heroes (FEH) Walkthrough & Guides Wiki
Pokemon Brilliant Diamond and Shining Pearl (BDSP) Walkthrough & Guides Wiki
Super Smash Bros. Ultimate Walkthrough & Guides Wiki
Diablo 4: Vessel of Hatred Walkthrough & Guides Wiki
Cyberpunk 2077: Ultimate Edition Walkthrough & Guides Wiki
Yu-Gi-Oh! Master Duel Walkthrough & Guides Wiki
Elden Ring Shadow of the Erdtree Walkthrough & Guides Wiki
Monster Hunter World Walkthrough & Guides Wiki
The Legend of Zelda: Tears of the Kingdom Walkthrough & Guides Wiki
Persona 3 Reload Walkthrough & Guides Wiki


All rights reserved
© 2025 Obsidian Entertainment, Inc. Obsidian Entertainment, the Obsidian Entertainment logo, The Outer Worlds 2, and The Outer Worlds 2 logos are trademarks or registered trademarks of Obsidian Entertainment, Inc. All rights reserved.
The copyrights of videos of games used in our content and other intellectual property rights belong to the provider of the game.
The contents we provide on this site were created personally by members of the Game8 editorial department.
We refuse the right to reuse or repost content taken without our permission such as data or images to other sites.