Best Flaws Tier List
✧ Best Builds: Science | Stealth | Gunslinger
✦ Best Background | Best Traits | Best Skills
✧ Missables and Points of No Return
✦ Best Weapons | Best Armor
✧ Unique Weapons | Unique Armor
✦ Best Flaws | Best Perks
The best Flaw you can get in Outer Worlds 2 is the Foot-in-Mouth Syndrome. Read on to see the best flaws and their effects, as well as a tier list for all of the flaws!
| Flaws-Related Pages | |
|---|---|
| List of All Flaws | Best Flaws |
List of Contents
Best Flaws Tier List
Foot-In-Mouth Syndrome is the Best Flaw
The Foot-in-Mouth Syndrome is the best Flaw in the game thanks to the increased EXP gain that you get from all sources. Its only downside is that it forces you to use one dialogue option if you take too long in picking. However, as you have a 15 second window to select a dialogue option, this downside is basically negligible.
If you prefer to ponder over your choices, you can pause the game during the conversation to give yourself time to think. Although the visual timer will appear to run out if you do this, you will still have however much time you had before the pause to make a decision.
Tier List Explanation
| Jump to a Tier | |||
|---|---|---|---|
S-Tier Skills
Foot-in-Mouth Syndrome
| Positive Effect | Negative Effect |
|---|---|
| +15% Experience Earned | Conversation options are now randomly chosen for you if you take too long to decide. |
Foot-in-Mouth Syndrome is the best Flaw in the game because of the +15% Experience that you get from all sources. Although it randomly chooses a dialogue option if you take too long, you have around 15 seconds to decide, which is long enough for most decisions.
How to Get Foot-in-Mouth Syndrome Flaw
Anger Mismanagement
| Positive Effect | Negative Effect |
|---|---|
| +25% Power Attack Damage | +50% Damage Received While Blocking |
Angert Mismanagement is a powerful melee build Flaw as it increases your Power Attack damage at the expense of decreased block effectiveness. This Flaw is great when using Heavy Melee weapons, or for empowering your melee Stealth Attacks.
How to Get Anger Mismanagement Flaw
Drug Addiction
| Positive Effect | Negative Effect |
|---|---|
| -40% Toxicity received from the Medical Inhaler | -20% Health restored by the Medical Inhaler |
Drug Addiction is a great Flaw for Medical Inhaler builds as it reduces your Toxicity buildup at the expense of decreased Health restoration. When partnered with Teetotaler, you will be able to negate the reduced Health restoration, while also getting a small boost to healing strength.
How to Get Drug Addiction Flaw
Teetotaler
| Positive Effect | Negative Effect |
|---|---|
| +25% Health restored by the Medical Inhaler | +25% Toxicity received from the Medical Inhaler |
Drug Addiction is a great Flaw for Medical Inhaler builds since it increases the Health you restore from inhalers, although you do get increased Toxicity with each use. If you combine it with Drug Addiction, you will be able to negate the increased Toxicity, while still getting some decrease in Toxicity.
Treacherous
| Positive Effect | Negative Effect |
|---|---|
| +50% Enemy Awareness Depletion Rate & +100% Sneak Attack Damage | -25% Base Health |
Treacherous is the best Flaw for stealth builds thanks to its increased Sneak Attack Damage and Enemy Awareness Depletion Rate. Although it reduces your Base Health, this shouldn't matter much for stealth builds.
A-Tier Skills
Bad Knees
| Positive Effect | Negative Effect |
|---|---|
| +50% Crouch Speed | Crouching emits a 10m radius sound that hostiles can hear and investigate |
Bad Knees increases your Crouch Speed, making it perfect for stealth or moving around while crouched. Its downside is that you emit a sound when you crouch, which will attract the attention of nearby enemies. As such, you will need to be more conscious of when and where you are crouching.
Easily Distracted
| Positive Effect | Negative Effect |
|---|---|
| +1 Skill Points gained per Level | When leveling, you can only add skill points into your lowest non-zero Skill or any Skill you have no points in already. |
Easily Distracted is a Flaw that rewards you with one additional Skill Point whenever you level up, allowing you to level skills faster. You are, however, forced to only level your lowest non-zero Skill, leading to a balanced build.
You can also choose to level a new skill if you want, but you will be forced to level it until it reaches the same level as your other skills.
How to Get Easily Distracted Flaw
Hermit
| Positive Effect | Negative Effect |
|---|---|
| +25% chance to double items on Breakdown | +50% Vendor Prices |
Hermit is a great Flaw for crafters, as it gives a chance to double items on Breakdown at the cost of increased Vendor Prices. This Flaw pushes you to craft your own items, be it ammo, mods, or even consumables.
Overprepared
| Positive Effect | Negative Effect |
|---|---|
| +50% Magazine Size | -40% Damage for 8s after a weapon's magazine hits empty. |
Overprepared is a great Flaw for builds that use guns, as they will get +50% Magazine Size which stacks with your Perks. You do, however, get a -40% Damage Debuff whenever you empty your magazine. Make sure to always reload your weapons early to avoid this Flaw's negative effect.
Easily Startled
| Positive Effect | Negative Effect |
|---|---|
| -25% Footsteps Volume & -25% NPC Awareness Detection Rate | Your Damage Resistance and Evasion are ignored for 8s when caught by an investigating enemy. |
Easily Started is a great Flaw for stealth builds since it reduces your Footstep Volume and NPC Awareness Detection Rate. The downside is that getting detected will negate your Damage Resistance and Evasion, making you take a lot of damage for the duration.
How to Get Easily Startled Flaw
Technophobia
| Positive Effect | Negative Effect |
|---|---|
| +20% Damage to Automechanicals | +20% Damage Taken From Automechanicals |
Technophobia lets you deal more damage to Automechanicals at the cost of taking more damage from them. This is a good Flaw to have as Automechanicals are usually concentrated in certain locations, allowing you to avoid them for most of your exploration.
B-Tier Skills
Dependent
| Positive Effect | Negative Effect |
|---|---|
| +25% Damage to enemies recently damaged by a companion. | -10% Damage |
This flaw is good thanks to the increase in damage against enemies that are recently damaged by a companion. Partnered with a gun that has a Tracing Unit, you will be able to enjoy its effects in most fights.
You will, however, deal -10% Damage against enemies your companions have not attacked, making this Flaw detrimental to stealth builds. You are also forced to attack the same target, as failure to do so will also decrease your damage.
Energy Hog
| Positive Effect | Negative Effect |
|---|---|
| +50 Gadget Energy Meter Max | -25% Energy Recharge Rate |
Energy Hog increases your Gadget Energy Meter Max at the cost of decreased Energy Recharge Rate. While this is great for builds that can provide you with increased Energy Recharge Rate, it is basically useless for builds that don't rely on Gadgets.
Gluttony
| Positive Effect | Negative Effect |
|---|---|
| +15% healing from Food and Drink | -10% Combat Movement Speed |
Gluttony increases the healing from Food and Drink, making it great for out-of-combat recovery. You will, however, get decreased Combat Movement Speed, making it easier for enemies to hit you with their attacks.
N-Radiated
| Positive Effect | Negative Effect |
|---|---|
| Camouflaged: Invisible to enemies and deal bonus damage. Cooldown: 30s. | Whenever you take damage, there is a 5% chance you become Camouflaged automatically, but take an additional 5% of your max health as N-Ray damage. |
N-Radiated gives a small chance to become Camouflaged whenever you take damage, making you invisible for the duration, while also dealing more damage. You will, however, take additional damage that scales with max health whenever the effect activates. This Flaw can kill you as easily as it can save you from danger.
Profligate Spender
| Positive Effect | Negative Effect |
|---|---|
| Earn 25% of stored bits on level up as interest. Earn an additional 25% interest every 5 levels. At level 30, receive 150% of your total stored bits. | 75% of all bits received are stored by VALERIE until level 30. |
Profligate Spender is an investment Flaw, with the payoff happening once you reach level 30. Before level 30, 75% of your bits will be stored by Valerie, decreasing the amount of Bits you get while exploring.
You will, however, get 25% of the stored Bits as interest whenever you level up, with an additional 25% every five levels. Once you reach level 30, you will receive 150% of the stored bits. If you plan to get this Flaw, make sure to get it as early as possible.
How to Get Profligate Spender Flaw
C-Tier Skills
Consumerism
| Positive Effect | Negative Effect |
|---|---|
| -15% Vendor Prices | -10% Sell Value at Vendors |
Consumerism decreases Vendor Prices, be it from Vending Machines or actual Vendors, and decreases Sell Value when you try to sell to vendors.
Although this is a good Flaw, it is locked behind the game's Premium Edition, which means you need to spend real money to get this Flaw.
Dangerously Curious
| Positive Effect | Negative Effect |
|---|---|
| +100% Experience from Hacking | +1 Bypass Shunts Required to Hack |
Dangerously Curious doubles your Hacking EXP, while also increasing your Bypass Shunt cost when hacking. While the Experience increase is big, it's not too game-changing as you will only be hacking now and then.
How to Get Dangerously Curious Flaw
Flawed
| Positive Effect | Negative Effect |
|---|---|
| If Flaws are accepted, gain a perk point every 5 levels, this bonus is retroactive. | Flaws that appear must be accepted. |
Flawed rewards you with a perk point every 5 levels, allowing you to get an additional 6 flaws in total. Getting Flawed will, however, force you to get every Flaw you encounter.
This Flaw greatly changes your gameplay, so only get it once you are more familiar with the game.
Kleptomania
| Positive Effect | Negative Effect |
|---|---|
| +100% Vendor Price for Buying Items | Occasional automatic stealing, may cause instant detection or fights against high-level targets |
Kleptomania occasionally forces you to steal items. This can have a variety of effects, ranging from an increase in bounty to high-level targets becoming hostile.
Kleptomania greatly changes your gameplay, so only get it once you are more familiar with the game.
Snobbish
| Positive Effect | Negative Effect |
|---|---|
| +20% Vendor buying price for crafting materials | You can no longer breakdown your items. |
Snobbish is a good flaw for making money, as you will get more money from selling crafting materials that you find. The downside is that you can no longer break down your items. This not only makes it harder to craft, but also makes it so you actually need to look for junk if you want to make money.
Sungazer
| Positive Effect | Negative Effect |
|---|---|
| Continually heal while outside during the day up to 50% health. | Permanent damage to your vision and +100% Ranged Weapon Spread |
Sungazer allows you to continuously heal up to 50% health while you are outside during the day, allowing you to save on Medical Inhaler charges. It will, however, increase your Ranged Weapon Spread, as well as permanently damage your character's vision.
We do not recommend this Flaw at all because of the permanent vision damage.
Bibliomania
| Positive Effect | Negative Effect |
|---|---|
| +20% Max Health | -30% Base Health for 2 minutes after talking to anyone. |
Bibliomania increases your Max Health by a sizeable amount. The downside is that, whenever you talk to anyone, your Base Health will temporarily decrease. As you will be talking to people a lot in the game, especially before difficult boss fights, we advise against picking this Flaw.
Outer Worlds 2 Related Guides

Recommended Guides
The Outer Worlds 2 Guides
 Main Quests
 Side Quests
 Collectible Quests
 Tasks
Tasks Companion Quests
 Companions
 Puzzles
 Choices
 Weapons
 Mods
Mods Armor
Armor Helmets
 Builds
 Resources
 Gadgets
 Inhalers
 Skills
 Perks
Perks Traits
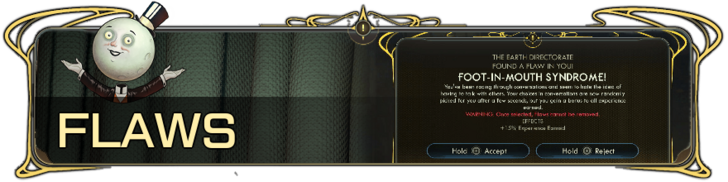 Flaws
Flaws Maps
Maps Tips and Tricks
 Factions
 Faction Quests
 Items
Items Ship Pets
 Trophies
 News and Game Info
Comment
Author

Best Flaws Tier List
Rankings
- We could not find the message board you were looking for.
Gaming News


![Monster Hunter Stories 3 Review [First Impressions] | Simply Rejuvenating](https://img.game8.co/4438641/2a31b7702bd70e78ec8efd24661dacda.jpeg/thumb)
![The Seven Deadly Sins: Origin [First Impressions] | A Promising Start](https://img.game8.co/4440581/584e0bfb87908f12c4eab6e846eb1afd.png/thumb)

Popular Games

Genshin Impact Walkthrough & Guides Wiki
Umamusume: Pretty Derby Walkthrough & Guides Wiki
Pokemon Pokopia Walkthrough & Guides Wiki
Honkai: Star Rail Walkthrough & Guides Wiki
Monster Hunter Stories 3: Twisted Reflection Walkthrough & Guides Wiki
Arknights: Endfield Walkthrough & Guides Wiki
Wuthering Waves Walkthrough & Guides Wiki
Zenless Zone Zero Walkthrough & Guides Wiki
Pokemon TCG Pocket (PTCGP) Strategies & Guides Wiki
Monster Hunter Wilds Walkthrough & Guides Wiki


Recommended Games
Diablo 4: Vessel of Hatred Walkthrough & Guides Wiki
Cyberpunk 2077: Ultimate Edition Walkthrough & Guides Wiki
Fire Emblem Heroes (FEH) Walkthrough & Guides Wiki
Yu-Gi-Oh! Master Duel Walkthrough & Guides Wiki
Super Smash Bros. Ultimate Walkthrough & Guides Wiki
Pokemon Brilliant Diamond and Shining Pearl (BDSP) Walkthrough & Guides Wiki
Elden Ring Shadow of the Erdtree Walkthrough & Guides Wiki
Monster Hunter World Walkthrough & Guides Wiki
The Legend of Zelda: Tears of the Kingdom Walkthrough & Guides Wiki
Persona 3 Reload Walkthrough & Guides Wiki


All rights reserved
© 2025 Obsidian Entertainment, Inc. Obsidian Entertainment, the Obsidian Entertainment logo, The Outer Worlds 2, and The Outer Worlds 2 logos are trademarks or registered trademarks of Obsidian Entertainment, Inc. All rights reserved.
The copyrights of videos of games used in our content and other intellectual property rights belong to the provider of the game.
The contents we provide on this site were created personally by members of the Game8 editorial department.
We refuse the right to reuse or repost content taken without our permission such as data or images to other sites.