This survey will take about 1 minute.
Your answers will help us to improve our website.
Outer Worlds 2
Listening For a Clue Walkthrough
Listening For a Clue is a companion quest for Tristan in the Outer Worlds 2. Read on for a full walkthrough of the companion quest, including info on how to unlock it and its rewards.
| Previous Quest | Next Quest |
|---|---|
| Arbitrary Measures | Casting Off the Veil |
List of Contents
How to Unlock Listening For a Clue
Speak to Tristan After Fiends in High Places
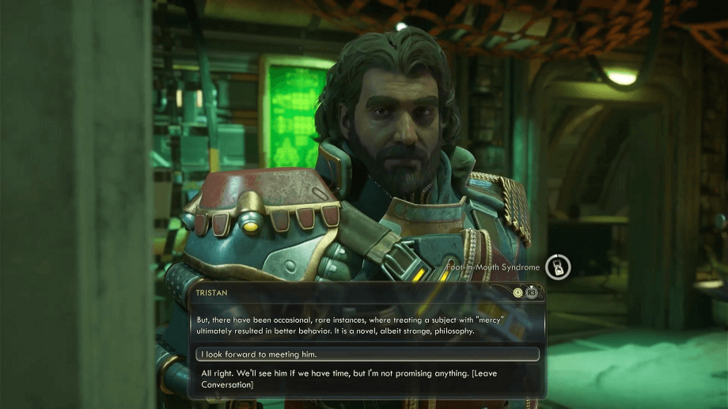
After completing the main quest, Fiends in High Places, speak with Tristan aboard the Incognito. Agree to meet Virgil with him to start the quest.
Fiends in High Places Walkthrough
Listening For a Clue Walkthrough
| Companion Quest Objectives | ||||||||||||
|---|---|---|---|---|---|---|---|---|---|---|---|---|
| 1 | Head Back to the Vox Relay | |||||||||||
| 2 | Deal With Sentinel Perrault | |||||||||||
| Option 1 | Option 2 | |||||||||||
| Convince Perrault to Leave | Kill Sentinel Perrault | |||||||||||
| 3 | Travel to the Oculus Collating Post | |||||||||||
| 4 | Get Past or Disable the Traps | |||||||||||
| 5 | Hack the Security Center Terminal | |||||||||||
| 6 | Turn On the Power in the Reactor Room | |||||||||||
| 7 | Open the Hidden Door | |||||||||||
| 8 | Spare or Execute Luther Okada | |||||||||||
| Option 1 | Option 2 | |||||||||||
| Spare Okada | Execute Okada | |||||||||||
| 9 | Access the Terminal to Gather Information | |||||||||||
| 10 | Debrief With Tristan at the Incognito | |||||||||||
Click on a step to jump to its section in the walkthrough!
Head Back to the Vox Relay
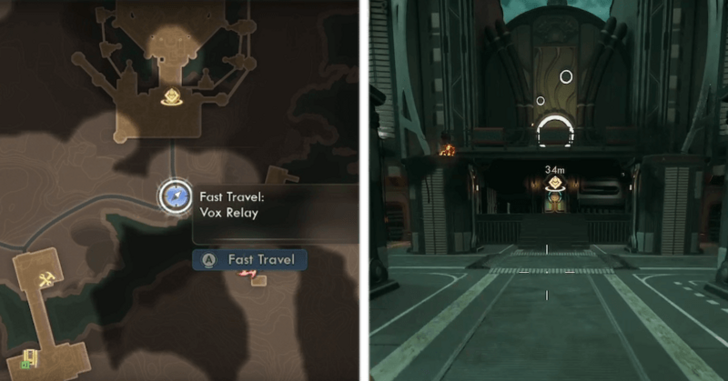
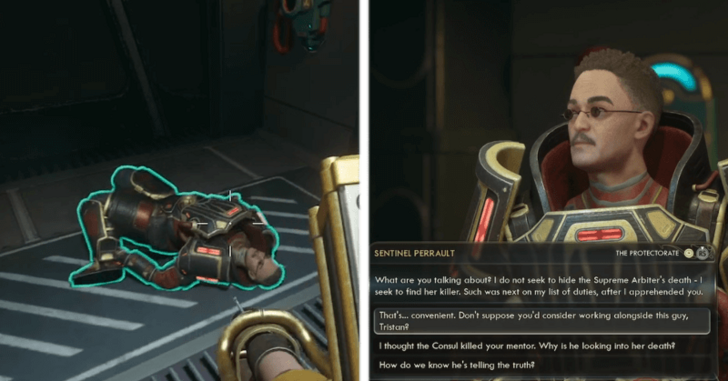
Return to the Vox Relay in Paradise Island to meet up with Tristan's associate. While the area is still marked as restricted, you can enter freely, as there are no more hostile Protectorate troops or mechs there. Head inside the main building, and you will immediately be accosted by Sentinel Perrault.
Deal With Sentinel Perrault
| Ways to Deal With Sentinel Perrault | |
|---|---|
| Make Perrault Leave | Kill Perrault |
In the dialogue with Sentinel Perrault, you can either convince the Sentinel to leave peacefully or be forced to kill him.
Option 1: Convince Sentinel Perrault to Leave

To convince Sentinel Perrault to leave peacefully, you must not select any hostile dialogue options, and eventually select the dialogue: "[Whisper to Tristan] If you want this to end peacefully, follow my lead."
You and Tristan will then start making up a story to make him leave. Select either of these next dialogue options to successfully get Perrault to back down:
- [Lie] I'm actually a criminal Arbiter Rao has been tracking! He's shown me the error of my ways! (Speech 3)
- [Lie] I'm a trained scientist, captured by Auntie's Choice. Arbiter Rao rescued me. (Science! 3)
After the dialogue that follows these choices, Perrault will leave peacefully, giving you information about the Oculus Collating Post and the Navkey to access it.
Option 2: Kill Sentinel Perrault
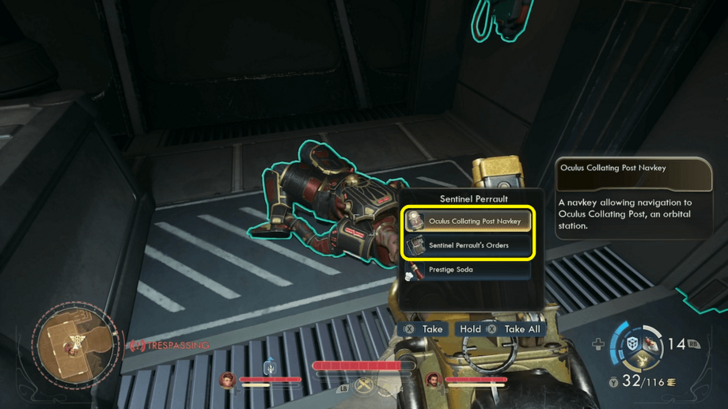
Sentinel Perrault has to be killed if you select hostile dialogue options or fail the skill checks to get him to leave. After killing him, loot his body for the Oculus Collating Post Navkey and Perrault's Orders.
After picking these up, Victor and Tristan will speak to you regarding the next move.
Travel to the Oculus Collating Post
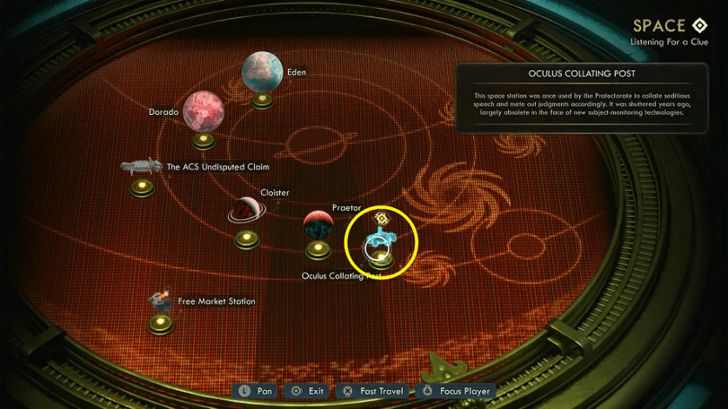
With the Navkey, head back to the Incognito and travel to the Oculus Collating Post with Tristan in your party.
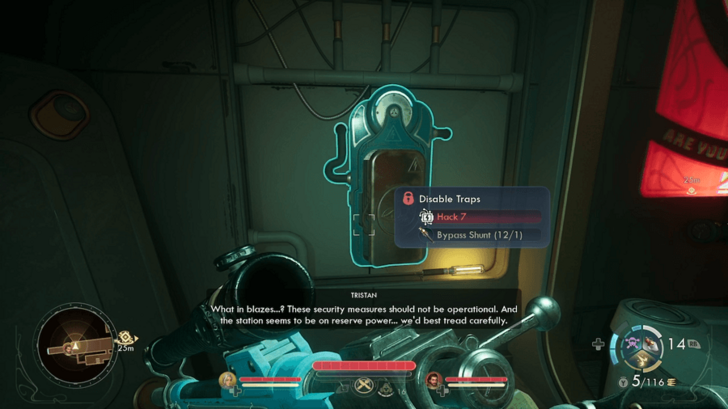
Get Past or Bypass the Traps
| How to Get Past the Traps | |
|---|---|
| Manually Get Past | Bypass With Skill Checks |
Upon arriving at the Oculus Collating Post, Tristan will unlock the first door. Past it is a laser and pressure plate security system, which you can bypass manually, disable through hacking, or avoid entirely by lockpicking the vent above.
Manually Getting Past the Traps
Carefully weave through the laser and pressure plate traps by timing your movements. Begin when the middle laser moves backward, and strafe or jump to avoid the others. You can also utilize the Tactical Time Dilation Gadget to help slow things down and time your movement better.
Touching a laser or pressure plate will trigger the turrets above the main door. You can disable each pressure plate with Explosives 7, though the moving lasers make this difficult.
We recommend making a save before attempting to pass through the traps. After successfully getting past, go into the room to the right and use the terminal to disable the traps and unseal the door.
Bypass the Traps With Skill Checks
 |
|
You can also bypass the traps entirely through skill checks. With Hack Lvl 7, use the console to your left to disable all security measures. Then, head down the hall and turn right into the room with a terminal to unseal the door.
Another option is to climb the crates and use Lockpick Lvl 4 to access the vent above, which leads to the terminal room where you can disable the traps and unseal the door.
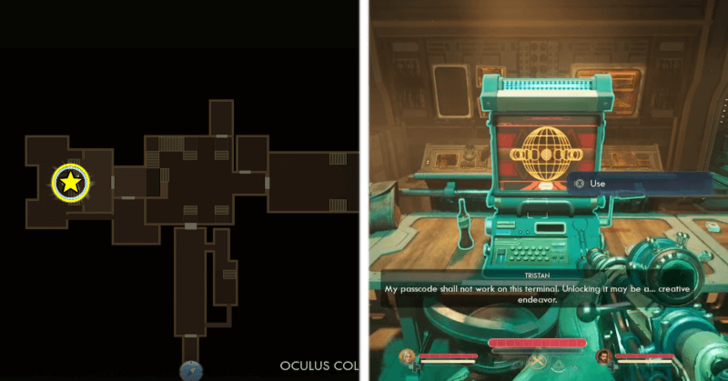
Hack the Security Center Terminal
 |
|
| Security Center Terminal Options | |
|---|---|
| Hack 7 | Hack the terminal to open the Reactor Room door and prevent any security automechs from spawning. |
| Try an old Earth Directorate passcode OR use the Dumb Trait | You can enter an old passcode or use the Dumb trait to mash random buttons. Either choice will spawn hostile automechs you must defeat. Afterward, the Reactor Room door will still open. |
You must enter the Security Center and override the terminal there to open the Reactor Room. You can either use Hack 7 to successfully override the system, opening the Reactor Room without automechs spawning.
The only other options, using an old passcode or using the Dumb Trait, will spawn one Dragoon and two Wasps for you to deal with. After dealing with them however, the Reactor Room will still open.
Turn On the Power in the Reactor Room
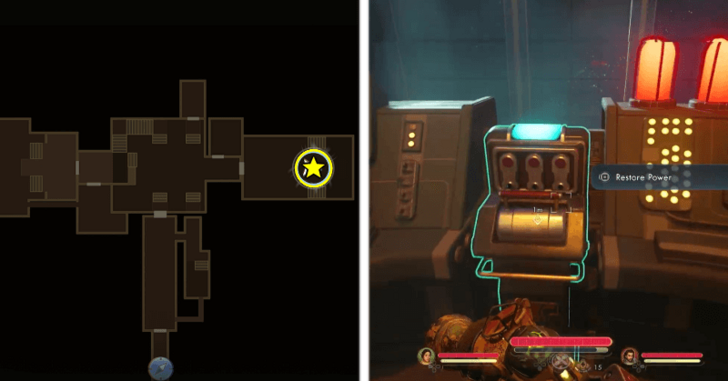
Once the Reactor Room is unsealed, cross to the eastern side of the station and head inside. Wait for Tristan to finish working on the nearby wires, then pull the lever to restore power.
Open the Hidden Door
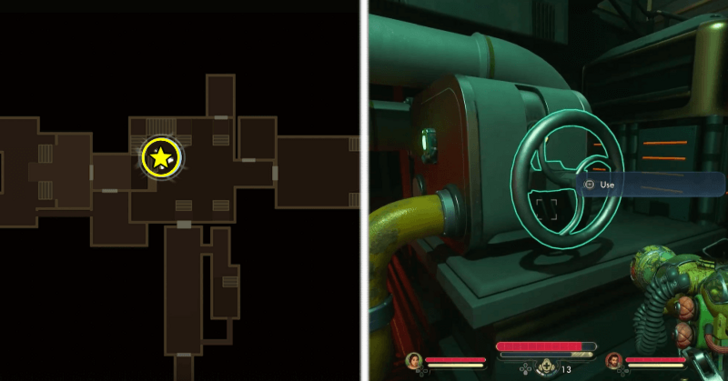
With the power restored, return to the central area and eliminate the Dragoon and Wasps that ambush you. Then, interact with the valve in the area to open the hidden door.
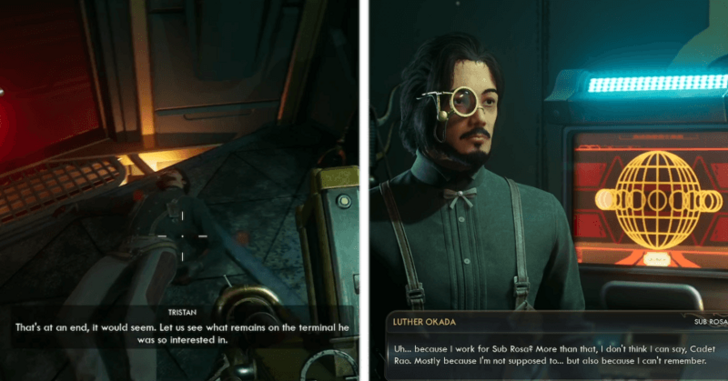
Spare or Execute Luther Okada
| Options to Deal With Okada | |
|---|---|
| Spare Okada | Execute Okada |
Inside the hidden room, you will find Luther Okada attempting to hack a terminal. You can choose to interrogate and spare him, or allow Tristan to execute him.
Option 1: Spare Okada
You can spare Okada only if you have Speech 11, or gather two pieces of evidence using skill/trait checks during the conversation to convince Tristan to trust you.
| Steps to Convince Tristan to Spare Okada | |
|---|---|
| 1 | 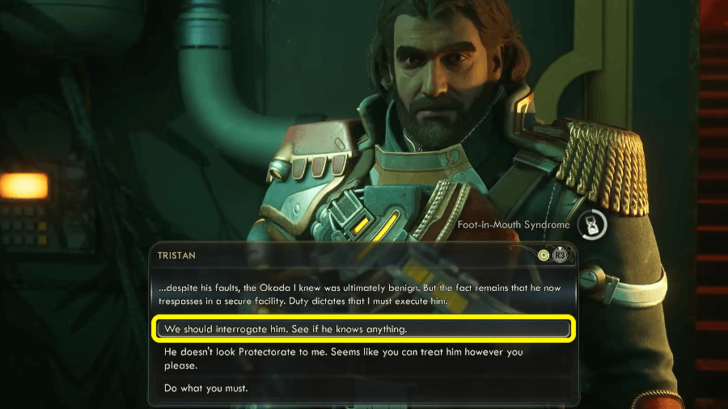 When speaking to Okada, select "We should interrogate him. See if he knows anything." to prevent Tristan from executing him immediately. |
| 2 | Next, select "What exactly were you supposed to do here?" |
| 3 | 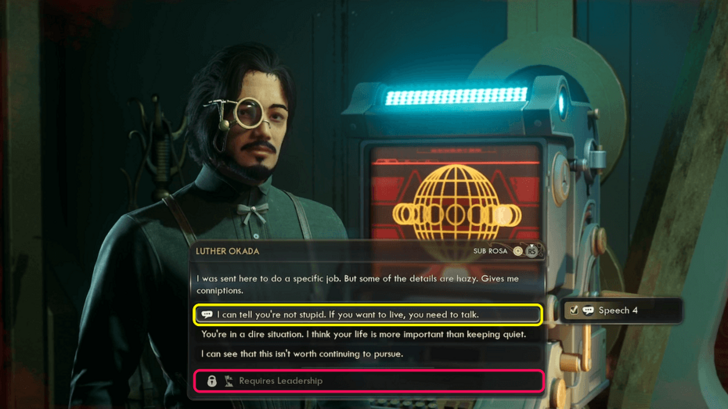 You then have two options to gain the first evidence to gain Tristan's trust in the dialogue later on, making it easier to spare Okada. Choose either of these two skill check options to get Okada to reveal more: ・Tristan, anything you can say to "motivate" our friend here? (Leadership 2) ・I can tell you're not stupid. If you want to live you need to talk. (Speech 4) |
| 4 | Next, select "What do you remember about Tristan, if anything?" to lead the conversation to the next piece of evidence. |
| 5 | 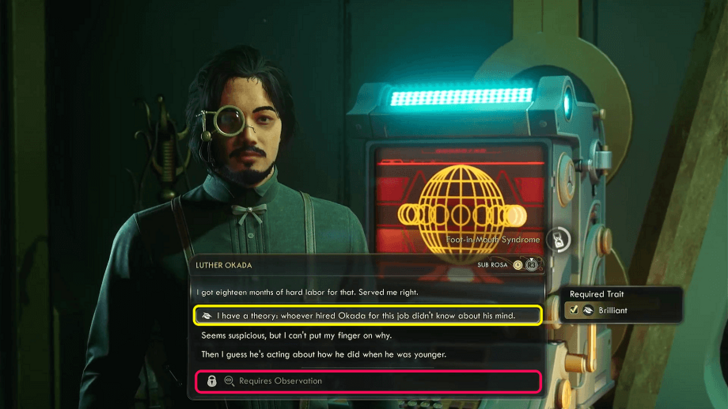 You will have another two options to gain the second piece of evidence to gain Tristan's trust. Choose either of these two skill/trait check options to gather more information: ・I've seen more capable spies digging ditches. Okada doesn't seem like he should be here. (Observation 7) ・I have a theory: whoever hired Okada for this job didn't know about his mind. (Brilliant Trait) |
| 6 | 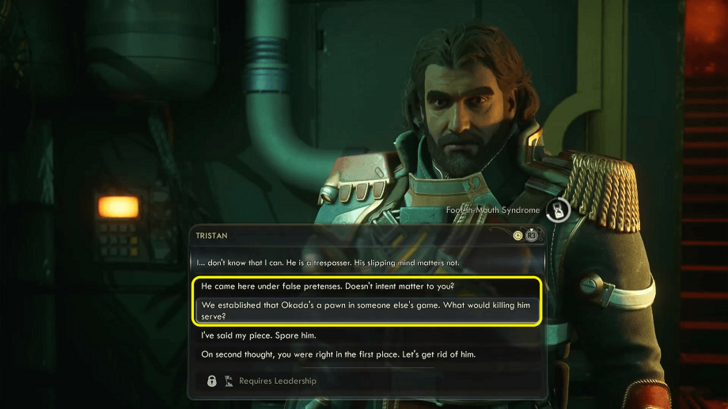 If you successfully passed the required skill checks in the earlier dialogues, you will have two extra dialogue options when speaking to Tristan about letting Okada go. Choose these dialogue options to get Tristan to spare Okada: 1. All right, I've made my decision. I think we should let him go. 2. He came here under false pretenses. Doesn't intent matter to you? (Passed Leadership or Speech checks in Step 3) 3. We established that Okada's a pawn in someone else's game. What would killing him serve? (Passed Observation or Brilliant checks in Step 5) 4. I've said my piece. Spare him. If you were able to say both the conditional dialogue options (options 2 and 3) to Tristan, he will spare Okada without further Speech checks and will be glad he can trust you. |
| 7 | 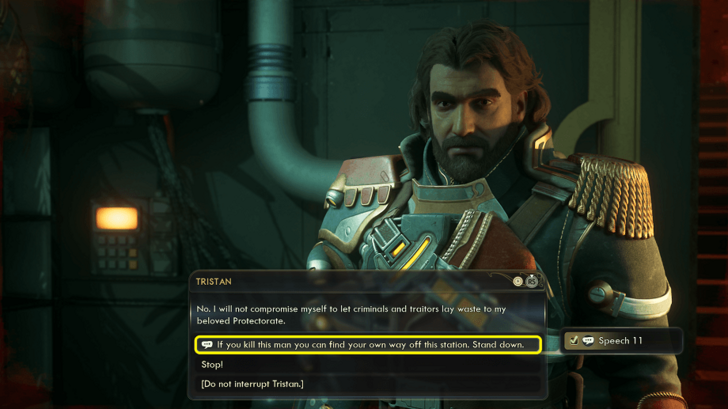 If you do not have the afformentioned skill checks from steps 3-5, but have Speech 11, you can threaten Tristan to stand down. 1. All right, I've made my decision. I think we should let him go. 2. I've said my piece. Spare him. 3. If you kill this man you can find your own way off this station. Stand down. (Speech 11) This affects your relationship with Tristan, as he is furious with the threat but will still comply. |
Option 2: Let Tristan Execute Okada
You can quickly resolve the situation by letting Tristan execute Okada. You may allow him to do it immediately or interrogate Okada first before giving Tristan the go-ahead to kill him.
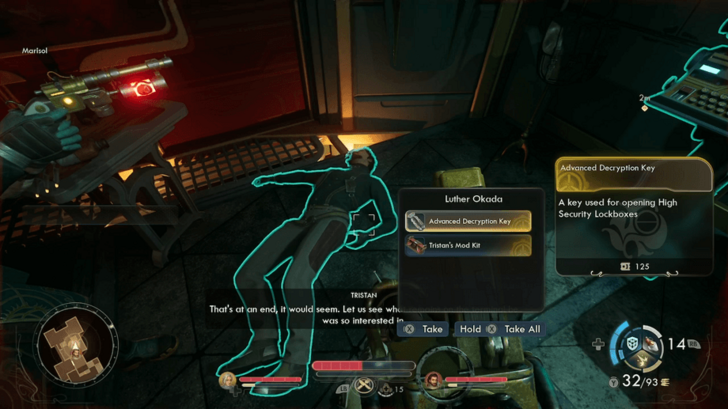
Afterward, loot Tristan's Mod Kit and an Advanced Decryption Key from his body.
Access the Terminal to Gather Information
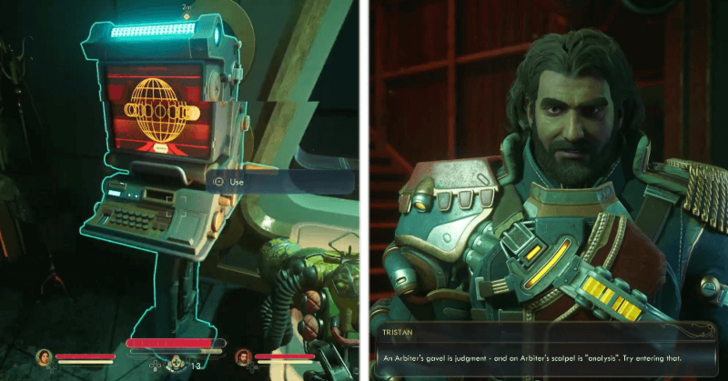
After dealing with Okada, try accessing the terminal he was on. It will be locked, but upon exiting, Tristan will speak up, revealing he knows the password. You can guess it yourself with Brilliant or Observation 4 checks, though he will provide it regardless.
With the password, access the terminal again and read all the logs to complete the objective.
Debrief With Tristan at the Incognito
Return to the Incognito and speak to Tristan to complete the quest, rewarding you 3726 XP. This leads immediately to the next companion quest Casting Off the Veil.
Listening For a Clue Choices
Killing or Sparing Sentinel Perrault
Killing Sentinel Perrault grants 300 XP and requires no skill checks. Convincing him to leave peacefully instead requires at least Speech 3 or Science! 3, with little difference in rewards.
Executing or Sparing Luther Okada
Executing Okada outright will cause Tristan to express moral doubts about his actions when you speak with him.
If you spare Okada and convince Tristan with evidence, he will be relieved and glad he trusted your judgment. However, if you threatened him to stand down, he will remain angry during your next conversation.
List of Choices and Consequences
Listening For a Clue Rewards
| Quest Completion Rewards | |
|---|---|
|
・3726 XP ・Tristan’s Mod Kit |
Tristan's Mod Kit
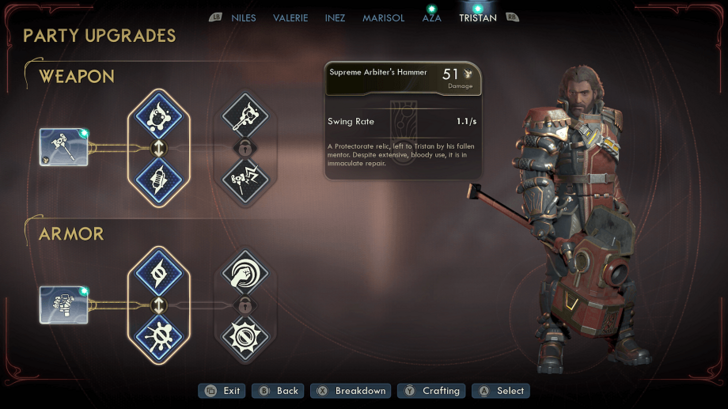
With Tristan's Mod Kit, you can now select Tristan's starting upgrades, making him stronger in battle.
Listening For a Clue Info
| Listening For a Clue Info | |||||
|---|---|---|---|---|---|
| Type | Tristan Companion Quest | ||||
| Location | The Incognito | ||||
| Quest Giver | Tristan | ||||
| How to Start | |||||
| After Fiends in High Places, speak to Tristan aboard the Incognito (he should appear next to the door to the bridge) and listen to his request. | |||||
Outer Worlds 2 Related Guides

All Companion Quests
| Companion | Quests |
|---|---|
 Niles Niles |
・Pressing Cares ・Do More Harm |
 VALERIE VALERIE |
・A Healthy Improvement ・Better by Factors |
 Inez Inez |
・Better than Nature ・A Most Extraordinary Specimen ┣ Half Truths in Advertising ┗ Full Measures |
 Tristan Tristan |
・Arbitrary Measures ・Listening For a Clue ・Casting Off the Veil |
 Marisol Marisol |
・Beginning at the Endpoint ・The Midpoint to the Endpoint ・Endpoint's End |
 Aza Aza |
・The Dawn of a Glorious Betrayal ・Stabbing at Shadows |
Comment
Author

Listening For a Clue Walkthrough
Please participate in our site
improvement survey
04/2026
improvement survey
04/2026
Would you assist in
improving Game8's site?
improving Game8's site?

×
We are listening to our users' valuable opinions and discussing how to act on them.
The information collected through this survey will be used for the purpose of improving our services. In addition, the information will only be disclosed a part of a statistic in a format that will not allow identification of personal information.
Begin Survey
Not Now
×
Please rate each item regarding Game8.co's Advertisements.
Amount of Ads
Very Dissatisfied
Somewhat Dissatisfied
Fine
Somewhat Satisfied
Highly Satisfied
Placement of Ads
Timing of Ad Display
Ad Loading Speed
Safeness of Ads
Content of Ads
×
Please rate each item regarding Game8.co's Quality of Articles.
Amount of information
Very Dissatisfied
Somewhat Dissatisfied
Fine
Somewhat Satisfied
Highly Satisfied
Frequency of updates
Speed of new information
Accuracy of articles
Understandibility of articles
Readability of sentences
×
Please rate each item regarding Game8.co's Usability of the Site.
Ease of finding information
Very Dissatisfied
Somewhat Dissatisfied
Fine
Somewhat Satisfied
Highly Satisfied
Loading Speed
Use of Color
Font Size
Visibility of Images
Easy to Understand Layout
×
Please rate each item regarding Game8.co's Message Boards, Comments.
Ease of Writing
Very Dissatisfied
Somewhat Dissatisfied
Fine
Somewhat Satisfied
Highly Satisfied
Readability
Ease in Finding Information
Comment Quality
Comment Quantity
Admin Response
×
Please rate each item regarding Game8.co's Site's new design.
Please rate our site's new design
Very Dissatisfied
Somewhat Dissatisfied
Fine
Somewhat Satisfied
Highly Satisfied
Do you think that the website's design change makes the site easier to use?
Has the new design made it easier for you to find information on the site?
Has the new design improved the overall visual appeal of the site?
How would you rate your overall satisfaction with the new design of the site?
×
How likely are you to recommend Game8 to someone you know?
Very Unlikely
0
1
2
3
4
5
6
7
8
9
10
Very Likely
If you have other opinions regarding potential improvement to the website, please share them with us. We would appreciate your honest opinion.
Note: This is a free response section, so you can proceed without entering anything.
Note: Please be sure not to enter any kind of personal information into your response.
Note: Please be sure not to enter any kind of personal information into your response.
×
Thank You
×
Thank you for participating in our survey! Your answers will help us to improve the quality of our website and services.
We hope you continue to make use of Game8.
We hope you continue to make use of Game8.
Close
Rankings
- We could not find the message board you were looking for.
Gaming News


![Forza Horizon 6 Review [Preview] | Beautiful Roads With a Whole Lot of Oversteer](https://img.game8.co/4460981/a7254c24945c43fbdf6ad9bea52b5ce9.png/thumb)
![Borderlands Mobile Review [Playtest] | The Same Borderlands Made Easy](https://img.game8.co/4465500/aac0c880a39ec5cd46073e49d18f3ed5.png/thumb)
Popular Games

Genshin Impact Walkthrough & Guides Wiki
Crimson Desert Walkthrough & Guides Wiki
Umamusume: Pretty Derby Walkthrough & Guides Wiki
Honkai: Star Rail Walkthrough & Guides Wiki
Monster Hunter Stories 3: Twisted Reflection Walkthrough & Guides Wiki
Wuthering Waves Walkthrough & Guides Wiki
The Seven Deadly Sins: Origin Walkthrough & Guides Wiki
Pokemon TCG Pocket (PTCGP) Strategies & Guides Wiki
Pokemon Pokopia Walkthrough & Guides Wiki
Zenless Zone Zero Walkthrough & Guides Wiki


Recommended Games
Fire Emblem Heroes (FEH) Walkthrough & Guides Wiki
Pokemon Brilliant Diamond and Shining Pearl (BDSP) Walkthrough & Guides Wiki
Super Smash Bros. Ultimate Walkthrough & Guides Wiki
Diablo 4: Vessel of Hatred Walkthrough & Guides Wiki
Cyberpunk 2077: Ultimate Edition Walkthrough & Guides Wiki
Yu-Gi-Oh! Master Duel Walkthrough & Guides Wiki
Elden Ring Shadow of the Erdtree Walkthrough & Guides Wiki
Monster Hunter World Walkthrough & Guides Wiki
The Legend of Zelda: Tears of the Kingdom Walkthrough & Guides Wiki
Persona 3 Reload Walkthrough & Guides Wiki


All rights reserved
© 2025 Obsidian Entertainment, Inc. Obsidian Entertainment, the Obsidian Entertainment logo, The Outer Worlds 2, and The Outer Worlds 2 logos are trademarks or registered trademarks of Obsidian Entertainment, Inc. All rights reserved.
The copyrights of videos of games used in our content and other intellectual property rights belong to the provider of the game.
The contents we provide on this site were created personally by members of the Game8 editorial department.
We refuse the right to reuse or repost content taken without our permission such as data or images to other sites.