This survey will take about 1 minute.
Your answers will help us to improve our website.
Outer Worlds 2
Fiends in High Places Walkthrough

This is a walkthrough for the Fiends in High Places main quest in Outer Worlds 2. Read on for a complete Fiends in High Places walkthrough, including the choices you can make and the rewards for completing the quest.
| ◀ Previous Mission | Next Mission ▶ |
|---|---|
| On the Trail of the Traitor | An Instrument to Unfold Space & Time |
List of Contents
Fiends in High Places Walkthrough
Click on a step to jump to its section in the walkthrough!
Travel to the Greater Tranquility Station
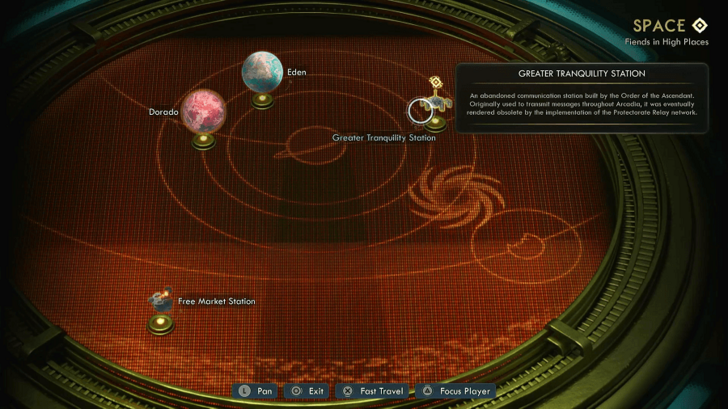
After a brief meeting with the crew aboard the Incognito, travel to the Greater Tranquility Station. During the meeting, Niles will insist on joining your squad for the mission.
Bringing him along makes a peaceful resolution with de Vries more difficult but still possible. If you leave him behind, he will be furious at the end of the quest.
Find Info on de Vries' Whereabouts
| Walkthrough | |
|---|---|
| 1 | 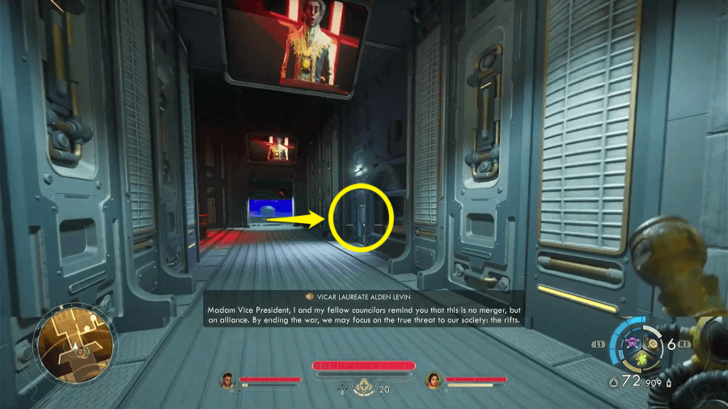 Upon landing, head towards the main entrance and take the first door on the right. |
| 2 | 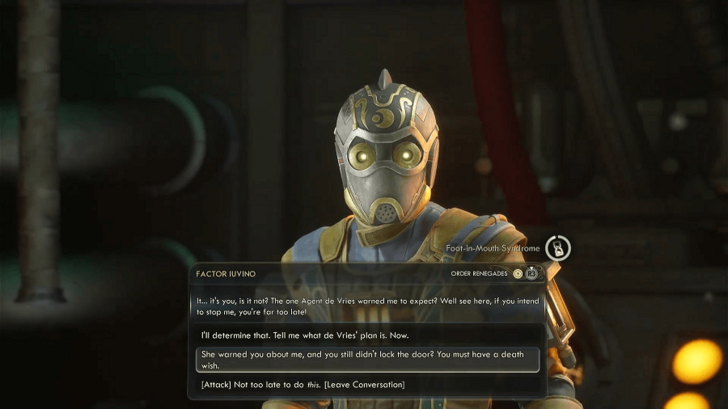 Factor Iuivino will speak to you. You can easily convince his team to stand down using Speech or Leadership, or just kill him and his squad. If you spare Iuivino, he will give you the de Vries' location himself and give you Mechanist Override Codes, that you can use to make the dragoons deeper in the level target enemies instead of you. |
| 3 | 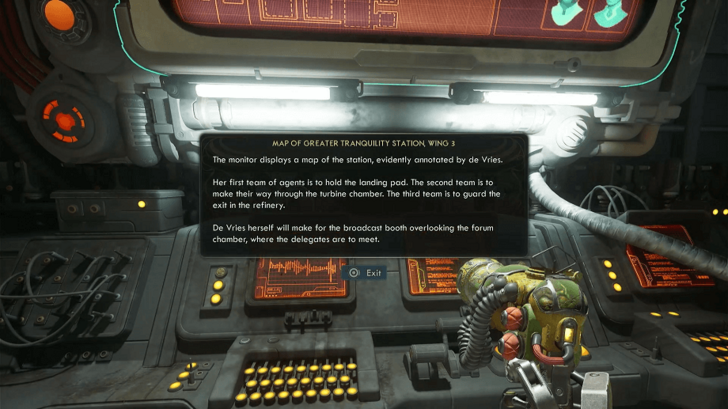 Get the info of de Vries' location on the terminal behind Iuvino. |
Fix the Fuse Box
| Fuse Box | 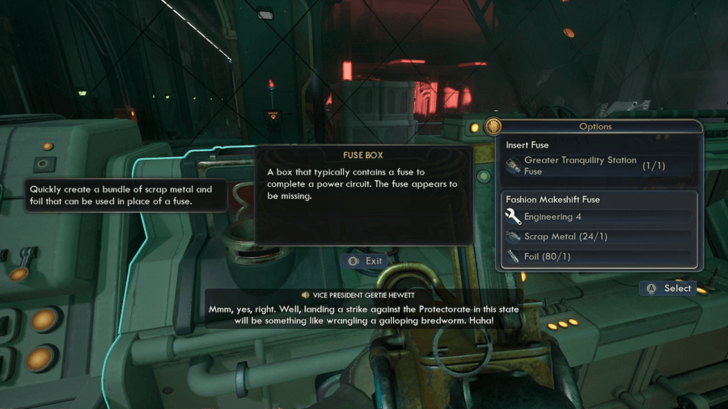 |
|---|---|
| Station Fuse Location | 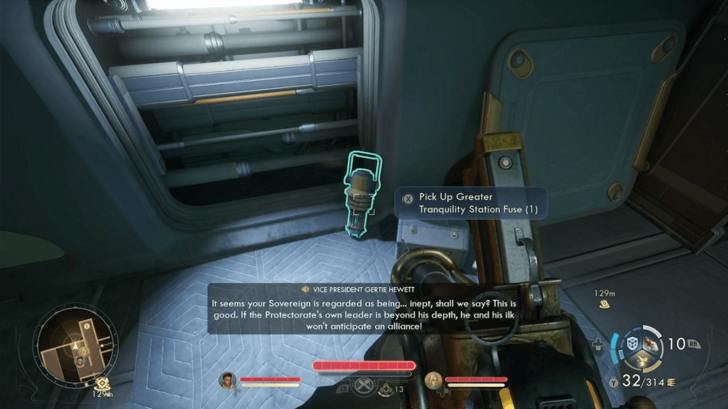 |
Once you have de Vries' location, head downstairs and take the elevator to the lower level. Exit the elevator and turn right to the next room. Turn on the Fuse Box there using the Station Fuse in the room, or bypass it with Hack 4, Engineering 4, or the Electro-Therapist perk
Download the Automechanical Hack Program
Next to the Fuse Box is a terminal where you can download a reprogramming cartridge to hack the dragoons in later areas, making the following areas easier to get through.
With the Fuse Box powered on, use the moving platform right outside the room to get across to the next area.
Make Your Way to the Broadcast Booth
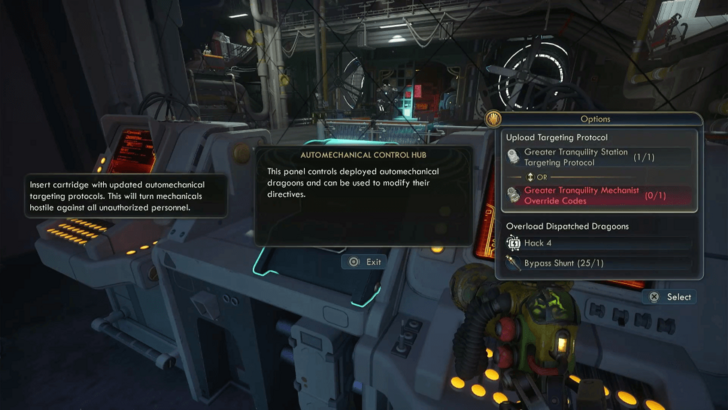
Go the terminal just before entering the area with multiple dragoons and guards. You can optionally use either the Target Protocol or Mechanist Override Codes (make the dragoons target enemies), or use Hack 4 (disables dragoons completely).
Fight or Sneak Past the Dragoons and Order Traitors
| Loud | |
|---|---|
| Stealth |
To go loud, simply pass through the door to the left of the terminal, and start defeating the dragoons and Order Traitors to get on through. One of the Order Traitors will be carrying the Greater Tranquility Maintenance Access that you can get.
For the stealthy route, head through the vent to the right of the terminal and go down the ladder. Then use the catwalk to get past to find a vent to sneak through, climb a ladder, then stealthily kill the guard for his Greater Tranquility Maintenance Access.
If you reprogrammed the dragoons to shoot at the order traitors, the guard holding the maintenance access can already be killed by the dragoon upstairs.
Pass the Fan Hazard and Fix the Fuse Box
| Walkthrough | |
|---|---|
| 1 | 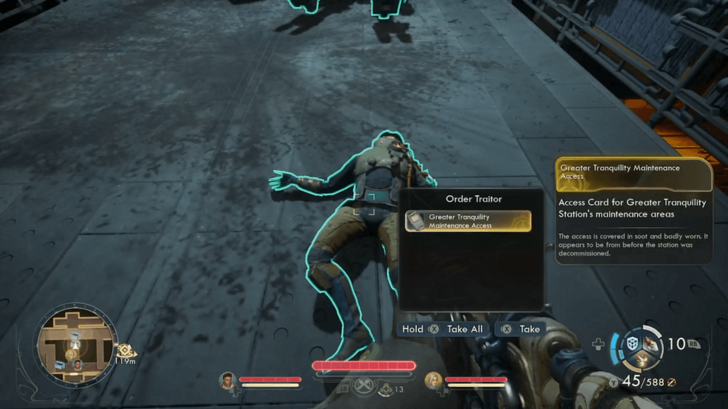 Loot the Greater Tranquility Maintenance Access from one of the dead Order Traitors. If you went in loud, his body may be lying somewhere on the floor, so check all the corpses you took down nearby. If you approached stealthily, you can find him in the room beyond the vent and ladder you can use to sneak through. |
| 2 | 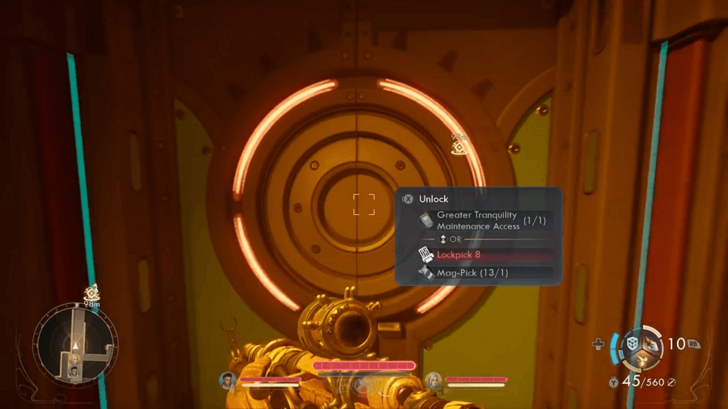 Head down to the lower catwalk and open the Maintenance Access Door and get 600 XP. You can also open it with Lockpick 8. |
| 3 | Past the next door, turn right and use the pipe bridge leading to the large spinning fan. You must use the Tactical Time Dilation gadget to get past the fan hazard. Turn right into the next room and pick up the Station Fuse there. |
| 4 | 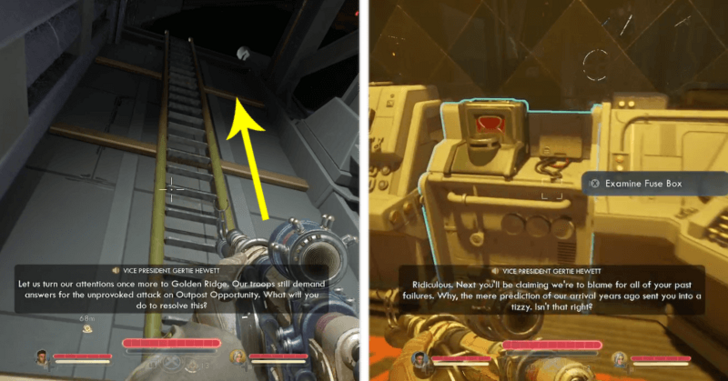 Turn around from the Fuse Box and use the ladder in the next room. After climbing up, you can place the Station Fuse in the box there to power the moving platform ahead. |
| 5 | 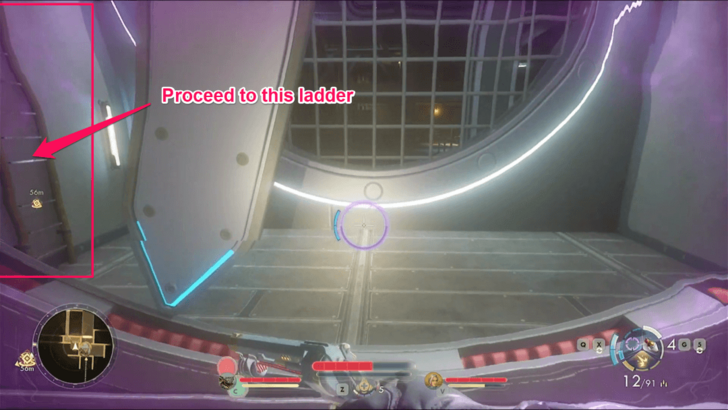 After using the platform, use the Tactical Time Dilation gadget to get past the fan hazard. Then, climb up the ladder past the fan. |
| 6 | 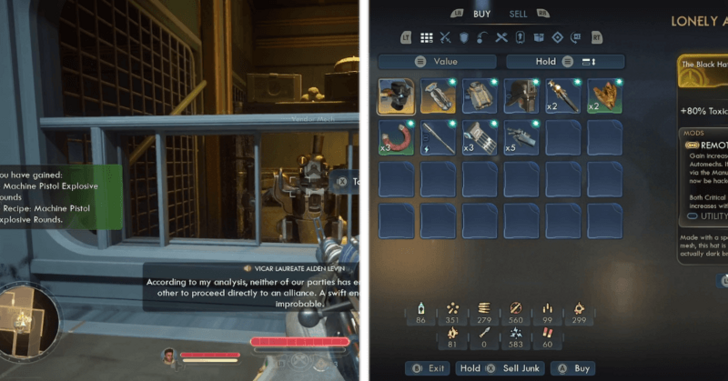 At the top of the ladder, you will find a lone Mech Vendor selling The Black Hat unique helmet for 2500 Bits. This is the only opportunity to purchase the helmet, as it becomes unavailable once the quest ends. |
| 7 | 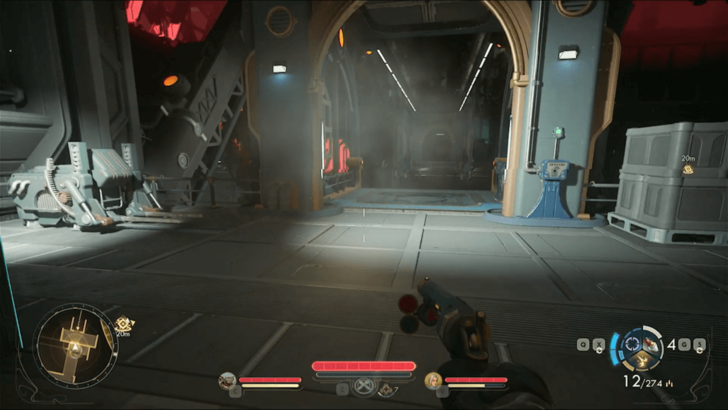 Head downstairs and use one last moving platform into the area with de Vries final defenses. |
Power the Bridge and Make it Past the Final Defenses
This next area is the last before you finally confront de Vries. You must power on two Fuse Boxes on either end of this arena, all the while two snipers constantly shoot at you for heavy damage if you stay in their sights for too long.
| Walkthrough | |
|---|---|
| 1 | 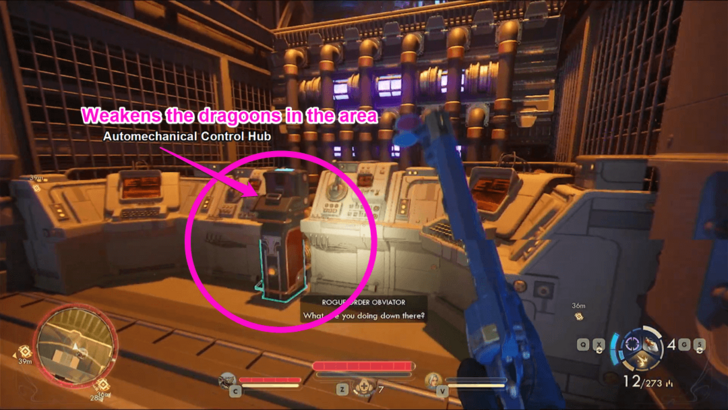 There is a terminal in the middle of the arena that you can access before you do the next steps, and you can use the Targeting Protocol, Mechanist Override Codes, or Hack 3 to weaken the dragoons that come out when you plug each Fuse Box. |
| 2 | 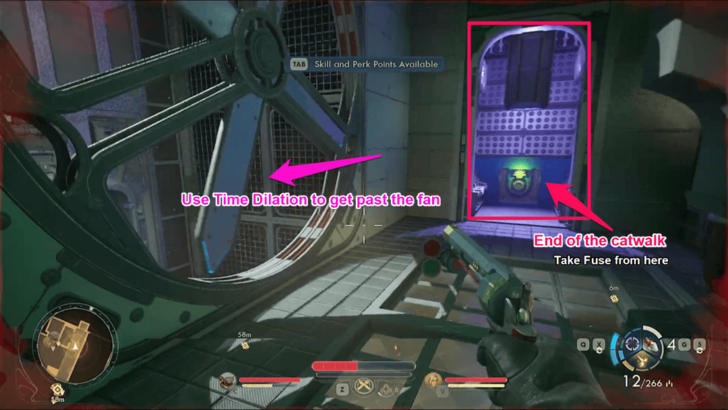 Head up the catwalk and quickly run to the end of either side. Sprint as fast as you can to avoid the sniper fire. Use the Gas-Energy Deflection Apparatus gadget for extra help tanking the sniper fire. You can kill the snipers, but they simply respawn if you do. Take the Station Fuse on the end and use Tactical Time Dilation to get past the Fan Hazard. |
| 3 | 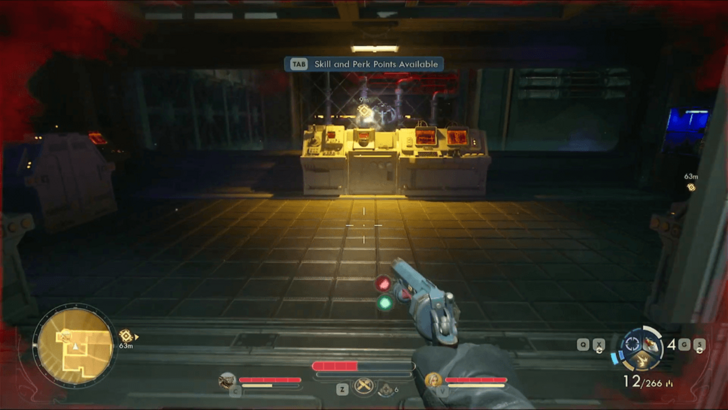 Past the fan, insert the Station Fuse in the box there, or you could optionally use the Dumb Trait and insert an Aluminum Foil in there to succesfully power it as well. Hostile Automechanicals will spawn after this if you didn't Hack the terminal nearby. Repeat the process and run to the other end. Take the Fuse, get past the fan hazard, and plug the fuse in below. The Bridge should be ready to use with both Fuse Boxes powered on. Head across and kill the last two snipers guarding de Vries area. |
| 4 | 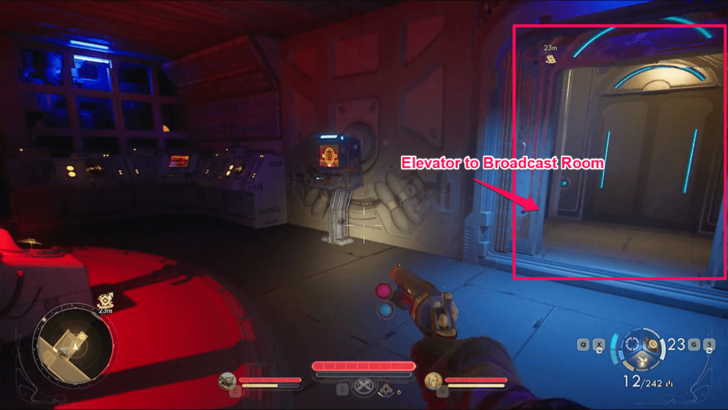 Go into the next room and take the elevator up to the Broadcast Room. |
Confront de Vries
| Options to Deal With de Vries | ||
|---|---|---|
| Kill de Vries | Kill the Delegates | Convince Her to Stand Down |
Once you reach the Broadcast Booth, you will immediately enter dialogue with de Vries. There are three possible outcomes: kill de Vries, let her kill the Delegates, or convince her to surrender.
Kill de Vries

Killing her is straightforward, choose any dialogue option that begins with [Attack]. She deals little damage and has low HP, so she dies pretty quick.
Kill the Delegates (Agree With de Vries' Plan)
You can choose to hear her out and ultimately side with her plan to kill the Delegates, allowing her to execute them with a sniper rifle. If Niles is in your party when you do this, he will turn on you, forcing you to kill him.
Convince de Vries to Stand Down and Stop Her Plan
You can also make de Vries stand down if you have Speech 5. When you do this, she releases the delegates and you avoid a fight.
| Steps to Spare de Vries | |
|---|---|
| 1 |  When meeting de Vries, you must select "I'll bite. Tell me what the peace talks have to do with the rifts." when the option pops up, to get her to explain her position. |
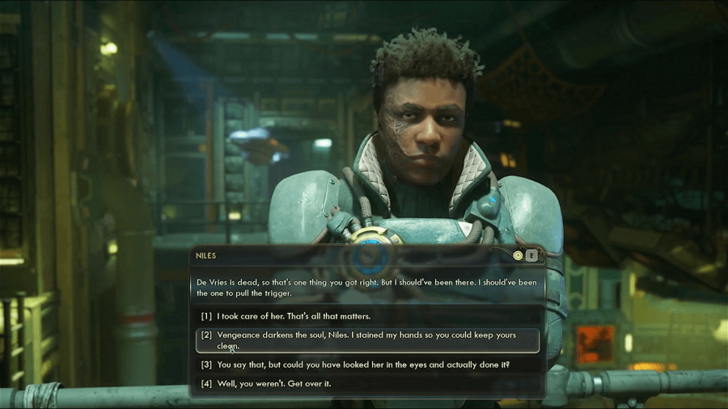
| 2 | 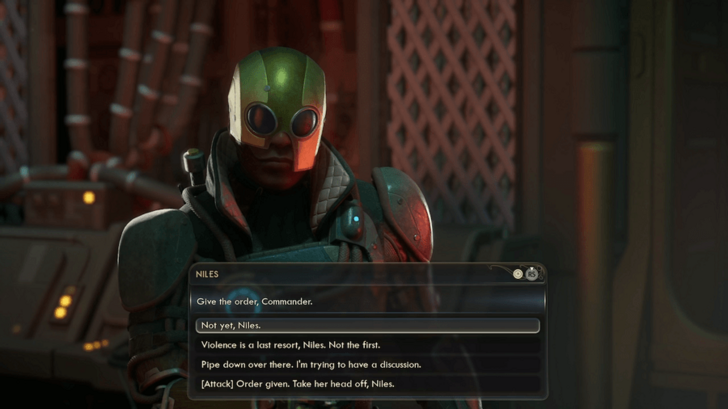 Go through with the conversation, selecting any dialogue options that do not start with [Attack]. If Niles is in your party, he will eventually interrupt and want to immediately kill de Vries. Here are the options that get Niles to calm down: ・We all want the same things here - to stop the rifts. To save Arcadia. (Speech 5) ・Trust that I know what I'm doing, Niles. If not as a leader... as a friend. (Speech 3 AND Leadership 3) ・That's enough, Niles. You've said your piece. (No skill check, but Niles is furious later on) |
| 3 | 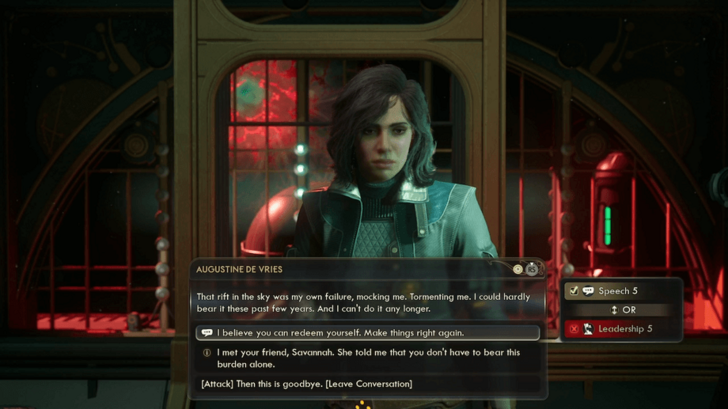 After making Niles stand down (if you had to), choose these key Speech check options during the conversation: 1. You can still solve the rift problem. But nobody needs to die here. (Speech 1) 2. I believe you can redeem yourself. Make things right again. (Speech 5 or Leadership 5) |
Retrieve the Data Cartridge and Sniper Rifle
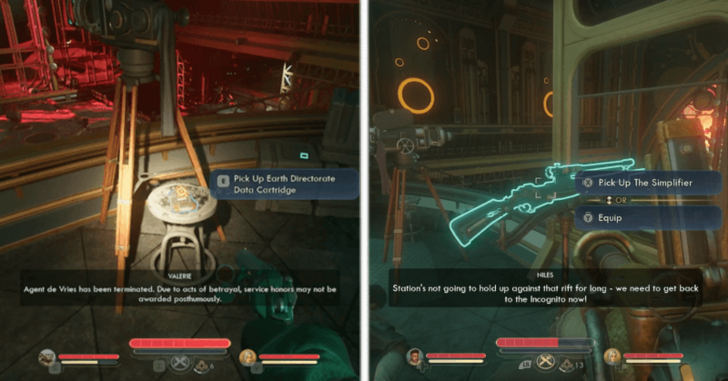
If you killed de Vries, you can retrieve the Data Cartridge on top of a stool to the right. If you chose to make her stand down or agreed with her killing the delegates, she hands over the Data Cartridge to you directly.
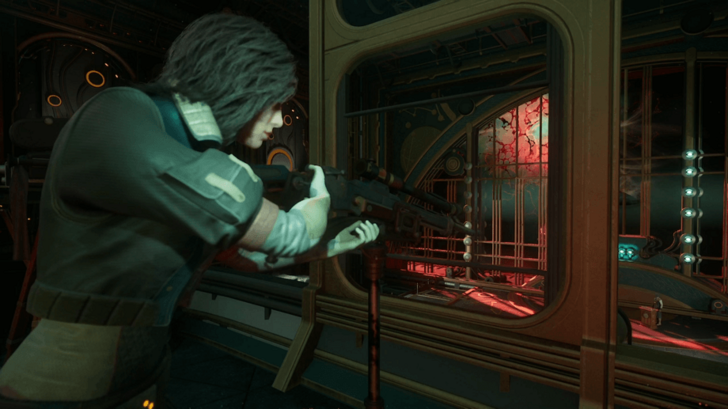
Be sure to also grab The Simplifier unique sniper rifle next to the stool, as you will not be able to obtain it once you leave the station. You can have the unique sniper no matter what outcome you chose.
Run Back to the Incognito

After dealing with de Vries, a Rift will erupt in the distance, causing the station to collapse. Before leaving, don't forget to pick up the missable weapon The Simplifier from the tripod. Then, use the new paths created by the destruction to race back to the Incognito, board the ship, and escape to complete the quest.
Fiends in High Places Missables
The Black Hat Unique Helmet
The Black Hat can be purchased for 2500 Bits, from the Vendor Mech on the second floor, where you either fight or sneak past the dragoons and guards.
The Simplifier Unique Sniper Rifle

After dealing with de Vries, you can take The Simplifier from the tripod it is mounted on, right next to de Vries. You cannot get the gun anymore after leaving the area.
List of All Missables and Points of No Return
De Vries' Jacket Unique Light Armor

You can obtain de Vries’ Jacket only by killing her and looting it from her body. This unique light armor cannot be acquired if she is spared.
Fiends in High Places Choices
Bringing Niles Along For the Mission
At the start of the quest, during the meeting with the crew, Niles will insist on joining the squad to confront de Vries.
If you bring him, he will be aggressive and push to kill her during the confrontation, but you can convince him to stand down.
If you leave him behind, he will be furious upon your return to the ship and threaten to leave.
Kill or Spare de Vries
You can spare de Vries by passing the required Speech checks. If Niles is in your party, he will protest, but you can convince him to stand down using Speech or Leadership.
Allow de Vries to Kill the Delegates or Save Them
You can side with de Vries and allow her to kill the delegates. If Niles is in your party when you do, he will turn on you and attack, resulting in his permanent death.
If you kill de Vries or convince her to stand down, the delegates will be spared.
List of Choices and Consequences
Fiends in High Places Rewards
Plasma Pistol and de Vries' Jacket (Killed de Vries Scenario)
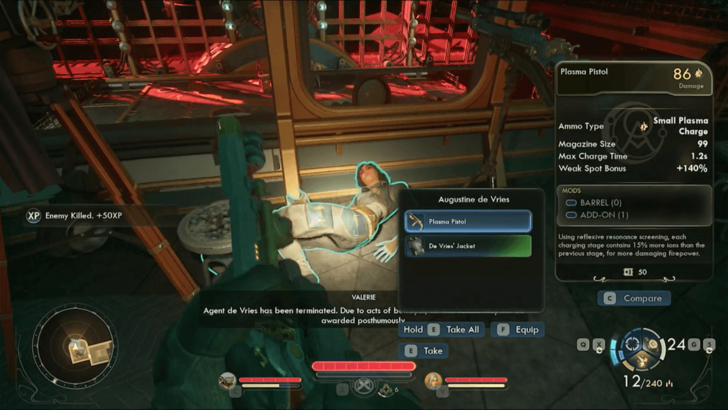
A common Plasma Pistol and de Vries' modded jacket can be obtained by looting de Vries' body if you chose to kill her.
The Simplifier
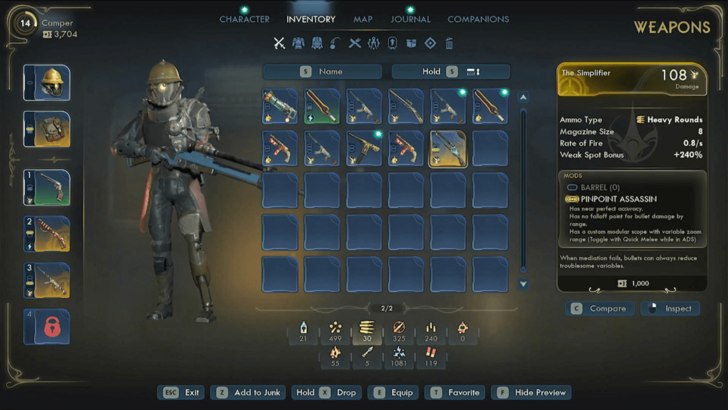
You can get the Simplifier from the tripod in the room where you confront de Vries. Make sure to grab it before running towards the Incognito, because you won't be able to return for it after the quest.
The Outer Worlds 2 Related Guides

All Main Quests
| # | Main Quests |
|---|---|
| 1 | A Cause Worth Killing For |
| 2 | Recalling the Score |
| 3 | The Saboteur of Paradise |
| 4 | On the Trail of the Traitor ┗ Discrete Mathematics |
| 5 | Fiends in High Places |
| 6 | An Instrument to Unfold Space & Time |
| 7 | A Complication with the Computronic Cerebrum |
| 8 | Sins of the Past on the Precipice of the Future |
Comment
3  Anonymous 5 months
if you have a sniper, use that as well and start peaking. that’s what i had to do. just make sure you have enough ammo for your sniper
Author

Fiends in High Places Walkthrough
Please participate in our site
improvement survey
04/2026
improvement survey
04/2026
Would you assist in
improving Game8's site?
improving Game8's site?

×
We are listening to our users' valuable opinions and discussing how to act on them.
The information collected through this survey will be used for the purpose of improving our services. In addition, the information will only be disclosed a part of a statistic in a format that will not allow identification of personal information.
Begin Survey
Not Now
×
Please rate each item regarding Game8.co's Advertisements.
Amount of Ads
Very Dissatisfied
Somewhat Dissatisfied
Fine
Somewhat Satisfied
Highly Satisfied
Placement of Ads
Timing of Ad Display
Ad Loading Speed
Safeness of Ads
Content of Ads
×
Please rate each item regarding Game8.co's Quality of Articles.
Amount of information
Very Dissatisfied
Somewhat Dissatisfied
Fine
Somewhat Satisfied
Highly Satisfied
Frequency of updates
Speed of new information
Accuracy of articles
Understandibility of articles
Readability of sentences
×
Please rate each item regarding Game8.co's Usability of the Site.
Ease of finding information
Very Dissatisfied
Somewhat Dissatisfied
Fine
Somewhat Satisfied
Highly Satisfied
Loading Speed
Use of Color
Font Size
Visibility of Images
Easy to Understand Layout
×
Please rate each item regarding Game8.co's Message Boards, Comments.
Ease of Writing
Very Dissatisfied
Somewhat Dissatisfied
Fine
Somewhat Satisfied
Highly Satisfied
Readability
Ease in Finding Information
Comment Quality
Comment Quantity
Admin Response
×
Please rate each item regarding Game8.co's Site's new design.
Please rate our site's new design
Very Dissatisfied
Somewhat Dissatisfied
Fine
Somewhat Satisfied
Highly Satisfied
Do you think that the website's design change makes the site easier to use?
Has the new design made it easier for you to find information on the site?
Has the new design improved the overall visual appeal of the site?
How would you rate your overall satisfaction with the new design of the site?
×
How likely are you to recommend Game8 to someone you know?
Very Unlikely
0
1
2
3
4
5
6
7
8
9
10
Very Likely
If you have other opinions regarding potential improvement to the website, please share them with us. We would appreciate your honest opinion.
Note: This is a free response section, so you can proceed without entering anything.
Note: Please be sure not to enter any kind of personal information into your response.
Note: Please be sure not to enter any kind of personal information into your response.
×
Thank You
×
Thank you for participating in our survey! Your answers will help us to improve the quality of our website and services.
We hope you continue to make use of Game8.
We hope you continue to make use of Game8.
Close
Rankings
- We could not find the message board you were looking for.
Gaming News


![Forza Horizon 6 Review [Preview] | Beautiful Roads With a Whole Lot of Oversteer](https://img.game8.co/4460981/a7254c24945c43fbdf6ad9bea52b5ce9.png/thumb)
![Borderlands Mobile Review [Playtest] | The Same Borderlands Made Easy](https://img.game8.co/4465500/aac0c880a39ec5cd46073e49d18f3ed5.png/thumb)
Popular Games

Genshin Impact Walkthrough & Guides Wiki
Crimson Desert Walkthrough & Guides Wiki
Umamusume: Pretty Derby Walkthrough & Guides Wiki
Honkai: Star Rail Walkthrough & Guides Wiki
Monster Hunter Stories 3: Twisted Reflection Walkthrough & Guides Wiki
Wuthering Waves Walkthrough & Guides Wiki
The Seven Deadly Sins: Origin Walkthrough & Guides Wiki
Pokemon TCG Pocket (PTCGP) Strategies & Guides Wiki
Pokemon Pokopia Walkthrough & Guides Wiki
Zenless Zone Zero Walkthrough & Guides Wiki


Recommended Games
Fire Emblem Heroes (FEH) Walkthrough & Guides Wiki
Pokemon Brilliant Diamond and Shining Pearl (BDSP) Walkthrough & Guides Wiki
Super Smash Bros. Ultimate Walkthrough & Guides Wiki
Diablo 4: Vessel of Hatred Walkthrough & Guides Wiki
Cyberpunk 2077: Ultimate Edition Walkthrough & Guides Wiki
Yu-Gi-Oh! Master Duel Walkthrough & Guides Wiki
Elden Ring Shadow of the Erdtree Walkthrough & Guides Wiki
Monster Hunter World Walkthrough & Guides Wiki
The Legend of Zelda: Tears of the Kingdom Walkthrough & Guides Wiki
Persona 3 Reload Walkthrough & Guides Wiki


All rights reserved
© 2025 Obsidian Entertainment, Inc. Obsidian Entertainment, the Obsidian Entertainment logo, The Outer Worlds 2, and The Outer Worlds 2 logos are trademarks or registered trademarks of Obsidian Entertainment, Inc. All rights reserved.
The copyrights of videos of games used in our content and other intellectual property rights belong to the provider of the game.
The contents we provide on this site were created personally by members of the Game8 editorial department.
We refuse the right to reuse or repost content taken without our permission such as data or images to other sites.
It's simply a matter of being a better shot. Use cover to your advantage, use your gadgets often. Companions who can draw aggro away from you like Niles and Tristan can give you a long enough opening to line up a shot. The snipers respawn until you lower the bridge, so this is about buying yourself time, not winning the fight. If you're using melee, then it becomes a mad dash to the fuses. Slide+jump often, spam Zyranium shield if you need to.