This survey will take about 1 minute.
Your answers will help us to improve our website.
Outer Worlds 2
A Complication with the Computronic Cerebrum Walkthrough
This is a walkthrough for the A Complication with the Computronic Cerebrum main quest in Outer Worlds 2. Read on for a complete A Complication with the Computronic Cerebrum walkthrough, including the choices you can make and the rewards for completing the quest.
| ◀ Previous Mission | Next Mission ▶ |
|---|---|
| Fiends in High Places | Sins of the Past on the Precipice of the Future |
List of Contents
A Complication with the Computronic Cerebrum Walkthrough
Click on a step to jump to its section in the walkthrough!
Utilize the Archive to Process the Rift Data
Upon finishing the debrief with VAL, the quest will become available along with An Instrument to Unfold Space & Time. Depending on your choices during Fiends in High Places, Niles will confront you about de Vries and based on your response he might leave the party.
Continue the quest by traveling to the Archive in Cloister to process the rift data you've received.
You can go to the Archive directly, but be warned it's full of Protectorate enemies. We highly recommend getting help from Auntie's Choice or The Order of Ascendant to reach the Archive safer.
Get Help in Taking the Archive (Optional)

You can seek assistance from Auntie's Choice or The Order in taking over the Archive, but you'll need to earn their trust first by completing their faction quests.
Alternatively, you can also work on getting the two factions to have an alliance, or side with no one and just directly go to the Archive. Choosing a side, forming an alliance, or going by yourself, can affect the ending.
Get Help from Auntie's Choice
| Choice | Results |
|---|---|
| Propose an Alliance | ・Continues An Equitable Arrangement quest.
・Auntie's Choice and the Order work together to reclaim the Archive. |
| Side with Auntie's Choice | ・Fails An Equitable Arrangement quest.
・Starts Recall Order for the Trifurcated Brain quest. ・Auntie's Choice steals the Archive. |
If you choose Auntie's Choice to seek help with the Archive, head to The ACS Undisputed Claim and talk to Vice President Gertie Hewett in Head Office Tower. Gertie asks you to gain the trust of the factions and propose an alliance to their leaders.
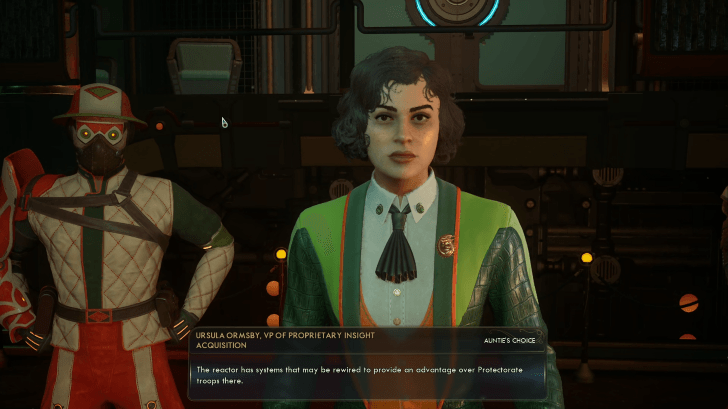
For Auntie's Choice, you will help out the VPs C.F. Pendergrass III and Urusula Ormsby. Head to the door on the left to meet Pendergrass and Ormsby, who will issue you two quests to gain Auntie's Choice's favor:
Once finished, you'll gain an audience with Auntie Cleo. Tell her about the delegates' plan for a negotiation, or agree to steal the Archive for Auntie's Choice. This is the last chance to propose an alliance between Auntie's Choice and The Order.
Get Help from The Order of the Ascendant
| Choice | Results |
|---|---|
| Propose an Alliance | ・Continues An Equitable Arrangement quest.
・The Order and Auntie's Choice work together to reclaim the Archive. |
| Side with the Order | ・Fails An Equitable Arrangement quest.
・Starts Methods of Applied Force quest. ・The Order reclaims the Archive. |
If you choose The Order to seek help with the Archive, find Vicar Laureate Alden Levin in Laplace's Garden on Cloister. Levin will ask you to propose an alliance to Bishop Ruth once you gain the Order's trust and meet her.
To gain the Order's favor, find in Laureate Enola Kraft in Laplace's Garden. Accept and complete the two quests she will issue you:
Once done, you'll gain an audience with Presiding Bishop Ruth Basar. Propose an alliance to her, or agree to side with the Order to reclaim the Archive. This is the last chance you can arrange an alliance.
Negotiatie an Alliance Between the Factions
| Choice | Results |
|---|---|
| Successfully Form an Alliance | ・Continues An Equitable Arrangement quest.
・Auntie's Choice and the Order work together to reclaim the Archive and fight the Protectorate. |
| Fail to Negotiate an Alliance | ・Fails An Equitable Arrangement quest.
・Both factions refuse to support you in infiltrating the Archive. |
If you choose to form an alliance between the Order and Auntie's Choice, gain their favor first by doing their faction quests. Once you're given an audience with Presiding Bishop Ruth Basar or Auntie Cleo, choose the dialogue that express the intention to form an alliance between their factions.
Afterwards, a negotiation will be agreed upon as part of the quest, An Equitable Arrangement. You'll take the role of a mediator and you can choose to favor one faction over the other, or ask for compromise.
It's required to pass multiple skill checks in order to convince Ruth Basar or Auntie Cleo to agree to a decision they are opposed to.
Gain Entry Into the Archive
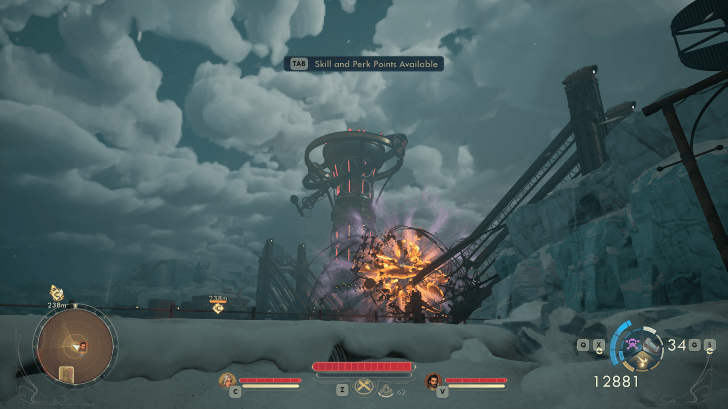
To gain entry into the Archive, head over to Newton in Cloister to cross the bridge blocked by a giant rift. Newton is located on the eastern side of the map, and is overrun by The Glorious Dawn cultists. To reach the bridge, you can convince the cultists to let you enter, shoot your way through, or use stealth.
Enter the Archive through Newton
| Step-by-step Walkthrough | |
|---|---|
| 1 | 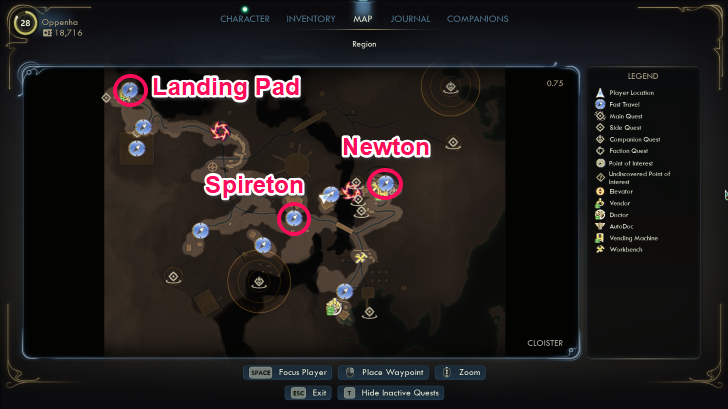 Newton is located on the eastern side of Cloister. From the Landing Pad, follow the roads eastward—or if you've already discovered Spireton, you can fast travel to it and head north east. Be ready to fight or run from the wildlife, Protectorate, and Scrappers scattered across the land. |
| 2 | 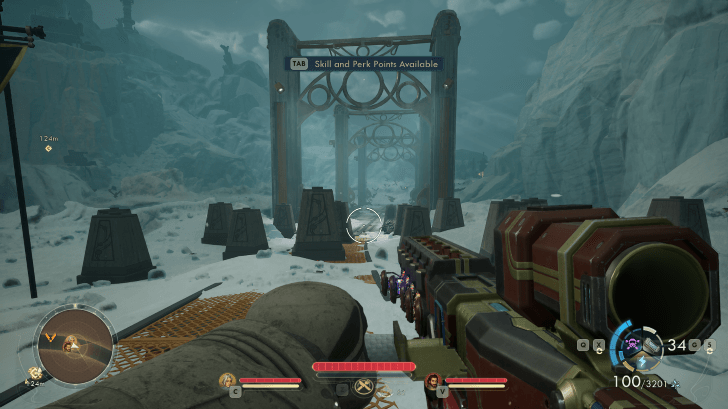 As you near Newton, you will cross a bridge full of Protectorate Automechs. Fight your way through or sneak pass. Then cross the bridge and follow the road to the left towards the small valley. |
| 3 |  The path here will be full of Mantipillars and Mantisaurs. Deal with them then walk straight until you reach a small open area. |
| 4 | 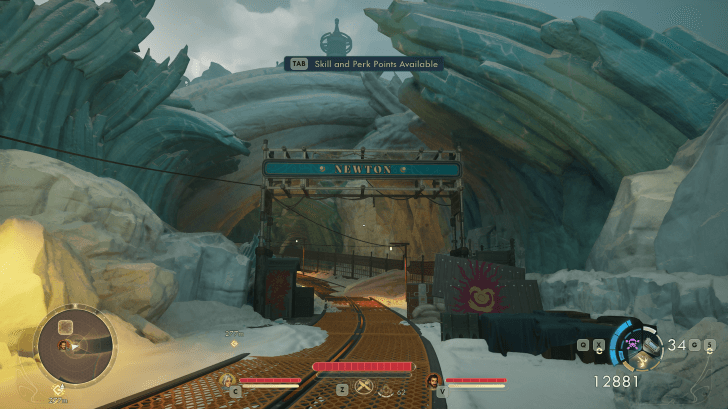 You should see the bridge with a giant rift in the distance, head right towards the tunnel to reach Newton. |
| 5 | 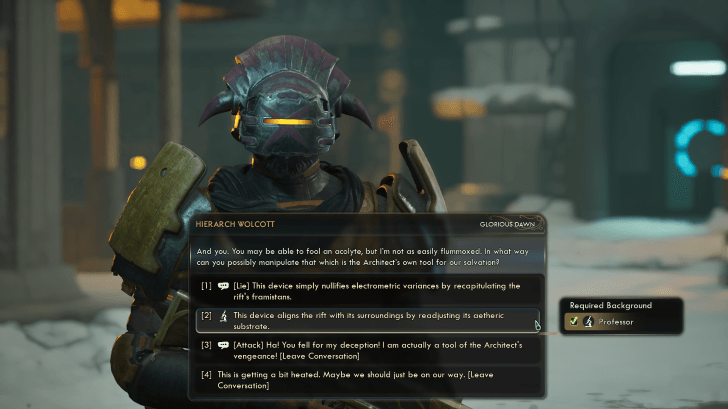 Newton has been overrun by Glorious Dawn cultists. You have a few options on how to reach the giant rift bridge while also dealing with the Dawn. ① Convince Hierarch Wolcott: requires
Failing the second skill check with Wolcott turn the cultists hostile. ② Bring Aza: Bringing Aza after she becomes the new Dawn leader, or if she's reforming the the Dawn, will lower both skill check requirement to
If you pass the skill checks, the cultist will leave with renewed purpose. This also unlocks a potential ending for her. ③ Shoot your way through: This method yields more loot and XP. ④ Sneak your way in: This method is faster and safer. |
| 6 | 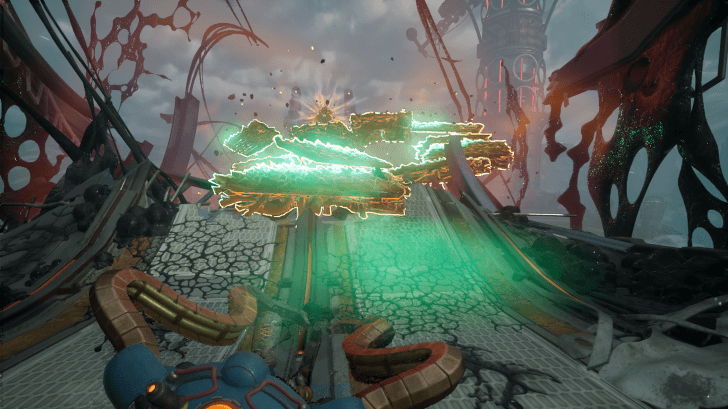 After dealing with the cultist, interact with the rift and jump your way across the bridge using the platforms it reconstructed. |
| 7 | 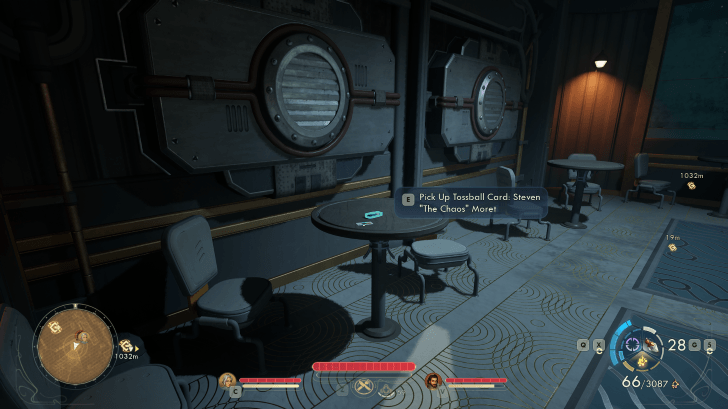 Once you reach the entrance to the Archive, turn left and enter the small cafeteria. Look to the first table by the door to find Tossball Card: Steven "The Chaos" Moret. Afterwards, enter the large door and ride the elevator to the Archive. |
Reach the Central Interface
| Step-by-step Walkthrough | |
|---|---|
| 1 | 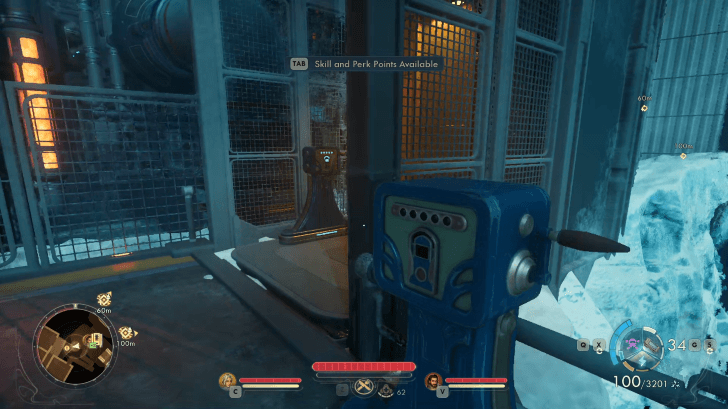 Next, find the Central Interface where you can process the rift data. From the entrance, turn left to ride a lift up. Be ready to fight as the pathway ahead is full of Protectorate soldiers and turrets. Note: the Archive is sprawling with Protectorate enemies. We recommend getting help from either The Order or Auntie's Choice (or both) in infiltrating the Archive. |
| 2 | 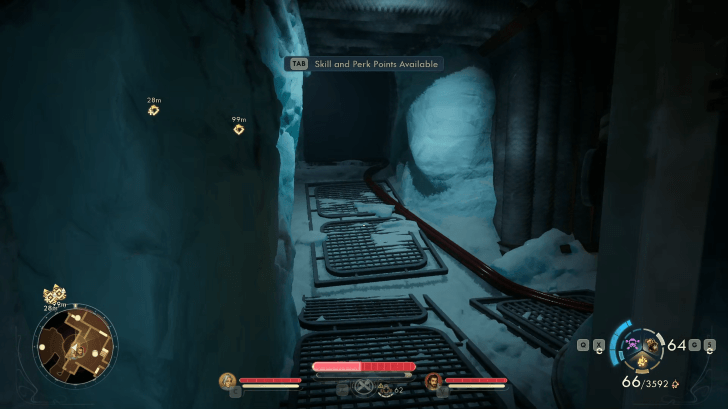 Once cleared, there will be two large double doors in this area. The other one is sealed for now, so head to the one on the left. Inside this room will be more Protectorate enemies, so deal with them. Afterwards, look right and follow the large red wires up the ramp through a door. |
| 3 | 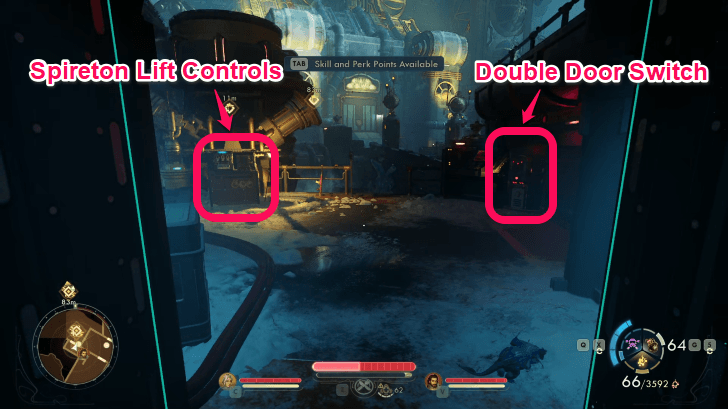 To the right of this small control room is a switch panel. Interact with this switch to unseal the other double door earlier. Walk back and enter the newly opened door. Note: If you've liberated Spireton for the Order or Auntie's Choice, the Spireton Lift controls is on the left side. Fix the controls with Spireton Lift Control Components, or a |
| 4 | 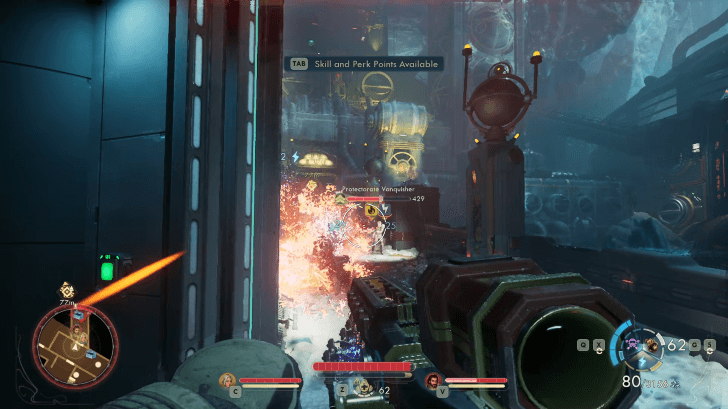 Across the bridge are even more Protectorate enemies. Clear them out and head straight towards the door to Central Interface. |
| 5 | 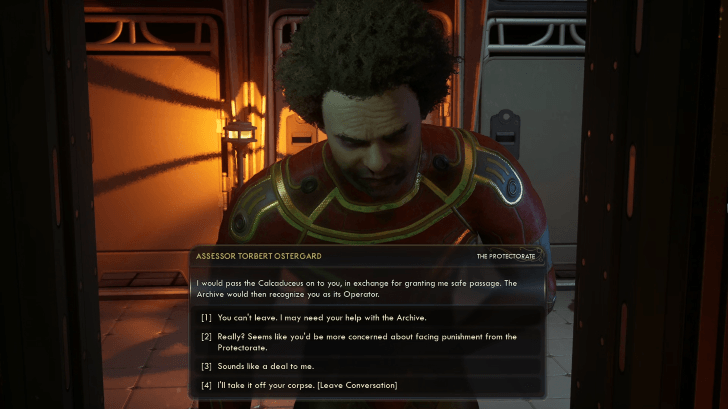 Head to the door on top of the stairway. The U.E.N.I.A.C. will decline you entry as it acquires the Calcaduceus, a special key used throughout the Archive. The door to the restroom will open and you will see Assesor Torbert Ostegard. Talk to him, and he'll gladly hand Calcaduceus over in exchange for his freedom. Before proceeding, wait for Ostegard to die of poisoning then loot his body for a Breath of Sovereign Silver primer. |
| 6 | 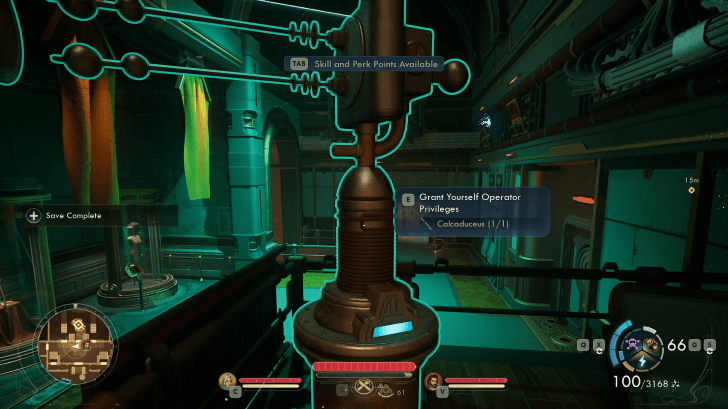 Now enter Central Interface main room by interacting with the bronze statue near the door to be granted access into the U.E.N.I.A.C. Speak to it. |
| 7 | 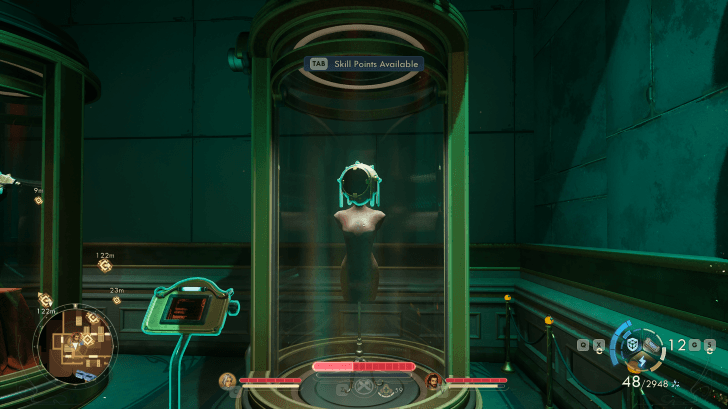 As a reward for accessing the Archive, the U.E.N.I.A.C. will unlock one of the display cases outside the room containing the Emanating Enlightened Seer Tutelary helmet. The U.E.N.I.A.C will now task you to send the rift program brick from Cold Storage in Cloister Underlands before it can process the rift data. |
Enter Cold Storage in Cloister Underlands
The U.E.N.I.A.C will open access to Cloister Underlands. You can head directly to Cold Storage to send a rift program brick, or fix Thermal Transfer as well to ensure that the U.E.N.I.A.C will not sustain damage while processing the rift data.
Repair Thermal Transfer (Optional)
| Steps to Repair Thermal Transfer | |
|---|---|
| 1 | 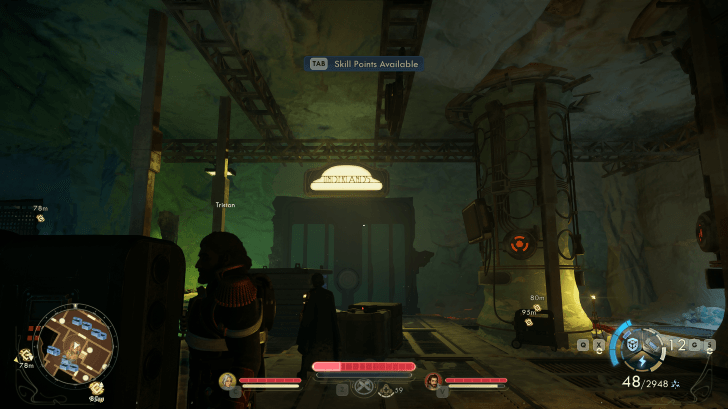 Reach Cloister Underlands by exiting Central Interface and heading back to the bridge. Head straight and enter the double doors again, then walk towards the entrance to the Underlands. |
| 2 | 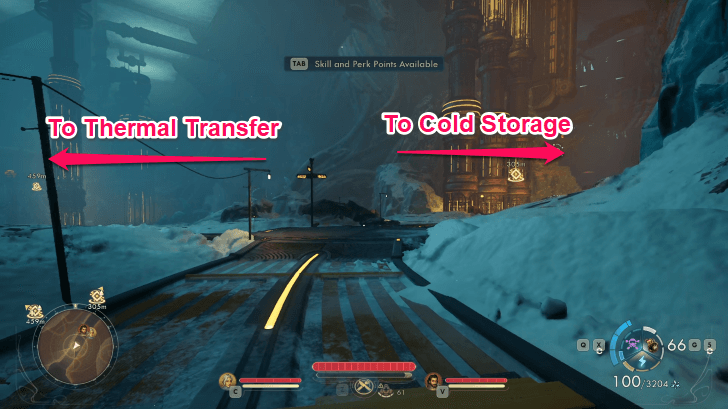 Once you reach the Underlands, follow the road until you reach a fork. Going left will take you to Thermal Transfer, while walking straight will take you to Cold Storage. Head left and take the lift down. You'll encounter Initiate Vance as you exit the elevator, you can explore around and help the trapped Order personnel, or continue down the path towards Thermal Transfer. |
| 3 | 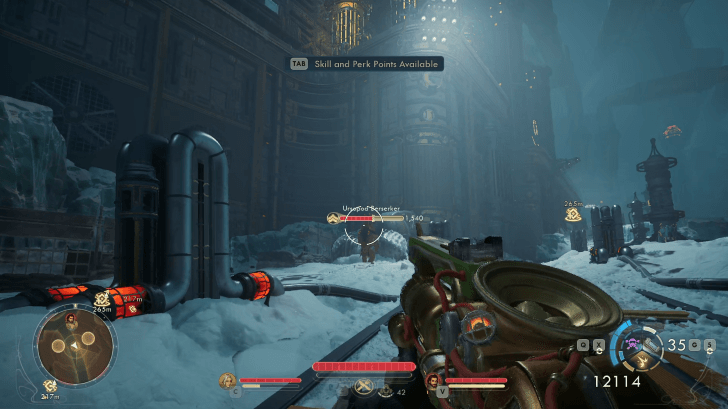 Continue down the path and once you reach a fork, ignore the bridge and keep going straight. Be ready to fight as the area is full of wildlife like Ursopods and Crabbles. Reach the end of the path and enter the tunnel. |
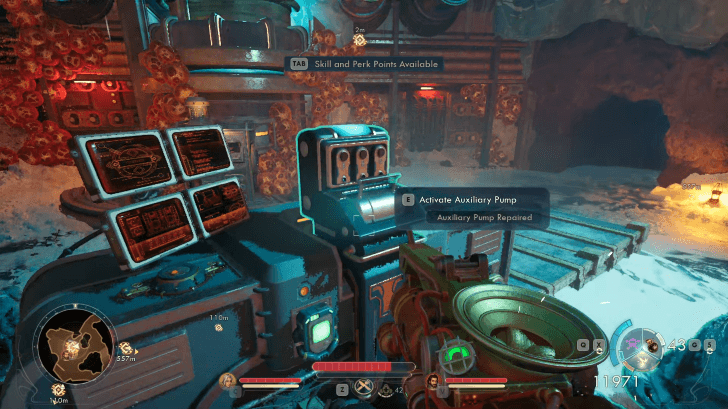
| 4 | 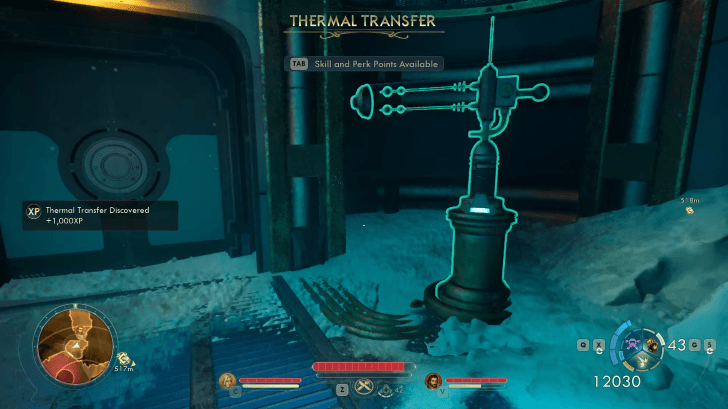 Gain entry into Thermal Transfer using Calcaduceus. Upon entering the first room, you'll be attacked by Crabbles. After the fight, find the dead Protectorate Trooper leaning on a crate, and read the datapad to learn that the Auxiliary Pump and Release Valve Generator need to be repaired. Proceed to the next area. |
| 5 | 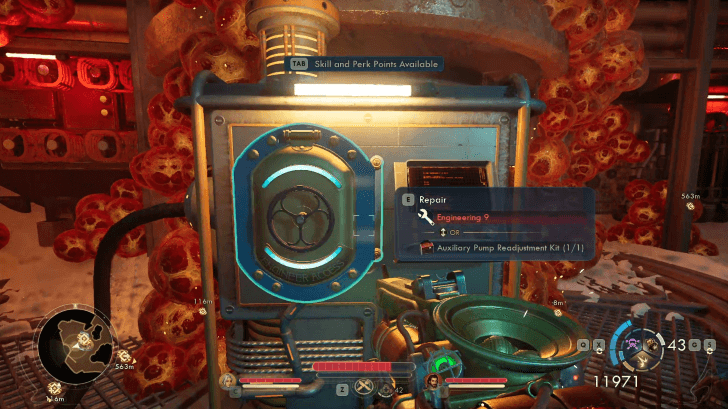 In the next area you will see that the path to the Auxiliary Pump is covered with Crabble eggs. Bash or shoot the eggs to pass through. Crabbles will attack as soon as you enter the area. After the fight, you'll need a Readjustment Kit to fix the Auxiliary Pump which can be found by following the bloodstains on the floor. If you have |
| 6 | 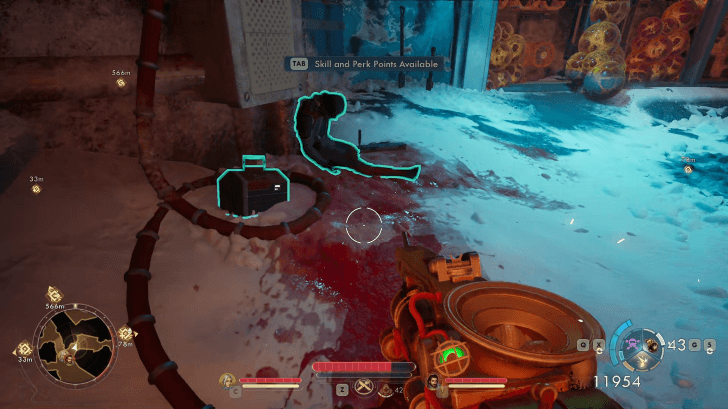 Follow the bloodstains until you reach another room blocked with Crabble eggs. Inside the room you'll find the Auxiliary Pump Readjustment Kit next to a dead Protectorate Trooper. The Trooper has an Advanced Decryption Key as loot as well. Go back to the Auxiliary Pump to fix it. |
| 7 | 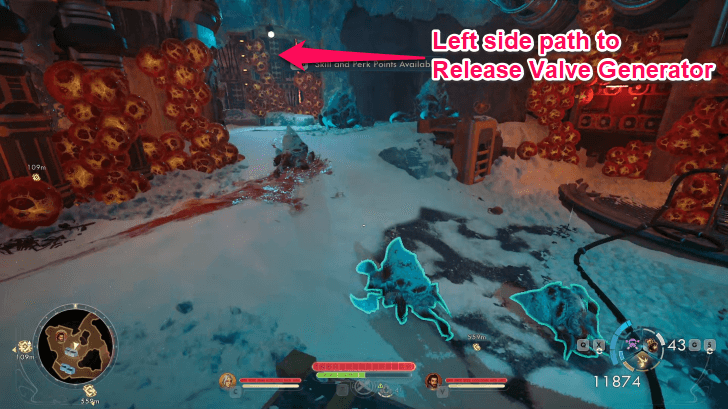 Using the Readjustment Kit or
Head left to the open area to find the Release Valve Generator next. |
| 8 |  Follow the path around the corner up a slope. Be ready for combat as Crabbles also guard this area. Continue your way uphill until you reach the Release Valve Generator which needs a fuse. Head left to find a broken bridge then jump across. |
| 9 | 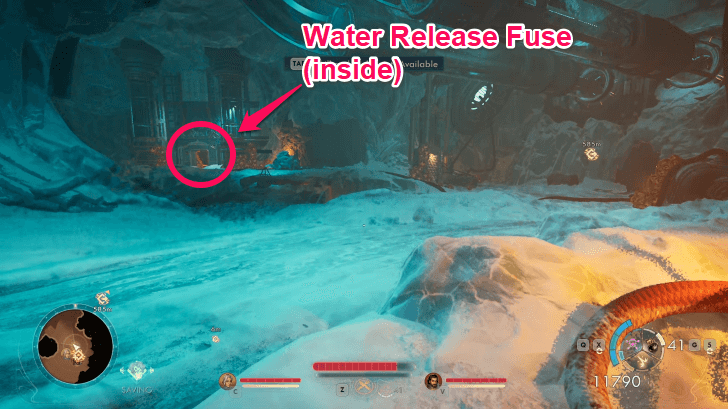 Enter the doorway ahead and inside you'll find the fuse on top of the bed. Bring the fuse back to the control panel and activate the switch to fix the Release Valve Generator. |
| 10 | 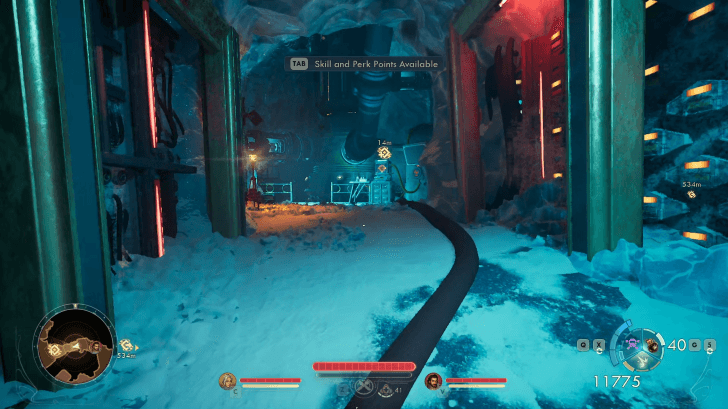 Next, find the terminal to activate the system. Follow the path ahead and interact with the terminal to restore the power. Before you leave, there's an Advanced Decryption Key on a chest to the left. |
| 11 | Continue on to Cold Storage if you haven't done so yet, or you can also explore Cloister Underlands.
To continue the quest, go back to Archive Central Interface. |
Send Rift Program Brick from Cold Storage
| Step-by-step Walkthrough | |
|---|---|
| 1 | Reach Cloister Underlands by exiting Central Interface and heading back to the bridge. Head straight and enter the double doors again, then walk towards the entrance to the Underlands. |
| 2 | Once you reach the Underlands, follow the road until you reach a fork. Going left will take you to Thermal Transfer, while walking straight will take you to Cold Storage. Head straight and follow the road until you reach the bridge. |
| 3 | 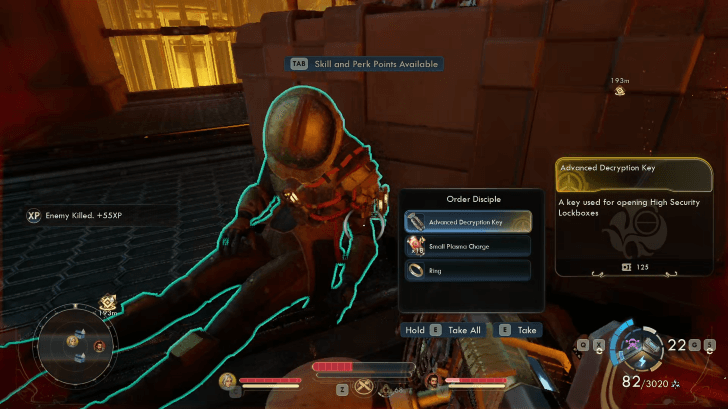 Be ready to fight as the bridge is guarded by Security Turrets. Clear them out then look for the corpse of an Order Disciple leaning against the crate. Loot his body for an Advanced Decryption Key. Cross the bridge and continue ahead. |
| 4 |  As you reach the top of the slope, there will be a building to the right with a few Order personnel inside. You can speak to Provost Coulter to learn what awaits inside Cold Storage. If you've already activated the lifts, the elevator here leads to Laplace's Garden in Cloister Overland. Once done, head out the building and cross the bridge to Cold Storage. |
| 5 | 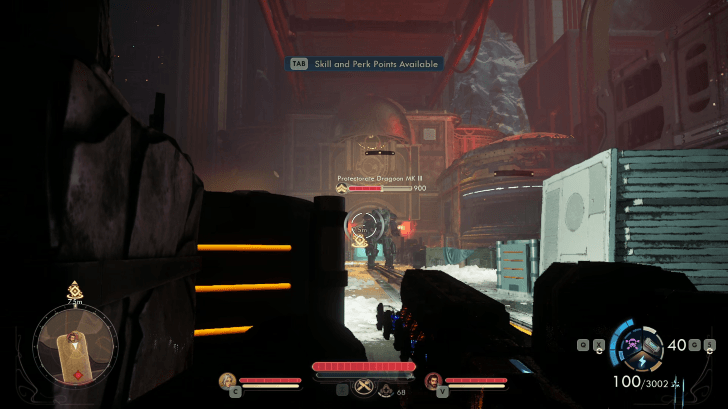 Be wary as the bridge is guarded by Protectorate soldiers, turrets, and a Protectorate Dragoon. Enter the building ahead once you clear the area. |
| 6 | 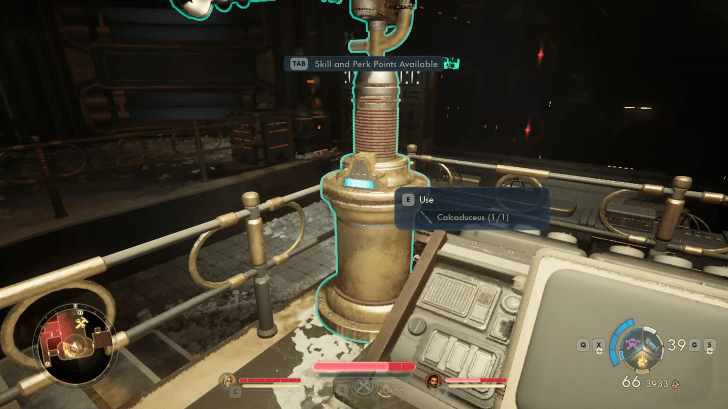 Before you can do anything inside Cold Storage, you need to be granted access. Activate the bronze statue near the control panels using Calcaduceus. U.E.N.I.A.C tells you to head inside to Cartridge Extractor Controls. |
| 7 | 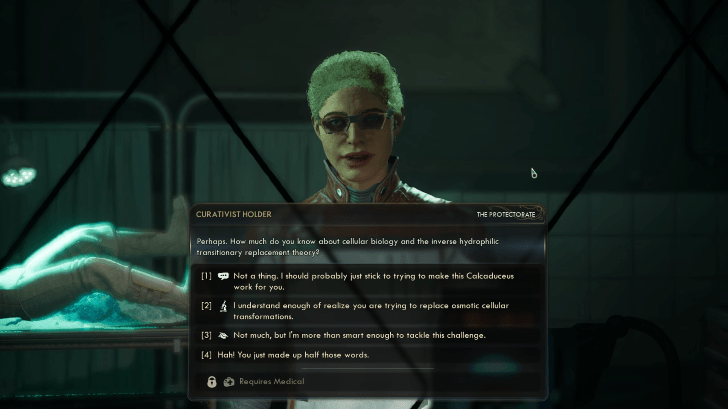 After activating the facility with Calcaduceus, Curativist Holder calls you over to ask what you did. Agree to help her so that she'll open the door to the elevator. Assist her by passing any of the following skill checks:
・ ・ ・ ・ Provoking Holder or refusing to help causes her to call the guards on you. There are no consequence to helping, killing, or ignoring Holder. |
| 8 | 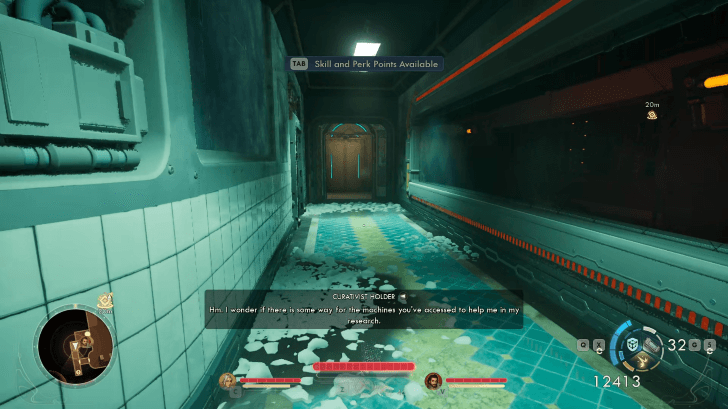 Enter the door that Holder opened, then walk to the end of the hallway to reach the elevator. Ride the elevator down and cross the walkway. Attacking the Protectorate soldier on this bridge will alert the enemies nearby. After dealing with him, enter the building. |
| 9 | 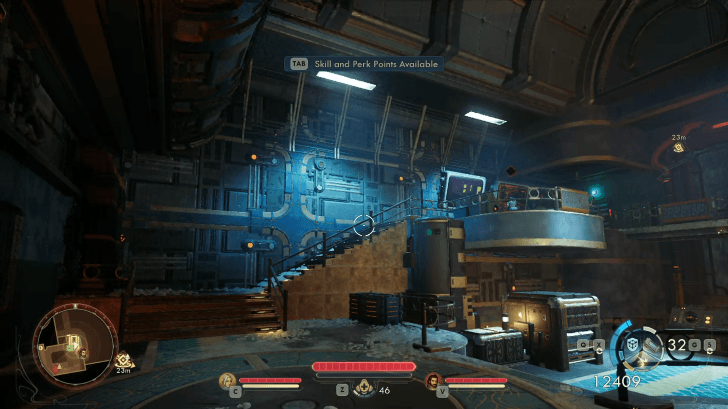 Inside are a few Protectorate soldiers. Clear the place out, climb the stairs, and ride the elevator to Cartridge Extractor Controls. |
| 10 |  The room ahead is guarded by Protectorate soldiers. If you don't want to waste resource on combat, you can freeze them by turning right on the open doorway and activating the switch for the Fire Suppression System. Head up the stairs and find the switch to start the Data Brick Extraction. The security inside this room triggers once you interact with the switch. After the fight, head to the Rail Operation Platform. |
| 11 | 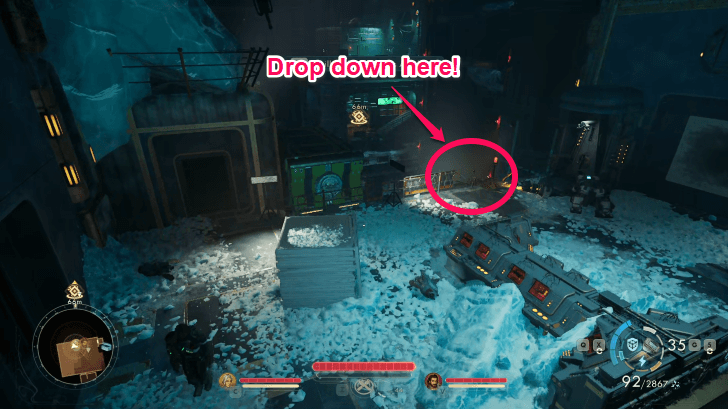 To find Rail Operation Platform, head out of the broken fence and drop down into the walkway below. Follow the pathway and jump down to the platform below. |
| 12 | 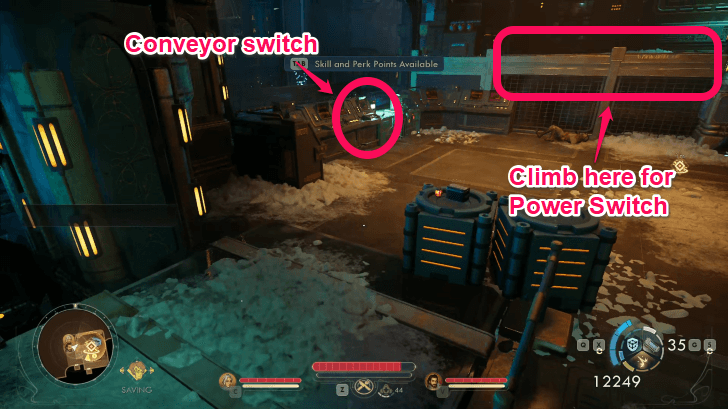 Head straight and follow the curved path around the building. Up ahead is another area guarded by the Protectorate. Take them out, then head to the conveyor switch in the middle of the room. This switch needs power, so use your N-Ray Scanner to follow the wire, or simply climb up the ledge using double-jump then activate the breaker and restore power to the switch. Head to Data Gateway Station next. |
| 13 | 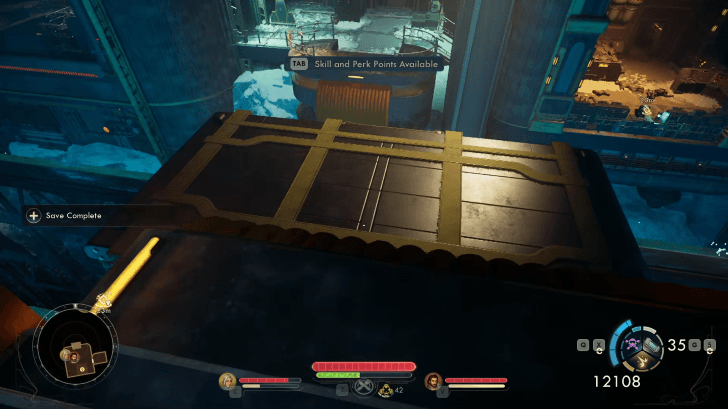 To reach Data Gateway Station, turn around and ride the lift up. The building ahead has Protectorate guards so make sure to clear them out. Then jump your way across using the data brick to the next platform to reach Data Gateway Station. Interact with the switch inside to activate the conveyor doors. Before leaving the room, there is a High Security Lockbox right next to the control panel. Afterwards, leave through the door and go back to the Archive Central Interface, or consider repairing Thermal Transfer. |
Return to Central Interface
Once you return to Central Interface, a representative of The Order or Auntie's Choice will appear if you decide to give the Archive to either faction. The representatives mention that the Punch Processing and Plasma Reactor have hidden caches that requires a passcode to enter.
For the Order representative, you can convince her with Speech 9 to give you the passcode, while the Auntie's Choice representative can be bribed with 250 bits or convinced with Speech 9. Once done, proceed to Central Interface and speak to U.E.N.I.A.C.
Re-Enable the Archive
| Routes in Re-Enabling the Archive | |
|---|---|
| Repair the Reactor | Re-Enable Punch Processing |
The U.E.N.I.A.C gives you access to the upper areas of the Archive to repair the Plasma Reactor and re-enable Punch Processing. It will also unlock another display case with the melee weapon, the Tremor Cleaver.
For this next objective, it doesn't matter which you do first, but take note that repairing the Plasma Reactor will have you fight against an Autonomous Bulwark Automech, a boss enemy.
Repair the Reactor
| Step-by-step Walkthrough | |
|---|---|
| 1 | 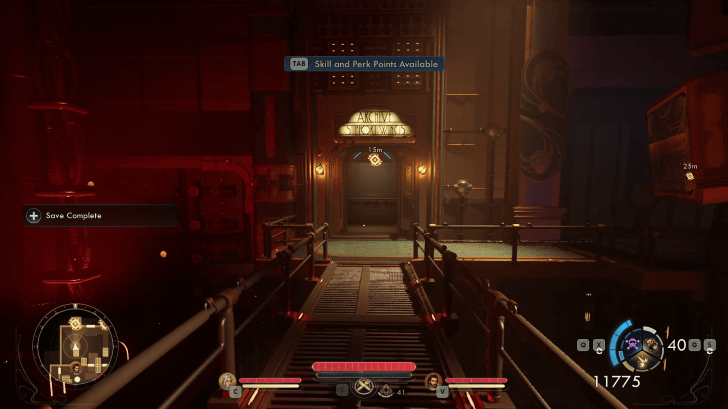 From U.E.N.I.A.C, head down the stairs to the right, and ride the elevator down to Archive Support Wings. |
| 1 | From U.E.N.I.A.C, head down the stairs to the right, and ride the elevator down to Archive Support Wings. |
| 2 | 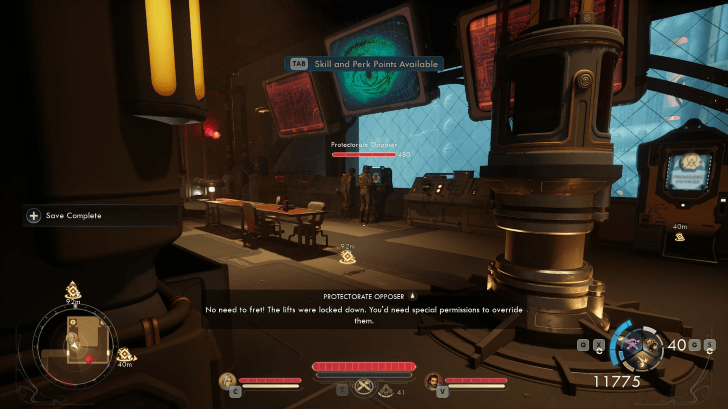 Once you arrive, there will be two Protectorate soldiers near the terminal. Eliminate them, then head to the door on the left and enter Plasma Reactor. |
| 4 | 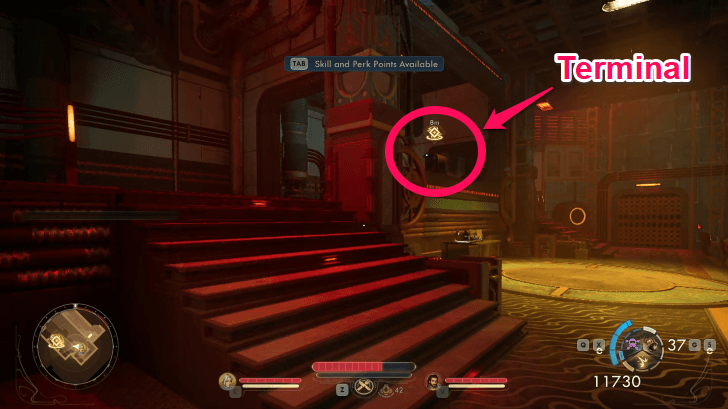 Find the terminal to learn that the reactor requires manual maintenance, and the switch is guarded by Protectorate soldiers and an Autonomous Bulwark Automech. Before engaging combat, it's recommended to make use of the Reactor's backup security systems. |
| 5 |  The five backup security systems can be activated by using Reactor Fuses found around the room. There are only four fuses to use, so it's not possible to activate all the security systems. The four Reactor Fuses can be found in the following places; ① One near the terminal in the room. ② Inside the red storage room on the left side of the area. ③ On a workbench in the middle of the room. Requires
④ Inserted in the Security Turrets port. Removing this will activate the Security Turrets. |
| 6 | 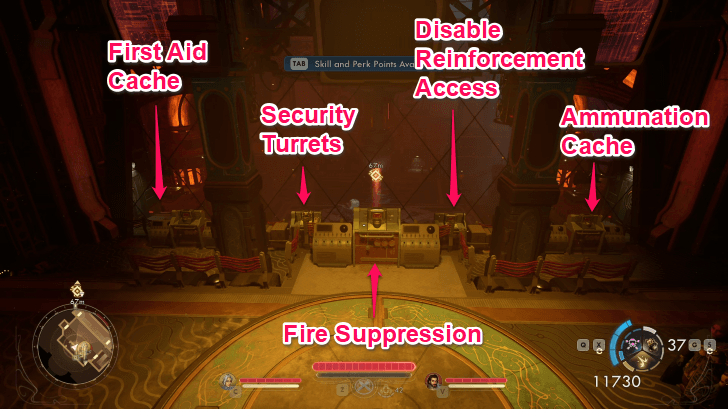 Pick four out of the five security backup systems to activate. We recommended to avoid activating the Ammunition and First Aid cache as they're not worth it. Once you're finished deciding, head to the elevator. ① Security Turrets: Can be re-activated by removing the fuse. ② Emergency Ammunitions Cache: Can be found on the east side of the arena. ③ Emergency First Aid Cache: Can be found on the west side of the arena. ④ Reinforcement Access to Reactor: Closes the doors in the arena so no Protectorate reinforcements can enter. ⑤ Fire Suppression System: Freezes the Protectorate soldiers in the arena, but not the Bulwark Automech. |
| 7 | 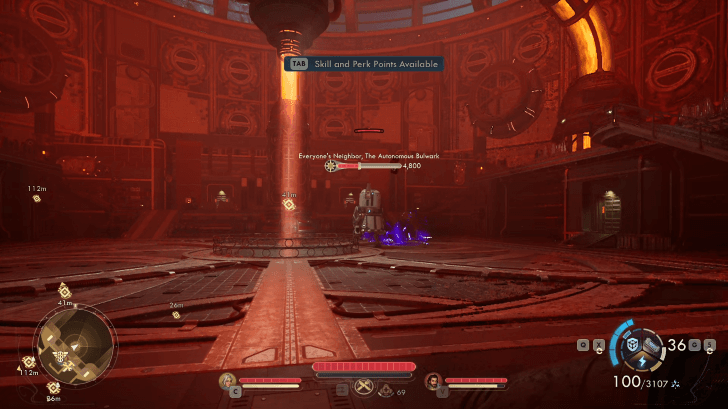 Enter the large door and prepare to fight the Protectorate enemies and Everyone's Neighbor, Autonomous Bulwark Automech. Automechs are weak to shock damage, so we recommend using shock weapons or shock grenades to stun it. This gives you time to counterattack, heal, or use companion abilities. Once the fight is over, head to the middle of the arena to turn on the switch and fix the reactor. |
| 8 | 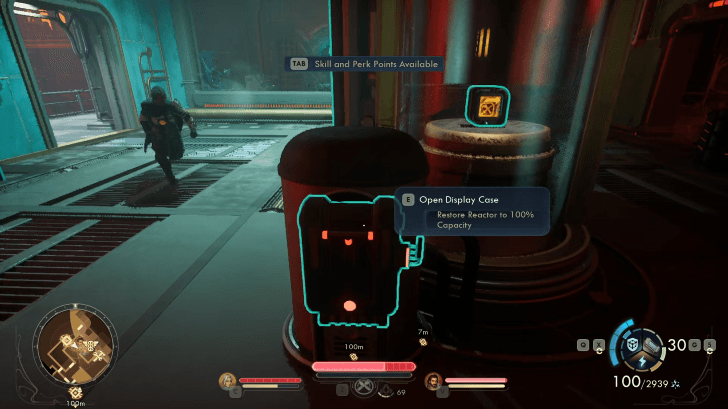 Head back out the double doors and flip the switch near the display case to get the Tremor Cleaver Focus Grip mod. Return to the Archive Central Interface through the door to the right. Re-enable Punch Processing next. |
Re-enable Punch Processing
| Step-by-step Walkthrough | |
|---|---|
| 1 | From U.E.N.I.A.C, head down the stairs to the left and ride the elevator down to Archive Support Wings. |
| 2 | Once you arrive, there will be two Protectorate soldiers near the terminal. Eliminate them, then enter the door on the right side to Punch Processing. |
| 3 | 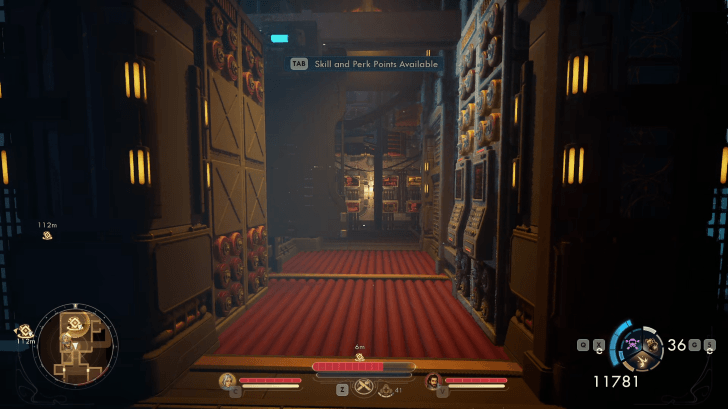 Follow the path ahead and prepare to fight as this place is full of Mantipillars and Mantisaurs. Once dealt with, head up the ramp and flip the switch to restart the Punch Processing rail system. Head back down and enter the doorway ahead, then pass through the moving punch card rail. Go to the door on the left. |
| 4 | 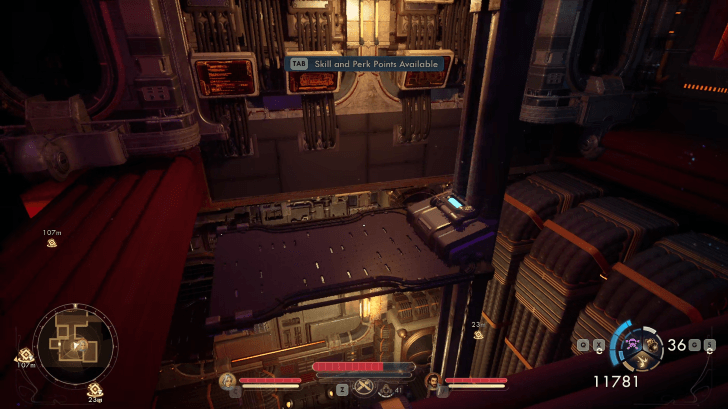 Enter the room and activate the switch that enables the Vertical Punch Card rail. Exit the room and jump onto the moving punch card rail going down, and jump off to the next area full of Mantipillars. |
| 5 | 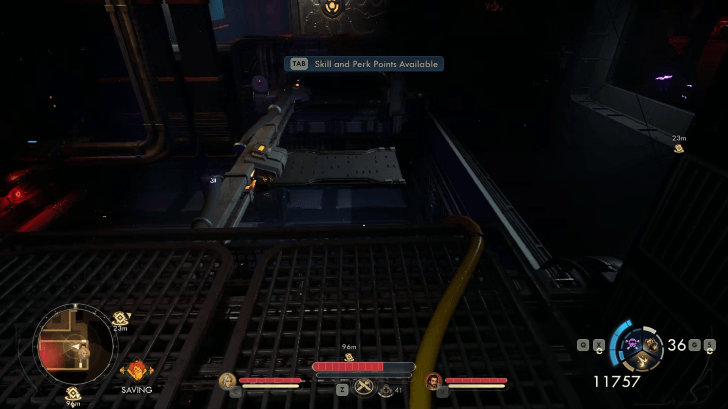 After clearing the area of enemies, jump up the crates with a yellow cloth and onto the pathway. Follow the path up and enter the door to activate the switch to reverse the Horizontal Rail's direction. Leave the room and jump into the punch card rail ahead that's moving horizontally. Jump onto the next platform, and enter the doorway to the right. |
| 6 | 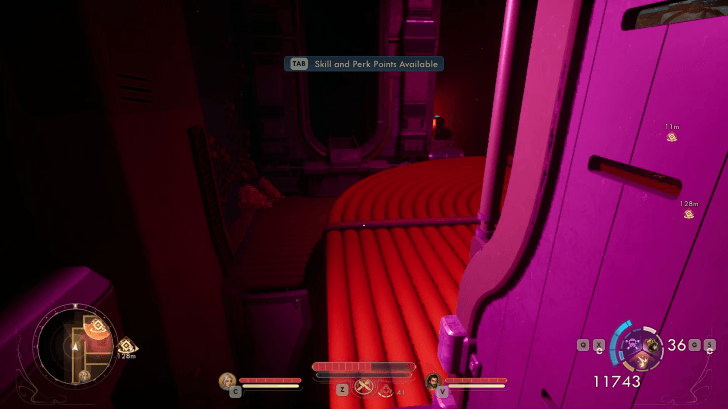 Flip the switch inside the room that reverses the Horizontal Rail's direction. To pass through the shock laser trap, follow behind the moving horizontal punch card rail to block lasers until you can safely move through the next area. |
| 7 | 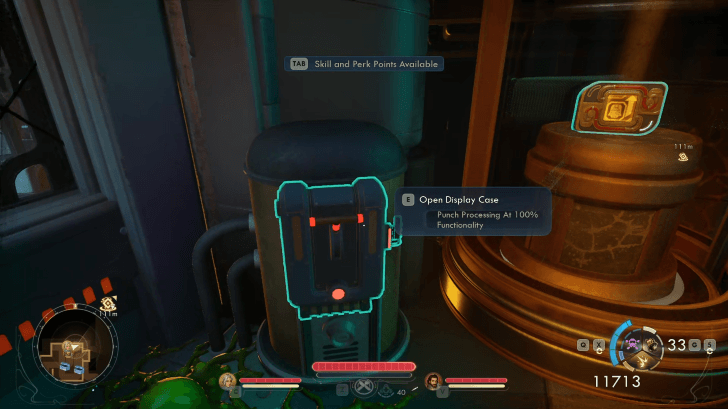 The next area is filled with Mantisaurs and Mantipillars. Clear them out, then activate the switch to re-enable Punch Processing. Don't forget to activate the display case to get the Reflective Amplification Plating mod. Use the elevator to head back to Archive Central Interface and repair the Plasma Reactor if you haven't done so. |
Resolve Personality Crisis
Speak to U.E.N.I.A.C to analyze the rift data. Unfortunately, it'll not be able to do anything due to the disruption of two other priority (or "personality") sets in its system.
You must choose which of the two priority sets to remove. You can ask U.E.N.I.A.C about its priority sets to get a better idea for your choice. Once you've decided, U.E.N.I.A.C will open the Priority Control Access Nook Head down stairs and enter the room.
Eliminate Priority Sets
| Priority Set | Results |
|---|---|
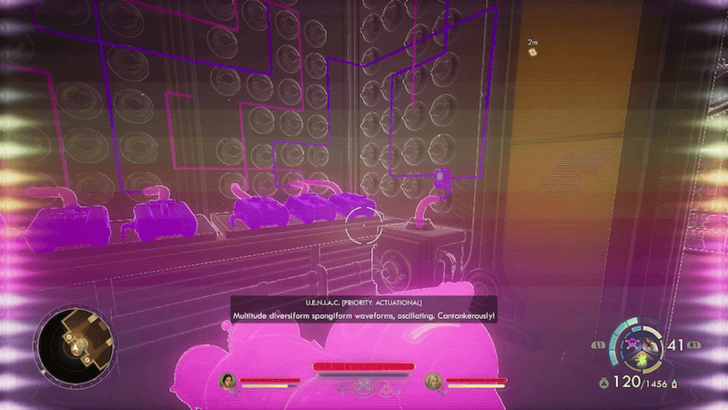
| Blue Node [Priority: Actuational] | Priority set made by The Order of Ascendant.
Main priority is to help humanity towards ultimate ascendance. The Order will be pleased if this is the priority set when the Archive is handed over. |
| Yellow Node [Priority: Profitalist] | Priority set made by Auntie's Choice.
Main priority is to bankrupt rivals and force them to buy all manner of necessities from them. Auntie's Choice will be pleased if this is the priority set when the Archive is handed over. |
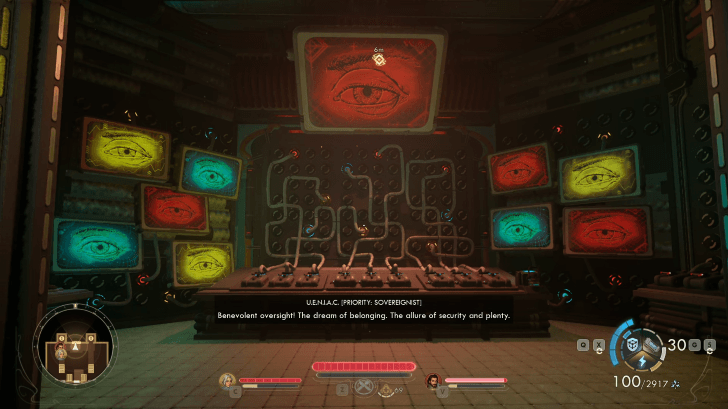
| Red Node [Priority: Sovereignist] | Priority set made by the Protectorate.
Main priority is to hinder outsiders from disrupting the Protectorate's perfect system. Auntie's Choice or The Order will not be happy if this is the priority set when the Archive is handed over. |
Inside Priority Control Access Nook are switches and nodes you can use to decide which priority set to remove. Turn off the switch connected to the colored node of the priority sets you want to eliminate. After choosing two priority sets to remove, interact with the fuse on the right side to reset the Archive in safe mode. Return to U.E.N.I.A.C.
If you sided with Auntie's Choice or The Order, or made an alliance, the priority set that remains will either please or displeased the faction that takes control of the Archive. However, your choice won't affect your reputation for that faction.
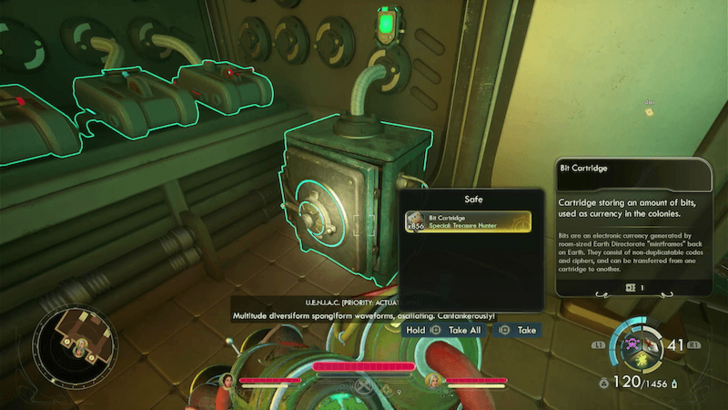
How to Open the Archive Safe Puzzle
You'll see a safe in the corner of the room connected to another set of switches and nodes. Use the N-Ray Scanner to see the nodes that connects to the switches.
If you flip the correct switches, it powers up the safe and opens it. You'll get 856 bits for your efforts. It's recommended to open the safe while in this room as it is missable.
List of All Missables and Points of No Return
Analyze Rift Data
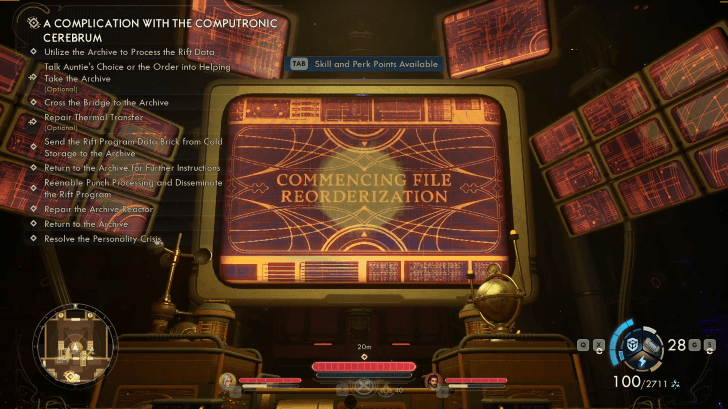
Once the Archive is reset, speak to U.E.N.I.A.C again to analyze the rift data. After it's done, it will unlock the last display case containing the Prescience armor.
Take note that any items you missed in the Plasma Reactor or Punch Processing will not be accessible once you exit Central Interface. Once done, leave Central Interface.
If you sided with Auntie's Choice or The Order, the representative will ask you to surrender Calcaduceus and the control of the Archive. Your choice here will significantly affect the ending. After making a decision, the quest ends.
Surrender Calcaduceus and the Archive
| Choice | Results |
|---|---|
| Give to Auntie's Choice | ・Auntie's Choice takes over the Archive.
・Your reputation to the Order will change to "Kill On Sight". |
| Give to the Order | ・The Archive is returned to the Order.
・Your reputation to Auntie's Choice will change to "Kill On Sight". |
| Give to the Alliance | ・Both Auntie's Choice and The Order will benefit from the Archive as agreed upon in the negotiations during Equitable Arrangement. |
| Keep It for Yourself | ・Refusing to surrender the Archive will result in the faction in charge to turn hostile.
・Your reputation to the faction in charge will change to "Outlaw". |
If siding with a faction, or if an alliance is formed, a representative of that faction asks you to hand over Calcaduceus and the Archive.
At this point, you can give it to the representative, give Calcaduceus to the opposing faction, give it to the alliance, or keep it for yourself.
Your decision on who controls the Archive will result in one of the endings.
A Complication with the Computronic Cerebrum Missables
Fixing Thermal Transfer
Returning to Central Interface after sending the rift program brick from Cold Storage and without fixing the Thermal Transfer will lock you out of the option to do so.
Without fixing Thermal Transfer, the U.E.N.I.A.C will sustain irreparable damage after analyzing the rift data. This will anger the faction you'll hand the Archive to.
Tremor Cleaver Focus Grip Mod
The Tremor Cleaver Focus Grip mod is found in the Plasma Reactor inside the Archive Central Interface. Open the display case after activating the switch near the Bulwark Automech and fixing the reactor.
Once the rift data has been analyzed, the Central Interface will permanently close and the area will never be accessible for the rest of the game.
Reflective Amplification Plating Mod
The Reflective Amplification Plating mod is found in Punch Processing inside the Archive Central Interface. The display case is accessible once the switch is activated in the last room of the area, and the Punch Process is re-enabled.
Once the rift data has been analyzed, the Central Interface will permanently close and the area will never be accessible for the rest of the game.
The Archive Safe
Obtaining the contents of the locked safe inside Priority Control Access Nook will not be accessible once Central Interface closes down.
It's recommended to solve the switch puzzle as soon as you gain access to the room as it is missable. The safe contains 856 bits.
A Complication with the Computronic Cerebrum Choices
Choosing the Priority Set for the U.E.N.I.A.C
| Choice | Results |
|---|---|
| Blue Node [Priority: Actuational] |
Main priority is to help humanity towards ultimate ascendance.
The Order will be pleased if this is the priority set when the Archive is handed over. |
| Yellow Node [Priority: Profitalist] |
Main priority is to bankrupt rivals and force them to buy all manner of necessities from them.
Auntie's Choice will be pleased if this is the priority set when the Archive is handed over. |
| Red Node [Priority: Sovereignist] |
Main priority is to hinder outsiders from disrupting the Protectorate's perfect system.
Auntie's Choice or The Order will not be happy if this is the priority set when the Archive is handed over. |
The priority set that you chose to keep will garner a reaction from the faction you give the Archive to.
The representative of The Order or Auntie's Choice will be pleased if you keep the priority set that align with their goals (blue node for The Order, and yellow node for Auntie's Choice).
However, leaving the red node as the priority set would leave the representatives either confused or disappointed.
Presiding Bishop Ruth Basar and Auntie Cleo will also be happy if you leave the priority set that fits their faction. However, this does not affect your reputation with them.
Give the Archive to Auntie's Choice, The Order, or Keep for Yourself
| Choice | Results |
|---|---|
| Give to Auntie's Choice or The Order | The faction will take control of the Archive.
Your reputation to the opposing faction will change to "Kill On Sight". Has a major effect on the ending. |
| Give to the Alliance | Both Auntie's Choice and The Order will benefit from the Archive unless only one faction owns it as agreed upon during the negotiation for the quest Equitable Arrangement.
Refusing to surrender the Archive will result in the faction in charge to turn hostile. Has a major effect on the ending. |
| Keep It for Yourself | Refusing to surrender the Archive will result in the faction in charge to turn hostile.
Your reputation to the faction in charge will change to "Outlaw". Has a major effect on the ending. |
If you got help from either The Order or Auntie Cleo, or if you have an alliance between the two factions, you will be asked to surrender control of the Archive by handing over Calcaduceus.
At this point, you have the choice to give it to either one of the factions or the alliance, or keep it for yourself and turn back on your word.
List of Choices and Consequences
A Complication with the Computronic Cerebrum Rewards
Emanating Enlightened Seer Tutelary Helmet
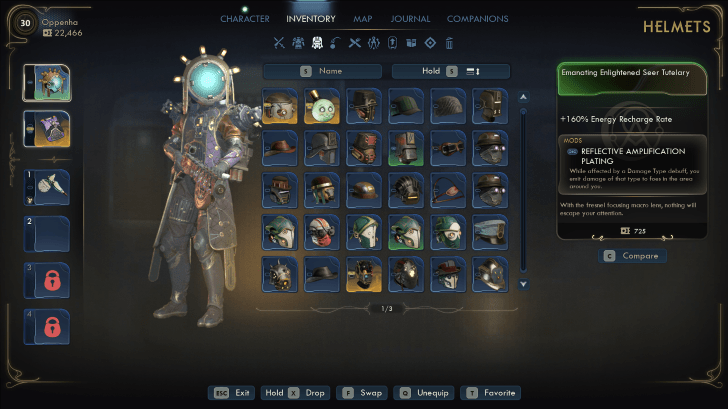
The Emanating Enlightened Seer Tutelary is inside a display case in the Archive. it is given by U.E.N.I.A.C when you are first granted access into the Central Interface.
The Tremor Cleaver Weapon
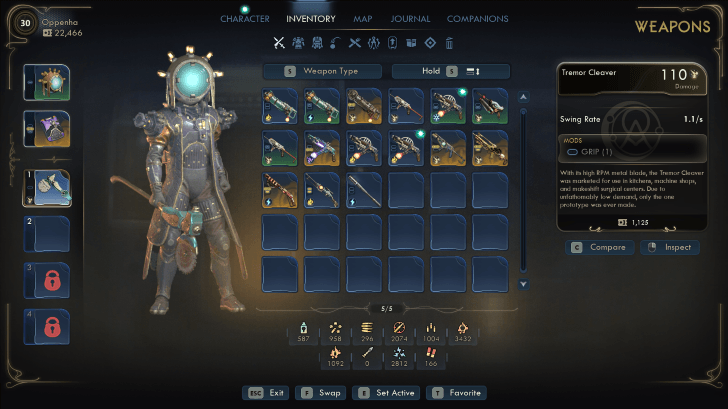
The Tremor Cleaver is found inside a display case in the Archive. U.E.N.I.A.C will unlock the display case as a reward for sending a rift program brick to the Central Interface.
List of All Heavy Melee Weapons
Prescience Armor
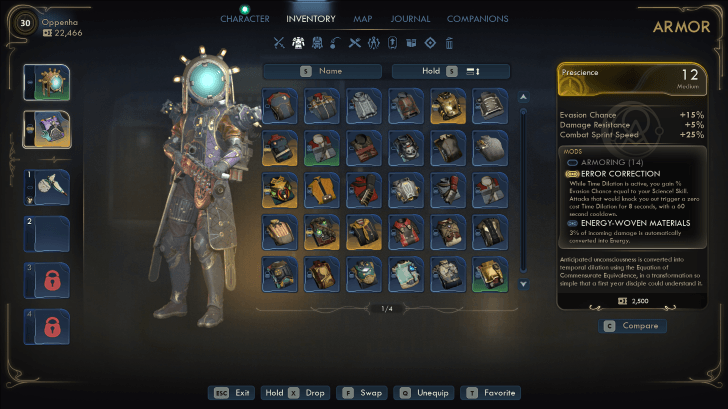
The Prescience is found displayed in one of the glass cases in the Archive. This is the last reward U.E.N.I.A.C will unlock once its priority set is resolved and before shutting down.
Prescience Stats and How to Get
A Complication with the Computronic Cerebrum Info
| A Complication with the Computronic Cerebrum Info | |||||
|---|---|---|---|---|---|
| Type | Main Quest | ||||
| Location | The Incognito | ||||
| How to Start | |||||
| Obtained when speaking to VAL in the Incognito right after Fiends in High Places. | |||||
The Outer Worlds 2 Related Guides

All Main Quests
| # | Main Quests |
|---|---|
| 1 | A Cause Worth Killing For |
| 2 | Recalling the Score |
| 3 | The Saboteur of Paradise |
| 4 | On the Trail of the Traitor ┗ Discrete Mathematics |
| 5 | Fiends in High Places |
| 6 | An Instrument to Unfold Space & Time |
| 7 | A Complication with the Computronic Cerebrum |
| 8 | Sins of the Past on the Precipice of the Future |
Comment
Author

A Complication with the Computronic Cerebrum Walkthrough
Please participate in our site
improvement survey
04/2026
improvement survey
04/2026
Would you assist in
improving Game8's site?
improving Game8's site?

×
We are listening to our users' valuable opinions and discussing how to act on them.
The information collected through this survey will be used for the purpose of improving our services. In addition, the information will only be disclosed a part of a statistic in a format that will not allow identification of personal information.
Begin Survey
Not Now
×
Please rate each item regarding Game8.co's Advertisements.
Amount of Ads
Very Dissatisfied
Somewhat Dissatisfied
Fine
Somewhat Satisfied
Highly Satisfied
Placement of Ads
Timing of Ad Display
Ad Loading Speed
Safeness of Ads
Content of Ads
×
Please rate each item regarding Game8.co's Quality of Articles.
Amount of information
Very Dissatisfied
Somewhat Dissatisfied
Fine
Somewhat Satisfied
Highly Satisfied
Frequency of updates
Speed of new information
Accuracy of articles
Understandibility of articles
Readability of sentences
×
Please rate each item regarding Game8.co's Usability of the Site.
Ease of finding information
Very Dissatisfied
Somewhat Dissatisfied
Fine
Somewhat Satisfied
Highly Satisfied
Loading Speed
Use of Color
Font Size
Visibility of Images
Easy to Understand Layout
×
Please rate each item regarding Game8.co's Message Boards, Comments.
Ease of Writing
Very Dissatisfied
Somewhat Dissatisfied
Fine
Somewhat Satisfied
Highly Satisfied
Readability
Ease in Finding Information
Comment Quality
Comment Quantity
Admin Response
×
Please rate each item regarding Game8.co's Site's new design.
Please rate our site's new design
Very Dissatisfied
Somewhat Dissatisfied
Fine
Somewhat Satisfied
Highly Satisfied
Do you think that the website's design change makes the site easier to use?
Has the new design made it easier for you to find information on the site?
Has the new design improved the overall visual appeal of the site?
How would you rate your overall satisfaction with the new design of the site?
×
How likely are you to recommend Game8 to someone you know?
Very Unlikely
0
1
2
3
4
5
6
7
8
9
10
Very Likely
If you have other opinions regarding potential improvement to the website, please share them with us. We would appreciate your honest opinion.
Note: This is a free response section, so you can proceed without entering anything.
Note: Please be sure not to enter any kind of personal information into your response.
Note: Please be sure not to enter any kind of personal information into your response.
×
Thank You
×
Thank you for participating in our survey! Your answers will help us to improve the quality of our website and services.
We hope you continue to make use of Game8.
We hope you continue to make use of Game8.
Close
Rankings
- We could not find the message board you were looking for.
Gaming News


![Forza Horizon 6 Review [Preview] | Beautiful Roads With a Whole Lot of Oversteer](https://img.game8.co/4460981/a7254c24945c43fbdf6ad9bea52b5ce9.png/thumb)
![Borderlands Mobile Review [Playtest] | The Same Borderlands Made Easy](https://img.game8.co/4465500/aac0c880a39ec5cd46073e49d18f3ed5.png/thumb)
Popular Games

Genshin Impact Walkthrough & Guides Wiki
Crimson Desert Walkthrough & Guides Wiki
Umamusume: Pretty Derby Walkthrough & Guides Wiki
Honkai: Star Rail Walkthrough & Guides Wiki
Monster Hunter Stories 3: Twisted Reflection Walkthrough & Guides Wiki
Wuthering Waves Walkthrough & Guides Wiki
The Seven Deadly Sins: Origin Walkthrough & Guides Wiki
Pokemon TCG Pocket (PTCGP) Strategies & Guides Wiki
Pokemon Pokopia Walkthrough & Guides Wiki
Zenless Zone Zero Walkthrough & Guides Wiki


Recommended Games
Fire Emblem Heroes (FEH) Walkthrough & Guides Wiki
Pokemon Brilliant Diamond and Shining Pearl (BDSP) Walkthrough & Guides Wiki
Super Smash Bros. Ultimate Walkthrough & Guides Wiki
Diablo 4: Vessel of Hatred Walkthrough & Guides Wiki
Cyberpunk 2077: Ultimate Edition Walkthrough & Guides Wiki
Yu-Gi-Oh! Master Duel Walkthrough & Guides Wiki
Elden Ring Shadow of the Erdtree Walkthrough & Guides Wiki
Monster Hunter World Walkthrough & Guides Wiki
The Legend of Zelda: Tears of the Kingdom Walkthrough & Guides Wiki
Persona 3 Reload Walkthrough & Guides Wiki


All rights reserved
© 2025 Obsidian Entertainment, Inc. Obsidian Entertainment, the Obsidian Entertainment logo, The Outer Worlds 2, and The Outer Worlds 2 logos are trademarks or registered trademarks of Obsidian Entertainment, Inc. All rights reserved.
The copyrights of videos of games used in our content and other intellectual property rights belong to the provider of the game.
The contents we provide on this site were created personally by members of the Game8 editorial department.
We refuse the right to reuse or repost content taken without our permission such as data or images to other sites.