This survey will take about 1 minute.
Your answers will help us to improve our website.
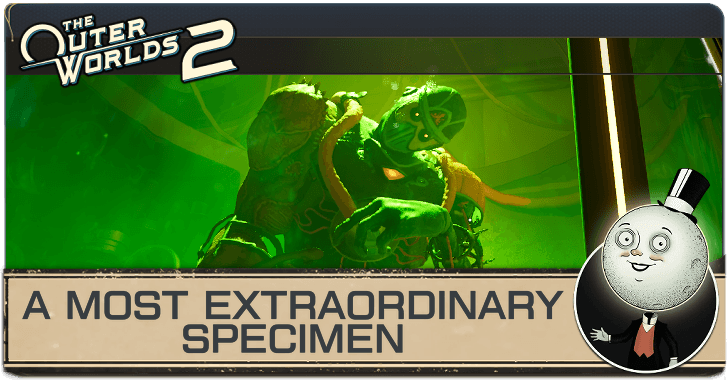
Outer Worlds 2
A Most Extraordinary Specimen Walkthrough
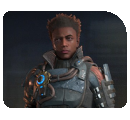
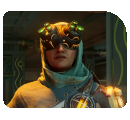
A Most Extraordinary Specimen is the second companion quest for Inez in the Outer Worlds 2. Read on for a full walkthrough of the companion quest, including info on how to unlock it and its rewards.
| Previous Quest | Next Quest |
|---|---|
| Better than Nature | Half-Truths in Advertising Full Measures |
List of Contents
How to Unlock A Most Extraordinary Specimen
Get the Message for Inez at the Undisputed Claim
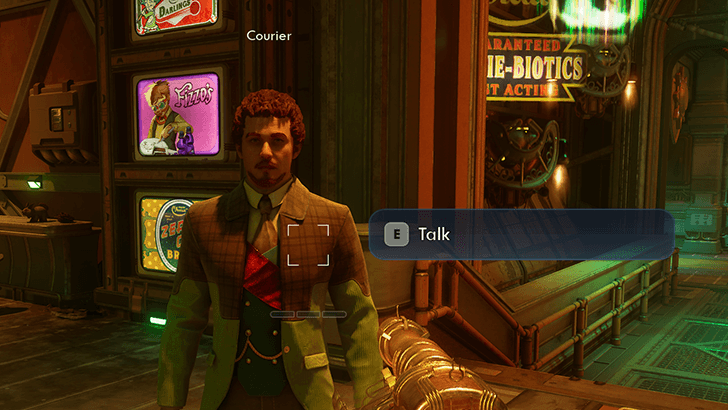
To unlock A Most Extraordinary Specimen, you'll need to have completed Fiends in High Places and gained access to the Undisputed Claim - the flagship of Auntie's Choice.
Once you're able to board the Undisputed Claim, head over to the The Value-Added Esplanade via the Client Intake tramicular. Speak to the Courier as soon as you exit the tram to get the quest item, Message for Inez.
Watch the Video Message on the Incognito
Take the cartridge back to the Incognito. From there, head over to the main deck viewing area (Inez should be here) and slot the cartridge into the terminal. Watch the message left by Ortiz, Inez's former squadmate, to trigger this quest.
A Most Extraordinary Specimen Walkthrough
Click on a step to jump to its section in the walkthrough!
Travel to Cloister
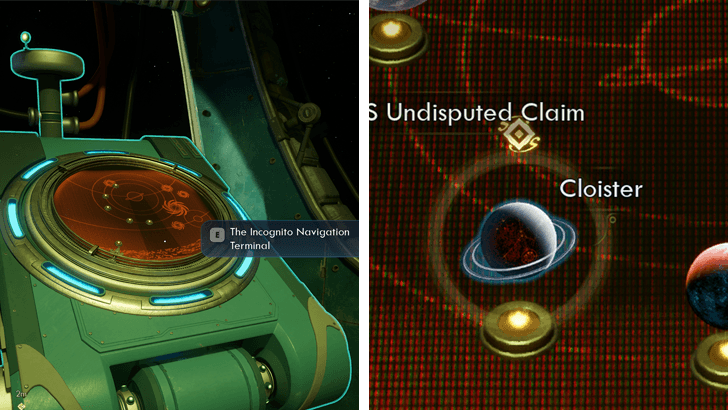
After watching Ortiz's message, head up to the Incognito's bridge and interact with the astrogator. Chart a course for Cloister then prepare your squad. Make sure you have Inez in your party before exiting unto the landing pad.
Reach the Secret Lab in the Frozen Maw
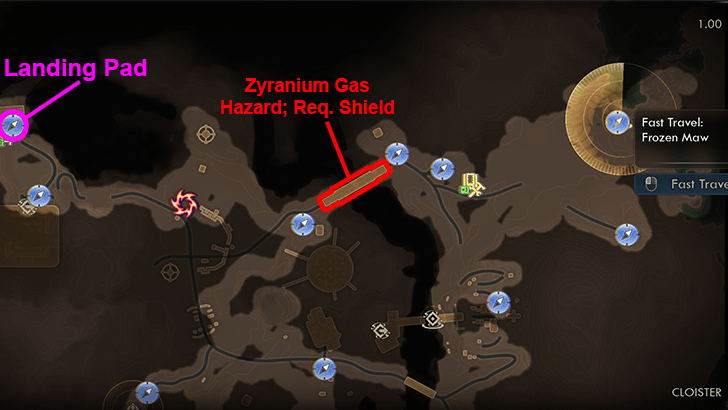
Your destination on Cloister will be the Frozen Maw - a large cave found at the eastern edge of the region. Follow the road east and cross the bridge near the Ascension Conduit 03 (an Auntie's Choice checkpoint).
From there, keep heading east. The Auntie's Choice Forward Operating Base will mark the entrance to a large ice field that leads to the Frozen Maw. Kill all the Scrappers and Ursopods you encounter until you reach the Auntie's Choice crash site inside the Frozen Maw.
Take the Elevator Down to the Algid Menagerie
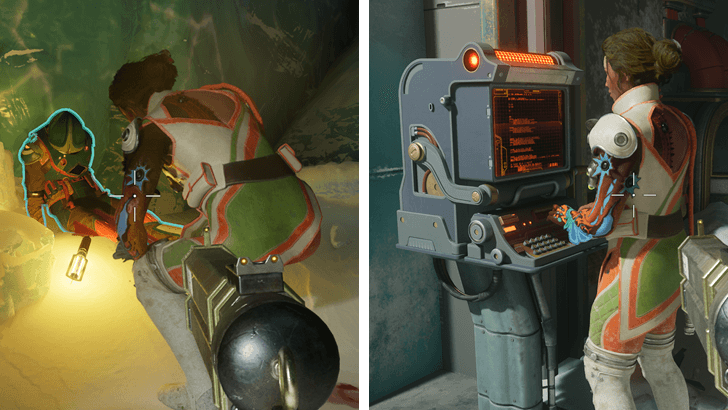
At the end of the Frozen Maw cave, you'll find a crashed Auntie's Choice shuttle and the corpses of troopers strewn about. Wait for Inez to use the nearby terminal to activate the elevator. Once the doors open, head down to the Algid Menagerie.
Bypass the Zyranium Leak
| Bypass the Zyranium | ||
|---|---|---|
| No Skill Checks | ||
Upon arriving at the lab, you'll have to contend with a Zyranium leak blocking your way forward. There are 3 ways to bypass the Zyranium leak as shown above.
Note: Of the 3 methods, the engineering path is the worst since you're guaranteed to get Zyranium poisoning. Engineering builds are better off going with the no skill check route.
Method 1: Use the Vents to Bypass the Zyranium Leak
| Step-by-step Walkthrough | |
|---|---|
| 1 | 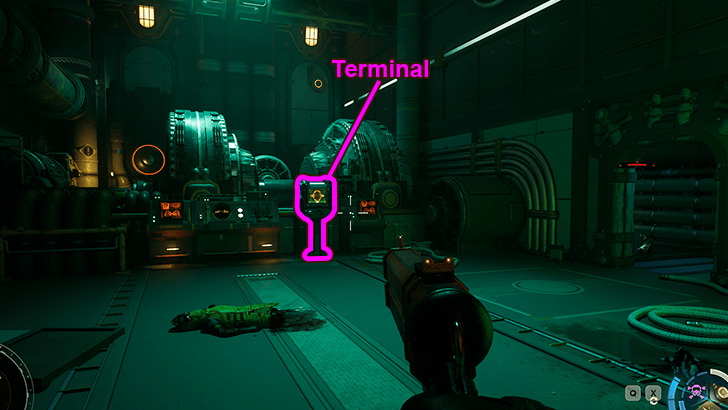 First, go to the nearby terminal and read all 3 messages here. |
| 2 | 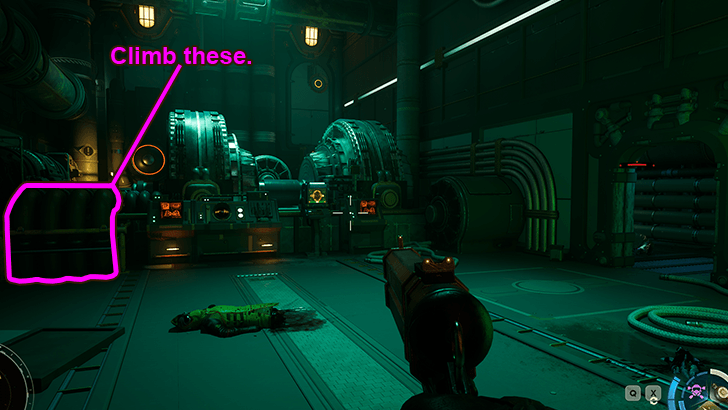 Next, climb the yellow pipes to the left of the terminal then head to the back of the room. |
| 3 | 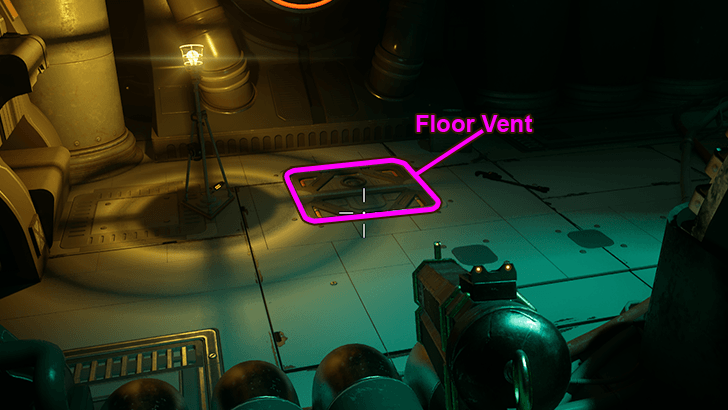 Use the floor vent to enter the vent system running beneath the menagerie. Follow it all the way to the end to reach an operating room with two Raptidon corpses. |
| 4 | 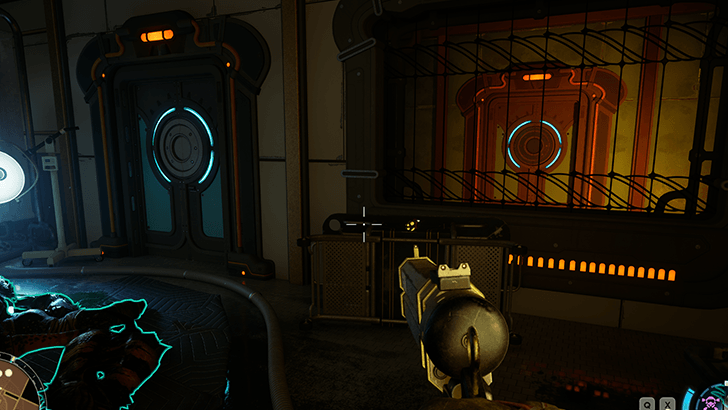 From here, simply exit through the only door in the room to bypass the large hallway with the Zyranium leak. |
Method 2: Use Hack 7 to Disable the Zyranium Flow
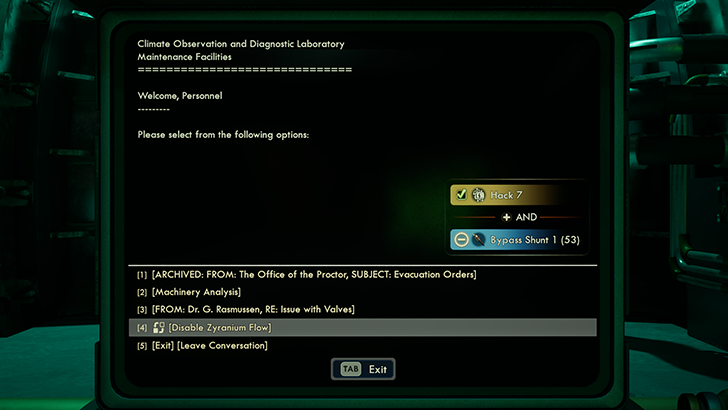
If you have Hack 7, use the terminal then read all 3 messages on it. Then, use a Bypass Shunt and Hack 7 to disable the flow of Zyranium. This should clear out the hazards in the hallway to your left.
From here, it's as simple as following the corridor towards the northern section of the Algid Menagerie.
Method 3: Use Engineering 4 to Halt the Zyranium Flow
| Step-by-step Walkthrough | |
|---|---|
| 1 | 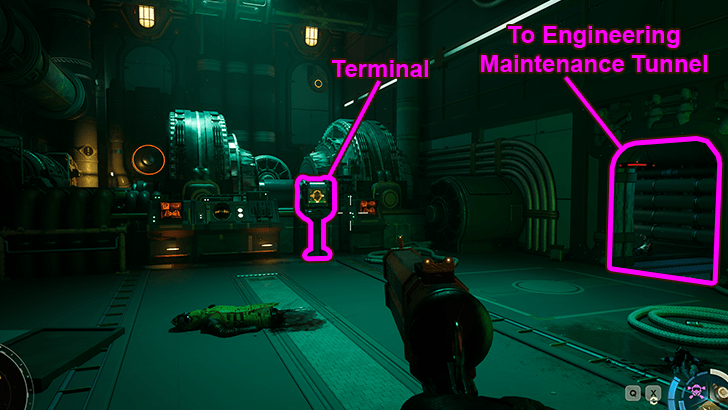 If you're dead set on using the Engineering 4 route, then prepare yourself for some Zyranium poisoning since even the shield gadget won't be enough to counteract the Zyranium. Read all 3 messages on the terminal then, when ready, head over to the small corridor to the right of the terminal. |
| 2 |  If it hasn't attacked you already, there should be a Raptidon here that you'll have to kill before you can proceed. |
| 3 | 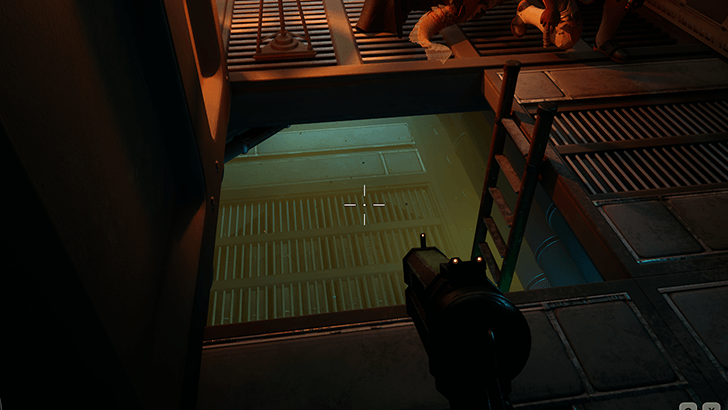 At the end of the corridor will be a floor opening and a ladder that leads down into a thick cloud of Zyranium gas. Go down this ladder. |
| 4 | 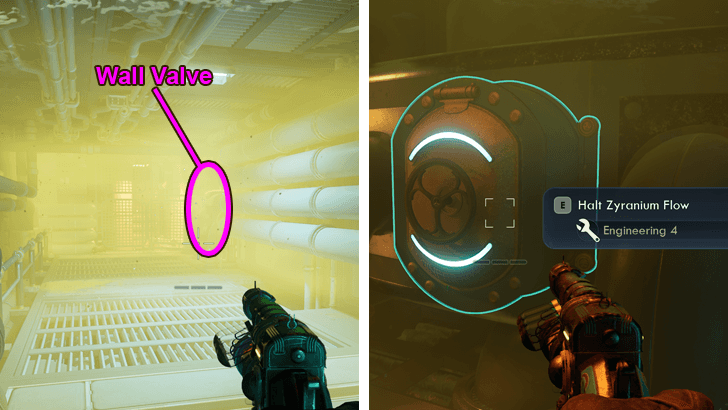 At the bottom of the ladder, go towards the opposite end of the Zyranium gas corridor. Use your Engineering 4 on the wall valve to halt the flow of Zyranium gas. |
| 5 | Once done, backtrack up to the original room and head through the hallway to the left of the terminal. It should now be free of the hazards, allowing you to reach the northern section of the Algid Menagerie. |
Examine the Specimen Room Terminal
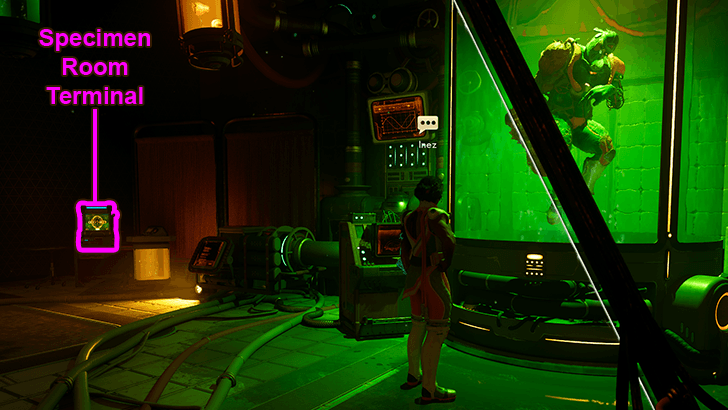
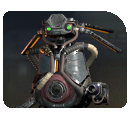
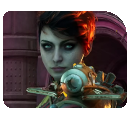
The next big area will be the Specimen Room where you'll find a grafted trooper that looks suspiciously like Ortiz suspended in glowing green liquid.
Before speaking to Inez, head over to the terminal found inside the room and read all of the records on it (particulary the Grafting Lab Files). This will help you inform Inez about what really happened in the lab by passing certain "Required Info" checks later on.
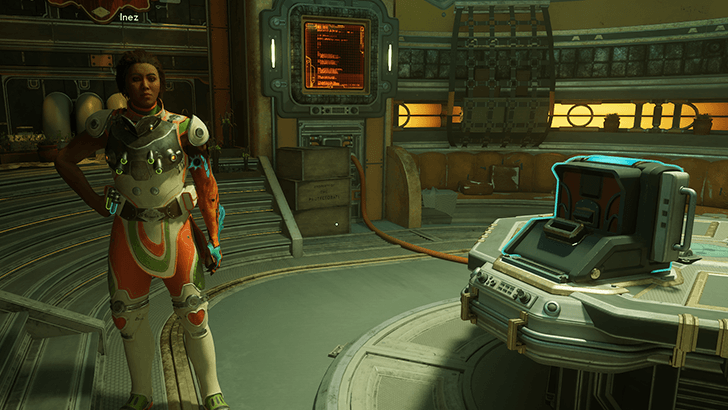
Speak to Inez Next to the Specimen Tank
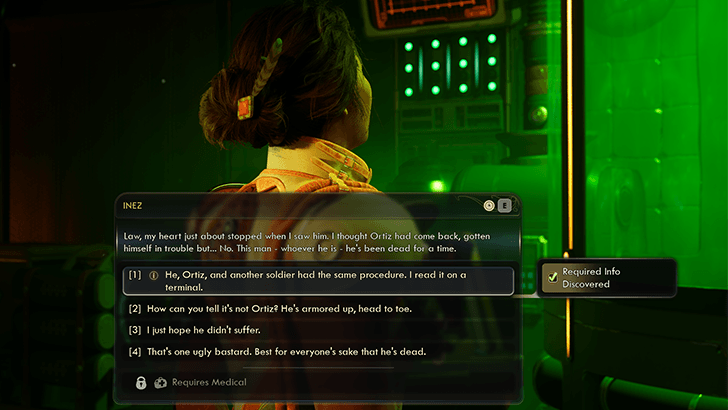
Once you're ready, speak to Inez beside the Specimen Tank and choose the following dialogue options to give her the bigger picture:
- He, Ortiz, and another soldier had the same procedure. I read it on a terminal.
- It's worse than we've seen. There were... many reports left on the terminals back there.
- They've captured a host of creatures too. One is a cub, apparently in surgery now. OR They keep the remains of all their dead subjects. Just in case.
After picking these dialogue options, close out the conversation then exit through the door on the west side of the room.
Deal with the Hostile Ursopods
| How to Deal with the Usopods | |
|---|---|
| Kill the Ursopods | |
In this segment, you'll have two options to deal with the Hostile Ursopods. If you don't have Medical 7, your only option will be to kill them.
Method 1: Kill the Hostile Ursopods
| Step-by-step Walkthrough | |
|---|---|
| 1 | 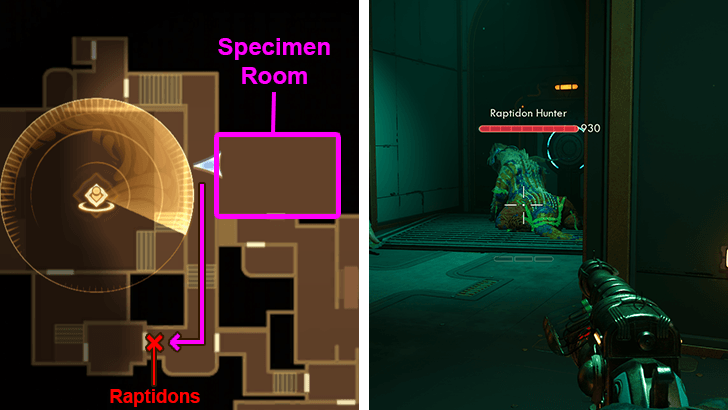 After exiting the Specimen Room, hang a left and go south along the corridor. Deal with the Raptidons you find at the end then enter the room they were guarding. |
| 2 | 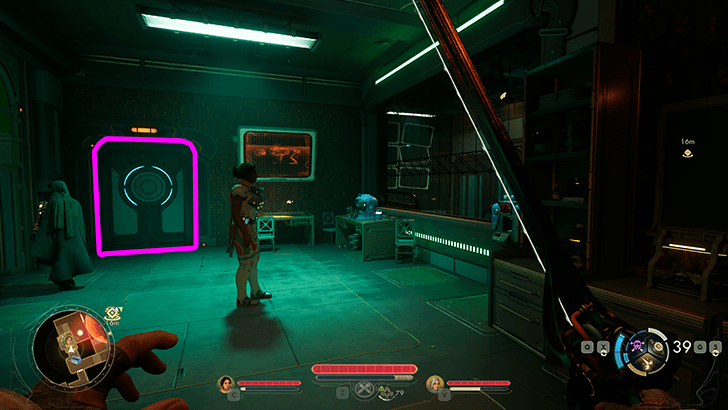 Since you don't have Medical 7, you won't need to do anything in this room. Exit through the opposite door and head down to the medical table where the Ursopod cub is recovering. |
| 3 | 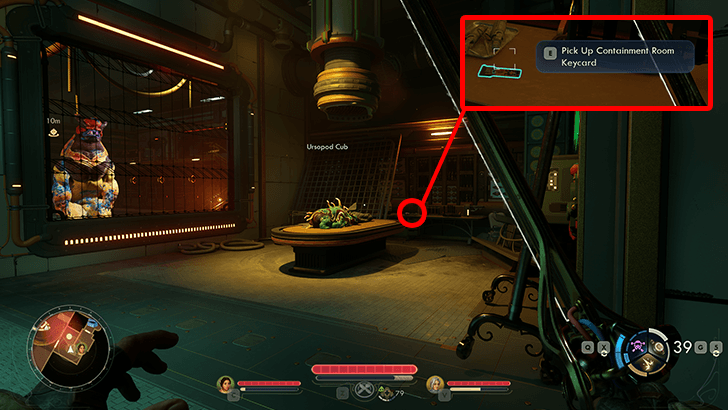 Pick up the Containment Room Keycard from the table past the cub then backtrack all the way to where you exited from the Specimen Room. Note: There is an AutoDoc here that you can use to cure your Zyranium poisoning if you used the Engineering 4 route earlier. |
| 4 | 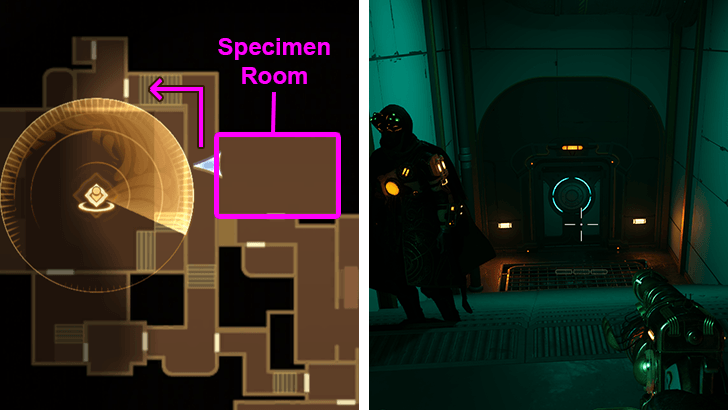 Once you're in front of the door leading back to the Specimen Room, follow the corridor north then hang another left at the bend. Head down the stairs and through the door to arrive at a small room with a caged Cystypig. |
| 5 | 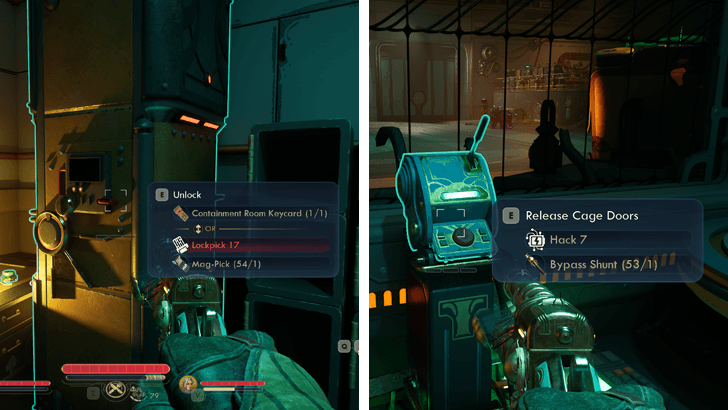 There are few things you can do before leaving. First, head over to the nearby locker and use the Containment Room Keycard you picked up earlier to open it. Inside, you'll find a unique rifle called the Critter Catcher. If you have Hack 7, you can also use a Bypass Shunt to use the nearby lever that opens the cage doors inside the main room. This unleashes a bunch of Raptidons that can soften the large Ursopod for you before you fight it. |
| 6 | 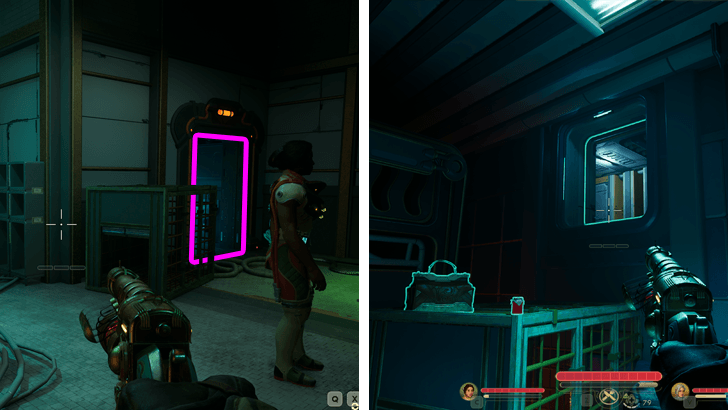 Once you're ready, go inside the bathroom attached to this small room. There should be a vent here that you can enter. Note: If you're looking to collect all Pets, use Lockpick 2 to unlock the Cystypig's cage. Speak to it to get it to join your crew as a pet. |
| 7 | 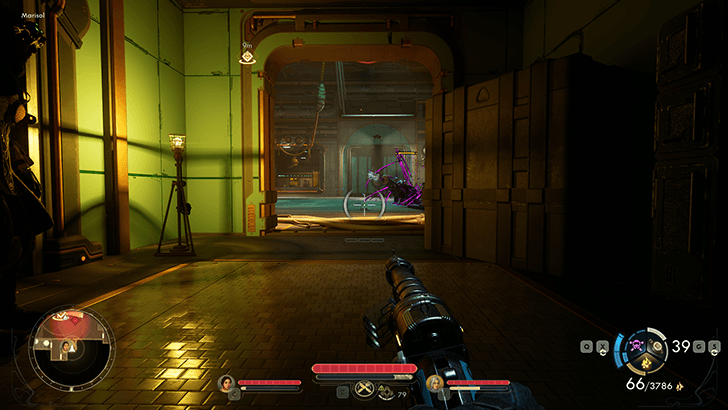 Follow the vents over to the adjacent room. This connects to the large main area with the hostile Ursopods. |
| 8 | 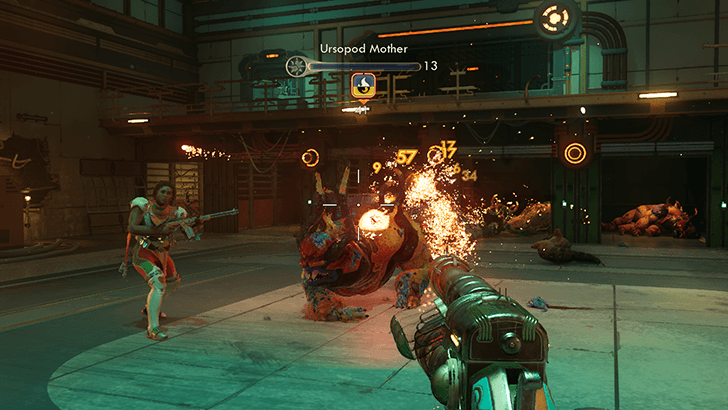 Kill all of the Ursopods to clear the way to the Grafting Doctor. |
Method 2: Reunite the Ursopod Cub with its Mother Using Medical 7
Note: You need Medical 7 to save the cub. Shooting it with the Critter Catcher will kill it.
| Step-by-step Walkthrough | |
|---|---|
| 1 | After exiting the Specimen Room, hang a left and go south along the corridor. Deal with the Raptidons you find at the end then enter the room they were guarding. |
| 2 | Since you have Medical 7, you'll be returning here to synthesize a cure for the Ursopod cub. For now, exit through the opposite door and head down to the medical table where the Ursopod cub is recovering. |
| 3 | 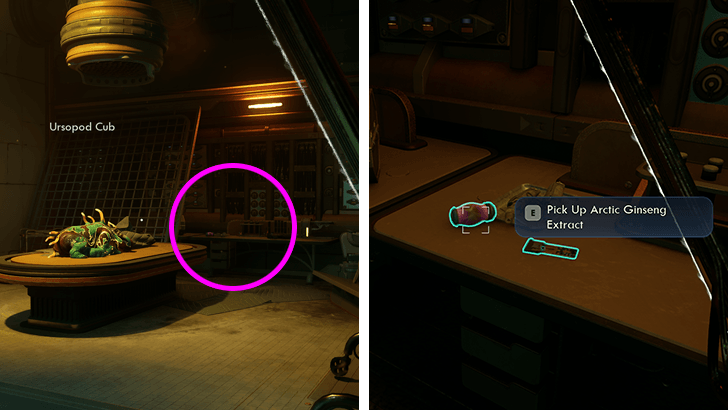 On the table past the cub, pick up the Arctic Ginseng Extract and the Containment Room Keycard. Note: There is an AutoDoc here that you can use to cure your Zyranium poisoning if you used the Engineering 4 route earlier. |
| 4 | 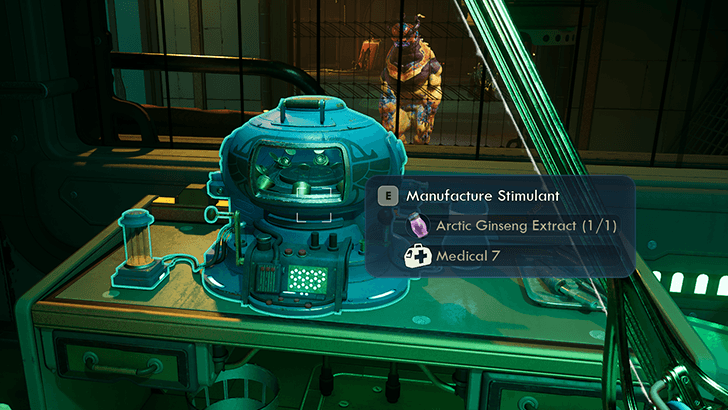 Head back up to the previous room and interact with the centrifuge to manufacture a stimulant for the cub. This nets you the quest item called the Post-Operative Stimulant. |
| 5 | 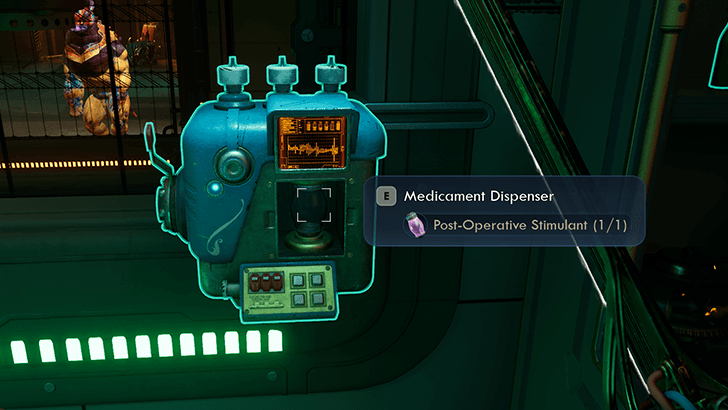 Take the Post-Operative Stimulant to the nearby Medicament Dispenser and interact with it to administer the medicine to the cub. |
| 6 | 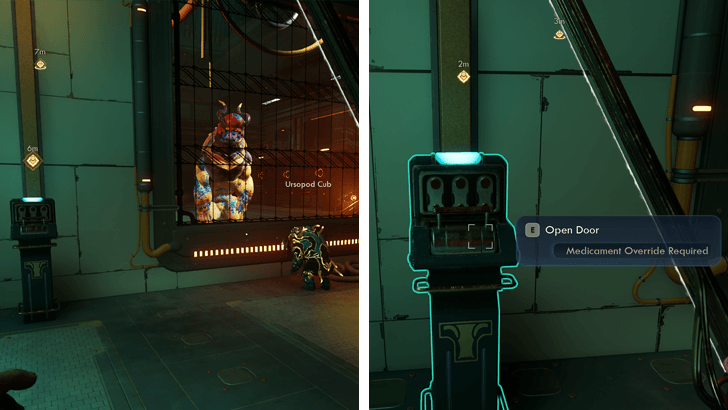 Once the cub is alive and well, head back down to where it is and use the switch to open the doors leading to the main room. |
| 7 | 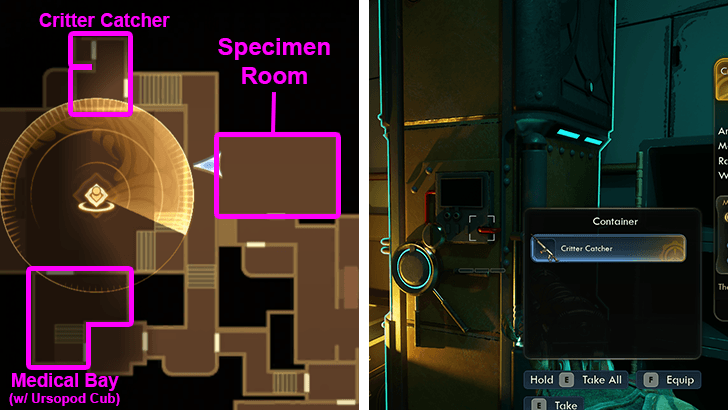 Before confronting the doctor, you can backtrack to the area opposite the medical bay (there should be a caged Cystypig inside the room). Here, you'll find a locker that you can open using the Containment Room Keycard. Loot it to get the Critter Catcher. |
Spare or Kill Dr. Giles Rasmussen
| Choose to Spare or Kill the Doctor | |
|---|---|
| Spare the Grafting Doctor | Kill the Grafting Doctor |
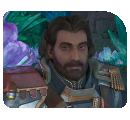
After dealing with the Ursopods, approach the back room of the lab and go through the door. This triggers a conversation with the grafting doctor - Giles Rasmussen. In this next segment, you'll have the option to spare or kill him.
Sparing or killing Dr. Giles Rasmussen will determine the next quest you get as well as the next grafting component you get for Inez.
Option 1: Spare the Grafting Doctor
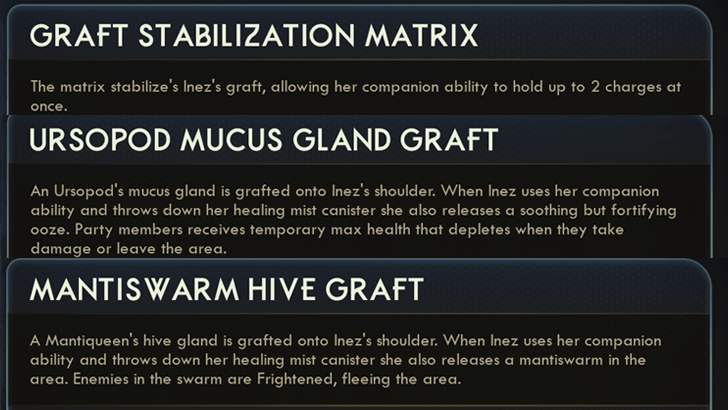
If you plan to spare the Doctor, choose the dialogue options shown below prevent Inez from killing him. This choice will net you the Mantiqueen and Ursopod grafting parts for Inez.
| How to Spare Dr. Giles Rasmussen | |
|---|---|
| 1 | Nice try. We found records that prove he underwent surgery here. Required Info |
| 2 | What were you trying to do, with Ortiz and the others? |
| 3 | Pick either dialogue option: ・Got any proof of that? OR ・Guns 7: So can I. Right now, with a well-placed bullet. |
| 4 | What's to stop us from killing you and taking your research? |
| 5 | Do you have a graft that could help Inez? |
| 6 | This could be your way to prove yourself. Let's at least hear him out. |
| 7 | His research could help so many others. The good might just outweigh the bad. |
| 8 | Pick either dialogue option: ・This is a personal choice, Inez. I'll stand by whatever you decide. OR ・Speech 17: You can set the terms, Inez. If things work out, so many lives can be saved. |
Option 2: Kill the Grafting Doctor
If you plan to kill the Doctor, choose the dialogue options shown below goad Inez into killing him. This choice will net you the Mechanical Augmentation part for Inez.
| How to Kill Dr. Giles Rasmussen | |
|---|---|
| 1 | Nice try. We found records that prove he underwent surgery here. |
| 2 | Who is this "sponsor"? |
| 3 | Pick either dialogue option: ・Been hearing a lot of homicidal freaks use that excuse lately. OR ・Guns 7 So can I. Right now, with a well-placed bullet. |
| 4 | So you do realize that your "subjects" suffered greatly. |
| 5 | Sure, and maybe, one day I'll grow wings and fly. |
| 6 | Void this guy. You're no failure. You've reclaimed all you need. |
| 7 | This doctor killed people. Tortured others. None of his "success" justifies this. |
| 8 | Pick either dialogue option: ・Speech 17 There's only one way to ensure this never happens again. Is letting him go worth the risk? OR ・Auntie's only cares to use and discard people. You can't change that. Nobody can. |
Meet Ethel Back in Paradise Island
| Step-by-step Walkthrough | |
|---|---|
| 1 | After sparing or killing the doctor, make sure to read through everything in his terminal and pick up the recipe for the Adreno Bubble Up! Ultra Premium from his desk. Once you're ready, exit the Algid Menagerie by using the doctor's keycard. |
| 2 | Once you're back on the surface of Cloister, fast travel back to the Incognito then set your course for Eden (Paradise Island). |
| 3 | Upon landing, head back over to Fairfield and look for Dr. Ethel. |
| 4 | Speak to Dr. Ethel to graft Inez with whatever grafting part you got from Dr. Rasmussen. Depending on your choices, you'll be able to graft one of the following: If you spared the doctor: ① Mantiqueen Grafting Part ② Ursopod Grafting Part If you killed the doctor: ① Mechanical Augmentation ▶ Which Grafting Part to Choose for Inez? |
| 5 | After choosing a grafting part for Inez, continue the conversation to trigger the follow-up quest for Inez. The quest you get will depend on whether you killed or spared the grafting doctor back on Cloister. If you spared the doctor, you'll trigger the quest, Half Truths in Advertising. If you killed the doctor, you'll trigger the quest, Full Measures. |
A Most Extraordinary Specimen Choices
Sparing or Killing Dr. Giles Rasmussen
| Choice | Result |
|---|---|
| Spare Dr. Giles Rasmussen |
You get both the Mantiqueen Grafting Part and Ursopod Grafting Part to choose from when you meet Ethel back in Paradise Island. The follow-up quest will be Half Truths in Advertising. |
| Kill Dr. Giles Rasmussen |
You'll get the Mechanical Augmentation to graft on Inez when you meet Ethel back in Paradise Island. The follow-up quest will be Full Measures. |
Sparing or killing Dr. Giles Rasumussen will determine the next grafting parts you get for Inez as well as the follow-up quest to A Most Extraordinary Specimen.
Choosing Inez's New Grafting Part
| Choice | Result |
|---|---|
| Mantiqueen Grafting Part Spared the Doctor |
When Inez uses her companion ability, she also releases a mantiswarm that Frightens enemies, causing them to flee. |
| Ursopod Grafting Part Spared the Doctor |
Upgrades Inez's healing mist. Party members caught in the mist's AoE will receive temporary max health. |
| Mechanical Augmentation Killed the Doctor |
Grants Inez 2 Ability Charges instead of the regular 1 charge. |
If you spared the doctor, you'll be able to choose between the Mantiqueen and Ursopod grafting parts. Of the two, the Ursopod is the safest choice since AoE crowd control that isn't a stun can be pretty finicky to use properly.
If you killed the doctor, you'll only be able to graft the Mechanical Augmentation. However, it is a very nice upgrade for Inez especially if you chose the Raptidon Graft earlier in the game.
A Most Extraordinary Specimen Rewards
Additional Graft for Inez
Aside from the XP you get during the quest, you'll also net Inez a new grafting part which upgrades her companion ability. Spare the grafting Doctor to get both the Mantiqueen and Ursopod Grafting Parts, or kill him to get the Mechanical Augmentation.
Critter Catcher and Cystypig Pet
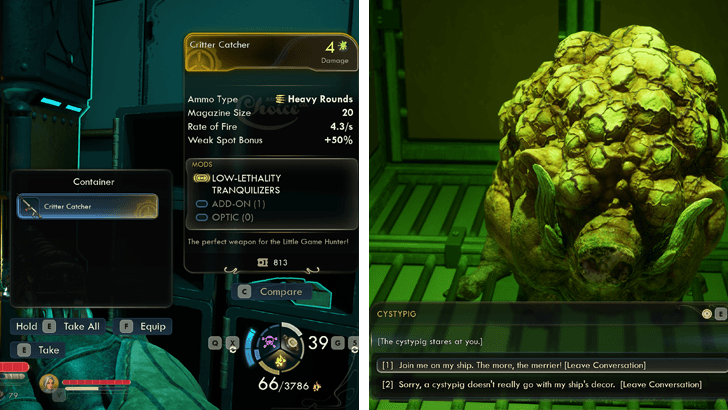
During the quest, you'll also be able to get the Critter Catcher as well as a pet Cystypig. The former can be obtained from a locker that you can open with the Containment Room Keycard while the latter requires you to pass a Lockpick 2 check in order to free it from its cage.
A Most Extraordinary Specimen Info
| A Most Extraordinary Specimen Info | |||||
|---|---|---|---|---|---|
| Type | Inez Companion Quest | ||||
| Location | The Value-Added Esplanade, ACS Undisputed Claim | ||||
| Quest Giver | Courier | ||||
| How to Start | |||||
| Upon landing on the Undisputed Claim, take the Profit Mover Tramicular from Client Intake to The Value-Added Esplanade. Once there, speak to the Courier after exiting the tramicular. | |||||
Outer Worlds 2 Related Guides
All Companion Quests
| Companion | Quests |
|---|---|
 Niles Niles |
・Pressing Cares ・Do More Harm |
 VALERIE VALERIE |
・A Healthy Improvement ・Better by Factors |
 Inez Inez |
・Better than Nature ・A Most Extraordinary Specimen ┣ Half Truths in Advertising ┗ Full Measures |
 Tristan Tristan |
・Arbitrary Measures ・Listening For a Clue ・Casting Off the Veil |
 Marisol Marisol |
・Beginning at the Endpoint ・The Midpoint to the Endpoint ・Endpoint's End |
 Aza Aza |
・The Dawn of a Glorious Betrayal ・Stabbing at Shadows |
Comment
Author

A Most Extraordinary Specimen Walkthrough
Please participate in our site
improvement survey
04/2026
improvement survey
04/2026
Would you assist in
improving Game8's site?
improving Game8's site?

×
We are listening to our users' valuable opinions and discussing how to act on them.
The information collected through this survey will be used for the purpose of improving our services. In addition, the information will only be disclosed a part of a statistic in a format that will not allow identification of personal information.
Begin Survey
Not Now
×
Please rate each item regarding Game8.co's Advertisements.
Amount of Ads
Very Dissatisfied
Somewhat Dissatisfied
Fine
Somewhat Satisfied
Highly Satisfied
Placement of Ads
Timing of Ad Display
Ad Loading Speed
Safeness of Ads
Content of Ads
×
Please rate each item regarding Game8.co's Quality of Articles.
Amount of information
Very Dissatisfied
Somewhat Dissatisfied
Fine
Somewhat Satisfied
Highly Satisfied
Frequency of updates
Speed of new information
Accuracy of articles
Understandibility of articles
Readability of sentences
×
Please rate each item regarding Game8.co's Usability of the Site.
Ease of finding information
Very Dissatisfied
Somewhat Dissatisfied
Fine
Somewhat Satisfied
Highly Satisfied
Loading Speed
Use of Color
Font Size
Visibility of Images
Easy to Understand Layout
×
Please rate each item regarding Game8.co's Message Boards, Comments.
Ease of Writing
Very Dissatisfied
Somewhat Dissatisfied
Fine
Somewhat Satisfied
Highly Satisfied
Readability
Ease in Finding Information
Comment Quality
Comment Quantity
Admin Response
×
Please rate each item regarding Game8.co's Site's new design.
Please rate our site's new design
Very Dissatisfied
Somewhat Dissatisfied
Fine
Somewhat Satisfied
Highly Satisfied
Do you think that the website's design change makes the site easier to use?
Has the new design made it easier for you to find information on the site?
Has the new design improved the overall visual appeal of the site?
How would you rate your overall satisfaction with the new design of the site?
×
How likely are you to recommend Game8 to someone you know?
Very Unlikely
0
1
2
3
4
5
6
7
8
9
10
Very Likely
If you have other opinions regarding potential improvement to the website, please share them with us. We would appreciate your honest opinion.
Note: This is a free response section, so you can proceed without entering anything.
Note: Please be sure not to enter any kind of personal information into your response.
Note: Please be sure not to enter any kind of personal information into your response.
×
Thank You
×
Thank you for participating in our survey! Your answers will help us to improve the quality of our website and services.
We hope you continue to make use of Game8.
We hope you continue to make use of Game8.
Close
Rankings
- We could not find the message board you were looking for.
Gaming News


![Forza Horizon 6 Review [Preview] | Beautiful Roads With a Whole Lot of Oversteer](https://img.game8.co/4460981/a7254c24945c43fbdf6ad9bea52b5ce9.png/thumb)
![Borderlands Mobile Review [Playtest] | The Same Borderlands Made Easy](https://img.game8.co/4465500/aac0c880a39ec5cd46073e49d18f3ed5.png/thumb)
Popular Games

Genshin Impact Walkthrough & Guides Wiki
Crimson Desert Walkthrough & Guides Wiki
Umamusume: Pretty Derby Walkthrough & Guides Wiki
Honkai: Star Rail Walkthrough & Guides Wiki
Monster Hunter Stories 3: Twisted Reflection Walkthrough & Guides Wiki
Wuthering Waves Walkthrough & Guides Wiki
The Seven Deadly Sins: Origin Walkthrough & Guides Wiki
Pokemon TCG Pocket (PTCGP) Strategies & Guides Wiki
Pokemon Pokopia Walkthrough & Guides Wiki
Zenless Zone Zero Walkthrough & Guides Wiki


Recommended Games
Fire Emblem Heroes (FEH) Walkthrough & Guides Wiki
Pokemon Brilliant Diamond and Shining Pearl (BDSP) Walkthrough & Guides Wiki
Super Smash Bros. Ultimate Walkthrough & Guides Wiki
Diablo 4: Vessel of Hatred Walkthrough & Guides Wiki
Cyberpunk 2077: Ultimate Edition Walkthrough & Guides Wiki
Yu-Gi-Oh! Master Duel Walkthrough & Guides Wiki
Elden Ring Shadow of the Erdtree Walkthrough & Guides Wiki
Monster Hunter World Walkthrough & Guides Wiki
The Legend of Zelda: Tears of the Kingdom Walkthrough & Guides Wiki
Persona 3 Reload Walkthrough & Guides Wiki


All rights reserved
© 2025 Obsidian Entertainment, Inc. Obsidian Entertainment, the Obsidian Entertainment logo, The Outer Worlds 2, and The Outer Worlds 2 logos are trademarks or registered trademarks of Obsidian Entertainment, Inc. All rights reserved.
The copyrights of videos of games used in our content and other intellectual property rights belong to the provider of the game.
The contents we provide on this site were created personally by members of the Game8 editorial department.
We refuse the right to reuse or repost content taken without our permission such as data or images to other sites.