This survey will take about 1 minute.
Your answers will help us to improve our website.
New World
Armoring Guide: How to Level from 0 to 200
Please note that the New World Team has stopped covering the game as of Update 1.2. Information on certain pages may not be up-to-date.
Armoring is a trade skill in New World that lets you craft various types of armor, bags, and honing stones in Forges and Outfitting Stations across Aeternum. This guide will show you how to level your Armoring skill fast from 0 to 200, as well as a complete list of all crafting recipes for Armoring. Read on to know more!
List of Contents
How to Level Up Armoring Skill
Since armor is relevant to all players of New World, Armoring is by far one of the best trade skills to level up early. Despite the long and tedious grind, the demand for 200 Armoring will enable players to fully participate in the game's player driven economy.
This guide will show a concrete leveling path from Armoring level 0 to 200, taking into account the crafting meta changes introduced in the Into the Void Update 1.1.
| Armoring Level Ranges | |||
|---|---|---|---|
| 0-50 | 50-100 | 100-150 | 150-200 |
Use the links above to quickly navigate to each Armoring level range!
Armoring Level 0 to 50
Farm Fiber in Starter Regions
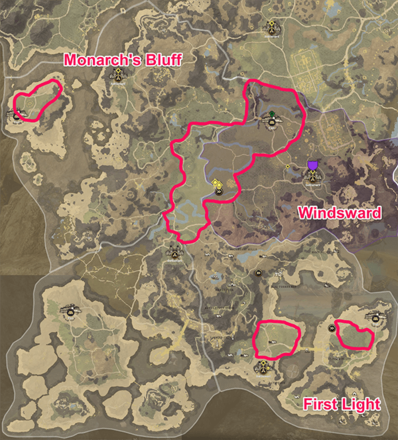
Farming resources plays a huge part in leveling trade skills. To begin leveling up Armoring, start farming and building up a surplus of fiber from Hemp Plants.
Players can farm fibers easily in any of the starter regions, with the large area on the border of Windsward and Monarch's Bluff being the easiest to farm.
Farm Starter Beaches and Wolf Dens for Rawhide
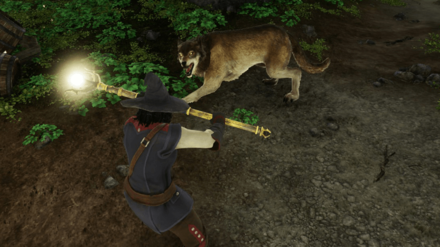
To fulfill the bulk craft order later, players will also need to source some Rawhide. Hunt and skin boars in any of the starter beaches, or fight wolves for rawhide in any of the starting wolf dens in each region.
Do note, the higher the level of the animal, the more rawhide it gives. For high-level players, it would be best to hunt and skin animals that are level 20+ to maximize their resource gains.
Craft 124 Linen or Leather Gloves

Players can opt to craft either Linen Gloves or Rough Leather Gloves as both need the same amount of resources and grant the same amount of XP per craft.
Craft 124 pieces of either kind to reach Armoring level 50. Listed below are the required amounts of resources needed to craft the items.
| Armor | Req. Materials |
|---|---|
|
・
・
・
|
|
|
・
・
・
|
Armoring Level 50 to 100
Note: Moving forward, the primary resource players will need will be Cloth materials. This is because from Armoring 50 to 200, cloth gloves will be the cheapest to craft as hemp, silkweed, and wirefiber are some of the easiest resources to get in bulk.
Farm or Purchase Cloth Refining Materials

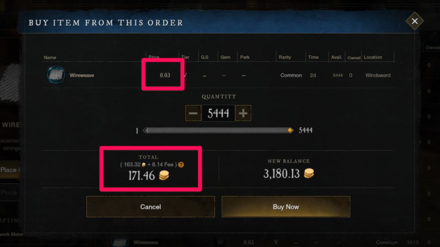
Given that all bulk crafting to be done from Armoring level 50 to 200 will primarily use cloth, players will need to either farm or purchase Crossweave, Silkweave, or Wireweave.
Hoard these refining materials as a lot of them will be used up as players grind to Armoring 200. Do note that players in high-pop servers are at an advantage since refining materials tend to be cheaper to buy, for them.
Revisit Starter Regions for Fiber, Rawhide, and Iron Ore

Return to the starter regions to farm more fiber, rawhide, and iron ore for the next round of bulk crafting. Remember to farm a surplus as all of these will be needed all the way to Armoring level 200.
Craft 384 Sateen Gloves
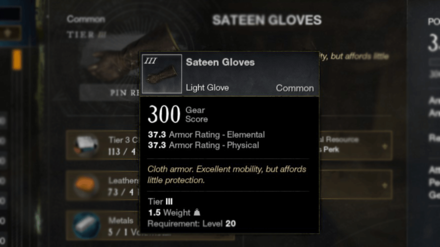
To reach Armoring level 100, players will need to craft 384 Sateen Gloves. Listed below are the ingredients needed to craft 384 pieces of this Tier 3 Glove.
| Armor | Req. Materials |
|---|---|
|
・
・
・
|
Remember: Salvage crafted items in order to refund a portion of the Sateen used when crafting. This should allow players to craft more gloves should they fall short of Armoring level 100.
Armoring Level 100 to 150
Note: At this level range, farming will be the biggest part of the leveling process. It will take a lot of raw materials to put a dent on the required XP to get from 100 to 150.
It is recommended that players level up, progress through different mid- to high-level regions, and farm resources while out questing. This should allow for more farming locations outside of the early zones.
Upgrade to Starmetal Tools
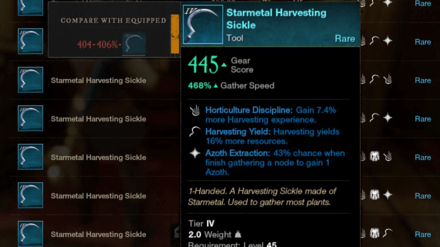
At this point in the game (level 40+), players should already be able to use Starmetal Tools. With the 3-perk advantage of this tool-tier, players will be able to boost their farming capacity to meet the demands of this Armoring level range.
Purchase or craft Starmetal Tools that preferably have the following perks:
| Perk | Effect |
|---|---|
|
|
30% chance when you finish gathering a node to gain 1 Azoth. Tools |
|
|
Skinning yields 10% more resources. Skinning Knife |
|
|
Gain 3% more Skinning experience. Skinning Knife |
|
|
Gain 3% more harvesting experience. Sickle |
|
|
Harvesting yields 10% more resources. Sickle |
|
|
Gain 3% more mining experience. Pickaxe |
|
|
Mining yields 10% more resources. Pickaxe |
Farm Fibers and Silk Threads in Restless Shore & Mourningdale
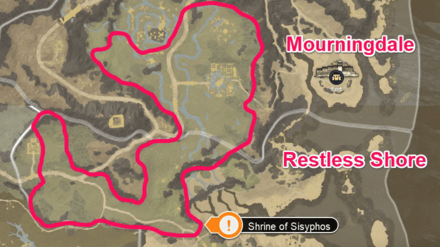
At this Armoring level range, players will need not only fibers, but also a lot of Silk Threads in order to make Silk. Starter regions will no longer be efficient to farm.
Instead, head over to the border of Restless Shore and Mourningdale via the Shrine of Sisyphos spirit shrine. Farm the large marked area populated by Hemp and Silkweed nodes.
Farm Rawhide and Iron Ore in Starter Regions
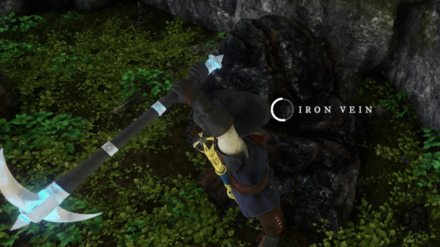
Due to the abundance of iron ore veins in starter regions, it is recommended that players farm both rawhide and iron ore here in order bypass the hassle of competing in mid-level regions.
Hunt and skin level 20+ animals for more rawhide per kill, and mine iron ore veins using these resource maps for each starter region.
Use Tier 3 or 4 Refining Materials for Sateen and Silk
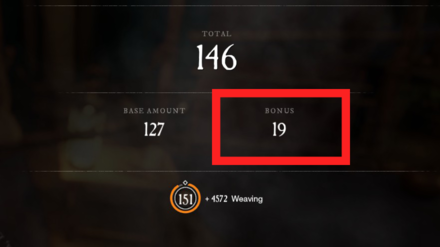
When refining Linen into Sateen then Silk, try to use either Silkweave or Wireweave as the refining material. Both will allow players to get bonus materials when refining, sometimes even doubling the amount they can receive.
Note: This step is optional. Only use these high-tier items in bulk if they can be bought for a very cheap price at the Trading Post.
Craft 730 Silk Gloves
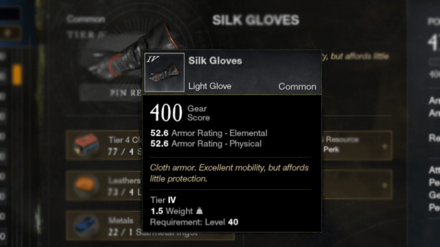
To reach Armoring level 150, players will need to craft 730 Silk Gloves. Listed below are the ingredients needed to craft 730 pieces of this Tier 4 Glove.
| Armor | Req. Materials |
|---|---|
|
・
・
・
|
Remember: Salvage crafted items in order to refund a portion of the Silk used when crafting. This should allow players to craft more gloves should they fall short of Armoring level 150.
Armoring Level 150 to 200
Note: It is recommended that players begin their Armoring 150 to 200 grind by first leveling up to character level 60.
This is because most of the farming at this range will occur in high level regions and items crafted at 150 Armoring can only be used by level 60s.
Upgrade to Orichalcum Tools

At level 60, players will now be able to equip Orichalcum Tools for maximum farming efficiency. Trade out Starmetal Tools that still have Trade Skill XP Boosters for Orichalcum tools that have Durability.
Ideally, players should aim to get both Durability and Yield Boost perks to make farming trips quicker and easier. Purchase or craft a set, especially for gathering skills that have already reached 200.
| Perk | Effect |
|---|---|
|
|
25% Durability increase. Tools |
|
|
30% chance when you finish gathering a node to gain 1 Azoth. Tools |
|
|
While skinning, gain 2% chance at finding rare items. Skinning Knife |
|
|
Skinning yields 10% more resources. Skinning Knife |
|
|
Harvesting yields 10% more resources. Sickle |
|
|
While harvesting, gain 2% chance at finding rare items. Sickle |
|
|
Mining yields 10% more resources. Pickaxe |
|
|
While mining, gain 2% chance at finding rare items. Pickaxe |
Luck boosting perks are optional, although they will greatly benefit players looking to sell rare resources at the Trading Post.
Farm Wirefiber in Edengrove
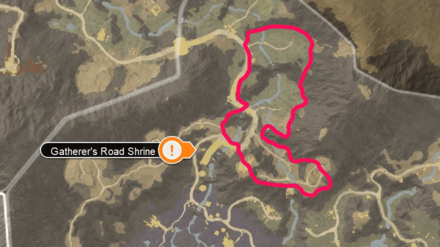
The northernmost part of Edengrove will have a ton of Wirefiber nodes in close proximity to each other. Fast travel to the Gatherer's Road spirit shrine and start farming the area from there.
Note: Exercise caution when farming this particular area as the hostiles that patrol here will be level 57+ Angry Earth, Corrupted, and Beast enemies.
Gather a Surplus of Fiber and Silkweed

Due to the large amount of Infused Silk needed to bulk craft Tier V items, players will need to gather a surplus of both fiber and silkweed to be later refined into infused silk.
Return to the border of Restless Shore and Mourningdale or, alternatively, farm the Balmy Veldt area in Cutlass Keys for fiber and silkweed.
Purchase or Farm a Surplus of Rawhide and Iron Ore
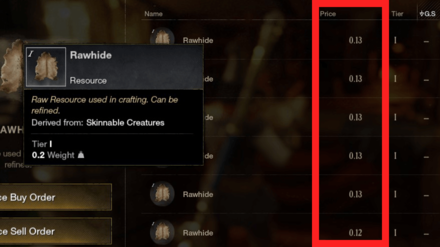
With the material costs racking up, regularly check the Trading Post for raw material prices. Buy rawhide or iron ore when they are cheap to shave off a bit of time from the already lengthy grind, or farm starter regions to save on coin.
However, do remember that it will take a bit of time to gather the necessary amount of Infused Silk. Do not rush this step and instead use it as a break from the long and tedious Wirefiber farm.
Craft 1250 Infused Silk Gloves
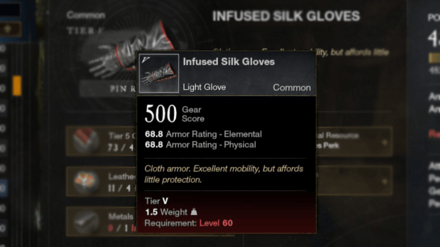
Due to Update 1.1, the grind from 150 to 200 Armoring will be long and costly. To get from 150 to 200, players will have to craft 1250 Infused Silk Gloves.
Listed below are the required number of materials needed to craft 1250 pieces of this Tier 5 Glove.
| Armor | Req. Materials |
|---|---|
|
・
・
・
|
Remember: Salvage crafted items in order to refund a portion of the Infused Silk used when crafting. This should allow players to craft more gloves should they fall short of Armoring level 200.
Armoring Leveling Tips
Craft Repair Kits from Salvaged Items
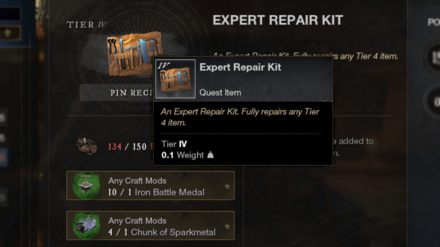
With Armoring demanding a lot of equipment crafting, most if not all of the products will end up salvaged. Use the extra Repair Parts earned from salvaging to craft different tiers of Repair Kits.
Crafting these useful items will save players a lot of money later on, especially when needing to fully repair damaged Tier 4-5 items. Players can also opt to sell these at the Trading Post for a nifty sum.
Use Proficiency Boosters & Yield Boosting Tools

While plant fibers are easy to come by, farming the amount needed to reach level 200 Armoring will take a significant amount of time, especially for many solo players and Company Settlers. Make sure to use Proficiency Boosters when out farming for maximum efficiency.
| Consumable | Effects and Level Req. |
|---|---|
|
|
Increases the amount of resources gathered with a tool by 5% for 10 minutes. Required Level 5 |
|
|
Increases the amount of resources gathered with a tool by 7% for 15 minutes. Required Level 20 |
|
|
Increase the amount of resources gathered with a tool by 10% for 20 minutes. Required Level 40 |
|
|
Increases the amount of resources gathered with a tool by 15% for 30 minutes. Required Level 60 |
Additionally, tools equipped with Yield Boosting perks will also help increase the amount of gathered resources per farming run. Buy or craft them, and use both methods to significantly reduce the amount of time needed to raise Armoring levels.
| Perk | Effect |
|---|---|
|
|
Mining yields 10% more resources. Pickaxe |
|
|
Harvesting yields 10% more resources. Sickle |
|
|
Logging yields 10% more resources. Logging Axe |
|
|
Skinning yields 10% more resources. Skinning Knife |
Make Use of the Trading Post
The biggest advantage of players in high population servers is the Trading Post. More players means more gatherers, and this usually translates to lower prices for raw resources and refining materials.
Take advantage of the ridiculously low prices and buy items that cannot be farmed easily like Crossweave. Players can also sell the best of their crafted items to recoup some of the losses due to trade skill leveling requirements.
Maintain Your Trade Skills As You Progress Through Zones
Questing in New World will earn players both coin and XP. However, when looking to level up trade skills like Armoring, an equal amount of time must be dedicated to farming raw materials and refining them.
As players level up and move from region to region, make sure to keep farming for resources even while out questing. This ensures that trade skills stay relevant to your needs (e.g., being able to craft Starmetal Armor at level 40+).
Crafting Guide: How to Level Trade Skills Fast
Craft and Refine Resources in Settlements With Low Taxes
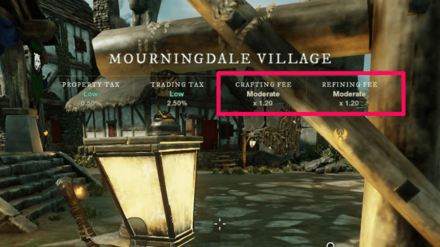
During Armoring leveling, players will be crafting a lot of items and refining a ton of raw materials. While usually cheap, costs pile up when refining leather, fibers, or ore by the tens of thousands.
Make sure to craft and refine in settlements with a low crafting and refining tax rate. Always pay attention to the taxes as they will vary depending on the owner of the settlement.
Choose Territory Standing Bonuses Based on Leveling Strategies
Players should choose Territory Standing Bonuses with their leveling strategies in mind. For example, when planning to make liberal use of the Trading Post, make sure to pick up the Trading Tax Reduction bonus.
Each case may vary depending on server population, settlement location, and the region's gatherable resources. Weigh the options carefully and plan for the future as trade skill leveling will be a long grind.
All Territory Standing Bonuses
Armoring Crafting Recipes
Heavy Armor

| Crafting Recipes by Category | ||
|---|---|---|
| Heavy Armor | Light Armor | Cloth Armor |
| Robes | Misc. Items | |
Click a link above to take you to that section.
| Item | Req. Resources | Req. Skill Level/Station |
|---|---|---|
|
|
・
・
・
|
Armoring Lv. 0
Forge Tier 2 |
|
|
・
・
・
|
Armoring Lv. 0
Forge Tier 2 |
|
|
・
・
・
|
Armoring Lv. 0
Forge Tier 2 |
|
|
・
・
・
|
Armoring Lv. 0
Forge Tier 2 |
|
|
・
・
・
|
Armoring Lv. 0
Forge Tier 2 |
|
|
・
・
・
|
Armoring Lv. 50
Forge Tier 3 |
|
|
・
・
・
|
Armoring Lv. 50
Forge Tier 3 |
|
|
・
・
・
|
Armoring Lv. 50
Forge Tier 3 |
|
|
・
・
・
|
Armoring Lv. 50
Forge Tier 3 |
|
|
・
・
・
|
Armoring Lv. 50
Forge Tier 3 |
|
|
・
・
・
|
Armoring Lv. 50
Forge Tier 3 |
|
|
・
・
・
|
Armoring Lv. 50
Forge Tier 3 |
|
|
・
・
・
|
Armoring Lv. 50
Forge Tier 3 |
|
|
・
・
・
|
Armoring Lv. 50
Forge Tier 3 |
|
|
・
・
・
|
Armoring Lv. 50
Forge Tier 3 |
|
|
・
・
・
・
|
Armoring Lv. 60
Forge Tier 3 |
|
|
・
・
・
・
|
Armoring Lv. 60
Forge Tier 3 |
|
|
・
・
・
・
|
Armoring Lv. 60
Forge Tier 3 |
|
|
・
・
・
・
|
Armoring Lv. 60
Forge Tier 3 |
|
|
・
・
・
・
|
Armoring Lv. 60
Forge Tier 3 |
|
|
・
・
・
・
|
Armoring Lv. 60
Forge Tier 3 |
|
|
・
・
・
・
|
Armoring Lv. 60
Forge Tier 3 |
|
|
・
・
・
・
|
Armoring Lv. 60
Forge Tier 3 |
|
|
・
・
・
・
|
Armoring Lv. 60
Forge Tier 3 |
|
|
・
・
・
・
|
Armoring Lv. 60
Forge Tier 3 |
|
|
・
・
・
|
Armoring Lv. 100
Forge Tier 3 |
|
|
・
・
・
|
Armoring Lv. 100
Forge Tier 3 |
|
|
・
・
・
|
Armoring Lv. 100
Forge Tier 3 |
|
|
・
・
・
|
Armoring Lv. 100
Forge Tier 3 |
|
|
・
・
・
|
Armoring Lv. 100
Forge Tier 3 |
|
|
・
・
・
|
Armoring Lv. 100
Forge Tier 3 |
|
|
・
・
・
|
Armoring Lv. 100
Forge Tier 3 |
|
|
・
・
・
|
Armoring Lv. 100
Forge Tier 3 |
|
|
・
・
・
|
Armoring Lv. 100
Forge Tier 3 |
|
|
・
・
・
|
Armoring Lv. 100
Forge Tier 3 |
|
|
・
・
・
・
|
Armoring Lv. 110
Forge Tier 4 |
|
|
・
・
・
・
|
Armoring Lv. 110
Forge Tier 4 |
|
|
・
・
・
・
|
Armoring Lv. 110
Forge Tier 4 |
|
|
・
・
・
・
|
Armoring Lv. 110
Forge Tier 4 |
|
|
・
・
・
・
|
Armoring Lv. 110
Forge Tier 4 |
|
|
・
・
・
・
|
Armoring Lv. 110
Forge Tier 4 |
|
|
・
・
・
・
|
Armoring Lv. 110
Forge Tier 4 |
|
|
・
・
・
・
|
Armoring Lv. 110
Forge Tier 4 |
|
|
・
・
・
・
|
Armoring Lv. 110
Forge Tier 4 |
|
|
・
・
・
・
|
Armoring Lv. 110
Forge Tier 4 |
|
|
・
・
・
|
Armoring Lv. 150
Forge Tier 5 |
|
|
・
・
・
|
Armoring Lv. 150
Forge Tier 5 |
|
|
・
・
・
|
Armoring Lv. 150
Forge Tier 5 |
|
|
・
・
・
|
Armoring Lv. 150
Forge Tier 5 |
|
|
・
・
・
|
Armoring Lv. 150
Forge Tier 5 |
|
|
・
・
・
|
Armoring Lv. 150
Forge Tier 5 |
|
|
・
・
・
|
Armoring Lv. 150
Forge Tier 5 |
|
|
・
・
・
|
Armoring Lv. 150
Forge Tier 5 |
|
|
・
・
・
|
Armoring Lv. 150
Forge Tier 5 |
|
|
・
・
・
|
Armoring Lv. 150
Forge Tier 5 |
|
|
・
・
・
・
|
Armoring Lv. 160
Forge Tier 5 |
|
|
・
・
・
・
|
Armoring Lv. 160
Forge Tier 5 |
|
|
・
・
・
・
|
Armoring Lv. 160
Forge Tier 5 |
|
|
・
・
・
・
|
Armoring Lv. 160
Forge Tier 5 |
|
|
・
・
・
・
|
Armoring Lv. 160
Forge Tier 5 |
|
|
・
・
・
・
|
Armoring Lv. 160
Forge Tier 5 |
|
|
・
・
・
・
|
Armoring Lv. 160
Forge Tier 5 |
|
|
・
・
・
・
|
Armoring Lv. 160
Forge Tier 5 |
|
|
・
・
・
・
|
Armoring Lv. 160
Forge Tier 5 |
|
|
・
・
・
|
Armoring Lv. 180
Forge Tier 5 |
|
|
・
・
・
|
Armoring Lv. 185
Forge Tier 5 |
|
|
・
・
・
|
Armoring Lv. 190
Forge Tier 5 |
|
|
・
・
・
|
Armoring Lv. 195
Forge Tier 5 |
|
|
・
・
・
|
Armoring Lv. 200
Forge Tier 5 |
|
|
・
・
・
・
|
Armoring Lv. 160
Forge Tier 5 |
Light Armor

| Crafting Recipes by Category | ||
|---|---|---|
| Heavy Armor | Light Armor | Cloth Armor |
| Robes | Misc. Items | |
Click a link above to take you to that section.
| Item | Req. Resources | Req. Skill Level/Station |
|---|---|---|
|
|
・
・
・
|
Armoring Lv. 0
Outfitting Station Tier 3 |
|
|
・
・
・
|
Armoring Lv. 0
Outfitting Station Tier 3 |
|
|
・
・
・
|
Armoring Lv. 0
Outfitting Station Tier 3 |
|
|
・
・
・
|
Armoring Lv. 0
Outfitting Station Tier 3 |
|
|
・
・
・
|
Armoring Lv. 0
Outfitting Station Tier 3 |
|
|
・
・
・
|
Armoring Lv. 50
Outfitting Station Tier 3 |
|
|
・
・
・
|
Armoring Lv. 50
Outfitting Station Tier 3 |
|
|
・
・
・
|
Armoring Lv. 50
Outfitting Station Tier 3 |
|
|
・
・
・
|
Armoring Lv. 50
Outfitting Station Tier 3 |
|
|
・
・
・
|
Armoring Lv. 50
Outfitting Station Tier 3 |
|
|
・
・
・
|
Armoring Lv. 50
Outfitting Station Tier 3 |
|
|
・
・
・
|
Armoring Lv. 50
Outfitting Station Tier 3 |
|
|
・
・
・
|
Armoring Lv. 50
Outfitting Station Tier 3 |
|
|
・
・
・
|
Armoring Lv. 50
Outfitting Station Tier 3 |
|
|
・
・
・
|
Armoring Lv. 50
Outfitting Station Tier 3 |
|
|
・
・
・
・
|
Armoring Lv. 60
Outfitting Station Tier 3 |
|
|
・
・
・
・
|
Armoring Lv. 60
Outfitting Station Tier 3 |
|
|
・
・
・
・
|
Armoring Lv. 60
Outfitting Station Tier 3 |
|
|
・
・
・
・
|
Armoring Lv. 60
Outfitting Station Tier 3 |
|
|
・
・
・
・
|
Armoring Lv. 60
Outfitting Station Tier 3 |
|
|
・
・
・
・
|
Armoring Lv. 60
Outfitting Station Tier 3 |
|
|
・
・
・
・
|
Armoring Lv. 60
Outfitting Station Tier 3 |
|
|
・
・
・
・
|
Armoring Lv. 60
Outfitting Station Tier 3 |
|
|
・
・
・
・
|
Armoring Lv. 60
Outfitting Station Tier 3 |
|
|
・
・
・
・
|
Armoring Lv. 60
Outfitting Station Tier 3 |
|
|
・
・
・
・
|
Armoring Lv. 60
Outfitting Station Tier 3 |
|
|
・
・
・
・
|
Armoring Lv. 60
Outfitting Station Tier 3 |
|
|
・
・
・
・
|
Armoring Lv. 60
Outfitting Station Tier 3 |
|
|
・
・
・
・
|
Armoring Lv. 60
Outfitting Station Tier 3 |
|
|
・
・
・
・
|
Armoring Lv. 60
Outfitting Station Tier 3 |
|
|
・
・
・
・
|
Armoring Lv. 60
Outfitting Station Tier 3 |
|
|
・
・
・
・
|
Armoring Lv. 60
Outfitting Station Tier 3 |
|
|
・
・
・
・
|
Armoring Lv. 60
Outfitting Station Tier 3 |
|
|
・
・
・
・
|
Armoring Lv. 60
Outfitting Station Tier 3 |
|
|
・
・
・
・
|
Armoring Lv. 60
Outfitting Station Tier 3 |
|
|
・
・
・
|
Armoring Lv. 100
Outfitting Station Tier 4 |
|
|
・
・
・
|
Armoring Lv. 100
Outfitting Station Tier 4 |
|
|
・
・
・
|
Armoring Lv. 100
Outfitting Station Tier 4 |
|
|
・
・
・
|
Armoring Lv. 100
Outfitting Station Tier 4 |
|
|
・
・
・
|
Armoring Lv. 100
Outfitting Station Tier 4 |
|
|
・
・
・
|
Armoring Lv. 100
Outfitting Station Tier 4 |
|
|
・
・
・
|
Armoring Lv. 100
Outfitting Station Tier 4 |
|
|
・
・
・
|
Armoring Lv. 100
Outfitting Station Tier 4 |
|
|
・
・
・
|
Armoring Lv. 100
Outfitting Station Tier 4 |
|
|
・
・
・
|
Armoring Lv. 100
Outfitting Station Tier 4 |
|
|
・
・
・
|
Armoring Lv. 100
Outfitting Station Tier 4 |
|
|
・
・
・
|
Armoring Lv. 100
Outfitting Station Tier 4 |
|
|
・
・
・
・
|
Armoring Lv. 110
Outfitting Station Tier 4 |
|
|
・
・
・
・
|
Armoring Lv. 110
Outfitting Station Tier 4 |
|
|
・
・
・
・
|
Armoring Lv. 110
Outfitting Station Tier 4 |
|
|
・
・
・
・
|
Armoring Lv. 110
Outfitting Station Tier 4 |
|
|
・
・
・
・
|
Armoring Lv. 110
Outfitting Station Tier 4 |
|
|
・
・
・
・
|
Armoring Lv. 110
Outfitting Station Tier 4 |
|
|
・
・
・
・
|
Armoring Lv. 110
Outfitting Station Tier 4 |
|
|
・
・
・
・
|
Armoring Lv. 110
Outfitting Station Tier 4 |
|
|
・
・
・
・
|
Armoring Lv. 110
Outfitting Station Tier 4 |
|
|
・
・
・
・
|
Armoring Lv. 110
Outfitting Station Tier 4 |
|
|
・
・
・
・
|
Armoring Lv. 110
Outfitting Station Tier 4 |
|
|
・
・
・
・
|
Armoring Lv. 110
Outfitting Station Tier 4 |
|
|
・
・
・
・
|
Armoring Lv. 110
Outfitting Station Tier 4 |
|
|
・
・
・
・
|
Armoring Lv. 110
Outfitting Station Tier 4 |
|
|
・
・
・
・
|
Currently unavailable Outfitting Station Tier 4 |
|
|
・
・
・
・
|
Armoring Lv. 110
Outfitting Station Tier 4 |
|
|
・
・
・
・
|
Armoring Lv. 110
Outfitting Station Tier 4 |
|
|
・
・
・
・
|
Armoring Lv. 110
Outfitting Station Tier 4 |
|
|
・
・
・
・
|
Armoring Lv. 110
Outfitting Station Tier 4 |
|
|
・
・
・
・
|
Armoring Lv. 110
Outfitting Station Tier 4 |
|
|
・
・
・
|
Armoring Lv. 150
Outfitting Station Tier 5 |
|
|
・
・
・
|
Armoring Lv. 150
Outfitting Station Tier 5 |
|
|
・
・
・
|
Armoring Lv. 150
Outfitting Station Tier 5 |
|
|
・
・
・
|
Armoring Lv. 150
Outfitting Station Tier 5 |
|
|
・
・
・
|
Armoring Lv. 150
Outfitting Station Tier 5 |
|
|
・
・
・
|
Armoring Lv. 150
Outfitting Station Tier 5 |
|
|
・
・
・
|
Armoring Lv. 150
Outfitting Station Tier 5 |
|
|
・
・
・
|
Armoring Lv. 150
Outfitting Station Tier 5 |
|
|
・
・
・
|
Armoring Lv. 150
Outfitting Station Tier 5 |
|
|
・
・
・
|
Armoring Lv. 150
Outfitting Station Tier 5 |
|
|
・
・
・
|
Armoring Lv. 150
Outfitting Station Tier 5 |
|
|
・
・
・
・
|
Armoring Lv. 160
Outfitting Station Tier 5 |
|
|
・
・
・
・
|
Armoring Lv. 160
Outfitting Station Tier 5 |
|
|
・
・
・
・
|
Armoring Lv. 160
Outfitting Station Tier 5 |
|
|
・
・
・
・
|
Armoring Lv. 160
Outfitting Station Tier 5 |
|
|
・
・
・
・
|
Armoring Lv. 160
Outfitting Station Tier 5 |
|
|
・
・
・
・
|
Armoring Lv. 160
Outfitting Station Tier 5 |
|
|
・
・
・
・
|
Armoring Lv. 160
Outfitting Station Tier 5 |
|
|
・
・
・
・
|
Armoring Lv. 160
Outfitting Station Tier 5 |
|
|
・
・
・
・
|
Armoring Lv. 160
Outfitting Station Tier 5 |
|
|
・
・
・
・
|
Armoring Lv. 160
Outfitting Station Tier 5 |
|
|
・
・
・
・
|
Armoring Lv. 160
Outfitting Station Tier 5 |
|
|
・
・
・
・
|
Armoring Lv. 160
Outfitting Station Tier 5 |
|
|
・
・
・
・
|
Armoring Lv. 160
Outfitting Station Tier 5 |
|
|
・
・
・
・
|
Armoring Lv. 160
Outfitting Station Tier 5 |
|
|
・
・
・
・
|
Armoring Lv. 160
Outfitting Station Tier 5 |
|
|
・
・
・
・
|
Armoring Lv. 160
Outfitting Station Tier 5 |
|
|
・
・
・
・
|
Armoring Lv. 160
Outfitting Station Tier 5 |
|
|
・
・
・
・
|
Armoring Lv. 160
Outfitting Station Tier 5 |
|
|
・
・
・
・
|
Armoring Lv. 160
Outfitting Station Tier 5 |
|
|
・
・
・
・
|
Armoring Lv. 160
Outfitting Station Tier 5 |
|
|
・
・
・
|
Armoring Lv. 180
Outfitting Station Tier 5 |
|
|
・
・
・
|
Armoring Lv. 185
Outfitting Station Tier 5 |
|
|
・
・
・
|
Armoring Lv. 190
Outfitting Station Tier 5 |
|
|
・
・
・
|
Armoring Lv. 195
Outfitting Station Tier 5 |
|
|
・
・
・
|
Armoring Lv. 200
Outfitting Station Tier 5 |
Cloth Armor

| Crafting Recipes by Category | ||
|---|---|---|
| Heavy Armor | Light Armor | Cloth Armor |
| Robes | Misc. Items | |
Click a link above to take you to that section.
| Item | Req. Resources | Req. Skill Level/Station |
|---|---|---|
|
|
・
・
・
|
Armoring Lv. 0
Outfitting Station Tier 2 |
|
|
・
・
・
|
Armoring Lv. 0
Outfitting Station Tier 2 |
|
|
・
・
・
|
Armoring Lv. 0
Outfitting Station Tier 2 |
|
|
・
・
・
|
Armoring Lv. 0
Outfitting Station Tier 2 |
|
|
・
・
・
|
Armoring Lv. 0
Outfitting Station Tier 2 |
|
|
・
・
・
|
Armoring Lv. 0
Outfitting Station Tier 2 |
|
|
・
・
・
|
Armoring Lv. 0
Outfitting Station Tier 2 |
|
|
・
・
・
|
Armoring Lv. 0
Outfitting Station Tier 2 |
|
|
・
・
・
|
Armoring Lv. 0
Outfitting Station Tier 2 |
|
|
・
・
・
|
Armoring Lv. 50
Outfitting Station Tier 3 |
|
|
・
・
・
|
Armoring Lv. 50
Outfitting Station Tier 3 |
|
|
・
・
・
|
Armoring Lv. 50
Outfitting Station Tier 3 |
|
|
・
・
・
|
Armoring Lv. 50
Outfitting Station Tier 3 |
|
|
・
・
・
|
Armoring Lv. 50
Outfitting Station Tier 3 |
|
|
・
・
・
|
Armoring Lv. 50
Outfitting Station Tier 3 |
|
|
・
・
・
|
Armoring Lv. 50
Outfitting Station Tier 3 |
|
|
・
・
・
|
Armoring Lv. 100
Outfitting Station Tier 4 |
|
|
・
・
・
|
Armoring Lv. 100
Outfitting Station Tier 4 |
|
|
・
・
・
|
Armoring Lv. 100
Outfitting Station Tier 4 |
|
|
・
・
・
|
Armoring Lv. 100
Outfitting Station Tier 4 |
|
|
・
・
・
|
Armoring Lv. 100
Outfitting Station Tier 4 |
|
|
・
・
・
|
Armoring Lv. 100
Outfitting Station Tier 4 |
|
|
・
・
・
|
Armoring Lv. 100
Outfitting Station Tier 4 |
|
|
・
・
・
|
Armoring Lv. 100
Outfitting Station Tier 4 |
|
|
・
・
・
|
Armoring Lv. 150
Outfitting Station Tier 5 |
|
|
・
・
・
|
Armoring Lv. 150
Outfitting Station Tier 5 |
|
|
・
・
・
|
Armoring Lv. 150
Outfitting Station Tier 5 |
|
|
・
・
・
|
Armoring Lv. 150
Outfitting Station Tier 5 |
|
|
・
・
・
|
Armoring Lv. 150
Outfitting Station Tier 5 |
|
|
・
・
・
|
Armoring Lv. 150
Outfitting Station Tier 5 |
|
|
・
・
・
|
Armoring Lv. 150
Outfitting Station Tier 5 |
|
|
・
・
・
|
Armoring Lv. 150
Outfitting Station Tier 5 |
Robes

| Crafting Recipes by Category | ||
|---|---|---|
| Heavy Armor | Light Armor | Cloth Armor |
| Robes | Misc. Items | |
Click a link above to take you to that section.
| Item | Req. Resources | Req. Skill Level/Station |
|---|---|---|
|
|
・
・
・
|
Armoring Lv. 50
Outfitting Station Tier 3 |
|
|
・
・
・
|
Armoring Lv. 50
Outfitting Station Tier 3 |
|
|
・
・
・
|
Armoring Lv. 50
Outfitting Station Tier 3 |
|
|
・
・
・
|
Armoring Lv. 50
Outfitting Station Tier 3 |
|
|
・
・
・
|
Armoring Lv. 50
Outfitting Station Tier 3 |
|
|
・
・
・
|
Armoring Lv. 100
Outfitting Station Tier 4 |
|
|
・
・
・
|
Armoring Lv. 100
Outfitting Station Tier 4 |
|
|
・
・
・
|
Armoring Lv. 100
Outfitting Station Tier 4 |
|
|
・
・
・
|
Armoring Lv. 100
Outfitting Station Tier 4 |
|
|
・
・
・
|
Armoring Lv. 100
Outfitting Station Tier 4 |
|
|
・
・
・
|
Armoring Lv. 150
Outfitting Station Tier 5 |
|
|
・
・
・
|
Armoring Lv. 150
Outfitting Station Tier 5 |
|
|
・
・
・
|
Armoring Lv. 150
Outfitting Station Tier 5 |
|
|
・
・
・
|
Armoring Lv. 150
Outfitting Station Tier 5 |
|
|
・
・
・
|
Armoring Lv. 150
Outfitting Station Tier 5 |
|
|
・
・
・
|
Armoring Lv. 180
Outfitting Station Tier 5 |
|
|
・
・
・
|
Armoring Lv. 185
Outfitting Station Tier 5 |
|
|
・
・
・
|
Armoring Lv. 195
Outfitting Station Tier 5 |
|
|
・
・
・
|
Armoring Lv. 200
Outfitting Station Tier 5 |
|
|
・
・
・
|
Armoring Lv. 190
Outfitting Station Tier 5 |
Miscellaneous Items

| Crafting Recipes by Category | ||
|---|---|---|
| Heavy Armor | Light Armor | Cloth Armor |
| Robes | Misc. Items | |
Click a link above to take you to that section.
Bags
| Item | Req. Resources | Req. Skill Level/Station |
|---|---|---|
|
|
・
・
・
|
Armoring Lv. 0
Outfitting Station Tier 2 |
|
|
・
・
・
|
Armoring Lv. 50
Outfitting Station Tier 3 |
|
|
・
・
・
|
Armoring Lv. 100
Outfitting Station Tier 4 |
|
|
・
・
・
|
Armoring Lv. 150
Outfitting Station Tier 5 |
Other Items
New World Related Guides

| Gathering Skills | ||
|---|---|---|
 Mining Mining |
 Logging Logging |
|
 Tracking & Skinning Tracking & Skinning |
 Fishing Fishing |
|
| Refining Skills | ||
 Smelting Smelting |
 Woodworking Woodworking |
 Leatherworking Leatherworking |
 Weaving Weaving |
 Stonecutting Stonecutting |
|
| Crafting Skills | ||
 Cooking Cooking |
 Weaponsmithing Weaponsmithing |
 Arcana Arcana |
 Armoring Armoring |
 Furnishing Furnishing |
 Jewelcrafting Jewelcrafting |
 Engineering Engineering |
||
Author

Armoring Guide: How to Level from 0 to 200
Please participate in our site
improvement survey
03/2026
improvement survey
03/2026
Would you assist in
improving Game8's site?
improving Game8's site?

×
We are listening to our users' valuable opinions and discussing how to act on them.
The information collected through this survey will be used for the purpose of improving our services. In addition, the information will only be disclosed a part of a statistic in a format that will not allow identification of personal information.
Begin Survey
Not Now
×
Please rate each item regarding Game8.co's Advertisements.
Amount of Ads
Very Dissatisfied
Somewhat Dissatisfied
Fine
Somewhat Satisfied
Highly Satisfied
Placement of Ads
Timing of Ad Display
Ad Loading Speed
Safeness of Ads
Content of Ads
×
Please rate each item regarding Game8.co's Quality of Articles.
Amount of information
Very Dissatisfied
Somewhat Dissatisfied
Fine
Somewhat Satisfied
Highly Satisfied
Frequency of updates
Speed of new information
Accuracy of articles
Understandibility of articles
Readability of sentences
×
Please rate each item regarding Game8.co's Usability of the Site.
Ease of finding information
Very Dissatisfied
Somewhat Dissatisfied
Fine
Somewhat Satisfied
Highly Satisfied
Loading Speed
Use of Color
Font Size
Visibility of Images
Easy to Understand Layout
×
Please rate each item regarding Game8.co's Message Boards, Comments.
Ease of Writing
Very Dissatisfied
Somewhat Dissatisfied
Fine
Somewhat Satisfied
Highly Satisfied
Readability
Ease in Finding Information
Comment Quality
Comment Quantity
Admin Response
×
Please rate each item regarding Game8.co's Site's new design.
Please rate our site's new design
Very Dissatisfied
Somewhat Dissatisfied
Fine
Somewhat Satisfied
Highly Satisfied
Do you think that the website's design change makes the site easier to use?
Has the new design made it easier for you to find information on the site?
Has the new design improved the overall visual appeal of the site?
How would you rate your overall satisfaction with the new design of the site?
×
How likely are you to recommend Game8 to someone you know?
Very Unlikely
0
1
2
3
4
5
6
7
8
9
10
Very Likely
If you have other opinions regarding potential improvement to the website, please share them with us. We would appreciate your honest opinion.
Note: This is a free response section, so you can proceed without entering anything.
Note: Please be sure not to enter any kind of personal information into your response.
Note: Please be sure not to enter any kind of personal information into your response.
×
Thank You
×
Thank you for participating in our survey! Your answers will help us to improve the quality of our website and services.
We hope you continue to make use of Game8.
We hope you continue to make use of Game8.
Close
Rankings
- We could not find the message board you were looking for.
Gaming News


![Monster Hunter Stories 3 Review [First Impressions] | Simply Rejuvenating](https://img.game8.co/4438641/2a31b7702bd70e78ec8efd24661dacda.jpeg/thumb)
Popular Games

Genshin Impact Walkthrough & Guides Wiki
Honkai: Star Rail Walkthrough & Guides Wiki
Umamusume: Pretty Derby Walkthrough & Guides Wiki
Pokemon Pokopia Walkthrough & Guides Wiki
Resident Evil Requiem (RE9) Walkthrough & Guides Wiki
Monster Hunter Wilds Walkthrough & Guides Wiki
Wuthering Waves Walkthrough & Guides Wiki
Arknights: Endfield Walkthrough & Guides Wiki
Pokemon FireRed and LeafGreen (FRLG) Walkthrough & Guides Wiki
Pokemon TCG Pocket (PTCGP) Strategies & Guides Wiki


Recommended Games
Diablo 4: Vessel of Hatred Walkthrough & Guides Wiki
Cyberpunk 2077: Ultimate Edition Walkthrough & Guides Wiki
Fire Emblem Heroes (FEH) Walkthrough & Guides Wiki
Yu-Gi-Oh! Master Duel Walkthrough & Guides Wiki
Super Smash Bros. Ultimate Walkthrough & Guides Wiki
Pokemon Brilliant Diamond and Shining Pearl (BDSP) Walkthrough & Guides Wiki
Elden Ring Shadow of the Erdtree Walkthrough & Guides Wiki
Monster Hunter World Walkthrough & Guides Wiki
The Legend of Zelda: Tears of the Kingdom Walkthrough & Guides Wiki
Persona 3 Reload Walkthrough & Guides Wiki


All rights reserved
© 2019-2021, Amazon.com, Inc. or its affiliates. All rights reserved.
The copyrights of videos of games used in our content and other intellectual property rights belong to the provider of the game.
The contents we provide on this site were created personally by members of the Game8 editorial department.
We refuse the right to reuse or repost content taken without our permission such as data or images to other sites.