Burn Build
As of December 2025, Game8 has ended coverage of Once Human. Thank you very much for your understanding and we hope you continue to enjoy Game8's guides.

The Burn Build in Once Human is one of the best builds in the game, updated for Season 2. See the Burn build, the best weapons, armor, mods, deviants, and cradle override for the Burn Build in this comprehensive guide!
| All Pyroclasm Starter and Burn Build Guides | ||
|---|---|---|
| Pyroclasm Starter Burn Build (Way of Winter) | How to Get ACS12 - Pyroclasm Starter | Burn Build |
List of Contents
Best Burn Build in Once Human
Burn Build Basic Info
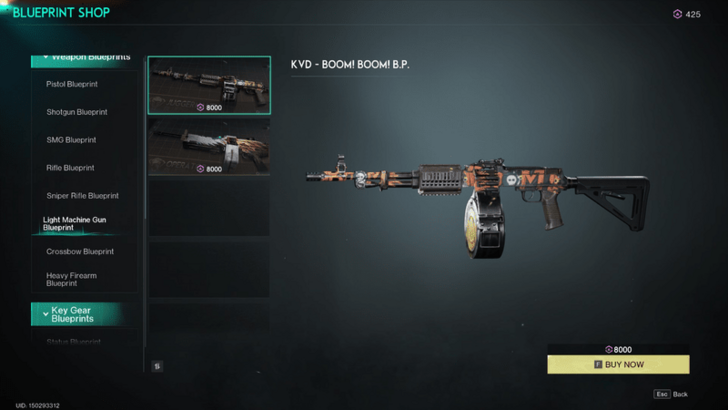
| Slot | Item | Mod |
|---|---|---|
| Primary Weapon | KVD Boom! Boom! or KAM Crank | Embers or Flame Resonance or Burning Wrath |
| Secondary Weapon | Recurve Crossbow or DE.50 - Wildfire | Vulnerability Amplifier |
| Melee | Long Axe | Final Territory |
| Helmet | Bastille Hood or Shelterer Hat | Deviation Expert |
| Face | Shelterer Mask | Blaze Amplifier |
| Gloves | Grill Gloves | Status Enhancement |
| Shoes | Shelterer Shoes | Covered Advance |
| Top | Shelterer Jacket or Bastille Jacket | Flame Resonance (Tier 3) |
| Bottoms | Shelterer Pants | Status Amplification or Precision Charge |
| Notes | ・Use the Combat Deviant Pyro Dino to deal more Fire Damage. ・For Cradle Overrides, equip Automatic Weapon Enhancement, Lone Walker, Master Tactician, Sustained Supression, Deviation Master, Tactical Combo, and Head Agglutination. ・For food, consume Whimsical Drink to increase PSI intensity for your Burn effect. You may also consume Mixed Fried Hotdog for your secondary weapon's Bull's Eye. | |
The Burn Build revolves around stacking Blaze damage over time with the Burn status effect, making it a ticking time bomb for your enemies. Every stack of Burn deals Status DMG of 10% Psi Intensity every 0.5 seconds, for a total of 6 seconds, and you can pile up to 5 stacks. The more stacks, the hotter the burn—and better yet, the damage doesn't decay with distance, meaning you can roast enemies from afar.
With each stack, the Blaze Element gets stronger, making your enemies suffer in a continuous firestorm. This build capitalizes on maximizing the Burn effect, and while it doesn't crit or hit weakspots, its consistent and scalable damage ensures that no matter how tough the enemy, they’ll be feeling the heat.
Best Weapons for Burn Build in Once Human
| Best Weapons for Burn Build | ||
|---|---|---|
| Primary | Secondary | Melee |
Primary Weapon: KVD - Boom! Boom! or KAM - Crank
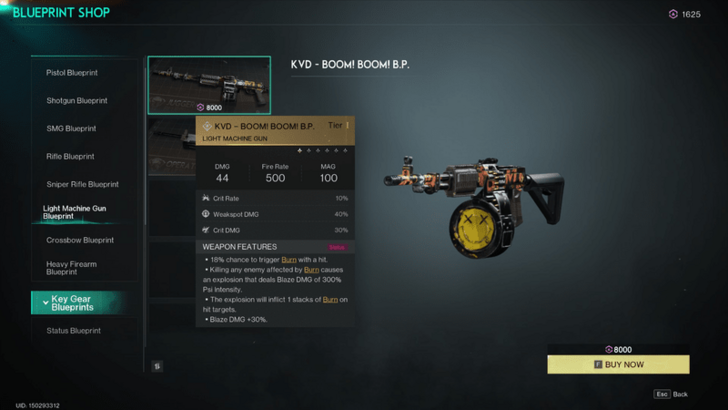
The KVD Boom! Boom! offers a more chaotic, high-damage playstyle. While its 18% chance to trigger Burn is luck-based, it compensates with its explosive nature—literally. Any kill on a burning enemy causes a massive explosion dealing 300% Psi Intensity Blaze DMG, making it ideal for crowd control and dealing with clustered enemies. The explosions also spread more Burn stacks to nearby targets, creating a chain reaction of fiery mayhem. With a passive 30% boost to Blaze DMG, this weapon ensures that every Burn and explosion packs a serious punch.
On the other hand, KAM - Crank is perfect for those who love consistency and precision in their Burn build. With a guaranteed Burn after hitting enemies seven times, it's reliable for stacking Burn quickly. This weapon also rewards aggressive play: each Burn kill gives you a 20% boost to Reload Speed and a 15% Burn DMG increase for 5 seconds, letting you apply more stacks faster while dishing out greater damage. Plus, the Max Burn Stacks +1 means you can stack up to 6 layers of Burn, ramping up your overall damage and making this weapon a steady DPS powerhouse.
Players can pick their weapon based on their preferred style: KAM - Crank for reliable, steady Burn stacking, or KVD - Boom! Boom! for explosive bursts of damage and chaos. Both bring heat—just in different ways!
Recommended Attachments and Calibrations
| Component | KVD - Boom! Boom! | KAM - Crank |
|---|---|---|
| Muzzle | Hammer Compensator | Hammer Compensator |
| Optic | Compact Reflex Sight | Compact Reflex Sight |
| Tactical | Tactical Laser Sight | Tactical Laser Sight |
| Magazine | Large LMG Drum Mag | Light Rifle Mag |
| Calibrations | Rapid Shot Style | Rapid Shot Style |
Here are the top attachments for your KVD - Boom! Boom! or KAM - Crank to heat up your Burn Build!
Secondary Weapon: DE.50 - Wildfire or Recurve Crossbow
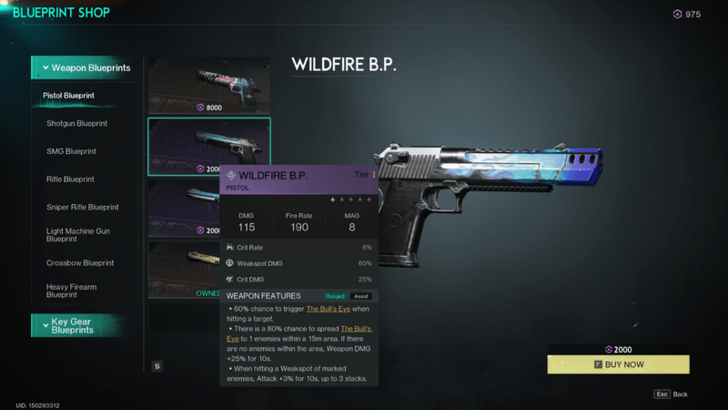
The DE.50 - Wildfire is all about spreading chaos and setting up enemies for destruction. With a 60% chance to trigger The Bull’s Eye on hit, it marks foes often, giving you a juicy 25% weapon damage boost for 10 seconds. Plus, the 80% chance to spread that mark to nearby enemies makes it perfect for softening up groups. Weak spot hits on marked enemies also stack a 3% attack boost, ramping up your damage and making them perfect targets for Burn combos.
On the other hand, the Recurve Crossbow rewards precise shots, guaranteeing a mark on weak spot hits with a 15% Crit Rate boost for 10 seconds. It also increases their vulnerability by 8%, making it easier to pick off key targets. This makes it great for lining up crits and prepping enemies before unleashing your Burn damage.
Both prime targets for Burn, making them more fragile for the real damage!
Recurve Crossbow: How to Get and Location
Melee: Long Axe
The Long Axe is perfect for when you need to be up close and personal in the Burn build. Its heavy attacks activate Fortress Warfare, giving you and your allies Heavy Armor with +20% Weapon DMG, which is invaluable when you're right in the enemy's face.
Long Axe: How to Get and Location
Best Armor for Burn Build in Once Human
| Best Armor for Burn Build | ||
|---|---|---|
| Mask, Shoes, Top, and Bottoms | Helmet | Gloves |
Shelterer Set for Mask, Shoes, Top, and Bottoms
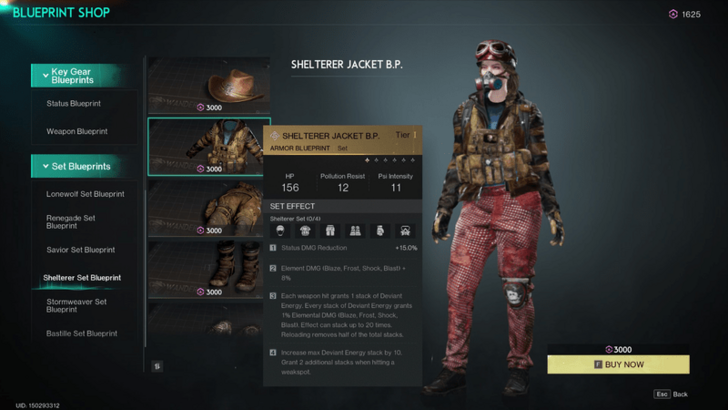
The Shelterer Set is a pyromaniac's dream come true! With its +8% Elemental DMG boost, your Blaze attacks will scorch enemies with even more intensity. Each weapon hit piles on Deviant Energy stacks, cranking up your Blaze DMG by up to 20%—that’s a whole lot of burn for your buck. And don’t worry about getting overwhelmed; the 15% Status DMG Reduction keeps you cool under fire. Hit weak spots to rack up extra stacks and keep the flames blazing, making this set a fiery essential for any Burn build.
Bastille Hood for Helmet
A piece of Bastille set is a fantastic choice for the Burn build, especially when you're feeling confident and staying above 70% HP. It gives you a solid +10% Weapon DMG, enhancing your overall damage output.
This means you can keep the heat on enemies with your Blaze attacks while reaping the benefits of extra firepower. So, as long as you’re healthy, the Bastille Hood keeps your damage burning bright and your enemies on the receiving end of your fiery wrath.
Bastille Hood: How to Get and Location
Grill Gloves for Gloves
Grill Gloves are a hot pick for the Burn build! With these gloves, the Burn damage frequency cranks up with more stacks, maxing out at a scorching 100%. That means the more you stack Burn, the faster your enemies melt. It’s all about turning up the heat and letting those Blaze stacks do rapid-fire damage, making them an essential part of any fiery loadout.
Grill Gloves: How to Get and Location
Best Mods for Burn Build in Once Human
Best Weapon Mods
| Weapon Mods for Burn Build | ||
|---|---|---|
| Primary | Secondary | Melee |
Embers or Flame Resonance for Primary Weapon
| Mod | Effect Description |
|---|---|
| Embers - Talents | Buff effect continues, but Burn stacks are reduced by 50%. |
| Flame Resonance - Burn | Max burn stacks +2, Burn Duration -20%. |
| Triggering Burn - Talents | 25% chance to grant +1 Burn stack(s) upon triggering Burn. |
These mods shine in the Burn Build by enhancing the core mechanics of Blaze damage, making them ideal for either KAM - Crank or KVD Boom! Boom!.
For KAM - Crank, Flame Resonance is a perfect fit. By increasing the maximum Burn stacks, it boosts the weapon’s potential to deal more damage per second, making each hit even more punishing. Triggering Burn is also excellent for this weapon, as it adds an extra Burn stack with a 25% chance, giving you more consistent damage output and allowing you to burn through enemies quickly.
On the other hand, KVD - Boom! Boom! benefits from Embers, which keeps the Burn effect going, though at the cost of fewer stacks, which fits perfectly with the weapon's explosive playstyle. The explosions from KVD - Boom! Boom! paired with Triggering Burn ensure that multiple enemies are set ablaze, spreading chaos. Players can choose mods based on their playstyle, whether they want quicker, more intense burns or longer-lasting, spread-out damage!
Vulnerability Amplifier for Second Weapon
| Mod | Effect Description |
|---|---|
| Vulnerability Amplifier | Enhances the vulnerability effect of Bull's Eye by 8% on marked targets. |
The Vulnerability Amplifier - The Bull's Eye mod works wonders when paired with Recurve Crossbow or DE.50 - Wildfire because it boosts the vulnerability effect from Bull's Eye by an extra 8%. This makes enemies marked by Bull's Eye even more susceptible to damage, setting them up perfectly for your burn-inflicting primary weapon.
Melee Amplifier for Melee
| Mod | Effect Description |
|---|---|
| Final Territory - Fortress Warfare | When Fortress Warfare ends, Weapon DMG +10%, Movement Speed +10% for 10s. |
Final Territory is a killer match for your Long Axe. It ramps up your Weapon DMG and Movement Speed by 10% for 10 seconds after Fortress Warfare ends.
Best Armor Mods
| Armor Mods for Burn Build | ||
|---|---|---|
| Helmet | Face | Gloves |
| Shoes | Top | Bottoms |
Deviation Expert for Helmet
| Mod | Effect Description |
|---|---|
| Deviation Expert - Talents | Range -25%, Fire Rate +10%, Status Damage +20% |
Deviation Expert might cut your range, but it boosts Fire Rate and Status Damage. This means you’ll rack up those Burn stacks faster and hit harder, making every shot sizzle!
Blaze Amplifier for Face
| Mod | Effect Description |
|---|---|
| Blaze Amplifier - Talents | Every stack of Burn grants +3% Psi Intensity DMG. |
Blaze Amplifier makes each Burn stack count even more by adding +3% Psi Intensity DMG per stack. The more Burn stacks you pile on, the hotter your damage gets!
Status Enhancement for Gloves
| Mod | Effect Description |
|---|---|
| Status Enhancement - Talents | Status DMG +20.0% |
Status Enhancement cranks up your Status Damage by 20%, turning up the heat on your Burn Build!
Covered Advance for Shoes
| Mod | Effect Description |
|---|---|
| Covered Advance - Talents | Taking no DMG within 4s grants +20% Melee, Weapon, and Status DMG for 30s. The effect resets when the duration ends. |
Covered Advance syncs perfectly with a piece of Bastille. It boosts Melee, Weapon, and Status DMG by 20% when you avoid damage for 4 seconds, which stacks nicely with the Bastille Hood’s +10% Weapon DMG when HP is above 70%.
Flame Resonance for Top
| Mod | Effect Description |
|---|---|
| Flame Resonance III - Talents | Status DMG +12.0% |
The armor version of Flame Resonance mod boosts Status DMG by 12%, which ramps up the effectiveness of your Burn build. This means your Burn effects hit harder, making it even easier to keep your foes ablaze!
Status Amplification or Precision Charge for Bottoms
| Mod | Effect Description |
|---|---|
| Status Amplification - Talents | When the magazine is empty, Status DMG +10% for 12s, stacking up to 3 times. |
| Precision Charge - Resonance | For every 10% Weakspot hit rate of the previous magazine, Elemental DMG +4%, up to 24%, lasting for 10s. Reloading resets the calculation. |
Status Amplification cranks up your Status DMG by up to 30% for 12 seconds when your magazine runs dry—perfect for setting foes ablaze when you’re out of ammo! Precision Charge, meanwhile, gives you up to 24% extra Elemental DMG for 10 seconds, based on how well you hit Weakspots—ideal for those precision shots that turn up the heat.
Best Deviant for Burn Build in Once Human
Pyro Dino

The Pyro Dino is your fiery buddy for the Burn Build! This fire-breathing dinosaur autonomously unleashes its wrath on enemies, upping the Blaze DMG they take by 29.4%, so it just makes your Burn even more terrifying. Even better, it causes an explosive eruption when it attacks enemies already burning.
Best Cradle Overrides for Burn Build in Once Human
| Cradle Overrides for Unstable Bomber Build | ||
|---|---|---|
| Automatic Weapon Enhancement | Lone Walker | Master Tactician |
| Sustained Suppression | Deviation Master | Tactical Combo |
| Heat Agglutination | ||
Automatic Weapon Enhancement
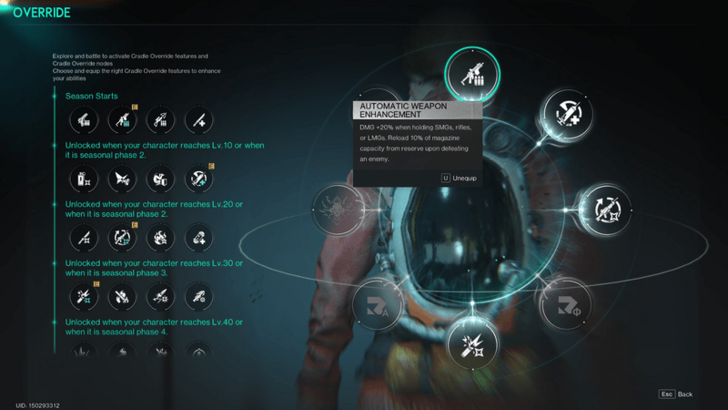
Automatic Weapon Enhancement is a no-brainer for your KAM - Crank or KVD Boom! Boom!. For these weapons, which are central to the Burn build, this mod amplifies damage by 20% and refills 10% of the magazine with each kill.
Lone Walker
An override introduced in Season 2, though it looks like it's here to stay: Lone Walker is your go-to for when you're flying solo. It speeds up curable usage by 35%, helps you tank hits with a 30% damage reduction when your HP dips below 30%, and adds a sweet 20% boost to your damage against deviants. f you're going it alone, this override keeps you alive and hitting hard!
Master Tactician
The Master Tactician Cradle Override boosts damage against Great Ones by 25% for 15 seconds after using a tactical item like Molotov, complementing your fiery build.
Sustained Suppression
Sustained Suppression turns up the heat with every kill. Each time you finish off an enemy with Continuous DMG like Burn, it boosts your Continuous DMG by +20% for 10 seconds, stacking up to three times.
Deviation Master
Deviation Master works great with Burn build as it grants a 50% damage boost against Deviants, making it highly effective when paired with the Pyro Dino.
Tactical Combo
Tactical Combo is your go-to for seamless damage boosts. It grants +25% Weapon DMG for 4 seconds after switching weapons or reloading. Perfect for transitioning from marking enemies with your secondary weapon using Bull’s Eye to unleashing your primary weapon's Burn effect.
Heat Agglutination
Heat Agglutination heats things up by boosting Burn DMG by 5% for 6 seconds with every stack of Burn triggered. Stack up to 6 times to amplify your fiery onslaught, turning every burn into a hotter, deadlier blaze!
Once Human Related Guides

All Best Builds
| All Best Builds | |
|---|---|
| Shrapnel | Power Surge |
| Frost Vortex | Sniper / Bull's Eye |
| Unstable Bomber | Bounce |
| Fabled Masamune | Corrosion |
| Burn | Fast Gunner |
| Doombringer | Critical Pulse |
All Class Builds
| All Class Best Builds | |
|---|---|
| Chef | Beastmaster |
| Gardener | - |
All Way of Winter Builds
Lunar Oracle Best Builds
| Lunar Oracle Builds | |
|---|---|
| Lunar Oracle Fortress Warfare Build | - |
Other Builds
| Other Builds | |
|---|---|
| Best PvP Build | Best PvE Build |
Comment
hahaha, theres a flame resonance for top armor its color blue tho
Author
improvement survey
03/2026
improving Game8's site?

Your answers will help us to improve our website.
Note: Please be sure not to enter any kind of personal information into your response.

We hope you continue to make use of Game8.
Rankings
- We could not find the message board you were looking for.
Gaming News
Popular Games

Genshin Impact Walkthrough & Guides Wiki

Honkai: Star Rail Walkthrough & Guides Wiki

Umamusume: Pretty Derby Walkthrough & Guides Wiki

Pokemon Pokopia Walkthrough & Guides Wiki

Resident Evil Requiem (RE9) Walkthrough & Guides Wiki

Monster Hunter Wilds Walkthrough & Guides Wiki

Wuthering Waves Walkthrough & Guides Wiki

Arknights: Endfield Walkthrough & Guides Wiki

Pokemon FireRed and LeafGreen (FRLG) Walkthrough & Guides Wiki

Pokemon TCG Pocket (PTCGP) Strategies & Guides Wiki
Recommended Games

Fire Emblem Heroes (FEH) Walkthrough & Guides Wiki

Diablo 4: Vessel of Hatred Walkthrough & Guides Wiki

Yu-Gi-Oh! Master Duel Walkthrough & Guides Wiki

Super Smash Bros. Ultimate Walkthrough & Guides Wiki

Pokemon Brilliant Diamond and Shining Pearl (BDSP) Walkthrough & Guides Wiki

Elden Ring Shadow of the Erdtree Walkthrough & Guides Wiki

Monster Hunter World Walkthrough & Guides Wiki

The Legend of Zelda: Tears of the Kingdom Walkthrough & Guides Wiki

Persona 3 Reload Walkthrough & Guides Wiki

Cyberpunk 2077: Ultimate Edition Walkthrough & Guides Wiki
All rights reserved
Privacy Policy, Terms of Use 2024 NetEase, Inc.All Rights Reserved
The copyrights of videos of games used in our content and other intellectual property rights belong to the provider of the game.
The contents we provide on this site were created personally by members of the Game8 editorial department.
We refuse the right to reuse or repost content taken without our permission such as data or images to other sites.


![Slay the Spire 2 Review [Early Access] | Still the Deckbuilder to Beat](https://img.game8.co/4433115/44e19e1fb0b4755466b9e516ec7ffb1e.png/thumb)

![Resident Evil Village Review [Switch 2] | Almost Flawless Port](https://img.game8.co/4432790/e1859f64830960ce4248d898f8cd38d9.jpeg/thumb)


