Doombringer Build
As of December 2025, Game8 has ended coverage of Once Human. Thank you very much for your understanding and we hope you continue to enjoy Game8's guides.
The Doombringer Build in Once Human is one of the best builds in the game, updated for Season 2. See the Doombringer build, the best weapons, armor, mods, deviants, and cradle override for the Doombringer Build in this comprehensive guide!
| Doombringer Guides | |
|---|---|
| How to Get Doombringer | Doombringer Build |
List of Contents
Best Doombringer Build in Once Human
Doombringer Build Basic Info
| Slot | Item | Mod |
|---|---|---|
| Primary Weapon | DBSG - Doombringer | Vulnerability Amplifier |
| Secondary Weapon | AWS.338 - Bullseye or Bingo | Vulnerability Amplifier |
| Melee | Long Axe | Portable Territory |
| Helmet | Savior Hood or Lonewolf Hood | Lifeforce Boost or Precise Strike |
| Face | Savior Mask or Lonewolf Mask | Most Wanted or Targeted Strike |
| Gloves | Heavy Duty Clothing Gloves or Bastille Gloves | Crit Amplifier or Munitions Amplifier |
| Shoes | Seasoned Hunter Leather Boots or Earthly Boots | Covered Advance |
| Top | Savior Jacket or Lonewolf Jacket | Healing Fortification and Munitions Amplifier |
| Bottoms | Savior Pants or Lonewolf Pants | Unstoppable or Three Strikes |
| Notes | ・For Cradle Overrides, equip Handgun Enhancement, Long Range Enhancement, Agility, Rapid Aid, Tactical Combo, and Bounty Hunter. ・Use Lonewolf's Whisper for your Combat Deviant, as it provides damage and distracts enemies. ・Consume Stardust Raspberry Shaved Ice and Iced Tea when available! |
|
The Doombringer Build is all about getting up close and personal because the Bull's Eye effect for the DBSG - Doombringer shotgun cranks up to a massive 80% chance to trigger Vulnerability when you're within 5 meters of your target. This tanky setup lets you roll around, shrug off damage, and blast foes at point-blank range, maximizing your shotgun's power. It thrives on stacking Weakspot DMG and HP boosts to keep you in the fight.
Paired with the AWS.338 - Bullseye or Bingo for long-range flexibility, you can tweak the build to focus purely on crits or shotgun dominance by swapping out upgrades meant for the Bingo. Either way, you’ll be a walking wrecking ball!
Best Weapons for Doombringer Build in Once Human
| Best Weapons for Doombringer Build | ||
|---|---|---|
| Primary | Secondary | Melee |
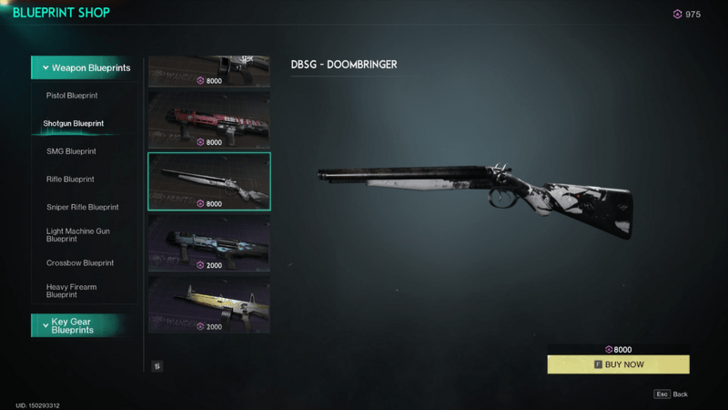
Primary Weapon: DBSG - Doombringer
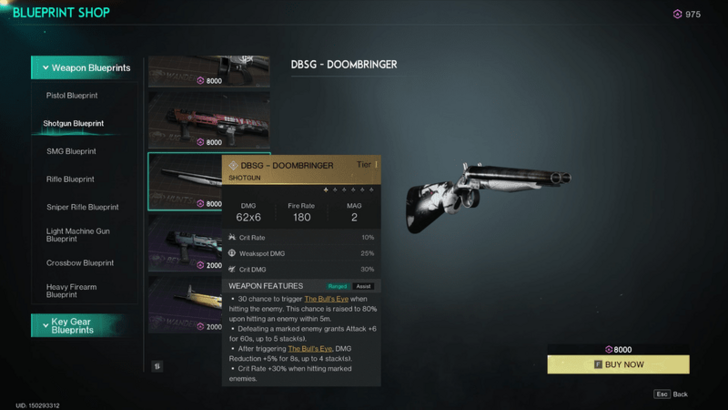
Despite the nerf, the DBSG - Doombringer remains one of the best shotguns around and is the soul of this build, delivering devastating close-range power with its Bull's Eye effect. With a 30% chance to trigger Bull's Eye on any hit, this skyrockets to an 80% chance when you're within 5 meters of your target. Once activated, enemies are marked, outlined, and weakened with +8% Vulnerability for 12 seconds, letting you blast away for maximum damage. This shotgun thrives on being up close and personal, where its power truly shines.
But it doesn't stop there. Defeating a marked enemy grants you a stackable +6 Attack for 60 seconds (up to 5 stacks), while every Bull's Eye trigger gives you 5% Damage Reduction for 8 seconds, stacking up to 4 times. To top it all off, hitting marked enemies boosts your Crit Rate by a whopping 30%, making sure your shots hit like a truck. This shotgun is the beating heart of the Doombringer Build, and its relentless close-range dominance is why the build gets its name.
The blueprint can be acquired via the Wish Machine by playing the mini-games or buying it with 8,000 Starchrom from the Blueprint Shop. We recommend crafting the Tier V version as soon as you can.
DBSG - Doombringer How to Get and Location
Recommended Attachments
| Component | Attachment |
|---|---|
| Muzzle | - |
| Optic | - |
| Tactical | Tactical Laser Sight |
| Magazine | - |
You only need Tactical Laser Sight, as the DBSG - Doombringer only has one attachment slot!
Secondary Weapon: AWS.338 - Bullseye
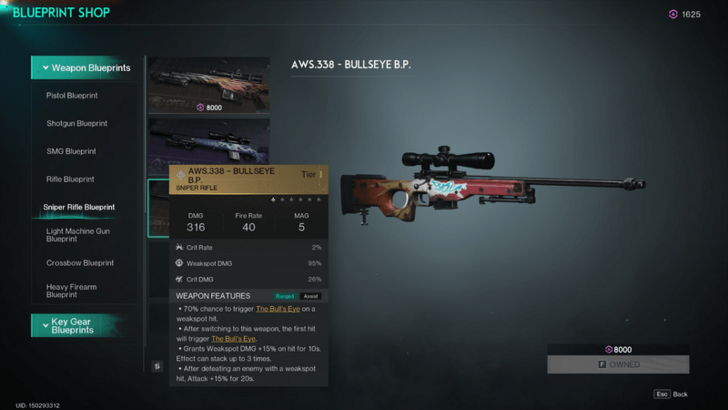
The AWS.338 - Bullseye or Bingo sniper rifle is the perfect secondary weapon to complement the close-range power of the Doombringer shotgun. While the shotgun dominates in tight spaces, this sniper rifle excels at long-range combat, making it the ideal backup for when you need to pick off enemies from afar. With a 70% chance to trigger Bull's Eye on a weakspot hit and the ability to trigger Bull's Eye automatically on the first hit after switching weapons, this rifle ensures you can keep the pressure on enemies, no matter the distance.
Its passive bonuses boost your damage significantly. Hitting weakspots grants a +15% Weakspot Damage boost for 10 seconds, stacking up to 3 times for a total of 45% extra damage. Plus, when you defeat an enemy with a weakspot hit, your Attack jumps by 15% for 20 seconds. Like the Doombringer, the Bull's Eye marks enemies with +8% Vulnerability for 12 seconds, making it a seamless addition to the build, letting you dominate both near and far.
AWS.338 - Bullseye: How to Get and Location
Melee: Long Axe
Though you’ll mostly be blasting away with your DBSG - Doombringer, for this build, the Long Axe is your melee weapon of choice, offering crucial support when you need to get up close and personal. Its passives make it an excellent fit for the build, providing both offensive and defensive benefits.
It’s not just for show—its heavy attacks trigger Fortress Warfare, creating a protective 2m radius that grants Heavy Armor with +20% Weapon DMG for 5 seconds. Plus, it enhances your crit rate and melee swing speed with each target hit, stacking up to 3 times. So when you need to switch to melee, the Long Axe has you covered, keeping you tanky and ready for close combat.
Long Axe: How to Get and Location
Best Armor for Doombringer Build in Once Human
| Best Armor for Doombringer Build | |||
|---|---|---|---|
| Helmet, Face, Top and Bottoms | Gloves | Shoes | DPS Alternative |
Savior Set for Helmet, Face, Top and Bottoms
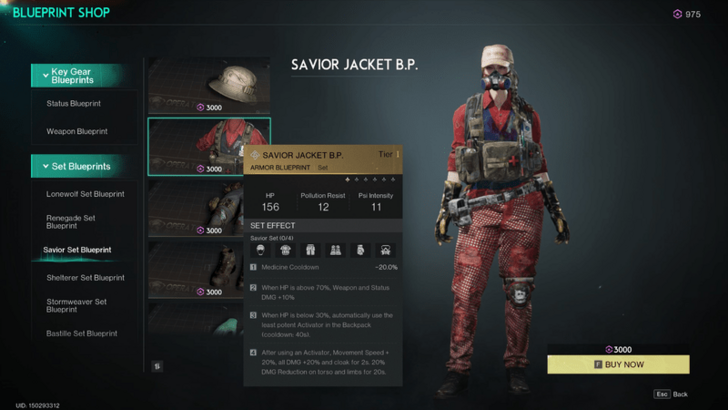
The Savior Set is perfect for the Doombringer Build, enhancing your tanky, close-range combat style. The Medicine Cooldown -20% ensures you can heal up quickly, keeping you in the fight longer. With Weapon and Status DMG +10% when your HP is above 70%, you'll deal more damage while you're in good shape. The set also automatically uses the least potent Activator when your HP drops below 30%, so you get a crucial healing boost without needing to manage it manually.
Additionally, after using an Activator, the set grants a 20% increase in Movement Speed and 20% extra damage, plus a 2-second cloak to help you reposition or escape. The 20% damage reduction on torso and limbs for 20 seconds further bolsters your durability, making the Savior Set an excellent choice to keep you resilient and powerful in the thick of battle.
You can purchase the blueprint for each piece of the Savior set at the Blueprints Shop by interacting with the Wish Machine for 3,000 Starchrom apiece.
Heavy Duty Clothing Gloves for Gloves
The Heavy Duty Clothing Gloves are a solid choice for the Doombringer Build due to their +10% Max HP boost. This extra health complements the build's tanky nature, giving you more survivability in close-quarters combat
.
Heavy Duty Clothing Gloves: How to Get and Location
Seasoned Hunter Leather Boots for Shoes
The Seasoned Hunter Leather Boots give your Bull's Eye shots a leg up by turning your next bullet into a guaranteed Weakspot hit, no aiming required. Plus, they boost Weakspot DMG by 30% for enemies under Bull's Eye's effect. It's a surefire way to kick your damage up a notch!
Seasoned Hunter Leather Boots: How to Get and Location
DPS Alternative: 4-Piece Lonewolf Set, 1-Piece Bastille, and Earthly Boots
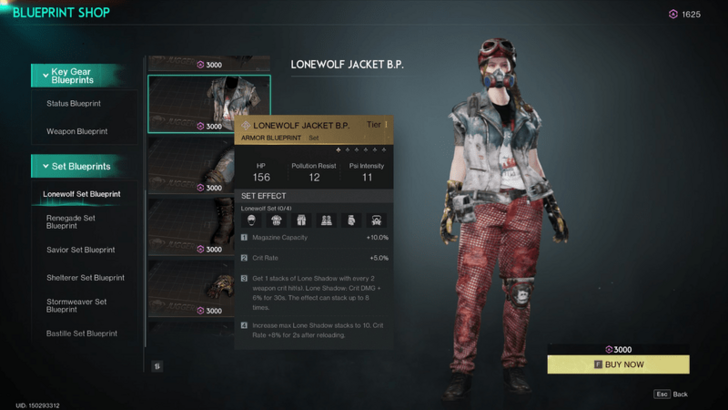
For a more DPS-focused spin, swap your gear to 4 pieces of the Lonewolf Set, add a touch of Bastille, and finish with Earthly Boots.
The Lonewolf Set turns you into a crit machine with a 10% magazine boost, a 5% Crit Rate increase, and stacks of Lone Shadow that ramp up your Crit DMG by 6% for 30 seconds. Max out those stacks for an extra Crit Rate boost after a kill, making every shot count.
A piece of Bastille keeps your Weapon DMG up by 10% when your HP is high, and the Earthly Boots boost your damage by 30% when hitting marked enemies. It’s a setup designed to keep the damage flowing and the crits flying! It's a powerhouse for PvE.
Best Mods for Doombringer Build in Once Human
| Best Mods for Doombringer | |
|---|---|
| Best Weapon Mods | Best Armor Mods |
Best Weapon Mods
| Weapon Mods for Doombringer Build | ||
|---|---|---|
| Primary | Secondary | Melee |
Vulnerability Amplifier for Primary Weapon
| Mod | Effect Description |
|---|---|
| Vulnerability Amplifier V | Increases The Bull's Eye effect by adding Vulnerability +8% to the target. |
Vulnerability Amplifier is the spice your DBSG - Doombringer needs! It boosts the Bull's Eye effect, turning your enemies into walking bullseyes with an extra 8% vulnerability.
Vulnerability Amplifier for Secondary Weapon
| Mod | Effect Description |
|---|---|
| Vulnerability Amplifier V | Increases The Bull's Eye effect by adding Vulnerability +8% to the target. |
Just like the DBSG - Doombringer, the AWS.338 - Bullseye/Bingo loves a good vulnerability boost! With Vulnerability Amplifier, your sniper shots get an extra 8% vulnerability added to your Bull's Eye, making every long-range shot a bit more devastating.
Portable Territory for Melee Weapon
| Mod | Effect Description |
|---|---|
| Portable Territory V | After leaving Fortress Warfare, the status effect will remain active for 2 additional seconds. |
Portable Territory is great for the Long Axe because it keeps Fortress Warfare’s heavy armor buff active for an extra 2 seconds after you leave the area. This means you get to keep that sweet Heavy Armor and 20% damage reduction even when you're swinging your axe elsewhere.
Best Armor Mods
| Armor Mods for Doombringer Build | ||
|---|---|---|
| Helmet | Face | Gloves |
| Shoes | Top | Bottoms |
Precise Strike or Lifeforce Boost for Helmet
| Mod | Effect Description |
|---|---|
| Precise Strike V | Hitting a weakspot grants Weakspot DMG +12% for 3 seconds. Effect stacks up to 3 times. |
| Lifeforce Boost V | Increases HP by 12.0%. |
Here's the lowdown on your helmet mod choices: Precise Strike is your ticket to ramping up Weakspot DMG by 12% for 3 seconds with each weakspot hit, stacking up to three times—ideal for turning those weak spots into sweet spots of damage.
If you’re leaning towards tanking through the chaos, Lifeforce Boost gives you a solid 12% HP boost, letting you tank more hits and stay in the game longer.
Most Wanted or Targeted Strike for Face
| Mod | Effect Description |
|---|---|
| Most Wanted V | Every time an enemy is marked, Attack +5% for 8s. Effect can stack up to 3 times. |
| Targeted Strike V | When hitting marked enemies, Crit Rate +10% and Crit DMG +25%. |
For the Doombringer Build, both of these mods bring their own flair to the table. Most Wanted ramps up your Attack power each time you mark an enemy, stacking up to 15% more Attack power for 8 seconds—perfect for maximizing your shotgun’s explosive close-range damage.
On the other hand, Targeted Strike enhances your precision, boosting Crit Rate by 10% and Crit DMG by 25% against marked enemies, making your shots even deadlier. Players can pick based on whether they want to amp up their Attack or supercharge their critical hits!
Crit Amplifier or Munitions Amplifier for Gloves
| Mod | Effect Description |
|---|---|
| Crit Amplifier V | Increases Crit Rate by 10% and Crit DMG by 15%. |
| Munitions Amplifier V | Weapon DMG + 15.0%s. |
Crit Amplifier cranks up your critical hits with a 10% boost to Crit Rate and 15% to Crit DMG, making those critical moments really count. Munitions Amplifier, on the other hand, delivers a solid 15% increase in Weapon DMG, ensuring all your shots hit harder. Choose Crit Amplifier for more punchy crits or Munitions Amplifier for a straightforward damage boost!
Covered Advance for Shoes
| Mod | Effect Description |
|---|---|
| Covered Advance V | Taking no DMG within 4 seconds grants +20% Melee, Weapon, and Status DMG for 30 seconds. Effect resets after the duration ends. |
Covered Advance boosts your damage significantly, providing a +20% increase to Melee, Weapon, and Status DMG for 30 seconds after you avoid taking damage for just 4 seconds. This mod synergizes beautifully with the Doombringer Build by allowing you to stay aggressive and maximize your damage output.
Healing Fortification for Top
| Mod | Effect Description |
|---|---|
| Healing Fortification V | When using a healing shot, DMG Reduction 40% for 2s. |
| Munitions Amplifier V | Weapon DMG +15% |
Healing Fortification is a perfect buddy if you're using Savior Set. When you activate a healing shot, it’s like getting a superhero shield that grants you a whopping 40% damage reduction for 2 seconds. This extra armor makes the Savior Set’s healing effects even more awesome, keeping you in the game longer and letting you keep blasting away while staying tougher than a two-dollar steak.
Munitions Amplifier, on the other hand, is like adding nitro to the Lonewolf Set’s engine. It gives a hefty 15% boost to weapon damage, which perfectly complements the Lonewolf Set's crit-focused perks. With your crit rate and crit damage already ramped up, Munitions Amplifier cranks up the damage even more, turning you into a high-octane damage dealer who can’t be stopped.
Unstoppable and Three Strikes for Bottoms
| Mod | Effect Description |
|---|---|
| Unstoppable V | Weakspot DMG +20% when a bullet hits a target more than 20 meters away. For every additional 1 meter(s) away from the target, Weakspot DMG +1%, up to 20%. |
| Three Strikes V | For the first three hits after reloading (not exceeding 50% of magazine capacity), Weakspot DMG +50%. |
Players can choose between Unstoppable and Three Strikes based on their playstyle needs. Unstoppable is ideal for players who want to enhance their long-range game with the sniper rifle, while also providing a backup plan for when the DBSG - Doombringer is out of its comfort zone at longer ranges.
On the other hand, Three Strikes is perfect for those who want to maximize their burst damage right after reloading, making every reload count whether you're using the shotgun or the sniper. Both mods offer distinct advantages depending on your strategy!
Best Deviant for Doombringer Build in Once Human
Lonewolf's Whisper
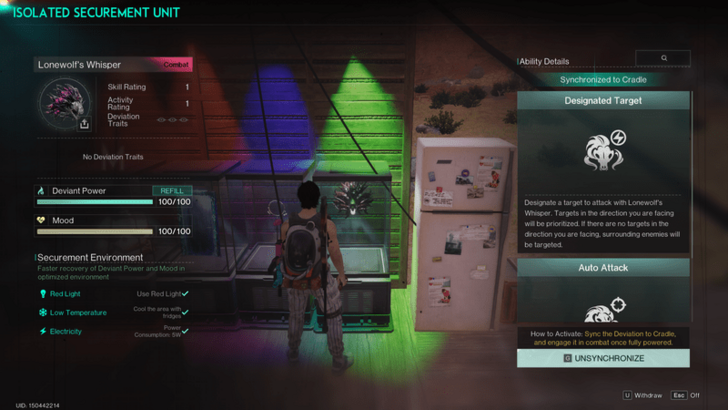
Lonewolf's Whisper is your perfect good boy buddy for your Doombringer Build. This canine deviant not only adds some bite to your damage but also keeps enemies off your tail. It can help distract and tank enemies, making it easier to trigger Covered Advance and unleash that extra damage boost. Perfect for staying on top of the hunt!
Best Cradle Overrides for Doombringer Build in Once Human
| Cradle Overrides for Unstable Bomber Build | ||
|---|---|---|
| Handgun Enhancement | Long-Range Enhancement | Agility |
| Bounty Hunter | Tactical Combo | Rapid Aid |
Handgun Enhancement
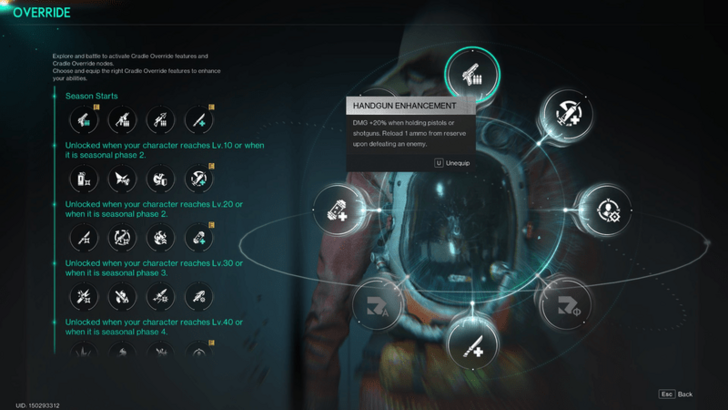
The Handgun Enhancement override is the obvious choice for the Doombringer Build. With its 20% damage boost for shotguns like the DBSG - Doombringer and the bonus of reloading 1 ammo from reserve with each enemy defeat, it ensures you're always ready to unleash devastating close-range attacks.
Long-Range Enhancement
Long-Range Enhancement is another obvious choice for the Doombringer Build. It amps up the AWS.338 - Bullseye’s damage by 20%, making your long-range shots hit even harder. Plus, it triggers a 30% chance to auto-reload a bullet from your backpack with each kill, keeping you in the fight longer.
Agility
Agility is your tanky sidekick! It gives you a 15% damage reduction for 4 seconds after rolling, perfect for shrugging off hits and staying in the fray with the DBSG - Doombringer. Roll in, tank up, and blast away!
Bounty Hunter
Bounty Hunter is your ultimate Bull's Eye buddy! Once you mark an enemy and take them down, it boosts your Weapon DMG by 25% and Weakspot DMG by 35% for 15 seconds.
Tactical Combo
Tactical Combo is your secret weapon for smooth transitions between the shotgun and sniper rifle. It boosts your Weapon DMG by 25% for 4 seconds after switching weapons or reloading. This means you’ll deal extra damage right when you need it most—whether you're blasting away up close with the DBSG - Doombringer or picking off foes from a distance with the AWS.338 - Bullseye.
Rapid Aid
Rapid Aid is a fantastic addition to the Doombringer Build, especially when paired with the Savior Set. With its -30% cooldown and +15% effect boost for healing items, you’ll be topping up your health faster and more effectively. This fits perfectly with the Savior Set’s features, as it ensures you can make the most of those automatic healing boosts and keep your durability high.
Once Human Related Guides

All Best Builds
| All Best Builds | |
|---|---|
| Shrapnel | Power Surge |
| Frost Vortex | Sniper / Bull's Eye |
| Unstable Bomber | Bounce |
| Fabled Masamune | Corrosion |
| Burn | Fast Gunner |
| Doombringer | Critical Pulse |
All Class Builds
| All Class Best Builds | |
|---|---|
| Chef | Beastmaster |
| Gardener | - |
All Way of Winter Builds
Lunar Oracle Best Builds
| Lunar Oracle Builds | |
|---|---|
| Lunar Oracle Fortress Warfare Build | - |
Other Builds
| Other Builds | |
|---|---|
| Best PvP Build | Best PvE Build |
Comment
Author
Doombringer Build
improvement survey
03/2026
improving Game8's site?

Your answers will help us to improve our website.
Note: Please be sure not to enter any kind of personal information into your response.

We hope you continue to make use of Game8.
Rankings
- We could not find the message board you were looking for.
Gaming News
Popular Games

Genshin Impact Walkthrough & Guides Wiki

Honkai: Star Rail Walkthrough & Guides Wiki

Umamusume: Pretty Derby Walkthrough & Guides Wiki

Pokemon Pokopia Walkthrough & Guides Wiki

Resident Evil Requiem (RE9) Walkthrough & Guides Wiki

Monster Hunter Wilds Walkthrough & Guides Wiki

Wuthering Waves Walkthrough & Guides Wiki

Arknights: Endfield Walkthrough & Guides Wiki

Pokemon FireRed and LeafGreen (FRLG) Walkthrough & Guides Wiki

Pokemon TCG Pocket (PTCGP) Strategies & Guides Wiki
Recommended Games

Fire Emblem Heroes (FEH) Walkthrough & Guides Wiki

Diablo 4: Vessel of Hatred Walkthrough & Guides Wiki

Yu-Gi-Oh! Master Duel Walkthrough & Guides Wiki

Super Smash Bros. Ultimate Walkthrough & Guides Wiki

Pokemon Brilliant Diamond and Shining Pearl (BDSP) Walkthrough & Guides Wiki

Elden Ring Shadow of the Erdtree Walkthrough & Guides Wiki

Monster Hunter World Walkthrough & Guides Wiki

The Legend of Zelda: Tears of the Kingdom Walkthrough & Guides Wiki

Persona 3 Reload Walkthrough & Guides Wiki

Cyberpunk 2077: Ultimate Edition Walkthrough & Guides Wiki
All rights reserved
Privacy Policy, Terms of Use 2024 NetEase, Inc.All Rights Reserved
The copyrights of videos of games used in our content and other intellectual property rights belong to the provider of the game.
The contents we provide on this site were created personally by members of the Game8 editorial department.
We refuse the right to reuse or repost content taken without our permission such as data or images to other sites.


![Slay the Spire 2 Review [Early Access] | Still the Deckbuilder to Beat](https://img.game8.co/4433115/44e19e1fb0b4755466b9e516ec7ffb1e.png/thumb)

![Resident Evil Village Review [Switch 2] | Almost Flawless Port](https://img.game8.co/4432790/e1859f64830960ce4248d898f8cd38d9.jpeg/thumb)


