Bounce Build
As of December 2025, Game8 has ended coverage of Once Human. Thank you very much for your understanding and we hope you continue to enjoy Game8's guides.
The Bounce Build in Once Human is one of the best builds in the game, updated for Version 1.4. See the Bounce build, the best weapons, armor, mods, deviants, and cradle override for the Bounce Build in this comprehensive guide!
List of Contents
Best Bounce Build in Once Human
Bounce Build Basic Info
| Slot | Item | Mod |
|---|---|---|
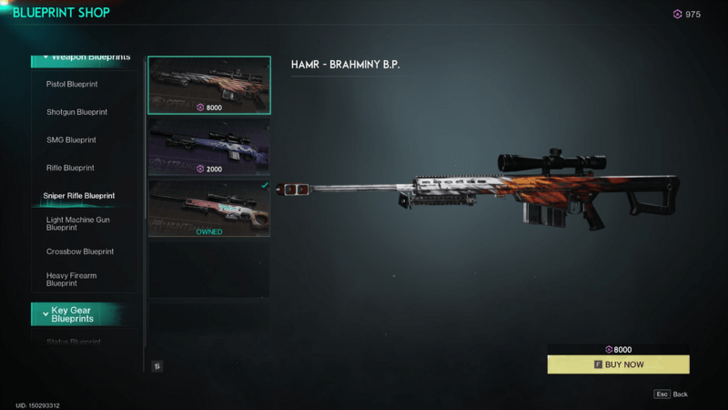
| Primary Weapon | HAMR - Brahminy | Targeted Bounce |
| Secondary Weapon | DE.50 Wildfire | Vulnerability Amplifier |
| Melee | Long Axe | Portable Territory |
| Helmet | Agent Helmet | Momentum Up or Precise Strike |
| Face | Agent Mask | Break Bounce or Precision Bounce |
| Gloves | Agent Gloves or Bastille Gloves | Weakspot DMG Boost |
| Shoes | Agent Shoes or Bastille Shoes | Covered Advance |
| Top | Bastille Jacket | Unstoppable or Weakspot DMG Boost |
| Bottoms | Hot Dog Shorts | Unstoppable / Weakspot DMG Boost |
| Notes | ・Cradle Overrides: Equip Long Range Enhancement, Tactical Combo, Deadly Combo and Bounce Rampage. ・Consume Assorted Canned Fruit to increase Weakspot DMG! |
|
The Bounce Build leverages the Bounce special ammo effect, where each bullet that hits an enemy has a chance to bounce to another target within a 10m radius, dealing 60% of your weapon's attack as damage. This secondary hit can Crit, target weakpoints, and is slightly reduced by distance.
This build turns every shot into a chain reaction, prioritizing weakspots for maximum damage output and making those bounce hits count!
Best Weapons for Bounce Build in Once Human
| Best Weapons for Bounce Build | ||
|---|---|---|
| Primary | Secondary | Melee |
Primary Weapon: HAMR - Brahminy
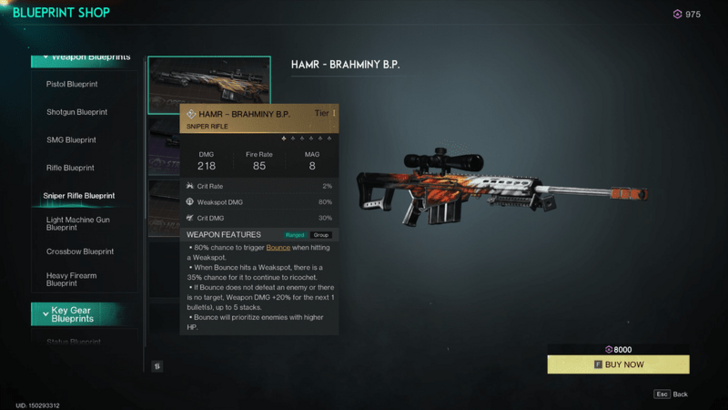
The HAMR - Brahminy is the backbone of the Bounce Build, designed to fully exploit the Bounce special ammo effect. With an 80% chance to trigger Bounce on weakspot hits, nearly every shot has the potential to ricochet, spreading damage across multiple enemies. The weapon's 35% chance for Bounce to continue ricocheting when hitting another weakspot adds even more destructive potential, allowing your bullets to chain together.
Additionally, if Bounce does not finish off a target or there is no other enemy nearby, the weapon boosts its damage for the next shot, stacking up to five times. This ensures that your follow-up shots pack a serious punch, keeping your damage output consistently high. Bounce also prioritizes tougher enemies with higher HP, so that your attacks are focused where they matter most.
Overall, the HAMR - Brahminy is not just good for the build—it IS the build, turning each shot into a potential multi-hit combo that can tear through enemy ranks, especially when aiming for weakspots and high-value targets.
HAMR - Brahminy How to Get and Location
Recommended Attachments
| Component | Attachment |
|---|---|
| Muzzle | Large Break |
| Optic | Precision Optic |
| Tactical | Compact Infarered Compensator |
| Magazine | Tactical SR Mag |
Here are the recommended attachments for the HAMR - Brahminy to elevate your Shrapnel Build.
Secondary Weapon: DE.50 Wildfire
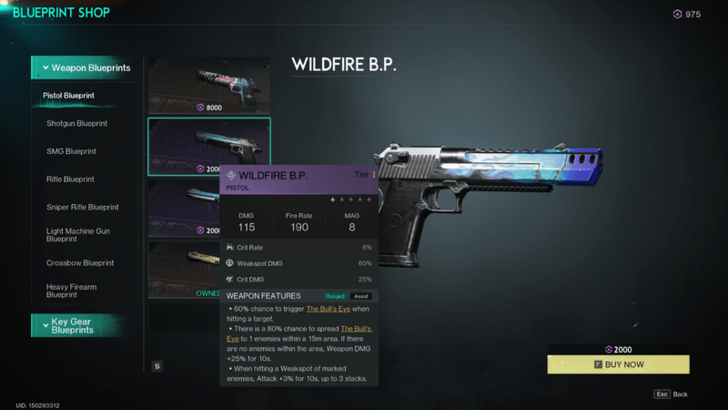
The DE.50 - Wildfire fits perfectly into the Bounce Build thanks to its 60% chance to mark targets with Bull's Eye and an impressive 80% chance to spread that mark to nearby enemies. This means as your bullets ricochet between foes, they’re not only hitting more enemies but also marking them for increased vulnerability.
Since the Bounce Build thrives on chaining weakspot hits, the Wildfire's passive boosts your attack when hitting marked weakspots, making those ricocheted shots even deadlier. This synergy turns each bounce into a high-damage, multi-target combo.
DE.50 Wildfire How to Get and Location
Melee: Long Axe
The Long Axe is your go-to melee weapon when you need to be up close and personal. Its heavy attacks not only trigger Fortress Warfare, creating a 2m radius that grants Heavy Armor and boosts your Weapon DMG by 20%, but also give you the ability to bulldoze through enemy blows with Super Armor. Plus, each swing ramps up your Crit Rate by 8% and Melee Swing Speed by 5%, stacking up to three times.
Long Axe How to Get and Location
Best Armor for Bounce Build in Once Human
| Best Armor for Bounce Build | |||
|---|---|---|---|
| Helmet, Face, Gloves, and Shoes | Top | Bottoms | Alternative |
Agent Set for Helmet, Face, Gloves, and Shoes
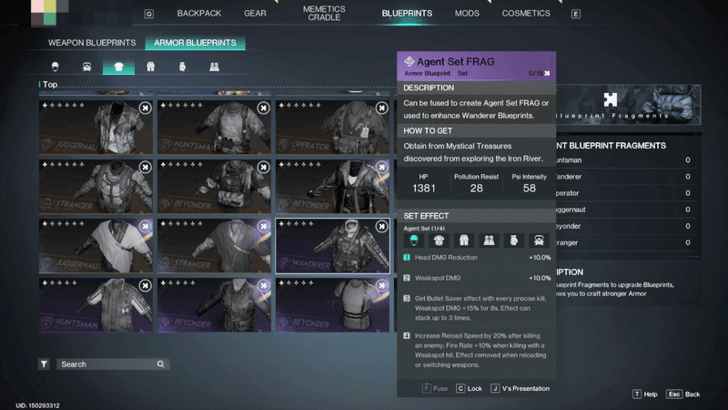
The Agent Set, with the Agent Helmet, Agent Gloves, Agent Shoes, and Agent Mask, is a match made in heaven for the Bounce Build.
With a 10% boost to Weakspot DMG, your bouncing bullets hit those critical spots like a charm. And when you land a precise kill, the Bullet Saver effect kicks in, giving you a juicy 15% Weakspot DMG boost for 8 seconds that stacks up to three times (up to 45%)—perfect for chaining those weakspot shots like a pro. Plus, with faster reloads and a fire rate boost after each weakspot kill, you’ll keep your shooting spree rolling smoothly and keep the chaos coming.
Bastille Jacket for Top
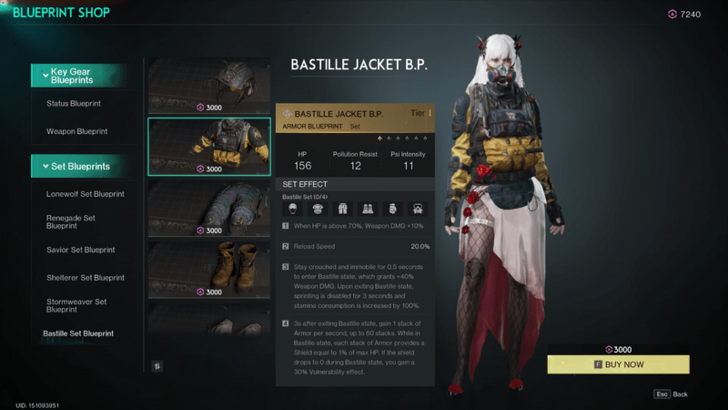
Sport the Bastille Jacket to get an impressive boost when you are in top shape. As part of the Bastille Set, it provides a nifty 10% increase in weapon damage as long as your HP stays above 70%.
Bastille Jacket How to Get and Location
Hot Dog Shorts for Bottoms
Rock the Hot Dog Shorts to give your Bounce Build an extra edge. These shorts are crucial for the build, adding an extra Bounce Target Count. This means more enemies get hit by your ricocheting bullets, turning every shot into a mini-explosion of chaos.
Hot Dog Shorts How to Get and Location
Alternative: 3-Piece Bastille Set
As an alternative, you can switch the 3 pieces from the Agent Set with 3 pieces from the Bastille Set. With the Bastille Set, you get a 10% Weapon DMG boost when your HP is above 70%, keeping your damage high and steady. Reloading is also quicker with a 20% increase, so you can keep those ricochets flying without delay.
Plus, the Bastille state grants a hefty 40% Weapon DMG boost when you stay crouched and immobile for 0.5 seconds, making your shots even more devastating. Just watch out for the sprinting penalty when you exit this state—it’s a small price to pay for a burst of extra damage!
Best Mods for Bounce Build in Once Human
| Best Mods for Bounce | |
|---|---|
| Best Weapon Mods | Best Armor Mods |
Best Weapon Mods
| Weapon Mods for Bounce Build | ||
|---|---|---|
| Primary | Secondary | Melee |
Targeted Bounce for Primary
| Mod | Effect Description |
|---|---|
| Targeted Bounce V | Bounce Weakspot Priority +300% - Bullets that bounce or ricochet will prioritize hitting weakspots. |
Targeted Bounce turns your ricochets into precision-guided missiles, giving them a 300% boost in hitting weakspots. Perfect for your HAMR - Brahminy.
Vulnerability Amplifier for Secondary
| Mod | Effect Description |
|---|---|
| Vulnerability Amplifier | The Bull's Eye adds Vulnerability +8%. |
The Vulnerability Amplifier mod adds some serious punch to your DE.50 - Wildfire! It boosts the Bull's Eye effect, making enemies 8% more vulnerable. For the Bounce Build, that means your ricochets hit even harder, and for the DE.50 - Wildfire, it turns marked targets into extra-squishy critters.
Portable Territory for Melee
| Mod | Effect Description |
|---|---|
| Portable Territory V | After leaving Fortress Warfare, the status effect will remain active for 2 additional seconds. |
Portable Territory is stellar for the Long Axe because it keeps the Fortress Warfare’s Heavy Armor buff active for an extra 2 seconds after you leave the area. This means you get to keep that sweet Heavy Armor and 20% damage reduction, even while you’re swinging your axe elsewhere.
Best Armor Mods
| Armor Mods for Bounce Build | ||
|---|---|---|
| Helmet | Face | Gloves |
| Shoes | Top | Bottoms |
Precise Strike for Helmet
| Mod | Effect Description |
|---|---|
| Momentum Up | Fire Rate +10% for the first 50% of the magazine and Weapon DMG +30% for the next 50% of the magazine. |
| Precise Strike | Hitting a weakspot grants Weakspot DMG +12% for 3 seconds. The effect can stack up to 3 times. |
Momentum Up boosts your Fire Rate by 10% for the first half of your magazine and ramps up Weapon DMG by 30% for the second half. This means you get rapid fire and high damage output throughout your clip, making it great for sustained assaults.
Precise Strike, on the other hand, enhances your Weakspot DMG by 12% for 3 seconds each time you hit a weakspot, stacking up to 3 times.
Precision Bounce or Break Bounce for Face
| Mod | Effect Description |
|---|---|
| Precision Bounce | After triggering Bounce 6 times, the next bullet's Bounce DMG +125%. |
| Break Bounce | When a bullet hits an enemy with more than 50% HP, the bullet's Ultimate DMG increases by +50%. |
Precision Bounce is a blast for the build, turning your 6th bounce into a crit with +80% DMG—perfect for packing a powerful punch.
Break Bounce, meanwhile, cranks up the Ultimate DMG by a tasty +50% on enemies with more than 50% HP. Choose between these two mods to amp up your bounce game.
Weakspot DMG Boost Gloves
| Mod | Effect Description |
|---|---|
| Weakspot DMG Boost V | Increases Weakspot Damage by +25.0%. |
Weakspot DMG Boost is like turning up the volume on your weakspot damage as it cranks it up by a whopping 25%.
Covered Advance for Shoes
| Mod | Effect Description |
|---|---|
| Covered Advance | Taking no damage for 4 seconds grants +20% Melee, Weapon, and Status Damage for 30 seconds. The effect resets when the duration ends. |
Covered Advance rewards you for staying unscathed. If you manage to avoid taking any damage for 4 seconds, you will get a sweet 20% boost to Melee, Weapon, and Status Damage for the next 30 seconds.
Weakspot DMG Boost (Green) for Top
| Mod | Effect Description |
|---|---|
| Weakspot DMG Boost II | Increases Weakspot Damage by +10.0%. |
The green version of the Weakspot DMG Boost might be the junior mod compared to the one used for gloves, but it still packs a punch with a 10% increase in Weakspot Damage. Every bit counts!
Unstoppable or Weakspot DMG Boost (Green) for Bottoms
| Mod | Effect Description |
|---|---|
| Unstoppable V | Grants +20% Weakspot Damage for hits on targets more than 20 meters away, with an additional +1% per extra meter, up to 20% more. |
| Weakspot DMG Boost (Green) | Increases Weakspot Damage by +10.0%. |
When it comes to the mod for bottoms, you have two choices: Unstoppable or Weakspot DMG Boost green mod. Unstoppable rewards you for hitting targets from a distance with a scaling boost, making it perfect for long-range engagements. On the other hand, Weakspot DMG Boost (Green) offers a straightforward 10% increase in Weakspot Damage.
Pick the one that best fits your playstyle and let your weakspot exploits shine!
Best Deviant for Bounce Build in Once Human
Lonewolf's Whisper
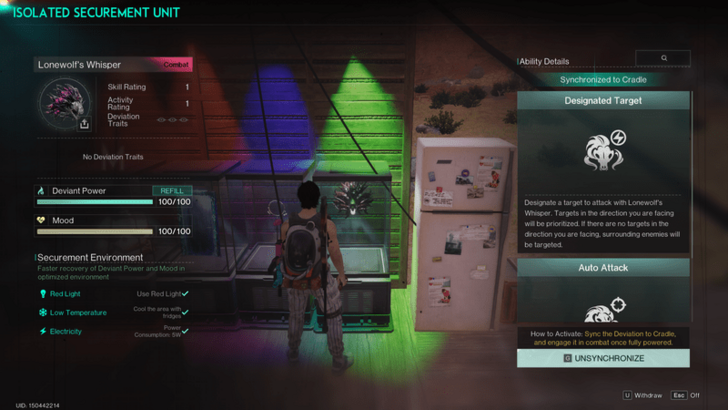
Lonewolf's Whisper is your build’s best four-legged friend. This loyal pup not only distracts foes and bites hard but also spawns more wolves with every takedown. It is the ultimate companion for keeping the Bounce Build's damage howling!
Best Cradle Overrides for Bounce Build in Once Human
| Cradle Overrides for Bounce Build | |||
|---|---|---|---|
| Long Range Enhancement | Tactical Combo | Deadly Combo | Bounce Rampage |
Long Range Enhancement
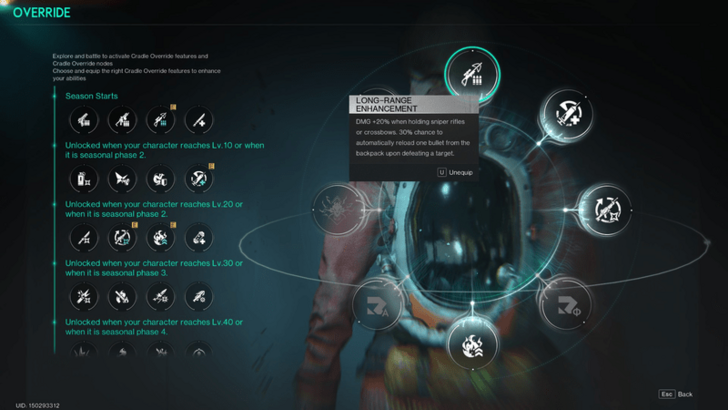
Long-Range Enhancement is a no-brainer for the Bounce Build since the HAMR - Brahminy is a sniper rifle. It boosts your damage by 20% and gives you a 30% chance to auto-reload a bullet with each kill.
Tactical Combo
Tactical Combo keeps the damage flowing like a pro. When you switch between your sniper rifle and assault rifle, or reload, it boosts your Weapon DMG by 25% for 4 seconds.
Deadly Combo
Deadly Combo is also another no-brainer for the Bounce Build. Every time you hit a weakspot with Bounce, it cranks up the bounce damage by 25% for 3 seconds. It also synergizes with Shrapnel damage if you decide to use SOCR - The Last Valor for your secondary weapon.
Bounce Rampage
Introduced as a season tag in Season 2, Bounce Rampage is a must-have for the Bounce Build. It boosts your Bounce DMG by 5% for 15 seconds after each bounced shot, stacking up to 5 times.
Once Human Related Guides

All Best Builds
| All Best Builds | |
|---|---|
| Shrapnel | Power Surge |
| Frost Vortex | Sniper / Bull's Eye |
| Unstable Bomber | Bounce |
| Fabled Masamune | Corrosion |
| Burn | Fast Gunner |
| Doombringer | Critical Pulse |
All Class Builds
| All Class Best Builds | |
|---|---|
| Chef | Beastmaster |
| Gardener | - |
All Way of Winter Builds
Lunar Oracle Best Builds
| Lunar Oracle Builds | |
|---|---|
| Lunar Oracle Fortress Warfare Build | - |
Other Builds
| Other Builds | |
|---|---|
| Best PvP Build | Best PvE Build |
Author
Bounce Build
improvement survey
03/2026
improving Game8's site?

Your answers will help us to improve our website.
Note: Please be sure not to enter any kind of personal information into your response.

We hope you continue to make use of Game8.
Rankings
- We could not find the message board you were looking for.
Gaming News
Popular Games

Genshin Impact Walkthrough & Guides Wiki

Honkai: Star Rail Walkthrough & Guides Wiki

Umamusume: Pretty Derby Walkthrough & Guides Wiki

Pokemon Pokopia Walkthrough & Guides Wiki

Resident Evil Requiem (RE9) Walkthrough & Guides Wiki

Monster Hunter Wilds Walkthrough & Guides Wiki

Wuthering Waves Walkthrough & Guides Wiki

Arknights: Endfield Walkthrough & Guides Wiki

Pokemon FireRed and LeafGreen (FRLG) Walkthrough & Guides Wiki

Pokemon TCG Pocket (PTCGP) Strategies & Guides Wiki
Recommended Games

Diablo 4: Vessel of Hatred Walkthrough & Guides Wiki

Fire Emblem Heroes (FEH) Walkthrough & Guides Wiki

Yu-Gi-Oh! Master Duel Walkthrough & Guides Wiki

Super Smash Bros. Ultimate Walkthrough & Guides Wiki

Pokemon Brilliant Diamond and Shining Pearl (BDSP) Walkthrough & Guides Wiki

Elden Ring Shadow of the Erdtree Walkthrough & Guides Wiki

Monster Hunter World Walkthrough & Guides Wiki

The Legend of Zelda: Tears of the Kingdom Walkthrough & Guides Wiki

Persona 3 Reload Walkthrough & Guides Wiki

Cyberpunk 2077: Ultimate Edition Walkthrough & Guides Wiki
All rights reserved
Privacy Policy, Terms of Use 2024 NetEase, Inc.All Rights Reserved
The copyrights of videos of games used in our content and other intellectual property rights belong to the provider of the game.
The contents we provide on this site were created personally by members of the Game8 editorial department.
We refuse the right to reuse or repost content taken without our permission such as data or images to other sites.


![Monster Hunter Stories 3 Review [First Impressions] | Simply Rejuvenating](https://img.game8.co/4438641/2a31b7702bd70e78ec8efd24661dacda.jpeg/thumb)


Are you saying that the weapon features of the Wildfire work passively while you're using the HAMR? Or are you suggesting to shoot at enemies with the pistol Before swapping to the sniper rifle?