Best Jaws Unstable Bomber Build
As of December 2025, Game8 has ended coverage of Once Human. Thank you very much for your understanding and we hope you continue to enjoy Game8's guides.

The Unstable Bomber Build in Once Human is one of the best builds in the game, updated for Season 2. See the Unstable Bomber build, the best weapons, armor, mods, deviants, and cradle override for the Unstable Bomber Build in this comprehensive guide!
List of Contents
Best Unstable Bomber Build in Once Human
Unstable Bomber Build Basic Info
| Slot | Item | Mod |
|---|---|---|
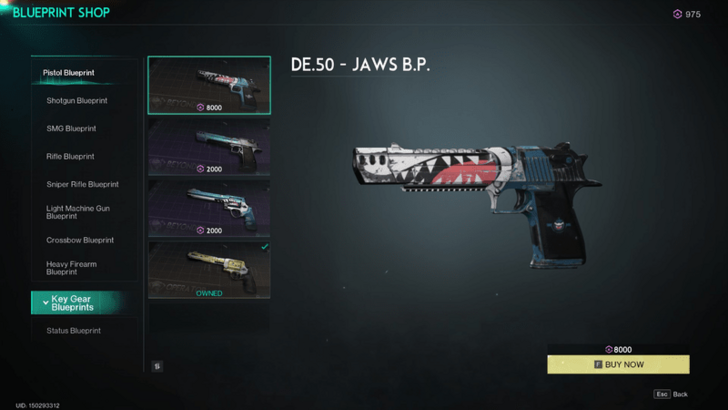
| Primary Weapon | DE.50 - Jaws | Bombardier Souvenir or Reckless Bomber |
| Secondary Weapon | AWS.338 - Bullseye | Vulnerability Amplifier |
| Melee | Long Axe or Stun Baton | Melee Amplifier |
| Helmet | Lonewolf Hood | Momentum Up or Deviation Expert |
| Face | Lonewolf Mask | Point Detonation |
| Gloves | Lonewolf Gloves or Bastille Gloves | Crit Amplifier or Crit Boost |
| Shoes | Bastille Shoes or Lonewolf Shoes | Slow and Steady |
| Top | Shaman Vulture Top | Rejuvenatiing or Resist Advantage |
| Bottoms | Lonewolf Pants | Deadshot |
| Notes |
・For Cradle Overrides, equip Handgun Enhancement,. Series Detonation, Lone Walker, Tactical Combo, First Round Blast, Deviation Master, and Status Enhancement ・Use the Combat Deviants Lonewolf's Whisper or Butterfly's Emissary for additional damage. |
|
The Unstable Bomber Build in Once Human—this one's all about making things explode with precision. The setup focuses on the Unstable Bomber effect, which unleashes a powerful Status DMG blast within a 1.5m radius. The best part? The Blast damage stays consistent, regardless of how close or far you are.
At the heart of the build is the DE.50 - Jaws, which is key to unleashing its full potential. This build thrives on high burst damage by landing critical hits and targeting weak points, with the DE.50 - Jaws delivering devastating explosive results.
Best Weapons for Unstable Bomber Build in Once Human
| Best Weapons for Unstable Bomber Build | ||
|---|---|---|
| Primary | Secondary | Melee |
Primary Weapon: DE.50 - Jaws
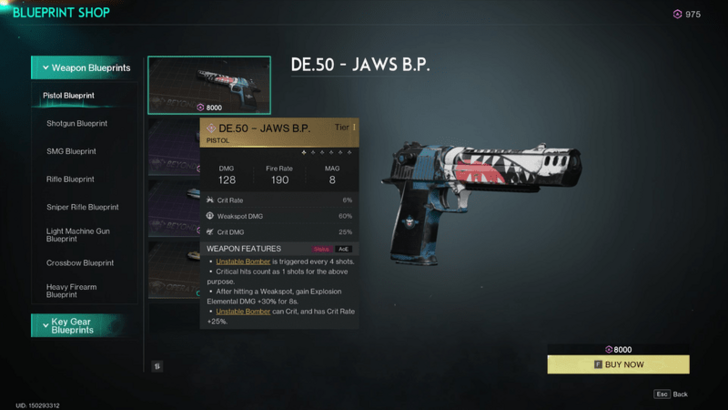
The DE.50 - Jaws isn’t just a weapon—it’s the explosive heart of the Unstable Bomber Build. This beauty triggers the Unstable Bomber effect every 4 shots, ensuring you’re setting off blasts left and right. Even better? Crits count as a shot, speeding up the chaos. And once you land a Weakspot hit, you get a sweet 30% boost to Explosion Elemental DMG for 8 seconds.
Now, here’s where things really blow up: while the Unstable Bomber effect normally can’t Crit, the DE.50 - Jaws breaks the rules by letting those blasts Crit with a 25% bonus Crit Rate. That’s right—your explosions now have the chance to hit like a truck with no damage decay.
DE.50 - Jaws: How to Get and Location
Recommended Attachments
| Component | Attachment |
|---|---|
| Muzzle | Small Compensator |
| Optic | Compact Reflex Sight |
| Tactical | Tactical Laser Sight |
| Magazine | Extended Pistol Mag |
Here are the top attachments for your DE.50 - Jaws to amp up your Unstable Bomber build!
Secondary Weapon: AWS.338 - Bullseye
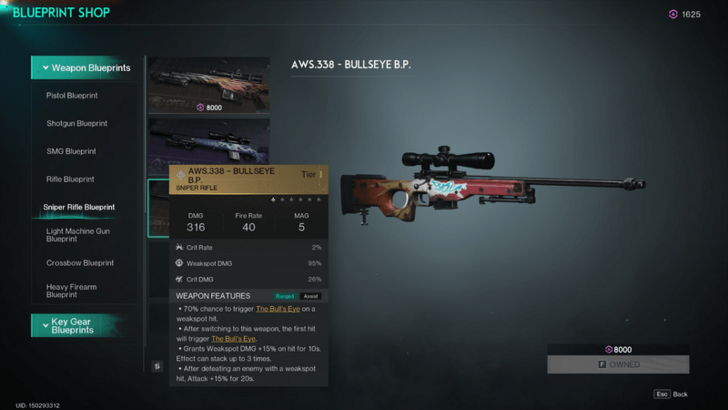
The AWS.338 - Bullseye is a top-tier secondary weapon for the Unstable Bomber Build, ideal for softening enemies before the main event. The Bull's Eye triggers with a 70% chance on weakspot hits (or guarantees on weapon switch), marking targets and boosting their vulnerability by 8% for 12 seconds, setting them up perfectly for explosive follow-ups.
Weapon swapping with Bullseye becomes key, as weakspot hits increase Weakspot DMG by 15% (stackable three times), and killing with a weakspot hit boosts your Attack by 15% for 20 seconds. This combination primes enemies for the devastating blasts from Jaws, ensuring maximum impact.
AWS.338 - Bullseye: How to Get and Location
Melee: Long Axe or Stun Baton
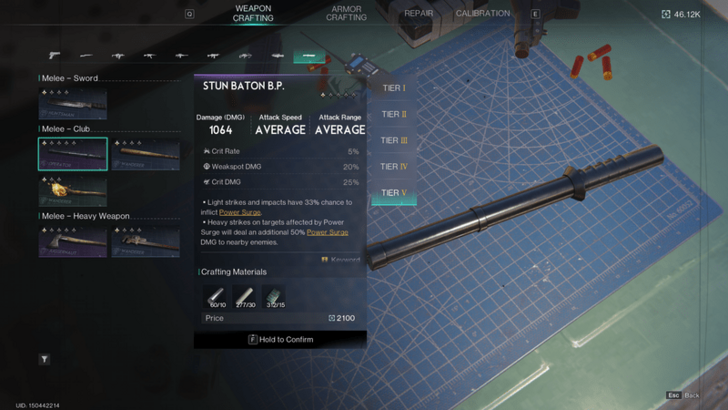
For this build, the Long Axe and Stun Baton are melee game-changers. The Long Axe turns you into a crowd-control maestro, with heavy attacks activating Fortress Warfare for a 2m radius of Heavy Armor, boosting your allies' damage resistance. Plus, it’s got a built-in Crit Rate and Melee Swing Speed boost with each target hit, stacking up to three times—perfect for setting up a battlefield for those big, explosive finishes.
On the flip side, the Stun Baton is all about status effects and shock tactics. Light strikes have an 80% chance to inflict Power Surge, while heavy strikes trigger a Shock Status DMG to nearby enemies. This means you’re not just hitting hard; you’re priming enemies for explosive follow-ups. With the Stun Baton, you’ll electrify your foes and set the stage for your DE.50 - Jaws to blow them away!
Best Armor for Unstable Bomber Build in Once Human
| Best Armor for Unstable Bomber Build | ||
|---|---|---|
| Top | Helmet, Face, Gloves, and Bottoms | Shoes |
Shaman Vulture Top for Top
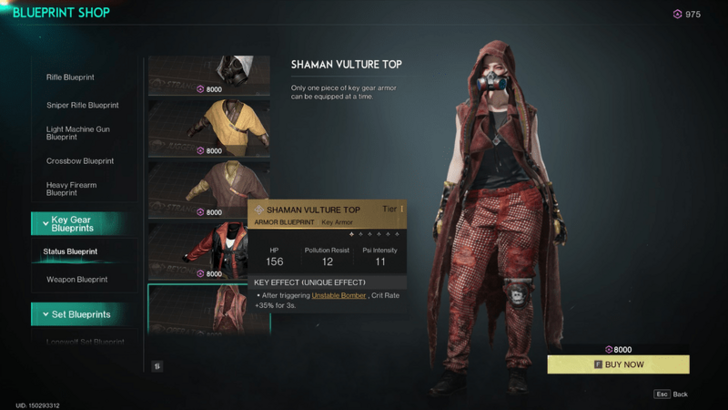
The Shaman Vulture Top is a fantastic fit for the Unstable Bomber Build. After triggering Unstable Bomber, it boosts your Crit Rate by 35% for 3 seconds. This spike in Crit Rate means that right after you unleash your powerful explosive attack, you'll have a great chance to land even more critical hits. It’s perfect for keeping the damage rolling and making sure your follow-up strikes hit harder and faster.
Shaman Vulture Top: How to Get and Location
Lonewolf Set for Helmet, Face, Gloves, and Bottoms
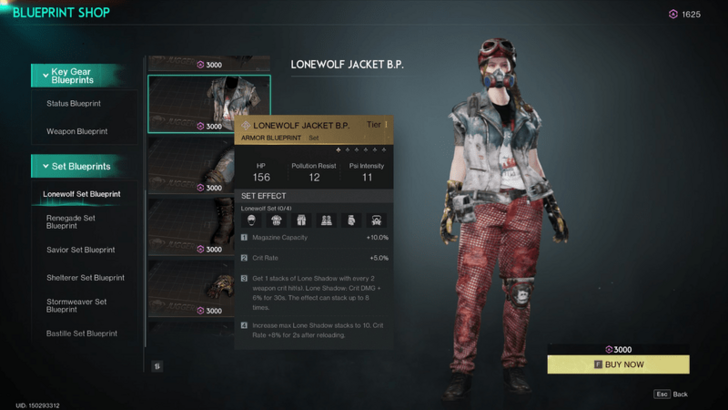
The Lonewolf Set is a perfect match for the Unstable Bomber Build, bringing a lot to the table. First up, the +10.0% Magazine Capacity means you can keep the bullets flying without constant reloads, while the +5.0% Crit Rate cranks up your chances of landing those game-changing critical hits.
The real highlight is the Lone Shadow stacks. Every two weapon Crits earn you a stack that boosts your Crit DMG by 6% for 30 seconds, stacking up to 10 times. After a kill, you also get an +8% Crit Rate boost for 2 seconds, keeping the damage rolling. With this set, you’ll be dishing out explosive damage and crits with style, making sure your enemies get a front-row seat to your firepower!
Bastille Shoes for Shoes
Bastille Shoes amp up the Unstable Bomber Build by giving you a +10% Weapon DMG boost when your HP is above 70%. This means as long as you're in good shape, you'll dish out even more damage, making your explosive attacks pack a bigger punch.
Bastille Shoes: How to Get and Location
Best Mods for Unstable Bomber Build in Once Human
| Best Mods for Unstable Bomber | |
|---|---|
| Best Weapon Mods | Best Armor Mods |
Best Weapon Mods
| Weapon Mods for Unstable Bomber Build | ||
|---|---|---|
| Primary | Secondary | Melee |
Bombardier Souvenir and Reckless Bomber for Primary
| Mod | Effect Description |
|---|---|
| Bombardier Souvenir V - Unstable Bomber | When triggering Unstable Bomber, automatically refill 10% of your magazine. |
| Reckless Bomber V - Violent | For every 1% Crit Rate, Unstable Bomber DMG +0.5%. |
You’ve got two excellent mod choices for your DE.50 - Jaws: Bombardier Souvenir ensures you’re never left high and dry in the middle of your explosive frenzy by refilling 10% of your magazine each time you trigger Unstable Bomber. This keeps your damage output steady and relentless.
On the other hand, Reckless Bomber boosts your Unstable Bomber damage by 0.5% for each 1% Crit Rate you have. This means the more crits you land, the more devastating your explosions become, turning your crit rate into a major damage amplifier.
Vulnerability Amplifier for Secondary
| Mod | Effect Description |
|---|---|
| Vulnerability Amplifier - Bull's Eye | Enhances the vulnerability effect of Bull's Eye by +8% on marked targets. |
The Vulnerability Amplifier mod supercharges the AWS.338 - Bullseye by adding 8% more vulnerability to marked targets, ensuring they take even more damage from your primary weapon's explosive blasts.
Melee Amplifier for Melee
| Mod | Effect Description |
|---|---|
| Melee Amplifier | Increases Melee DMG by +20.0%. |
The Melee Amplifier mod boosts Melee DMG by 20%, making every swing pack a bigger punch.
Best Armor Mods
| Armor Mods for Unstable Bomber Build | ||
|---|---|---|
| Helmet | Face | Gloves |
| Shoes | Top | Bottoms |
Momentum Up or Deviation Expert for Helmet
| Mod | Effect Description |
|---|---|
| Momentum Up - Violent | Fire Rate +10% for the first 50% of the magazine and Weapon DMG +30% for the next 50% of the magazine. |
| Deviation Expert - Violent | Range -25%, Fire Rate +10%, Status DMG +20%. |
Momentum Up ramps up your Unstable Bomber action with a 10% fire rate boost for the first half of your magazine, letting you unleash those explosive triggers faster. Plus, with a 30% weapon damage increase for the second half of your shots, you're ensuring those final blasts hit with maximum force!
On the flip side, Deviation Expert gives your Status DMG a 20% boost, making each Unstable Bomber hit even more impactful. While it reduces range and fire rate, it’s perfect if you’re ready to get close and personal for some serious damage. Choose between faster firing and high damage or powerful status effects—each brings something unique to the table!
Delayed Blast for Face
| Mod | Effect Description |
|---|---|
| Point Detonation - Violent | When Unstable Bomber hits only one enemy, Unstable Bomber final DMG +25%. |
Point Detonation is a must-have when you’re up against a lone enemy. This mod boosts your Unstable Bomber's final damage by 25% whenever you're targeting just one unlucky foe. It's ideal for ramping up your damage output and making each explosive hit count with extra oomph!
Crit Amplifier or Crit Boost for Gloves
| Mod | Effect Description |
|---|---|
| Crit Amplifier - Violent | Crit Rate +10%, Crit DMG +15%. |
| Crit Boost - Violent | Crit Rate +15.0%. |
Crit Amplifier turns up the heat with +10% Crit Rate and +15% Crit DMG, giving your Unstable Bomber's explosions both more frequency and punch. It’s perfect for packing a bigger bang with each crit!
On the flip side, Crit Boost cranks your Crit Rate up by 15%, making those critical hits land more often. Choose between extra damage and more crit chances to keep your explosions booming!
Slow and Steady for Shoes
| Mod | Effect Description |
|---|---|
| Slow and Steady V | Melee, Weapon, and Status DMG +10%. When HP is above 90%, grants +10% additional DMG. |
Slow and Steady is a great fit for your build, boosting Melee, Weapon, and Status DMG by 10%. Plus, when you're feeling healthy with HP above 90%, it throws in an extra 10% damage boost.
This synergy pairs perfectly with Bastille Shoes, which already ramps up Weapon DMG when you’re at high HP, making your damage output soar even higher. It’s all about keeping the pressure on and turning those healthy moments into explosive advantages!
Rejuvenating or Resist Advantage for Top
| Mod | Effect Description |
|---|---|
| Rejuvenating - Violent | When HP is above 60%, a kill recovers 15% lost HP. |
| Resist Advantage - Talents | When out of combat, gain 1 stack of 10% DMG Reduction every 5s. Effect can stack up to 5 times. 1 stack is removed when hit. |
Rejuvenating is a perfect match for this build, especially when paired with Slow and Steady and Bastille Shoes. It helps you keep your HP high by recovering 15% of lost HP with each kill while your health is above 60%. This fits like a glove with Slow and Steady, which boosts damage when your HP is high, and Bastille Shoes, which also enhances damage at high HP. So, you stay in the fight longer and hit harder!
On the other hand, Resist Advantage provides a different kind of edge by giving you 10% DMG Reduction every 5 seconds when out of combat, stacking up to 50%. This makes it great for those moments between fights, adding a layer of durability to your build and helping you stay resilient in tough spots.
Deadshot for Bottoms
| Mod | Effect Description |
|---|---|
| Deadshot V - Violent | Each Crit Hit by non-melee weapons grants +5% Crit DMG, up to 45%. The effect is removed upon the next reload. |
Deadshot adds extra zing to your crits! Every time you land a critical hit with non-melee weapons, you get a 5% boost to your Crit DMG, stacking up to 45%. Just reload to reset the bonus—so make sure you’re making those crits count before you hit the reload button!
Best Deviant for Unstable Bomber Build in Once Human
Lonewolf's Whisper
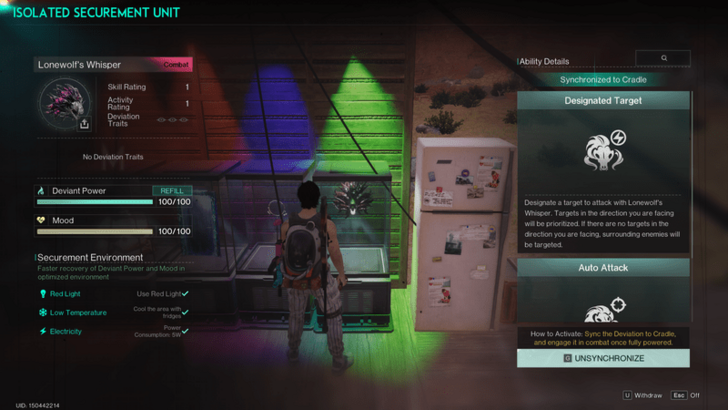
Lonewolf's Whisper is a top pick for the Unstable Bomber Build because this trusty pup keeps enemies busy while you set up your explosive masterpieces. Not to mention the increased Weapon DMG whenever this pup is about—Let the wolf handle the heat while you focus on making things go boom!
Best Cradle Overrides for Unstable Bomber Build in Once Human
| Cradle Overrides for Unstable Bomber Build | ||
|---|---|---|
| Handgun Enhancement | Series Detonation | Lone Walker |
| Tactical Combo | First Round Blast | Deviation Master |
| Status Enhancement | ||
Handgun Enhancement
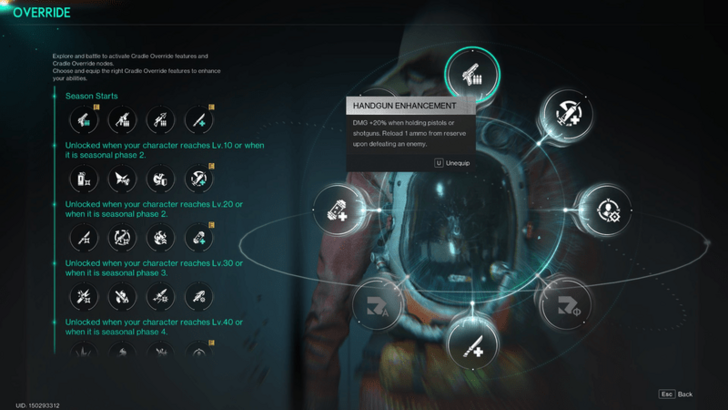
Handgun Enhancement is a no-brainer for the Unstable Bomber Build. It boosts your damage by 20% when using pistols or shotguns and reloads 1 ammo from your reserve each time you defeat an enemy, making it a perfect fit for your DE.50 - Jaws. This keeps you blasting away and makes sure you’re always ready for the next big boom!
Series Detonation
Series Detonation, introduced as a tag in Season 2, gives your Unstable Bomber build a serious upgrade. After you land an Unstable Bomber hit, any follow-up Unstable Bomber damage on the same target within 3 seconds gets a juicy 25% boost. This override is perfect for chaining explosions in quick succession.
Lone Walker
Another override introduced in Season 2, though it looks like it's here to stay: Lone Walker is your go-to for when you're flying solo. It speeds up curable usage by 35%, helps you tank hits with a 30% damage reduction when your HP dips below 30%, and adds a sweet 20% boost to your damage against deviants. f you're going it alone, this override keeps you alive and hitting hard!
Tactical Combo
Tactical Combo is like the secret sauce for the Unstable Bomber Build, turning every weapon switch or reload into a 25% damage boost for 4 seconds. Since swapping weapons is your bread and butter, this mod ensures you’re always dishing out explosive damage with a side of extra power.
First Round Blast
First Round Blast delivers a 25% instant damage boost to Unstable Bomber for 4 seconds after reloading. This makes your opening shot after reloading pack an even bigger punch, ensuring your first attack hits with explosive force.
Deviation Master
Deviation Master makes you incredibly potent when you summon Lonewolf's Whisper to your side. With this trusty ally around, your damage against Deviants gets a hefty 50% boost, making your explosive power skyrocket. It's like having a perfect hunting duo—let the wolf distract while you obliterate everything in sight!
Status Enhancement
Status Enhancement gives a huge boost to your Status DMG after hitting a weak spot. With a 35% increase for 3 seconds, it rewards precision by making your explosive Unstable Bomber follow-ups even more devastating.
Once Human Related Guides

All Best Builds
| All Best Builds | |
|---|---|
| Shrapnel | Power Surge |
| Frost Vortex | Sniper / Bull's Eye |
| Unstable Bomber | Bounce |
| Fabled Masamune | Corrosion |
| Burn | Fast Gunner |
| Doombringer | Critical Pulse |
All Class Builds
| All Class Best Builds | |
|---|---|
| Chef | Beastmaster |
| Gardener | - |
All Way of Winter Builds
Lunar Oracle Best Builds
| Lunar Oracle Builds | |
|---|---|
| Lunar Oracle Fortress Warfare Build | - |
Other Builds
| Other Builds | |
|---|---|
| Best PvP Build | Best PvE Build |
Comment
crumbly bread or shattered bread are the names for food that will help this build
Author
Best Jaws Unstable Bomber Build
Rankings
- We could not find the message board you were looking for.
Gaming News
Popular Games

Genshin Impact Walkthrough & Guides Wiki

Umamusume: Pretty Derby Walkthrough & Guides Wiki

Pokemon Pokopia Walkthrough & Guides Wiki

Honkai: Star Rail Walkthrough & Guides Wiki

Monster Hunter Stories 3: Twisted Reflection Walkthrough & Guides Wiki

Arknights: Endfield Walkthrough & Guides Wiki

Wuthering Waves Walkthrough & Guides Wiki

Zenless Zone Zero Walkthrough & Guides Wiki

Pokemon TCG Pocket (PTCGP) Strategies & Guides Wiki

Monster Hunter Wilds Walkthrough & Guides Wiki
Recommended Games

Diablo 4: Vessel of Hatred Walkthrough & Guides Wiki

Cyberpunk 2077: Ultimate Edition Walkthrough & Guides Wiki

Fire Emblem Heroes (FEH) Walkthrough & Guides Wiki

Yu-Gi-Oh! Master Duel Walkthrough & Guides Wiki

Super Smash Bros. Ultimate Walkthrough & Guides Wiki

Pokemon Brilliant Diamond and Shining Pearl (BDSP) Walkthrough & Guides Wiki

Elden Ring Shadow of the Erdtree Walkthrough & Guides Wiki

Monster Hunter World Walkthrough & Guides Wiki

The Legend of Zelda: Tears of the Kingdom Walkthrough & Guides Wiki

Persona 3 Reload Walkthrough & Guides Wiki
All rights reserved
Privacy Policy, Terms of Use 2024 NetEase, Inc.All Rights Reserved
The copyrights of videos of games used in our content and other intellectual property rights belong to the provider of the game.
The contents we provide on this site were created personally by members of the Game8 editorial department.
We refuse the right to reuse or repost content taken without our permission such as data or images to other sites.


![The Liar Princess and the Blind Prince Review [PC] | Lovely to Look at but Tedious to Play](https://img.game8.co/4442586/8d95f5faf05780f1765ce7e0938bd825.jpeg/show)
![Monster Hunter Stories 3 Review [First Impressions] | Simply Rejuvenating](https://img.game8.co/4438641/2a31b7702bd70e78ec8efd24661dacda.jpeg/thumb)

![The Seven Deadly Sins: Origin [First Impressions] | A Promising Start](https://img.game8.co/4440581/584e0bfb87908f12c4eab6e846eb1afd.png/thumb)


This wiki needs to be updated with the new version of the game,most is different in normal and novice servers,gotta make a novice and normal PvE builds.