This survey will take about 1 minute.
Your answers will help us to improve our website.
Zenless Zone Zero (ZZZ)
Hollow Zero Lost Void Guide
☆ New: Tier List Maker & Co-Op Board!
★ 2.7: Nangong Yu, Cissia, & 2.7 Livestream
☆ 2.6 Phase 1: Sunna & Yixuan
★ 2.6 Phase 2: Aria & Yuzuha
☆ Tier Lists: Agents | W-Engines | Bangboos | Teams
★ Redeem Codes for free Polychromes!
Lost Void is a Hollow Zero combat mode in Zenless Zone Zero (ZZZ). See how to unlock Lost Void, the best teams for Battlefront Purge, as well as how to beat it, all the rewards, and the latest Lost Void updates here!
| Hollow Zero: Lost Void Guides | ||
|---|---|---|
 Operation Matrix Operation Matrix |
 Battlefront Purge Battlefront Purge |
|
 Task Force Investigation Task Force Investigation |
 Perpetrator Battle Perpetrator Battle |
|
List of Contents
Latest Lost Void Updates
New Agents and Tactical Prisms

Both Lucia and Yidhari, along with their Tactical Prisms, have been added to Task Force Investigation. You can also try them out in Perpetrator Battle.
How to Unlock Lost Void
Complete Mole in the Hole (I)

Lost Void can be unlocked after completing the first Soldier 11 Agent Commission, Mole in the Hole (I).
Mole in the Hole Soldier Story Guide
Lost Void Modes
All Lost Void Modes
| Mode | Description |
|---|---|
 Battlefront Purge▼ Battlefront Purge▼ |
Choose your buffs and modifiers before heading into Hollow Zero and taking on Geppetto. Different buffs and modifiers rotate on a weekly basis. |
 Task Force Investigation Task Force Investigation |
Explore the Lost Void in a series of challenges that ends with a boss battle against the Miasma Priest or the Wandering Hunter. Use featured Agents to earn more points and claim rewards quicker. Additional boss options and Task Force Agents may be added in future updates. |
 Perpetrator Battle Perpetrator Battle |
Proxies will take on sets of trials using specific Agents when playing through Perpetrator Battle. Featured Agents will also have their Tactical Prisms activated in this mode. |
 Shadow Operation Shadow Operation |
Go through the challenges of exploring Hollow Zero with the aid of supplies you find along the way. |
Battlefront Purge Best Teams
Miyabi Team
| Team Comp | ||
|---|---|---|
|
|
|
|
| Gear | ||
Use Miyabi to inflict Frostburn onto enemies and deal a lot of AoE DMG with her charged up Basic Attack. Use another Anomaly unit with Miyabi to trigger Disorder and get more Fallen Frost stacks.
| Alternative | Explanation |
|---|---|
| Any Anomaly Unit of a Different Attribute | Anomaly Replacement You can pretty much use any Anomaly unit of another attribute to help trigger Disorder. |
 Astra Astra | Support Replacement Astra provides a team-wide DMG buff and enables frequent Quick Assists. |
 Rina Rina | Support Replacement Rina can provide a PEN Ratio buff simply by attacking. |
 Lucy Lucy | Support Replacement Lucy can buff everyone's ATK with her EX Special Attack and Chain Attack. |
 Seth Seth | Support Replacement Seth can be used to provide Shields and increase the Anomaly Proficiency of the Agent before him. |
 Soukaku Soukaku | Support Replacement Soukaku provides Ice DMG buffs to Miyabi. |
Evelyn Team
| Team Comp | ||
|---|---|---|
|
|
|
|
| Gear | ||
Use Evelyn's Chain Attacks to deal massive DMG to both mobs and boss enemies. We recommend pairing Evelyn with a Stun unit to be able to unleash more Chain Attacks.
| Alternative | Explanation |
|---|---|
 Koleda Koleda | Stun Replacement Koleda can stun enemies and increase Chain Attack DMG dealt by allies. |
 Qingyi Qingyi | Stun Replacement Qingyi can increase the Stun DMG multiplier on enemies. |
 Ju Fufu Ju Fufu | Stun Replacement Ju Fufu is able to provide Stun, buffs, and additional damage from off-field. |
 Caesar Caesar | Support Replacement Caesar can provide shielding and an ATK buff. She can also deal decent Daze on an enemy. |
| Lucy | Support Replacement Lucy can increase the party's ATK with her Special Attack and Ultimate. |
Alice Team
| Team Comp | ||
|---|---|---|
|
|
|
|
| Gear | ||
Alice, especially when paired with Vivian, can be a solid team for Disorder DMG. If you don't have Burnice, you can use other Supports to maximize Jane's personal DMG output.
| Alternative | Explanation |
|---|---|
| Any Anomaly Unit of a Different Attribute | Anomaly Replacement You can pretty much use any Anomaly unit of another attribute to help trigger Disorder. |
| Astra | Support Replacement Astra provides a team-wide DMG buff and enables frequent Quick Assists. |
| Lucy | Support Replacement Lucy can buff everyone's ATK with her EX Special Attack and Chain Attack. |
| Seth | Support Replacement Seth can be used to provide Shields and increase the Anomaly Proficiency of the Agent before him. |
| Rina | Support Replacement Rina can provide PEN Ratio buffs to the party. |
Hugo Team
| Team Comp | ||
|---|---|---|
|
|
|
|
| Gear | ||
Hugo can deal a lot of Ice DMG through the Totalize mechanic. With both Lighter and Lycaon on the team with him, Hugo will have plenty of opportunities to dish out Totalize and maximize its damage.
| Alternative | Explanation |
|---|---|
| Caesar | Stun Replacement Caesar can both stun enemies and provide a shield to allies. |
| Qingyi | Stun Replacement Qingyi can increase the Stun Multiplier by using her Basic Attack: Enchanted Moonlit Blossoms. |
| Soukaku | Support Replacement Soukaku is a free-to-play Support that can buff Hugo's Ice DMG. |
Soldier 0 Anby Team
| Team Comp | ||
|---|---|---|
|
|
|
|
| Gear | ||
A team with this setup will have access to plenty of Aftershock damage. Soldier 0 Anby will be your point character while receiving support from off-field with Orphie and Magus alongside Trigger.
| Alternative | Explanation |
|---|---|
 Seed Seed | Support Replacement Seed can buff Soldier 0 Anby while dealing significant damage of her own. |
 Pulchra Pulchra | Stun Replacement Pulchra can provide Stuns and Aftershock DMG from off-field. |
| Rina | Support Replacement Rina can increase the team's PEN Ratio, providing a buff that improves overall damage. |
| Astra | Support Replacement Astra provides a team-wide DMG buff and enables frequent Quick Assists. |
Yixuan Team
| Team Comp | ||
|---|---|---|
|
|
|
|
| Gear | ||
This team will focus on Yixuan dishing out damage while Lucia and Ju Fufu provide support from off-field. Yixuan will gain an array of buffs from her two teammates which enhances her offense and allow her to cast her Ultimates more frequently.
| Alternative | Explanation |
|---|---|
| Koleda | Stun Replacement Koleda can stun enemies and increase Chain Attack DMG dealt by allies. |
| Pulchra | Stun Replacement Pulchra can provide Stuns from off-field. |
 Pan Yinhu Pan Yinhu | Support Replacement Pan Yinhu has buffs that will enhance the damage of Rupture Agents. |
| Astra | Support Replacement Astra provides a team-wide DMG buff and enables frequent Quick Assists. |
F2P Team
| Team Comp | ||
|---|---|---|
|
|
|
|
| Gear | ||
You can use a team filled with free-to-play units with Billy as your Main DPS. Use Anby to Stun enemies while Nicole can gather mobs and inflict DEF shred on enemies.
How to Play Battlefront Purge
How to Beat Battlefront Purge
- Select Investigation Strategy
- Gain Buffs From Collecting Resonium
- Use Gear Suited for Your Team
- Get Mottled Ether Particle for Gears
- Check the Map and Plan Your Routes
- Unlock and Increase Your Combat Potential
Select Investigation Strategy
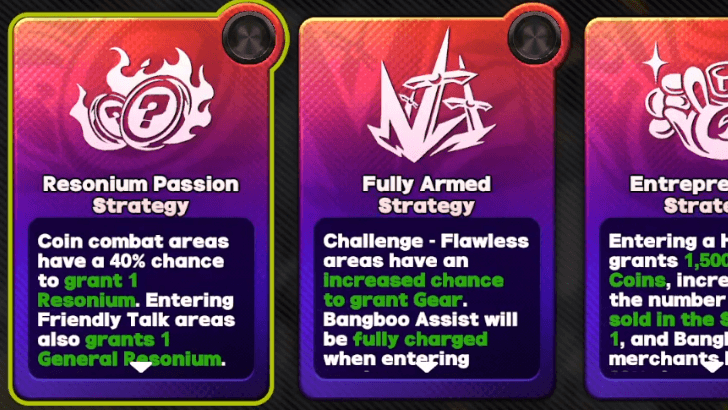
Before you head into the Hollow Zero, players can select an Investigation Strategy in the Battlefront Purge menu. You can select from various strategies, each having its unique effects.
Choose one that benefits your team the most. You can unlock an Explorer's Badge for your collection by clearing Battlefront Purge: Difficulty V with a Tier 3 General Gear.
Gain Buffs From Collecting Resonium

Similar to previous renditions of Hollow Zero game modes, Hollow Zero: Lost Void also offers players Resonium that gives different effects to your team.
Collecting Resonium will give you a ton of advantage over your enemies, especially in high difficulties.
Use Gears Suited for Your Team
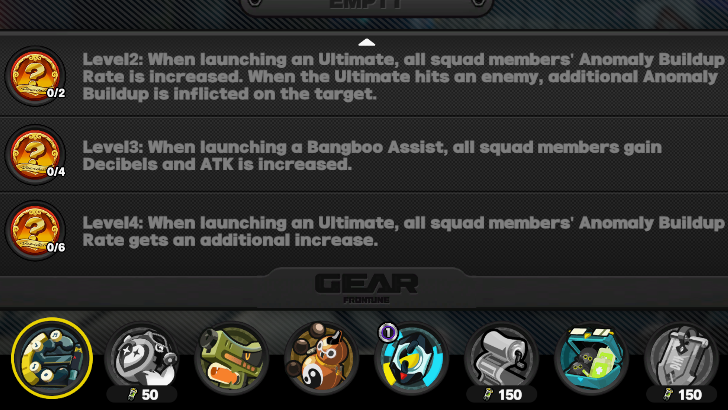
Talk to Ray at the entrance to the Hollow Zero: Lost Void to select your gear. These gears grant different effects, such as reducing Decibel requirements, and provide you with a Bangboo that can assist your team in battle.
Each gear has its own different effects, so make sure to choose one that is best suited for your team. You can also increase your gear level by completing a Combat - Gear node.
Get Mottled Ether Particle for Gears
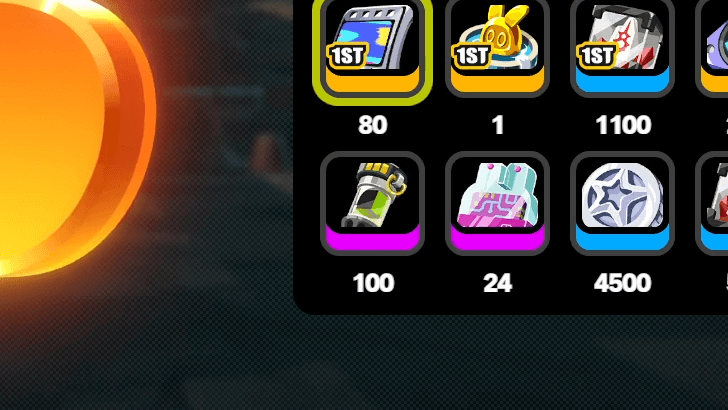
When you're starting in Hollow Zero: Lost Void, there will be gears in the selection that are locked. You will need to get a Mottled Ether Particle to access these gears.
Mottled Ether Particle can be obtained by completing a run of Battlefront Purge.
Check the Map and Plan Your Routes

Make sure to constantly check the map to plan which node you want to go to. Each node will also have different symbols that let you know which place to go!
Red nodes typically mean that you'll be fighting against enemies, a Light Bulb symbol means you can usually get Resonium for free, green nodes are places to heal your characters, and yellow nodes are where you can buy Resonium.
Unlock and Increase Your Combat Potential
You can unlock Combat Potential to give your team some buffs or effects that will be useful in your Hollow Zero: Lost Void run.
You can also use a maximum of 5 Expertise Points on Combat Potential you've fully unlocked to increase their buffs even more.
Battlefront Purge Rewards
Difficulty Rewards
| Difficulty | Rewards |
|---|---|
| I | |
| II | |
| III | |
| IV | |
| V | |
| VI |
Ether Activity Rewards (For Difficulty V)
| Ether Activities 1-8 |
|
|---|---|
| Ether Activity 9 |
Ether Activity Rewards (For Difficulty VI)
| Ether Activities 1-8 |
|
|---|---|
| Ether Activity 9-11 | |
| Ether Activity 12 |
License Level Rewards
| Lv. | Investigation License Rewards |
|---|---|
| 1 |
|
| 2 |
|
| 3 |
|
| 4 | |
| 5 |
|
| 6 |
|
| 7 | |
| 8 |
|
| 9 | |
| 10 |
|
| 11 |
|
| 12 | |
| 13 |
|
| 14 | |
| 15 |
|
| 16 |
|
| 17 | |
| 18 |
|
| 19 | |
| 20 |
|
| 21 |
|
| 22 | |
| 23 |
|
| 24 | |
| 25 |
|
| 26 |
|
| 27 | |
| 28 |
|
| 29 | |
| 30 |
|
| 31 |
|
| 32 | |
| 33 |
|
| 34 | |
| 35 |
Final Dose x1
|
| 36 |
|
| 37 | |
| 38 |
|
| 39 | |
| 40 |
|
| 41 |
|
| 42 | |
| 43 |
|
| 44 | |
| 45 |
|
| 46 |
|
| 47 | |
| 48 |
|
| 49 | |
| 50 |
|
| 51 |
|
| 52 | |
| 53 |
|
| 54 | |
| 55 |
|
| 56 |
|
| 57 | |
| 58 |
|
| 59 | |
| 60 |
|
| 61 |
|
| 62 | |
| 63 |
|
| 64 | |
| 65 |
|
| 66 |
|
| 67 | |
| 68 |
|
| 69 | |
| 70 |
|
| 71 |
|
| 72 | |
| 73 |
|
| 74 | |
| 75 |
|
| 76 |
|
| 77 | |
| 78 |
|
| 79 | |
| 80 |
|
| 81 |
|
| 82 | |
| 83 |
|
| 84 | |
| 85 |
|
| 86 |
|
| 87 | |
| 88 |
|
| 89 | |
| 90 |
Something Certain Namecard x1
|
| 91 |
|
| 92 | |
| 93 |
|
| 94 | |
| 95 |
|
| 96 |
|
| 97 | |
| 98 |
|
| 99 | |
| 100 |
Plundering Core Avatar x1
|
| 101 |
|
| 102 | |
| 103 |
|
| 104 | |
| 105 |
|
| 106 |
|
| 107 | |
| 108 |
|
| 109 | |
| 100 |
|
| 111 |
|
| 112 | |
| 113 |
|
| 114 | |
| 115 |
|
| 116 |
|
| 117 | |
| 118 |
|
| 119 | |
| 120 |
|
| 121 |
|
| 122 | |
| 123 |
|
| 124 | |
| 125 |
|
| 126 |
|
| 127 | |
| 128 |
|
| 129 | |
| 130 |
|
| 131 |
|
| 132 | |
| 133 |
|
| 134 | |
| 135 |
|
| 136 |
|
| 137 | |
| 138 |
|
| 139 | |
| 140 |
|
| 141 |
|
| 142 | |
| 143 |
|
| 144 | |
| 145 |
|
| 146 |
|
| 147 | |
| 148 |
|
| 149 | |
| 150 |
|
| 151 |
|
| 152 | |
| 153 |
|
| 154 | |
| 155 |
|
| 156 |
|
| 157 | |
| 158 |
|
| 159 | |
| 160 |
|
| 161 |
|
| 162 | |
| 163 |
|
| 164 | |
| 165 |
|
| 166 |
|
| 167 | |
| 168 |
|
| 169 | |
| 170 |
|
| 171 |
|
| 172 | |
| 173 |
|
| 174 | |
| 175 |
|
| 176 |
|
| 177 | |
| 178 |
|
| 179 | |
| 180 |
|
| 181 |
|
| 182 | |
| 183 |
|
| 184 | |
| 185 |
|
| 186 |
|
| 187 | |
| 188 |
|
| 189 | |
| 190 |
|
| 191 |
|
| 192 | |
| 193 |
|
| 194 | |
| 195 |
|
| 196 |
|
| 197 | |
| 198 |
|
| 199 | |
| 200 |
|
Exploration Collection Total Rewards
| Objective and Rewards | |
|---|---|
| Explorer's Badge | Achieve a total 72-Rank for all Investigation Strategy Explorer's Badges |
| Gear Database | Collect 56 [Gear] of different levels |
| Resonium Database | Collect 68 [Resonia] |
| Card Database | Collect 21 [Cards] |
Exploration Mission Rewards
| Battlefield Encounter Objectives and Rewards | |
|---|---|
| At Difficulty IV or above, equip the Gear Tsukihiro Yanagi: Soaring Moonlight and use EX Special Attack: Gekka Ruten 3 times and trigger thunderbolt strikes in a single combat. |
|
| At Difficulty IV or above, equip the Gear Tsukihiro Yanagi: Kagura's Dance and repeatedly perform the last move of Basic Attack for over 5 seconds. |
|
| At Difficulty IV or above, equip the Gear Ellen: Blade of Frost and launch Icy Blade 5 times in a single combat. |
|
| At Difficulty IV or above, equip the Gear Ellen: Hunter's Fin and launch EX Special Attack 4 times in a row. |
|
| At Difficulty IV or above, equip the Gear Hoshimi Miyabi: Awakening of the Bees and launch use Dash Attack: Fuyubachi - Maximum 5 times in a single combat. |
|
| At Difficulty IV or above, consume 18 points of Fallen Frost within 25 seconds as Agent Hoshimi Miyabi. |
|
| At Difficulty IV or above, equip the Gear Billy: Mysterious Transmorpher and maintain Starlight Descent state for over 25 seconds. |
|
| At Difficulty IV or above, equip the Gear Billy: Rotating Drivetrain and Dash Attack: Starlight Sanction 4 times in a row. |
|
| At Difficulty IV or above, equip the Gear Corin: Overload Driver and trigger Overclock Overload 3 times in a single combat. |
|
| At Difficulty IV or above, equip the Gear Corin: Operation Manual and hit 3 or more enemies with Dash Attack: Oopsy-Daisy! - Unleashed. |
|
| At Difficulty IV or above, equip the Gear Corin: Overload Driver and trigger Overclock Overload 3 times in a single combat. |
|
| At Difficulty IV or above, equip the Gear Corin: Operation Manual and hit 3 or more enemies with Dash Attack: Oopsy-Daisy! - Unleashed. |
|
| At Difficulty IV or above, equip the Gear Jane: Venomous Edge and use EX Special Attack: Aerial Sweep - Onslaught 3 times in a single combat. |
|
| At Difficulty IV or above, equip the Gear Jane: Phantom Armor and use Basic Attack: Salchow Chop 3 times in a single combat. |
|
| At Difficulty IV or above, equip the Gear Evelyn: Low-Combustion Coating and use Chain Attack: Lunalux - Entanglement 3 times in a single combat. |
|
| At Difficulty IV or above, equip the Gear Evelyn: Portable Detonator and use Dash Attack: Ambush Blast 3 times in a row. |
|
| At Difficulty IV or above, equip the Gear Astra Yao: Radiant Moment and use Basic Attack: Radiant Moment 3 times in a single combat. |
|
| At Difficulty IV or above, equip the Gear Astra Yao: Radiant Moment and hit 5 or more enemies with Basic Attack: Radiant Movement. |
|
| First Encounter Objectives and Rewards | |
| Upgrade General Gear to Lv. 2 for the first time |
|
| Obtain Exclusive Gear for the first time |
|
| Complete Card Purification for the first time |
|
| Complete an Expertise Boost in Combat Potential for the first time |
|
| Unlock Gear for the first time |
|
| Repeated Trials Objectives and Rewards | |
| Obtain a total of 12,000 Gear Coins in Hollow Zero: Lost Void |
|
| Upgrade Gear 9 times in Hollow Zero: Lost Void |
|
| Clear Hollow Zero: Lost Void with a total of 8 different Exclusive Gear |
|
| Obtain a total of 72 Resonia in Hollow Zero: Lost Void |
|
| Unlock a total of 8 pieces of Gear in Hollow Zero: Lost Void |
|
| Obtain a total of 9 Cards in Hollow Zero: Lost Void |
|
| Purchase a total of 45 items from Bangboo merchants in Hollow Zero: Lost Void |
|
| Purify a total of 12 Cards in Hollow Zero: Lost Void |
|
| Complete a total of 15 challenge areas in Hollow Zero: Lost Void |
|
| Clear Hollow Zero: Lost Void with 6 different Investigation Strategies |
|
| Tough Challenge Objectives and Rewards | |
| Complete the "Battle Front Purge: Difficulty III" |
|
| Complete the "Battle Front Purge: Difficulty V" |
|
| Complete the "Battle Front Purge: Difficulty V" on Ether Activity 1 |
|
| Complete the "Battle Front Purge: Difficulty V" on Ether Activity 3 |
|
| Complete the "Battle Front Purge: Difficulty V" on Ether Activity 5 |
|
| Complete the "Battle Front Purge: Difficulty V" on Ether Activity 7 |
|
| Special Objectives and Rewards | |
| Obtain 12 items in a single successful challenge in Hollow Zero: Lost Void |
|
| Enter 7 combat or challenge areas in a single successful challenge of Hollow Zero: Lost Void |
|
| Enter 5 Encounter or Price Difference areas in a single successful challenge of Hollow Zero: Lost Void |
|
| Obtain 3 cards in a single successful challenge of Hollow Zero: Lost Void |
|
| Purify 3 cards in a single successful challenge of Hollow Zero: Lost Void |
|
| Upgrade 2 General Gear to their highest level in a successful challenge of Hollow Zero: Lost Void |
|
| Obtain 5 pieces of Agent Exclusive Gear in a successful challenge of Hollow Zero: Lost Void |
|
| Complete 4 challenge areas in a successful challenge of Hollow Zero: Lost Void |
|
| Unveil the Truth Objectives and Rewards | |
| Clear Battlefront Purge: Difficulty VI and earn 1 [Phantom] Resonium in a single session. |
|
| Clear Battlefront Purge: Difficulty VI and refresh the map a total of 3 times. |
|
| Clear Battlefront Purge: Difficulty VI and accumulate a total of 8000 Gear Coins in a single session. |
|
| Clear Battlefront Purge: Difficulty VI and reearn 10 [General] Resonia in a single session. |
|
| Clear Battlefront Purge: Difficulty VI and obtain 2 Lv. 4 Gear in a single session. |
|
| Clear Battlefront Purge: Difficulty VI at Ether Activity: 6. |
|
| Clear Battlefront Purge: Difficulty VI and complete the battle with Gepetto in less than 3 minutes and 30 seconds. |
|
Zenless Zone Zero Related Guides

All Hollow Zero Game Modes
| Hollow Zero Modes | |
|---|---|
 Lost Void Lost Void |
 Withered Domain Withered Domain |
Lost Void Stages
| All Lost Void Stages | |
|---|---|
| Task Force Investigation | Perpetrator Battle |
| Shadow Operation | Battlefront Purge |
| Operation Matrix | - |
Withered Domain Stages
| All Withered Domain Stages | |
|---|---|
| Qualification Assessment | Old Capital Metro |
| Construction Ruins | Abandoned Skyscraper |
| Withering Garden | Inferno Reap |
Other Hollow Zero Guides
| Hollow Zero Upgrades and Mechanics | |
|---|---|
| Resonia | Corruption |
Comment
4  Anonymous about 1 year
just realized i do not have 2 gear for physical element... how do I get them, if there are any at all?
Author

Hollow Zero Lost Void Guide
Please participate in our site
improvement survey
03/2026
improvement survey
03/2026
Would you assist in
improving Game8's site?
improving Game8's site?

×
We are listening to our users' valuable opinions and discussing how to act on them.
The information collected through this survey will be used for the purpose of improving our services. In addition, the information will only be disclosed a part of a statistic in a format that will not allow identification of personal information.
Begin Survey
Not Now
×
Please rate each item regarding Game8.co's Advertisements.
Amount of Ads
Very Dissatisfied
Somewhat Dissatisfied
Fine
Somewhat Satisfied
Highly Satisfied
Placement of Ads
Timing of Ad Display
Ad Loading Speed
Safeness of Ads
Content of Ads
×
Please rate each item regarding Game8.co's Quality of Articles.
Amount of information
Very Dissatisfied
Somewhat Dissatisfied
Fine
Somewhat Satisfied
Highly Satisfied
Frequency of updates
Speed of new information
Accuracy of articles
Understandibility of articles
Readability of sentences
×
Please rate each item regarding Game8.co's Usability of the Site.
Ease of finding information
Very Dissatisfied
Somewhat Dissatisfied
Fine
Somewhat Satisfied
Highly Satisfied
Loading Speed
Use of Color
Font Size
Visibility of Images
Easy to Understand Layout
×
Please rate each item regarding Game8.co's Message Boards, Comments.
Ease of Writing
Very Dissatisfied
Somewhat Dissatisfied
Fine
Somewhat Satisfied
Highly Satisfied
Readability
Ease in Finding Information
Comment Quality
Comment Quantity
Admin Response
×
Please rate each item regarding Game8.co's Site's new design.
Please rate our site's new design
Very Dissatisfied
Somewhat Dissatisfied
Fine
Somewhat Satisfied
Highly Satisfied
Do you think that the website's design change makes the site easier to use?
Has the new design made it easier for you to find information on the site?
Has the new design improved the overall visual appeal of the site?
How would you rate your overall satisfaction with the new design of the site?
×
How likely are you to recommend Game8 to someone you know?
Very Unlikely
0
1
2
3
4
5
6
7
8
9
10
Very Likely
If you have other opinions regarding potential improvement to the website, please share them with us. We would appreciate your honest opinion.
Note: This is a free response section, so you can proceed without entering anything.
Note: Please be sure not to enter any kind of personal information into your response.
Note: Please be sure not to enter any kind of personal information into your response.
×
Thank You
×
Thank you for participating in our survey! Your answers will help us to improve the quality of our website and services.
We hope you continue to make use of Game8.
We hope you continue to make use of Game8.
Close
Rankings
- We could not find the message board you were looking for.
Gaming News


![Everwind Review [Early Access] | The Shaky First Step to A Very Long Journey](https://img.game8.co/4440226/ab079b1153298a042633dd1ef51e878e.png/thumb)

![Monster Hunter Stories 3 Review [First Impressions] | Simply Rejuvenating](https://img.game8.co/4438641/2a31b7702bd70e78ec8efd24661dacda.jpeg/thumb)
Popular Games

Genshin Impact Walkthrough & Guides Wiki
Honkai: Star Rail Walkthrough & Guides Wiki
Umamusume: Pretty Derby Walkthrough & Guides Wiki
Pokemon Pokopia Walkthrough & Guides Wiki
Resident Evil Requiem (RE9) Walkthrough & Guides Wiki
Monster Hunter Wilds Walkthrough & Guides Wiki
Wuthering Waves Walkthrough & Guides Wiki
Arknights: Endfield Walkthrough & Guides Wiki
Pokemon FireRed and LeafGreen (FRLG) Walkthrough & Guides Wiki
Pokemon TCG Pocket (PTCGP) Strategies & Guides Wiki


Recommended Games
Diablo 4: Vessel of Hatred Walkthrough & Guides Wiki
Fire Emblem Heroes (FEH) Walkthrough & Guides Wiki
Yu-Gi-Oh! Master Duel Walkthrough & Guides Wiki
Super Smash Bros. Ultimate Walkthrough & Guides Wiki
Pokemon Brilliant Diamond and Shining Pearl (BDSP) Walkthrough & Guides Wiki
Elden Ring Shadow of the Erdtree Walkthrough & Guides Wiki
Monster Hunter World Walkthrough & Guides Wiki
The Legend of Zelda: Tears of the Kingdom Walkthrough & Guides Wiki
Persona 3 Reload Walkthrough & Guides Wiki
Cyberpunk 2077: Ultimate Edition Walkthrough & Guides Wiki


All rights reserved
Copyright © 2024 HoYoverse, COGNOSPHERE. All Rights Reserved.
The copyrights of videos of games used in our content and other intellectual property rights belong to the provider of the game.
The contents we provide on this site were created personally by members of the Game8 editorial department.
We refuse the right to reuse or repost content taken without our permission such as data or images to other sites.
Exploration Collection has more levels than listed here and a full section more (Unofficial Guide).