This survey will take about 1 minute.
Your answers will help us to improve our website.
Zenless Zone Zero (ZZZ)
List of All Corruption
☆ New: Tier List Maker & Co-Op Board!
★ 2.7: Nangong Yu, Cissia, & 2.7 Livestream
☆ 2.6 Phase 1: Sunna & Yixuan
★ 2.6 Phase 2: Aria & Yuzuha
☆ Tier Lists: Agents | W-Engines | Bangboos | Teams
★ Redeem Codes for free Polychromes!

Corruption can negatively affect your Hollow Zero combat and exploration in Zenless Zone Zero (ZZZ). See a list of all Corruption and how it works here!
List of Contents
List of All Corruption in Hollow Zero
All Corruption and Effects
| Corruption | Effect |
|---|---|
| Agents gain less Pressure, but lose HP when obtaining Resonia. | |
| Off-field characters gradually lose Energy. | |
| Rest Areas and Swift Supplies no longer recover HP. Instead, after each battle, all squad members recover 3% of Max HP. Before the next floor and final battle, recover 10% of Max HP. | |
| Enemy Daze diminishes over time, but the Stun DMG Multiplier is increased. | |
| When Pressure overloads, all squad members lose HP. | |
| Purchasing items from Bangboo merchants costs HP instead of Gear Coins. | |
| Gear Coin events generate more Gear Coins but also inflict more Pressure. | |
| Upon entering the next floor and starting the final battle, lose 300 Gear Coins and recover 10% of Max HP for all squad members. However, failure to pay will immediately deduct 15% Max HP from all squad members. | |
| When an Agent's HP is above 50%, HP recovery is significantly reduced. When an Agent's HP is below 50%, HP recovery speed is significantly increased. | |
| The Bangboo merchant offers discounts, but also fewer items. | |
| Traps become more deadly. | |
| When selecting Resonium, you have fewer choices. | |
| Enemies gain Anomaly Buildup RES but lose Daze RES. | |
| You receive Gear Coins when Pressure increases, but can only possess up to 3,333 Coins. | |
| Both enemies and allies gain a CRIT DMG bonus. | |
| Both enemies and allies gain a CRIT Rate bonus. | |
| Boss attacks have a chance to deal critical damage. | |
| When Pressure increases, there is a chance your Pressure either does not increase or increases by a lot. | |
| Boss attacks have a chance to deal critical damage. | |
| Dodge has a longer cooldown. |
A random Corruption will be applied to the player from the list above each time their Pressure overloads during exploration in Hollow Zero. These Corruption will apply negative effects to the team in and out of combat.
All Max Corruption and Effects
| We'll continuously update this section as we expand our Corruption Research. Stay tuned! |
| Max Corruption | Effect |
|---|---|
| Decreases HP when exploring through the monitor. In combat, on-field characters will lose HP gradually. | |
| Corruption Complex deals 30% more DMG. | |
| Corruption Complex deals 40% more DMG. Attacks from allies no longer accumulate Daze, but breaking weak spots inflicts a substantial amount of Daze. | |
| Corruption Complex deals 50% more DMG. Attacks from allies no longer accumulate Daze, but breaking weak spots inflicts a substantial amount of Daze. | |
| You can no longer recover HP. | |
| Dead End Butcher deals 20% more DMG. | |
| Dead End Butcher deals 30% more DMG. | |
| The Dead End Butcher deals 40% more DMG. He restores a small amount of HP when he hits squad members. | |
| The Dead End Butcher deals 50% more DMG. He restores Daze and a small amount of HP when he hits squad members. | |
| The Dead End Butcher deals 50% more DMG. He restores Daze and a small amount of HP when he hits squad members. | |
| Twin Marrionettes deal 40% more DMG. | |
| Twin Marrionettes deal 50% more DMG and revive much faster. | |
| Twin Marrionettes deal 50% more DMG and revive much faster. |
A random Max Corruption from the list above will be granted to the player once their Corruption meter hits the maximum capacity, and will bestow stronger negative effects to their team in and out of combat.
How Does Corruption Work in Hollow Zero?
Pressure Overload Causes Corruption
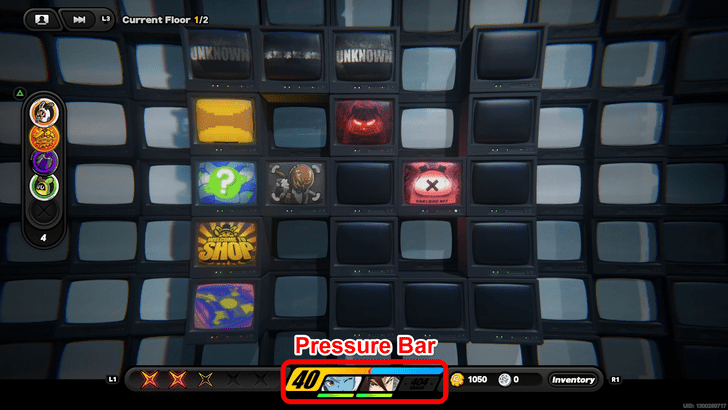
During the exploration phase in Hollow Zero, Pressure is added for every unexplored tile visited, or through Disconnection and random encounter tiles, and is indicated as the yellow meter filling the blue bar on the bottom of the screen.
Once the Pressure meter reaches its maximum capacity, Pressure Overload will occur, granting the player a random Corruption, which applies a negative effect to their exploration, combat, or both. The Pressure meter will reset after this, and will grant another random Corruption once Pressure Overload is retriggered.
Reduce Pressure to Prevent Pressure Overload
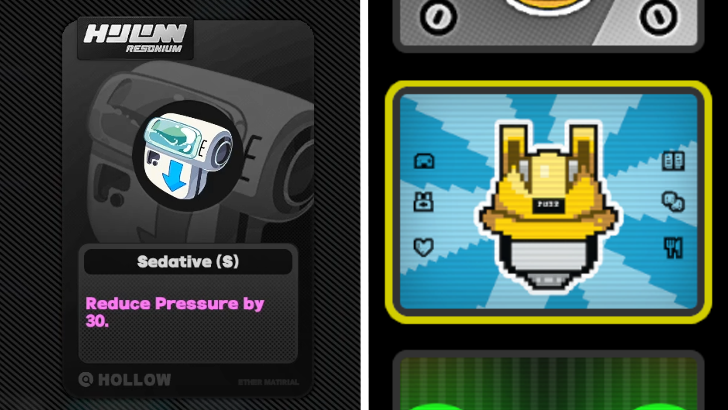
There are event tiles and items that can help reduce Pressure such as the Safety Zone tile that reduces Pressure by 10 and the Sedative (S) item, gained from the Swift Supply event tile, that reduces pressure by 30 when chosen.
Managing Pressure levels efficiently will slow the rate of Corruption, so players should keep a close eye on their Pressure meter.
Corruption Effects Stack
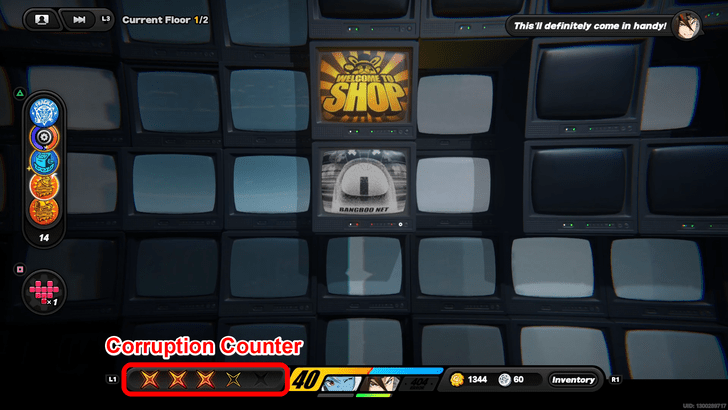
Corruption accumulates at the end of every Pressure Overload, and can stack up to a maximum of 4 standard Corruption before reaching its maximum capacity.
Players can keep track of how much Corruption they have accumulated at the bottom left of their screen, indicated by an pulsating orange sideways cross.
Max Corruption Obtained at Full Corruption Capacity
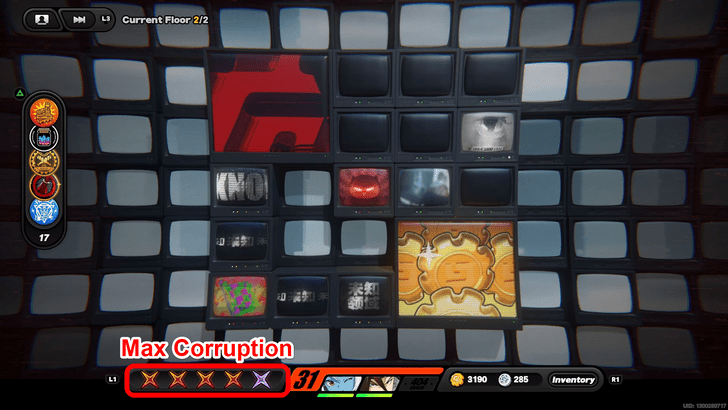
After 4 standard Corruptions have filled the meter, the next Pressure Overload will grant the player a Max Corruption.
These Corruptions have stronger negative effects that will adversely affect players' combat or exploration, indicated by a holographic purple sideways cross on the Corruption counter. No other Corruptions will be granted after obtaining this, even after triggering another Pressure Overload.
Corruption Can be Cleansed
Any type of Corruption can be cleansed at a Purification Room event tile. Once visited, players may choose which specific Corruption they would like to remove from their Corruption list, including Max Corruptions.
Zenless Zone Zero Related Guides

All Hollow Zero Game Modes
| Hollow Zero Modes | |
|---|---|
 Lost Void Lost Void |
 Withered Domain Withered Domain |
Lost Void Stages
| All Lost Void Stages | |
|---|---|
| Task Force Investigation | Perpetrator Battle |
| Shadow Operation | Battlefront Purge |
| Operation Matrix | - |
Withered Domain Stages
| All Withered Domain Stages | |
|---|---|
| Qualification Assessment | Old Capital Metro |
| Construction Ruins | Abandoned Skyscraper |
| Withering Garden | Inferno Reap |
Other Hollow Zero Guides
| Hollow Zero Upgrades and Mechanics | |
|---|---|
| Resonia | Corruption |
Author

List of All Corruption
Please participate in our site
improvement survey
03/2026
improvement survey
03/2026
Would you assist in
improving Game8's site?
improving Game8's site?

×
We are listening to our users' valuable opinions and discussing how to act on them.
The information collected through this survey will be used for the purpose of improving our services. In addition, the information will only be disclosed a part of a statistic in a format that will not allow identification of personal information.
Begin Survey
Not Now
×
Please rate each item regarding Game8.co's Advertisements.
Amount of Ads
Very Dissatisfied
Somewhat Dissatisfied
Fine
Somewhat Satisfied
Highly Satisfied
Placement of Ads
Timing of Ad Display
Ad Loading Speed
Safeness of Ads
Content of Ads
×
Please rate each item regarding Game8.co's Quality of Articles.
Amount of information
Very Dissatisfied
Somewhat Dissatisfied
Fine
Somewhat Satisfied
Highly Satisfied
Frequency of updates
Speed of new information
Accuracy of articles
Understandibility of articles
Readability of sentences
×
Please rate each item regarding Game8.co's Usability of the Site.
Ease of finding information
Very Dissatisfied
Somewhat Dissatisfied
Fine
Somewhat Satisfied
Highly Satisfied
Loading Speed
Use of Color
Font Size
Visibility of Images
Easy to Understand Layout
×
Please rate each item regarding Game8.co's Message Boards, Comments.
Ease of Writing
Very Dissatisfied
Somewhat Dissatisfied
Fine
Somewhat Satisfied
Highly Satisfied
Readability
Ease in Finding Information
Comment Quality
Comment Quantity
Admin Response
×
Please rate each item regarding Game8.co's Site's new design.
Please rate our site's new design
Very Dissatisfied
Somewhat Dissatisfied
Fine
Somewhat Satisfied
Highly Satisfied
Do you think that the website's design change makes the site easier to use?
Has the new design made it easier for you to find information on the site?
Has the new design improved the overall visual appeal of the site?
How would you rate your overall satisfaction with the new design of the site?
×
How likely are you to recommend Game8 to someone you know?
Very Unlikely
0
1
2
3
4
5
6
7
8
9
10
Very Likely
If you have other opinions regarding potential improvement to the website, please share them with us. We would appreciate your honest opinion.
Note: This is a free response section, so you can proceed without entering anything.
Note: Please be sure not to enter any kind of personal information into your response.
Note: Please be sure not to enter any kind of personal information into your response.
×
Thank You
×
Thank you for participating in our survey! Your answers will help us to improve the quality of our website and services.
We hope you continue to make use of Game8.
We hope you continue to make use of Game8.
Close
Rankings
Gaming News


![Everwind Review [Early Access] | The Shaky First Step to A Very Long Journey](https://img.game8.co/4440226/ab079b1153298a042633dd1ef51e878e.png/thumb)

![Monster Hunter Stories 3 Review [First Impressions] | Simply Rejuvenating](https://img.game8.co/4438641/2a31b7702bd70e78ec8efd24661dacda.jpeg/thumb)
Popular Games

Genshin Impact Walkthrough & Guides Wiki
Honkai: Star Rail Walkthrough & Guides Wiki
Umamusume: Pretty Derby Walkthrough & Guides Wiki
Pokemon Pokopia Walkthrough & Guides Wiki
Resident Evil Requiem (RE9) Walkthrough & Guides Wiki
Monster Hunter Wilds Walkthrough & Guides Wiki
Wuthering Waves Walkthrough & Guides Wiki
Arknights: Endfield Walkthrough & Guides Wiki
Pokemon FireRed and LeafGreen (FRLG) Walkthrough & Guides Wiki
Pokemon TCG Pocket (PTCGP) Strategies & Guides Wiki


Recommended Games
Diablo 4: Vessel of Hatred Walkthrough & Guides Wiki
Fire Emblem Heroes (FEH) Walkthrough & Guides Wiki
Yu-Gi-Oh! Master Duel Walkthrough & Guides Wiki
Super Smash Bros. Ultimate Walkthrough & Guides Wiki
Pokemon Brilliant Diamond and Shining Pearl (BDSP) Walkthrough & Guides Wiki
Elden Ring Shadow of the Erdtree Walkthrough & Guides Wiki
Monster Hunter World Walkthrough & Guides Wiki
The Legend of Zelda: Tears of the Kingdom Walkthrough & Guides Wiki
Persona 3 Reload Walkthrough & Guides Wiki
Cyberpunk 2077: Ultimate Edition Walkthrough & Guides Wiki


All rights reserved
Copyright © 2024 HoYoverse, COGNOSPHERE. All Rights Reserved.
The copyrights of videos of games used in our content and other intellectual property rights belong to the provider of the game.
The contents we provide on this site were created personally by members of the Game8 editorial department.
We refuse the right to reuse or repost content taken without our permission such as data or images to other sites.
hay fever as well