 Miyabi
 Ellen
Ellen Yanagi
 Harumasa
 Astra
Astra Evelyn
 Trigger
 Vivian
 Ben
Ben Piper
Piper Jane
Jane Lucy
Lucy Burnice
 Ju Fufu
 Zhao
Zhao Nicole
 Zhu Yuan
 Qingyi
 Nekomata
 Soukaku
 Yuzuha
 Alice
Alice Anton
Anton Grace
Grace Rina
Rina Soldier 0 Anby
 Seth
Seth Dialyn
 Ye Shunguang
 Sunna
Sunna Pan Yinhu
 Billy
Billy Caesar
 Lucia
Lucia Anby
Anby Lycaon
 Lighter
 Hugo
Hugo Corin
Corin
 News and Game Info
 Redeem Codes
 Characters
 Tier Lists
 W-Engine
 Drive Discs
 Signal Search
 Bangboo
 Events
 Travel
 Shops
Shops VR Device
 Enemies
 Bosses
 Hollow Zero
 Shiyu Defense
 Rally Commissions
 Arcade (Godfinger)
 Items
Items Commissions
 Mewmew Medals
This survey will take about 1 minute.
Your answers will help us to improve our website.
Zenless Zone Zero (ZZZ)
Threshold Simulation - Myriad Endgame Combat Guide
☆ New: Tier List Maker & Co-Op Board!
★ Upcoming: Version 2.7, Nangong Yu & Cissia
☆ 2.6 Phase 1: Sunna & Yixuan
★ 2.6 Phase 2: Aria & Yuzuha
☆ Tier Lists: Agents | W-Engines | Bangboos | Teams
★ Redeem Codes for free Polychromes!

Threshold Simulation - Myriad Endgame is new combat in Zenless Zone Zero (ZZZ) 2.6. See all the guides on all hard battle modes, as well as the easy ones, and how to play Threshold Simulation here!
List of Contents
Threshold Simulation Latest Updates
Myriad Endgame Released in Version 2.6
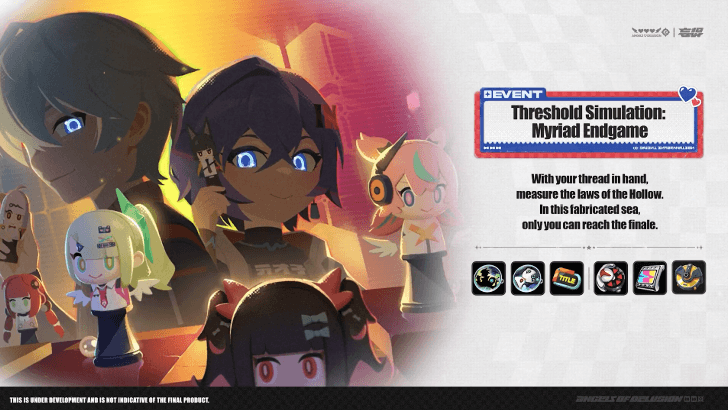
A new mode in Threshold Simulation, called Myriad Endgame, was released in Version 2.6, on February 6, 2026.
Additionally, the user interface of Threshold Simulation, as well as the endings and stages themselves, will have various optimizations.
Threshold Simulation Myriad Endgame Stages
All Hard Mode Threshold Simulation Stages
| Battle | Stages | Wk. | Res |
|---|---|---|---|
| Battle 01 | Final Stage | ||
| Required 1-1 | |||
| Required 1-2 | |||
| Optional 1-3 | None | ||
| Battle 02 | Final Stage | ||
| Required 2-1 | |||
| Required 2-2 | |||
| Optional 2-3 | |||
| Last Node (Ending 1) | Final LAST NODE | ||
| Required 3-1 | |||
| Required 3-2 | |||
| Required 3-3 | |||
| Optional 3-4 | |||
| Last Node (Ending 2) | Final Stage | ||
| Required 3-1 | |||
| Required 3-2 | |||
| Required 3-3 | |||
| Optional 3-4 |
All Easy Mode Threshold Simulation Stages
| Battle | Stages | Wk. | Res |
|---|---|---|---|
| Battle 01 | Final Stage | None | |
| Required 1-1 | |||
| Battle 02 | Final Stage | ||
| Required 2-1 | |||
| Optional 2-2 | None | ||
| Battle 03 | Final Stage | ||
| Required 3-1 | None | ||
| Required 3-2 | |||
| Optional 3-3 | |||
| Last Node | Final Stage | ||
| Required 4-1 | |||
| Required 4-2 | |||
| Optional 4-3 |
Threshold Simulation Battle 01 Hard
Battle 01 Hard Final Stage Guide
| Final Stage Boss Information | ||
|---|---|---|
 Wandering Hunter Wandering Hunter
|
Wk. | |
| Res. | ||
| Enemy Details | ||
| • Suitable for Agents with the Rupture specialty. • Wandering Hunter's Base DEF increases by 40% in Miasmic Field; when an Agent hits Wandering Hunter with Assist Follow-Up or Dodge Counter, 1 stack of Wavering is applied. Wavering can stack up to 5 times and lasts 15 seconds. Repeated triggers reset the duration. • When an Agent's attacks hit Wandering Hunter, for each stack of Wavering, the Agent's Sheer DMG is increased by 7%. • During the hide-and-seek phase, using Perception Technique to break Drowned Ideal Lucia's true form will grant 3,000 Performance Points. Exposing his true form and activating Defensive Assist or Assist Follow-Up against Wandering Hunter will grant 2,000 Performance Points, up to a maximum of 5,000 points. |
||
How to Beat Wandering Hunter
Find the Real Drowned Lucia
When the Wandering Hunter disappears and the drowned Lucia plays the hide-and-seek game, use the Revelation technique and find the illusion with the glowing purple aura.
Afterwards, immediately parry the Hunter's strike to impair it! You can gain about 5,000 Performance Points from performing this.
Use Defensive Assists
A lot of the Wandering Hunter's attacks have golden attack cues, which makes them perfect for Defensive Assists. Be sure to do so as often as you can!
Battle 01 Hard Final Stage Best Teams
| Best Teams & Bangboo | Buff |
|---|---|
|
|
|
|
|
|
|
|
|
|
|
|
|
|
Required Stage 1-1 Hard Guide
1-1 Stage Details
| Multiplier |
|
|---|---|
| Objectives |
|
| Enemies & Weaknesses |
|
1-1 Best Teams
| Best Teams & Bangboo | Buff |
|---|---|
|
|
|
|
|
|
|
|
Required Stage 1-2 Hard Guide
1-2 Stage Details
| Multiplier |
|
|---|---|
| Objectives |
|
| Enemies & Weaknesses |
|
1-2 Best Teams
| Best Teams & Bangboo | Buff |
|---|---|
|
|
|
|
|
Optional Stage 1-3 Hard Guide
1-3 Stage Details
| Multiplier |
|
|---|---|
| Objectives |
|
| Enemies & Weaknesses |
|
1-3 Best Teams
| Best Teams & Bangboo | Buff |
|---|---|
|
|
|
|
|
Optional Stage 1-3 Hard Guide
1-3 Stage Details
| Multiplier |
|
|---|---|
| Objectives |
|
| Enemies & Weaknesses |
|
1-3 Best Teams
| Best Teams & Bangboo | Buff |
|---|---|
|
|
|
|
|
Threshold Simulation Battle 02 Hard
Battle 02 Hard Final Stage Guide
| Final Stage Boss Information | ||
|---|---|---|
 Ye Shiyuan The Thrall Ye Shiyuan The Thrall
|
Wk. | |
| Res. | ||
| Enemy Details | ||
| • Suitable for Agents with Stun specialty. • When Sobek and The Thrail alternate turns, The Thrall gains 1 stack of Contract and Self-Sacrifice. Contract and Self-Sacrifice can stack up to 3 times. Each stack of Contract increases All-Attribute Anomaly RES by 15%, each stack of Self-Sacrifice reduces The Thrall's DEF by 8%. When The Thrall is Stunned, CRIT DMG taken increases by 50%. • When Agents inflict Weakened on Sobek and The Thrall, 1,500 Performance Points will be awarded. When an Agent eliminates Sobek, 2,000 Performance Points will be awarded. Up to a maximum of 5,000 Performance Points can be earned. |
||
How to Beat Ye Shiyuan the Thrall
Parry Fusion Attacks
During certain points in the fight, especially in the beginning, Ye Shiyuan and its Ethereal called Sobek will fly off the field and around it to do a joint attack against you. Though these Fusion Attacks may vary, some of them will be perfectly parryable.
Doing so will put the pair in a special weakened state for a certain duration, allowing you to follow up with your own attacks! Hence, when fighting Ye Shiyuan the Thrall, make it a point to bring along Agents that can initiate Defensive Assists!
Battle 01 Hard Final Stage Best Teams
| Best Teams & Bangboo | Buff |
|---|---|
|
|
|
|
|
|
|
|
Required Stage 2-1 Hard Guide
2-1 Stage Details
| Multiplier |
|
|---|---|
| Objectives |
|
| Enemies & Weaknesses |
|
2-1 Best Teams
| Best Teams & Bangboo | Buff |
|---|---|
|
|
|
|
|
|
|
|
| Alternative Agents | ||
|---|---|---|
 Soldier 11 Soldier 11 |  Koleda Koleda |  Orphie and Magus Orphie and Magus |
Required Stage 2-2 Hard Guide
2-2 Stage Details
| Multiplier |
|
|---|---|
| Objectives |
|
| Enemies & Weaknesses |
|
2-2 Best Teams
| Best Teams & Bangboo | Buff |
|---|---|
|
|
|
|
|
|
|
|
|
|
|
Optional Stage 2-3 Hard Guide
2-3 Stage Details
| Multiplier |
|
|---|---|
| Objectives |
|
| Enemies & Weaknesses |
|
2-3 Best Teams
| Best Teams & Bangboo | Buff |
|---|---|
|
|
|
|
|
Threshold Simulation Last Node - Ending 1 Hard
Last Node - Ending 1 Hard Final Stage Guide
| Final Stage Boss Information | ||
|---|---|---|
 Vesper Vesper
|
Wk. | |
| Res. | ||
| Enemy Details | ||
| • When Discordant Solo is being attacked, the CRIT DMG of this attack decreases 40%. When an Agent deploys or extends the duration of Ether Veil in battle, the whole squad gains 1 stack of Sonic Resonance. Sonic Resonance stacks up to 3 times, and each stack increases Anomaly Buildup Rate by 8%, as well as Anomaly DMG by 15%. • During a Control Skill, every successful counter of a Boss attack grants 350 Performance Points. A Shutdown of the Boss's Control Skill or counter of the final strike of certain skills inflicts on the Boss the Impaired effect and grants 750 Performance Points. Earn up to 5,000 Performance Points from the above. |
||
How to Beat Discordant Solo
Parry Control Skill and Inflict Shutdown
| How to Parry Vesper's Control Skill |
|---|
| Wait → Dodge → Parry → Parry → Parry → Pause → Parry |
One particular attack of Versper's that you need to keep your eyes peeled for is her Control Skill, similar to the Primordial Nightmare's. This skill has no attack cues, so it's best observe each hit carefully.
Battle 03 Ending 1 Hard Final Stage Best Teams
| Best Teams & Bangboo | Buff |
|---|---|
|
|
|
|
|
Required Stage 3-1 - Ending 1 Hard Guide
3-1 Stage Details
| Multiplier |
|
|---|---|
| Objectives |
|
| Enemies & Weaknesses |
|
3-1 Best Teams
| Best Teams & Bangboo | Buff |
|---|---|
|
|
|
|
|
|
|
|
|
|
|
Required Stage 3-2 - Ending 1 Hard Guide
3-2 Stage Details
| Multiplier |
|
|---|---|
| Objectives |
|
| Enemies & Weaknesses |
|
3-2 Best Teams
| Best Teams & Bangboo | Buff |
|---|---|
|
|
|
|
|
Required Stage 3-3 - Ending 1 Hard Guide
3-3 Stage Details
| Multiplier |
|
|---|---|
| Objectives |
|
| Enemies & Weaknesses |
|
3-3 Best Teams
| Best Teams & Bangboo | Buff |
|---|---|
|
|
|
|
|
|
|
|
Optional Stage 3-4 - Ending 1 Hard Guide
3-4 Stage Details
| Multiplier |
|
|---|---|
| Objectives |
|
| Enemies & Weaknesses |
|
3-4 Best Teams
| Best Teams & Bangboo | Buff |
|---|---|
|
|
|
|
|
|
|
|
|
|
|
Threshold Simulation Last Node - Ending 2 Hard
Last Node - Ending 2 Hard Final Stage Guide
| Final Stage Boss Information | ||
|---|---|---|
 Primordial Nightmare Primordial Nightmare
|
Wk. | |
| Res. | ||
| Enemy Details | ||
| • Suitable for Agents with Attack specialty. • Boss Anomaly DMG taken is reduced by 30%. When switching from Miasmic Shield state to normal state, or from normal state to Miasmic Shield state, Agent CRIT DMG against them is increased by 20%. This effect can stack up to 3 times and resets when the boss recovers from Stun. • Triggering Miasmic Shield Purification grants 1,000 Performance Points. During the Control Skill, each successful counter against the Boss's attacks grants 500 Performance Points. Performing a Shutdown on the Boss's Control Skill grants 2,000 Performance Points. Maximum obtainable Performance Points: 5,000. |
||
How to Beat Primordial Nightmare
Avoid Control Skills
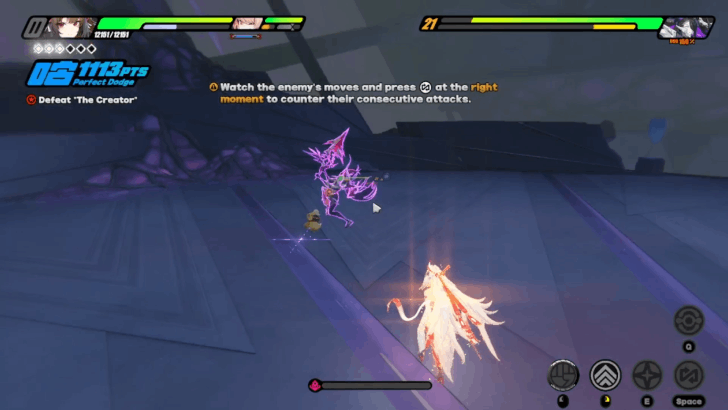
Getting hit with a Control Skill will limit your options in battle, so be sure to avoid their first phase using Dodges and Perfect Assists. You will then need to counter the consecutive attacks that follow by timing your assists.
Avoiding these attacks will be a bit more challenging than usual since they will have no flash indicators when used.
Battle 03 Hard Final Stage Best Teams
| Best Teams & Bangboo | Buff |
|---|---|
|
|
|
|
|
Required Stage 3-1 - Ending 2 Hard Guide
3-1 Stage Details
| Multiplier |
|
|---|---|
| Objectives |
|
| Enemies & Weaknesses |
|
3-1 Best Teams
| Best Teams & Bangboo | Buff |
|---|---|
|
|
|
|
|
|
|
|
| Alternative Agents | ||
|---|---|---|
| Soldier 11 |  Pulchra Pulchra |  Seed Seed |
 Manato Manato | ||
Required Stage 3-2 - Ending 2 Hard Guide
3-2 Stage Details
| Multiplier |
|
|---|---|
| Objectives |
|
| Enemies & Weaknesses |
|
3-2 Best Teams
| Best Teams & Bangboo | Buff |
|---|---|
|
|
|
|
|
Required Stage 3-3 - Ending 2 Hard Guide
3-3 Stage Details
| Multiplier |
|
|---|---|
| Objectives |
|
| Enemies & Weaknesses |
|
3-3 Best Teams
| Best Teams & Bangboo | Buff |
|---|---|
|
|
|
|
|
Optional Stage 3-4 - Ending 2 Hard Guide
3-4 Stage Details
| Multiplier |
|
|---|---|
| Objectives |
|
| Enemies & Weaknesses |
|
3-4 Best Teams
| Best Teams & Bangboo | Buff |
|---|---|
|
|
|
|
|
|
|
|
Threshold Simulation Battle 01 Easy
Battle 01 Final Stage Guide
| Final Stage Boss Information | ||
|---|---|---|
 Notorious - Dead End Butcher Notorious - Dead End Butcher
|
Wk. | |
| Res. | None |
|
| Enemy Details | ||
| • DMG dealt to boss enemies by Attribute Anomaly is increased by 50%. While Notorious - Dead End Butcher is in Ether Enhanced state, the DMG it takes is reduced by 15%, and the Daze value dealt by Agents to it is reduced by 30%. Triggering Disorder on Notorious - Dead End Butcher immediately forces it to exit the Ether Enhanced state.
• Successfully triggering Perfect Dodge grants 200 Performance Points. A maximum of 5,000 Performance Points can be obtained. • When an extra score multiplier is active in this stage, the Performance Points cap will increase accordingly. |
||
How to Beat Notorious Dead End Butcher
Beware of the Disappearing Attack
The Notorious Dead End Butcher will disappear momentarily, then an attack cue will appear. Counter it by executing a Perfect Dodge or switching via a Perfect Assist.
Avoid Ether Missiles
This variant of the Dead End Butcher can also gather what looks like ether into a ball; it will follow you and explode. It will chip a lot of HP off your agents, so best dodge it before it explodes.
Counter Torrent of Hits
The Notorious Dead End Butcher will gather ether in their hammer, and once it's full, they will unleash a torrent of attacks that can only be countered by switching via a Perfect Assist and repeatedly pressing the attack button.
Battle 1 Final Stage Best Teams
| Best Teams & Bangboo | Buff |
|---|---|
|
|
|
|
|
|
|
|
|
|
|
Required Stage 1-1 Guide
1-1 Stage Details
| Objectives |
|
|---|---|
| Enemies & Weakneses |
|
1-1 Best Teams
| Best Teams & Bangboo | Buff |
|---|---|
|
|
|
|
|
Threshold Simulation Battle 02 Easy
Battle 02 Final Stage Guide
| Final Stage Boss Information | ||
|---|---|---|
 Notorious - Pompey Notorious - Pompey
|
Wk. | |
| Res. | ||
| Enemy Details | ||
| • When the Agent hits the boss enemy with a Defensive Assist or Chain Attack, they applies 1 stack of Weakening to the target. For each stack of Weakening on the target, Agent CRIT DMG is increased by 10%.
When the boss enemy has 4 stacks of Weakening, Defensive Assist will deflect the boss enemy's attack, causing a Stagger effect. • Successfully triggering Perfect Assist grants 300 Performance Points. A maximum of 5,000 Performance Points can be obtained. • When an extra score multiplier is active in this stage, the Performance Points cap will increase accordingly. |
||
How to Beat Notorious Pompey
Stagger Notorious Pompey with Defensive Assists
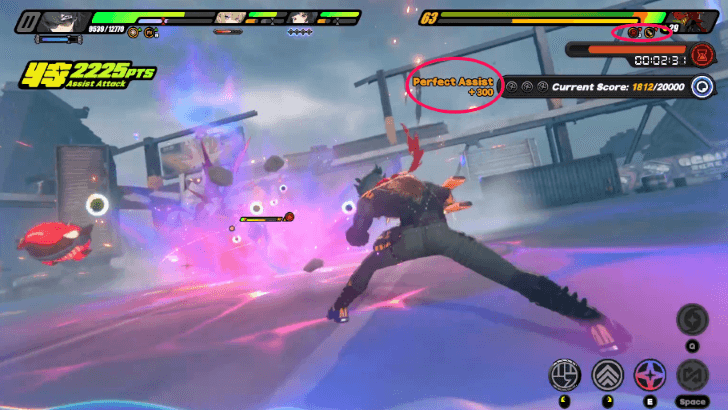
Notorious Pompey will have the gold or red Perfect Assist cues during its AoE attacks and launch to an Agent with a quick strike—Counter Notorious Pompey's attacks with Perfect Assists or Dodge Counters.
Build up the Weakening stacks using Chain Attacks and Defensive Assists. Use the Defensive Assist at four stacks to stagger the boss and make an opening; use Agent Ultimates when it's stunned.
You can also earn more Performance Points by landing Perfect Assists; therefore, using the attack cues to counter is essential.
Battle 2 Final Stage Best Teams
| Best Teams & Bangboo | Buff |
|---|---|
|
|
|
|
|
|
|
|
|
|
|
Required Stage 2-1 Guide
2-1 Stage Details
| Objectives |
|
|---|---|
| Enemies & Weakneses |
|
2-1 Best Teams
| Best Teams & Bangboo | Buff |
|---|---|
|
|
|
|
|
Optional Stage 2-2 Guide
2-2 Stage Details
| Objectives |
|
|---|---|
| Enemies & Weakneses |
|
2-2 Best Teams
| Best Teams & Bangboo | Buff |
|---|---|
|
|
|
|
|
|
|
|
Threshold Simulation Battle 03 Easy
Battle 03 Final Stage Guide
| Final Stage Boss Information | ||
|---|---|---|
 Typhon Destroyer Typhon Destroyer
|
Wk. | |
| Res. | ||
| Enemy Details | ||
| • Agents inflict Overwhelmed when landing a Defensive Assist hit against a Boss enemy, and 3 stacks of Overwhelmed when accumulating 3 Defensive Assist hits and triggering Impaired. Each stack of Overwhelmed increases Daze by 15%, and Chain Attack and Ultimate DMG taken while Stunned by 10%. The enemy will fix the impaired parts and reset the impairment level while charging, and will reset its Overwhelmed stacks after recovering from Stun.
• Assist Points are not consumed for this battle. • Successfully triggering a Perfect Assist grants 200 Performance Points. • Successfully causing Impaired grants 600 Performance Points. A maximum of 5,000 Performance Points can be obtained. • When an extra score multiplier is active in this stage, the Performance Points cap will increase accordingly. |
||
How to Beat Typhon Destroyer
Frequently Dodge or Execute Assists
From the get-go, expect the Typhon Destroyer to be increasingly aggressive in its attacks, so it's best to either dodge or do assists to avoid tanking too much damage against this enemy.
Inflict Shock Effect
The best way to defeat the Typhon Destroyer is to inflict the Shock effect, slow it down, and stagger it. This will give you the opportunity to beat it a lot faster!
Battle 3 Final Stage Best Teams
| Best Teams & Bangboo | Buff |
|---|---|
|
|
|
|
|
|
|
|
|
|
|
Required Stage 3-1 Guide
3-1 Stage Details
| Objectives |
|
|---|---|
| Enemies & Weakneses |
|
3-1 Best Teams
| Best Teams & Bangboo | Buff |
|---|---|
|
|
|
|
|
Required Stage 3-2 Guide
3-2 Stage Details
| Objectives |
|
|---|---|
| Enemies & Weakneses |
|
3-2 Best Teams
| Best Teams & Bangboo | Buff |
|---|---|
|
|
|
|
|
Optional Stage 3-3 Guide
3-3 Stage Details
| Objectives |
|
|---|---|
| Enemies & Weakneses |
|
3-3 Best Teams
| Best Teams & Bangboo | Buff |
|---|---|
|
|
|
|
|
|
|
|
Threshold Simulation Last Node Easy
Last Node Final Stage Guide
| Final Stage Boss Information | ||
|---|---|---|
 Miasma Priest Miasma Priest
|
Wk. | |
| Res. | ||
| Enemy Details | ||
| • When the Miasma Priest switches phase, their Anomaly Buildup RES increases by 10% and CRIT DMG taken increases by 30%. This effect can stack up to 2 times and is cleared when Miasmic Shield breaks.
• When an Agent successfully performs 3 Defensive Assists within 3 seconds, earn 1,000 Performance Points. A maximum of 5,000 Performance Points can be obtained. • When an extra score multiplier is active in this stage, the Performance Points cap will increase accordingly. |
||
How to Beat Miasma Priest
Use Defense Assists for Points
To gain a maximum of 5,000 Performance Points, you must continuously perform three consecutive Defensive Assists during the Miasma Priest's barrage of attacks.
Use Ultimates Often
Whenever the Miasma Priest reels away to gather power, counter it by activating an agent's ultimate as it strikes to avoid taking damage while also dealing it.
Last Node Final Stage Best Teams
| Best Teams & Bangboo | Buff |
|---|---|
|
|
|
|
|
|
|
|
|
|
|
Required Stage 4-1 Guide
4-1 Stage Details
| Objectives |
|
|---|---|
| Enemies & Weakneses |
|
4-1 Best Teams
| Best Teams & Bangboo | Buff |
|---|---|
|
|
|
|
|
|
|
|
Required Stage 4-2 Guide
4-2 Stage Details
| Objectives |
|
|---|---|
| Enemies & Weakneses |
|
4-2 Best Teams
| Best Teams & Bangboo | Buff |
|---|---|
|
|
|
|
|
|
|
|
Optional Stage 4-3 Guide
4-3 Stage Details
| Objectives |
|
|---|---|
| Enemies & Weakneses |
4-3 Best Teams
| Best Teams & Bangboo | Buff |
|---|---|
|
|
|
|
|
How to Play Threshold Simulation
Threshold Simulation Guide
- Plan For Multiple Squads
- Select Appropriate Buffs
- Clear Stages to Increase Score Multiplier
- Aim For High Scores Against the Boss
Plan For Multiple Squads
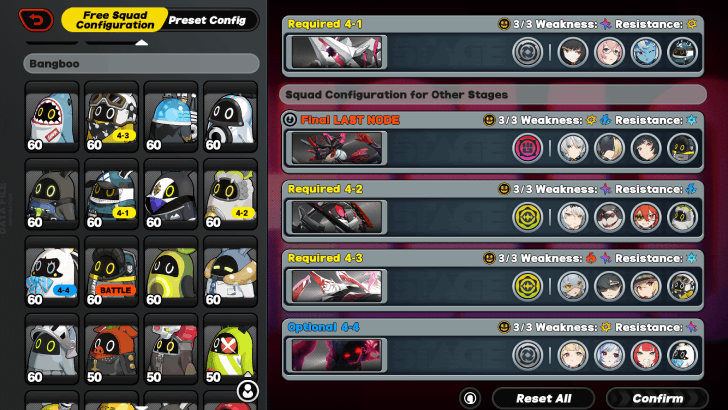
When progressing through Threshold Simulation, Agents and Bangboo cannot be used again within a battle node. Each stage within a battle node will require unique teams.
Due to this restriction, you will need to take a look at enemy weaknesses and plan your teams accordingly.
Select Appropriate Buffs
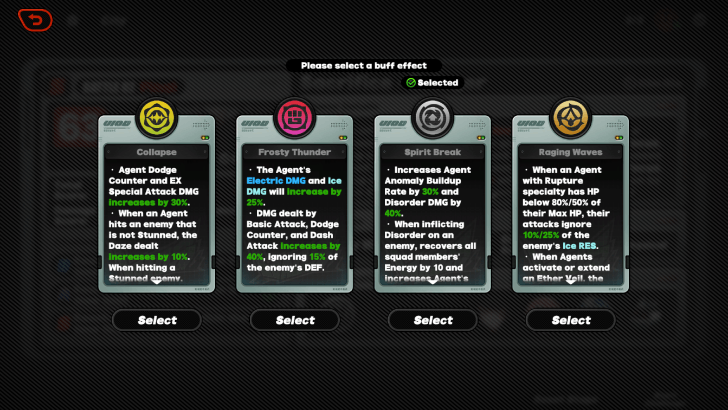
Each stage in Threshold Simulation will come with a set of buffs you can apply to your team. Choose the one that works best with your current lineup for a better chance at clearing all objectives.
Clear Stages to Increase Score Multiplier
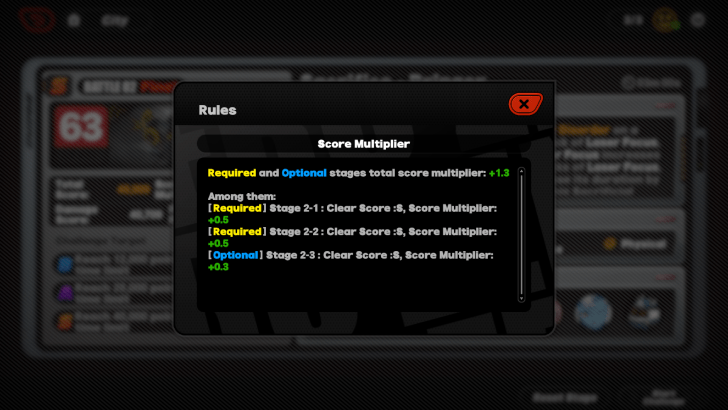
Clearing fights before the final one in each battle node will increase your score multiplier against the boss. Clearing most of these encounters is required to continue progress, but some will be optional.
Aim For High Scores Against the Boss
Once you take on the boss of a battle node, aim for a high score to ensure you get all of the rewards. To do this, be sure to once again select the appropriate buff for the team you are using and take advantage of boss mechanics.
What is Threshold Simulation - Branching Echoes?
New Combat Game Mode
Threshold Simulation - Branching Echoes is a new game mode coming in Version 2.3. Here, you might fight through Combat Nodes that have three stages within and make a choice to reach an ending in Story Nodes!
Threshold Simulation Rewards
Easy Mode Rewards
| Easy Mode Rewards |
|---|
You can earn up to 380 Polychromes by completing all objectives in Threshold Simulation Easy Mode. Easy Mode is available permanently and rewards do not reset.
Hard Mode Rewards
| Hard Mode Rewards |
|---|
You can earn up to 500 Polychromes by completing all objectives in Threshold Simulation Hard Mode. Hard Mode is only available for set periods and rewards do reset with each new period.
Threshold Simulation - Branching Echoes Release Date
Released in Version 2.3
| Zenless Zone Zero 2.3 Release Date | |
|---|---|
 |
|
| Release Date | October 15, 2025 |
Threshold Simulation: Branching Echoes was released on October 15, 2025 during Version 2.3. The new combat mode was first announced during the 2.3 Livestream.
2.3 Release Date and Banners Guide
Zenless Zone Zero Related Guides
Guides by Category
Author

Threshold Simulation - Myriad Endgame Combat Guide
Please participate in our site
improvement survey
03/2026
improvement survey
03/2026
Would you assist in
improving Game8's site?
improving Game8's site?

×
We are listening to our users' valuable opinions and discussing how to act on them.
The information collected through this survey will be used for the purpose of improving our services. In addition, the information will only be disclosed a part of a statistic in a format that will not allow identification of personal information.
Begin Survey
Not Now
×
Please rate each item regarding Game8.co's Advertisements.
Amount of Ads
Very Dissatisfied
Somewhat Dissatisfied
Fine
Somewhat Satisfied
Highly Satisfied
Placement of Ads
Timing of Ad Display
Ad Loading Speed
Safeness of Ads
Content of Ads
×
Please rate each item regarding Game8.co's Quality of Articles.
Amount of information
Very Dissatisfied
Somewhat Dissatisfied
Fine
Somewhat Satisfied
Highly Satisfied
Frequency of updates
Speed of new information
Accuracy of articles
Understandibility of articles
Readability of sentences
×
Please rate each item regarding Game8.co's Usability of the Site.
Ease of finding information
Very Dissatisfied
Somewhat Dissatisfied
Fine
Somewhat Satisfied
Highly Satisfied
Loading Speed
Use of Color
Font Size
Visibility of Images
Easy to Understand Layout
×
Please rate each item regarding Game8.co's Message Boards, Comments.
Ease of Writing
Very Dissatisfied
Somewhat Dissatisfied
Fine
Somewhat Satisfied
Highly Satisfied
Readability
Ease in Finding Information
Comment Quality
Comment Quantity
Admin Response
×
Please rate each item regarding Game8.co's Site's new design.
Please rate our site's new design
Very Dissatisfied
Somewhat Dissatisfied
Fine
Somewhat Satisfied
Highly Satisfied
Do you think that the website's design change makes the site easier to use?
Has the new design made it easier for you to find information on the site?
Has the new design improved the overall visual appeal of the site?
How would you rate your overall satisfaction with the new design of the site?
×
How likely are you to recommend Game8 to someone you know?
Very Unlikely
0
1
2
3
4
5
6
7
8
9
10
Very Likely
If you have other opinions regarding potential improvement to the website, please share them with us. We would appreciate your honest opinion.
Note: This is a free response section, so you can proceed without entering anything.
Note: Please be sure not to enter any kind of personal information into your response.
Note: Please be sure not to enter any kind of personal information into your response.
×
Thank You
×
Thank you for participating in our survey! Your answers will help us to improve the quality of our website and services.
We hope you continue to make use of Game8.
We hope you continue to make use of Game8.
Close
Rankings
- We could not find the message board you were looking for.
Gaming News


![Pokémon FireRed Review [Switch] | As Beautiful as the Day We Left Them](https://img.game8.co/4427482/3d5f77da7bd7c1ed4fa09591077cd864.jpeg/thumb)
Popular Games

Genshin Impact Walkthrough & Guides Wiki
Honkai: Star Rail Walkthrough & Guides Wiki
Umamusume: Pretty Derby Walkthrough & Guides Wiki
Pokemon Pokopia Walkthrough & Guides Wiki
Resident Evil Requiem (RE9) Walkthrough & Guides Wiki
Monster Hunter Wilds Walkthrough & Guides Wiki
Wuthering Waves Walkthrough & Guides Wiki
Arknights: Endfield Walkthrough & Guides Wiki
Pokemon FireRed and LeafGreen (FRLG) Walkthrough & Guides Wiki
Pokemon TCG Pocket (PTCGP) Strategies & Guides Wiki


Recommended Games
Fire Emblem Heroes (FEH) Walkthrough & Guides Wiki
Diablo 4: Vessel of Hatred Walkthrough & Guides Wiki
Yu-Gi-Oh! Master Duel Walkthrough & Guides Wiki
Super Smash Bros. Ultimate Walkthrough & Guides Wiki
Pokemon Brilliant Diamond and Shining Pearl (BDSP) Walkthrough & Guides Wiki
Elden Ring Shadow of the Erdtree Walkthrough & Guides Wiki
Monster Hunter World Walkthrough & Guides Wiki
The Legend of Zelda: Tears of the Kingdom Walkthrough & Guides Wiki
Persona 3 Reload Walkthrough & Guides Wiki
Cyberpunk 2077: Ultimate Edition Walkthrough & Guides Wiki


All rights reserved
Copyright © 2024 HoYoverse, COGNOSPHERE. All Rights Reserved.
The copyrights of videos of games used in our content and other intellectual property rights belong to the provider of the game.
The contents we provide on this site were created personally by members of the Game8 editorial department.
We refuse the right to reuse or repost content taken without our permission such as data or images to other sites.
How to activate 2nd ending?