Cumulative & Adversity Assessment Day 4 Guide
☆ New: Tier List Maker & Co-Op Board!
★ 2.7: Nangong Yu, Cissia, & 2.7 Livestream
☆ 2.6 Phase 1: Sunna & Yixuan
★ 2.6 Phase 2: Aria & Yuzuha
☆ Tier Lists: Agents | W-Engines | Bangboos | Teams
★ Redeem Codes for free Polychromes!
Cumulative & Adversity Assessment is the Band of Brave Bangboo Day 4 challenge in Zenless Zone Zero (ZZZ) 2.2. See all Cumulative & Adversity Assessment Day 4 guides, best Bangboo placements, and rewards here!
| Band of Brave Bangboo Event Guides | ||
|---|---|---|
 Day 1 Day 1 |
 Day 2 Day 2 |
|
 Day 3 Day 3 |
 Day 4 Day 4 |
|
List of Contents
Band of Brave Bangboo Day 4 Guide
All Tower Defense Bangboo Day 4 Stages
| Stage | Summarized Placements |
|---|---|
| Adversity - Cumulative Assessment 6 | 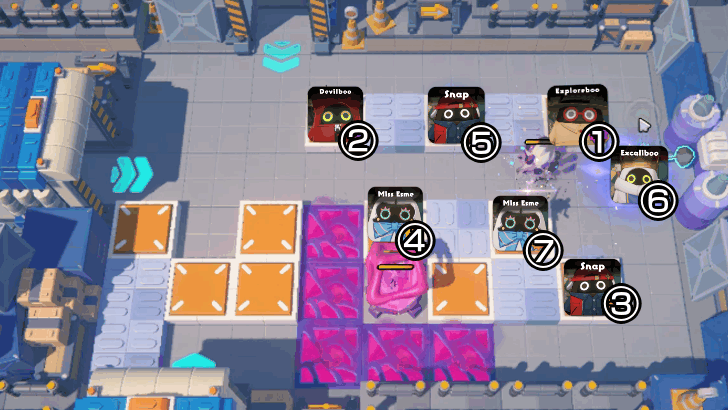 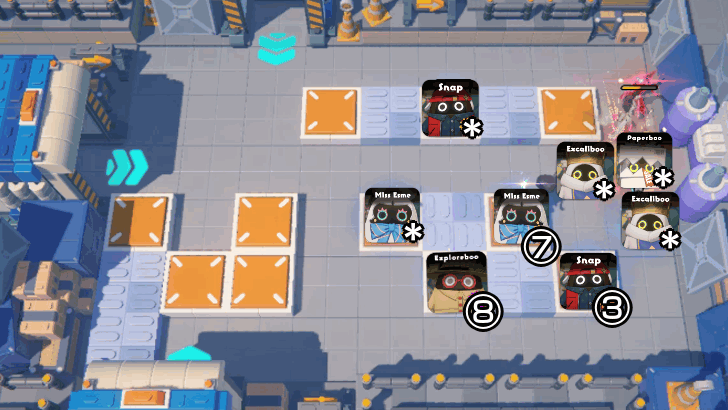 |
| Adversity - Cumulative Assessment 5 |  |
| Cumulative Assessment 4 | 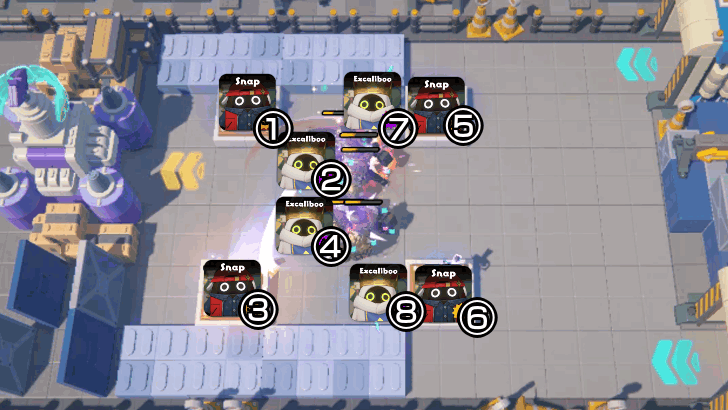 |
| Cumulative Assessment 3 | 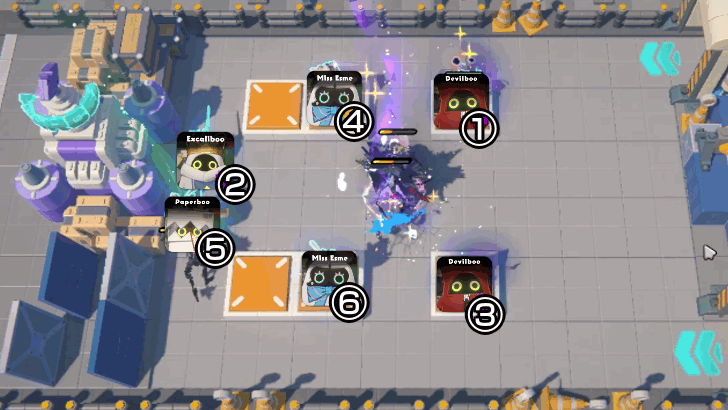 |
| Cumulative Assessment 2 | 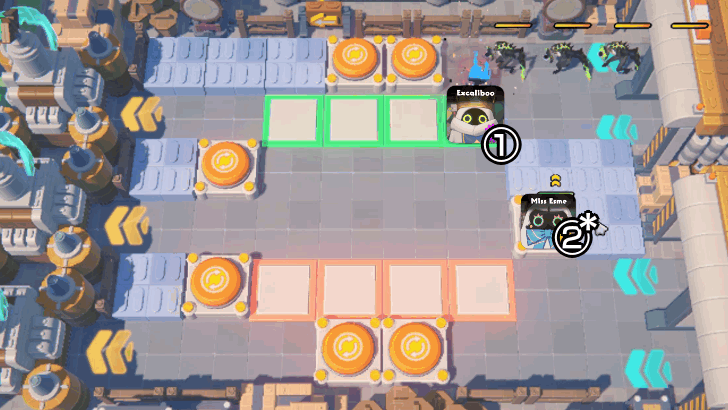 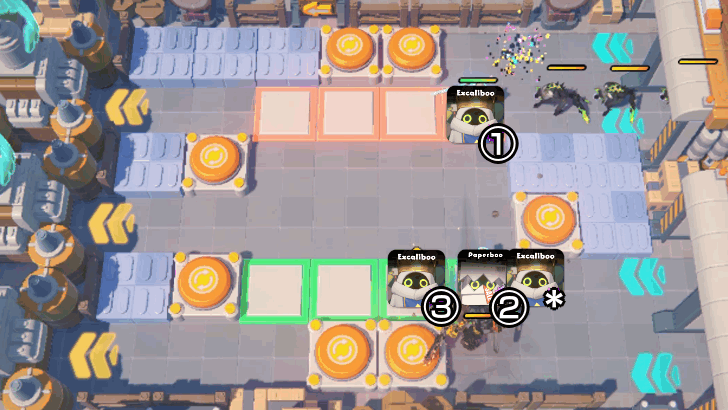 |
| Cumulative Assessment 1 | 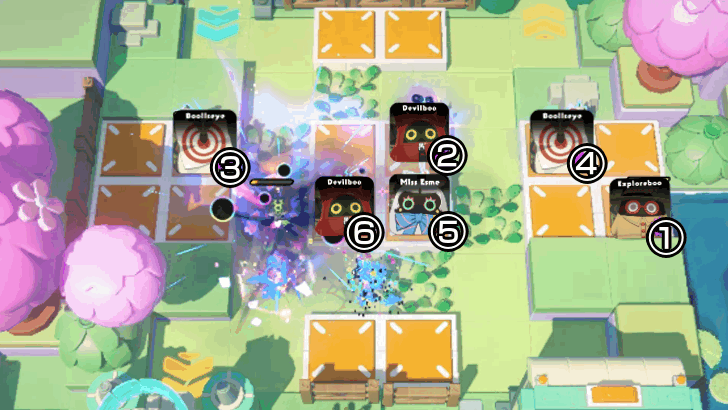 |
Adversity - Cumulative Assessment 6 Guide
| Adversity - Cumulative Assessment 6 | |||
|---|---|---|---|
|
|||
| ① | Placement | * | Removeable |
- During Phase 1, place Kind Bangboo (Exploreboo) first at the elevated position near the exit.
- Then put a Rapid Bangboo (Devilboo) near the first entrance and a Rapid Bangboo (Snap) at the bottom row near the exit.
- Acquire Kind Bangboo (Miss Esme) and put it in the middle row.
- Place another Snap in the middle of the top row.
- Wait for the other wave on the bottom row to spawn and place Brave Bangboo (Excaliboo) at the exit.
- Place the second Miss Esme beside the first Miss Esme.
- Once the Flame Cantor appears, upgrade the first Miss Esme to keep your units alive and always have a Miss Esme at those same positions!
- Make sure to always have any Brave Bangboo and replace the fallen ones immediately at the exit to prevent the enemies from escaping.
- Repurchase and upgrade Kind Bangboo (Exploreboo) to keep the cost going, so you can always replace a fallen unit.
Be prepared for Phase 2, as multiple Flame Cantors will unleash their skills, which rapidly drain your units’ HP. Deploying two Miss Esmes is the key to keeping your units alive and sustained throughout the fight.
Always have 2 Miss Esme at the center, 1 Exploreboo, Snap as your Rapid Bangboo, and at least 2 Excaliboos at the exit to complete this stage.
Adversity - Cumulative Assessment 6 Enemies
| Enemies | SPD | Threat Lv. |
|---|---|---|
| Medium | Super High | |
| Fast | Medium | |
| Slow | Super High | |
| Slow | Super High | |
| Slow | Low | |
| Fast | Low | |
| Slow | Low | |
| Slow | Medium |
Adversity - Cumulative Assessment 5 Guide
| Adversity - Cumulative Assessment 5 | |||
|---|---|---|---|
|
|||
| ① | Placement | * | Removeable |
- Place Kind Bangboo (Exploreboo) at the elevated position near the exit.
- Quickly put Rapid Bangboo (Snap) in the center near the entrance to slow down the incoming enemies.
- A new enemy wave will spawn at the top, so put a Rapid Bangboo (Boollseye) at the top row along with another Snap.
- Place Brave Bangboo (Excaliboo) in the bottom row.
- Once you have enough cost, get Kind Bangboo (Miss Esme) for the center to heal the nearby units, especially the Excaliboo.
- Upgrade your Rapid Bangboo units once you have enough cost and add another Snap at the center.
- Keep an eye on the Excaliboo and replace it with another Excaliboo to keep the enemies from advancing.
The strategy for this stage is to keep a Brave Bangboo (Excaliboo) near the exit, and upgrading your Rapid Bangboos can quickly wipe out the enemy waves.
You can remove and replace your units once they disappear, and prioritize placing the units in the center row as the enemies circle that area.
Deploying Snap is the best way to slow down the enemies while Excaliboo tanks the damage, and Miss Esme keeps your units alive.
Adversity - Cumulative Assessment 5 Enemies
| Enemies | SPD | Threat Lv. |
|---|---|---|
| Medium | Super High | |
| Medium | Super High | |
| Fast | Medium | |
| Fast | Medium | |
| Slow | Low | |
| Slow | Low | |
| Slow | Medium |
Cumulative Assessment 4 Guide
| Cumulative Assessment 4 | |||
|---|---|---|---|
|
|||
| ① | Placement | * | Removeable |
- Place Rapid Bangboo (Snap) first at the top corner.
- Then place Brave Bangboo (Excaliboo) below it.
- Get another Snap, then place it on the opposite side below and add another Excaliboo
- Place another Snap on the front side and another one below.
- Deploy Excaliboos at the sides as well to maximize the damage and the upgraded range.
- Whenever an Excaliboo disappears, immediately repurchase and place it in the same position.
For the fourth assessment, you can only deploy Snap and Excaliboo, which are the strongest units in the event. Follow the arrangements for each bangboo and upgrade them as soon as possible!
The biggest threat would be the Rampant Brute targeting the Excaliboos, so immediately replace the unit once it has fallen to prevent the enemies from advancing.
Cumulative Assessment 4 Enemies
| Enemies | SPD | Threat Lv. |
|---|---|---|
| Medium | Super High | |
| Fast | Low | |
| Fast | Low | |
| Slow | Low | |
| Fast | Medium | |
| Fast | Medium | |
| Fast | Medium |
Cumulative Assessment 3 Guide
| Cumulative Assessment 3 | |||
|---|---|---|---|
|
|||
| ① | Placement | * | Removeable |
- Deploy Devilboo near the entrance where the first wave of enemies will come out.
- Then add Excaliboo on the ground near the exit.
- Put another Devilboo on the other entrance.
- After that, put Miss Esme near the first Devilboo.
- Place Paperboo beside Excaliboo to prevent the enemies from advancing.
- Place another Miss Esme near the second Devilboo.
There will be no Explorerboo for this stage, which means you must spend your points efficiently. Deploy a Brave Bangboo near the exit, have Rapid Bangboos near the entrance, then place a Kind Bangboo at the center.
Cumulative Assessment 3 Enemies
| Enemies | SPD | Threat Lv. |
|---|---|---|
| Slow | Super High | |
| Slow | Low | |
| Slow | Low | |
| Fast | Medium |
Cumulative Assessment 2 Guide
| Cumulative Assessment 2 | |||
|---|---|---|---|
|
|||
| ① | Placement | * | Removeable |
- Place Excaliboo on the top row near the entrance and immediately upgrade it.
- Place Miss Esme on the elevated button at the right side near the entrance to switch the buff.
- Remove the Miss Esme and place another Excaliboo on the bottom row.
- Once the bottom row Excaliboo falls, replace it immediately with Paperboo.
- Then place another Excaliboo behind the Paperboo.
The strategy here is to deploy Excaliboo and upgrade it as soon as you place it, so it will last longer in the field and gain additional range.
Lumberjack in the final wave is the only threat to this stage. Make sure that your units are upgraded and have Paperboo to tank its damage!
Cumulative Assessment 2 Enemies
| Enemies | SPD | Threat Lv. |
|---|---|---|
| Medium | Super High | |
| Slow | Low | |
| Fast | Medium |
Cumulative Assessment 1 Guide
| Cumulative Assessment 1 | |||
|---|---|---|---|
|
|||
| ① | Placement | * | Removeable |
- Place Exploreboo on the far right side.
- After that, put a Rapid Bangboo (Devilboo) on the elevated center position.
- Place Boollseye on the left side and immediately upgrade it to increase the target range.
- Put another Boollseye on the opposite side to the right and upgrade it too.
- Place Miss Esme at the center just below the Devilboo.
- If you have enough costs, deploy another Devilboo beside Miss Esme, then proceed with upgrading all of your units using the extra points.
The enemies will circle the center area, so having an upgraded Boollseye can target all of the enemies regardless of their position.
Cumulative Assessment 1 Enemies
| Enemies | SPD | Threat Lv. |
|---|---|---|
| Slow | Low | |
| Slow | Low | |
| Fast | Medium |
Cumulative & Adversity Assessment Details
Best Bangboos to Use
| Bangboo | Details |
|---|---|
| |
• Deployable Position: Ground • Skills: Block up to 2 enemies while continuously attacking 1 enemy within range. • Adv. Skills: If not blocked, attack range increases and attacks all enemies in range. |
| |
• Deployable Position: Elevated • Skills: Continuously heals up to 3 allies within range. • Adv. Skills: Number of targets healed increased to 5. When healing less than 5 targets, deals additional damage to enemies. |
| |
• Deployable Position: Elevated • Skills: Continuously attack 1 enemy within range and slow them. • Adv. Skills: Attacks have a chance to immobilize enemies |
Featured Buff Items
| Item | Effect |
|---|---|
| When a Miasma Tumor is destroyed, gain 12 Assessment Points. | |
| Number of deployable Bangboo +1. | |
| Bangboo deal 25% more DMG to bosses. | |
| The required Assessment Points for Bangboo upgrades are reduced by 4 points. | |
| Bangoo slowly recover HP on Photosynthetic Chargers. |
Cumulative & Adversity Assessment Rewards
Band of Brave Bangboo Day 4 Rewards
| Objective | Rewards |
|---|---|
| Complete Cumulative Assessment 01 |
|
| Complete Cumulative Assessment 02 |
|
| Complete Cumulative Assessment 03 |
|
| Complete Cumulative Assessment 04 |
|
| Complete Adversity - Cumulative Assessment 05 |
|
| Complete Adversity - Cumulative Assessment 06 |
|
Cumulative & Adversity Assessment Information
Part of the Band of Brave Bangboo Event

Cumulative & Adversity Assessment is a Bangboo battle mode within the Band of Brave Bangboo event. During the event, Proxies must deploy Bangboo units to battle against the Ethereals.
Band of Brave Bangboo Event Guide
Zenless Zone Zero Related Guides

Band of Brave Bangboo Event Guide
Band of Brave Bangboo Guides
| Unlock | Stage |
|---|---|
| Sept. 05 | |
| Sept. 06 | |
| Sept. 07 | |
| Sept. 08 |
|
Other Events

Comment
phase 2 of adversity cumulative assessment 06 day 4 i mean
Author

Cumulative & Adversity Assessment Day 4 Guide
Rankings
- We could not find the message board you were looking for.
Gaming News

![The Liar Princess and the Blind Prince Review [PC] | Lovely to Look at but Tedious to Play](https://img.game8.co/4442586/8d95f5faf05780f1765ce7e0938bd825.jpeg/show)
![The Liar Princess and the Blind Prince Review [PC] | Lovely to Look at but Tedious to Play](https://img.game8.co/4442586/8d95f5faf05780f1765ce7e0938bd825.jpeg/thumb)
![Marathon Cryo Archive Map Teased as [REDACTED] on Selection Screen](https://img.game8.co/4442236/6357203e58172f6de57f1991e7c39b22.png/thumb)

Popular Games

Genshin Impact Walkthrough & Guides Wiki
Umamusume: Pretty Derby Walkthrough & Guides Wiki
Pokemon Pokopia Walkthrough & Guides Wiki
Honkai: Star Rail Walkthrough & Guides Wiki
Monster Hunter Stories 3: Twisted Reflection Walkthrough & Guides Wiki
Arknights: Endfield Walkthrough & Guides Wiki
Wuthering Waves Walkthrough & Guides Wiki
Zenless Zone Zero Walkthrough & Guides Wiki
Pokemon TCG Pocket (PTCGP) Strategies & Guides Wiki
Monster Hunter Wilds Walkthrough & Guides Wiki


Recommended Games
Diablo 4: Vessel of Hatred Walkthrough & Guides Wiki
Cyberpunk 2077: Ultimate Edition Walkthrough & Guides Wiki
Fire Emblem Heroes (FEH) Walkthrough & Guides Wiki
Yu-Gi-Oh! Master Duel Walkthrough & Guides Wiki
Super Smash Bros. Ultimate Walkthrough & Guides Wiki
Pokemon Brilliant Diamond and Shining Pearl (BDSP) Walkthrough & Guides Wiki
Elden Ring Shadow of the Erdtree Walkthrough & Guides Wiki
Monster Hunter World Walkthrough & Guides Wiki
The Legend of Zelda: Tears of the Kingdom Walkthrough & Guides Wiki
Persona 3 Reload Walkthrough & Guides Wiki


All rights reserved
Copyright © 2024 HoYoverse, COGNOSPHERE. All Rights Reserved.
The copyrights of videos of games used in our content and other intellectual property rights belong to the provider of the game.
The contents we provide on this site were created personally by members of the Game8 editorial department.
We refuse the right to reuse or repost content taken without our permission such as data or images to other sites.
THANK YOUUU, the last one was like impossible