 Mother Boomy
 Boisterous Roper
 Ruthless
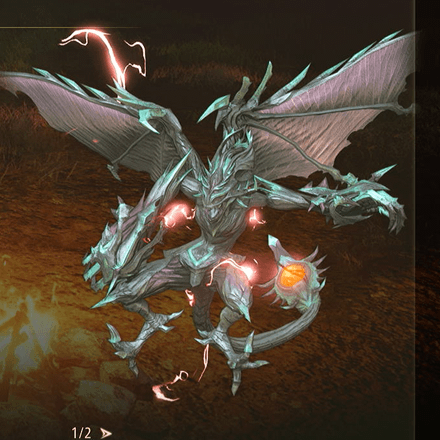 Cruel Keeper
 Grinymuk
 Toxidillo
 Polycephus
 Great Dragon
 Flamewrecker
 Relentless Charger
 Alpha Reaper
 Stormbringer
 Elemental
 Regent Bee
 Agony Keeper
 Thunderite
 Mantis
 Calamity Arms
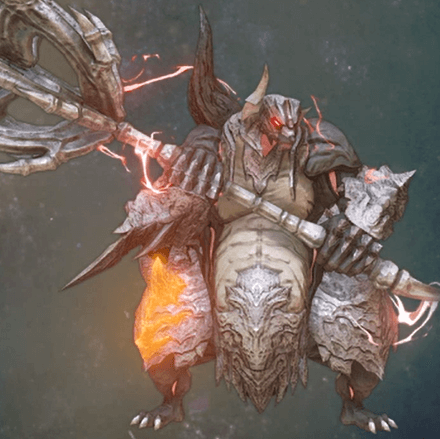 Masher Bull
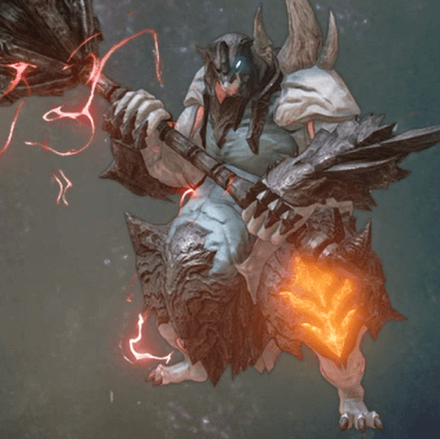 Masher Mare
 Sword Dancer
This survey will take about 1 minute.
Your answers will help us to improve our website.
Tales of Arise
Ezamamuk Boss Guide: Recommended Setup and How to Beat
☆ Earn bonuses before you start the DLC.
★ Clear campaign & sub-quests | Get max lvl
☆ Learn all the ingredients in this new Gourmet Saga!
★ Get all Beyond the Dawn Trophies with these guides:
☆ Ryugola Weapons | All Portraits | Hero of the Summit
This is a guide on how to beat Ezamamuk in Tales of Arise! Learn more about Ezamamuk's stats, weaknesses, attack patterns, and the best party setup including Artes and Equipment for this boss fight!
List of Contents
Ezamamuk Stats and General Info
Ezamamuk Location
| Map | Actual Location |
|---|---|
 |
 |
Ezamamuk only appears in Mount Dhiara - Mountain Base after accepting the sub-quest The Ultimate Zeugle.
The Ultimate Zeugle Sub-Quest Walkthrough: Rewards and How to Clear
Ezamamuk Stats
| Recommended Level: 55 | |||
|---|---|---|---|
 HP: 438950 |
|||
| Attack | 3660 | Defense | 1361 |
| Elemental Attack | 3328 | Elemental Defense | 1289 |
| Penetration | 2543 | Resistance | 2677 |
| Weakness | Resistance | ||
Item to Drop
| Astral Flower | Lustrous Astral Crystal (5) |
How to Beat Ezamamuk
| Tips |
|---|
Focus on Its Tail
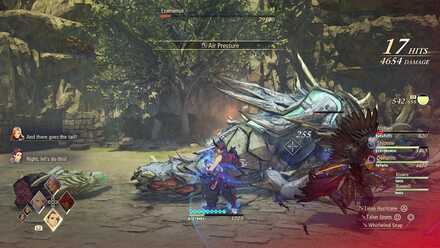
Ezamamuk can whip up a tornado that summons lightning on your party members. This is its most bothersome attack as it can interrupt your combo as well as inflict Paralysis, making it more difficult to dodge its other powerful attacks.
However, if you can achieve a core break on its tail weak point, Ezamamuk will no longer be able to use this attack.
Use Recovery Items

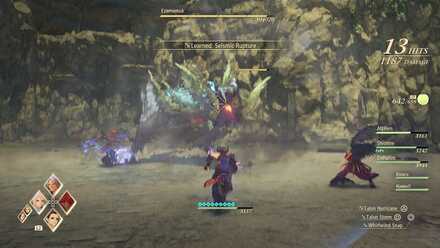
Ezamamuk can both deal and take a lot of damage. Due to its high health pool and powerful attacks, the fight is likely to take longer than most gigant fights. Be sure to bring lots of HP and CP recovery items and don't forget to use them in battle.
Recommended Party Setup for Ezamamuk
Party Members
| Leader | Members | ||
|---|---|---|---|
 Law Law
Lv. 55 |
 Alphen Alphen
Lv. 55 |
 Dohalim Dohalim
Lv. 55 |
 Shionne Shionne
Lv. 55 |
Bring two healers
Dohalim's arsenal of healing artes and Dark artes makes him a perfect addition to the team in this battle. In cases that one of your healers is taken out, the other can use Resurrection. Needless to say, you need to bring lots of recovery items, especially CP recovering ones, to increase you party's survivability.
Switch between Law and Alphen
We recommend controlling Alphen in this fight as he's tankier than Law. However, if you're confident that you can avoid getting hit as much as possible to maintain Law's Awakening, use Law instead as he can deal much more damage with this perk.
Law Equipment and Artes
|
Law
Lv. 55 |
Equipment |
|---|---|
| Divine Wrath | |
| Prismatic Jacket | |
| Zephyr's Ring | |
| Ground Artes | Aerial Artes |
| First Set | |
| Talon Hurricane | Eagle Assault |
| Talon Storm | Fang Bolero |
| Whirlwind Snap | Inferno Punch |
| Second Set | |
| Steel | - |
| - | - |
| - | - |
Maintain Awakening status
Law's Awakening makes his attacks get stronger the more hits he lands without getting damaged. You'll need to be careful attacking Ezamamuk's tail as it can suddenly attack while you're performing a combo.
Alphen Equipment and Artes
|
Alphen
Lv. 55 |
Equipment |
|---|---|
| El Vahf | |
| Mumbane | |
| Pierce Emblem | |
| Ground Artes | Aerial Artes |
| First Set | |
| Lightning Thrust | Mirage |
| Swallow Blade | Stardust |
| Double Demon Fang | Hurricane Thrust |
| Second Set | |
| - | - |
| - | - |
| - | - |
Use boost attack to boost break
Alphen's boost attack won't down Ezamamuk for long but it can still help to interrupt its attack as well as leave it defenseless for a short while.
Dohalim Equipment and Artes
|
Dohalim
Lv. 55 |
Equipment |
|---|---|
| Hanuman Shaft | |
| Duality | |
| Magic Emblem | |
| Ground Artes | Aerial Artes |
| First Set | |
| Elusive Diety | Tornado Drive |
| Negative Gate | Demon's Lance |
| Solitary Captivity | - |
| Second Set | |
| Heal | - |
| Resurrection | - |
| Regenerate | - |
Spam Dark artes
Dohalim can spam Demon's Lance in midair to exploit Ezamamuk's weakness. This arte has a short attack animation so you can almost immediately dodge when Ezamamuk attacks.
Shionne Equipment and Artes
|
Shionne
Lv. 55 |
Equipment |
|---|---|
| Sclopetum Rene | |
| Wedding Dress | |
| Magic Emblem | |
| Ground Artes | Aerial Artes |
| First Set | |
| Gravitas Field | Scorched Earth |
| Burning Strike | Tres Ventos |
| Magna Ray | Toxicity |
| Second Set | |
| Resurrection | - |
| Healing Circle | - |
| First Aid | - |
Attack from a safe distance
Shionne will be your main healer in this battle so you must keep her alive. Ezamamuk's attacks cover a wide range so be sure to keep Shionne on a safe distance so she doesn't get taken out while casting artes.
Ezamamuk Attack Patterns
Crush

Chomps twice while moving forward. After the second chomp, Ezamamuk will swing its tail forward then slams the ground with it thrice.
Roar
Deal damage and stagger everyone around Ezamamuk with a loud roar. This attack can reach you even if you're attacking Ezamamuk's tail.
Flame Breath
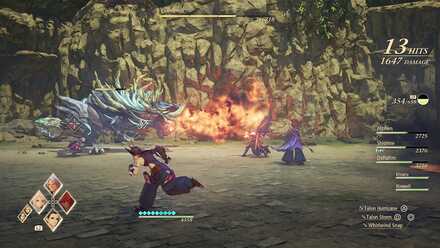
Breathes fire in an arc in front of Ezamamuk. It will move its head slowly while breathing fire so you have enough time to get behind it and avoid the attack.
Maelstrom
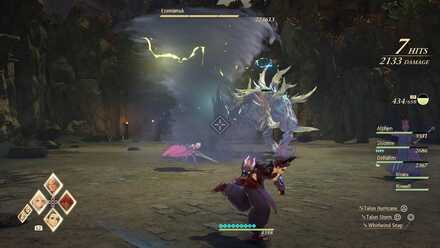
Uses its tail to summon a tornado that can also send out lightning strikes on your party. The lightning strikes will track the movement of its target and can inflict Paralysis on anyone hit.
The tornado will remain for a few more seconds and will deal damage on contact, but you can dodge into it on purpose to trigger a perfect dodge and perform a counter edge.
Divine Eraser

Charges for a short moment and unleashes a powerful beam from its mouth. This attack is easy to avoid unless you're casting an arte or in mid-combo right in front of Ezamamuk.
Fire Blast

Releases a fireball to the ground and hops backward. This attack is usually followed by either a flame breath attack or a powerful beam attack.
Tales of Arise Related Guides

List of Gigants
Author
Ezamamuk Boss Guide: Recommended Setup and How to Beat
Please participate in our site
improvement survey
03/2026
improvement survey
03/2026
Would you assist in
improving Game8's site?
improving Game8's site?

×
We are listening to our users' valuable opinions and discussing how to act on them.
The information collected through this survey will be used for the purpose of improving our services. In addition, the information will only be disclosed a part of a statistic in a format that will not allow identification of personal information.
Begin Survey
Not Now
×
Please rate each item regarding Game8.co's Advertisements.
Amount of Ads
Very Dissatisfied
Somewhat Dissatisfied
Fine
Somewhat Satisfied
Highly Satisfied
Placement of Ads
Timing of Ad Display
Ad Loading Speed
Safeness of Ads
Content of Ads
×
Please rate each item regarding Game8.co's Quality of Articles.
Amount of information
Very Dissatisfied
Somewhat Dissatisfied
Fine
Somewhat Satisfied
Highly Satisfied
Frequency of updates
Speed of new information
Accuracy of articles
Understandibility of articles
Readability of sentences
×
Please rate each item regarding Game8.co's Usability of the Site.
Ease of finding information
Very Dissatisfied
Somewhat Dissatisfied
Fine
Somewhat Satisfied
Highly Satisfied
Loading Speed
Use of Color
Font Size
Visibility of Images
Easy to Understand Layout
×
Please rate each item regarding Game8.co's Message Boards, Comments.
Ease of Writing
Very Dissatisfied
Somewhat Dissatisfied
Fine
Somewhat Satisfied
Highly Satisfied
Readability
Ease in Finding Information
Comment Quality
Comment Quantity
Admin Response
×
Please rate each item regarding Game8.co's Site's new design.
Please rate our site's new design
Very Dissatisfied
Somewhat Dissatisfied
Fine
Somewhat Satisfied
Highly Satisfied
Do you think that the website's design change makes the site easier to use?
Has the new design made it easier for you to find information on the site?
Has the new design improved the overall visual appeal of the site?
How would you rate your overall satisfaction with the new design of the site?
×
How likely are you to recommend Game8 to someone you know?
Very Unlikely
0
1
2
3
4
5
6
7
8
9
10
Very Likely
If you have other opinions regarding potential improvement to the website, please share them with us. We would appreciate your honest opinion.
Note: This is a free response section, so you can proceed without entering anything.
Note: Please be sure not to enter any kind of personal information into your response.
Note: Please be sure not to enter any kind of personal information into your response.
×
Thank You
×
Thank you for participating in our survey! Your answers will help us to improve the quality of our website and services.
We hope you continue to make use of Game8.
We hope you continue to make use of Game8.
Close
Rankings
- We could not find the message board you were looking for.
Gaming News


![Everwind Review [Early Access] | The Shaky First Step to A Very Long Journey](https://img.game8.co/4440226/ab079b1153298a042633dd1ef51e878e.png/thumb)

![Monster Hunter Stories 3 Review [First Impressions] | Simply Rejuvenating](https://img.game8.co/4438641/2a31b7702bd70e78ec8efd24661dacda.jpeg/thumb)
Popular Games

Genshin Impact Walkthrough & Guides Wiki
Honkai: Star Rail Walkthrough & Guides Wiki
Umamusume: Pretty Derby Walkthrough & Guides Wiki
Pokemon Pokopia Walkthrough & Guides Wiki
Resident Evil Requiem (RE9) Walkthrough & Guides Wiki
Monster Hunter Wilds Walkthrough & Guides Wiki
Wuthering Waves Walkthrough & Guides Wiki
Arknights: Endfield Walkthrough & Guides Wiki
Pokemon FireRed and LeafGreen (FRLG) Walkthrough & Guides Wiki
Pokemon TCG Pocket (PTCGP) Strategies & Guides Wiki


Recommended Games
Diablo 4: Vessel of Hatred Walkthrough & Guides Wiki
Fire Emblem Heroes (FEH) Walkthrough & Guides Wiki
Yu-Gi-Oh! Master Duel Walkthrough & Guides Wiki
Super Smash Bros. Ultimate Walkthrough & Guides Wiki
Pokemon Brilliant Diamond and Shining Pearl (BDSP) Walkthrough & Guides Wiki
Elden Ring Shadow of the Erdtree Walkthrough & Guides Wiki
Monster Hunter World Walkthrough & Guides Wiki
The Legend of Zelda: Tears of the Kingdom Walkthrough & Guides Wiki
Persona 3 Reload Walkthrough & Guides Wiki
Cyberpunk 2077: Ultimate Edition Walkthrough & Guides Wiki


All rights reserved
© BANDAI NAMCO Entertainment America Inc. All third party content, brands, names, and logos are used under license and remain property of their respective owners. All rights reserved.
The copyrights of videos of games used in our content and other intellectual property rights belong to the provider of the game.
The contents we provide on this site were created personally by members of the Game8 editorial department.
We refuse the right to reuse or repost content taken without our permission such as data or images to other sites.