This survey will take about 1 minute.
Your answers will help us to improve our website.
Tales of Arise
Mahag Saar Walkthrough: Sub-Quests, Owl Locations, and Boss Strategy
☆ Earn bonuses before you start the DLC.
★ Clear campaign & sub-quests | Get max lvl
☆ Learn all the ingredients in this new Gourmet Saga!
★ Get all Beyond the Dawn Trophies with these guides:
☆ Ryugola Weapons | All Portraits | Hero of the Summit

This is a walkthrough to the Mahag Saar section of Tales of Arise! Read on to learn how to clear this chapter, boss strategy, items and chest locations, as well as Sub-Quests, owls, and more!
| Previous Quest | Next Quest |
|---|---|
| Elde Menancia | Ganath Haros |
Mahag Saar Walkthrough
Objectives
| Objectives | |
|---|---|
| Reach Mahag Saar. | |
| Search the Fortress Ruins. | |
| Chase Almeidria | |
Reach Mahag Saar
| Objectives | |
|---|---|
| 1 | Once Kisara returns to your party, exit the city through the southern-most gate. |
| 2 | Follow the path until you reach the Mountain Trail. The path to Mahag Saar is the southeastern-most corner of the path. Once through, you'll encounter the Mysterious Swordsman. Simply survive the fight until you can manage to move again. |
| 3 | Head through to the next exit, where you'll enter Niez, the capital city of Mahag Saar. |
| 4 | 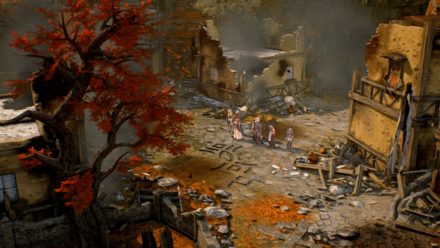 Head through to the next exit, where you'll enter Niez, the capital city of Mahag Saar. Head to the southwestern portion of the map where you'll meet the Dark Wings. Head into their base of operations and rest at the inn once done. |
Search the Fortress Ruins
| Objectives | |
|---|---|
| 5 | Head through the western exit of the city to enter The Valley of the Four Winds. From there, fight your way through the enemies and head north and into the Este Luvah Forest. |
| 6 | Head to the ladders north of the deactivated elevator and climb down. Turn on the generator and take the elevator up to B3. Head to the western-most room and activate the generator there. Take the elevator to B1. From there, jump off any of the ledges to head down to B2. |
| 7 |  Activate the generator in the room west of the elevator to allow the elevator to stop at all floors. Head back up to B1 and drop down the southern most ledge shown in the image above. This will lead to the closed off section of B2. Prepare for a Boss Fight against Temararus. It will be Level 28. |
Chase Almeidrea
| Objectives | |
|---|---|
| 8 | Head back to Niez after the battle. You can fast travel from the room you fought Temararus in to head straight back to Niez, or make use of the Elevator outside to explore. |
| 9 | Once in Niez, prepare yourself for another fight and head to the Inn to rest. Defeat Grinymuk. |
| 10 | After the fight, head to the Hidden Wharf through the Adan Ruins by going through the Aqfotle Hills. Use the elevator to head up and board the boat by talking to the dockmaster. Prepare yourself for another fight, and talk to the man once again to continue. |
| 11 |  Check in on the different members of your party on the boat.Talk to Mahavar once again when you're through and rest. |
| 12 | Aboard the ship, head to the southwestern-most room to get a key off of the table. Head back to the elevator you pass on the way there to activate it, and head down to the Lower Level. Head to the western end of that level, and grab the key on the table. Return to the elevator and take up to L2. |
| 13 | In the southwestern-most room on L2, you'll find a control panel for the door for you to use.Enter through the now opened doorway leading to the right side of L2, and fight the guards at the very end. Once done, proceed through the door, then grab the key on the couch after the cutscene. |
| 14 | Head to L4 afterwards and exit out into the Boat Deck. Reach the far end of it to find another control panel that will deactivate the barrier in L3. From there, head to L3 and prepare for a fight. Note that you do not need to worry if you miss the Owl or any treasure on the ship, because they will appear in the next area after the battle. |
| 15 | Defeat Almeidria & Mesmald. |
Mahag Saar Boss Fights
Temararus
| Recommended Level: 27 | |||
|---|---|---|---|
 HP: 82930 |
|||
| Attack | 921 | Defense | 424 |
| Elemental Attack | 837 | Elemental Defense | 402 |
| Penetration | 1128 | Resistance | 1188 |
| Weakness | Resistance | ||
A monster haunting the Fortress Ruins in Este Luvah Forest. Savage and quick-moving, it can be dealt with through the use of Dohalim's Boost Attacks.
Grinymuk
| Recommended Level: 28 | |||
|---|---|---|---|
 HP: 150280 |
|||
| Attack | 959 | Defense | 439 |
| Elemental Attack | 872 | Elemental Defense | 416 |
| Penetration | 1163 | Resistance | 1225 |
| Weakness | Resistance | ||
| Recommended Level: 80 | |||
|---|---|---|---|
 HP: 278670 |
|||
| Attack | 5928 | Defense | 1628 |
| Elemental Attack | 5390 | Elemental Defense | 1543 |
| Penetration | 5032 | Resistance | 5300 |
| Weakness | Resistance | ||
A spawn left behind in the wake of the massacre at Niez, this dinosaur-like creature makes full use of its tail, which also acts as its weak spot. Focus your attention upon it but be wary of being hit by its attacks.
Almeidria & Mesmald
| Recommended Level: 29 | |||
|---|---|---|---|
 HP: 160420 |
|||
| Attack | 968 | Defense | 430 |
| Elemental Attack | 1028 | Elemental Defense | 525 |
| Penetration | 1198 | Resistance | 1262 |
| Weakness | Resistance | ||
How to Beat Almeidrea & Mesmald
The Lord of Mahag Saar rides atop a creature called Mesmald – conjuring cyclones and tornadoes. Help Rinwell settle the score against this lord using her Boost Attacks to prevent the enemy from casting Artes.
Sub-Quests
Mahag Saar Sub-Quests
| Quest Name | Rewards |
|---|---|
| City Renewal |
・1800 Gald
・210 SP ・x1 Roasted Chicken Recipe ・x3 Life Bottle |
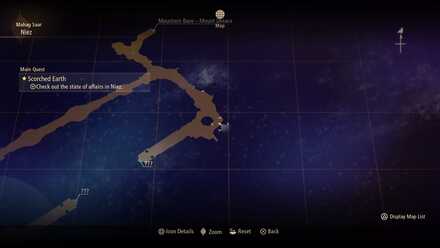
| Location: Mahag Saar - Niez Unlock Conditions: After the quest Scorched Earth is unlocked Request Giver: Beast-hating man in Niez Recommended Level: 26 |
|
| Quest Name | Rewards |
| Gourmet Saga: Prairie Scent |
・2300 Gald
・x1 Vitamin Smoothie Recipe ・x1 Glutton's Maze |
| Location: Mahag Saar - Aqfotle Hills Unlock Conditions: Unlocked upon arriving in Aqfotle Hills Request Giver: Gourdeno |
|
| Quest Name | Rewards |
| The Mysterious Pair |
・2300 Gald
・15 SP ・x1 Quivering Candles |
| Location: Mahag Saar - Niez Unlock Conditions: After the quest Scorched Earth is unlocked Request Giver: The Wonder Bard |
|
| Quest Name | Rewards |
| Kisara's Initiation |
・2300 Gald
・160 SP |
| Location: Mahag Saar - Niez Unlock Conditions: After the quest Scorched Earth is unlocked Request Giver: Food Manager at Niez's inn |
|
| Quest Name | Rewards |
| Echoes |
・12600 Gald
・35 SP ・x1 Lucky Cat Statue |
| Location: Mahag Saar - Niez Unlock Conditions: Unlocked after reaching Cyslodia from Ganath Haros Request Giver: Baephon Recommended Level: 43 |
|
| Quest Name | Rewards |
| Skybound Swarm |
・12600 Gald
・380 SP |
| Location: Mahag Saar - Hidden Wharf Unlock Conditions: Unlocked after reaching Cyslodia from Ganath Haros Request Giver: A Fleeing Man in Mahag Saar - Wharf Recommended Level: 42 |
|
| Quest Name | Rewards |
| Owl Sanctuary |
・2300 Gald
・145 SP |
| Location: Mahag Saar - Niez Unlock Conditions: Unlocked after reaching Cyslodia from Ganath Haros Request Giver: Giselle |
|
| Quest Name | Rewards |
| Farewell, Mage |
・36800 Gald
・65 SP ・x1 Drum of the Legend |
| Location: Mahag Saar - Niez Unlock Conditions: Unlocked after completing the sub-quest "Echoes" Request Giver: Baephon Recommended Level: 70 |
|
| Quest Name | Rewards |
|
Ignorance of Knowledge
NEW |
・2000 Gald
・300 SP ・x1 Curse Charm |
| Location: Mahag Saar - Aqfotle Hills Unlock Conditions: Unlocked after finishing the main quest "The Lord's Daughter" Request Giver: Torvin Recommended Level: 65 |
|
| Quest Name | Rewards |
|
For a Safe Trade Route
NEW |
・2000 Gald
・300 SP ・x1 Black Onyx |
| Location: Mahag Saar - Aqfotle Hills Unlock Conditions: Unlocked after finishing the main quest "The Lord's Daughter" Request Giver: Migrant Sailor Recommended Level: 65 |
|
| Quest Name | Rewards |
|
Life's Changes
NEW |
・2000 Gald
・300 SP ・x1 Swift Ring |
| Location: Mahag Saar - Niez Unlock Conditions: Unlocked after finishing the main quest "The Lord's Daughter" Request Giver: Renan Man Recommended Level: 65 |
|
| Quest Name | Rewards |
|
The Meaning of the Flag
NEW |
・2000 Gald
・300 SP ・x1 Stamina Ring |
| Location: Mahag Saar - Niez Unlock Conditions: Unlocked after finishing the main quest "The Lord's Daughter" Request Giver: Male Dark Wings Member Recommended Level: 65 |
|
| Quest Name | Rewards |
|
Silence and Sleep
NEW |
・2200 Gald
・360 SP |
| Location: Mahag Saar - Aqfotle Hills Unlock Conditions: Unlocked after finishing the main quest "Branded" Request Giver: Tomb Raider Recommended Level: 72 |
|
| Quest Name | Rewards |
|
The Owls' Gratitude
NEW |
・2500 Gald
・480 SP |
| Location: Mahag Saar - Aqfotle Hills Unlock Conditions: Unlocked midway through the "Disappearance and Distress" Main Quest Request Giver: Giselle Recommended Level: 75 |
|
Owl Locations
All Dahnan Owls
| Location | |
|---|---|
| 22 | 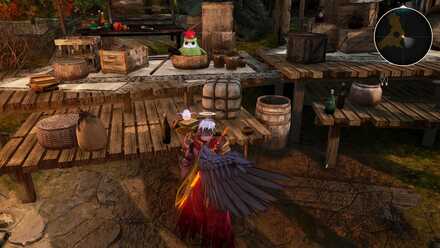 |
 |
|
| Niez Head east to find a dried up fountain. Look at the nearby stall to find this owl sitting in a basket. Reward: Red Rose Corsage |
|
| 23 | 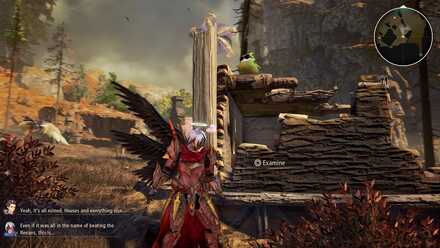 |
 |
|
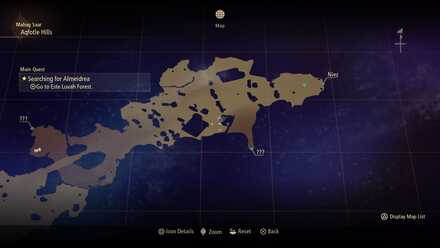
| Aqfotle Hills From Niez, head west until you encounter some Archer Hawks. From the hawks, go south to find this owl sitting on a ruin. Reward: Retro Sunglasses |
|
| 24 | 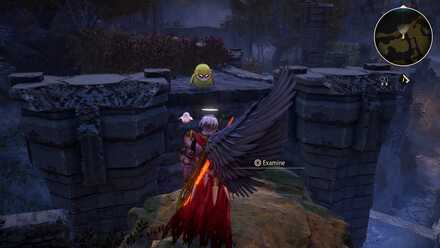 |
 |
|
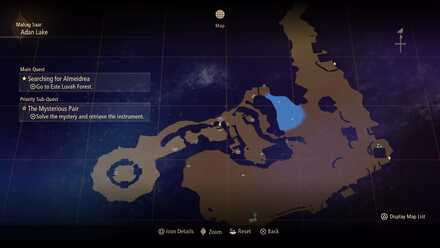
| Adan Lake You must go up the path west of the map until you reach the tower. From there, head east and drop down where you can find the owl sitting on a stone arch. Reward: Angry Glasses |
|
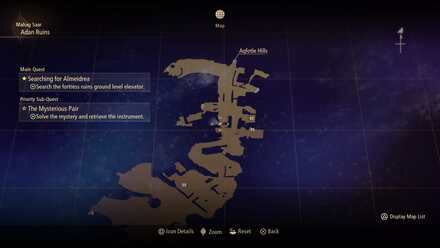
| 25 | 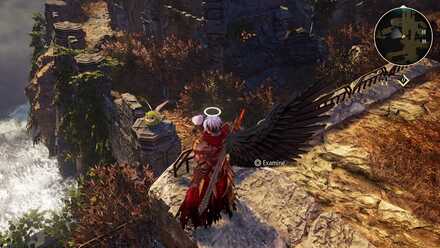 |
 |
|
| Adan Ruins You'll see a wind turbine in front of you right after entering the area. To the east of this wind turbine is an owl sitting on a stone wall. Reward: Angel Wings |
|
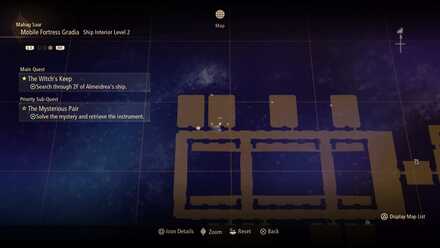
| 26 | 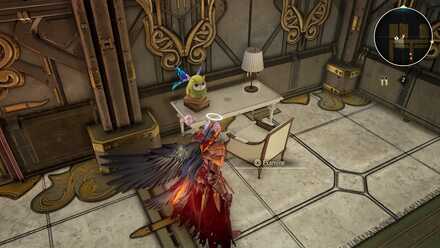 |
 |
|
| Mobile Fortress Gradia - Ship Interior Level 2 Go inside the second room, starting from the northwest corner of the floor, to find this owl sitting on top of some books. After you defeat the realm's boss, the ship will sink and you can find the owl on the shore of Thislym. Reward: Butterfly Wings |
All Dahnan Owl Locations and Rewards
Tales of Arise Related Guides

All Story Walkthroughs
| All Story Walkthroughs | |
|---|---|
| Tales of Arise Walkthrough | Beyond the Dawn DLC Walkthrough |
All Base Game Walkthroughs
| Chapters | |
|---|---|
 Calaglia Calaglia |
 Cyslodia Cyslodia |
 Elde Menancia Elde Menancia |
 Mahag Saar Mahag Saar |
 Ganath Haros Ganath Haros |
 The Wedge The Wedge |
 Berg Volcano Berg Volcano |
 Rena Rena |
Author
Mahag Saar Walkthrough: Sub-Quests, Owl Locations, and Boss Strategy
Please participate in our site
improvement survey
03/2026
improvement survey
03/2026
Would you assist in
improving Game8's site?
improving Game8's site?

×
We are listening to our users' valuable opinions and discussing how to act on them.
The information collected through this survey will be used for the purpose of improving our services. In addition, the information will only be disclosed a part of a statistic in a format that will not allow identification of personal information.
Begin Survey
Not Now
×
Please rate each item regarding Game8.co's Advertisements.
Amount of Ads
Very Dissatisfied
Somewhat Dissatisfied
Fine
Somewhat Satisfied
Highly Satisfied
Placement of Ads
Timing of Ad Display
Ad Loading Speed
Safeness of Ads
Content of Ads
×
Please rate each item regarding Game8.co's Quality of Articles.
Amount of information
Very Dissatisfied
Somewhat Dissatisfied
Fine
Somewhat Satisfied
Highly Satisfied
Frequency of updates
Speed of new information
Accuracy of articles
Understandibility of articles
Readability of sentences
×
Please rate each item regarding Game8.co's Usability of the Site.
Ease of finding information
Very Dissatisfied
Somewhat Dissatisfied
Fine
Somewhat Satisfied
Highly Satisfied
Loading Speed
Use of Color
Font Size
Visibility of Images
Easy to Understand Layout
×
Please rate each item regarding Game8.co's Message Boards, Comments.
Ease of Writing
Very Dissatisfied
Somewhat Dissatisfied
Fine
Somewhat Satisfied
Highly Satisfied
Readability
Ease in Finding Information
Comment Quality
Comment Quantity
Admin Response
×
Please rate each item regarding Game8.co's Site's new design.
Please rate our site's new design
Very Dissatisfied
Somewhat Dissatisfied
Fine
Somewhat Satisfied
Highly Satisfied
Do you think that the website's design change makes the site easier to use?
Has the new design made it easier for you to find information on the site?
Has the new design improved the overall visual appeal of the site?
How would you rate your overall satisfaction with the new design of the site?
×
How likely are you to recommend Game8 to someone you know?
Very Unlikely
0
1
2
3
4
5
6
7
8
9
10
Very Likely
If you have other opinions regarding potential improvement to the website, please share them with us. We would appreciate your honest opinion.
Note: This is a free response section, so you can proceed without entering anything.
Note: Please be sure not to enter any kind of personal information into your response.
Note: Please be sure not to enter any kind of personal information into your response.
×
Thank You
×
Thank you for participating in our survey! Your answers will help us to improve the quality of our website and services.
We hope you continue to make use of Game8.
We hope you continue to make use of Game8.
Close
Rankings
- We could not find the message board you were looking for.
Gaming News


![Everwind Review [Early Access] | The Shaky First Step to A Very Long Journey](https://img.game8.co/4440226/ab079b1153298a042633dd1ef51e878e.png/thumb)

![Monster Hunter Stories 3 Review [First Impressions] | Simply Rejuvenating](https://img.game8.co/4438641/2a31b7702bd70e78ec8efd24661dacda.jpeg/thumb)
Popular Games

Genshin Impact Walkthrough & Guides Wiki
Honkai: Star Rail Walkthrough & Guides Wiki
Umamusume: Pretty Derby Walkthrough & Guides Wiki
Pokemon Pokopia Walkthrough & Guides Wiki
Resident Evil Requiem (RE9) Walkthrough & Guides Wiki
Monster Hunter Wilds Walkthrough & Guides Wiki
Wuthering Waves Walkthrough & Guides Wiki
Arknights: Endfield Walkthrough & Guides Wiki
Pokemon FireRed and LeafGreen (FRLG) Walkthrough & Guides Wiki
Pokemon TCG Pocket (PTCGP) Strategies & Guides Wiki


Recommended Games
Diablo 4: Vessel of Hatred Walkthrough & Guides Wiki
Fire Emblem Heroes (FEH) Walkthrough & Guides Wiki
Yu-Gi-Oh! Master Duel Walkthrough & Guides Wiki
Super Smash Bros. Ultimate Walkthrough & Guides Wiki
Pokemon Brilliant Diamond and Shining Pearl (BDSP) Walkthrough & Guides Wiki
Elden Ring Shadow of the Erdtree Walkthrough & Guides Wiki
Monster Hunter World Walkthrough & Guides Wiki
The Legend of Zelda: Tears of the Kingdom Walkthrough & Guides Wiki
Persona 3 Reload Walkthrough & Guides Wiki
Cyberpunk 2077: Ultimate Edition Walkthrough & Guides Wiki


All rights reserved
© BANDAI NAMCO Entertainment America Inc. All third party content, brands, names, and logos are used under license and remain property of their respective owners. All rights reserved.
The copyrights of videos of games used in our content and other intellectual property rights belong to the provider of the game.
The contents we provide on this site were created personally by members of the Game8 editorial department.
We refuse the right to reuse or repost content taken without our permission such as data or images to other sites.