Storage Area A - Breach Firewall and Maze Guide
☆ New: Tier List Maker & Co-Op Board!
★ 2.7: Nangong Yu, Cissia, & 2.7 Livestream
☆ 2.6 Phase 1: Sunna & Yixuan
★ 2.6 Phase 2: Aria & Yuzuha
☆ Tier Lists: Agents | W-Engines | Bangboos | Teams
★ Redeem Codes for free Polychromes!
Storage Area A is Camellia Golden Week's Day 1 Hollow Stage in Zenless Zone Zero (ZZZ). See how to complete the breach firewall guide, how to go through the maze, and the full hollow walkthrough here!
| Camellia Golden Week Hollow C41 Guides | |||
|---|---|---|---|
Breach Firewall - Storage Area A Challenges
Breach Firewall - Storage Area A Stages
Day 1 - Inner Firewall Guide
| Day 1 - Inner Firewall Perfect Run |
Try to Hit the Target Hit Combo Early
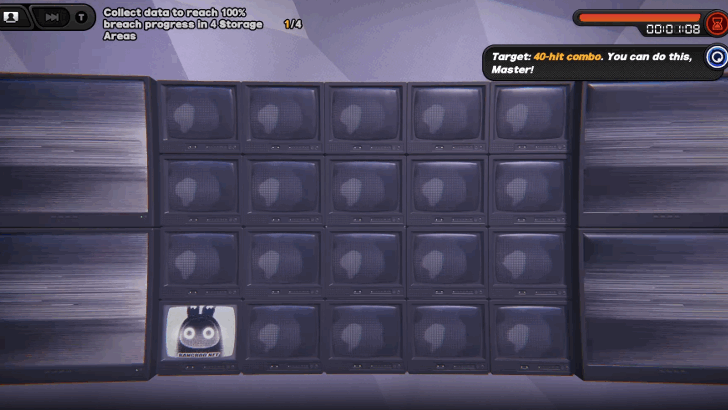
We recommend for all the Breach Firewall challenges is to hit the target combo early while the red tiles are easier to avoid. This way if you manage to get hit by a red tile much later you still completed the initial objective.
Back to Breach Firewall Stages ▲
Day 1 - Deep Firewall Guide
| Day 1 - Deep Firewall Perfect Run |
Watch Out for the Cross Patterns at the End
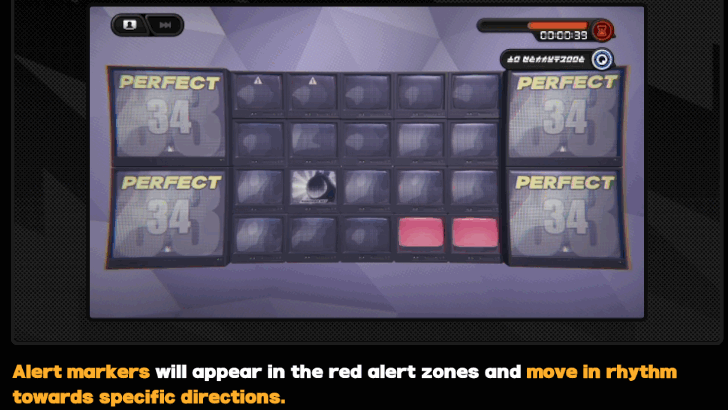
You need to watch out for the cross red tile patterns that will spawn towards the end of this challenge. You can avoid them before they spwan by looking out for the tiles that has the red triangle on them.
Back to Breach Firewall Stages ▲
Day 1 - Core Firewall Guide
Be Alert for the One Free Tile Wave

Always be alert when and how to avoid the red tiles especially the ones that spawn in lines that only have one free space where you can void them. These red tile lines will spawn frequently throughout the whole challenge.
Back to Breach Firewall Stages ▲
Maze Storage Area A Guide
Maze Guide
The objective of these maze challenges is to remember the path that will lead to the reward at the end while trying to avoid the red tiles.
The red tiles will disappear once you start moving, but can be seen again if you step on the Reset tile at the starting point. If you touch a red tile, you will be teleported back to the starting point.
Maze 1 - Storage Area A
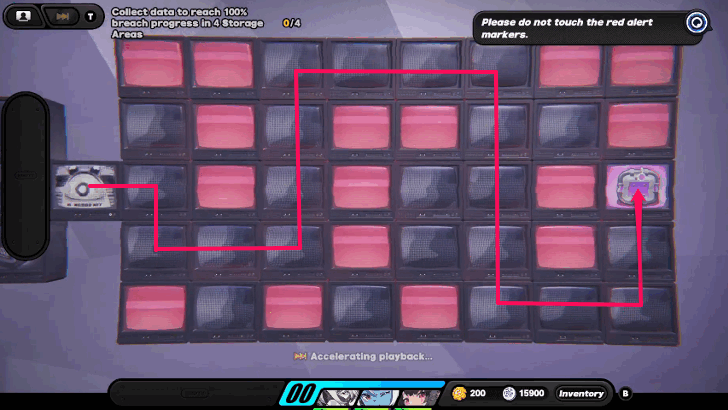
For Maze 1, the fastest route would be by going, from the start go right, down, right two times, up three times, right three times, down four times, right two times, and up two times.
This maze will be unlocked after stepping on the Observations tile on the Heat Haze Amplifier area in the southeast corner of Storage Area A.
Maze 2 - Storage Area A

In Maze 2, the quickest route would be by going, from the start go right, down two times, right three times, up two times, turn left, up two times, right two times, then go down, turn right, down two times, right two times and lastly up.
This maze will be unlocked after stepping on the Observations tile on the Heat Haze Amplifier area in the east side of Storage Area A.
Maze 3 - Storage Area A

For Maze 3, the best route would be by going, from the start go right, up, right, up, right two times, down two times, then left, down two times, right two times, then up, turn right three times, up two times, left two times, and then up.
This maze will be unlocked after stepping on the Observations tile on the Heat Haze Amplifier area in the northeast corner of Storage Area A.
Storage Area A Hollow Guide
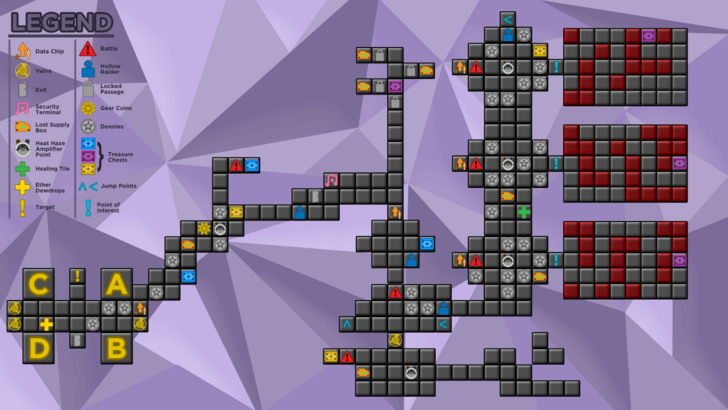
Storage Area A Day 1 Walkthrough
| Storage Area A HDD Map Contents |
|---|
 |
Hollow Deep Dive System Events and Guide
Step-By-Step Guide
- Interact With the Security Terminal
- Talk to the First Hollow Raider
- Defeat the Enemy and Talk to the Raider
- Reach the Heat Haze Amplifier Area
- Fire Up the Heat Haze Amplifier
- Continue Exploring the Hollow
- Explore the Last Available Area
Interact With the Security Terminal

Interact with the Security Terminal tile to unlock the locked gate on the north side of Storage Area A. The gate will unlock the Security Facility where some Lost Supply Boxes are located.
After interacting with the Security Terminal tile will also unlock the Breach Firewall tutorial and minigame.
Back to Day 1 Walkthrough Guide and Map ▲
Move 10 Times to the Rhythm of The Music
For the Breach Firewall tutorial, simply move ten times while in sync with the rhythm of the background music, and we recommend using earphones for this.
After successfully moving ten times to the rhythm, dodge all the red markers by moving left and right or up and down that will spawn to complete the tutorial.
Talk to the First Hollow Raider

Talk to the first Hollow Raider by following the path towards the southeast from the Security Terminal tile. The Raider will offer you a data chip that will unlock the Inner Firewall challenge.
Successfully completing the Inner Firewall Challenge will reward you a Lost Supply Box that can be claimed at the north side of Storage Area A.
Back to Day 1 Walkthrough Guide and Map ▲
Defeat the Enemy and Talk to the Raider
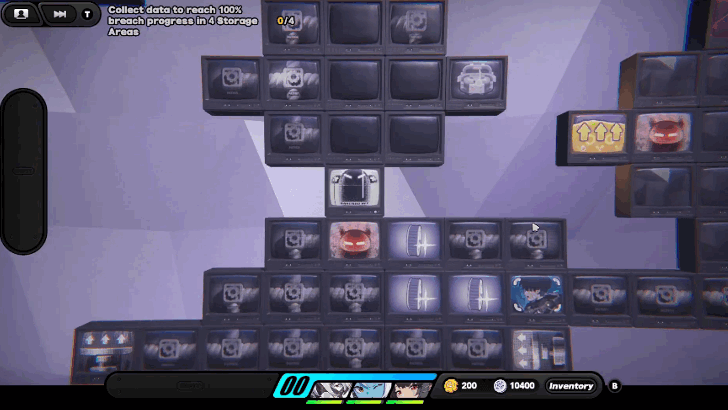
Continuing down the path, defeat the enemy blocking the way and talk to the second Hollow Raider to unlock the Deep Firewall challenge.
Successfully completing the Deep Firewall Challenge will reward you a Lost Supply Box that can be claimed at the north side of Storage Area A.
Back to Day 1 Walkthrough Guide and Map ▲
Reach the Heat Haze Amplifier Area

On the east side of Storage Area A, you will reach an area with an Observations tile, Heat Haze Amplifier, and an enemy blocking a Data Breach tile.
The Observations Tile will unlock the first maze, the Amplifier can be activated once you continue the event quest, and the Data Breach tile can be claimed after defeating the enemy.
Back to Day 1 Walkthrough Guide and Map ▲
Fire Up the Heat Haze Amplifier

After continuing the quest events, fire up the Heat Haze Amplifier to continue exploring in Storage Area A.
Back to Day 1 Walkthrough Guide and Map ▲
Continue Exploring the Hollow

Continue exploring the Hollow towards the north and you will enter another area with a Lost Supply Box, an enemy blocking a Data Breach tile, and a Heat Haze Amplifier.
Activating the Heat Haze Amplifier will reveal an Observations tile on the right side and will unlock the second maze.
Back to Day 1 Walkthrough Guide and Map ▲
Grab the Damaged Small Safe at the End of the Maze

Before leaving the second maze area, you can grab a Damaged Small Safe at the end after completing the maze. It will unlock a event side commission afterwards.
Back to Day 1 Walkthrough Guide and Map ▲
Explore the Last Available Area
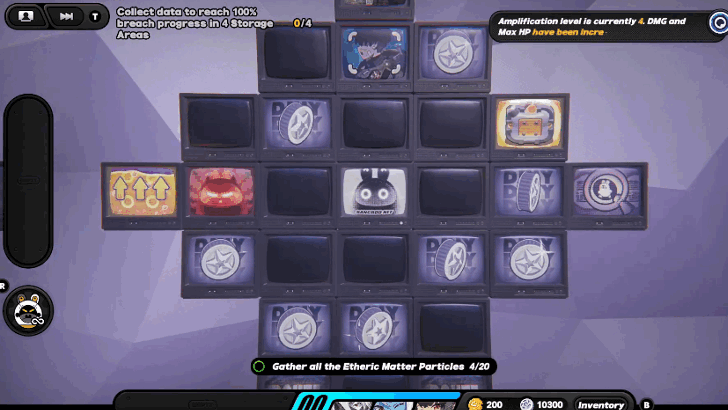
Explore the last available area on the north and you will encounter an enemy blocking a Data Breach tile, another Heat Haze Amplifier, and the third Hollow Raider.
Activating the Heat Haze Amplifier will reveal an Observations tile on the right side and will unlock the third maze. The third Hollow Raider will also give the data chip to unlock the Core Firewall Challenge.
Back to Day 1 Walkthrough Guide and Map ▲
Day 1 Storage Area A Information
Part of the Hollow C41 in the Camellia Golden Week Event
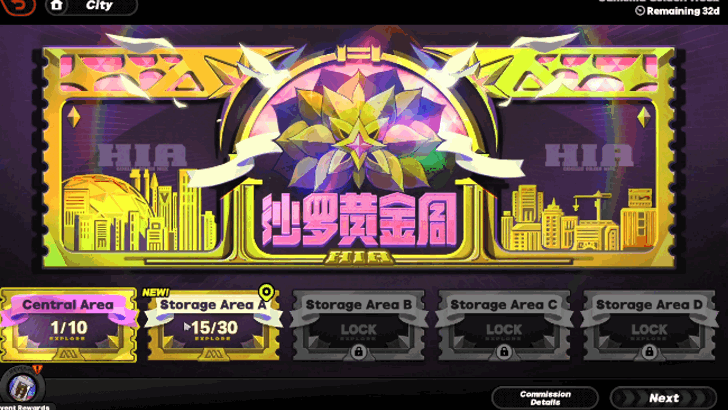
Storage Area A is part of the Hollow Stage, Hollow C41, in Day 1 of the Camellia Golden Week Event. Explore Storage Area A to find Lost Data Supply Boxes inside the limited time Hollow Stage.
Camellia Golden Week Event Guide
Zenless Zone Zero Related Guides

Camellia Golden Week Event Guide
Camellia Golden Week Quests
| Camellia Golden Week Quests | ||
|---|---|---|
 Prepare for the Gold Rush Prepare for the Gold Rush |
 Supply Boxes and Gold Rush Proxy Supply Boxes and Gold Rush Proxy |
 Midsummer Central Warehouse Midsummer Central Warehouse |
 Allure of the Mysterious Treasure Allure of the Mysterious Treasure |
 Holiday Out of Control Holiday Out of Control |
 Save Golden Week Save Golden Week |
Camellia Golden Week Hollow Guides
| Camellia Golden Week Hollow C41 Guides | |||
|---|---|---|---|
 Storage Area A Storage Area A |
 Storange Area B Storange Area B |
||
 Storage Area C Storage Area C |
 Storage Area D Storage Area D |
||
Other Camellia Golden Week Guides
| Camellia Golden Week Guides | ||
|---|---|---|
 Valuable Lost Item Guide Valuable Lost Item Guide |
 Gilded Blossom W-Engine Gilded Blossom W-Engine |
 Blooming Wind Special W-Engine Core Blooming Wind Special W-Engine Core |
Other Upcoming and Current Events

Comment
Author
Storage Area A - Breach Firewall and Maze Guide
improvement survey
03/2026
improving Game8's site?

Your answers will help us to improve our website.
Note: Please be sure not to enter any kind of personal information into your response.

We hope you continue to make use of Game8.
Rankings
- We could not find the message board you were looking for.
Gaming News
Popular Games

Genshin Impact Walkthrough & Guides Wiki

Honkai: Star Rail Walkthrough & Guides Wiki

Umamusume: Pretty Derby Walkthrough & Guides Wiki

Pokemon Pokopia Walkthrough & Guides Wiki

Resident Evil Requiem (RE9) Walkthrough & Guides Wiki

Monster Hunter Wilds Walkthrough & Guides Wiki

Wuthering Waves Walkthrough & Guides Wiki

Arknights: Endfield Walkthrough & Guides Wiki

Pokemon FireRed and LeafGreen (FRLG) Walkthrough & Guides Wiki

Pokemon TCG Pocket (PTCGP) Strategies & Guides Wiki
Recommended Games

Diablo 4: Vessel of Hatred Walkthrough & Guides Wiki

Cyberpunk 2077: Ultimate Edition Walkthrough & Guides Wiki

Fire Emblem Heroes (FEH) Walkthrough & Guides Wiki

Yu-Gi-Oh! Master Duel Walkthrough & Guides Wiki

Super Smash Bros. Ultimate Walkthrough & Guides Wiki

Pokemon Brilliant Diamond and Shining Pearl (BDSP) Walkthrough & Guides Wiki

Elden Ring Shadow of the Erdtree Walkthrough & Guides Wiki

Monster Hunter World Walkthrough & Guides Wiki

The Legend of Zelda: Tears of the Kingdom Walkthrough & Guides Wiki

Persona 3 Reload Walkthrough & Guides Wiki
All rights reserved
Copyright © 2024 HoYoverse, COGNOSPHERE. All Rights Reserved.
The copyrights of videos of games used in our content and other intellectual property rights belong to the provider of the game.
The contents we provide on this site were created personally by members of the Game8 editorial department.
We refuse the right to reuse or repost content taken without our permission such as data or images to other sites.


![Everwind Review [Early Access] | The Shaky First Step to A Very Long Journey](https://img.game8.co/4440226/ab079b1153298a042633dd1ef51e878e.png/thumb)

![Monster Hunter Stories 3 Review [First Impressions] | Simply Rejuvenating](https://img.game8.co/4438641/2a31b7702bd70e78ec8efd24661dacda.jpeg/thumb)


