This survey will take about 1 minute.
Your answers will help us to improve our website.
Call of Duty Modern Warfare 3 (MW3)
Zombies Interactive Map
★ S6 New Guns: DTIR 30-06 | Kastov LSW
☆ S5 Reloaded Dark Aether Keys and Locations
★ Mr. Peeks | Drum | Locked Diary | Giraffe Toy
☆ Final MWZ Story Mission: Ascension Walkthrough
★ Zombies Map | Dark Aether Interactive Map
☆ Rarity vs Pack-a-Punch Damage Chart

This is a full interactive map of Zombies Mode and Urzikstan in Call of Duty: Modern Warfare 3 (MW3). Read on for locations of all wallbuy weapons, aether tears and portals, and explanations of the different threat level zones.
| All Maps | |
|---|---|
| Multiplayer Maps | Zombies Maps |
List of Contents
Zombies Interactive Map
Urzikstan Map
1. Click an icon on the right side to show all the pins of a specific type, or click the magnifying glass button to search for a specific pin by name.
2. Click a pin on the map to see its name and description.
3. You can hide all Pins by clicking the green Show Pins button on the left side.
| Legend for Map Icons | ||
|---|---|---|
Der Wunderfizz |
||
The Interactive Map both shows the location of key points on the map, and doubles as a collectible checker.
| Icon | How to Use |
|---|---|
 | Show Names This button reveals the Name of every icon currently shown. |
 | Show Pins This button will toggle between showing and hiding all the pins which you have already marked as acquired. |
 | All Pins This button is shown along with the Icons on the right when there are over 6 types of pins. Click it for a full selection of all available pin types. |
 | Fullscreen This button will change the map display to fill the screen. |
 | Search Mode Toggle This button will display a searchbar which you can use to search for an individual pin by its name. |
Zombies Map Legend: All Icon Meanings
All Map Icons
Note: Ammo Caches and Gas Stations have set spawn points that don't change per game of Zombies. However, everything else doesn't have set locations across all matches.
While certain icons like Exfils have a set number of possible spawn locations, these will switch up with every game. Similarly, Perk Machines and Contracts have set locations across the map, but the type of Perk Machine or Contract you'll find at that location will also differ across matches.
| Map Icon | Description |
|---|---|
| Purchase new weapons with the essence you currently have. These weapons are indicated by glowing outlines on the wall. ▶ All Zombie Weapon Locations |
|
| Refill your ammunition with these ammo caches scattered around the map. | |
| Repair and top up your vehicles with gas from gas stations to keep them running longer. ▶ All Gas Station Locations |
|
| Interact with the exfil location to "exfiltrate", or extract yourself from the game with all the loot you've earned. Get in the helicopter before the horde of zombies gets to you! ▶ How to Exfil |
|
| Complete Contracts to gain more essence and other rewards. These Contracts are comprised of various activities such as delivering cargo and defending a location against waves of enemies. ▶ How to Complete Contracts |
|
| The Aether Storm is a hazardous storm that grows in size over time, engulfing Exfil locations and rendering them unusable. Avoid these storms at all costs! | |
| Pack-a-Punch machines increase the damage of your weapons, helping you tear through enemies much quicker. ▶ How to Pack-a-Punch Weapons |
|
| Perk Machines grant you specific Perks that increase your effectiveness in combat. ▶ List of Perk Machine Locations |
|
| At Buy Stations, you will be able to purchase equipment that increase your survivability and grant you various upgrades. Here, you can also sell the loot you have. ▶ List of All Buy Station Locations |
|
| Find a Fortress key in Strongholds to unlock these locations, which are the most difficult infestations filled with tons of enemies and a tough Warlord. ▶ How to Enter Legacy Fortress |
|
| Find a Stronghold keycard in Encampments to unlock strongholds, which are difficult areas filled with enemies. ▶ All Stronghold Locations: Mercenary and Infested |
|
| Encampments are fill with enemies and are the easier infested areas you can clear out. ▶ All Mercenary Camp Locations |
|
| Redeploy Drones catapult you to the sky, allowing you to glide toward a far-off location in a short amount of time. ▶ All Redeploy Drone Locations |
|
| Aether Nests are infested locations where you should destroy all nests within the area. | |
| Spend essence at Mystery Boxes to obtain a random weapon, including the legendary Ray Gun weapon. ▶ All Mystery Box Weapons and Locations |
Zombies Map Threat Zone Meanings
| Map of All Difficulty Zones |
|---|
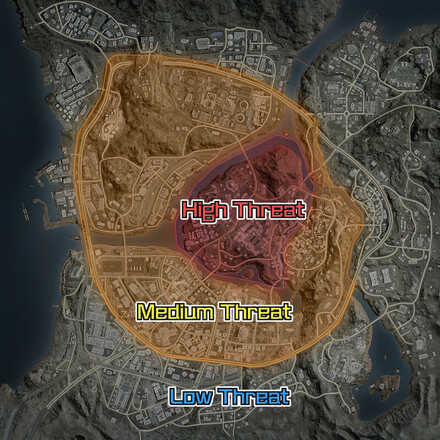 |
High Threat Difficulty

The high difficulty area, represented by the red zone in the map, is the most difficult area, where the toughest enemies can spawn.
You will need to upgrade yourself further in the medium threat area before you can take on this area. Banding your squad together with other squads will significantly increase your chances of defeating the final boss and making it out alive.
Red Zone Loot and Tips to Survive
Medium Threat Difficulty
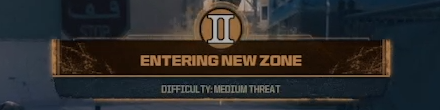
In the medium threat difficulty zone, represented by the middle orange ring, enemies will be much tougher and attack you more frequently.
Be sure to upgrade yourself in the low threat area before moving on to this area. We recommend sticking with your squad to have a better chance of survival here.
Low Threat Difficulty
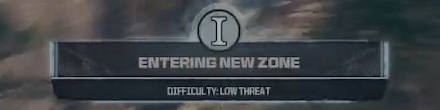
The low threat difficulty area covers the outermost area of the Zombies map, which is the uncolored zone in the above map. You will always start out in this area and enemies here will be very weak and easy to deal with.
It is recommended that you take your time in this starting area; completing Contracts, clearing out Encampments and Strongholds, buying weapons, and upgrading these weapons at Pack-A-Punch machines, as well as upgrading your own Operator with Perks from Perk-a-Cola Machines.
Call of Duty Modern Warfare 3 (MW3) Related Guides
Zombies Mode Walkthrough and Guide
All Zombies Guides
Author
Call of Duty Modern Warfare 3 (MW3) Walkthrough & Guides Wiki
Zombies Interactive Map
Please participate in our site
improvement survey
01/2026
improvement survey
01/2026
Would you assist in
improving Game8's site?
improving Game8's site?

×
We are listening to our users' valuable opinions and discussing how to act on them.
The information collected through this survey will be used for the purpose of improving our services. In addition, the information will only be disclosed a part of a statistic in a format that will not allow identification of personal information.
Begin Survey
Not Now
×
Please rate each item regarding Game8.co's Advertisements.
Amount of Ads
Very Dissatisfied
Somewhat Dissatisfied
Fine
Somewhat Satisfied
Highly Satisfied
Placement of Ads
Timing of Ad Display
Ad Loading Speed
Safeness of Ads
Content of Ads
×
Please rate each item regarding Game8.co's Quality of Articles.
Amount of information
Very Dissatisfied
Somewhat Dissatisfied
Fine
Somewhat Satisfied
Highly Satisfied
Frequency of updates
Speed of new information
Accuracy of articles
Understandibility of articles
Readability of sentences
×
Please rate each item regarding Game8.co's Usability of the Site.
Ease of finding information
Very Dissatisfied
Somewhat Dissatisfied
Fine
Somewhat Satisfied
Highly Satisfied
Loading Speed
Use of Color
Font Size
Visibility of Images
Easy to Understand Layout
×
Please rate each item regarding Game8.co's Message Boards, Comments.
Ease of Writing
Very Dissatisfied
Somewhat Dissatisfied
Fine
Somewhat Satisfied
Highly Satisfied
Readability
Ease in Finding Information
Comment Quality
Comment Quantity
Admin Response
×
Please rate each item regarding Game8.co's Site's new design.
Please rate our site's new design
Very Dissatisfied
Somewhat Dissatisfied
Fine
Somewhat Satisfied
Highly Satisfied
Do you think that the website's design change makes the site easier to use?
Has the new design made it easier for you to find information on the site?
Has the new design improved the overall visual appeal of the site?
How would you rate your overall satisfaction with the new design of the site?
×
How likely are you to recommend Game8 to someone you know?
Very Unlikely
0
1
2
3
4
5
6
7
8
9
10
Very Likely
If you have other opinions regarding potential improvement to the website, please share them with us. We would appreciate your honest opinion.
Note: This is a free response section, so you can proceed without entering anything.
Note: Please be sure not to enter any kind of personal information into your response.
Note: Please be sure not to enter any kind of personal information into your response.
×
Thank You
×
Thank you for participating in our survey! Your answers will help us to improve the quality of our website and services.
We hope you continue to make use of Game8.
We hope you continue to make use of Game8.
Close
Rankings
- We could not find the message board you were looking for.
Gaming News
![Warhammer 40K Rogue Trader [Switch 2] Review | Not Fit For The Omnissiah's Favor Just Yet](https://img.game8.co/4380722/f4be6f849139a9f521a11f76363d4900.png/show)


Popular Games

Genshin Impact Walkthrough & Guides Wiki
Zenless Zone Zero Walkthrough & Guides Wiki
Umamusume: Pretty Derby Walkthrough & Guides Wiki
Clair Obscur: Expedition 33 Walkthrough & Guides Wiki
Wuthering Waves Walkthrough & Guides Wiki
Digimon Story: Time Stranger Walkthrough & Guides Wiki
Pokemon Legends: Z-A Walkthrough & Guides Wiki
Where Winds Meet Walkthrough & Guides Wiki
Pokemon TCG Pocket (PTCGP) Strategies & Guides Wiki
Monster Hunter Wilds Walkthrough & Guides Wiki


Recommended Games
Fire Emblem Heroes (FEH) Walkthrough & Guides Wiki
Pokemon Brilliant Diamond and Shining Pearl (BDSP) Walkthrough & Guides Wiki
Diablo 4: Vessel of Hatred Walkthrough & Guides Wiki
Yu-Gi-Oh! Master Duel Walkthrough & Guides Wiki
Super Smash Bros. Ultimate Walkthrough & Guides Wiki
Elden Ring Shadow of the Erdtree Walkthrough & Guides Wiki
Monster Hunter World Walkthrough & Guides Wiki
The Legend of Zelda: Tears of the Kingdom Walkthrough & Guides Wiki
Persona 3 Reload Walkthrough & Guides Wiki
Cyberpunk 2077: Ultimate Edition Walkthrough & Guides Wiki


All rights reserved
© 2023 Activision Publishing, Inc. ACTIVISION, CALL OF DUTY, MODERN WARFARE, and CALL OF DUTY WARZONE are trademarks of Activision Publishing, Inc. All other trademarks and trade names are the property of their respective owners.
The copyrights of videos of games used in our content and other intellectual property rights belong to the provider of the game.
The contents we provide on this site were created personally by members of the Game8 editorial department.
We refuse the right to reuse or repost content taken without our permission such as data or images to other sites.
updated warp gate codes