 Shinjuku Hospital Walkthrough
 Yoyogi Park and Shibuya Walkthrough
 Amala Network 1 Walkthrough
 Ginza and the Great Underpass Walkthrough
 Ikebukuro Walkthrough
 Assembly of Nihilo Walkthrough
 Kabukicho Walkthrough
 Asakusa and Obelisk Walkthrough
 Amala Network 2 Walkthrough
 Yoyogi Park 2 Walkthrough
 Amala Temple Walkthrough
 Mifunashiro and Yurakucho Walkthrough
 Diet Building Walkthrough
 Bandou Shrine Walkthrough
 Tower of Kagutsuchi Walkthrough
This survey will take about 1 minute.
Your answers will help us to improve our website.
Shin Megami Tensei 3: Nocturne (SMT Nocturne)
Asakusa - Obelisk Walkthrough, Boss Battles, and Item Locations
This is a story walkthrough for Asakusa - Obelisk in Shin Megami Tensei III HD Remaster (SMT Nocturne) for the Nintendo Switch, PS4, and Steam. Here you'll find a guide on how to complete this area, solve the Obelisk Puzzles, story section, boss strategies, general tips, and a list of items that can be found.
| Previous | Next |
|---|---|
| Kabukicho | Amala Network 2 |
List of Contents
Asakusa Story Walkthrough
At this point, we recommend finishing the First Kalpa and Second Kalpa in the Labyrinth of Amala to trigger the Boss Fights against other Menorah Bosses in this area.
Kuramae - Asakusa
| Objectives | |
|---|---|
| 1 | On the Overworld, cross the bridge from Kuramae to Asakusa and head down the slope to enter Asakusa Proper. |
| 2 | You will start in Nakamise-Dori. Enter the Terminal Room. A cutscene with Hijiri will play. |
| 3 | If you have completed the First Kalpa and Second Kalpa in the Labyrinth of Amala, a boss fight against White Rider will occur right outside the S-Terminal. |
| Boss Fight | 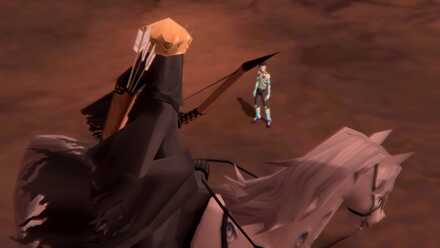 Boss Battle: White Rider Boss Battle: White RiderObtain the Menorah of Compassion after defeating White Rider. |
| 5 | Afterwards, fast-travel to the Great Underpass of Ginza to battle Red Rider. Prepare for the boss fight beforehand. |
| Boss Fight | 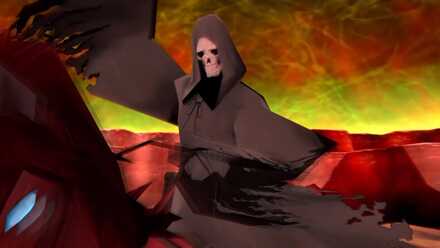 Boss Battle: Red Rider Boss Battle: Red RiderObtain the Menorah of Insight after defeating Red Rider. |
| 7 | After defeating Red Rider, return to Asakusa via the Terminal. |
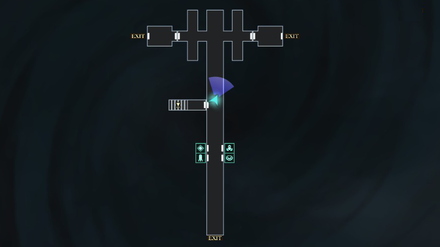
| 8 | 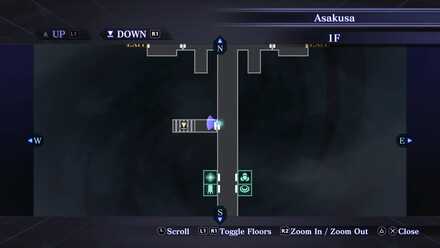 Walk along Nakamise-Dori, and then go down the first set of West stairs located at 1F, and then go speak to the Collector Manikin. |
| 9 |  Leave the room and move further along Nakamise-Dori going North, and then go through the East Exit and leave the area. |
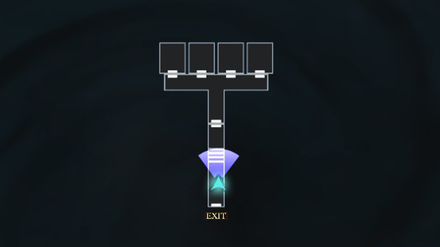
| 10 | Cross the bridge and enter the building to gain access to the Asakusa building. |
| 11 | Head down the flight of stairs, follow the hallway and then turn right. Continue pushing forward going North and go through the door. |
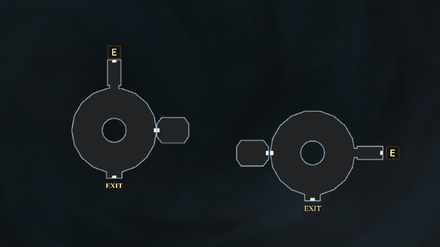
| 12 | 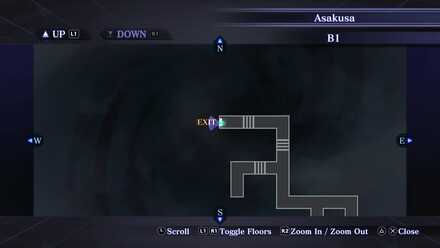 Take the left hallway. Push forward until you reach the farthest left turn. Climb the stairs and exit the area. |
| 13 | 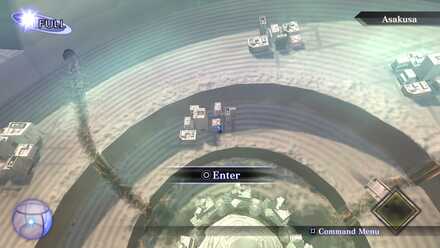 Cross the North bridge and then enter the Asakusa building and speak with the Female Manikin. |
| 14 | Backtrack and cross the South bridge and enter the Asakusa building. |
| 15 | Continue forward and turn right and head through the East door. Use the stairs and leave the area. There's an S-Terminal located at the West door. |
| 16 | Enter Mifunashiro. |
| 17 | Continue walking forward and head for the North door. A cutscene with Futomimi will play. An S-Terminal can be located at the East door. |
| 18 | 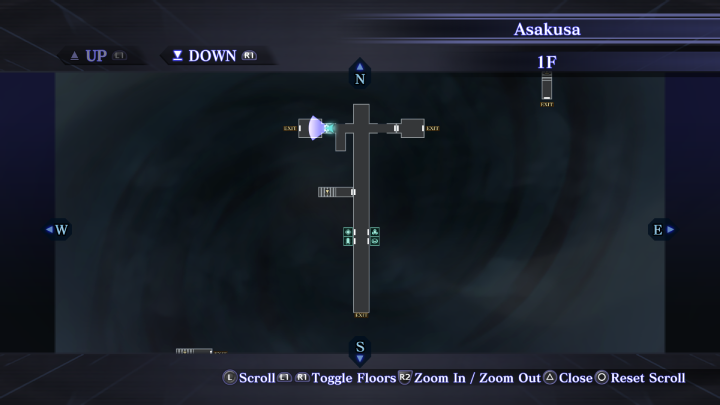 Head back to Nakamise-Dori in the Asakusa temple and go through the West exit. |
| 19 | 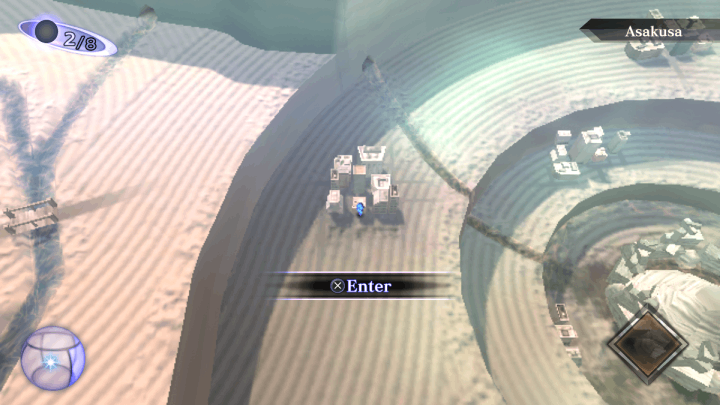 Cross the bridge to the left and enter the building. |
| 20 | Climb down the stairs and turn to the first right and enter the door. A cutscene with Sakahagi will begin. |
| 21 | Return to Nakamise-Dori in the Asakusa temple and speak with Hijiri in the Terminal room. |
| 22 | 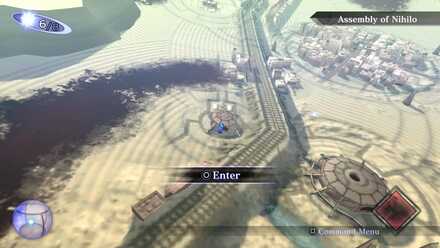 Fast-travel to Ginza and make your way to the Assembly of Nihilo. Cross the bridges and take the highway. Just follow the road and enter the dome in Shiba. |
Assembly of Nihilo
We recommend getting Light Balls or learning Lightoma for this area.
| Objectives | |
|---|---|
| 23 | Head North ang use the elevator. Go to B15. |
| 24 | 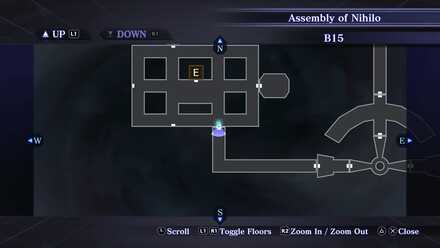 From the elevator, move forward going Southeast and go through the door. |
| 25 | Walk along the corridor and exit the room. Enter the True Core. |
| 26 | Continue straight ahead and the take Southeast door. Go through the door and exit the True Core. |
| 27 | Follow the long corridor and use the elevator. Go to 1F. |
| 28 | From Marunouchi Entrance, go to the West exit and leave the area. An S-Terminal is located at the North door. |
| 29 | On the Overworld, proceed South, traversing Hibiya and Chiyoda. Go through the walkway entrance and head straight to the Obelisk. |
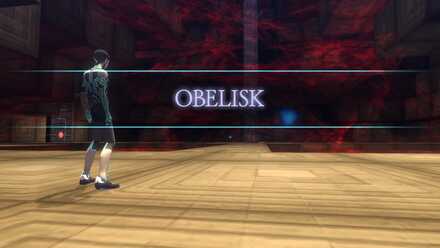
Obelisk
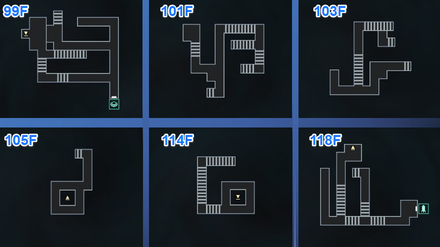
| Objectives | |
|---|---|
| 30 | Continue forward and use the lift at the Northernmost structure. An S-Terminal is located at the West door. |
| 31 | Continue forward going South. A cutscene with the three Moirae sisters will play, then after which ride the South lift. |
| 32 | Climb up the right-side stairs and ride the West lift. Continue forward and climb another set of stairs. Activate the blue orb. |
| 33 | Touch the puzzles to fast-forward time and gain access to the raised platform. Tip: The required moon phase to lower the platform is etched as tiles on the platform before you. E.g. if there are 4 tiles, you need to get a Half Moon, 3 tiles would be 3/8, and so on. |
Obelisk - 32F
| Objectives | |
|---|---|
| 34 | Touch the puzzles to fast-forward time to a Half Moon. |
| 35 | 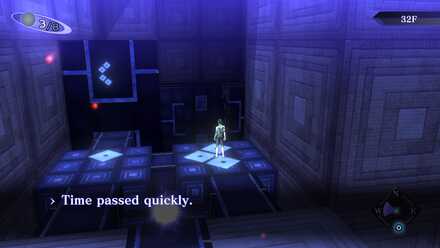 Step 1 |
| 36 | 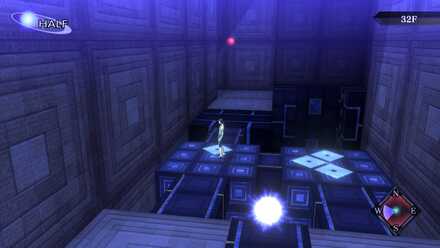 Step 2 |
| 37 | Proceed and then follow the corridor and climb up the stairs. Take the lift. |
| 38 | On 40 F, take the right-side corridor and follow the path, and then take a left and climb up the stairs. Turn left and cross the bridging set of stairs. An S-Terminal is located at the first South door to the right of the lift. |
| 39 | Turn left going South, and then turn left again and climb up the stairs. Keep climbing up until you reach the lift. Ride the lift up to 50F. |
| 40 | From the lift, turn left going East and climb down the right-side set of stairs. Follow the path and climb up until you reach 52F. An S-Terminal is located at the Southeast door on 52F. Touch the puzzles to fast-forward time and gain access to the raised platform. |
Obelisk - 52F
| Objectives | |
|---|---|
| 41 | Touch the puzzles to fast-forward time to a Full Moon. |
| 42 | 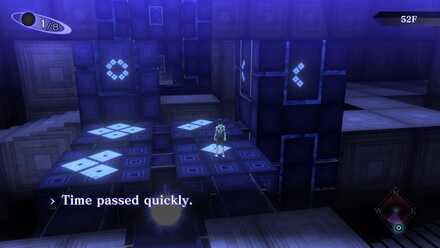 Step 1 |
| 43 | 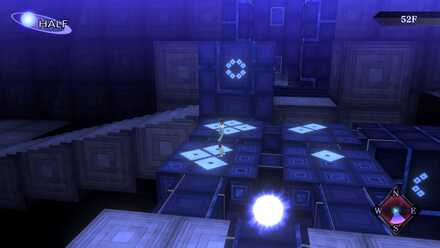 Step 2 |
| 44 | 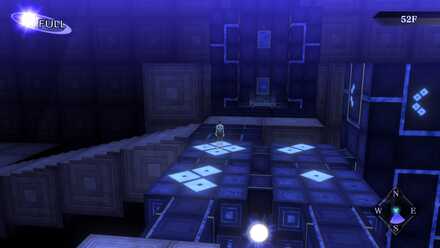 Step 3 |
| 45 | Proceed and ride the lift to 60F. From there, walk forward and go on the 2nd to the left lift, immediately next to the middle one. Ride the lift on 70F to get to 77F. |
| 46 | Hop on the right side cube and touch puzzles to fast-forward time and gain access to the raised platform. An S-Terminal and Cathedral of Shadows are located on the left wing. |
Obelisk - 77F
| Objectives | |
|---|---|
| 47 | Touch the puzzles to fast-forward time to a Full Moon. |
| 48 | 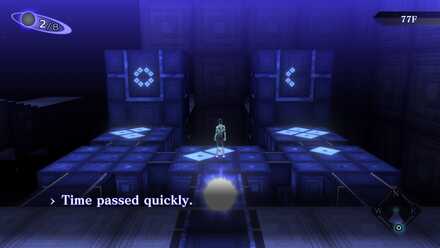 Step 1 |
| 49 | 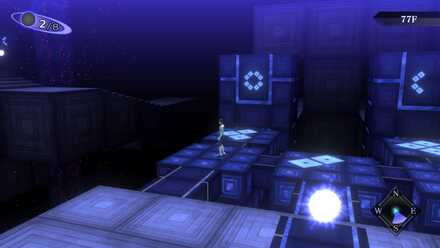 Step 2 |
| 50 | 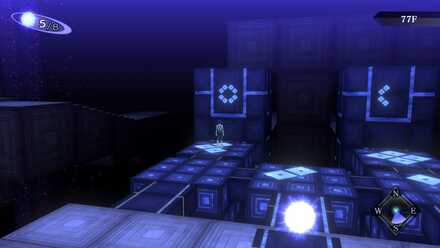 Step 3 |
| 51 | 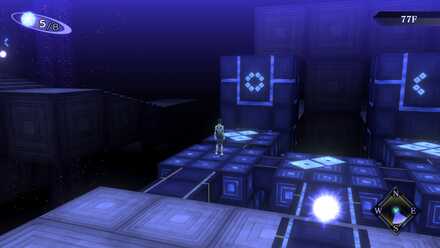 Step 4 |
| 52 | 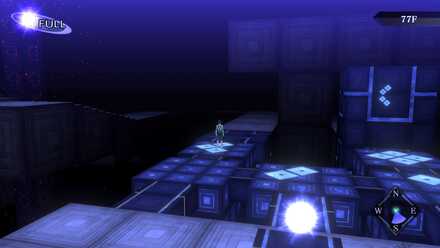 Step 5 |
| 53 | Ride the lift and then climb up the stairs. |
| 54 | Touch the puzzles to fast-forward time to a Full Moon. |
| 55 | 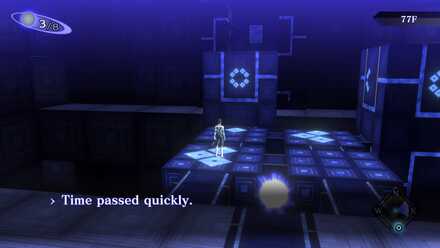 Step 1 |
| 56 | 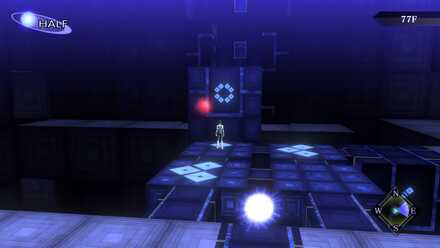 Step 2 |
| 57 | 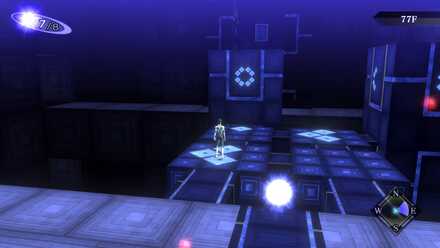 Step 3 |
| 58 | 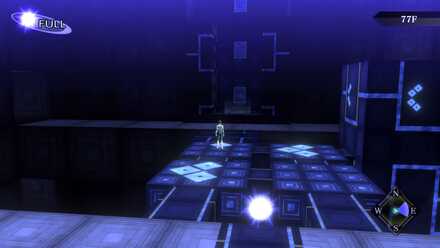 Step 4 |
| 59 | Continue forward and ride the lift. Climb up the stairs to 93F. |
| 57 | Turn left to the Southeast set of stairs and climb up the several set of stairs to 95F. Take the lift up to 97F. |
| 60 | Turn left and climb up the stairs. Turn left again and climb another set of stairs. |
| 61 | Turn right, and then turn right again and climb up the stairs. After that, climb the nearest set of stairs to your right to reach 101F. A Fountain of Life is located at the South door. |
| 62 | At 101F, turn right and climb the set of stairs. Continue forward, ignoring the immediate right-side set of stairs, and climb the ones up ahead instead. Follow the path and climb the nearest set of stairs to the right. Just keep climbing going in a clockwise direction. |
| 63 | Once you get to 105F, ride the lift to 114F. Climb up the flight of stairs. Turn right and climb up until you reach 118F. Ride the lift to 128F. An S-Terminal is located at the Northeast door in the left wing. |
Obelisk - 128F
This puzzle requires you to get all the puzzles right in one go to trigger the final boss fight.
| Objectives | |
|---|---|
| 64 | Touch the puzzles to fast-forward time to a Half Moon. Prepare for a boss fight against Clotho before proceeding with this step. |
| 65 | 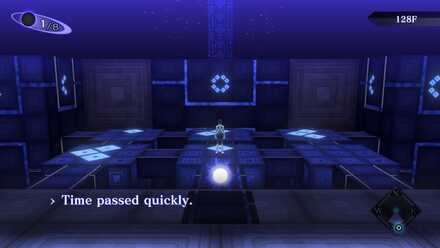 Step 1 |
| 66 | 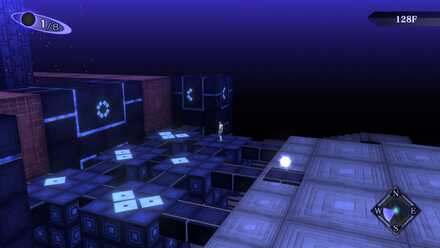 Step 2 |
| 67 | 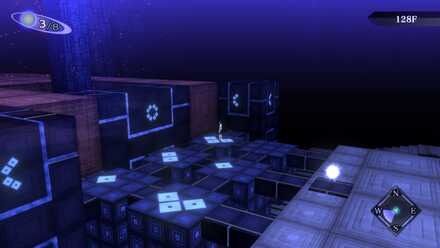 Step 3 |
| Boss Fight | 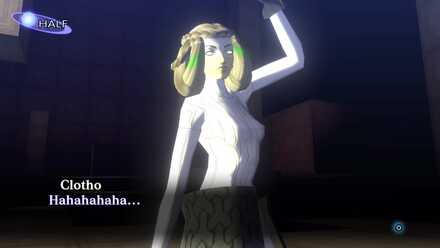 Boss Battle: Clotho Boss Battle: ClothoClotho will just flee from the battle once you do enough damage. |
| 68 | Do Not reset. Touch the puzzles right away to fast-forward time to a Full Moon. Prepare for a boss fight against Lachesis before proceeding with this step. |
| 69 | 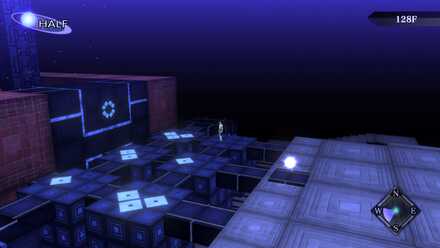 Step 1 |
| 70 | 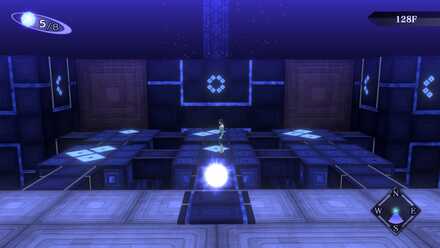 Step 2 |
| 71 | 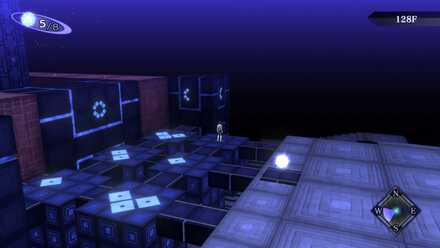 Step 3 |
| 72 | 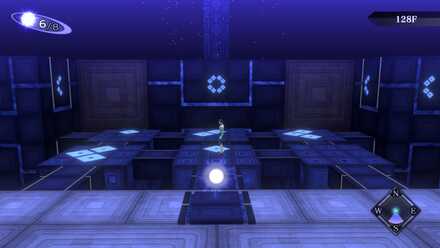 |
| 73 | 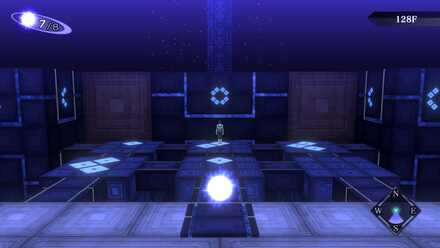 |
| Boss Fight | 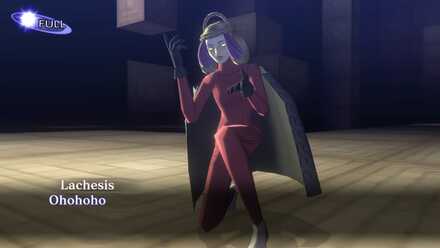 Boss Battle: Lachesis Boss Battle: LachesisJust like her sister, Lachesis will flee from the battle once you do enough damage. |
| 75 | Do NOT reset, instead touch the puzzles to fast-forward time to a Half Moon straight away. Prepare for a boss fight against Atropos before proceeding with this step. |
| 76 | 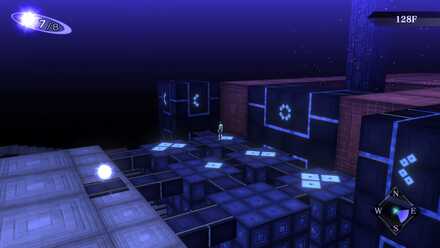 Step 1 |
| 77 | 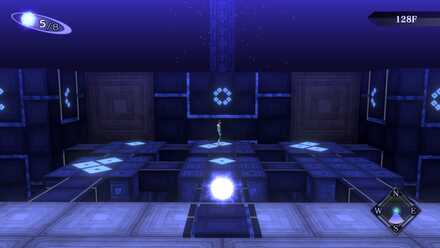 Step 2 |
| 78 | 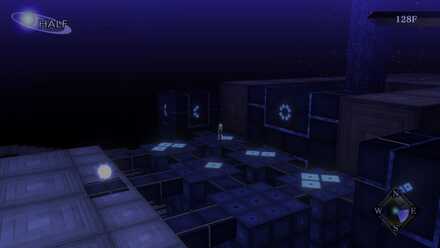 Step 3 |
| Boss Fight | Boss Battle: Atropos Yes, just sister things. Atropos will flee from the battle once you do enough damage. |
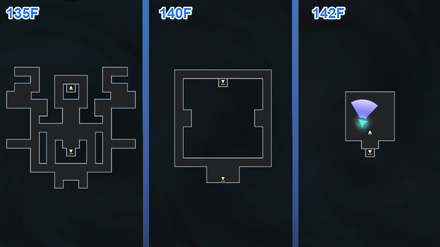
| 80 | Afterwards, cross the lowered platforms and ride the lift to 140F. Ride the platform on 140F to get to the Moirae Sisters. Prepare for the final boss fight against the Moirae Sisters before proceeding. |
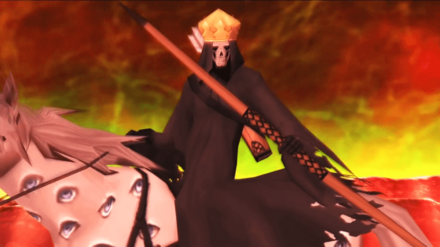
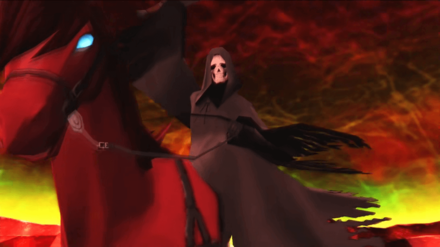
| Boss Fight | 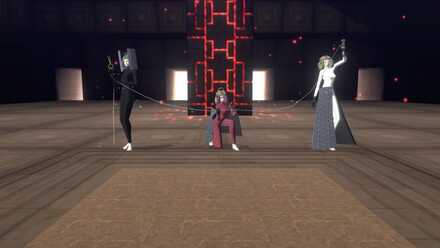 Boss Battle: Moirae Sisters |
| 82 | 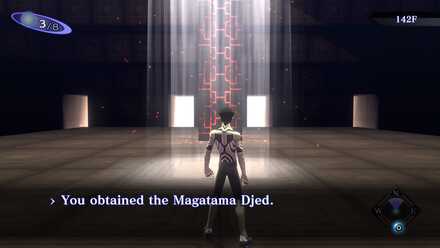 Obtain Djed Magatama after defeating the Moirae Sisters. |
| 83 | Examine the illuminated patch of floor and ascend. A cutscene with Yuko will play. |
| 84 | Receive two additional demon slots from Aradia. |
| 85 | A cutscene with Old Woman and Little Master will play. |
| 86 | Return to Asakusa proper. A cutscene with Hikawa will play. None of your response will affect the ending. |
| 87 | Exit the area to proceed with the story. |
Obtain Menorah of Compassion After Defeating White Rider
You can obtain the Menorah of Compassion after defeating White Rider at Asakusa.
Obtain Menorah of Insight After Defeating Red Rider
You can obtain the Menorah of Insight after defeating Red Rider at Asakusa.
Obtain Geis Magatama After Beating Puzzle Boy
You can obtain Geis Magatama after beating Puzzle Boy, an arcade game located in the East Asakusa building.
Obtain Djed Magatama After Defeating Moirae Sisters
You can obtain Djed Magatama after defeating Moirae Sisters in the Obelisk.
Receive Two Additional Demon Slots From Aradia
You will receive two additional demon slots from Aradia during the cutscene with Yuko in the Obelisk.
Asakusa Boss Fights
White Rider
The White Rider calls on you to unite the Menorahs. Watch out for his powerful attack God's Bow.
| Weaknesses | ||
|---|---|---|
| None, but Phys Attacks can go a long way. |
White Rider does not have any Elemental weakness, however using Phys attacks and Magic skills except for Fire, Light, Dark, and Ailment can inflict damage onto it.
Red Rider
The Red Rider longs for your demise. Take note of his numerous elemental strengths.
| Weaknesses | ||
|---|---|---|
| None, but Phys Attacks can go a long way. |
Red Rider does not have any Elemental weakness, however, using Phys Attacks is good for dealing damage.
Moirae Sisters - Clotho, Lachesis, Atropos

The Moirae Sisters will spin, measure, and snip your fate. Fighting all three at the same time will undoubtedly be tough.
| Weaknesses | ||
|---|---|---|
| None, but Phys and Magic attacks can go a long way. |
The Moirae Sisters do not have any elemental weakness, however, using Phys and Magic attacks is useful for dealing damage.
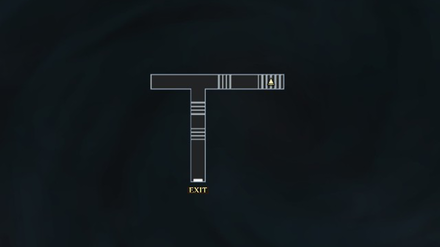
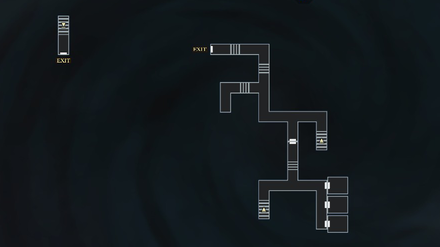
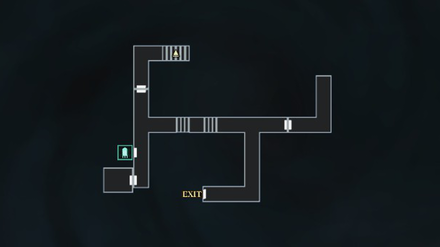
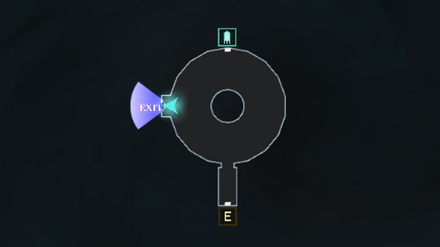
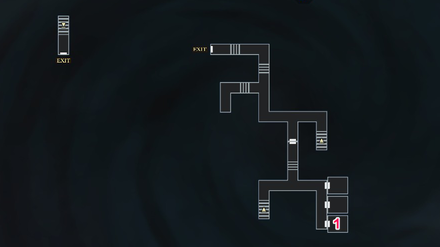
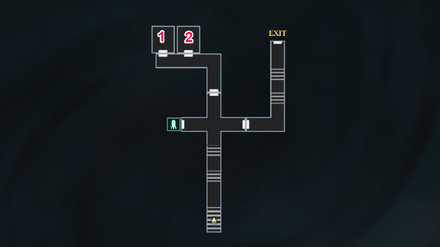
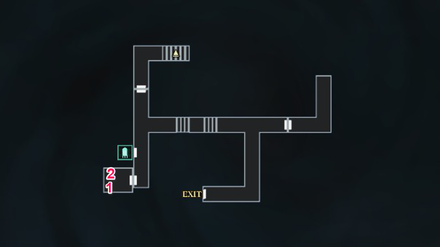
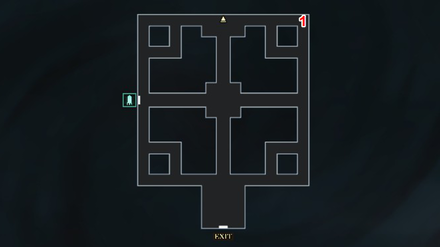
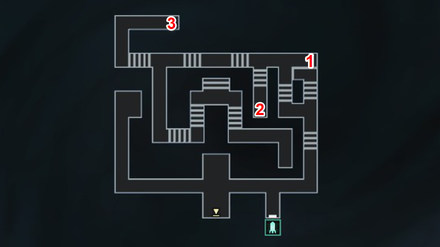
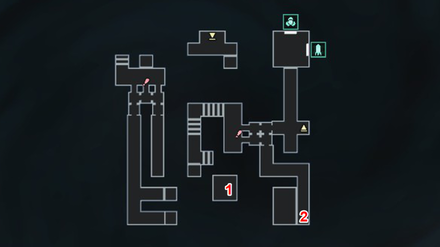
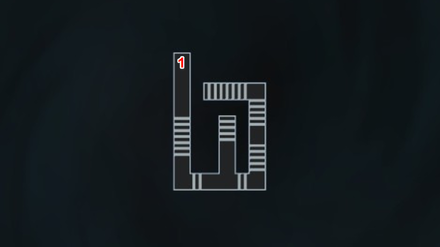
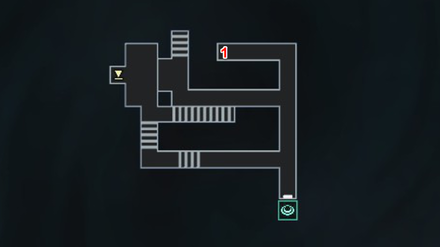
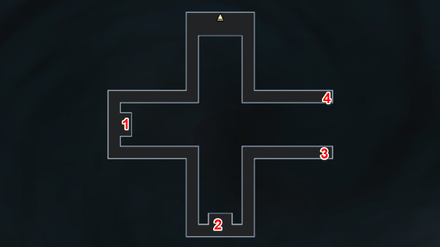
Asakusa Maps
Asakusa
| B2 (Inner Southwestern Building) |
 |
|---|---|
| B1 (Inner Northern Building) |
 |
| B1 (Outer Southeastern Building) |
 |
| B1 (Outer Western Building) |
 |
| B1 (Along Nakamise-Dori) |
 |
| 1F (Inner Northeastern Building) |
 |
| 1F Nakamise-Dori |
 |
| 2F (Northernmost Building) |
 |
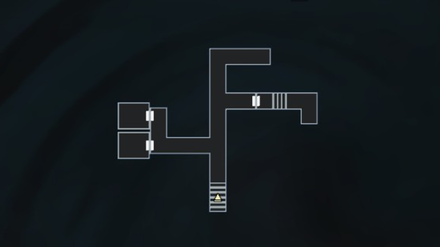
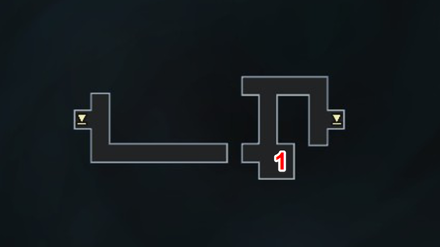
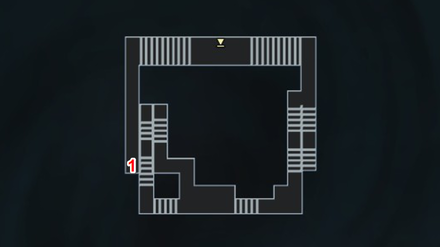
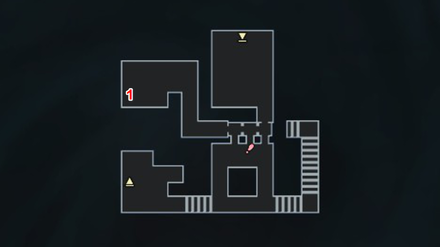
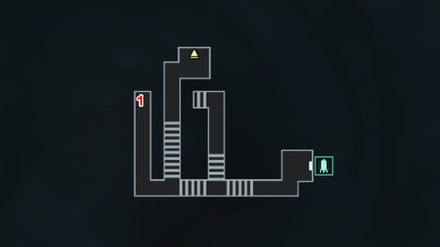
Assembly of Nihilo
| 1F Secondary Entrance |
 |
|---|---|
| B15 | 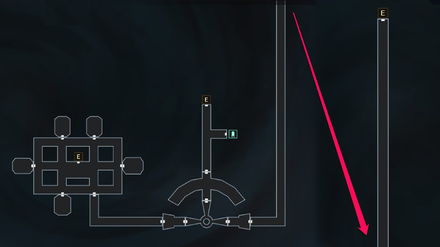 |
| 1F Exit |
 |
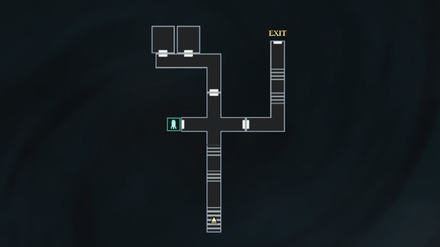
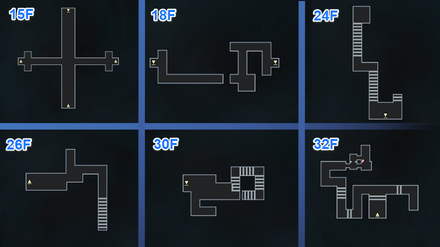
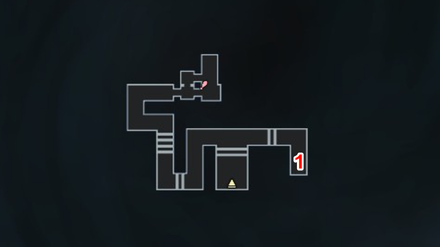
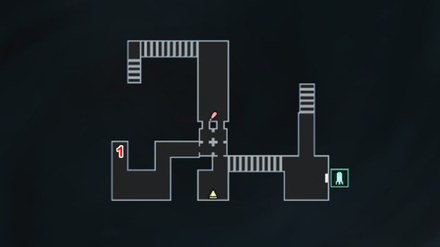
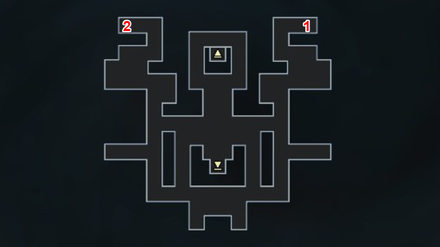
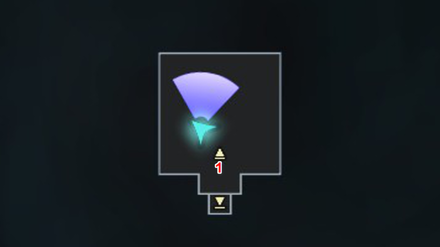
Obelisk
| B2 |  |
|---|---|
| 1F | 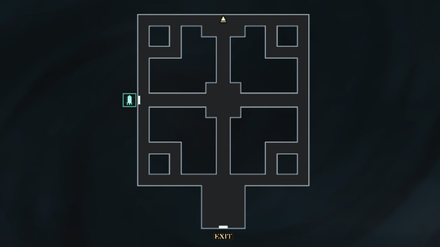 |
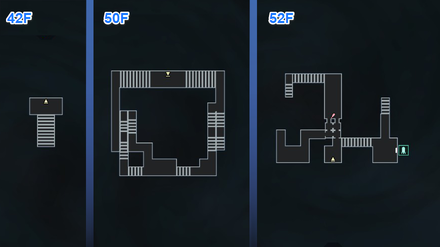
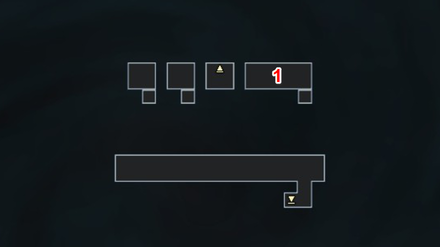
| 15F 18F 24F 26F 30F 32F |
 |
| 40F | 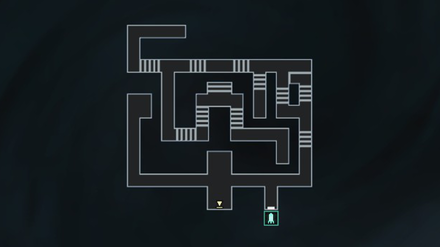 |
| 42F 50F 52F |
 |
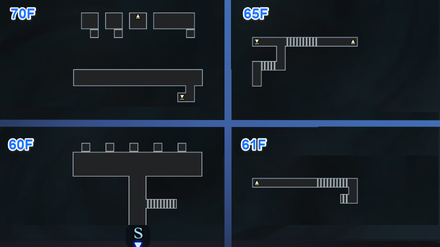
| 60F 61F 65F 70F |
 |
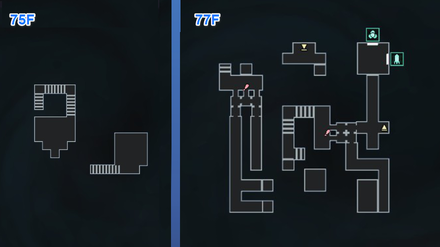
| 75F 77F |
 |
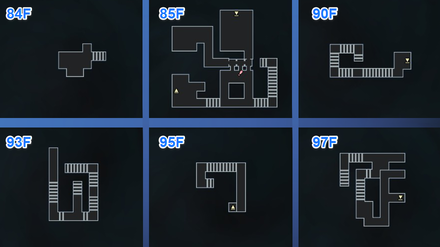
| 84F 85F 90F 93F 95F 97F |
 |
| 99F 101F 103F 105F 114F 118F |
 |
| 127F 128F 132F |
 |
| 135F 140F 142F |
 |
Asakusa Obtainable Magatamas
Nirvana
Nirvana can be bought in the Asakusa Junk Shop.
Gehenna
Gehenna can be bought in the Asakusa Junk Shop.
Geis
Geis is rewarded to you after clearing all 20 Stages in Puzzle Boy.
Djed
Djed is rewarded to you after beating the Moirae Sisters.
Asakusa Obtainable Items
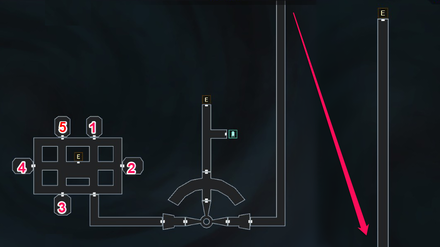
World Map
| Obtained from | Items | |
|---|---|---|
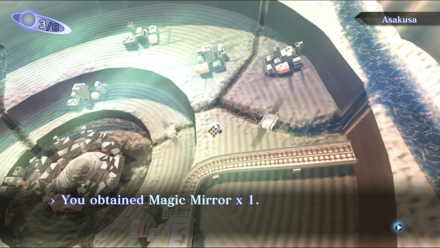
| 1 | Asakusa | Magic Mirror x 1 |
| 2 | Shiba Near the Second Entrance of Assembly of Nihilo |
Enemy ambush x 1 Succubus |
| 3 | Chiyoda To the right of the entrance to Obelisk |
Life Stone x 3 |
| 4 | Kudan To the left of the entrance to Obelisk |
10000 Macca |
Asakusa: B1 (Outer Western Building)
| Obtained from | Items | |
|---|---|---|
| 1 | Cache Cube | It's empty |
| 2 | Cache Cube | It's empty |
Asakusa: B1 (Outer Southeastern Building)
| Obtained from | Items | |
|---|---|---|
| 1 | Puzzle Boy | Geis Magatama x 1 |
Asakusa: B2 (Inner Southwestern Building)
| Obtained from | Items | |
|---|---|---|
| 1 | Cache Cube | 3000 Macca |
| 2 | Cache Cube | Attract Pipe x 1 |
Asakusa: 1F (Outer Northeastern Building)
Note: Only accessible after completing the Obelisk
| Obtained from | Items | |
|---|---|---|
| 1 | Cache Cube | Life Stone x 2 |
| 2 | Cache Cube | 2000 Macca |
Asakusa: 1F (Far Outer Northeastern Building)
Note: Only accessible after completing the Obelisk
| Obtained from | Items | |
|---|---|---|
| 1 | Mystical Chest | Diamond x 1 |
| 2 | Mystical Chest | Sapphire x 1 |
| 3 | Mystical Chest | Emerald x 1 |
Asakusa: B1 (Along Nakamise-Dori)

Note: Only accessible after meeting Hikawa in front of the Mantra HQ in Ikebukuro.
| Obtained from | Items | |
|---|---|---|
| 1 | Cache Cube | Revival Bead x 1 |
Assembly of Nihilo: B15
| Obtained from | Items | |
|---|---|---|
| 1 | Cache Cube | It's a trap! Your party takes damage. |
| 2 | Cache Cube | Bead x 1 |
| 3 | Cache Cube | Tetraja Rock x 1 |
| 4 | Cache Cube | It's a trap! Your party gets poisoned |
| 5 | Cache Cube | Medicine x 1 |
Obelisk: 1F
| Obtained from | Items | |
|---|---|---|
| 1 | Cache Cube | Dis-Mute x 1 |
Obelisk: 18F
| Obtained from | Items | |
|---|---|---|
| 1 | Mystical Chest | Jade x 1 |
Obelisk: 32F
| Obtained from | Items | |
|---|---|---|
| 1 | Cache Cube | Chakra Drop x 2 |
Obelisk: 40F
| Obtained from | Items | |
|---|---|---|
| 1 | Cache Cube | Life Stone x 4 |
| 2 | Cache Cube | Sacred Water x 1 |
| 3 | Cache Cube | Dekaja Rock x 1 |
Obelisk: 50F
| Obtained from | Items | |
|---|---|---|
| 1 | Cache Cube | Bead x 1 |
Obelisk: 52F
| Obtained from | Items | |
|---|---|---|
| 1 | Mystical Chest To access the chest, step on the puzzle blocks in this order: 3-4-2-1-2 |
Great Chakra x 1 |
Obelisk: 70F
| Obtained from | Items | |
|---|---|---|
| 1 | Mystical Chest Ride either the 3rd or 4th platform from the left to arrive at the Mystical Chest. |
Soma x 1 |
Obelisk: 77F
| Obtained from | Items | |
|---|---|---|
| 1 | Cache Cube To access the cube, step on the puzzle blocks in this order: 2-1-4-1-4 |
8000 Macca |
| 2 | Mystical Chest To access the chest, step on the puzzle blocks in this order: Bottom left, bottom right, top right, bottom right, bottom left, bottom right, top right |
Magic Incense x 1 |
Obelisk: 93F
| Obtained from | Items | |
|---|---|---|
| 1 | Cache Cube | Life Stone x 2 |
Obelisk: 99F
| Obtained from | Items | |
|---|---|---|
| 1 | Cache Cube | It's a trap! Your party gets stunned |
Obelisk: 85F
| Obtained from | Items | |
|---|---|---|
| 1 | Mystical Chest To access the chest, step on the puzzle blocks in this order: 2-3-2-1 |
Chakra Pot x 1 |
Obelisk: B2
Note: To access this floor, go to 85F and input this sequence into the floor puzzle to open the path: 1-2-1-2-1-2-3
| Obtained from | Items | |
|---|---|---|
| 1 | Cache Cube | Medicine x 1 |
| 2 | Cache Cube | It's a trap! Your party gets silenced |
| 3 | Cache Cube | Spyglass x 1 |
| 4 | Cache Cube | Medicine x 1 |
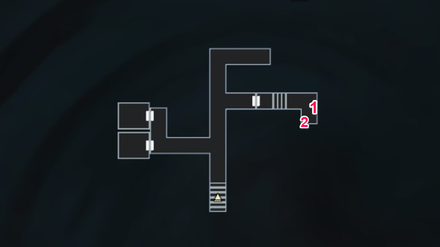
Obelisk: 118F
| Obtained from | Items | |
|---|---|---|
| 1 | Cache Cube | Soma Droplet x 1 |
Obelisk: 135F
| Obtained from | Items | |
|---|---|---|
| 1 | Mystical Chest | Bead Chain x 1 |
| 2 | Mystical Chest | Balm of Rising x 1 |
Obelisk: 142F
| Obtained from | Items | |
|---|---|---|
| 1 | Moirae Sisters Boss Fight | Bead Chain x 1 |
Asakusa General Tips
Complete the First and Second Kalpa in Labyrinth of Amala
You must complete the first and second Kalpa in Labyrinth of Amala to trigger the boss fights with White Rider and Red Rider in Asakusa.
Acquire Light Balls or Lightoma for Assembly of Nihilo
We recommend getting Light Balls or learning Lightoma for this area as it will be total darkness in the dungeon.
Look at the Etched Tiles on the Platforms in Obelisk
The required moon phase to lower the platform in Obelisk is etched as tiles on the platform.
Shin Megami Tensei 3: Nocturne Related Links

Story Walkthrough Guides
Endings Guide: How to Get All Endings
Labyrinth of Amala Guides
 First Kalpa Area First Kalpa AreaRecommended level: 20 |
 Second Kalpa Area Second Kalpa AreaRecommended level: 35 |
 Third Kalpa Area Third Kalpa AreaRecommended level: 50 |
 Fourth Kalpa Area Fourth Kalpa Area Recommended level: 65 |
 Fifth Kalpa Area Fifth Kalpa AreaRecommended level: 75 |
DLC Dungeon Guides
 Where the Demi-Fiend was Born Where the Demi-Fiend was Born |
 Center of the Conception Center of the Conception |
Comment
7  Anonymous over 1 year
I dropped this game 2 years ago because the sakahagi part was missing and I got lost And would you look at that, it's still gone!
Author
Asakusa - Obelisk Walkthrough, Boss Battles, and Item Locations
Please participate in our site
improvement survey
03/2026
improvement survey
03/2026
Would you assist in
improving Game8's site?
improving Game8's site?

×
We are listening to our users' valuable opinions and discussing how to act on them.
The information collected through this survey will be used for the purpose of improving our services. In addition, the information will only be disclosed a part of a statistic in a format that will not allow identification of personal information.
Begin Survey
Not Now
×
Please rate each item regarding Game8.co's Advertisements.
Amount of Ads
Very Dissatisfied
Somewhat Dissatisfied
Fine
Somewhat Satisfied
Highly Satisfied
Placement of Ads
Timing of Ad Display
Ad Loading Speed
Safeness of Ads
Content of Ads
×
Please rate each item regarding Game8.co's Quality of Articles.
Amount of information
Very Dissatisfied
Somewhat Dissatisfied
Fine
Somewhat Satisfied
Highly Satisfied
Frequency of updates
Speed of new information
Accuracy of articles
Understandibility of articles
Readability of sentences
×
Please rate each item regarding Game8.co's Usability of the Site.
Ease of finding information
Very Dissatisfied
Somewhat Dissatisfied
Fine
Somewhat Satisfied
Highly Satisfied
Loading Speed
Use of Color
Font Size
Visibility of Images
Easy to Understand Layout
×
Please rate each item regarding Game8.co's Message Boards, Comments.
Ease of Writing
Very Dissatisfied
Somewhat Dissatisfied
Fine
Somewhat Satisfied
Highly Satisfied
Readability
Ease in Finding Information
Comment Quality
Comment Quantity
Admin Response
×
Please rate each item regarding Game8.co's Site's new design.
Please rate our site's new design
Very Dissatisfied
Somewhat Dissatisfied
Fine
Somewhat Satisfied
Highly Satisfied
Do you think that the website's design change makes the site easier to use?
Has the new design made it easier for you to find information on the site?
Has the new design improved the overall visual appeal of the site?
How would you rate your overall satisfaction with the new design of the site?
×
How likely are you to recommend Game8 to someone you know?
Very Unlikely
0
1
2
3
4
5
6
7
8
9
10
Very Likely
If you have other opinions regarding potential improvement to the website, please share them with us. We would appreciate your honest opinion.
Note: This is a free response section, so you can proceed without entering anything.
Note: Please be sure not to enter any kind of personal information into your response.
Note: Please be sure not to enter any kind of personal information into your response.
×
Thank You
×
Thank you for participating in our survey! Your answers will help us to improve the quality of our website and services.
We hope you continue to make use of Game8.
We hope you continue to make use of Game8.
Close
Rankings
- We could not find the message board you were looking for.
Gaming News


![Everwind Review [Early Access] | The Shaky First Step to A Very Long Journey](https://img.game8.co/4440226/ab079b1153298a042633dd1ef51e878e.png/thumb)

![Monster Hunter Stories 3 Review [First Impressions] | Simply Rejuvenating](https://img.game8.co/4438641/2a31b7702bd70e78ec8efd24661dacda.jpeg/thumb)
Popular Games

Genshin Impact Walkthrough & Guides Wiki
Honkai: Star Rail Walkthrough & Guides Wiki
Umamusume: Pretty Derby Walkthrough & Guides Wiki
Pokemon Pokopia Walkthrough & Guides Wiki
Resident Evil Requiem (RE9) Walkthrough & Guides Wiki
Monster Hunter Wilds Walkthrough & Guides Wiki
Wuthering Waves Walkthrough & Guides Wiki
Arknights: Endfield Walkthrough & Guides Wiki
Pokemon FireRed and LeafGreen (FRLG) Walkthrough & Guides Wiki
Pokemon TCG Pocket (PTCGP) Strategies & Guides Wiki


Recommended Games
Diablo 4: Vessel of Hatred Walkthrough & Guides Wiki
Fire Emblem Heroes (FEH) Walkthrough & Guides Wiki
Yu-Gi-Oh! Master Duel Walkthrough & Guides Wiki
Super Smash Bros. Ultimate Walkthrough & Guides Wiki
Pokemon Brilliant Diamond and Shining Pearl (BDSP) Walkthrough & Guides Wiki
Elden Ring Shadow of the Erdtree Walkthrough & Guides Wiki
Monster Hunter World Walkthrough & Guides Wiki
The Legend of Zelda: Tears of the Kingdom Walkthrough & Guides Wiki
Persona 3 Reload Walkthrough & Guides Wiki
Cyberpunk 2077: Ultimate Edition Walkthrough & Guides Wiki


All rights reserved
©ATLUS. ©SEGA. All rights reserved. ATLUS is registered in the U.S. Patent and Trademark Office. ATLUS, the ATLUS logo, SHIN MEGAMI TENSEI, SHIN MEGAMI TENSEI NOCTURNE and SMT are either registered trademarks or trademarks of ATLUS Co., Ltd. or its affiliates.
©CAPCOM CO., LTD. All rights reserved.
The copyrights of videos of games used in our content and other intellectual property rights belong to the provider of the game.
The contents we provide on this site were created personally by members of the Game8 editorial department.
We refuse the right to reuse or repost content taken without our permission such as data or images to other sites.
Hey putting this here if anyone is wondering why the reporter dude keeps telling you don't bother him after you did everything up to that point. It's because your also supposed to take the west side exit and go into the over there to meet the killer Manklin. My god this guide is ass sometimes