Bandou Shrine Walkthrough, Boss Battles, and Item Locations

This is a walkthrough for Bandou Shrine in Shin Megami Tensei III HD Remaster (SMT Nocturne) for the Nintendo Switch, PS4, and Steam. Here you'll find a guide on how to complete this area, boss strategies, general tips, and a list of items that can be found.
List of Contents
How to Unlock Bandou Shrine
Only Available After Collecting All Magatama

Players will only be able to access Bandou Shrine near the Tower of Kagutsuchi once they collect all the Magtama in the game. If in possession of a complete set, simply go to the Cathedral of Shadows and they will give you the key item needed to access Bandou Shrine.
For a complete list of all the Magatama and how to get them, visit our Magatama page for more information!
Bandou Shrine Walkthrough
Bring the Lord's Sword to Masakados' Grave

Upon getting the Lord's Sword, present it to Masakados' Grave. The grave can be found to the northeast of the Tower of Kagutsuchi, after warping to the Assembly of Nihilo: Marunouchi.
Presenting the sword will unlock Bandou Shrine where the Masakados Magatama can be acquired.
Bandou Shrine
Advisory: Players will need to lower 4 pillars to gain access to Masakados' shrine. Lowering each pillar will trigger a boss fight. Make sure to prepare for a fight before lowering each pillar.
| Objectives | |
|---|---|
| 1 | 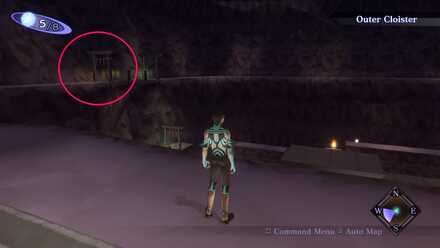 |
| 2 | 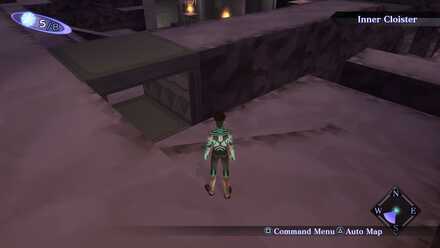 |
| 3 | After passing under the bridge, use the ramp to your right to go down another level. Follow it until you reach the 3rd Pillar from the top. |
| Boss Fight | 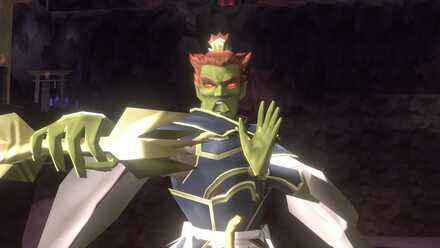 Lower the pillar and fight Zouchouten. Lower the pillar and fight Zouchouten.This boss is weak to Force. He also mainly uses Elec skills. |
| 5 | With one pillar lowered, retrace your steps back to the ramp/bridge area. This time, pass over the bridge. Players will be able to come and go from the shrine without losing progress. If you find yourself in a bad state after any of the boss fights, you can leave and come back later. |
| 6 | Head down this long ramp until you come to a T-intersection. Go right once there. |
| 7 | 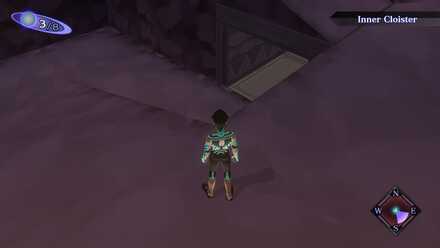 |
| 8 | You should now be able to see the ramps that lead to the bottom pillar. Head for the lowest pillar in the area. |
| Boss Fight | 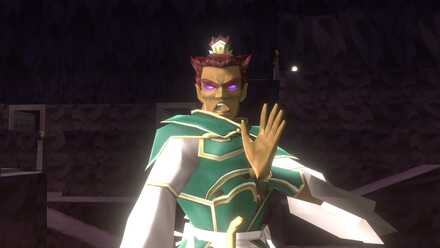 Lower the pillar and fight Jikokuten. Lower the pillar and fight Jikokuten.This boss is weak to Fire. He also mainly uses Ice skills. |
| 10 | With a second pillar lowered, retrace your steps back to the T-intersection. This time take the left path. |
| 11 | Before the pathway ends, there will be a right turn. Take it and follow it up until you reach the blue warp point. |
| 12 | Use the blue warp point to teleport to the previously inaccessible back portion of the outer cloister. |
| 13 | From here, go to the green warp point and use it to go down again. The path to the topmost pillar should be visible. Head for it. |
| Boss Fight | 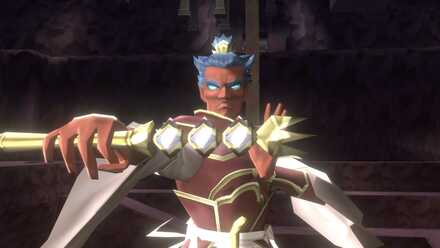 Lower the pillar and fight Koumokuten. Lower the pillar and fight Koumokuten.This boss is weak to Elec. While he uses Force skills, be careful of his Phys attacks as they are more deadly. |
| 15 | Retrace your steps and head back through the green, blue, and yellow warp gates. You must go back to your original position after first entering Bandou Shrine. It is recommended that players recover before going through the next steps, as the last boss is the hardest of the four. |
| 16 | Once ready, head for the red warp point and use it to go down to the lower level. |
| 17 | Follow the path down a series of ramps until you reach the 2nd pillar from the top. |
| Boss Fight |  Lower the pillar and fight Bishamonten. Lower the pillar and fight Bishamonten.While this boss is weak to Ice, it is harder to exploit than the others. Exercise caution when fighting him as both his magic and phys attacks hit very hard due to multiple buffs. |
| 19 | With the last pillar lowered, Bandou Shrine will descend. From your position, simply head for the door in front of you. |
| 20 | 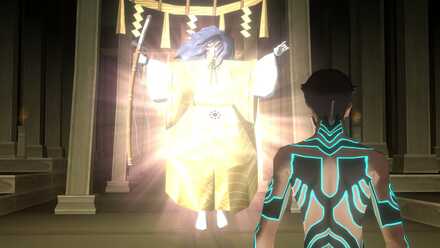 Go inside and meet Lord Masakado. Use the following responses to acquire the Masakados Magatama. Go inside and meet Lord Masakado. Use the following responses to acquire the Masakados Magatama.Why hast thou come this far to see me? "I want your power." Wilt thou bring peace to Tokyo? "Yes." |
Bandou Shrine Boss Fights
Zouchouten

Zouchouten is the easiest boss in Bandou Shrine. However, make sure to equip a Magatama that has Null: Elec.
Weaknesses
| Weaknesses | ||
|---|---|---|
| Force |
Zouchouten's weakness to Force is very easy to exploit. Couple this with his predictable moveset and you have one of the easier bosses of the Bandou Shrine.
Strengths
| Attacks | Normal Phys Attack, Elec |
|---|---|
| Void | Light, Dark, Ailments |
| Support | Dragon Eye, Beast Eye, Makakaja, Tarukaja |
Zouchouten will always prefer to cast magic over his Phys attacks. He'll use Makakaja buffs to power up before he casts. Deny the extra turns Dragon Eye gives him by equipping Magatama with Null: Elec and bringing demons that can void his Elec magic.
Jikokuten

Jikokuten will freeze his opponents before beating them down with charged Phys attacks. Make sure to equip Magatama that has Null: Ice.
Weaknesses
| Weaknesses | ||
|---|---|---|
| Fire |
Exploit Jikokuten's weakness to fire when possible, but the key to winning this fight is having immunity to ice since it allows your party to shrug off most of the damage he deals.
Strengths
| Attacks | Phys, Ice |
|---|---|
| Void | Light, Dark, Ailments |
| Support | Dragon Eye, Beast Eye, Makakaja, Focus |
Jikokuten will always cast magic when he uses the ability Dragon Eye. He'll buff using Makakaja before casting high-level ice spells like Bufudyne, Mabufudyne, and Glacial Blast.
Anyone he freezes will be focused down as he'll cast Beast Eye and use Physical attacks to deplete the frozen party member's HP. Equip Magatama and summon demons that void Ice.
Koumokuten

Koumokuten is a Phys damaging boss that can one-shot or two-shot your demons with the right buffs.
Weaknesses
| Weaknesses | ||
|---|---|---|
| Elec |
While Koumokuten is weak to Elec, players can still focus him down with either Phys or other Magic. However, exploiting Elec will grant players more turns to either heal or deal damage.
Strengths
| Attacks | Phys, Force |
|---|---|
| Void | Light, Dark, Ailments |
| Support | Dragon Eye, Makakaja, Rakukaja, Rakunda, Focus |
Koumokuten's biggest strength is the skill Focus and the combo that he performs with it. First he'll buff his defense using Rakukaja. Then he'll debuff your party with Rakunda. Finally, he'll cast Focus along with any of his Phys attack skills to deal massive damage.
Players will need to have demons that can repel or absorb Phys in order to survive. Constantly heal your Demi-fiend as no Magatama can void Phys (only Strong Resist).
Bishamonten

Bishamonten is the last of the Heavenly Kings and perhaps the most powerful. Exercise caution when fighting him.
Weaknesses
| Weaknesses | ||
|---|---|---|
| Ice |
Bishamonten is weak to Ice. Make sure to have at least 1 demon that can cast strong Ice spells like Mabufudyne or Bufudyne. The extra press turn is a nice advantage to have since you'll be dealing with Bishamonten's very large HP pool.
Strengths
| Attacks | Phys, Almighty, Fire |
|---|---|
| Void | Light, Dark, Ailments |
| Support | Tarukaja, Makakaja, Dekaja, Debilitate, Dragon Eye |
Bishamonten's strengths lie in his constant buffs and debuffs. Throughout the battle he will either buff himself with multiple instances of Tarukaja and Makakaja, or debuff the players with two casts of Debilitate.
In order to beat him, players will need to have a specialized party which can counter these buffs and debuffs using Dekunda and/or Dekaja.
Bandou Shrine Maps
| Inner Cloister | 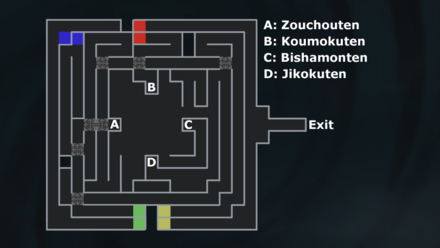 |
|---|
Bandou Shrine Obtainable Magatamas
Lord Masakado bestows Masakados to the player after they beat the Four Heavenly Kings and meet him inside the inner shrine.
Bandou Shrine Obtainable Items

Note: Item #3 is only obtainable after defeating all 4 bosses in the area.
| Obtained from | Items | |
|---|---|---|
| 1 | Cache Cube | 50000 Macca |
| 2 | Cache Cube | 50000 Macca |
| 3 | Cache Cube | 50000 Macca |
Bandou Shrine General Tips
Always recover to full before lowering pillars

Lowering pillars will always trigger the boss fights. Make sure you're ready for each of them before you decide to go through with the prompts.
While some bosses may be easy, they can still be unpredictable due to their high-level and massive HP pools.
Be comfortable using multiple demon teams and tactics
Bandou Shrine is an end-game dungeon. It will test the player's ability to field different teams, use different skills, and equip different Magatama. Remember, a single strategy will not work for all the bosses.
Bring High-Level Demons

Base demons will not do for all of the boss fights in this dungeon. Even if you have the demons with the right abilities, it is advisable that players level them up first before putting them in battle. Anything below 20 Vit. can be one-shotted.
Shin Megami Tensei 3: Nocturne Related Links

Story Walkthrough Guides
 Shinjuku Hospital Walkthrough
 Yoyogi Park and Shibuya Walkthrough
 Amala Network 1 Walkthrough
 Ginza and the Great Underpass Walkthrough
 Ikebukuro Walkthrough
 Assembly of Nihilo Walkthrough
 Kabukicho Walkthrough
 Asakusa and Obelisk Walkthrough
 Amala Network 2 Walkthrough
 Yoyogi Park 2 Walkthrough
 Amala Temple Walkthrough
 Mifunashiro and Yurakucho Walkthrough
 Diet Building Walkthrough
 Bandou Shrine Walkthrough
 Tower of Kagutsuchi Walkthrough
Endings Guide: How to Get All Endings
Labyrinth of Amala Guides
 First Kalpa Area First Kalpa AreaRecommended level: 20 |
 Second Kalpa Area Second Kalpa AreaRecommended level: 35 |
 Third Kalpa Area Third Kalpa AreaRecommended level: 50 |
 Fourth Kalpa Area Fourth Kalpa Area Recommended level: 65 |
 Fifth Kalpa Area Fifth Kalpa AreaRecommended level: 75 |
DLC Dungeon Guides
 Where the Demi-Fiend was Born Where the Demi-Fiend was Born |
 Center of the Conception Center of the Conception |
Comment
Lol T intersection the hell you talking about? For future reference if you want someone to retrace their steps try using familiar terms…
Author
Bandou Shrine Walkthrough, Boss Battles, and Item Locations
Rankings
- We could not find the message board you were looking for.
Gaming News


![Monster Hunter Stories 3 Review [First Impressions] | Simply Rejuvenating](https://img.game8.co/4438641/2a31b7702bd70e78ec8efd24661dacda.jpeg/thumb)
Popular Games

Genshin Impact Walkthrough & Guides Wiki
Honkai: Star Rail Walkthrough & Guides Wiki
Umamusume: Pretty Derby Walkthrough & Guides Wiki
Pokemon Pokopia Walkthrough & Guides Wiki
Resident Evil Requiem (RE9) Walkthrough & Guides Wiki
Monster Hunter Wilds Walkthrough & Guides Wiki
Wuthering Waves Walkthrough & Guides Wiki
Arknights: Endfield Walkthrough & Guides Wiki
Pokemon FireRed and LeafGreen (FRLG) Walkthrough & Guides Wiki
Pokemon TCG Pocket (PTCGP) Strategies & Guides Wiki


Recommended Games
Diablo 4: Vessel of Hatred Walkthrough & Guides Wiki
Cyberpunk 2077: Ultimate Edition Walkthrough & Guides Wiki
Fire Emblem Heroes (FEH) Walkthrough & Guides Wiki
Yu-Gi-Oh! Master Duel Walkthrough & Guides Wiki
Super Smash Bros. Ultimate Walkthrough & Guides Wiki
Pokemon Brilliant Diamond and Shining Pearl (BDSP) Walkthrough & Guides Wiki
Elden Ring Shadow of the Erdtree Walkthrough & Guides Wiki
Monster Hunter World Walkthrough & Guides Wiki
The Legend of Zelda: Tears of the Kingdom Walkthrough & Guides Wiki
Persona 3 Reload Walkthrough & Guides Wiki


All rights reserved
©ATLUS. ©SEGA. All rights reserved. ATLUS is registered in the U.S. Patent and Trademark Office. ATLUS, the ATLUS logo, SHIN MEGAMI TENSEI, SHIN MEGAMI TENSEI NOCTURNE and SMT are either registered trademarks or trademarks of ATLUS Co., Ltd. or its affiliates.
©CAPCOM CO., LTD. All rights reserved.
The copyrights of videos of games used in our content and other intellectual property rights belong to the provider of the game.
The contents we provide on this site were created personally by members of the Game8 editorial department.
We refuse the right to reuse or repost content taken without our permission such as data or images to other sites.
What. Have you ever driven a vehicle? A T intersection is where the road ends with paths to the left and right, y'know, like a T.