Amala Temple Walkthrough, Boss Battles, and Item Locations

This is a story walkthrough for Amala Temple in Shin Megami Tensei III HD Remaster (SMT Nocturne) for the Nintendo Switch, PS4, and Steam. Here you'll find a guide on how to complete this area, story section, boss strategies, general tips, and a list of items that can be found.
| Previous | Next |
|---|---|
| Yoyogi Park 2 | Mifunashiro and Yurakucho |
List of Contents
Amala Temple Story Walkthrough
Ikebukuro
| Objectives | |
|---|---|
| 1 | After the cutscene with Hijiri in Asakusa, fast-travel to Ikebukuro and head to 64F Mantra Headquarters. Enter Gozu-Tennoh's chamber. A cutscene will play |
| 2 | After the cutscene, return to Asakusa and speak with Hijiri. After the cutscene, use the Terminal to go after Hijiri. |
| 3 | A cutscene with Isamu in the Amala Network will play. Your response to his question will not affect the ending of the game. |
Amala Network
| Objectives | |
|---|---|
| 4 | Starting at the Anomaly, go through the door in the room, and then head straight towards the light. Prepare for a boss battle against Specter before proceeding with this step. |
| Boss Fight | 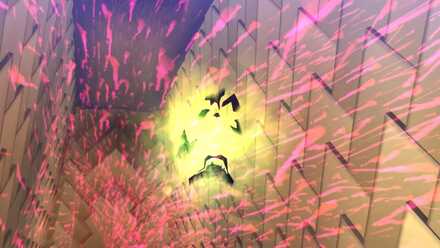 Boss Battle: Specter |
| 6 | Afterwards, exit the area to go to the Overworld. |
| 7 | Starting from Roppongi, head North and go up the slope. Turn right and go up the slope and enter the Amala Temple. |
Amala Temple
We highly recommend buying Light Balls or learning Lightoma for the Black Temple.
| Objectives | |
|---|---|
| 8 | Follow the length of the corridor by heading North until a short cutscene plays. Go through the door afterwards.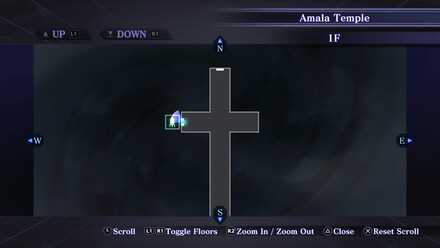 |
Black Temple
| Objectives | |
|---|---|
| 9 | Turn left and head towards Black Temple. Go through the door upon entering Black Temple 1F. |
| 10 | 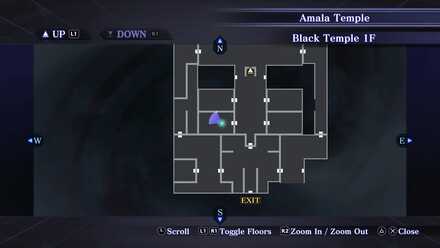 Enter the first West room and examine the crack on the floor. |
| 11 | Exit the room and go through the blue beam to reach 2F. Upon reaching 2F, continue forward going South and step on the blue beam to reach 3F. |
| 12 | On 3F, go up the stairs and examine the Black Torch. Put out the flame. |
| 13 |  Go back to 2F. From the starting point, enter the 2nd West room and jump off the hole. |
| 14 | 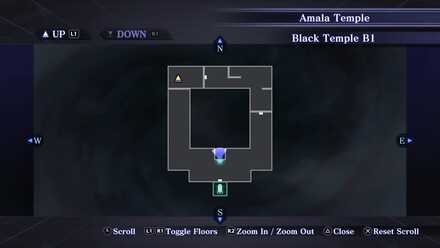 Down at B1, turn left and follow the path then enter the North door to access the Altar. Climb up the platform to fight Aciel. Prepare for a boss fight against Alciel before proceeding. |
| Boss Fight | 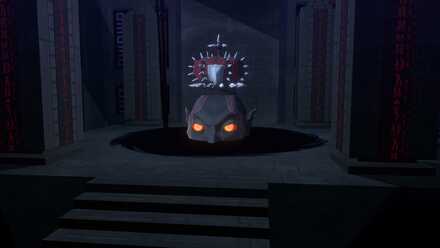 Boss Battle: Aciel |
White Temple
| Objectives | |
|---|---|
| 16 | After the fight, head over to the North Wing of the Amala Temple and enter the White Temple.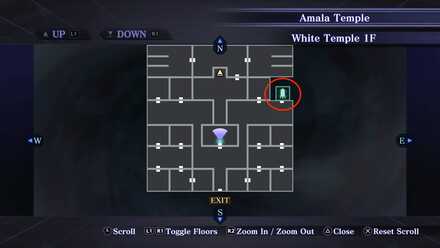 |
| 17 | 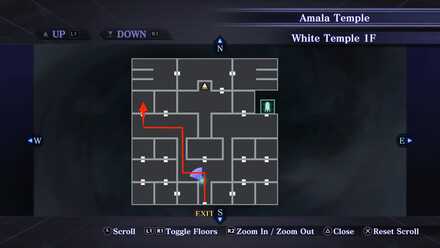 Pace forward, turn left, follow the path, and go through the left-side West door. You will be warped to another room. |
| 18 | 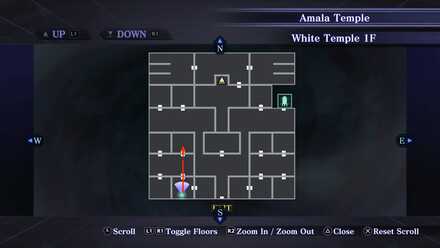 Head straight going North and go through the door. Head straight again and head for the North door. You will be warped to another room. |
| 19 |  Head straight and go through the door. You will be warped to another room. |
| 20 | 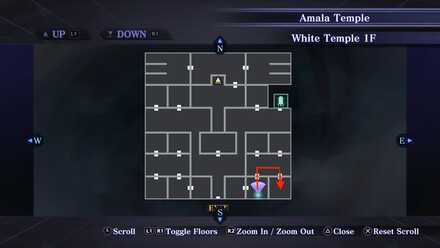 Go through the North door, and then turn right and enter the South door. You will be warped to another room. |
| 21 | Head towards the yellow beam to get to 2F. Pace forward and get warped to another room. |
| 22 | 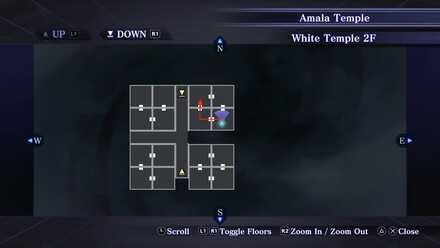 Turn left and go through the West door, then turn right go through the North door. You will be warped to another room. |
| 23 | 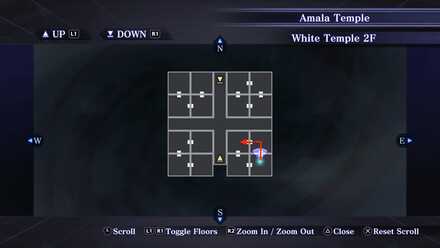 Pace forward and go through the North door, then turn left and enter the West door. You will be transported to another room. |
| 24 |  Immediately turn right and enter the East door. You will be transported to another room. |
| 25 | 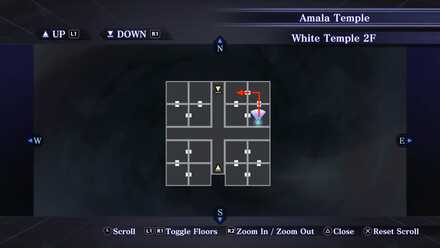 Pace forward and go through the North door, and then turn left and enter the West door. |
| 26 | Head towards the yellow beam to get warped to the White Temple Altar. Come up the altar to trigger the boss fight. Prepare for a boss fight against Albion, Luvah, Urizen, Tharmas, and Urthrona before proceeding. |
| Boss Fight | 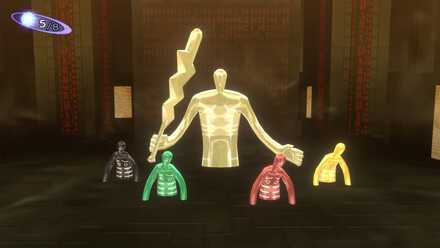 Boss Battle: Albion and Zoas |
| 28 | Obtain Adama Magatama after defeating Albion and the group of Zoas. Afterwards, head towards the white beam and examine it to exit the temple. |
Red Temple
We recommend getting a Float Ball or learning Liftoma for this area.
| Objectives | |
|---|---|
| 29 | After the fight, head over to the East Wing of the Amala Temple and enter the Red Temple. |
| 30 | 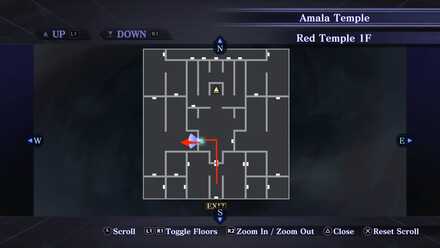 Head towards the North door in 1F, then turn left and go through the West door. |
| 31 | 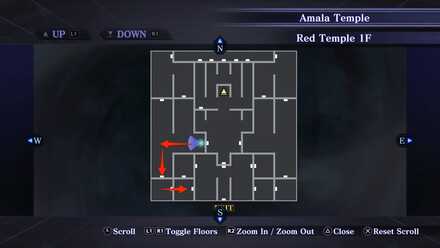 Turn left and enter the South door, and then turn left again and enter the East door. |
| 32 | 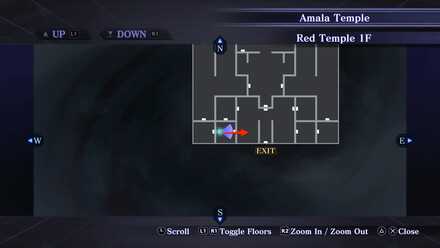 Pace forward and go through the East door. |
| 33 |  Head for the North door again and enter the first East door. |
| 34 | 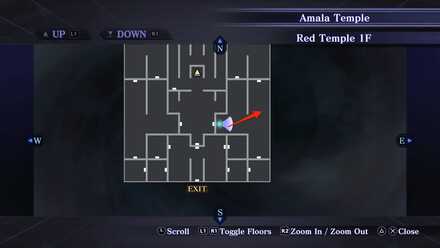 Take the 2nd left-side path and get warped to a cursed dimension. |
| 35 | 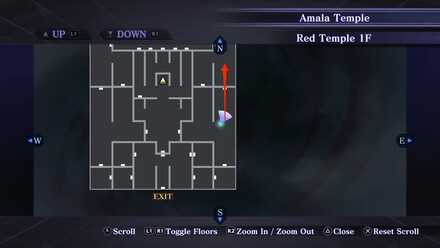 Pace forward and head towards the North door. |
| 36 | 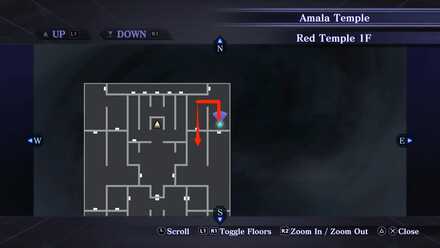 Continue forward and turn left going West, and turn left again going South. Go through the South door. |
| 37 | 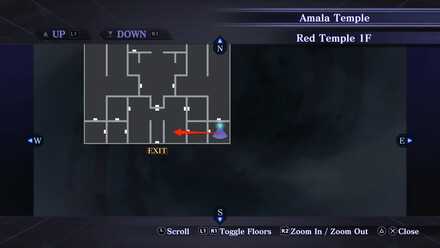 Turn right and enter the West door, go through the beam, and enter the West door. |
| 38 |  Go through the North door, and then turn left and enter the West door. |
| 39 | 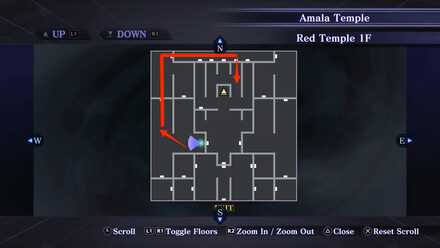 Take the second right-side path and go through the North door. Continue forward and enter the East door. Move along the corridor and enter the fourth South door. |
| 40 | Move forward, turn right, and hop on the red beam to get to 2F. |
| 41 | On 2F, move forward and go through the South door. |
| 42 | 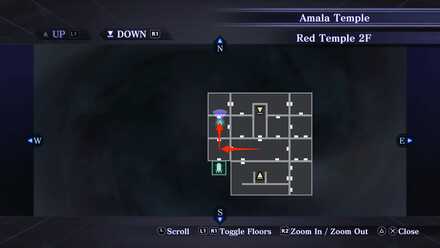 Turn right and enter the West door. Turn right again and enter the North door. Paced forward ang get warped to a cursed dimension. |
| 43 | 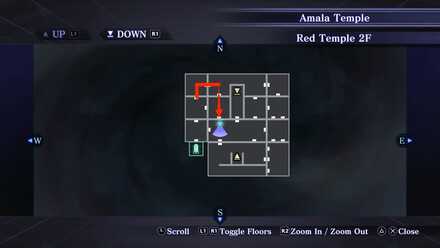 Go through the North door, turn right and enter the East door, and turn right again and enter the South door. Go through the beam and go through the South door. |
| 44 | 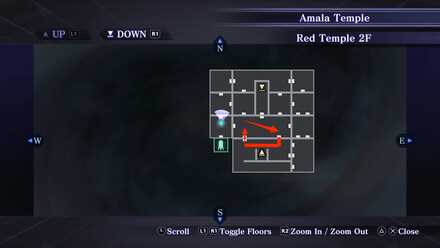 Enter the left-side South door and get warped. Turn right, pace forward, and enter the North door. |
| 45 | 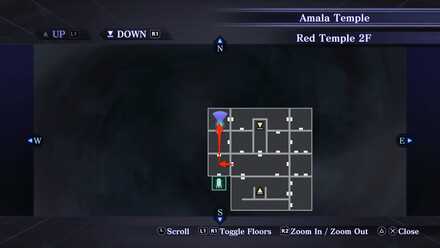 Turn left and enter the West door, move forward and enter the North door, move forward again and enter the North door. |
| 46 |  Turn right and enter the East door, move forward and enter the East door, and then turn right and enter the South door. |
| 47 | 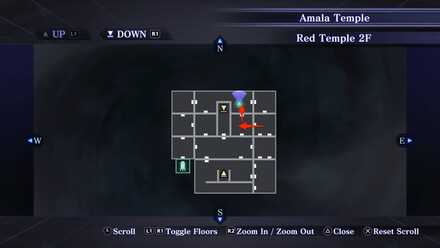 Turn right and enter the West door, go through the beam, and then turn right and enter the North door. |
| 48 | 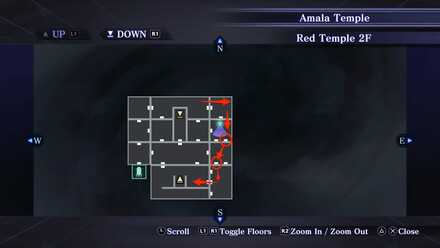 Turn right and enter the East door, turn right and enter the South door, move forward and enter the Southeast door, then enter the Southwest door, and go through the middle West door. Then hop on the red beam to get to the Red Temple Altar. |
| 49 | Climb up the stairs to trigger the boss fight. Prepare for a boss fight against Skadi. |
| Boss Fight | 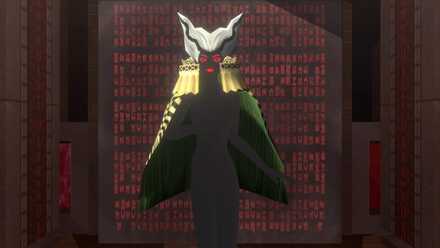 Boss Battle: Skadi |
| 51 | A cutscene will play after the battle. Afterwards, examine the white beam to exit the temple. |
| 52 | Head over to the center of the Amala Temple then examine and enter the upside-down pyramid. |
| 53 | A cutscene will play. If you triggered Musubi Flag 1 / 2, your response to Isamu's following question will affect the ending of the game. Otherwise, your response to his question will have no effect. Will you do it, for the sake of Musubi? "All right." (Musubi Flag 2 / 2) "No way." (Reject) |
| 54 | Pace forward and a cutscene with Yosuga-aligned demons will play. |
| 55 | Fast-travel to Mifunashiro to proceed with the story. |
Obtain Adama Magatama After Defeating Albion and the group of Zoas
Obtain Adama Magatama after defeating Albion and the group of Zoas in the White Temple.
How to Get Adama Magatama: Adama Stats and Skills Learned
Response to Isamu Will Affect the Ending of the Game If Musubi Flag 1 / 2 was Triggered
If you triggered Musubi Flag 1 / 2, your response to Isamu's following question will affect the ending of the game. Otherwise, your response to his question will have no effect.
| Response | Effect |
|---|---|
| All right. | Musubi Flag 2 / 2 |
| No way. | Reject |
Endings Guide: How to Get All Endings
Amala Temple Boss Fights
Specter

Specter returns for a third round. This is the toughest he's ever been, so don't underestimate him.
| Weaknesses | ||
|---|---|---|
| None, but Phys Attacks can go a long way. |
Specter does not have any elemental weakness, however, using Phys attacks is useful for dealing damage.
How to Beat Specter (3rd Encounter)
Aciel
Aciel has come from the depths of hell, seeking Magatsuhi. Beware his Tempest attacks.
| Weaknesses | ||
|---|---|---|
| None, but Phys and Magic attacks can go a long way |
Aciel does not have any elemental weakness, however, using both but Phys and Magic attacks is useful for dealing damage.
Albion, Luvah, Urizen, Tharmas, and Urthrona
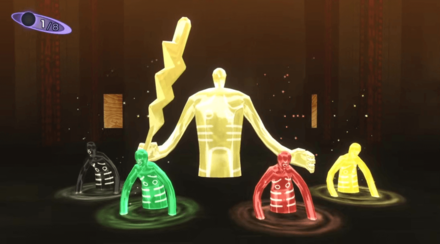
Albion can only think of devouring. Beware his army of Zoas.
| Weaknesses | ||
|---|---|---|
| None, but Phys Attacks can go a long way. |
Albion does not have any elemental weakness, however, using Phys attacks is useful for dealing damage. Meanwhile, Luvah is weak to Elec, Urizen is weak to Ice, Tharmas is weak to Fire, and Urthona is weak to Force.
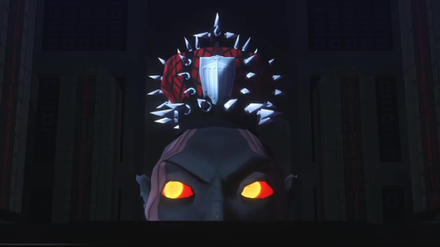
Skadi

Skadi is tired of Magatsuhi and thirsts for your blood. Physical attacks don't work on her, so plan your moves wisely.
| Weaknesses | ||
|---|---|---|
| None, but Magic attacks can go a long way |
Skadi does not have any elemental weakness, however, using but Magic attacks is useful for dealing damage.
Amala Temple Maps
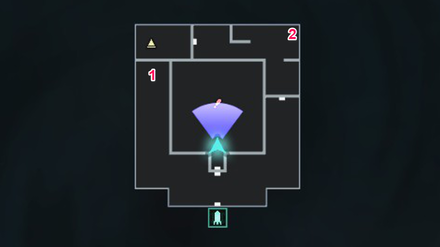
Amala Network (3rd Entry)
| 1F |  |
|---|
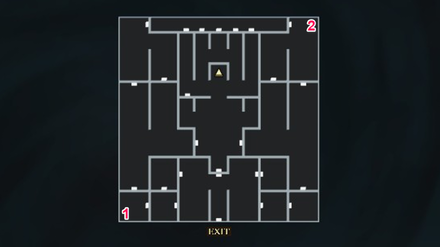
Amala Temple
| 1F (Upper) | 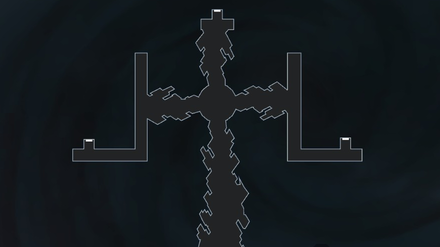 |
|---|---|
| 1F (Lower) | 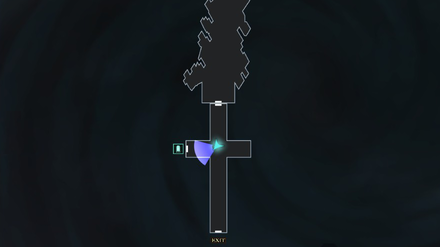 |
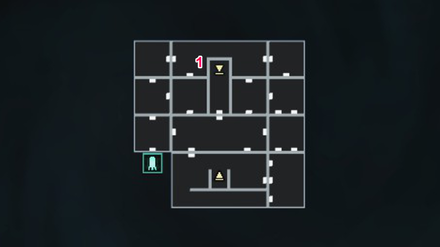
Amala Temple: Black Temple
| B1 | 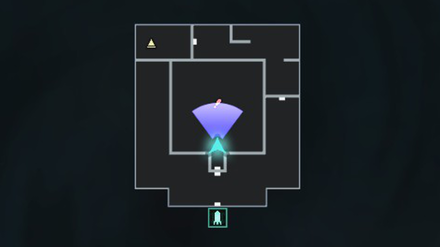 |
|---|---|
| 1F | 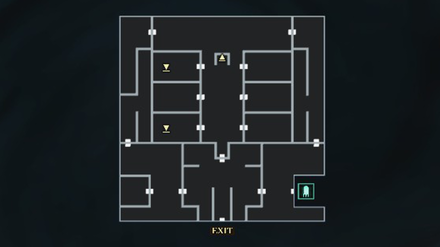 |
| 2F | 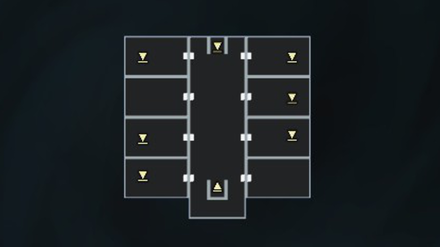 |
| Altar | 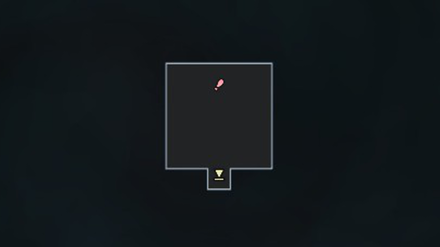 |
Amala Temple: Red Temple
| 1F | 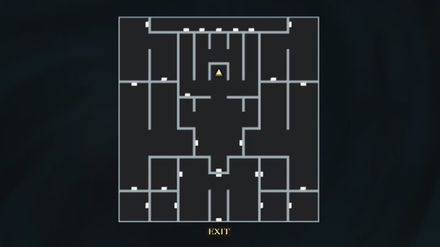 |
|---|---|
| 2F | 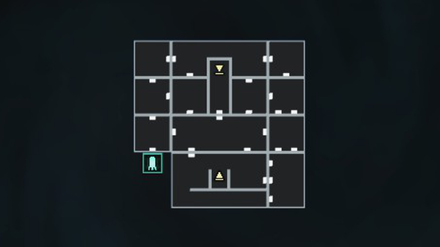 |
| Altar |  |
Amala Temple: White Temple
| 1F | 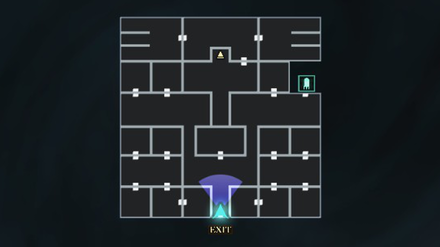 |
|---|---|
| 2F | 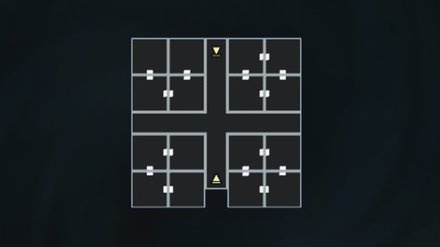 |
| Altar | 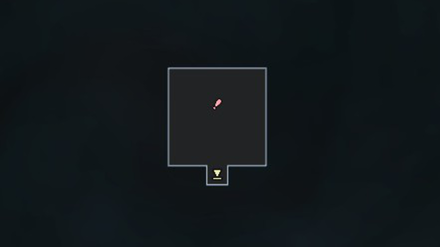 |
Obtainable Magatamas
Adama
Adama can be acquired after defeating Albion!
Amala Temple Obtainable Items
World Map
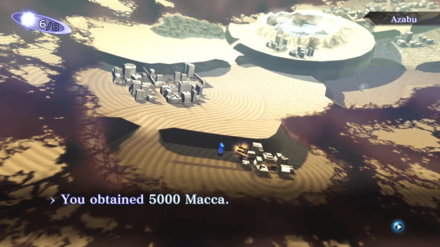
| Obtained from | Items | |
|---|---|---|
| 1 | Azabu South of Amala Temple |
5000 Macca |
Black Temple: 1F

| Obtained from | Items | |
|---|---|---|
| 1 | Cache Cube | Megido Rock x 1 |
| 2 | Cache Cube | Light Ball x 1 |
| 3 | Mystical Chest | Luck Incense x 1 |
Black Temple: B1
| Obtained from | Items | |
|---|---|---|
| 1 | Cache Cube | Bead x 1 |
| 2 | Mystical Chest | Soma x 1 |
Red Temple: 1F
| Obtained from | Items | |
|---|---|---|
| 1 | Cache Cube | Bead x 1 |
| 2 | Mystical Chest | Agility Incense x 1 |
Red Temple: 2F
| Obtained from | Items | |
|---|---|---|
| 1 | Cache Cube | Life Stone x 3 |
White Temple: 1F
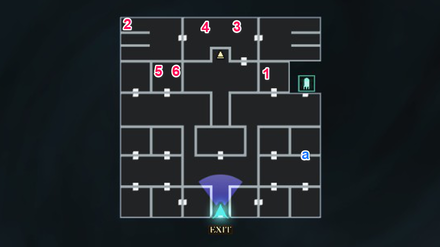
| Obtained from | Items | |
|---|---|---|
| 1 | Cache Cube | Life Stone x 2 |
| 2 | Mystical Chest | Soma x 1 |
| 3 | Cache Cube | It's a trap! Ambushed by 3 Legion. |
| 4 | Cache Cube | Revival Bead x 1 |
| 5 | Cache Cube To access this Cache Cube, enter the door marked "a" |
Medicine x 1 |
| 6 | Cache Cube To access this Cache Cube, enter the door marked "a" |
Bead x 1 |
White Temple: 2F
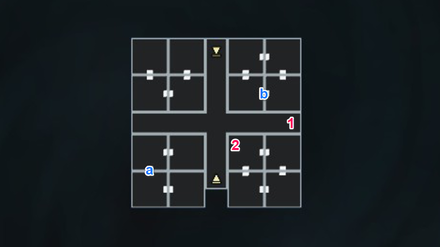
| Obtained from | Items | |
|---|---|---|
| 1 | Cache Cube Enter the door marked "a" from the room above to teleport to this Cache Cube |
Blessed Fan x 1 |
| 2 | Mystical Chest Enter the door marked "b" to teleport to this Mystical Chest |
Life Stone x 1 |
Amala Temple General Tips
Level Up to at least lvl.70
We highly recommend to level up to at least lvl.70 for this area so you can keep up with all the bosses in the Amala Temple.
Get Light Balls or Learn Lightoma for the Black Temple
We recommend buying Light Balls or learning Lightoma for the Black Temple as the dungeon will be shrouded in darkness.
Get Float Balls or learning Liftoma for Red Temple
We recommend getting a Float Ball or learning Liftoma for Red Temple as the dungeon is made up of cursed rooms and hallways.
Shin Megami Tensei 3: Nocturne Related Links

Story Walkthrough Guides
 Shinjuku Hospital Walkthrough
 Yoyogi Park and Shibuya Walkthrough
 Amala Network 1 Walkthrough
 Ginza and the Great Underpass Walkthrough
 Ikebukuro Walkthrough
 Assembly of Nihilo Walkthrough
 Kabukicho Walkthrough
 Asakusa and Obelisk Walkthrough
 Amala Network 2 Walkthrough
 Yoyogi Park 2 Walkthrough
 Amala Temple Walkthrough
 Mifunashiro and Yurakucho Walkthrough
 Diet Building Walkthrough
 Bandou Shrine Walkthrough
 Tower of Kagutsuchi Walkthrough
Endings Guide: How to Get All Endings
Labyrinth of Amala Guides
 First Kalpa Area First Kalpa AreaRecommended level: 20 |
 Second Kalpa Area Second Kalpa AreaRecommended level: 35 |
 Third Kalpa Area Third Kalpa AreaRecommended level: 50 |
 Fourth Kalpa Area Fourth Kalpa Area Recommended level: 65 |
 Fifth Kalpa Area Fifth Kalpa AreaRecommended level: 75 |
DLC Dungeon Guides
 Where the Demi-Fiend was Born Where the Demi-Fiend was Born |
 Center of the Conception Center of the Conception |
Author
Amala Temple Walkthrough, Boss Battles, and Item Locations
Rankings
- We could not find the message board you were looking for.
Gaming News
![Animal Crossing: New Horizons Review [Switch 2] | Needlessly Crossing Over to a New Generation](https://img.game8.co/4391759/47d0408b0b8a892e453a0b90f54beb8a.png/show)


Popular Games

Genshin Impact Walkthrough & Guides Wiki
Honkai: Star Rail Walkthrough & Guides Wiki
Arknights: Endfield Walkthrough & Guides Wiki
Umamusume: Pretty Derby Walkthrough & Guides Wiki
Wuthering Waves Walkthrough & Guides Wiki
Pokemon TCG Pocket (PTCGP) Strategies & Guides Wiki
Abyss Walkthrough & Guides Wiki
Zenless Zone Zero Walkthrough & Guides Wiki
Digimon Story: Time Stranger Walkthrough & Guides Wiki
Clair Obscur: Expedition 33 Walkthrough & Guides Wiki


Recommended Games
Fire Emblem Heroes (FEH) Walkthrough & Guides Wiki
Pokemon Brilliant Diamond and Shining Pearl (BDSP) Walkthrough & Guides Wiki
Diablo 4: Vessel of Hatred Walkthrough & Guides Wiki
Super Smash Bros. Ultimate Walkthrough & Guides Wiki
Yu-Gi-Oh! Master Duel Walkthrough & Guides Wiki
Elden Ring Shadow of the Erdtree Walkthrough & Guides Wiki
Monster Hunter World Walkthrough & Guides Wiki
The Legend of Zelda: Tears of the Kingdom Walkthrough & Guides Wiki
Persona 3 Reload Walkthrough & Guides Wiki
Cyberpunk 2077: Ultimate Edition Walkthrough & Guides Wiki


All rights reserved
©ATLUS. ©SEGA. All rights reserved. ATLUS is registered in the U.S. Patent and Trademark Office. ATLUS, the ATLUS logo, SHIN MEGAMI TENSEI, SHIN MEGAMI TENSEI NOCTURNE and SMT are either registered trademarks or trademarks of ATLUS Co., Ltd. or its affiliates.
©CAPCOM CO., LTD. All rights reserved.
The copyrights of videos of games used in our content and other intellectual property rights belong to the provider of the game.
The contents we provide on this site were created personally by members of the Game8 editorial department.
We refuse the right to reuse or repost content taken without our permission such as data or images to other sites.
White Temple 2F Mystical Chest is a Life Stone not a Chakra Pot