Puzzle Boy Stage 19 Solution
This is a guide to solving Stage 19 of the Puzzle Boy mini-game for Shin Megami Tensei III: HD Remaster (SMT Nocturne). Learn how to complete the Puzzle Boy Stage 19.
| Previous Level | Next Level |
|---|---|
| Puzzle Boy Stage 18 | Puzzle Boy Stage 20 |
List of Contents
Puzzle Boy Stage 19 Solution
Puzzle Boy Stage 19 Video Guide
Puzzle Boy Stage 19 Step-by-Step Guide
| 1 | From your starting position, move all the way to the right and push the orange 2-block into the hole. |
|---|---|
| 2 | 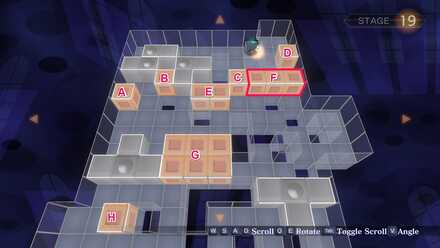 |
| 3 | 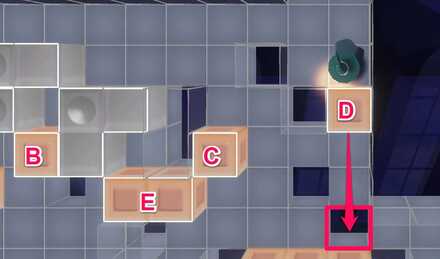 |
| 4 | 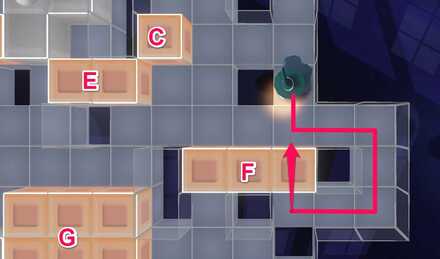 |
| 5 | Now go under block C and push it up by 3 steps. |
| 6 | Once done, go to the left side of block E. Push it 2 steps right. |
| 7 |  |
| 8 | Next, push block F all the way down again. Once it hits the lower wall, go under it and push it up by 1 step. |
| 9 | Now you can push block F from its right side. Push it left by 1 step. |
| 10 | 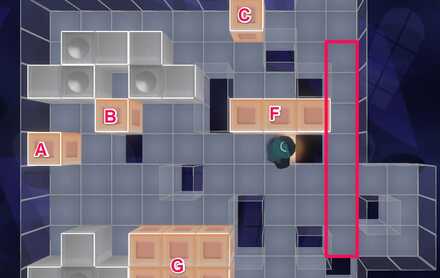 |
| 11 | 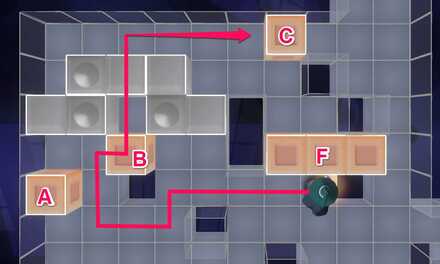 |
| 12 | Push block C all the way to the right (until it hits the wall), then all the way down to plug another hole. |
| 13 | Take 2 steps down to flip the swivel below you before the next step. |
| 14 | 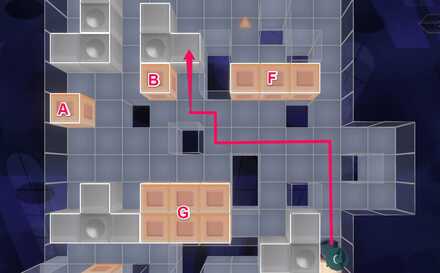 |
| 15 | From here, go to the left side of block B. Push it right by 1 step and up by 3 steps. |
| 16 | 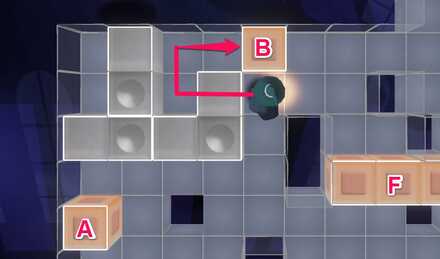 |
| 17 | Flip these swivels by following the red path. |
| 18 |  |
| 19 | Push block H 1 step up and 2 steps right. Go under it and push it 1 step up. |
| 20 | 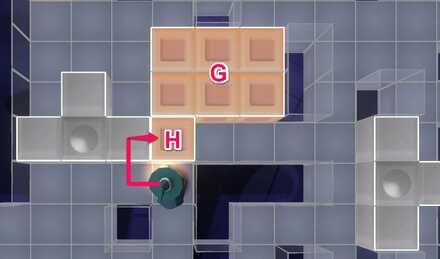 |
| 21 | Now go around and approach block H from above. Push it down until it hits the lower wall. |
| 22 | 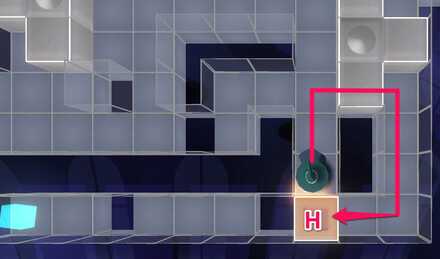 |
| 23 | Push block H left by 1 step to plug one of the last two holes. |
| 24 | From your last position take 5 steps up, 5 steps left, 1 step down, 2 steps left, and 1 step up. |
| 25 | Your path to block A should be clear. Go on top of it and push it down by 6 steps. |
| 26 | Take 1 step right to reset the swivel on your right, before going to the left side of block A and pushing it right by 1 step. |
| 27 | Now, push block A by 1 step up, 2 steps right, and 1 step up. |
| 28 | 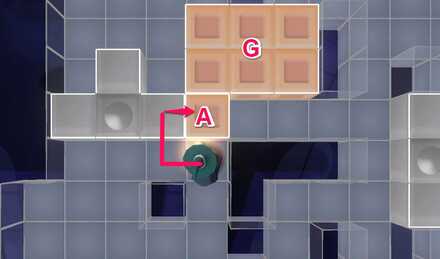 |
| 29 | Go around again and approach block A from above. Push it all the way down until it hits the lower wall. |
| 30 | 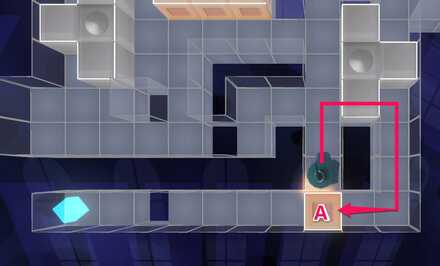 |
| 31 | The path to the blue cube should now be clear. Complete the stage. |
Puzzle Boy Related Guides

All Puzzle Boy Solutions
| Puzzle Boy Solutions | |||
|---|---|---|---|
| Stage 1 | Stage 2 | Stage 3 | Stage 4 |
| Stage 5 | Stage 6 | Stage 7 | Stage 8 |
| Stage 9 | Stage 10 | Stage 11 | Stage 12 |
| Stage 13 | Stage 14 | Stage 15 | Stage 16 |
| Stage 17 | Stage 18 | Stage 19 | Stage 20 |
Author
Puzzle Boy Stage 19 Solution
Rankings
- We could not find the message board you were looking for.
Gaming News
![Neverness to Everness (NTE) Review [Beta Co-Ex Test] | Rolling the Dice on Something Special](https://img.game8.co/4414628/dd3192c8f1f074ea788451a11eb862a7.jpeg/show)


Popular Games

Genshin Impact Walkthrough & Guides Wiki
Honkai: Star Rail Walkthrough & Guides Wiki
Arknights: Endfield Walkthrough & Guides Wiki
Umamusume: Pretty Derby Walkthrough & Guides Wiki
Wuthering Waves Walkthrough & Guides Wiki
Pokemon TCG Pocket (PTCGP) Strategies & Guides Wiki
Abyss Walkthrough & Guides Wiki
Zenless Zone Zero Walkthrough & Guides Wiki
Digimon Story: Time Stranger Walkthrough & Guides Wiki
Clair Obscur: Expedition 33 Walkthrough & Guides Wiki


Recommended Games
Fire Emblem Heroes (FEH) Walkthrough & Guides Wiki
Pokemon Brilliant Diamond and Shining Pearl (BDSP) Walkthrough & Guides Wiki
Diablo 4: Vessel of Hatred Walkthrough & Guides Wiki
Super Smash Bros. Ultimate Walkthrough & Guides Wiki
Yu-Gi-Oh! Master Duel Walkthrough & Guides Wiki
Elden Ring Shadow of the Erdtree Walkthrough & Guides Wiki
Monster Hunter World Walkthrough & Guides Wiki
The Legend of Zelda: Tears of the Kingdom Walkthrough & Guides Wiki
Persona 3 Reload Walkthrough & Guides Wiki
Cyberpunk 2077: Ultimate Edition Walkthrough & Guides Wiki


All rights reserved
©ATLUS. ©SEGA. All rights reserved. ATLUS is registered in the U.S. Patent and Trademark Office. ATLUS, the ATLUS logo, SHIN MEGAMI TENSEI, SHIN MEGAMI TENSEI NOCTURNE and SMT are either registered trademarks or trademarks of ATLUS Co., Ltd. or its affiliates.
©CAPCOM CO., LTD. All rights reserved.
The copyrights of videos of games used in our content and other intellectual property rights belong to the provider of the game.
The contents we provide on this site were created personally by members of the Game8 editorial department.
We refuse the right to reuse or repost content taken without our permission such as data or images to other sites.
They changed it for the switch port on stage 19 i need help