Tower of Kagutsuchi Walkthrough, Boss Battles, and Item Locations
This is a story walkthrough for Tower of Kagutsuchi in Shin Megami Tensei III HD Remaster (SMT Nocturne) for the Nintendo Switch, PS4, and Steam. Here you'll find a guide on how to complete this area, a story section, boss strategies, general tips, and a list of items that can be found.
| Previous | Next |
|---|---|
| Diet Building Walkthrough | - |
List of Contents
Tower of Kagutsuchi Story Walkthrough
If you are aiming for the True Demon Ending, you must first clear the Fifth Kalpa in the Amala Labyrinth before proceeding to Tower of Kagutsuchi.
Amala Temple
| Objectives | |
|---|---|
| 1 | After receiving the Yahiro no Himorogi from Yuko, fast-travel to Amala Temple. Head to the courtyard where the upside down temple is. |
| 2 | Head towards the upside down temple. A cutscene will play. Afterwards, walk up to the temple, examine it, and then enter to get inside the central temple. Another cutscene will play. |
| 3 | Fast-travel to Assembly of Nihilo to proceed with the story. |
Assembly of Nihilo - The Obelisk
| Objectives | |
|---|---|
| 4 | From the terminal, turn right to the West exit and leave the area. |
| 5 | On the overworld, head Southwest then go down the sloping pathwalks to enter the Obelisk. |
| 6 | On 132F of Obelisk, go around the block wall, and then ride the block to 135F. Continue forward and ride the block past the column to get to 140F. |
| 7 | From the lift, circle around 140F and ride the opposite block to 142F. Examine the light coming from above and ascend to 150F. |
| 8 | On 150F, examine the temple structure up ahead and enter the Tower of Kagutsuchi. |
Tower of Kagutsuchi 1
We recommend using Float Balls or Liftoma for the area following the fight with Ahriman.
| Objectives | |
|---|---|
| 9 | A cutscene will play as you enter the tower. Afterwards, ride the the block to move up to the next area. |
| 10 | Continue forward going South and enter the South door. Continue forward, past the Manikins, and ride the South block. Continue forward and enter the North door. |
| 11 | Continue forward until you reach a large square elevator platform An S-terminal is located at the North door. |
| 12 | Continue climbing up the set of stairs until you reach 179F. Go through the door. |
| 13 | 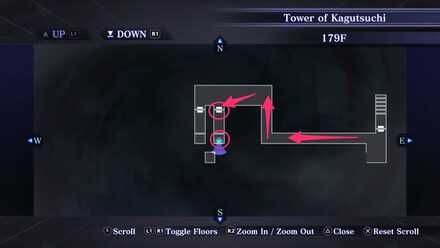 Immediately turn right, follow the length of the path and enter the left-side South door. Use the block to get to the other end of the area. |
| 14 | Enter the left-side South door, then turn left and enter the East door. Continue forward and enter another East door. |
| 15 | Turn right (ignore the door) and climb up the stairs. Follow the length of the path and ride the block located at the edge. |
| 16 | Get off the lift, circle around and climb up the stairs (West) to 187F. |
| 17 | 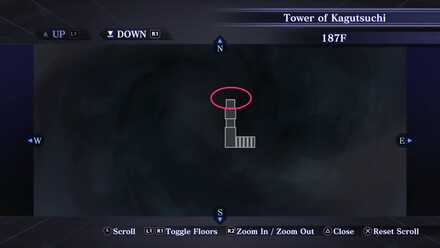 |
| 18 | Climb up the stairs (West) again and this time take the nearer block to 188F. |
| 19 | 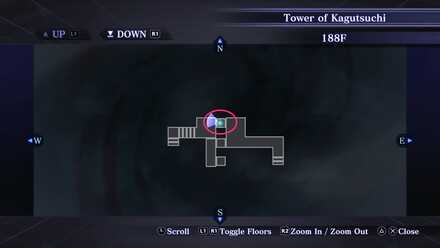 Continue forward and use the upper 3rd block. Climb down the set of stairs up ahead. |
| 20 | Turn right, then turn left to the the path and climb up the stairs. Ride the middle block going down to 187F. |
| 21 | Orient the compass North, continue forward past two sets of stairs beside each other and ride the elevator up ahead. |
| 22 | 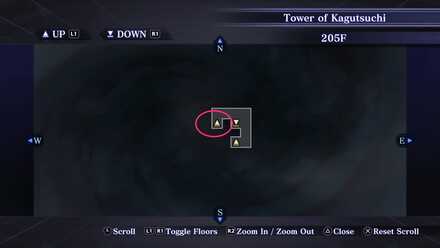 On 196F, climb up the left-side stairs. Use the block to go up to 205F. Orient the compast West and head to the block to go up to 209F. You can reach the S-Terminal by using the other block. |
| 23 | Climb the right-side stairs and keep climbing up the next flights of stairs until you reach the block to go up to 215F. |
| 24 | Ride the elevator up ahead to 223F. Enter the North door to trigger the boss fight. Boss Fight up ahead! Prepare before entering the door at 223F. |
| Boss Fight | 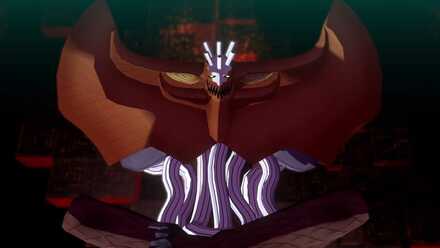 Boss Battle: Ahriman |
| 26 | Obtain the Earthstone after defeating Ahriman. |
| 27 | After defeating Ahriman, turn left and follow the narrow West path. Climb up the stairs and enter the door. Ride the elevator to 231F. |
| 28 | Continue forward going South and ride the block to 285F. From the platform, turn left going West and enter the West door. A Fountain of Life is located at the North door. |
| 29 | Continue forward to the other end of the room then turn right to a narrow hallway and then ride the elevator to 302F. |
Tower of Kagutsuchi 2
We recommend using Float Balls or Liftoma and Light Balls or Lightoma for this area.
| Objectives | |
|---|---|
| 30 | 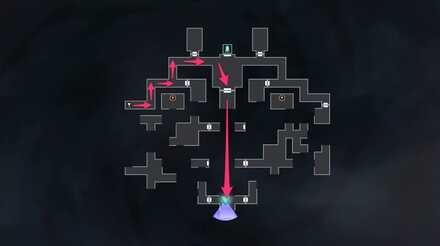 From the elevator, follow the corridor and then turn left going North and continue until you reach a wide area. Orient the compass South and enter the South door. Continue forward using the invisi-floors and move forward until you reach the other end of the area. |
| 31 | Turn left going East and enter the East door. Turn left and coss the long invisi-floor. Turn left again and cross an L-shaped invisi-floor. Take the first left turn and cross the long invisi-floor. |
| 32 | Enter the West door up ahead and climb the stairs. Ride the lift down to 302F, and then move forward and ride the lift to 322F. |
| 33 | Climb up the long slope. The camera orietation will change once you get to the top. Climb up another long slope and keep climbing up. |
| 34 | Enter the door at the top. Continue forward and enter the West door to battle Noah. Prepare for a boss fight against Noah before entering the West door. |
| Boss Fight |  Boss Battle: Noah |
| 36 | Obtain the Netherstone after defeating Noah. |
Tower of Kagutsuchi 3
| Objectives | |
|---|---|
| 37 | Return outside to the slopes. Take the elevator located at the edge. Climb up the stairs and enter the West door. Continue forward and ride the elevator to 402F. Multiple facilities including Fountain of Life, Junk Shop, S-Terminal, and a Cathedral of Shadows are all located beyond the West door at 402F. |
| 38 | Climb up the stairs and ride the elevator to 418F. Pace forward for a cutscene. Prepare to battle Thor before proceeding. |
| Boss Fight | 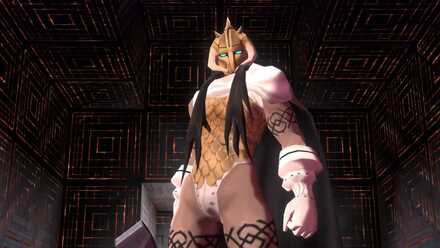 Boss Battle: Thor 2nd Encounter |
| 40 | After defeating Thor, climb up the right-side stairs. Pace forward and get warped to a new area in 418F. Continue forward going South then take the second right turn near the edge. Turn right going South, move forward and take the second left-side path going East. Turn right and pace forward until you get warped to a new area in 418F. |
| 41 | Continue forward South, then West, and then take the left turn South and follow the length of the path. Turn left and pace forward until you get warped to a new area in 418F. |
| 42 | Continue forward going North, turn left West, then turn right going North. Immediately turn left when a path going West opens up, and then immediately turn left again going South. Pace forward until you get warped to a new area in 418F. |
| 43 | Go to the Northernmost block to your left and get warped to another area in 418F. Turn around heading North and then take the first right-side path going East. Pace forward and get warped again. |
| 44 | In the new area, follow the path until you get warped again. Continue forward going South and ride the elevator to get to 431F. |
| 45 | Turn right, and then turn right again, enter the East door. Move forward and take the second right, turn left, turn right, take the first left. Ride the elevator up to 444F. An S-Terminal is located at a North door. |
| 46 | Continue forward and follow the invisi-floors. Turn right to get warped to a new area in 431F. |
| 47 | Back in 431F, orient the compass South, move forward to the wide area and enter the South door. |
| 48 | Follow the path and climb up the slope. The camera orientation will change as you get to the top. Ride the block lift up to 444F. |
| 49 | Climb up the slope and enter the door. Continue forward and enter the West door. An S-Terminal is located at the North door. |
| 50 | Turn right and follow the invisi-floor. Turn right going East and follow the invisi-floor. |
| 51 | Walk towards the Westernmost block and follow the invisi-floor. Ride the block to 462F. An S-Terminal is located at the West door on 462F. |
| 52 | Enter the North door. Prepare for a boss fight against Baal before proceeding. |
| Boss Fight | 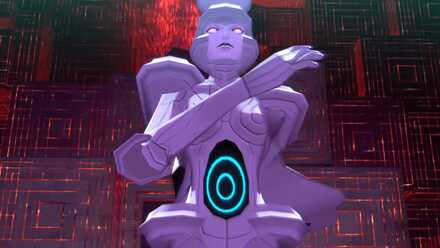 Boss Battle: Baal |
| 54 | Obtain Heavenstone after defeating Baal. |
| 55 | Continue forward by climbing up the right-side stairs. Enter the door, pace forward and then get warped. Ride the elevator in the new area to reach 475F. |
| 56 | On 475F, continue forward going South and ride another elevator going up 666F. A cutscene will play. |
| 57 | Continue forward going North and ride the block to get the ramp on the other side. Continue forward and examine the three columns. An S-Terminal is located at the West door. |
| 58 | Offer the Earthstone, Netherstone, and Heavenstone to the three columns (order does not matter). A cutscene will play afterwards. |
| 59 | Step on the circular lift and go up to Kagutsuchi. Prepare for a boss fight against Kagutsuchi before proceeding. |
| Boss Fight |  Boss Battle: Kagutsuchi |
| 61 | A cutscene will play after defeating Kagutsuchi. If you are gunning for the True Demon Ending and have finished Labyrinth of Amala, you will immediately face Lucifer after the cutscene. Otherwise, this is the end of the game. |
| Boss Fight |  Boss Battle: Lucifer |
| 63 | You have completed the game. |
Tower of Kagutsuchi Boss Fights
Ahriman

Hikawa takes on the form of Ahriman. Play by his rules or suffer the consequences in battle.
| Weaknesses | ||
|---|---|---|
| None |
Ahriman, in its first form, does not have any elemental weakness, and the attack types you can use will be dictated by Ahriman. In its second form, does not have any elemental weaknes. However, using buffed Phys attacks is highly recommended.
Noah
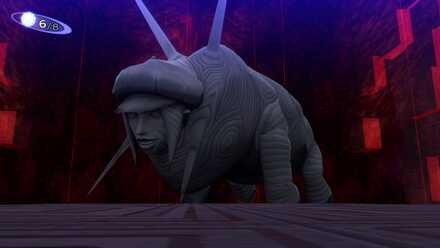
Isamu takes on the form of Noah in an attempt to enforce his Reason and to get rid of you once and for all.
| Weaknesses | ||
|---|---|---|
| None, but Phys attacks can go a long way |
Noah does not have any elemental weakness. However, in the first phase, you can use Phys attacks before it casts Aurora. In the second phase, the Magic attacks you can effectively use will depend on Noah's elemental affinities after it casts Aurora.
Thor

Thor has come to stop you from interfering with the Yosuga agenda. Pummel Thor with boosted Phys and Magic attacks.
| Weaknesses | ||
|---|---|---|
| None, but Phys and Magic attacks can go a long way |
Thor does not have any elemental weakness, however, using either boosted Phys or Magic attacks is useful for dealing damage.
How to Beat Thor (2nd Encounter)
Baal

Chiaki has fused with her demon sponsor to manifest into Baal. Baal will have two Hallel summons by its side.
Baal Weaknesses
| Weaknesses | ||
|---|---|---|
| None, but Phys and Magic attacks can go a long way |
Baal does not have any elemental weakness, however, using Phys and Magic attacks is useful for dealing damage.
Ose Hallel Weaknesses
| Weaknesses | ||
|---|---|---|
| None, but Phys and Magic attacks can go a long way |
Ose Hallel does not have any elemental weakness, however, using Phys and Magic attacks is useful for dealing damage.
Flauros Hallel Weaknesses
| Weaknesses | ||
|---|---|---|
| None, but Phys and Magic attacks can go a long way |
Baal does not have any elemental weakness, however, using Phys and Magic attacks is useful for dealing damage.
Kagutsuchi
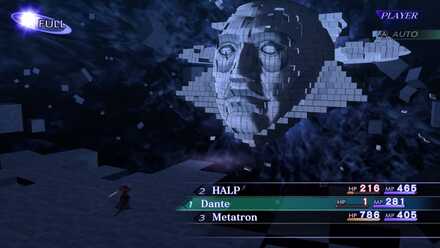
Kagutsuchi awaits you at the top of the tower. Make sure you have Endure to last through this battle.
First Form Weaknesses
| Weaknesses | ||
|---|---|---|
| None, but Phys and Magic attacks can go a long way |
Kagutsuchi does not have any elemental weakness, however, using boosted Phys or Magic attacks is effective in dealing sufficient amounts of damage.
Kagutsuchi Moon Phases
The table below illustrates the moon phase, the damage modifier and the amount of damage Kagutsuchi receives during specific moon phases.
| Moon Phase | Amount of Damage Kagutsuchi Receives |
|---|---|
| New Moon | 200% of total damage |
| 2/8 | 150% of total damage |
| Half | 100% of total damage |
| 6/8 | 75% of total damage |
| Full Moon | 50% of total damage |
Kagtuschi's Defense rate is influenced by the moon cycle. Kagutsuchi uses Phase Shift to shift forward the moon cycle by 2 phases. During the second phase of the battle, Kagutsuchi takes on its second form and the moon phase is fixed at a Full Moon. However, the damage Kagutsuchi receives will remain at 100% of total damage.
Second Form Weaknesses
| Weaknesses | ||
|---|---|---|
| None, but Phys and Magic attacks can go a long way |
Kagutsuchi does not have any elemental weakness, however, using boosted Phys and Magic attacks is effective in dealing sufficient amounts of damage.
Lucifer
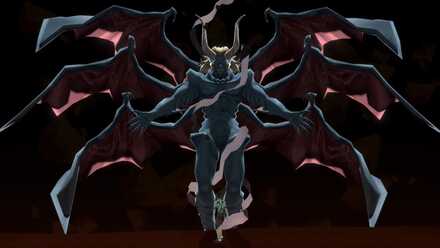
Lucifer is the final boss of the game if you are following the True Demon Ending. Make sure you have Pierce to win this fight.
| Weaknesses | ||
|---|---|---|
| None, but having Pierce and Freikugel goes a long way |
Lucifer does not have any elemental weakness and will be able to resist Phys, Magic, and Almighty. However, having Pierce and Freikugel in your arsenal will help you deal a sufficient amount of damage.
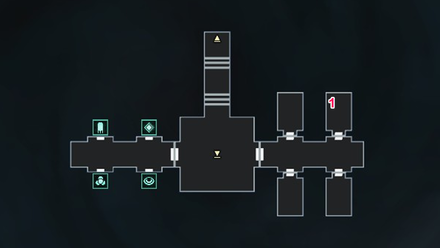
Tower of Kagutsuchi Maps
Tower of Kagutsuchi 1
| 160F | 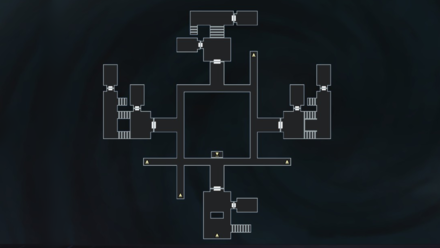 |
|---|---|
| 162F | 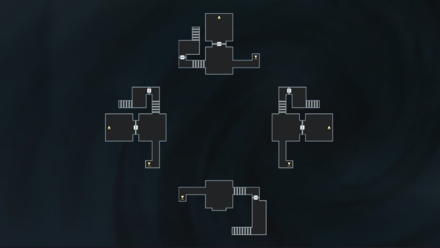 |
| 167F | 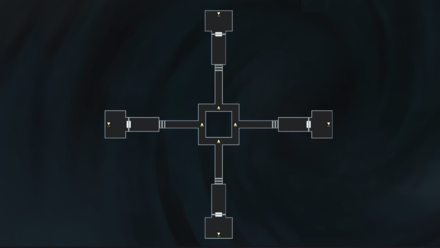 |
| 175F |  |
| 179F | 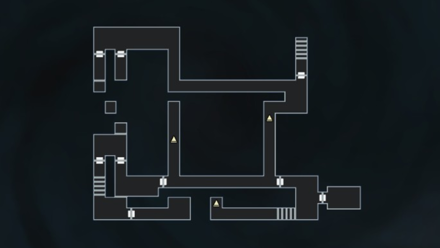 |
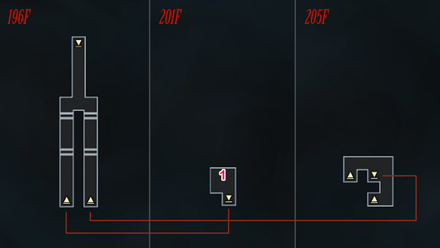
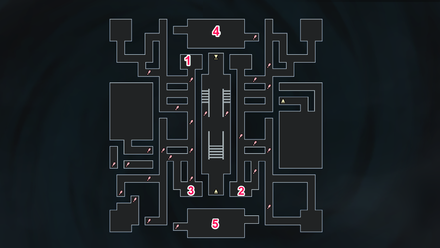
| 186F 187F 188F |
 |
| 196F 201F 205F |
 |
| 209F 211F |
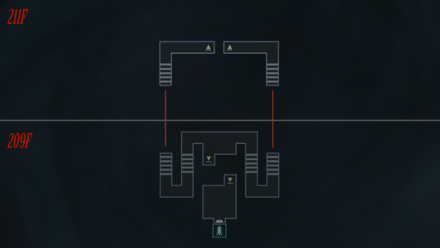 |
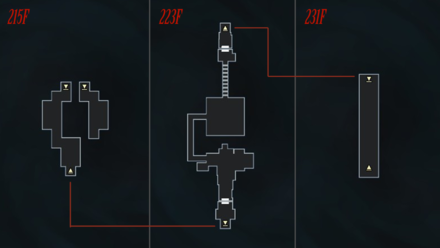
| 215F 223F 231F |
 |
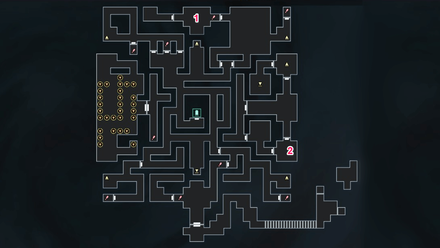
Tower of Kagutsuchi 2
| 285F | 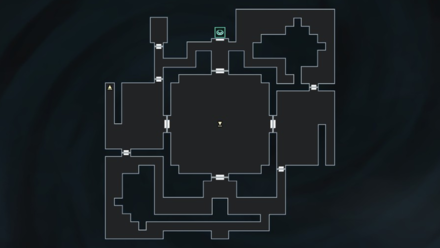 |
|---|---|
| 298F | 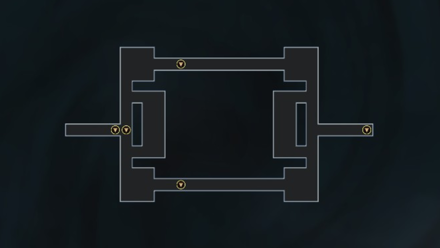 |
| 302F | 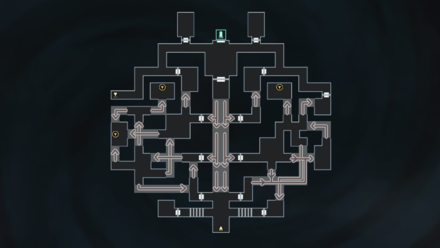 |
| 322F | 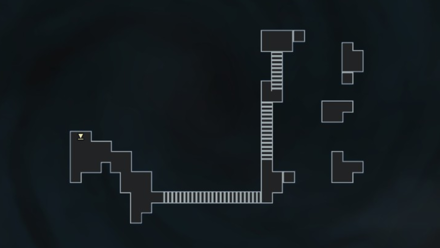 |
| 329F 345F |
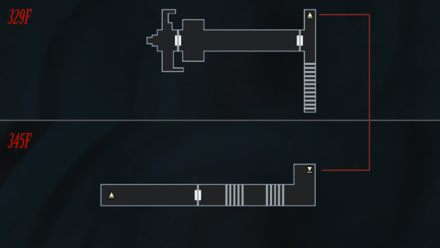 |
Tower of Kagutsuchi 3
| 402F | 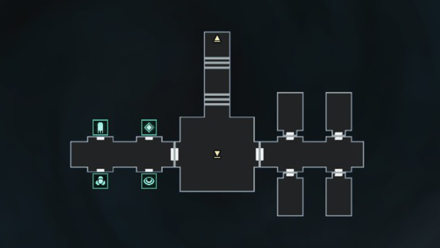 |
|---|---|
| 418F |  |
| 431F |  |
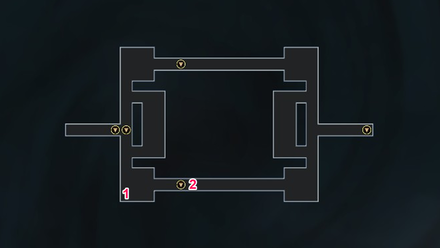
| 444F |  |
| 462F |  |
| 475F |  |
| 666F | 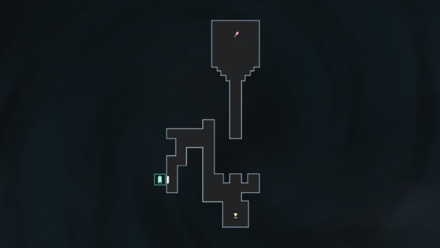 |
Obtainable Magatamas
Kailash
Kailash can be purchased in the Junk Shop in Tower of Kagutsuchi 3.
Tower of Kagutsuchi Obtainable Items
Tower of Kagutsuchi 1: 167F

| Obtained from | Items | |
|---|---|---|
| 1 | Cache Cube | Float Ball x 1 |
| 2 | Mystical Chest | Vitality Incense x 1 |
| 3 | Cache Cube | Bead x 1 |
| 4 | Mystical Chest | Agility Incense x 1 |
| 5 | Cache Cube | Soma Droplet x 1 |
| 6 | Mystical Chest | Strength Incense x 1 |
Tower of Kagutsuchi 1: 179F
| Obtained from | Items | |
|---|---|---|
| 1 | Cache Cube | Megidola Rock x 1 |
| 2 | Mystical Chest | Great Chakra x 1 |
Tower of Kagutsuchi 1: 186F
| Obtained from | Items | |
|---|---|---|
| 1 | Cache Cube | Bead x 1 |
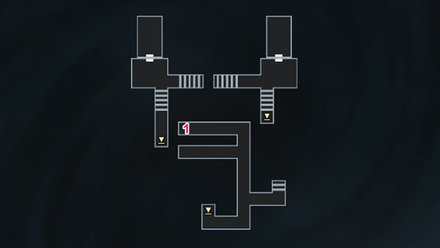
Tower of Kagutsuchi 1: 201F
| Obtained from | Items | |
|---|---|---|
| 1 | Mystical Chest | Chakra Pot x 1 |
Tower of Kagutsuchi 1: 215F
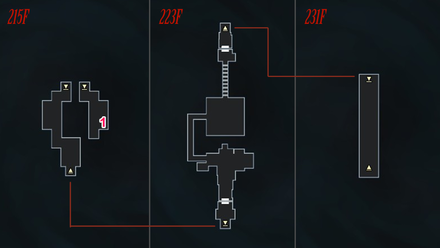
| Obtained from | Items | |
|---|---|---|
| 1 | Mystical Chest | Bead of Life x 1 |
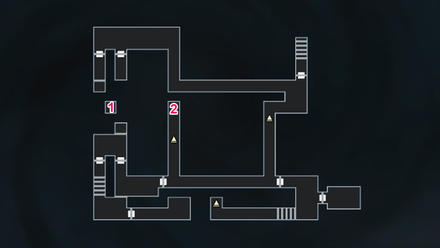
Tower of Kagutsuchi 2: 285F
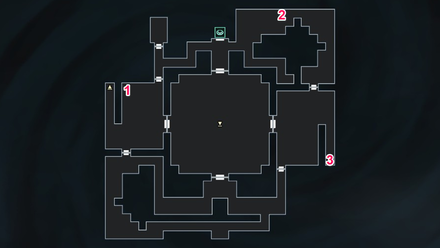
| Obtained from | Items | |
|---|---|---|
| 1 | Cache Cube | It's a trap! Ambushed by 1 Rangda and 2 Abaddon |
| 2 | Cache Cube | Attack Mirror x 1 |
| 3 | Mystical Chest | Pot of Death x 1 |
Tower of Kagutsuchi 2: 298F
| Obtained from | Items | |
|---|---|---|
| 1 | Mystical Chest | Soma x 1 |
| 2 | Mystical Chest | Chakra Pot x 1 |
Tower of Kagutsuchi 2: 322F
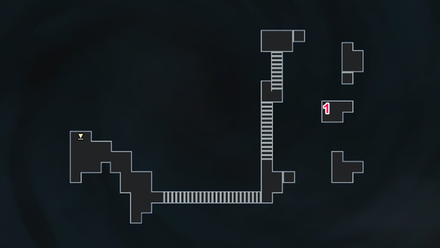
| Obtained from | Items | |
|---|---|---|
| 1 | Mystical Chest | Soma x 1 |
Tower of Kagutsuchi 3: 402F
| Obtained from | Items | |
|---|---|---|
| 1 | Cache Cube | Life Stone x 3 |
Tower of Kagutsuchi 3: 418F
Note: Refer to the map in the above section to figure out the teleport routes.
| Obtained from | Items | |
|---|---|---|
| 1 | Cache Cube | 20000 Macca |
| 2 | Mystical Chest | Bead Chain x 1 |
| 3 | Mystical Chest | Soma x 1 |
| 4 | Cache Cube | It's a trap! Ambushed by 3 Shadows and 3 Mots |
| 5 | Cache Cube | Soul-Return x 1 |
Tower of Kagutsuchi 3: 431F
| Obtained from | Items | |
|---|---|---|
| 1 | Cache Cube | Soma Droplet x 1 |
| 2 | Mystical Chest | Great Chakra x 1 |
Tower of Kagutsuchi General Tips
Level Up to At Least Lvl.90
We highly recommend leveling up to at least Lvl.90 for Tower of Kagutuschi to be able to effectively square up against the bosses in this area.
Leveling Guide: Best Leveling Areas
Use Float Balls or Liftoma, and Light Balls or Lightoma
We recommend using Float Balls or Liftoma for the area following the fight with Ahriman. Likewise, we recommend using Float Balls or Liftoma and Light Balls or Lightoma for this Tower of Kagutsuchi 2.
Summon Your Most Powerful Demons
It's all or nothing at this point. Summon your most powerful demons to melt through the enemies in this area.
Shin Megami Tensei 3: Nocturne Related Links

Story Walkthrough Guides
 Shinjuku Hospital Walkthrough
 Yoyogi Park and Shibuya Walkthrough
 Amala Network 1 Walkthrough
 Ginza and the Great Underpass Walkthrough
 Ikebukuro Walkthrough
 Assembly of Nihilo Walkthrough
 Kabukicho Walkthrough
 Asakusa and Obelisk Walkthrough
 Amala Network 2 Walkthrough
 Yoyogi Park 2 Walkthrough
 Amala Temple Walkthrough
 Mifunashiro and Yurakucho Walkthrough
 Diet Building Walkthrough
 Bandou Shrine Walkthrough
 Tower of Kagutsuchi Walkthrough
Endings Guide: How to Get All Endings
Labyrinth of Amala Guides
 First Kalpa Area First Kalpa AreaRecommended level: 20 |
 Second Kalpa Area Second Kalpa AreaRecommended level: 35 |
 Third Kalpa Area Third Kalpa AreaRecommended level: 50 |
 Fourth Kalpa Area Fourth Kalpa Area Recommended level: 65 |
 Fifth Kalpa Area Fifth Kalpa AreaRecommended level: 75 |
DLC Dungeon Guides
 Where the Demi-Fiend was Born Where the Demi-Fiend was Born |
 Center of the Conception Center of the Conception |
Author
Tower of Kagutsuchi Walkthrough, Boss Battles, and Item Locations
Rankings
- We could not find the message board you were looking for.
Gaming News


Popular Games

Genshin Impact Walkthrough & Guides Wiki
Honkai: Star Rail Walkthrough & Guides Wiki
Arknights: Endfield Walkthrough & Guides Wiki
Umamusume: Pretty Derby Walkthrough & Guides Wiki
Wuthering Waves Walkthrough & Guides Wiki
Pokemon TCG Pocket (PTCGP) Strategies & Guides Wiki
Abyss Walkthrough & Guides Wiki
Zenless Zone Zero Walkthrough & Guides Wiki
Digimon Story: Time Stranger Walkthrough & Guides Wiki
Clair Obscur: Expedition 33 Walkthrough & Guides Wiki


Recommended Games
Fire Emblem Heroes (FEH) Walkthrough & Guides Wiki
Pokemon Brilliant Diamond and Shining Pearl (BDSP) Walkthrough & Guides Wiki
Diablo 4: Vessel of Hatred Walkthrough & Guides Wiki
Super Smash Bros. Ultimate Walkthrough & Guides Wiki
Yu-Gi-Oh! Master Duel Walkthrough & Guides Wiki
Elden Ring Shadow of the Erdtree Walkthrough & Guides Wiki
Monster Hunter World Walkthrough & Guides Wiki
The Legend of Zelda: Tears of the Kingdom Walkthrough & Guides Wiki
Persona 3 Reload Walkthrough & Guides Wiki
Cyberpunk 2077: Ultimate Edition Walkthrough & Guides Wiki


All rights reserved
©ATLUS. ©SEGA. All rights reserved. ATLUS is registered in the U.S. Patent and Trademark Office. ATLUS, the ATLUS logo, SHIN MEGAMI TENSEI, SHIN MEGAMI TENSEI NOCTURNE and SMT are either registered trademarks or trademarks of ATLUS Co., Ltd. or its affiliates.
©CAPCOM CO., LTD. All rights reserved.
The copyrights of videos of games used in our content and other intellectual property rights belong to the provider of the game.
The contents we provide on this site were created personally by members of the Game8 editorial department.
We refuse the right to reuse or repost content taken without our permission such as data or images to other sites.
this guide is very hard to follow, and some stuff doesn't line up properly like the 3rd floor