Third Kalpa Walkthrough and Item Locations
This is a walkthrough for the Third Kalpa in Shin Megami Tensei III HD Remaster (SMT Nocturne) for the Nintendo Switch, PS4, and Steam. Here you'll find a guide on how to complete this area, general tips, and a list of items that can be found.
| Previous | Next |
|---|---|
| Second Kalpa Walkthrough | Fourth Kalpa Walkthrough |
How to Unlock Third Kalpa
DLC Only Content
You will only be able to access this content if you are playing the Chronicle or Maniax version of the game.
Accessible after defeating White Rider, Red Rider, and Black Rider
Only after defeating White Rider in Asakua, Red Rider in the Great Underpass of Ginza, and Black Rider at the Shinjuku Medical Center, will you be able to access the Third Kalpa in the Labyrinth of Amala.
| Boss Fight Guides | ||
|---|---|---|
 White Rider White Rider |
 Red Rider Red Rider |
 Black Rider Black Rider |
Third Kalpa Walkthrough
Second Kalpa
| Objectives | |
|---|---|
| 1 |  From the entrance of the Amala Labyrinth, use the path on the right (path no. 2) to drop down to the Second Kalpa entrance. |
| 2 | Follow the hallway down and use the drop-down pit to go to the B1 level. |
| 3 | From your landing spot, take a right turn and continue along until you come across two doorways. |
| 4 | Use the Moon Key item to unlock the silver door. |
| 5 |  Follow the path to this drop-down pit to go to the B2 level. |
| 6 | Once you land, turn around immediately. There should be another silver door behind you. Use the Moon Key to open it again. |
| 7 | 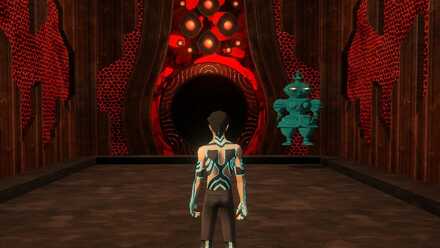 Follow the hallways and ladders down until you reach the hole dropping down to the Third Kalpa. You'll know you're there since the hole has an Arahabaki demon standing next to it. |
| 8 | Play the mini-game as you fall down. The blue orbs are items. Try to get them as you fall. |
| 9 | Once down in the Third Kalpa entrance, go to the Hall of Candles. |
| 10 |  Place the Menorahs of Compassion, Insight, and Wisdom on the pedestals to unlock the door to the Third Kalpa. |
Third Kalpa 1F
Strength Route
Note: Players will need 20 Base Strength to access both doors needed to get to the B1 level. Base stats means your stat must reach 20 before bonuses such as Magatama stats are applied.
| Objectives | |
|---|---|
| 1 | 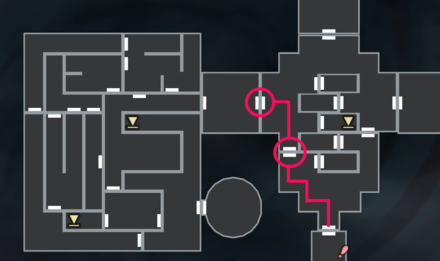 Once you arrive in the 1F of the Third Kalpa, pass through these doors to arrive at the Strength Door. |
| 2 | 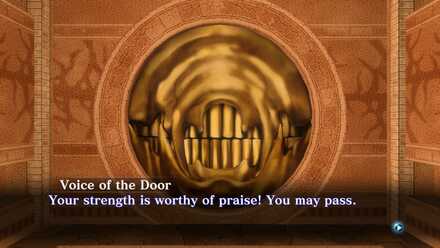 The door will test your Strength (read stats) and determine if you have enough to pass. Go through this door to enter the Strength maze. Players need 10 base Strength to pass through this door successfully. |
| 3 | After passing through the one-way door, head straight and turn left at the end of the hallway. You should be looking at another one of the stat doors. |
| 4 | Push ahead and enter through this second stat door (still strength). Players need 20 base Strength to pass through this door successfully. |
| 5 | This room will have two doors. Both east and west doors will lead to ladders that take you to B1 of the Third Kalpa. Take the west door if you want to access the room with a Shady Broker. Note that the door to the broker will only open if the player has a Dark Alignment. |
| 6 | Descend either room's ladder to the B1 level. |
| 7 | Follow either hallway and the doors at the end lead to the central area of the B1 level. Proceed to Third Kalpa B1-B4 section of this walkthrough to continue. |
Magic Route
Note: Players will need 20 Base Magic to access both doors needed to get to the B1 level. Base stats means your stat must reach 20 before bonuses such as Magatama stats are applied.
| Objectives | |
|---|---|
| 1 | 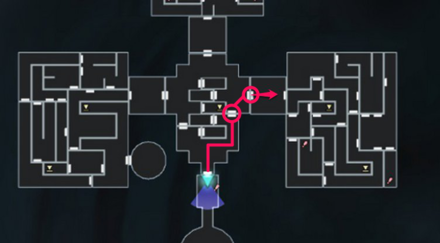 Once you arrive in the 1F of the Third Kalpa, pass through these doors to arrive at the Magic Door. |
| 2 | The door will test your Magic (read stats) and determine if you have enough to pass. Go through this door to enter the Magic maze. Players need 15 base Magic to pass through this door successfully. |
| 3 | After entering, you should see another stat door directly in front of you. Go through this door. Players need 20 base Magic to pass through this second door. |
| 4 | 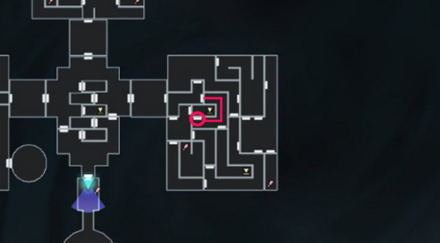 From here, follow the hallway and pass through this door. This should take you to a ladder leading down to B1. |
| 5 | Upon arriving at B1, follow the hallway and enter through the lone door. |
| 6 | You are now at the central area of B1. Proceed to Third Kalpa B1-B4 section of this walkthrough to continue. |
Luck Route
Note: Players will need 14 Base Luck to access both doors needed to get to the B1 level. Base stats means your stat must reach 14 before bonuses such as Magatama stats are applied.
| Objectives | |
|---|---|
| 1 | 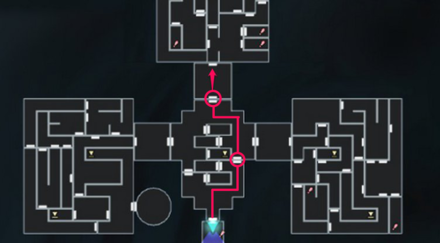 Once you arrive in the 1F of the Third Kalpa, pass through these doors to arrive at the Luck Door. |
| 2 | The door will test your Luck (read stats) and determine if you have enough to pass. Go through this door to enter the Luck maze. Players need 10 base Luck to pass through this door successfully. |
| 3 | After entering, you should see another stat door directly in front of you. Go through this door.Players need 14 base Luck to pass through this second door. |
| 4 | You should now be in a room with a ladder leading down. Go down to the B1 level. |
| 5 | In B1, take either the left or right side doors as they will lead to the same area. The door directly in front of you has a Shady Broker inside. It only opens for players who have a neutral alignment. |
| 6 | 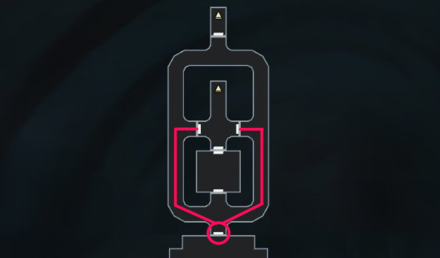 Upon exiting through either the left or right side door, head south along the hallway until you reach this door. |
| 7 | Go through it to enter the central area of the B1 level. Proceed to Third Kalpa B1-B4 section of this walkthrough to continue. |
Third Kalpa B1-B4
| Objectives | |
|---|---|
| 1 |  All stat routes will lead to the central B1 level. Talk to Hee Ho and he'll tell you he saw a man with guns/a man trapping demons in tubes inside the Kalpa. |
| 2 | 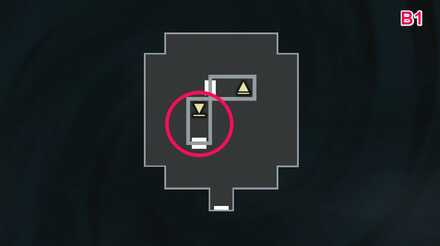 Warning: Players should prepare to fight a new Fiend Boss before they descend! |
| 3 | Descend to the B2 level of the Third Kalpa. |
| 4 | A short cutscene will play once you get down the ladder. It involves Dante/Raidou and how you should not go further. |
| 5 | Enter the door in front of you, anyway. |
| 6 | 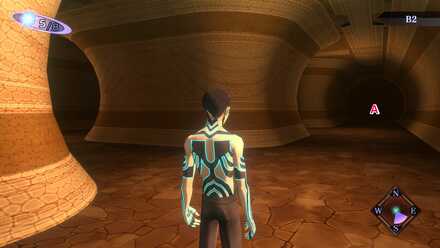 Warning: If Dante/Raidou catches you, you have to fight him until he flees. After the fight, he will reset your position to the beginning of the room. |
| 7 | 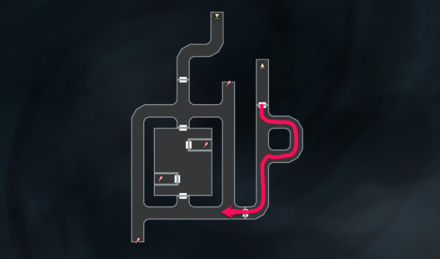 Lead Dante/Raidou around this loop while you head south towards the next door. |
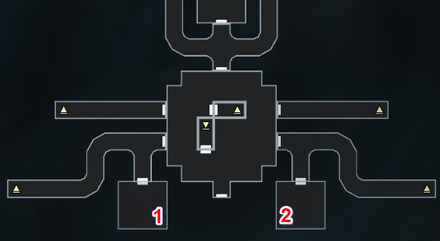
| 8 |  This next room will have you activating these two switches in the middle of the room. |
| 9 | Keep Dante/Raidou in sight while leading him around the area. Once one of the middle room's doors are unguarded, head inside. |
| 10 | Once inside the room, Dante/Raidou will enter from the opposite end. Always pick the switch room that is closest to you (it will always be on your left side after entering). |
| 11 |  Dante/Raidou cannot chase you into the switch rooms. Use these areas to catch your breath, heal, or relax your nerves. |
| 12 | Once activated, go out and leave through the exit opposite Dante/Raidou. Lead him around the outer hallway before repeating the same process with the other switch. |
| 13 | 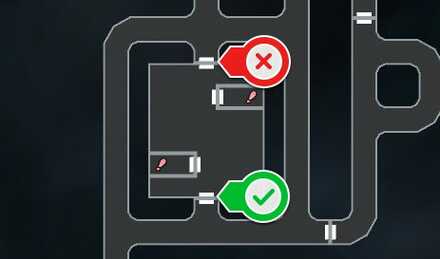 Having activated both switches, do not exit through the north door. Instead, head south and run along either the east or west corridors towards the unlocked door. |
| 14 | Dante/Raidou should be waiting for you in front of the unlocked door. Bait him around the area again, allowing him to come close before you dash away. |
| 15 | Take a roundabout route while keeping Dante/Raidou in sight. Loop around until you reach the unlocked door. |
| 16 | Enter the door and proceed down the hallway. There should be a ladder in front of you. |
| 17 | Take the ladder down to the B3 level. |
| 18 | 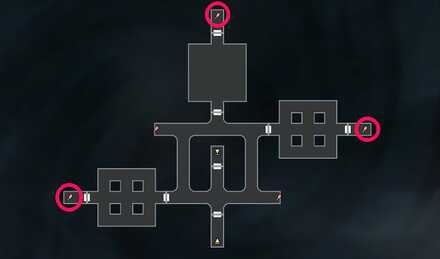 The B3 level will have players activate 3 switches in these rooms. Dante/Raidou will spawn once players activate 1 of the 3 switches. |
| 19 | 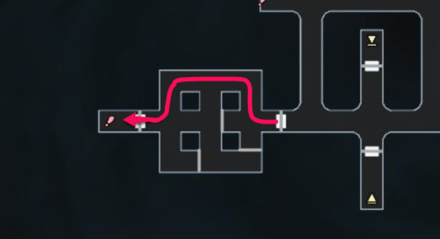 First, go left and enter the western room. This room will have invisible walls blocking certain areas off. Follow this path to get to the switch. |
| 20 | 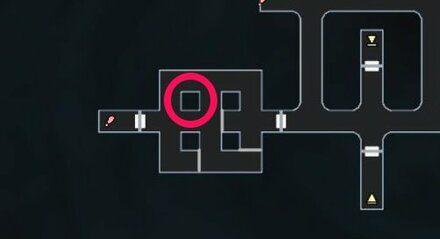 Once the switch is activated, Dante/Raidou will enter from the door behind you. Use the pillar to loop him around as you double back to the door. |
| 21 | Once out, run to your left again then take a right turn at the end of the hallway. |
| 22 | Enter the door on your left (this is the northern room). |
| 23 | 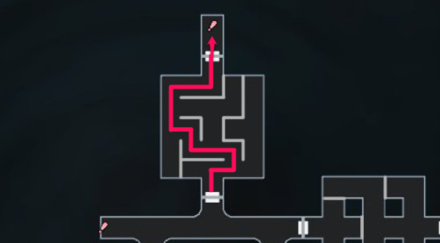 The northern room will have all its inner walls invisible. Follow this path to the switch. |
| 24 | Activate the switch and Dante/Raidou will enter the room. |
| 25 | 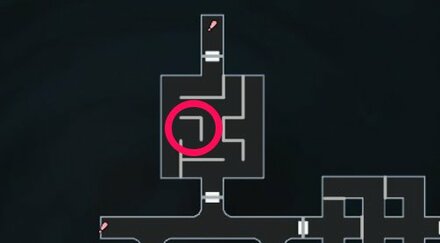 Use this wall section to put Dante/Raidou in another loop. Once he is clear of the way to the exit, run for it. |
| 26 | Take another left upon exiting the room. The door in front of you is the last room with a switch. |
| 27 | Enter the last room (eastern room). |
| 28 | 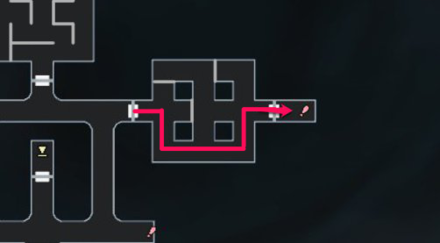 This room is similar to the western room. Follow this path to get to the switch. |
| 29 | Once you activate this switch, the locked door at the center of this level will open. Dante/Raidou will once again stand guard in front of the now unocked door. |
| 30 | 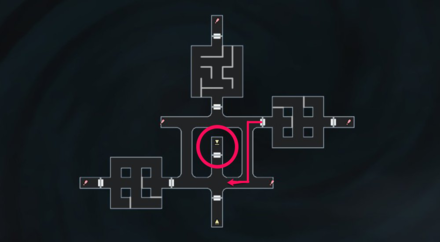 Exit the room and turn left again. Move down the hallway towards the entrance of the unlocked room. |
| 31 | Approach the unlocked door slowly until you see Dante/Raidou. |
| 32 | Wait for Dante/Raidou to begin chasing you before turning tail and running the other way. |
| 33 | 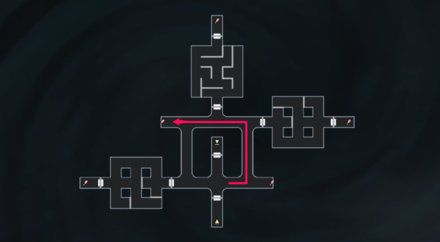 Follow this path around while keeping Dante/Raidou in sight. |
| 34 | Wait at the entrance of the northwest teleporter for Dante/Raidou to get closer. |
| 35 | Once Dante/Raidou reaches the middle of the hallway, enter the teleporter. You will exit at the southeast teleporter. |
| 36 | The path to the unlocked door should now be clear. Run up to it and enter. |
| 37 | Take the ladder down to the B4 level. |
| 38 | In the B4 level heal your party first and prepare for an upcoming boss fight. This winding hallway will have a Shady Surgeon. If you want to conserve your HP recovery items, pay him 5000 Macca for a heal. |
| 39 | Once the player is ready, follow the snaking hallway. Enter the door at the end to trigger the Dante/Raidou boss fight. |
| 40 | 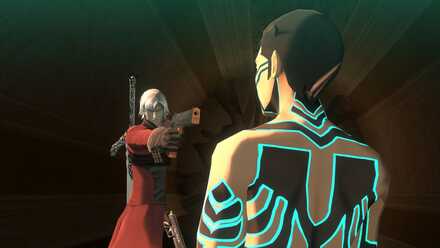 Boss Fight: Dante/Raidou. Boss Fight: Dante/Raidou.He will hand over the Menorah of Knowledge before leaving. |
| 41 | After the boss fight, head down the ladder to the B5 level. |
| 42 | Follow the hallway down to emerge at another peephole area. Peek through it for a cutscene with the lady-in-black. |
| 43 | The Third Kalpa has now been cleared. |
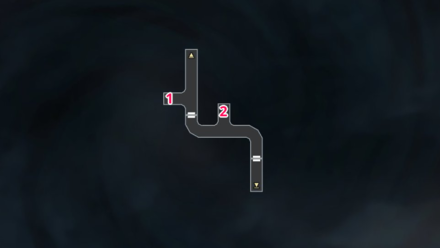
Third Kalpa Maps
| 1F | 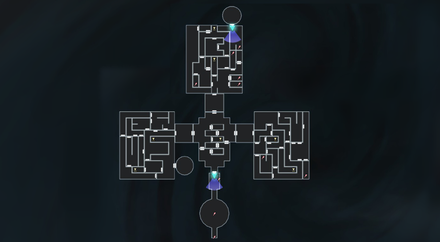 |
|---|---|
| B1 | 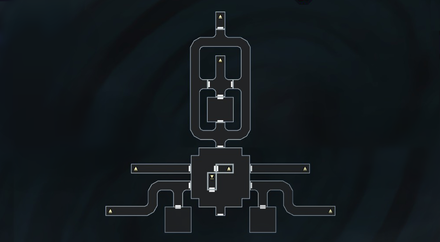 |
| B2 | 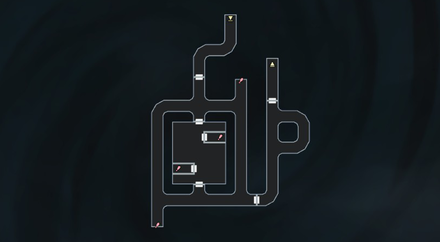 |
| B3 | 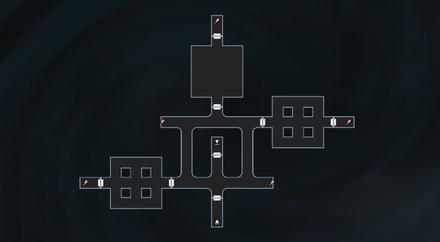 |
| B4 | 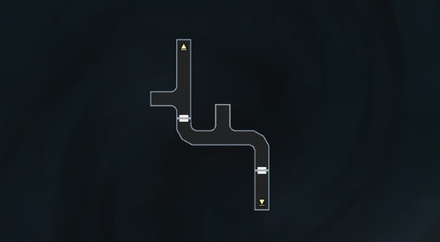 |
| B5 | 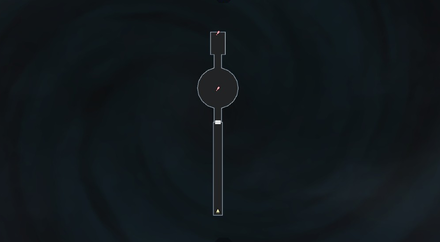 |
Third Kalpa NPCs
1F
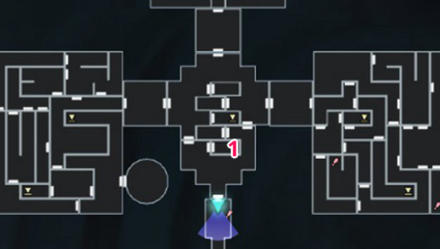
| NPC | |
|---|---|
| 1 | Shady Surgeon |
Shady Surgeon
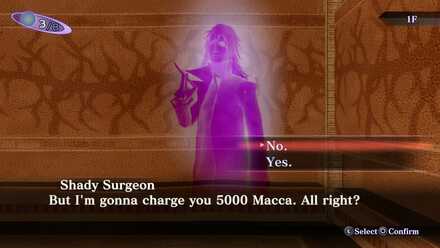
This Shady Surgeon can be found in the central area of the Third Kalpa's 1F level.
He will charge 5,000 Macca for a heal. Use his services only should the need arise.
B1
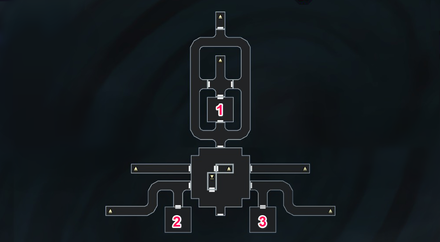
| NPC | |
|---|---|
| 1 | Shady Broker Behind Neutral alignment door. |
| 2 | Shady Broker Behind Dark alignment door. |
| 3 | Shady Broker Behind Light alignment door. |
Shady Broker 1
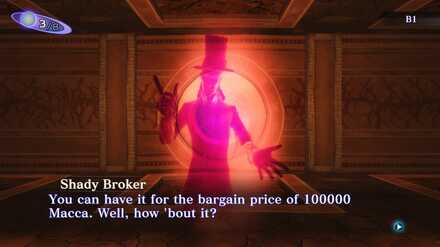
Shady Broker 1 can be found behind the Neutral Alignment door, under the Luck Maze. Players will have to pass through the Luck Stat Door in 1F to get to him.
This broker sells an unlimited amount of Deathstones. However, it costs 100,000 Macca apiece.
Shady Broker 2
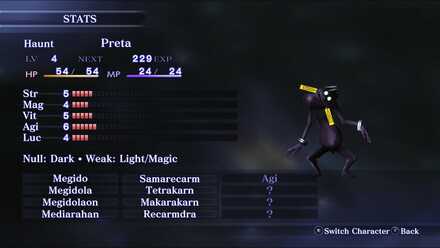
Shady Broker 2 can be found behind the Dark Alignment door, under the Strength Maze. Players will have to pass through the Strength Stat Door in 1F to get to him.
This broker sells a Preta for 150,000 Macca. While costly, this special demon does have access to the coveted Almighty Skills like Megido, which not a lot of demons have resistance to.
Preta Skills, Stats, and Locations Encountered
Shady Broker 3
Shady Broker 3 can be found behind the Light Alignment door, under the Magic Maze. Players will have to pass through the Magic Stat Door in 1F to get to him.
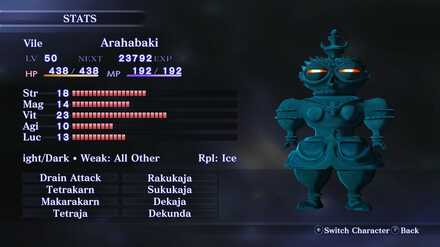
This broker sells an Arahabaki for 70,000 Macca. It has many party buff skills which can aid in the harder battles to come.
B4
| NPC | |
|---|---|
| 1 | Souls Offering Rest |
| 2 | Shady Surgeon |
Souls Offering Rest
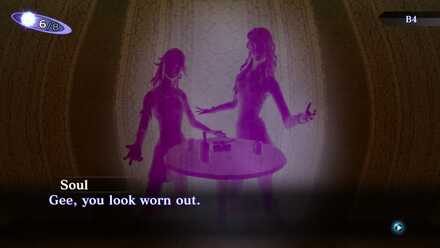
Before the section of B4 where you fight Dante/Raidou, there will be these two Souls Offering Rest.
Take them up on their offer and you will be fully healed but sent back to the beginning of the dungeon with a few more than 500 Macca missing.
Shady Surgeon
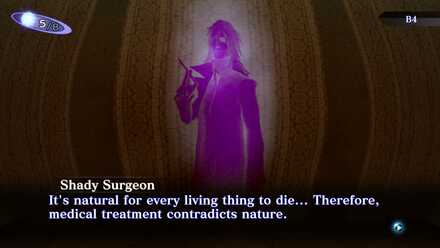
The Shady Surgeon can be found in the section of B4 before you fight Dante/Raidou.
If you want to conserve Recovery items, avail of his services for 5,000 Macca.
Third Kalpa Obtainable Items
1F: Strength Area
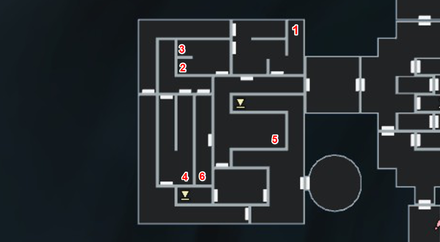
| Obtained from | Items | |
|---|---|---|
| 1 | Cache Cube | Deathstone x 1 |
| 2 | Cache Cube | Bead x 1 |
| 3 | Cache Cube | Magic Mirror x 1 |
| 4 | Mystical Chest | Great Chakra x 1 |
| 5 | Cache Cube | Bead x 1 |
| 6 | Mystical Chest | Bead Chain x 1 |
1F: Magic Area
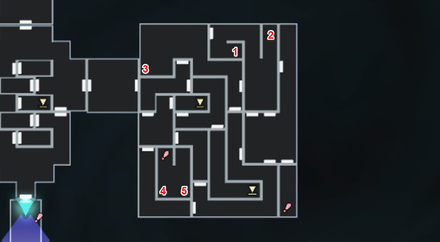
| Obtained from | Items | |
|---|---|---|
| 1 | Mystical Chest | Chakra Pot x 1 |
| 2 | Mystical Chest | Balm of Rising x 1 |
| 3 | Mystical Chest | Attack Mirror x 1 |
| 4 | Mystical Chest | Soma x 1 |
| 5 | Mystical Chest | Bead Chain x 1 |
1F: Luck Area
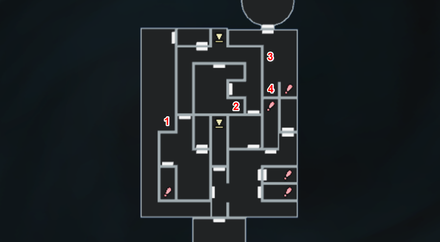
| Obtained from | Items | |
|---|---|---|
| 1 | Cache Cube | Deathstone x 1 |
| 2 | Mystical Chest | Magic Incense x 1 |
| 3 | Mystical Chest | Strength Incense x 1 |
| 4 | Mystical Chest | Great Chakra x 1 |
B1
| Obtained from | Items | |
|---|---|---|
| 1 | Cache Cube | Deathstone x 1 |
| 2 | Cache Cube | Deathstone x 1 |
Third Kalpa General Tips
Bring Healers and Party Buffers
This Kalpa Dungeon is littered with enemies that have the Dragon Eye skill which grants them extra Press Turns when cast.
Coupled with their 400~600 HP pools, players will find themselves hard pressed to deal consistent damage during battles.
Consider bringing multiple healers with Mediarama (or better) and maybe one party buffer that gives Physical or Magical resistances.
Prepare for Strong Magic Attacks
When passing through the Magic Maze, players should prepare for much stronger magic attacks than they're used to.
Demons like the Jinn and Efreet will deploy multi-target, magic spells that deal a lot of damage when exploiting weaknesses. Counter them by using skills like Tarunda, exploiting their weaknesses, or simply by using status effects to waste Press Turns.
Prepare for Physical Strengths
A lot of the demons you'll encounter in this dungeon will also have strengths against Physical damage, like the Ongkhot and the Titan demons.
Make sure to keep track of their weaknesses so as not to waste precious Press Turns during battle.
Equip Demi-fiend with Dark Resistances
The Yomotu-Ikusa demon found that joins some battles in this dungeon, will love casting Mudoon on the Demi-Fiend.
Remember that if the Demi-fiend dies, it's game over. Prepare by bringing resistances to Dark to increase your chances of survival.
Exploring the Entire Dungeon Requires Stats
For players exploring this dungeon immediately after their recent Fiend Boss fights, remember that you will not be able to fully explore it without the required stat points in either Strength, Magic, or Luck.
If you find yourself locked out of certain areas, consider leveling up more before going back to this dungeon.
Use Estoma if You Plan to Only Fight Dante/Raidou
Dante/Raidou's boss fight is very challenging since you will have to tackle him multiple times before the actual boss fight in the B4 level.
For players wanting to only challenge Dante/Raidou, bring a demon with Estoma to make getting to the lower levels easier.
Keep Track of Health During Dante/Raidou Chase
Dante/Raidou's bullets during the chase portions of B2 and B3 will deal damage apart from slowing you down. On normal, each hit deals about 9 damage. While seemingly insignificant, this does add up, especially during longer chases.
If you find yourself about to be caught by him, pause the game and check your HP. Heal up accordingly and prepare to fight a short but hard battle.
Shin Megami Tensei 3: Nocturne Related Links

Story Walkthrough Guides
 Shinjuku Hospital Walkthrough
 Yoyogi Park and Shibuya Walkthrough
 Amala Network 1 Walkthrough
 Ginza and the Great Underpass Walkthrough
 Ikebukuro Walkthrough
 Assembly of Nihilo Walkthrough
 Kabukicho Walkthrough
 Asakusa and Obelisk Walkthrough
 Amala Network 2 Walkthrough
 Yoyogi Park 2 Walkthrough
 Amala Temple Walkthrough
 Mifunashiro and Yurakucho Walkthrough
 Diet Building Walkthrough
 Bandou Shrine Walkthrough
 Tower of Kagutsuchi Walkthrough
Endings Guide: How to Get All Endings
Labyrinth of Amala Guides
 First Kalpa Area First Kalpa AreaRecommended level: 20 |
 Second Kalpa Area Second Kalpa AreaRecommended level: 35 |
 Third Kalpa Area Third Kalpa AreaRecommended level: 50 |
 Fourth Kalpa Area Fourth Kalpa Area Recommended level: 65 |
 Fifth Kalpa Area Fifth Kalpa AreaRecommended level: 75 |
DLC Dungeon Guides
 Where the Demi-Fiend was Born Where the Demi-Fiend was Born |
 Center of the Conception Center of the Conception |
Author
Third Kalpa Walkthrough and Item Locations
Rankings
- We could not find the message board you were looking for.
Gaming News


![Monster Hunter Stories 3 Review [First Impressions] | Simply Rejuvenating](https://img.game8.co/4438641/2a31b7702bd70e78ec8efd24661dacda.jpeg/thumb)
Popular Games

Genshin Impact Walkthrough & Guides Wiki
Honkai: Star Rail Walkthrough & Guides Wiki
Umamusume: Pretty Derby Walkthrough & Guides Wiki
Pokemon Pokopia Walkthrough & Guides Wiki
Resident Evil Requiem (RE9) Walkthrough & Guides Wiki
Monster Hunter Wilds Walkthrough & Guides Wiki
Wuthering Waves Walkthrough & Guides Wiki
Arknights: Endfield Walkthrough & Guides Wiki
Pokemon FireRed and LeafGreen (FRLG) Walkthrough & Guides Wiki
Pokemon TCG Pocket (PTCGP) Strategies & Guides Wiki


Recommended Games
Diablo 4: Vessel of Hatred Walkthrough & Guides Wiki
Cyberpunk 2077: Ultimate Edition Walkthrough & Guides Wiki
Fire Emblem Heroes (FEH) Walkthrough & Guides Wiki
Yu-Gi-Oh! Master Duel Walkthrough & Guides Wiki
Super Smash Bros. Ultimate Walkthrough & Guides Wiki
Pokemon Brilliant Diamond and Shining Pearl (BDSP) Walkthrough & Guides Wiki
Elden Ring Shadow of the Erdtree Walkthrough & Guides Wiki
Monster Hunter World Walkthrough & Guides Wiki
The Legend of Zelda: Tears of the Kingdom Walkthrough & Guides Wiki
Persona 3 Reload Walkthrough & Guides Wiki


All rights reserved
©ATLUS. ©SEGA. All rights reserved. ATLUS is registered in the U.S. Patent and Trademark Office. ATLUS, the ATLUS logo, SHIN MEGAMI TENSEI, SHIN MEGAMI TENSEI NOCTURNE and SMT are either registered trademarks or trademarks of ATLUS Co., Ltd. or its affiliates.
©CAPCOM CO., LTD. All rights reserved.
The copyrights of videos of games used in our content and other intellectual property rights belong to the provider of the game.
The contents we provide on this site were created personally by members of the Game8 editorial department.
We refuse the right to reuse or repost content taken without our permission such as data or images to other sites.