 Shinjuku Hospital Walkthrough
 Yoyogi Park and Shibuya Walkthrough
 Amala Network 1 Walkthrough
 Ginza and the Great Underpass Walkthrough
 Ikebukuro Walkthrough
 Assembly of Nihilo Walkthrough
 Kabukicho Walkthrough
 Asakusa and Obelisk Walkthrough
 Amala Network 2 Walkthrough
 Yoyogi Park 2 Walkthrough
 Amala Temple Walkthrough
 Mifunashiro and Yurakucho Walkthrough
 Diet Building Walkthrough
 Bandou Shrine Walkthrough
 Tower of Kagutsuchi Walkthrough
This survey will take about 1 minute.
Your answers will help us to improve our website.
Shin Megami Tensei 3: Nocturne (SMT Nocturne)
Second Kalpa Walkthrough and Item Locations
This is a walkthrough for the Second Kalpa in Shin Megami Tensei III HD Remaster (SMT Nocturne) for the Nintendo Switch, PS4, and Steam. Here you'll find a guide on how to complete this area, general tips, and a list of items that can be found.
| Previous | Next |
|---|---|
| First Kalpa Walkthrough | Third Kalpa Walkthrough |
List of Contents
How to Unlock Second Kalpa
DLC Only Content
You will only be able to access this content if you are playing the Chronicle or Maniax version of the game.
Accessible after defeating Daisoujou and Hell Biker
Only after defeating Daisoujou in Ikebukuro, and Hell Biker in the highway south of Ikebukuro, will you be able to access the Second Kalpa in the Labyrinth of Amala.
Once you have retrieved Daisoujou's Menorah of Eternity and Hell Biker's Menorah of Dignity, head back to the Labyrinth of Amala. Go down the First Kalpa and use the hole to jump down to the Second Kalpa.
| Boss Fight Guides | |
|---|---|
 Daisoujou Daisoujou |
 Hell Biker Hell Biker |
Second Kalpa Walkthrough
First Kalpa
| Objectives | |
|---|---|
| 1 | 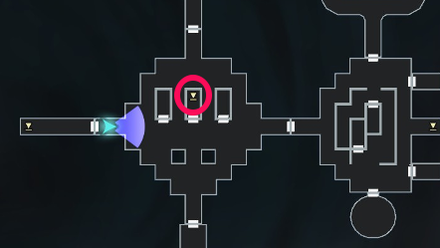 Take this ladder down from the First Kalpa 1F. |
| 2 | Keep following the corridors and heading down until you reach the peephole area. Go through the door behind it. |
| 3 | Jump down the hole. Prepare for another mini-game as you fall. |
| 4 | After falling down for a bit, you'll arrive at the entrance of the 2nd Kalpa. |
Second Kalpa
| Objectives | |
|---|---|
| 1 | You'll now see two pedestals upon landing. Place the Menorah of Eternity and Dignity on them. |
| 2 | A door behind the pedestals will open. Head through it. |
| 3 | Follow the hallway down this new area and head through the far door. |
| 4 | There should now be a pit in front of you, with a demon to its left. Jump down the pit to reach B1. |
| 5 | After landing, take a right turn until you reach the two doors. The southern door is locked. Go through the northern door. |
| 6 | 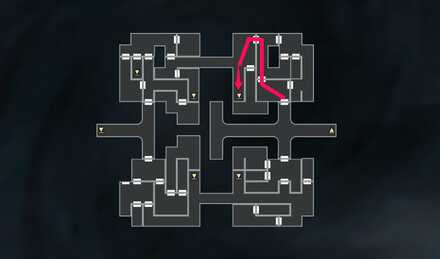 Follow this path from the northern door, until you reach the drop-down pit. Drop down to reach B2. |
| 7 | You will land in a room with a one-way door. Go through it. |
| 8 | When you exit, immediately look to your left. Use the drop-down you see to reach B3. |
| 9 |  This is a room with invisible walls. You can use the above map to nagivate on your own or refer to our video guide down below. |
| 10 | 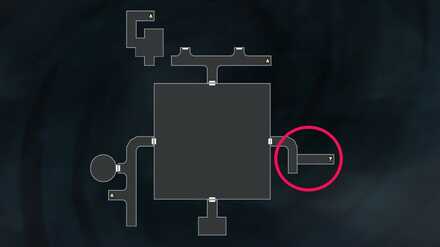 First, navigate to the eastern door of this large room. Inside you will find the Moon Key behind an invisible wall. Pick it up to unlock shortcuts and doors in this Kalpa. |
| 11 | 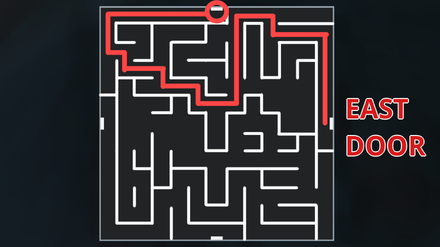 Next, head back into the maze room and navigate your way to the northern door. |
| 12 | Once inside the northern door, turn right and head up the ladder to B2. |
| 13 | Follow the corridor and exit through the one-way door. This is the room you first dropped down in. Exit its one-way door again. |
| 14 | Upon exit, look right and go to the door straight ahead. Use the ladder inside to head up to B1. |
| 15 | 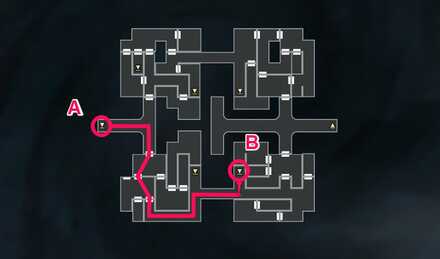 From (A), follow the path to this next drop-down pit (B) and use it to go down to B2 (you'll know it's the right pit if the wall behind it is like the invisible wall design). |
| 16 | Upon landing, look behind you. There should be a locked silver door. Use your newly acquired Moon Key to open it and head inside. |
| 17 | Follow the hall until you arrive at another drop-down pit. Drop down to reach B3. |
| 18 | When you land, follow the hallway in front of you and go down the ladder. This takes you to B4. |
| 19 | Follow the hallway down again, and enter through the door. There should be a new peephole to interact with in front of you. |
| 20 | After the peephole cutscene, the door to the Third Kalpa will open. |
| 21 | Go through the door and down the new hole (an Arahabaki demon will be stood next to it). Prepare for another mini-game. |
| 22 | Go to the pedestal area to trigger a new cutscene with the next Menorah bosses. Note: You need to do this step for them to show up in the Vortex World. |
Invisible Wall Maze Video Walkthrough
Remember to face north to orient yourself with the video's steps.
Cursed Corridor (Optional)
| Objectives | |
|---|---|
| 1 | 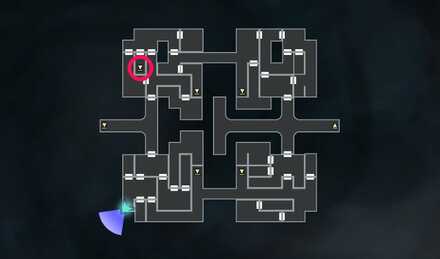 The entrance to the Cursed Corridor can be found here. Once inside this room, use the ladder to go down to B2. |
| 2 | 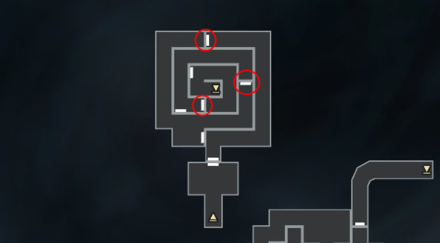 Follow the winding path of the Cursed Corridor. Only go through these marked doors unless you want to be sent to a previous section of the corridor. |
| 3 | Once you reach the center of the Corridor, use the ladder to go down. |
| 4 | Talk to the demon in the room. He will reward you with 250,000 Macca. |
| 5 | Use the ladder to go back up to the Cursed Corridor. |
| 6 | 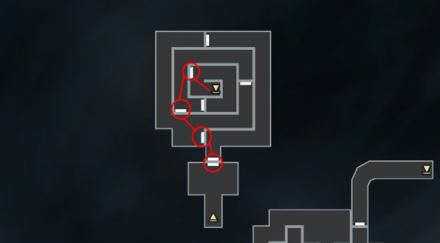 Now use the following doors for a quick escape. |
Second Kalpa Maps
Second Kalpa
| 1F | 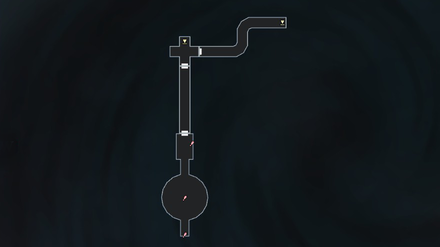 |
|---|---|
| B1 | 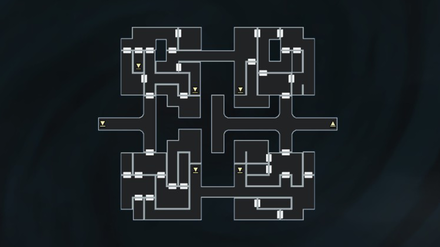 |
| B2 | 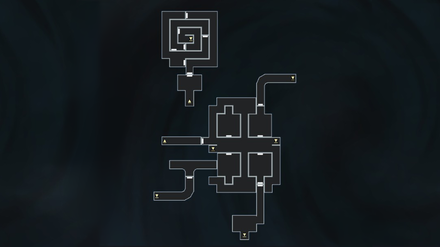 |
| B3 | 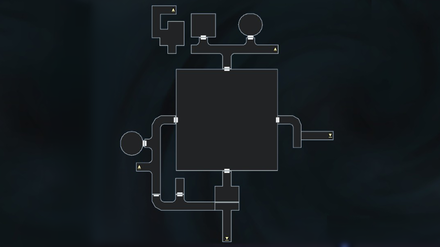 |
| B4 | 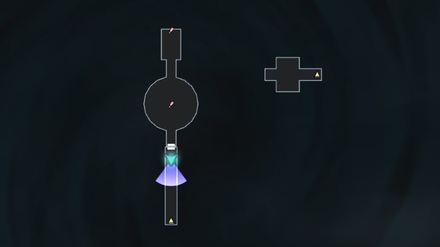 |
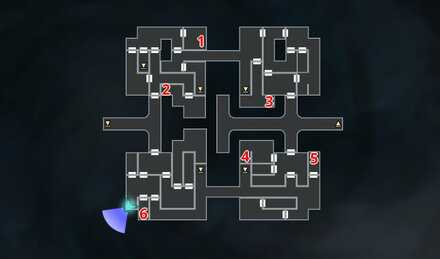
Second Kalpa NPCs
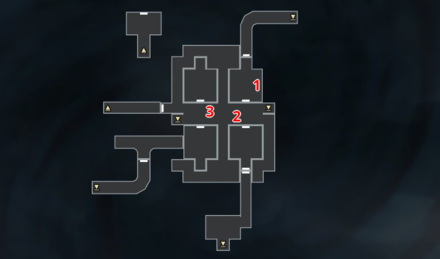
| NPC | |
|---|---|
| 1 | Shady Broker |
| 2 | Souls Offering Rest |
| 3 | Shady Surgeon |
Shady Broker
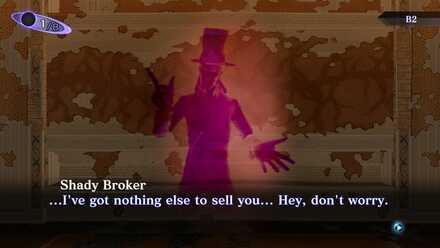
The Shady Broker in the 2nd Kalpa will sell a demon to players for 30,000 Macca.
Players will get a Nue with amazing Recovery Skills like Mana Refill, Prayer, and a lot of anti-debuff spells.
Two Souls Offering Rest
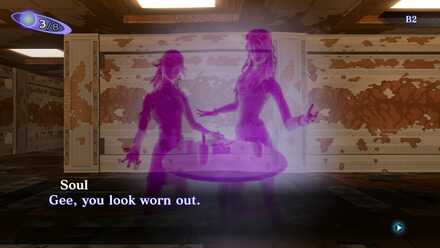
These two souls will offer the Demi-fiend a chance to rest up and heal. While they will heal your party, players will be teleported back to the dungeon entrance with a few more of their Macca missing.
Shady Surgeon
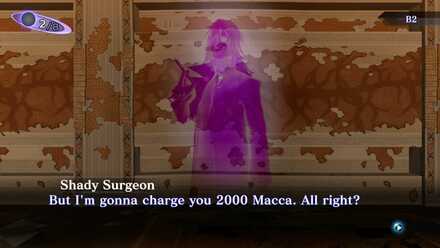
The Shady Surgeon will heal players but for a steep price: 2,000 Macca for a heal.
Second Kalpa Obtainable Items
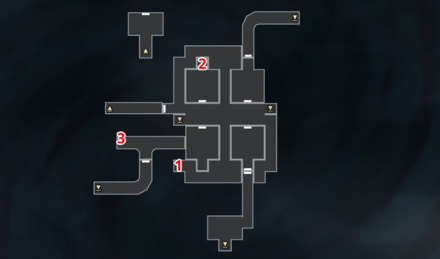
Second Kalpa B1
| Obtained from | Items | |
|---|---|---|
| 1 | Cache Cube | Smoke Ball x1 |
| 2 | Cache Cube | Magic Mirror x1 |
| 3 | Cache Cube | Tetraja Rock x1 |
| 4 | Mystical Chest | Bead Chain x1 |
| 5 | Cache Cube | Bead x1 |
| 6 | Cache Cube | Dekaja Rock x1 |
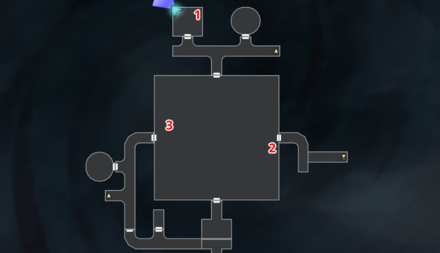
Second Kalpa B2
| Obtained from | Items | |
|---|---|---|
| 1 | Cache Cube | Repulse Bell x1 |
| 2 | Mystical Chest | Agility Incense x1 |
| 3 | Cache Cube | Deathstone x1 |
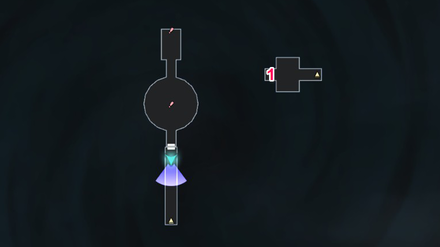
Second Kalpa B3
| Obtained from | Items | |
|---|---|---|
| 1 | Cache Cube | Deathstone x1 |
| 2 | Cache Cube | Chakra Pot x1 |
| 3 | Mystical Chest | Soma x1 |
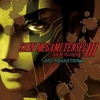
Second Kalpa B4
| Obtained from | Items | |
|---|---|---|
| 1 | Cache Cube | Moon Key x 1 |
Second Kalpa General Tips
Bring HP Recovery Items and Healers
With the amount of winding corridors, dead ends, and the room with invisible walls, players will find themselves quite stuck here for a longer time than the First Kalpa.
HP Recovery items are essential when exploring this dungeon.
Bring a Demon with Estoma
The Estoma skill reduces demonic encounters until a new Kagutsuchi phase. Use this skill especially when traversing the Cursed Corridor as demonic encounters are nuisance in such a convoluted dungeon.
Float Balls do not Negate Cursed Corridor Floor Damage
The Cursed Corridor is indeed cursed. Float balls do not work here, essentially having the player take all the floor damage ticks until they reach the center of the room.
Use Macca beforehand to buy HP Recovery items, instead.
Cursed Corridor Damage Calculation
Each tick of floor damage inside the corridor will always take 1/2 of your remaining HP. Any damage taken after reaching 1 HP will be zero. Note, this damage is brought down to 1/4 when playing on Merciful.
While you cannot die inside the Cursed Corridor, you and your party will always be vulnerable to combat encounters. Use Estoma and healing spells to increase your odds of survival.
Flee Battles When You Can
Sometimes, taking damage isn't worth it to get from point A to point B. Remember, HP Recovery items are finite. Plan your battles accordingly.
Shin Megami Tensei 3: Nocturne Related Links

Story Walkthrough Guides
Endings Guide: How to Get All Endings
Labyrinth of Amala Guides
 First Kalpa Area First Kalpa AreaRecommended level: 20 |
 Second Kalpa Area Second Kalpa AreaRecommended level: 35 |
 Third Kalpa Area Third Kalpa AreaRecommended level: 50 |
 Fourth Kalpa Area Fourth Kalpa Area Recommended level: 65 |
 Fifth Kalpa Area Fifth Kalpa AreaRecommended level: 75 |
DLC Dungeon Guides
 Where the Demi-Fiend was Born Where the Demi-Fiend was Born |
 Center of the Conception Center of the Conception |
Comment
6  Anonymous about 4 years
In theory, step by step guides should be idiot proof
Author
Second Kalpa Walkthrough and Item Locations
Please participate in our site
improvement survey
03/2026
improvement survey
03/2026
Would you assist in
improving Game8's site?
improving Game8's site?

×
We are listening to our users' valuable opinions and discussing how to act on them.
The information collected through this survey will be used for the purpose of improving our services. In addition, the information will only be disclosed a part of a statistic in a format that will not allow identification of personal information.
Begin Survey
Not Now
×
Please rate each item regarding Game8.co's Advertisements.
Amount of Ads
Very Dissatisfied
Somewhat Dissatisfied
Fine
Somewhat Satisfied
Highly Satisfied
Placement of Ads
Timing of Ad Display
Ad Loading Speed
Safeness of Ads
Content of Ads
×
Please rate each item regarding Game8.co's Quality of Articles.
Amount of information
Very Dissatisfied
Somewhat Dissatisfied
Fine
Somewhat Satisfied
Highly Satisfied
Frequency of updates
Speed of new information
Accuracy of articles
Understandibility of articles
Readability of sentences
×
Please rate each item regarding Game8.co's Usability of the Site.
Ease of finding information
Very Dissatisfied
Somewhat Dissatisfied
Fine
Somewhat Satisfied
Highly Satisfied
Loading Speed
Use of Color
Font Size
Visibility of Images
Easy to Understand Layout
×
Please rate each item regarding Game8.co's Message Boards, Comments.
Ease of Writing
Very Dissatisfied
Somewhat Dissatisfied
Fine
Somewhat Satisfied
Highly Satisfied
Readability
Ease in Finding Information
Comment Quality
Comment Quantity
Admin Response
×
Please rate each item regarding Game8.co's Site's new design.
Please rate our site's new design
Very Dissatisfied
Somewhat Dissatisfied
Fine
Somewhat Satisfied
Highly Satisfied
Do you think that the website's design change makes the site easier to use?
Has the new design made it easier for you to find information on the site?
Has the new design improved the overall visual appeal of the site?
How would you rate your overall satisfaction with the new design of the site?
×
How likely are you to recommend Game8 to someone you know?
Very Unlikely
0
1
2
3
4
5
6
7
8
9
10
Very Likely
If you have other opinions regarding potential improvement to the website, please share them with us. We would appreciate your honest opinion.
Note: This is a free response section, so you can proceed without entering anything.
Note: Please be sure not to enter any kind of personal information into your response.
Note: Please be sure not to enter any kind of personal information into your response.
×
Thank You
×
Thank you for participating in our survey! Your answers will help us to improve the quality of our website and services.
We hope you continue to make use of Game8.
We hope you continue to make use of Game8.
Close
Rankings
- We could not find the message board you were looking for.
Gaming News


![Monster Hunter Stories 3 Review [First Impressions] | Simply Rejuvenating](https://img.game8.co/4438641/2a31b7702bd70e78ec8efd24661dacda.jpeg/thumb)
Popular Games

Genshin Impact Walkthrough & Guides Wiki
Honkai: Star Rail Walkthrough & Guides Wiki
Umamusume: Pretty Derby Walkthrough & Guides Wiki
Pokemon Pokopia Walkthrough & Guides Wiki
Resident Evil Requiem (RE9) Walkthrough & Guides Wiki
Monster Hunter Wilds Walkthrough & Guides Wiki
Wuthering Waves Walkthrough & Guides Wiki
Arknights: Endfield Walkthrough & Guides Wiki
Pokemon FireRed and LeafGreen (FRLG) Walkthrough & Guides Wiki
Pokemon TCG Pocket (PTCGP) Strategies & Guides Wiki


Recommended Games
Diablo 4: Vessel of Hatred Walkthrough & Guides Wiki
Cyberpunk 2077: Ultimate Edition Walkthrough & Guides Wiki
Fire Emblem Heroes (FEH) Walkthrough & Guides Wiki
Yu-Gi-Oh! Master Duel Walkthrough & Guides Wiki
Super Smash Bros. Ultimate Walkthrough & Guides Wiki
Pokemon Brilliant Diamond and Shining Pearl (BDSP) Walkthrough & Guides Wiki
Elden Ring Shadow of the Erdtree Walkthrough & Guides Wiki
Monster Hunter World Walkthrough & Guides Wiki
The Legend of Zelda: Tears of the Kingdom Walkthrough & Guides Wiki
Persona 3 Reload Walkthrough & Guides Wiki


All rights reserved
©ATLUS. ©SEGA. All rights reserved. ATLUS is registered in the U.S. Patent and Trademark Office. ATLUS, the ATLUS logo, SHIN MEGAMI TENSEI, SHIN MEGAMI TENSEI NOCTURNE and SMT are either registered trademarks or trademarks of ATLUS Co., Ltd. or its affiliates.
©CAPCOM CO., LTD. All rights reserved.
The copyrights of videos of games used in our content and other intellectual property rights belong to the provider of the game.
The contents we provide on this site were created personally by members of the Game8 editorial department.
We refuse the right to reuse or repost content taken without our permission such as data or images to other sites.
You might have better luck on r/megaten for your "pro" questions