Immersive Theatre Guide
★ Tier Lists: Characters | Weapons | Demon Wedges
★ Builds: Kezhou | Fushu | Fina | Lynn | Psyche
★ Version 1.2 Summary | Characters: Zhiliu | Yuming
┗ Mechanics: Mount | Gifting | Reputation | Accessory Customization
★ How to Get Characters | Mystic Maze | Redeem Codes
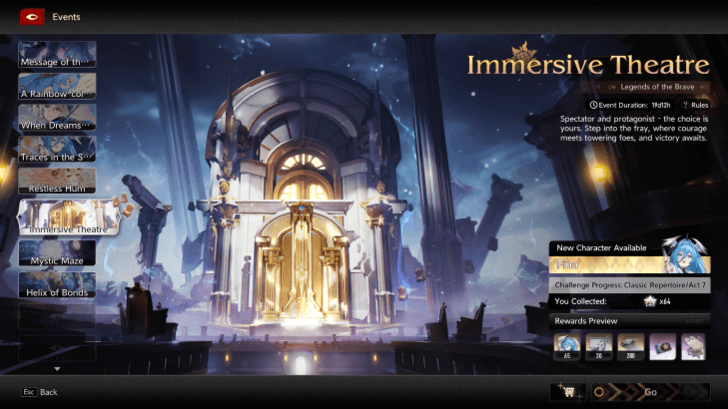
Immersive Theatre is an endgame event mode in Duet Night Abyss (DNA). See our Immersive Theatre Tier List, how to play the Immersive Theatre, all combat acts and stages, information about Classic Repertoire, Featured Repertoire, and Immortal Repertoire, best characters for the event, how to unlock, and all of the rewards here in this guide!
List of Contents
Immersive Theatre Schedule
Resets Every 28 Days
| Current Character and Weapon | |
|---|---|
 Su Yi Su Yi
|
|
| Upcoming Characters and Weapons | |
 Camilla Camilla
|
Release Dates |
| May 5, 2026 |
|
| Past Characters and Weapons | |
 Yuming Yuming
|
 Zhiliu Zhiliu
|
| Release Dates | |
| March 10, 2026 | February 10, 2026 |
The Immersive Theatre resets every 28 days, bringing a new featured character along with fresh rewards and challenges each cycle.
On April 7, 2026, Su Yi became the latest featured character, replacing Yuming. At the same time, the shotgun Fledgling’s Gleam took the place of Venial Sinscales.
How to Play Immersive Theatre
| Jump to a Section! |
|---|
|
|
Choose Section
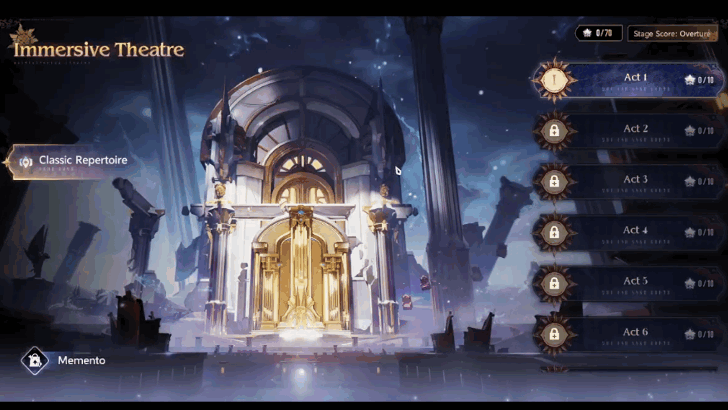
Immersive Theatre is divided into three sections: Classic Repertoire, Featured Repertoire, and Immortal Repertoire. Each of these comes in varying levels of difficulty, with Classic being the easiest and Immortal being the most difficult.
Select an Act and Stage Score
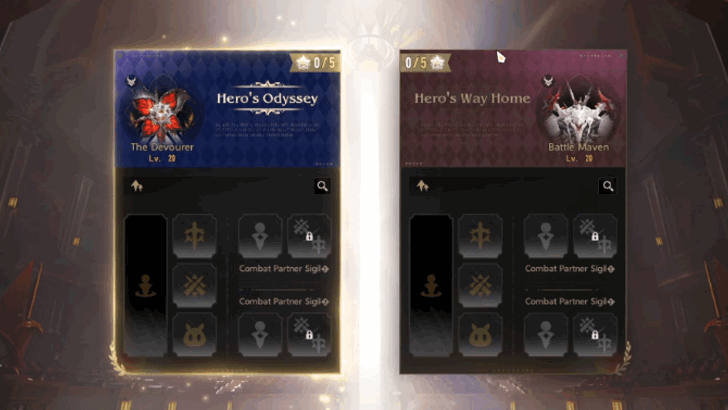
Each sections all have Acts that players must complete. These Acts have two sections have two rounds: Hero's Odyssey and Hero's Way Home. Each round features 5 battles each, with the fifth one being a boss battle.
Each stage completed will reward players with a star, and most of the event's rewards are tied to how many stars a player has collected. These also grant Ticket Stubs, which can be exchanged at the event's shop for valuables like Secret Letters, Demon Wedges, and upgrade materials.
Arrange Team Set Up
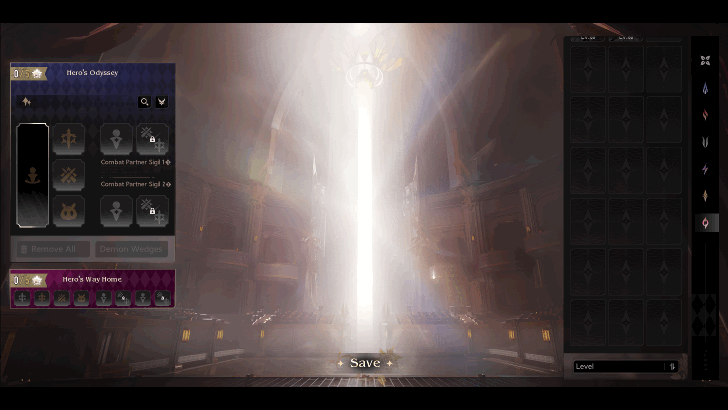
At the beginning of each Act, players can select their character and organize combat partners into a team.
Characters used in one round cannot be reused in the other, and the team setup will remain locked for the entire Act.
All character, weapon, and Geniemon slots must be filled out, so players need at least 6 characters, 8 weapons, and 2 Geniemons to participate in the event.
Consider Using Recommended Elements
 Electro Electro
|
 Lumino Lumino
|
Featured and Immortal Repertoire have recommended elements, and characters from these elements benefit from huge buffs to their damage.
In the current iteration of Immersive Theatre, the recommended elements are Electro and Lumino.
That said, the event's best performers are from these two elements, and should definitely be factored in when coming up with team comps.
Complete Trials within the Time Limit

During the Act, players must clear the Trials by defeating a corresponding number of enemies and the final boss battle within the time limit.
Each Act is more difficult than the last one; players must look to strengthen their team should they fail to defeat the enemies within the given time limit.
Immersive Theatre Tier List
This tier list is based on the current iteration of Immersive Theater.
| Tier | Characters |
|---|---|
|
|
    
|
|
|
|
|
|
|
Best Characters For Immersive Theatre
Zhiliu
|
Zhiliu
|
||||||||
| Element |
Electro
|
|||||||
|---|---|---|---|---|---|---|---|---|
| Role | DPS / Skill DMG | |||||||
Zhiliu is the premier pick for the Immersive Theatre stages where Electro characters are empowered.
Her versatile kit offers self-buffs, a strong AoE attack, a burst ability, and even Ultra Shield, giving her a tool to use for every situation.
Her Myriad Things Thrive version of her ultimate ability can make quick work of mobs. Against bosses, she can spam her Thunder's Oracle Peal ability to quickly burst them down.
Rhythm
 Rhythm Rhythm
|
||||||||
| Element |
Electro
|
|||||||
|---|---|---|---|---|---|---|---|---|
| Role | DPS / Skill DMG | |||||||
Rhythm is an excellent pick for the Immersive Theatre stages where Electro characters are empowered.
When built properly, Rhythm's ultimate ability may just be the best tool for clearing mobs, due to its AoE damage striking enemies over a large area.
Dealing with bosses is not a cakewalk with Rhythm, since she is more of a specialist against mobs. However, her constant damage output make boss fights manageable, and her ultimate will quickly wipe out the mobs summoned by the boss at 50% HP.
Yuming
|
Yuming
|
||||||||
| Element |
Electro
|
|||||||
|---|---|---|---|---|---|---|---|---|
| Role | DPS / Skill DMG / Weapon DMG | |||||||
If you have managed to build Yuming already, incorporating him into an Electro team as a Sub DPS is a great idea, even at low Intron levels.
This is because Yuming deals great damage, grants impactful buffs to Morale and Damage Dealt, and multi-target debuffs that increase the damage enemies take from Electro characters.
A sample team with Yuming involves himself, Rhythm or Zhiliu as the main DPS, and Fushu as the support.
Kezhou
 Kezhou Kezhou
|
||||||||
| Element |
Lumino
|
|||||||
|---|---|---|---|---|---|---|---|---|
| Role | DPS / Weapon DMG | |||||||
Kezhou is great in stages where the recommended element is Lumino, given that he is the strongest Lumino character in the game.
Kezhou is a weapon DMG-oriented character with high ATK Speed and a flashy fast-paced playstyle.
He has recently taken Lady Nifle's place as the strongest Lumino DPS in the game, thanks to his great synergy with the new Lumino-exclusive Demon Wedges released this patch.
When using Kezhou, have Fina alongside him and equip her with the new Siren's Wings • Inspo • Focus Demon Wedge for best results.
Fina
 Fina Fina
|
||||||||
| Element |
Lumino
|
|||||||
|---|---|---|---|---|---|---|---|---|
| Role | Support | |||||||
Fina is one of the finest offensive support characters for Weapon DMG-oriented characters, thanks to her ability to increase the damage her allies deal with weapons.
Even if her team's DPS unit is a Skill DMG-oriented character, she will bring a lot to the table thanks to her general damage and PEN buffs.
Because she is a Lumino character, Fina herself will also be able to dish out some solid damage in this iteration of the event.
To sum it up, Fina is great for any team, and excellent alongside weapon users.
Fushu
 Fushu Fushu
|
||||||||
| Element |
 Hydro Hydro
|
|||||||
|---|---|---|---|---|---|---|---|---|
| Role | Support / Skill DMG / Summon / Healing | |||||||
If you have managed to snag yourself a copy of Fushu, know that Fushu does well in any team comp.
Fushu grants her allies Skill DMG, which is extremely useful for all characters, even the ones that mainly deal Weapon DMG.
She can also heal and restore Sanity, which again is a universal bonus all characters would love to have.
Because she is a Hydro character, Fushu herself will also be able to dish out some solid damage in this iteration of the event.
Truffle and Filbert
 Truffle and Filbert Truffle and Filbert
|
||||||||
| Element |
 Anemo Anemo
|
|||||||
|---|---|---|---|---|---|---|---|---|
| Role | Support / Healing / Max HP | |||||||
Truffle and Filbert is an all-around support that grants healing, Resolve, and damage. They work well in almost any team, be it led by Lady Nifle or Rebecca.
Because Psyche's kit benefits greatly from Resolve and healing, Truffle and Filbert synergize extremely well alongside Immersive Theatre's best character.
Tabethe
 Tabethe Tabethe
|
||||||||
| Element |
Hydro
|
|||||||
|---|---|---|---|---|---|---|---|---|
| Role | Support / Summon / Crowd Control | |||||||
Tabethe is a Hydro support that grants Skill Intensity buffs, making her great alongside DPS units that like to deal damage with their skills. She also summons tentacles to the battlefield, dealing damage and holding enemies in place.
Because she is a Hydro character, Tabethe herself will also be able to dish out some solid damage in this iteration of the event.
Lady Nifle
 Lady Nifle Lady Nifle
|
||||||||
| Element |
Lumino
|
|||||||
|---|---|---|---|---|---|---|---|---|
| Role | DPS / Skill Damage | |||||||
Despite her not being as strong as she once was, Lady Nifle is still a solid pick for Immersive Theatre against Umbro enemies due to her strong AoE damage and boss-busting abilities.
When using Lady Nifle, be sure to equip the Embla Inflorescence as her ranged weapon as this increases Skill Range and Skill Intensity, two of her most impactful stats. This weapon is also great at proccing her I6 passive for a potent ranged attack.
Lisbell
 Lisbell Lisbell
|
||||||||
| Element |
Lumino
|
|||||||
|---|---|---|---|---|---|---|---|---|
| Role | DPS / Consonance Weapon / Weapon DMG | |||||||
Lisbell is a Lumino Consonance Weapon wielder who uses her giant greatsword, Samael, to strike down bosses and wipe out mobs with ease.
Although she is a free character, she is actually quite good and can hold her own in stages against Umbro enemies.
Su Yi
|
Su Yi
|
||||||||
| Element |
Lumino
|
|||||||
|---|---|---|---|---|---|---|---|---|
| Role | DPS / Skill DMG | |||||||
Su Yi is Immersive Theatre's featured character this time around. If you happened to acquire her already, she can be used as a DPS for your remaining Immersive Theatre challenges.
Unfortunately, she is not as strong as Kezhou, but she is quite fun to play. Her ultimate form gives her access to new movesets, with her melee attack swinging a gigantic greatsword that deals heavy damage, and her ranged attacks firing projectiles that deal AoE damage.
When using Su Yi, equip the Fengshi Type III: Tracking Mode Demon Wedge and use her alongside Fushu and Fina for best results.
Sample Immersive Theatre Teams
Featured Repertoire Sample Team
Hero's Oddysey
| Hero's Oddysey Sample Team | |||
|---|---|---|---|
|
Zhiliu
|
|
Yuming
|
|
|
|
Fushu
|
|
|
|
|
|||
Hero's Oddysey stages are against Hydro enemies, so having an Electro DPS carry is necessary for success.
Zhiliu leads the way here with her high AoE damage, burst potential, and self-buffs. Rhythm also works as the primary DPS if Zhiliu is unavailable.
Yuming is the team's Sub-DPS who buffs his allies while also dealing loads of damage himself.
Their support is Fushu for Sanity recovery, Skill DMG buffs, and healing.
Hero's Way Home
| Hero's Way Home Sample Team | |||
|---|---|---|---|
|
Kezhou
|
|
Fina
|
|
|
|
Truffle and Filbert
|
|
|
|
|
|||
In Hero's Way Home, the stages are against Umbro enemies, so having a Lumino DPS carry is a must.
Kezhou will be your playable character who will melt bosses and mobs with his high damage and fast-paced attack sequences.
Fina is here to increase Kezhou's Weapon DMG, DMG, and PEN. Be sure to equip her with the new Siren's Wings • Inspo • Focus Demon Wedge for best results.
Truffle and Filbert, on the other hand, offers DMG buffs alongside healing capabilities. If for whatever reason Fushu is not being used on the Hero's Oddysey team, use her in Truffle and Filbert's place instead.
Immortal Repertoire Sample Team
| Immortal Repertoire Sample Team | |||
|---|---|---|---|
|
Zhiliu
|
|
Yuming
|
|
|
|
Fushu
|
|
|
|
|
|||
The Immortal Repertoire sample team is identical to the Hero's Oddysey sample team.
Sample Demon Wedge Loadouts for Immersive Theatre
Electro DPS Loadout
| Slot 1 | Slot 3 | Core | Slot 4 | Slot 2 |
|---|---|---|---|---|
|
|
|
|
|
|
| Slot 5 | Slot 7 | Slot 8 | Slot 6 | |
|
|
|
|
|
Kezhou Lumino DPS Loadout
| Slot 1 | Slot 3 | Core | Slot 4 | Slot 2 |
|---|---|---|---|---|
|
|
|
|
|
|
| Slot 5 | Slot 7 | Slot 8 | Slot 6 | |
|
|
|
|
|
All Immersive Theatre Acts and Stages
| Jump to a Section! |
|---|
|
|
List of Classic Repertoire Stage Bosses
| Act | Hero's Odyssey | Hero's Way Home |
|---|---|---|
| Act 1 | The Devourer (Lv.20) | Battle Maven (Lv.20) |
| Act 2 | Battle Maven (Lv.25) | Blessed Ascetic (Lv.25) |
| Act 3 | Blessed Arbiter (Lv.30) | The Devourer (Lv.30) |
| Act 4 | Blessed Ascetic (Lv.35) | ??? (Lv.35) |
| Act 5 | Sibylle (Lv.40) | Crystalophile (Lv.40) |
| Act 6 | ??? (Lv.45) | The Eclosioner (Lv.45) |
| Act 7 | The Eclosioner (Lv.50) | The Warden of the Inferno (Lv.50) |
List of Featured Repertoire Stage Bosses
| Act | Hero's Odyssey | Hero's Way Home |
|---|---|---|
| Act 1 | Battle Maven (Lv.60) | The Devourer (Lv.60) |
| Act 2 | ??? (Lv.70) | Sibylle (Lv.70) |
| Act 3 | The Warden of the Inferno (Lv.80) | The Beast From the Snowfield (Lv.80) |
List of Immortal Repertoire Stage Bosses
| Act | Boss |
|---|---|
| Act 1 | Battle Maven (Lv.90) |
| Act 2 | The Devourer (Lv.92) |
| Act 3 | ??? (Lv.94) |
| Act 4 | Sibylle (Lv.96) |
| Act 5 | The Warden of the Inferno (Lv.98) |
| Act 6 | The Beast From the Snowfield (Lv.105) |
| Act 7 | Battle Maven (Lv.108) |
| Act 8 | The Devourer (Lv.110) |
| Act 9 | ??? (Lv.112) |
| Act 10 | Sibylle (Lv.114) |
| Act 11 | The Warden of the Inferno (Lv.116) |
| Act 12 | The Beast From the Snowfield (Lv.123) |
What is Immersive Theatre?
Combat Event in Duet Night Abyss
The Immersive Theatre is a unique combat game mode where you can assemble powerful teams in Duet Night Abyss. Phoxhunters must face challenges where they must help out at The Galea Theatre, as enemies are disguising themselves as performers on stage.
You must complete 10 trials in each act. Defeating these within the time limit will earn you stars, which can be claimed to unlock various rewards, most notably Secret Letters for the latest character and weapon!
List of All Events and Schedule
How to Unlock Immersive Theatre
Complete The Judgment Day Main Quest
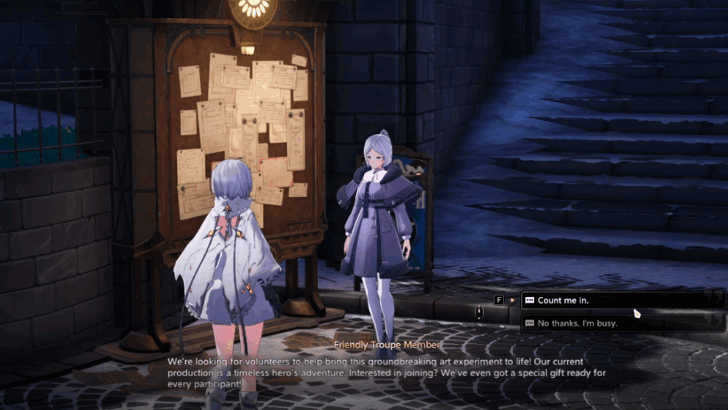
The Immersive Theatre is unlocked after completing the main quest, The Judgment Day. Upon completion, you will get a Special Side Quest, A New Theatrical Experience.
Head out to the Eastern District of Icelake and speak with the friendly troupe member of The Galea Theatre to volunteer in participating in this new mode.
The Judgment Day Story Walkthrough and Guide
Immersive Theatre Rewards
| Jump to a Section! |
|---|
|
|
All Classic Repertoire Star Rewards
Phoxhunters can check out the rewards on the Immersive Theatre menu and claim it based on the total stars collected from the completed trials.
| Goal | Rewards |
|---|---|
| Total Stars Collected: 2 ☆ |
Ticket Stub x80
Carmine Globule x100
Coins x5000
|
| Total Stars Collected: 4 ☆ |
Ticket Stub x80
Carmine Globule x100
Coins x5000
|
| Total Stars Collected: 6 ☆ |
Ticket Stub x80
Carmine Globule x100
Coins x5000
|
| Total Stars Collected: 8 ☆ |
Ticket Stub x80
Carmine Globule x100
Coins x5000
|
| Total Stars Collected: 10 ☆ |
Ticket Stub x80
Carmine Globule x100
Coins x5000
|
| Total Stars Collected: 12 ☆ |
Ticket Stub x80
Carmine Globule x100
Coins x5000
|
| Total Stars Collected: 14 ☆ |
Ticket Stub x80
Carmine Globule x100
Coins x5000
|
| Total Stars Collected: 16 ☆ |
Ticket Stub x80
Carmine Globule x100
Coins x5000
|
| Total Stars Collected: 18 ☆ |
Ticket Stub x80
Carmine Globule x100
Coins x5000
|
| Total Stars Collected: 20 ☆ |
Ticket Stub x80
Carmine Globule x100
Coins x5000
|
| Total Stars Collected: 22 ☆ |
Ticket Stub x120
Carmine Globule x150
Coins x8000
|
| Total Stars Collected: 24 ☆ |
Ticket Stub x120
Carmine Globule x150
Coins x8000
|
| Total Stars Collected: 26 ☆ |
Ticket Stub x120
Carmine Globule x150
Coins x8000
|
| Total Stars Collected: 28 ☆ |
Ticket Stub x120
Carmine Globule x150
Coins x8000
|
| Total Stars Collected: 30 ☆ |
Ticket Stub x120
Carmine Globule x150
Coins x8000
|
| Total Stars Collected: 32 ☆ |
Ticket Stub x120
Carmine Globule x150
Coins x8000
|
| Total Stars Collected: 34 ☆ |
Ticket Stub x120
Carmine Globule x150
Coins x8000
|
| Total Stars Collected: 36 ☆ |
Ticket Stub x120
Carmine Globule x150
Coins x8000
|
| Total Stars Collected: 40 ☆ |
Ticket Stub x120
Carmine Globule x150
Coins x8000
|
| Total Stars Collected: 42 ☆ |
Ticket Stub x120
Carmine Globule x150
Coins x8000
|
| Total Stars Collected: 44 ☆ |
Ticket Stub x120
Carmine Globule x150
Coins x8000
|
| Total Stars Collected: 46 ☆ |
Ticket Stub x120
Carmine Globule x200
Coins x8000
|
| Total Stars Collected: 48 ☆ |
Ticket Stub x120
Carmine Globule x200
Coins x8000
|
| Total Stars Collected: 50 ☆ |
Ticket Stub x120
Carmine Globule x200
Coins x8000
|
| Total Stars Collected: 52 ☆ |
Ticket Stub x120
Carmine Globule x200
Coins x8000
|
| Total Stars Collected: 54 ☆ |
Ticket Stub x120
Carmine Globule x200
Coins x8000
|
| Total Stars Collected: 56 ☆ |
Ticket Stub x120
Carmine Globule x200
Coins x8000
|
| Total Stars Collected: 58 ☆ |
Ticket Stub x120
Carmine Globule x200
Coins x8000
|
| Total Stars Collected: 60 ☆ |
Ticket Stub x120
Carmine Globule x200
Coins x8000
|
| Total Stars Collected: 62 ☆ |
Ticket Stub x150
Carmine Globule x200
Coins x100000
|
| Total Stars Collected: 64 ☆ |
Ticket Stub x150
Carmine Globule x200
Coins x100000
|
| Total Stars Collected: 66 ☆ |
Ticket Stub x150
Carmine Globule x200
Coins x100000
|
| Total Stars Collected: 68 ☆ |
Ticket Stub x150
Carmine Globule x200
Coins x100000
|
| Total Stars Collected: 70 ☆ |
Ticket Stub x200
Carmine Globule x200
Coins x100000
|
All Featured Repertoire Star Rewards
Completing Featured Repertoire trials grant similar rewards to Classic Repertoire, but with more quantity and better quality. Featured Repertoire is also where players can earn Secret Letters of the latest character, Fushu.
| Goal | Rewards |
|---|---|
| Total Stars Collected: 2 ☆ |
Secret Letter: Yuming x4
Ticket Stub x150
Carmine Globule x200
Coins x10000
|
| Total Stars Collected: 4 ☆ |
Secret Letter: Yuming x4
Ticket Stub x150
Carmine Globule x200
Coins x10000
|
| Total Stars Collected: 6 ☆ |
Secret Letter: Yuming x4
Ticket Stub x150
Carmine Globule x200
Coins x10000
|
| Total Stars Collected: 8 ☆ |
Secret Letter: Yuming x4
Ticket Stub x150
Carmine Globule x200
Coins x10000
|
| Total Stars Collected: 10 ☆ |
Secret Letter: Yuming x4
Ticket Stub x150
Carmine Globule x200
Coins x10000
|
| Total Stars Collected: 12 ☆ |
Ticket Stub x150
Carmine Globule x200
Coins x10000
|
| Total Stars Collected: 14 ☆ |
Ticket Stub x150
Carmine Globule x200
Coins x10000
|
| Total Stars Collected: 16 ☆ |
Ticket Stub x150
Carmine Globule x200
Coins x10000
|
| Total Stars Collected: 18 ☆ |
Ticket Stub x150
Carmine Globule x200
Coins x10000
|
| Total Stars Collected: 20 ☆ |
Ticket Stub x150
Carmine Globule x200
Coins x10000
|
| Total Stars Collected: 22 ☆ |
Ticket Stub x200
Carmine Globule x300
Coins x15000
|
| Total Stars Collected: 24 ☆ |
Ticket Stub x200
Carmine Globule x300
Coins x15000
|
| Total Stars Collected: 26 ☆ |
Ticket Stub x200
Carmine Globule x300
Coins x15000
|
| Total Stars Collected: 28 ☆ |
Ticket Stub x200
Carmine Globule x300
Coins x15000
|
| Total Stars Collected: 30 ☆ |
Ticket Stub x200
Carmine Globule x300
Coins x15000
|
All Immortal Repertoire Star Rewards
The final and most difficult section of the game rewards players with the most Fushu Secret Letters in the game, along with some Ticket Stubs as well.
| Goal | Rewards |
|---|---|
| Total Stars Collected: 10 ☆ |
Secret Letter: Yuming x7
Ticket Stub x200
Carmine Globule x300
Coins x12000
|
| Total Stars Collected: 20 ☆ |
Secret Letter: Yuming x7
Ticket Stub x200
Carmine Globule x300
Coins x12000
|
| Total Stars Collected: 30 ☆ |
Secret Letter: Yuming x7
Ticket Stub x200
Carmine Globule x300
Coins x12000
|
| Total Stars Collected: 35 ☆ |
Secret Letter: Yuming x4
Ticket Stub x75
|
| Total Stars Collected: 40 ☆ |
Secret Letter: Yuming x4
Ticket Stub x75
|
| Total Stars Collected: 45 ☆ |
Secret Letter: Yuming x4
Ticket Stub x75
|
| Total Stars Collected: 50 ☆ |
Secret Letter: Yuming x4
Ticket Stub x75
|
| Total Stars Collected: 55 ☆ |
Secret Letter: Yuming x4
Ticket Stub x75
|
| Total Stars Collected: 60 ☆ |
Secret Letter: Yuming x4
Ticket Stub x75
|
| Total Stars Collected: 62 ☆ |
Ticket Stub x20
|
| Total Stars Collected: 64 ☆ |
Ticket Stub x20
|
| Total Stars Collected: 66 ☆ |
Ticket Stub x20
|
| Total Stars Collected: 68 ☆ |
Ticket Stub x20
|
| Total Stars Collected: 70 ☆ |
Ticket Stub x20
|
| Total Stars Collected: 72 ☆ |
Ticket Stub x20
|
| Total Stars Collected: 74 ☆ |
Ticket Stub x20
|
| Total Stars Collected: 76 ☆ |
Ticket Stub x20
|
| Total Stars Collected: 78 ☆ |
Ticket Stub x20
|
| Total Stars Collected: 80 ☆ |
Ticket Stub x20
|
| Total Stars Collected: 82 ☆ |
Ticket Stub x20
|
| Total Stars Collected: 84 ☆ |
Ticket Stub x20
|
| Total Stars Collected: 86 ☆ |
Ticket Stub x20
|
| Total Stars Collected: 88 ☆ |
Ticket Stub x20
|
| Total Stars Collected: 90 ☆ |
Ticket Stub x20
|
| Total Stars Collected: 92 ☆ |
Ticket Stub x20
|
| Total Stars Collected: 94 ☆ |
Ticket Stub x20
|
| Total Stars Collected: 96 ☆ |
Ticket Stub x20
|
| Total Stars Collected: 98 ☆ |
Ticket Stub x20
|
| Total Stars Collected: 100 ☆ |
Ticket Stub x20
|
| Total Stars Collected: 102 ☆ |
Ticket Stub x20
|
| Total Stars Collected: 104 ☆ |
Ticket Stub x20
|
| Total Stars Collected: 106 ☆ |
Ticket Stub x20
|
| Total Stars Collected: 108 ☆ |
Ticket Stub x20
|
| Total Stars Collected: 110 ☆ |
Ticket Stub x20
|
| Total Stars Collected: 112 ☆ |
Ticket Stub x20
|
| Total Stars Collected: 114 ☆ |
Ticket Stub x20
|
| Total Stars Collected: 116 ☆ |
Ticket Stub x20
|
| Total Stars Collected: 118 ☆ |
Ticket Stub x20
|
| Total Stars Collected: 120 ☆ |
Ticket Stub x20
|
| Total Stars Collected: 122 ☆ |
Ticket Stub x20
|
| Total Stars Collected: 124 ☆ |
Ticket Stub x20
|
| Total Stars Collected: 126 ☆ |
Ticket Stub x20
|
| Total Stars Collected: 128 ☆ |
Ticket Stub x20
|
| Total Stars Collected: 130 ☆ |
Ticket Stub x20
|
| Total Stars Collected: 132 ☆ |
Ticket Stub x20
|
| Total Stars Collected: 134 ☆ |
Ticket Stub x20
|
| Total Stars Collected: 136 ☆ |
Ticket Stub x20
|
| Total Stars Collected: 138 ☆ |
Ticket Stub x20
|
| Total Stars Collected: 140 ☆ |
Ticket Stub x20
|
| Total Stars Collected: 142 ☆ |
Ticket Stub x20
|
| Total Stars Collected: 144 ☆ |
Ticket Stub x20
|
| Total Stars Collected: 146 ☆ |
Ticket Stub x20
|
| Total Stars Collected: 148 ☆ |
Ticket Stub x20
|
| Total Stars Collected: 150 ☆ |
Ticket Stub x20
|
| Total Stars Collected: 152 ☆ |
Ticket Stub x20
|
| Total Stars Collected: 154 ☆ |
Ticket Stub x20
|
| Total Stars Collected: 156 ☆ |
Ticket Stub x20
|
| Total Stars Collected: 158 ☆ |
Ticket Stub x20
|
| Total Stars Collected: 160 ☆ |
Ticket Stub x20
|
| Total Stars Collected: 162 ☆ |
Ticket Stub x20
|
| Total Stars Collected: 164 ☆ |
Ticket Stub x20
|
| Total Stars Collected: 166 ☆ |
Ticket Stub x20
|
| Total Stars Collected: 168 ☆ |
Ticket Stub x20
|
| Total Stars Collected: 170 ☆ |
Ticket Stub x20
|
| Total Stars Collected: 172 ☆ |
Ticket Stub x20
|
| Total Stars Collected: 174 ☆ |
Ticket Stub x20
|
| Total Stars Collected: 176 ☆ |
Ticket Stub x20
|
| Total Stars Collected: 178 ☆ |
Ticket Stub x20
|
| Total Stars Collected: 180 ☆ |
Ticket Stub x20
|
| Total Stars Collected: 182 ☆ |
Ticket Stub x10
|
Duet Night Abyss Related Guides

Duet Night Abyss Wiki Top Page
| Main Links Partial | |
|---|---|
 Latest News Latest News |
 Tier Lists Tier Lists |
 Characters Characters |
 Maps Maps |
 Tips and Tricks Tips and Tricks |
 Commissions Commissions |
 Bosses Bosses |
 Weapons Weapons |
 Quests Quests |
 Myriad (Gacha) Myriad (Gacha) |
 Events Events |
 Cosmetics Cosmetics |
 Message Boards Message Boards |
 Geniemon Geniemon |
 Enemies Enemies |
 Items Items |
 Demon Wedges Demon Wedges |
|
All Recommended Guides
 All Best Builds
 Best Starting Characters
 Mystic Maze Guide
 How to Get Prismatic and Pristine Hourglass
 How to Get Iridescent and Lucent Prism
 How to Get Phoxene Plumules
 How to Get and Use Phoxene
 How to Get and Use Thought
 How to Get and Use Secret Letter Clue
 How to Farm Coins
 How to Get and Use Advensphere
 Glossary of Terms
 Combat Guide
 Impressions Guide
 List of EN and JP Voice Actors
 How to Equip Demon Wedges
 Attribute Guide
 How to Get Psyche
 List of All Fish
 Beginner Weapon Selection
 Elements Guide
 Weapon Builds
Author

Immersive Theatre Guide
Rankings
Gaming News


![Forza Horizon 6 Review [Preview] | Beautiful Roads With a Whole Lot of Oversteer](https://img.game8.co/4460981/a7254c24945c43fbdf6ad9bea52b5ce9.png/thumb)
Popular Games

Genshin Impact Walkthrough & Guides Wiki
Crimson Desert Walkthrough & Guides Wiki
Umamusume: Pretty Derby Walkthrough & Guides Wiki
Honkai: Star Rail Walkthrough & Guides Wiki
Monster Hunter Stories 3: Twisted Reflection Walkthrough & Guides Wiki
Wuthering Waves Walkthrough & Guides Wiki
The Seven Deadly Sins: Origin Walkthrough & Guides Wiki
Pokemon TCG Pocket (PTCGP) Strategies & Guides Wiki
Pokemon Pokopia Walkthrough & Guides Wiki
Zenless Zone Zero Walkthrough & Guides Wiki


Recommended Games
Monster Hunter World Walkthrough & Guides Wiki
Fire Emblem Heroes (FEH) Walkthrough & Guides Wiki
Pokemon Brilliant Diamond and Shining Pearl (BDSP) Walkthrough & Guides Wiki
Super Smash Bros. Ultimate Walkthrough & Guides Wiki
Diablo 4: Vessel of Hatred Walkthrough & Guides Wiki
Cyberpunk 2077: Ultimate Edition Walkthrough & Guides Wiki
Yu-Gi-Oh! Master Duel Walkthrough & Guides Wiki
Elden Ring Shadow of the Erdtree Walkthrough & Guides Wiki
The Legend of Zelda: Tears of the Kingdom Walkthrough & Guides Wiki
Persona 3 Reload Walkthrough & Guides Wiki


All rights reserved
Game Copyright©Pan Studio All Rights Reserved.
The content we provide on this site were created personally by members of the Game8 editorial department.
We refuse the right to reuse or repost content taken without our permission such as data or images to other sites.
©Pan Studio (Provider)
Where's featured repertoire and immortal repertoire guides??