Mystic Maze Guide
★ Tier Lists: Characters | Weapons | Demon Wedges
★ Builds: Kezhou | Fushu | Fina | Lynn | Psyche
★ Version 1.2 Summary | Characters: Zhiliu | Yuming
┗ Mechanics: Mount | Gifting | Reputation | Accessory Customization
★ How to Get Characters | Mystic Maze | Redeem Codes
The Mystic Maze is a roguelite mode in Duet Night Abyss! Read on to learn the best characters for Mystic Maze, tips on how to clear it, how to unlock it, and the rewards you can get for clearing it.
List of Contents
Mystic Maze Best Characters
| Mystic Maze Best Characters | |||||
|---|---|---|---|---|---|
Lady Nifle
 Lady Nifle Lady Nifle
|
||||||||
| Element |
 Lumino Lumino
|
|||||||
|---|---|---|---|---|---|---|---|---|
| Role | DPS / Skill Damage | |||||||
Lady Nifle is a skill-oriented DPS character that deals great Skill DMG, specifically when upgraded to I6, as this solves her Sanity issues by making it possible to generate her Lunar Hunt or Solar Eclipse abilities with her ranged weapon.
She becomes extremely powerful when equipped with the Embla Inflorescence bow, as this further increases Skill Intensity, while firing out multiple arrows towards multiple opponents.
When it comes to Mystic Maze builds, Lady Nifle works well with Skill Intensity, Skill Range, and Ranged Weapon Trigger Probability, so look for Lampwicks and Artefacts that enhance these stats.
Zhiliu
 Zhiliu Zhiliu
|
||||||||
| Element |
 Electro Electro
|
|||||||
|---|---|---|---|---|---|---|---|---|
| Role | DPS / Skill DMG | |||||||
Zhiliu is another skill-oriented DPS whose ultimate ability comes in three forms. One of which is a spammable burst ability great for bosses, while another is an AoE ability that is excellent against mobs.
Just like Lady Nifle, Zhiliu works well with Skill Intensity, Skill Range, and Melee Weapon Trigger Probability, so try to supplement her with buffs that enhance these stats.
Psyche
 Psyche Psyche
|
||||||||
| Element |
 Anemo Anemo
|
|||||||
|---|---|---|---|---|---|---|---|---|
| Role | DPS / Consonance Weapon / Weapon DMG / Skill DMG | |||||||
Psyche is excellent for Mystic Maze as her ability to fly keeps her safe from most enemy threats, while dishing out huge damage to mobs and bosses alike.
Psyche's Consonance Weapon scales with Skill Intensity and Ranged Weapon DMG, so it is very easy to build her optimally. Her build flexibility minimizes the risk of having to pick sub-optimal Lampwicks and Artefacts when out of better options.
Lynn
 Lynn Lynn
|
||||||||
| Element |
 Pyro Pyro
|
|||||||
|---|---|---|---|---|---|---|---|---|
| Role | DPS / Consonance Weapon / Weapon DMG | |||||||
Lynn is great in Mystic Maze for the same reasons as Psyche, minus the ability to fly. She is also a flexible Consonance Weapon user that deals big damage, especially when supplemented with Skill Intensity or Ranged Weapon DMG buffs.
While Psyche gains superior mobility while using her Consonance Weapon, Lynn is the opposite and loses all mobility whatsoever. That said, players will have to be a little bit more strategic when using Lynn, with proper positioning separating good Lynn players from the average.
Rebecca
 Rebecca Rebecca
|
||||||||
| Element |
 Hydro Hydro
|
|||||||
|---|---|---|---|---|---|---|---|---|
| Role | DPS / Skill DMG / Summon | |||||||
Rebecca is excellent in Mystic Maze since her Jellyfish Summons can easily take out mobs within a huge AoE radius, especially when amplified with Skill DMG or Skill Range buffs. She is the premier option when it comes to characters accessible to beginners.
Do note that it is a little bit harder to fight with bosses with Rebecca, especially when pitted against mobile ones that constantly leave your summons' range. That said, boss fights are still very much doable with an optimal build, it just isn't the cakewalk that it is with Lynn or Psyche.
Mystic Maze Tips and Tricks
- Six Kinds of Zones to Experience
- Lampwicks are Your Primary Buffs
- Artefacts Change How You Play
- Lantern Light-Up Provides Permanent Buffs
- Abyssward Depth Alters Difficulty For More Threads of Time
Six Kinds of Zones to Experience

Each exploration will task you with clearing 9 or more Zones depending on the difficulty. There are 6 kinds of Zones: Abyssal Echo, Rest, Penumbral Abyssoid, Scattered Abyssoid, Atrocious Abyssoid, and Abysmal Abyssoid.
Abyssal Echo and Rest
Abyssal Echo zones contain Encounters, special mini-events featuring conversations with mysterious characters, each ending with a reward. Here, you can obtain Lampwicks, Artefacts, or Embers. Access Abyssal Echo zones by going through blue doors.
Rest, on the other hand, lets you heal your character and regain Sanity. These will always be the last room before the final boss. You will also find the Abyssal Merchant in this zone. You can exchange Embers for Lampwicks and Artefacts at the Abyssal Merchant. Rest zones are entered through yellow doors.
Abyssoid Zones
Penumbral, Scattered, Atrocious, and Abysmal Abyssoid Zones are combat arenas that scale in difficulty in that order. These show up as red doors.
Penumbral Abyssoids usually contain only basic enemies, while Scattered Abyssoids can spawn stronger ones. Atrocious Abyssoids are smaller rooms filled only with strong enemies. Lastly, the Abysmal Abyssoid contains a boss fight and is typically the final Zone in an Exploration.
Lampwicks are Your Primary Buffs

Demon Wedges and Combat Partners are deactivated within the Mystic Maze. Instead, you can gather several unique buffs called Lampwicks. Lampwicks only last for a single Exploration and do not carry over to the next. There are seven types of Lampwicks: Core Flame, Seaborne Moon, Luminite, Lumitwig, Nocturne Moth, Glimmerfly, and Vamprose.
Each type of Lampwick has a different focus, buffing and augmenting your character in unique ways. For example, Nocturne Moth Lampwicks care about buffing basic attacks and movement, while Seaborne Moon Lampwicks can strengthen your ranged attacks. There are several kinds of Lampwick for each type, and stacking several of the same type will unlock even greater buffs.
Artefacts Change How You Play

Similar to Lampwicks, Artefacts are single-Exploration items that provide your character with buffs. Artefacts, however, are much more rare and can have a much bigger impact. For example, a single Artefact can increase your character's Skill DMG by 30% but will also decrease their Ranged DMG by 30%. Artefacts can completely change your approach to combat.
Lantern Light-Up Provides Permanent Buffs

Each Exploration will reward you with Glazeystal, a resource unique to the Mystic Maze. In between runs, you can use Glazeystal to repair your Lantern in the Light-Up Lantern menu. The Lantern provide buffs to your characters that are permanent but apply only within the Mystic Maze.
There are four Lantern segments that each focus on a specific aspect. The Lantern Lid powers up your Skills. The Lantern Handle increases your survivability. The Frame is focused on melee combat. The Base provides buffs to ranged combat. There are 24 power-ups to unlock in each Lantern segment.
Best Lantern Light-Up Buffs
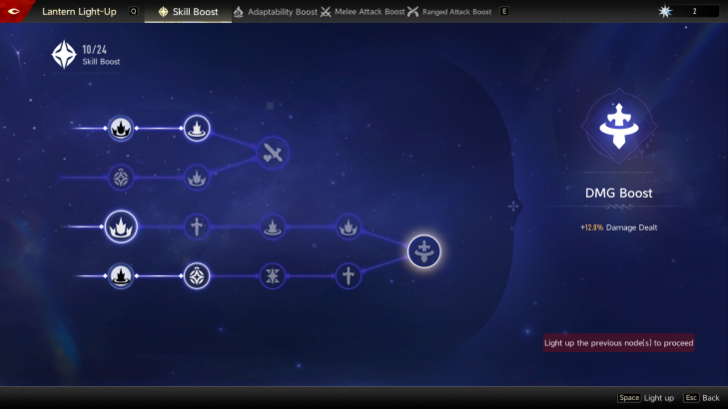
The best set of buffs Lantern Light-Up offers is the Skill Boost tree. Most of the game's best characters deal primarily Skill DMG, and those that do not can often still benefit from Skill DMG, Skill Duration, and Skill Range, which are all buffs that can be found in this skill tree.
Investing heavily into the Skill Boost tree supercharges your characters' skills, allowing players to potentially one-shot mobs and deal huge damage against bosses.
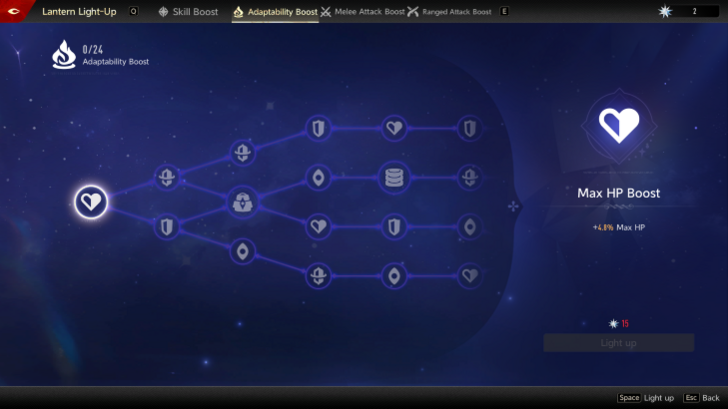
If you find yourself struggling with survival, investing your Glazeystals into the Adaptability Boost skill tree should beef up your character's defensive stats like HP, Shield, and DEF.
This skill tree also offers buffs that affect Trace Points, Combat Embers, and Sanity, boosting overall utility.
Investing a few points into this skill tree should make the event's tougher challenges like boss battles much more manageable, especially if you further supplement your build with defensive Lampwicks.
Abyssward Depth Alters Difficulty For More Threads of Time
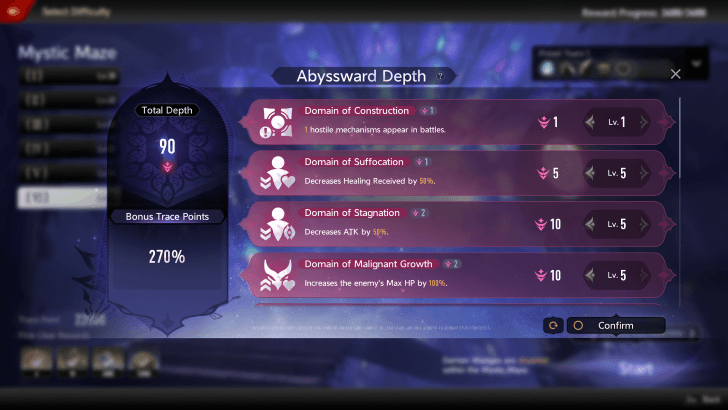
Once hitting Trial Lv. 60, Mystic Maze runs can be altered with the Abyssward Depth system. These essentially increase the game mode's difficulty. In exchange for the added challenge, you are rewarded more Threads of Time with every run. The more Depths you have active, the more rewards you will earn.
Below is a list of all Abyssward Depth modifiers.
| Title | Effect (Lv. 1) | Effect (Max) |
|---|---|---|
| Domain of Construction | 1 hostile mechanism appear in battles. | - |
| Domain of Suffocation | Decreases Healing Received by 10% | Decreases Healing Received by 50% |
| Domain of Stagnation | Decreases ATK by 10% | Decreases ATK by 50% |
| Domain of Malignant Growth | Increases the enemy's Max HP by 20% | Increases the enemy's Max HP by 100% |
| Domain of Torment | Increases the enemy's ATK by 10% | Increases the enemy's ATK by 50% |
| Domain of Numbness | Decreases the enemy's Damage Taken by 10% | Decreases the enemy's Damage Taken by 50% |
| Domain of Growth | Defeating a normal enemy triggers an explosion within a 4-metre range, dealing AoE Damage. | - |
| Domain of Clamor | 1 or more elite enemies appear in Combat · Atrocious Abyssoid | 2 or more elite enemies appear in Combat · Atrocious Abyssoid |
| Domain of Unrest | 1 or more Primanders emerge in Penumbral Abyssoid and Scattered Abyssoid. | 3 or more Primanders emerge in Penumbral Abyssoid and Scattered Abyssoid. |
| Domain of Blindness | Decreases available options by 1. | - |
| Domain of Desiccation | Increases prices at Abyssal Merchang by 50% Embers. | - |
| Domain of Folly | All choices become randomized. | - |
Once this system has been unlocked, Mystic Maze becomes the best game mode for farming Coins.
How to Unlock Mystic Maze
Complete On a Gentle Breeze Main Quest
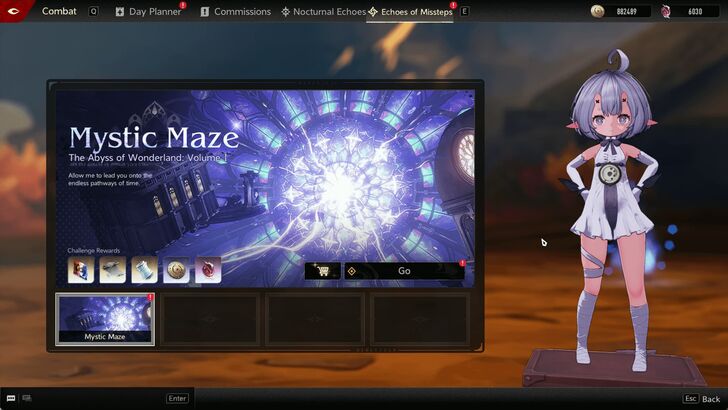
The Mystic Maze is unlocked automatically after completing the main quest On a Gentle Breeze. Upon completion, you will get a pop-up notifying you of the Mystic Maze's availability.
This game mode can be found in the Echoes of Missteps tab within the Combat menu.
On a Gentle Breeze Story Walkthrough and Guide
Mystic Maze Rewards

| Milestones | Rewards |
|---|---|
| 1 | Threads of Time |
| 2 | Secret Letter Clue |
| 3 | Commission Manuals |
| 4 | Carmine Globules |
| 5 | Coins |
| 6 | Threads of Time |
| 7 | Secret Letter Clue |
| 8 | Carmine Globule |
| 9 | Coins |
| 10 | Twilight Tread |
| 11 | Threads of Time |
| 12 | Threads of Time |
Threads of Time

Explorations net you Threads of Time, the currency used within the Spindle of Fate shop. You can use Threads of Time to purchase various items like coins, Combat Melodies, Weapon Manuals, and Carmine Globules. The Spindle of Fate resets every Monday at 5 AM (UTC+8).
Additionally, there is a large selection of weapon Demon Wedges and Demon Wedge blueprints you can purchase within the Spindle of Fate. These Demon Wedges are exclusive to Consonance weapons used by characters with the Consonance Weapon role.
Lisbell Thoughts and Secret Letters

Mystic Maze is linked to Restless Hum, a permanent event for Lisbell.
Clearing each of the six difficulty stages of Mystic Maze rewards players with Thoughts and Secret Letters of Lisbell, along with other goodies too.
Completing all six stages rewards players with a total of 60 Thoughts for Lisbell, along with 40 Lisbell Secret Letters too. The thoughts alone are enough to get Lisbell unlocked and upgraded to Intron 1, while the Secret Letters allow players to grind for even more thoughts.
You will also be rewarded at the end of every Exploration with an amount of Trace Points depending on your chosen difficulty and performance. Every week, you can exchange these Trace Points for a pre-determined set of rewards, containing things like coins, leveling resources, and Threads of Time. Trace Points reset every Monday at 5 AM (UTC+8).
Weekly rewards scale with your Trial Rank. The higher your rank, the more rewards you'll receive. The Trace Points needed to claim these rewards will also be higher, however.
Duet Night Abyss Related Guides

Duet Night Abyss Wiki Top Page
| Main Links Partial | |
|---|---|
 Latest News Latest News |
 Tier Lists Tier Lists |
 Characters Characters |
 Maps Maps |
 Tips and Tricks Tips and Tricks |
 Commissions Commissions |
 Bosses Bosses |
 Weapons Weapons |
 Quests Quests |
 Myriad (Gacha) Myriad (Gacha) |
 Events Events |
 Cosmetics Cosmetics |
 Message Boards Message Boards |
 Geniemon Geniemon |
 Enemies Enemies |
 Items Items |
 Demon Wedges Demon Wedges |
|
All Recommended Guides
 All Best Builds
 Best Starting Characters
 Immersive Theatre Guide
 How to Get Prismatic and Pristine Hourglass
 How to Get Iridescent and Lucent Prism
 How to Get Phoxene Plumules
 How to Get and Use Phoxene
 How to Get and Use Thought
 How to Get and Use Secret Letter Clue
 How to Farm Coins
 How to Get and Use Advensphere
 Glossary of Terms
 Combat Guide
 Impressions Guide
 List of EN and JP Voice Actors
 How to Equip Demon Wedges
 Attribute Guide
 How to Get Psyche
 List of All Fish
 Beginner Weapon Selection
 Elements Guide
 Weapon Builds
Comment
Author

Mystic Maze Guide
Rankings
- We could not find the message board you were looking for.
Gaming News


![Forza Horizon 6 Review [Preview] | Beautiful Roads With a Whole Lot of Oversteer](https://img.game8.co/4460981/a7254c24945c43fbdf6ad9bea52b5ce9.png/thumb)
Popular Games

Genshin Impact Walkthrough & Guides Wiki
Crimson Desert Walkthrough & Guides Wiki
Umamusume: Pretty Derby Walkthrough & Guides Wiki
Honkai: Star Rail Walkthrough & Guides Wiki
Monster Hunter Stories 3: Twisted Reflection Walkthrough & Guides Wiki
Wuthering Waves Walkthrough & Guides Wiki
The Seven Deadly Sins: Origin Walkthrough & Guides Wiki
Pokemon TCG Pocket (PTCGP) Strategies & Guides Wiki
Pokemon Pokopia Walkthrough & Guides Wiki
Zenless Zone Zero Walkthrough & Guides Wiki


Recommended Games
Monster Hunter World Walkthrough & Guides Wiki
Fire Emblem Heroes (FEH) Walkthrough & Guides Wiki
Pokemon Brilliant Diamond and Shining Pearl (BDSP) Walkthrough & Guides Wiki
Super Smash Bros. Ultimate Walkthrough & Guides Wiki
Diablo 4: Vessel of Hatred Walkthrough & Guides Wiki
Cyberpunk 2077: Ultimate Edition Walkthrough & Guides Wiki
Yu-Gi-Oh! Master Duel Walkthrough & Guides Wiki
Elden Ring Shadow of the Erdtree Walkthrough & Guides Wiki
The Legend of Zelda: Tears of the Kingdom Walkthrough & Guides Wiki
Persona 3 Reload Walkthrough & Guides Wiki


All rights reserved
Game Copyright©Pan Studio All Rights Reserved.
The content we provide on this site were created personally by members of the Game8 editorial department.
We refuse the right to reuse or repost content taken without our permission such as data or images to other sites.
©Pan Studio (Provider)