This survey will take about 1 minute.
Your answers will help us to improve our website.
Call of Duty Black Ops 6 (BO6)
Shattered Veil Easter Egg Walkthrough and Steps

This is the Shattered Veil easter egg walkthrough for Call of Duty Black Ops 6 (BO6) Zombies. Learn all the Shattered Veil steps and a full guide for the main quest easter egg.
| Shattered Veil Guides | |
|---|---|
| Easter Egg Walkthrough | Interactive Map |
List of Contents
Shattered Veil Easter Egg Walkthrough
Note that this Shattered Veil easter egg requires use of Aether Shroud, Brain Rot Ammo Mod, and an LT53 Kazimir, so make sure you have unlocked all of those first.
| Shattered Veil Easter Egg Steps | ||||||
|---|---|---|---|---|---|---|
| 1 | Go to the Mainframe Chamber (Pack-a-Punch Machine) | |||||
| 2 | Obtain the Ray Gun Mark II | |||||
| 3 | Craft to Ray Gun Mark II-W | |||||
| 4 | Obtain the Flask (Ritual Item) |
|||||
| 5 | Craft to Ray Gun Mark II-R | |||||
| 6 | Obtain the Nuclear Plant Inspection Report (Ritual Item) | |||||
| 7 | Craft to Ray Gun Mark II-P | |||||
| 8 | Obtain the Antler Carving (Ritual Item) | |||||
| 9 | Fight the Z-Rex (Final Boss) | |||||
1. Go to the Mainframe Chamber (Pack-a-Punch Machine)
| 1 | Explore the Mansion |
|---|---|
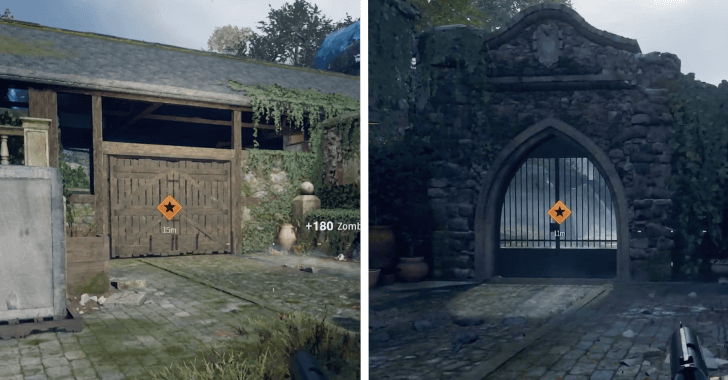 Your initial task is to explore the mansion. You can choose between two different paths, each leading to the same area of the Mansion. |
|
| 2 | Obtain the Fuse from the Maintenance Worker |
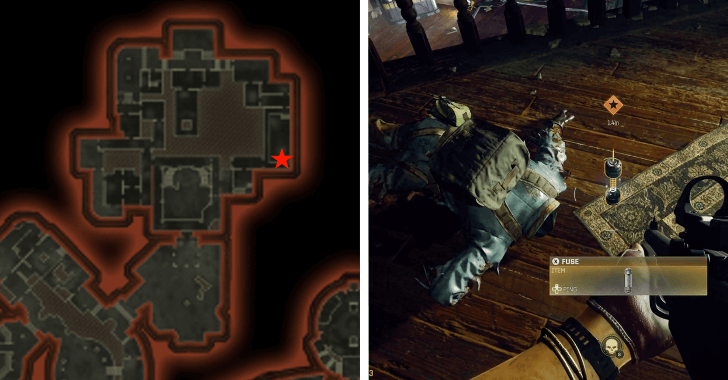 Make your way to the library, after climbing the stairs, you'll come across a zombie disguised as a maintenance worker, wearing a helmet. Defeat it to obtain the fuse. |
|
| 3 | Destroy a Computer to get the Circuit Board |
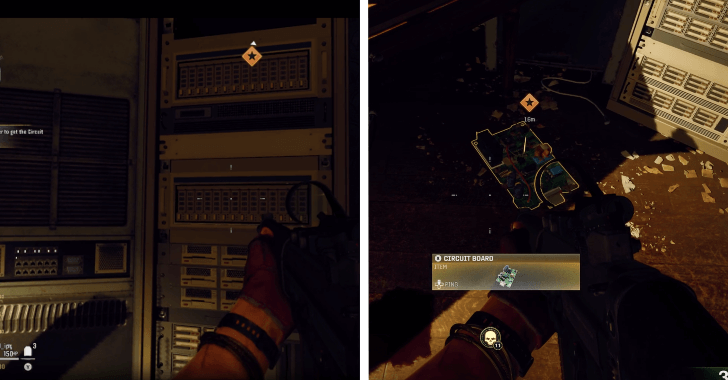 Make your way to the Director's Quarters and find a computer beside a tall CPU cabinet. Shoot the computer to drop the circuit board. |
|
| 4 | Use the Fuse and Circuit Board to the Elevator |
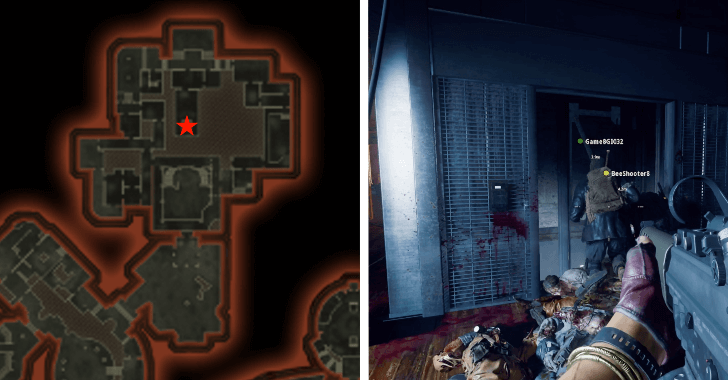 Head to the Banquet Hall and find the broken elevator. Fix it by interacting with the rear panel, then call the elevator. Be ready, when the doors open, a horde of zombies will charge out. The elevator will malfunction, forcing you to zipline down to safety. |
|
| 5 | Go to the Mainframe Chamber (Pack-a-Punch Machine) |
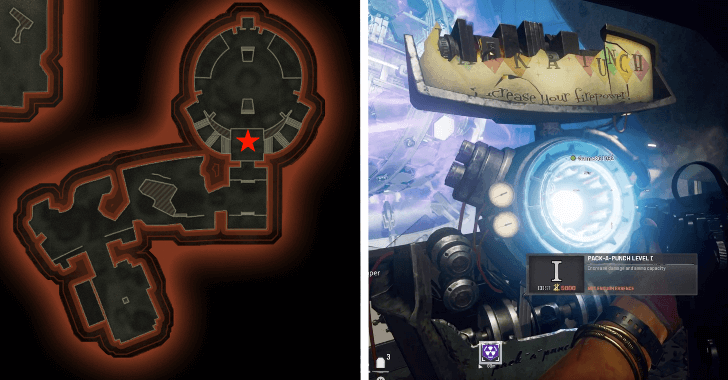 After descending, you;ll see S.A.M. and above the stairs you'll see the Pack-A-Punch Machine where you can upgrade weapons. |
2. Obtain the Ray Gun Mark II
| 1 | Get the Floppy Disk |
|---|---|
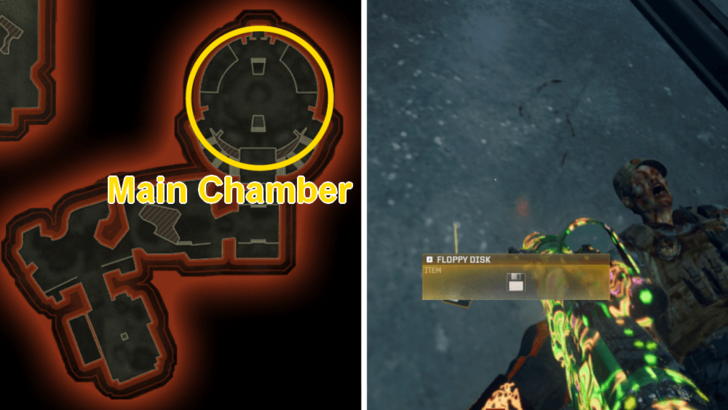 Inside the Mainframe Chamber in the underground, kill the Lab Technician to get the Floppy Disk. The Lab Technician will only spawn in Round 10, so try to get enough Essence and Salvage first to Pack-A-Punch and upgrade the Rarity of your weapon if you're still in the lower rounds. |
|
| 2 | Bring the Floppy Disk to the Fax Machine |
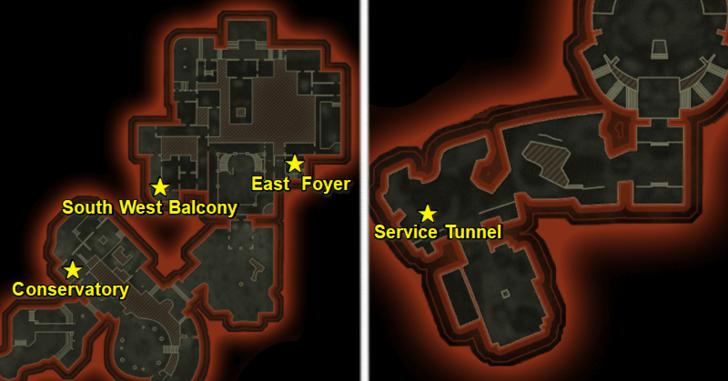
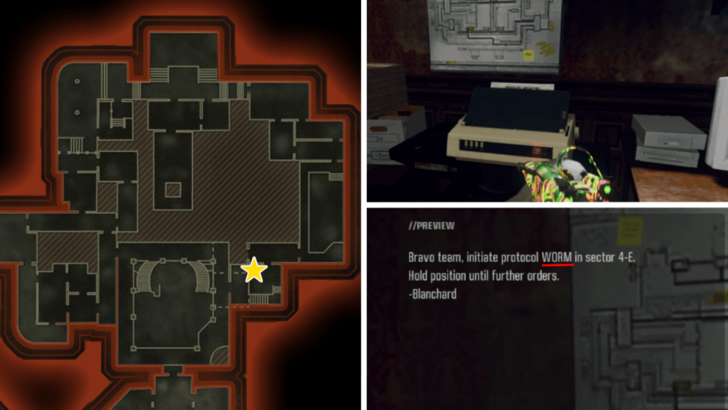 Head to the mansion using the elevator where you came from and go to the East Foyer where you can find the Stamin-Up Perk Machine. Interact with the computer with a printer near a body covered with a white blanket to print out a random code. Vermins and Parasites will spawn during the printing process so prepare for a fight. Possible Codes: WORM, YETI, MOTH, CRAB |
|
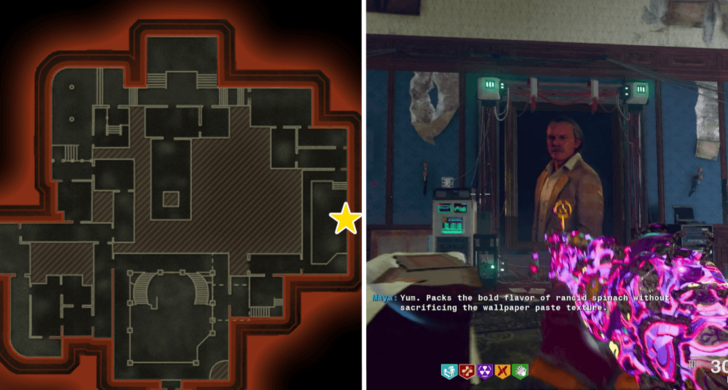
| 3 | Decipher the Code |
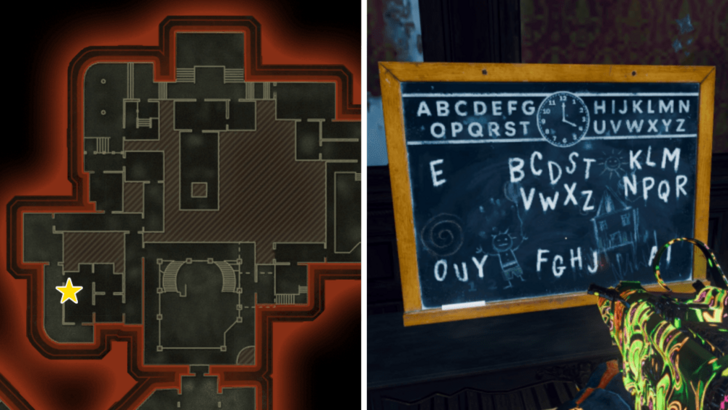 Go to the Nursery Room where the PhD Flopper Perk Machine can be found and look for a board with letters written on it. The number of letters in a group where the letter of the code appears will be the Key Code to open the door in the Service Tunnel underground. Note that the letters on the board changes with each playthrough. Example: WORM is the code we're looking to decipher from the image above. W is grouped with 9 Letters so the first digit in the code will be 9. The next letter is O and it is grouped with 3 letters, so the next digit in the code will be 3. R and M are in the same group of 7 letters so the last two digits are 7 and 7. It means the code is 9377. |
|
| 4 | Release the Doppelghast |
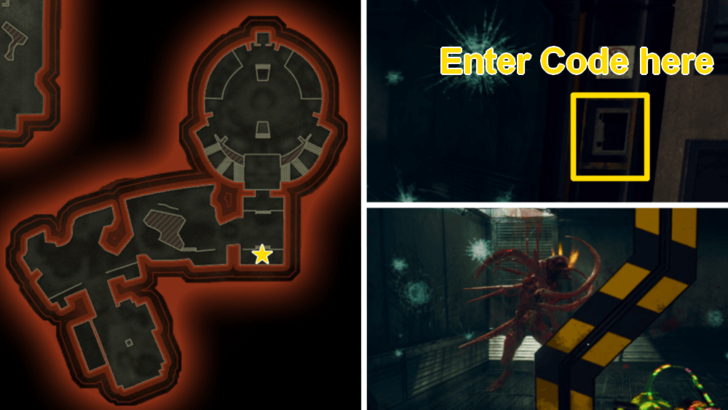 Head back to the Main Chamber and unlock the door in the Service Tunnel. Use the code you got from the Nursery Room to open the door that has a Doppelghast behind it. It will trigger a mini-boss fight so make sure you're all geared up before entering the code. |
|
| 5 | Defeat the Doppelghast to Get Severed Arm |
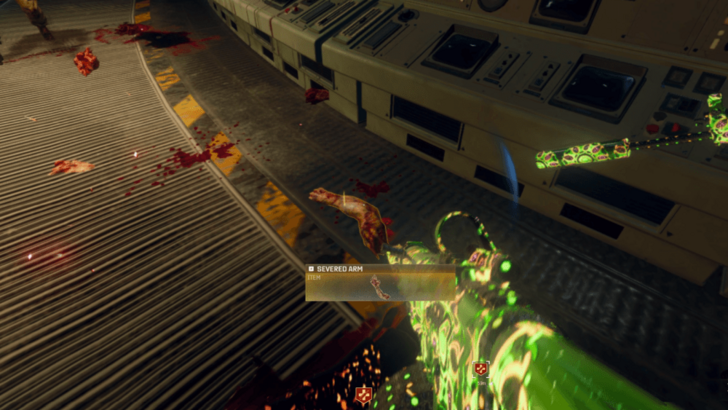 You will get the Severed Arm from the Doppelghast once you killed it. You can use the Severed Arm to open the vault that has the Ray Gun Mark II. |
|
| 6 | Use the Severed Arm to Unlock the Ray Gun |
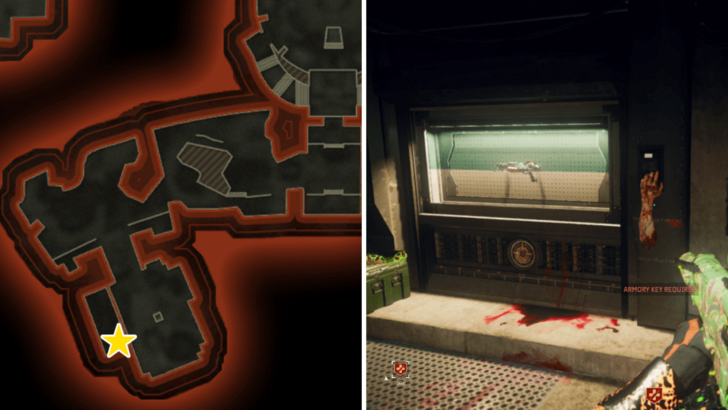 Head to the Armory in the Supply Depot, which you can find if you go right from the Service Tunnel. Use the Severed Arm on the fingerprint scanner to open the vault and get the Ray Gun Mark II. |
3. Craft to Ray Gun Mark II-W
After obtaining the Ray Gun Mark II, you must craft it to the upgraded Ray Gun Mark II-W. This is the first of three crafted upgrades for the Ray Gun in Shattered Veil.
| 1 | Pick Up An Empty Canister From Blue Crystals |
|---|---|
 To upgrade the Ray Gun to the Mark II-W, first obtain an Empty Canister. The most efficient way at this point of the run is to destroy Blue Crystals with the Ray Gun, each crystal having a chance to drop an Empty Canister. There are 4 Blue Crystals on the map, one being in the Service Tunnel right outside where you craft the Ray Gun Mark II. The other three crystals are all found above ground. ▶ All Empty Canister Locations |
|
| 2 | Pick Up the Empty Canister |
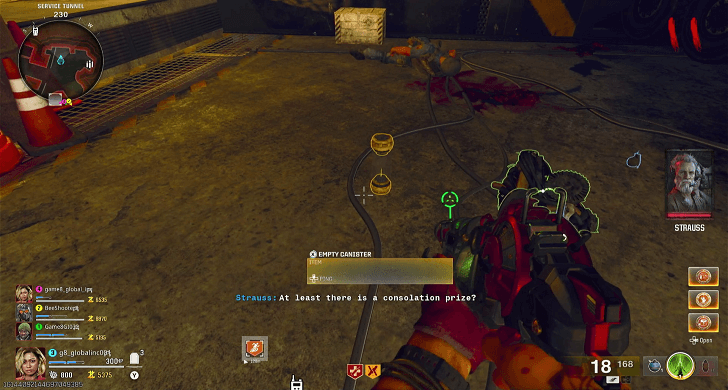 Pick up the Empty Canister that one of the Broken Crystals drop. |
|
| 3 | Place the Empty Canister into the Machine in Shem's Henge |
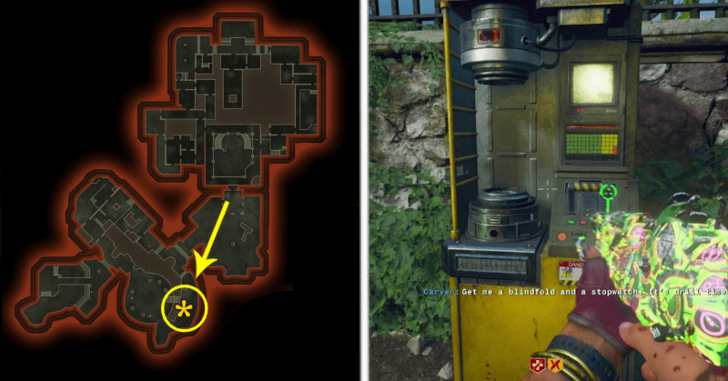 Return above ground to Shem's Henge, where the Speed Cola Perk Machine is located. In front of the Speed Cola, you'll find a yellow machine. Interact with it to insert the Empty Canister. This spawns in two Abominations by the circular garden down the steps next to you, but do not kill them just yet. |
|
| 4 | Make the Abominations Laser-Beam the Small Rocks |
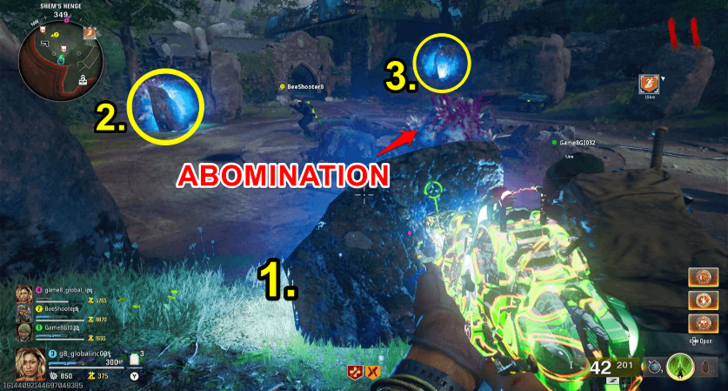 Bait the Abominations into firing their laser beams at the three smaller rocks around the perimeter by positioning yourself behind them. Each rock needs to be laser-beamed twice: once to charge it, and again to make it float. Once all three rocks are floating, the Abominations die and a portal in the center opens. |
|
| 5 | Defend the Portal From Vermin |
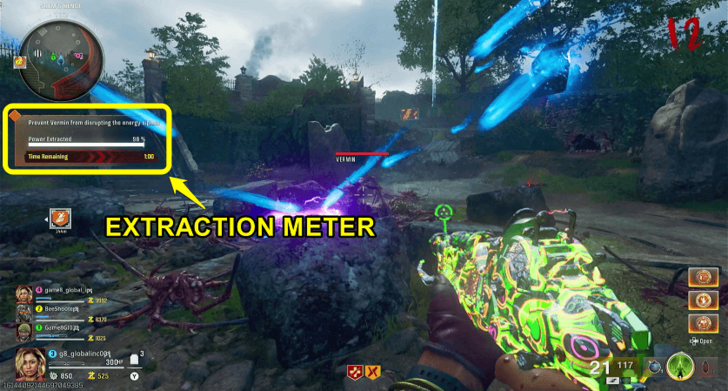 The Portal will begin siphoning energy from the floating rocks, but Vermin will spawn, trying to disrupt the process. Eliminate the Vermin and Parasites to prevent them from interfering. Note: If you fail to stop the Vermin, you can simply restart the challenge by interacting with the Canister Machine again. |
|
| 6 | Pick Up the Explosive Canister |
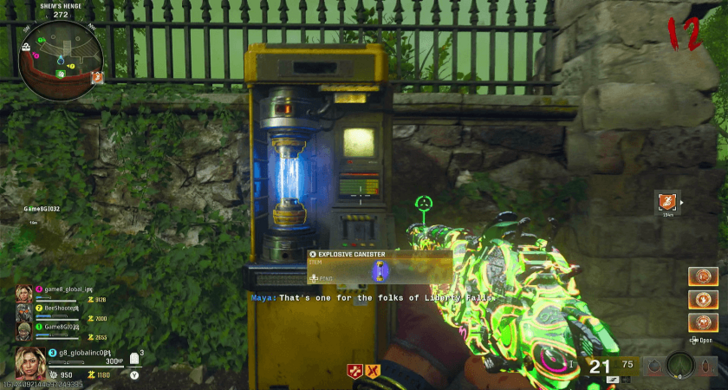 Return to the Canister Machine and pick up the new Explosive Canister. |
|
| 7 | Return to the Workbench in the Supply Depot |
 Bring the Explosive Canister back to the Workbench in the Supply Depot underground where you first got the Ray Gun, and upgrade it to the Ray Gun Mark II-W. |
4. Obtain the Flask Ritual Item
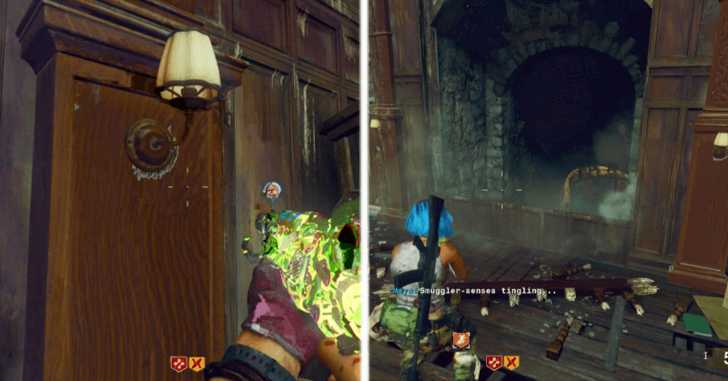
| 1 | Grab the Sconce Inside the Mansion |
|---|---|
 Between the elevator and the Double Tap Machine, there is a table in the corner of the connecting room. On the table, you'll find a box containing a Sconce (Wall Lamp) that you can pick up. |
|
| 2 | Place the Sconce on a Wall Near the T-Rex |
 In the Grand Foyer, insert the Sconce into the small hole on the wall near the left staircase, just to the left of the T-Rex skeleton. |
|
| 3 | Open the Hidden Door By Completing the Lamp Mini Game |
 With both Wall Lamps attached, interact with the Lamp on the left to start a sequence game. The lamps will blink in a pattern, and you must interact with them in the correct order. For example, if the sequence is left, right, then left again, interact with the Lamps in that same order. Completing the challenge will open a hidden door. |
|
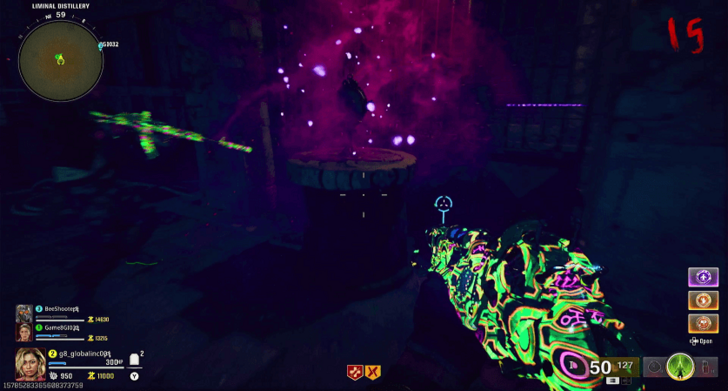
| 4 | Open a Liminal Portal by Using the Computer by the Painting |
 Through the hidden door, interact with the old computer to the left of the large painting to begin opening the Liminal Portal. Zombies will spawn in afterward. Kill them using the Ray Gun Mark II-W to open the portal fully. Kills with other weapons do not work for the portal’s progress meter. |
|
| 5 | Pick Up the Bell From the Study |
 Pick up the small Bell from the Study. It spawns in various places that change per playthrough, such as inside the Study's glass cabinets. ▶ Shattered Veil Bell Location |
|
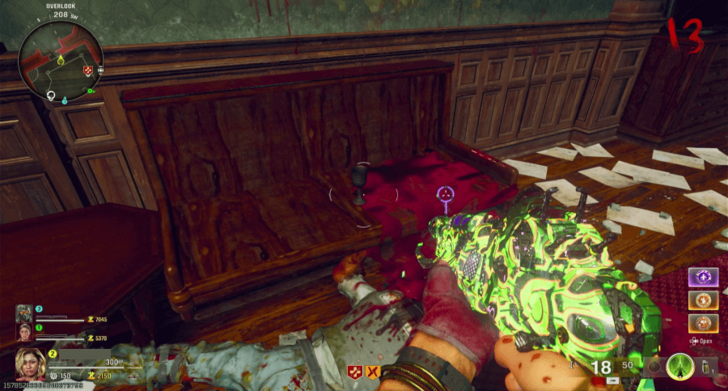
| 6 | Place the Bell at the Overlook Bar |
 After acquiring the bell, proceed to the Overlook, the second floor of the Grand Foryer with the T-Rex statue. Place the bell by interacting with the bar in the corner. Note that you can only place the bell down if you have entered the painting already. |
|
| 7 | Apply Brain Rot to a Zombie and Ring the Bell |
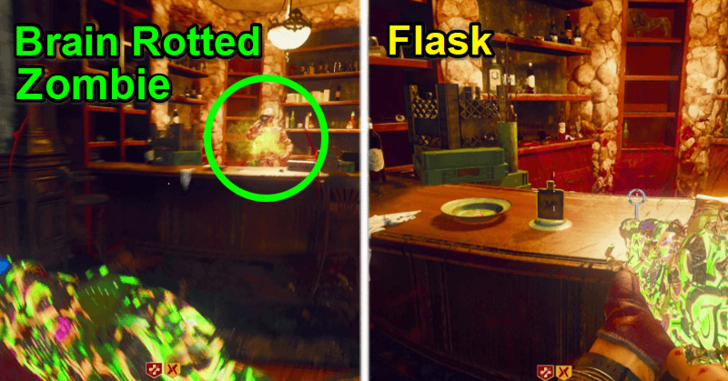 Apply Brain Rot to a zombie and lure them near the bell. Interact with the bell to ring it, then the zombie should hop behind the bar and drop the Flask Ritual Item for you to pick up. |
|
| 8 | Place the Flask on the Pedestal Back at the Portal |
 With the Flask in hand, return to Potter's Liminal Portal and place the Flask on the pedestal, which is on the right side of the room as you enter the painting. This will spawn a Mangler. |
|
| 9 | Defeat the Mangler |
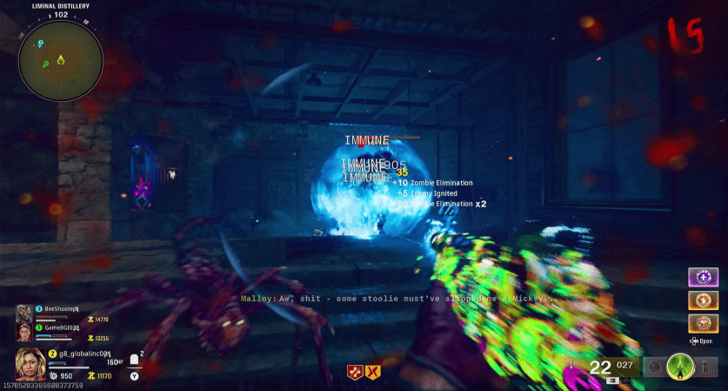 Defeat the Mangler to get the Flask back as a ritual item. The Mangler has a shield that's immune to all attacks except from the Ray Gun Mark II-W. Vermin also spawn alongside the Mangler. ▶ How to Eliminate Manglers |
5. Craft to Ray Gun Mark II-R
| 1 | Check the Gas Chamber's Label |
|---|---|
 Head to the Mainframe Chamber and check out the Gas Chamber to the northeast. Check if the label is A or B, as it will be important for the next step. |
|
| 2 | Use Combat Axes on the Valves |
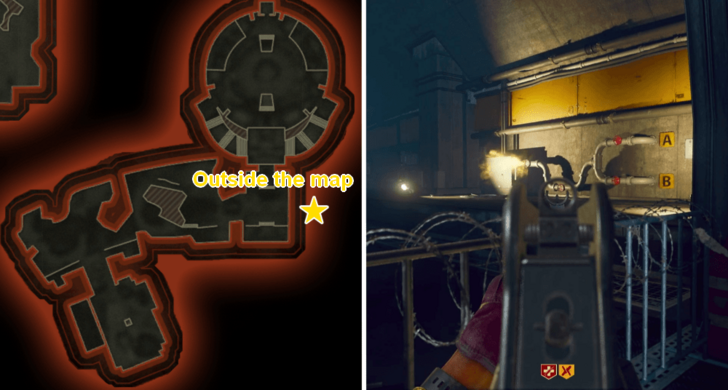 Head to the Service Tunnel and throw a Combat Axe at 2 valves; the middle one on the bottom, and the valve that corresponds to the letter A or B (whichever you saw in the Mainframe Chamber). |
|
| 3 | Blow Up the Gas Chamber |
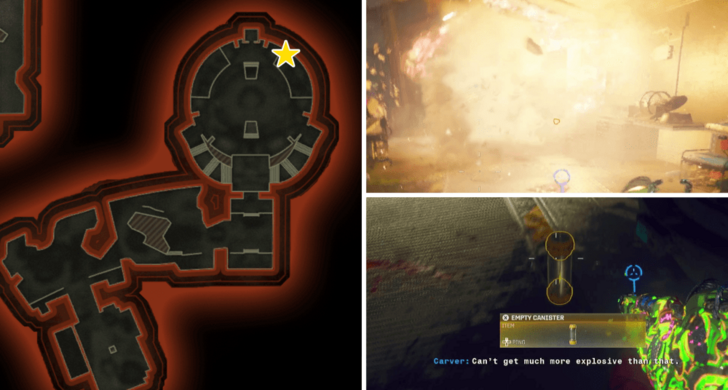 Head back to the Gas Chamber and blow it up with an explosive. An Empty Canister will pop out afterward. |
|
| 4 | Destroy the Blue Spores |
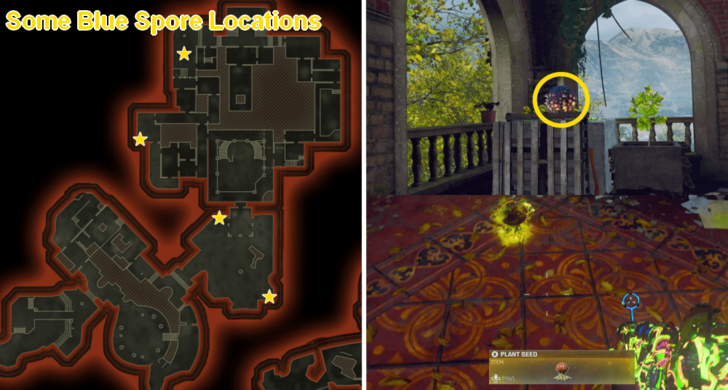 Look for the Blue Spores around the map. They will drop plant seeds if you hit them with lethal explosions or the Ray Gun Mark II (base version only). You only need to get four of these seeds before moving to the next step. ▶ All Plant Seed Locations |
|
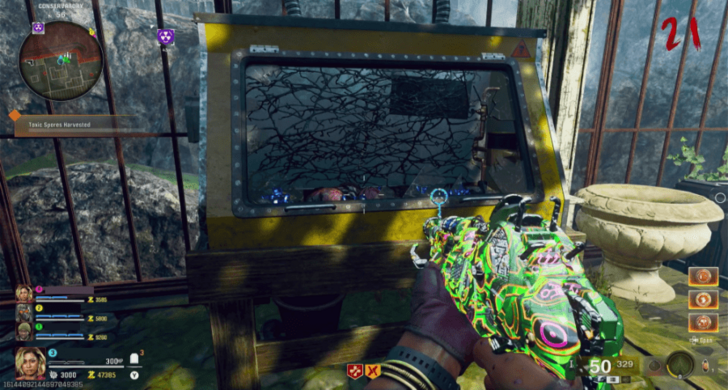
| 5 | Place the Empty Canister in the Conservatory |
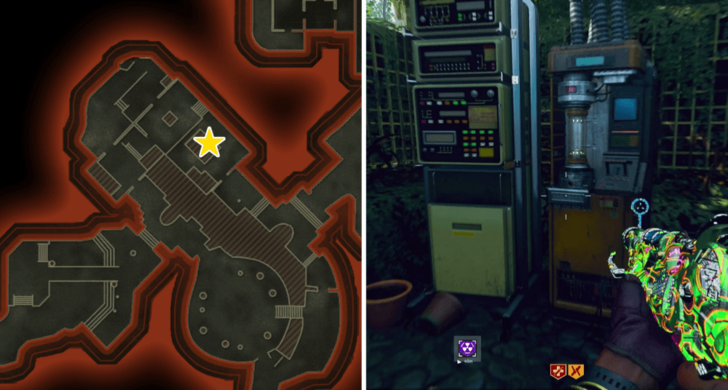 Head to the Conservatory and place the Empty Canister in the machine to start the objective. |
|
| 6 | Place the Seeds in the Machines |
 The objective is to place all 4 seeds in these Yellow Machines and protect them as they grow into full spores. All 4 seeds need to fully grow in order to pass the objective. Zombies will try to stop these plants from growing, so be sure to eliminate them. |
|
| 7 | Get the Toxic Canister |
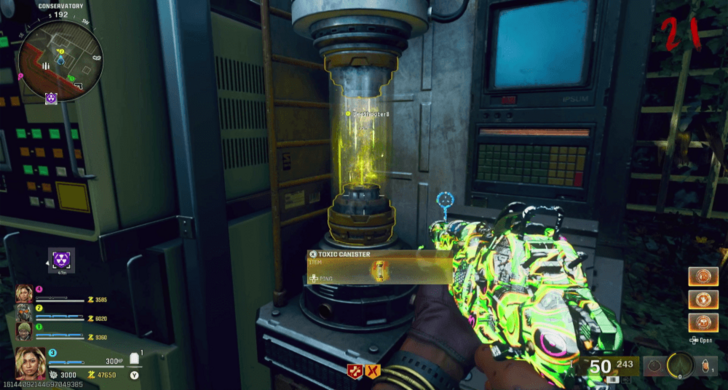 Once all the plants are fully grown, take the Toxic Canister from the machine. |
|
| 8 | Obtain the Ray Gun Mark II-R |
 Head to the Workbench in the Garden Pond (starting area) with the base Ray Gun Mark II and upgrade it to Ray Gun Mark II-R. |
|
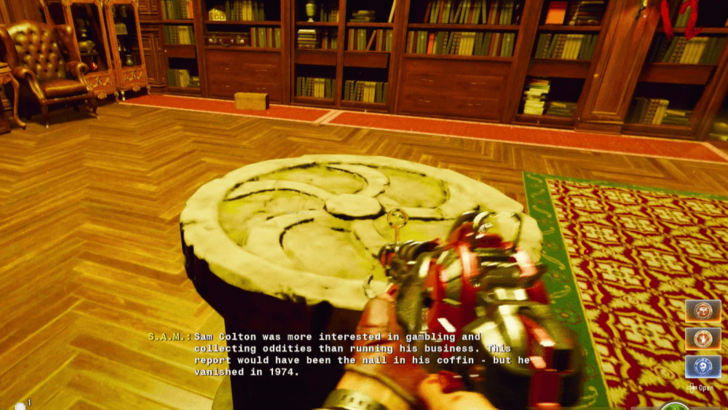
| 9 | Open the Liminal Portal |
 Interact with the computer in front of the painting in the Library to start a timed trial where you need to kill a certain amount of Zombies with the Ray Gun Mark II-R. Successfully doing so unlocks the Liminal Portal. |
6. Obtain the Nuclear Plant Inspection Report
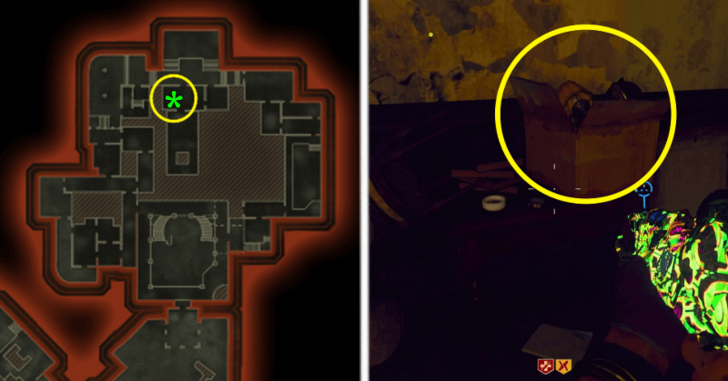
| 1 | Look for the Hidden Items |
|---|---|
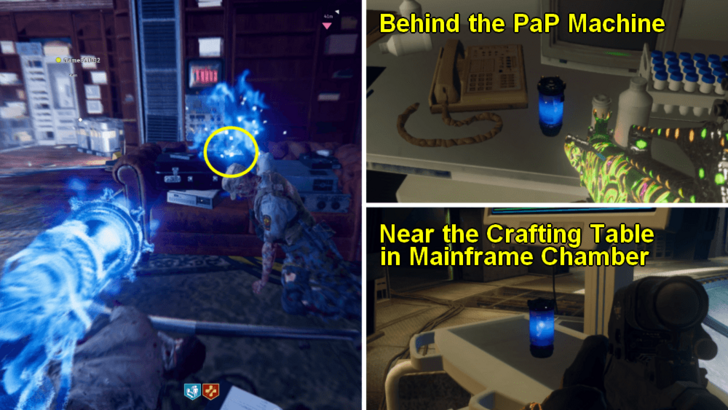 Once you open the portal in the Library, you may now look for the three hidden items around the mansion. You can only see them when phasing out using the Aether Shroud. You can refill your Aether Shroud using the purple vials in the Mainframe Chamber if you run out trying to find the items. Items to find: Audio Log, Nuclear Plant ID Badge, and Ledger ▶ Aether Shroud Refill Guide |
|
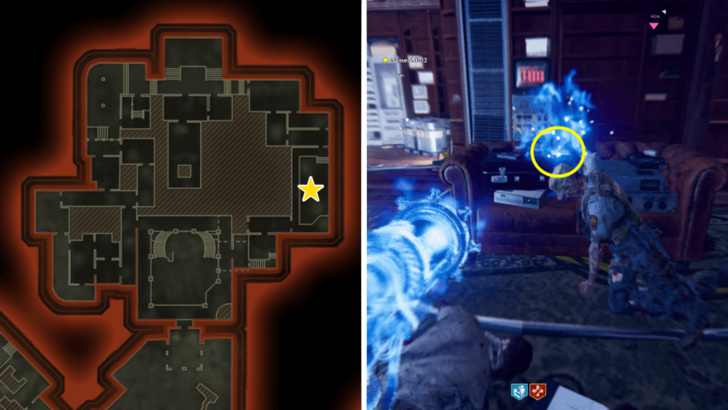 You may find one of them on the couch with machines on it in front of the painting portal in the Library. |
|
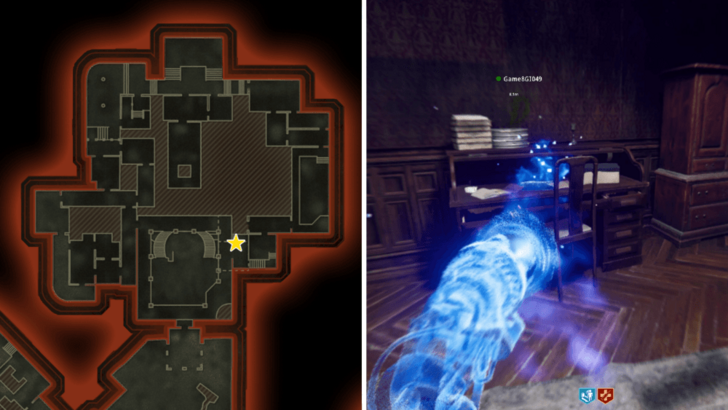 One can also spawn on a desk on the second floor of the room where you get the Code on the Fax Machine in East Foyer. |
|
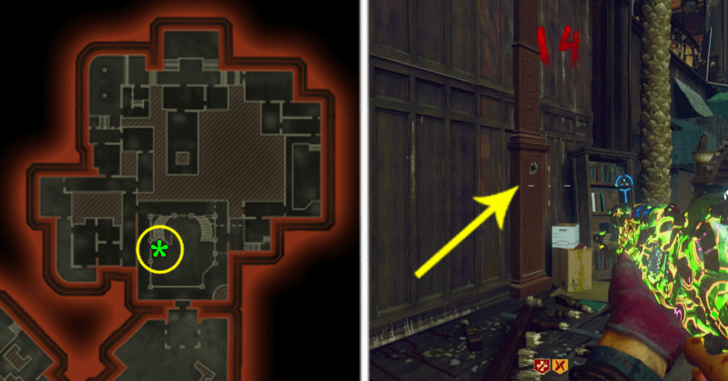
 They can also spawn on the chimney in the first floor of East Foyer. |
|
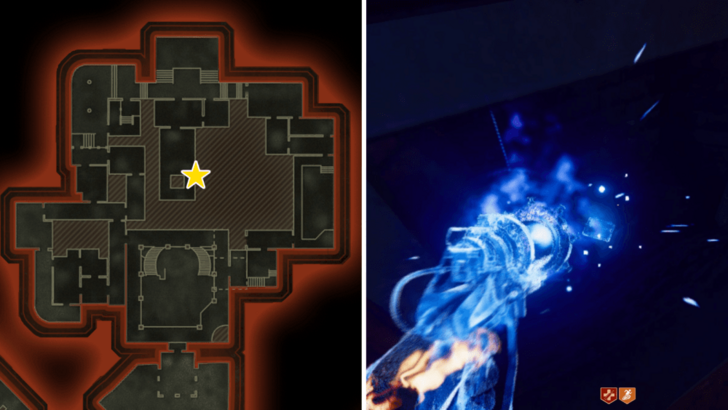 One item can spawn on the chimney beside the elevator. |
|
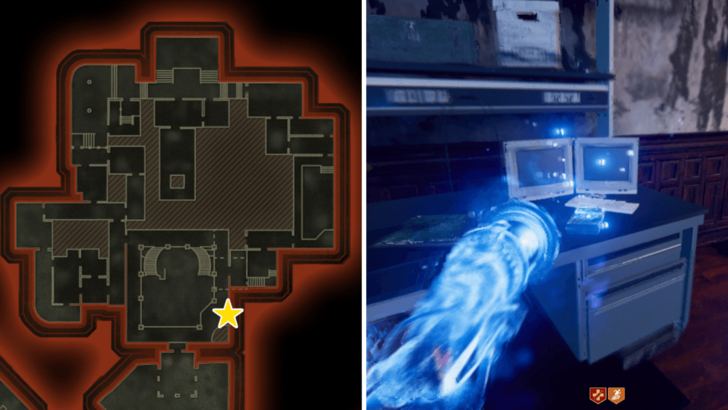 You may find one in the Overlook besides the bar where you can place the Bell. |
|
| 2 | Interact with the Glowing Books in the Library |
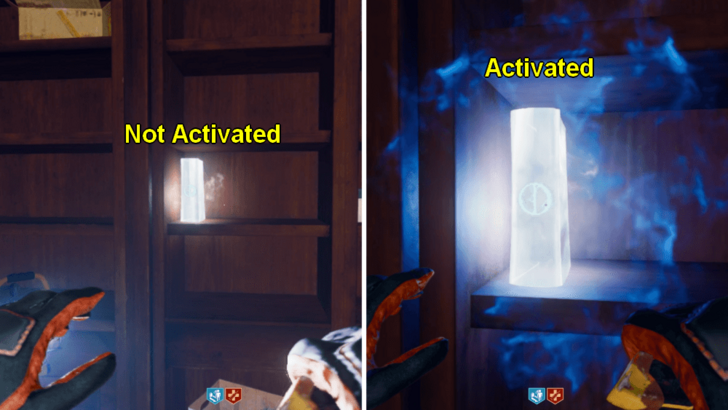 After getting them, the items will move to the bookshelf in the Library. Activate them according to the number of circles of their counterparts inside the portal, in order to open up the next room. You can check their order in the portal or you can just spam the interact button on the three of them until they emit a Blue Light. |
|
| 3 | Take the Nuclear Plant Inspection Report |
 Once you solve the puzzle, a new room will open up on the left side facing the books. Enter the room and grab the Nuclear Plant Inspection Report. |
|
| 4 | Place the Nuclear Plant Inspection Report on the Pedestal |
 Place the Nuclear Plant Inspection Report on the pedestal inside the painting. It will teleport all players and start a mini-boss fight against an Elite Doppelghast. |
7. Craft to Ray Gun Mark II-P
| 1 | Obtain an Empty Canister |
|---|---|
 Get another empty canister from the Zombie Spawn window in the Rear Patio. The empty canister is inside the window, but you can pull it out by throwing an LT53 Kazimir on the ground outside of it. |
|
| 2 | Get the Two Reflectors |
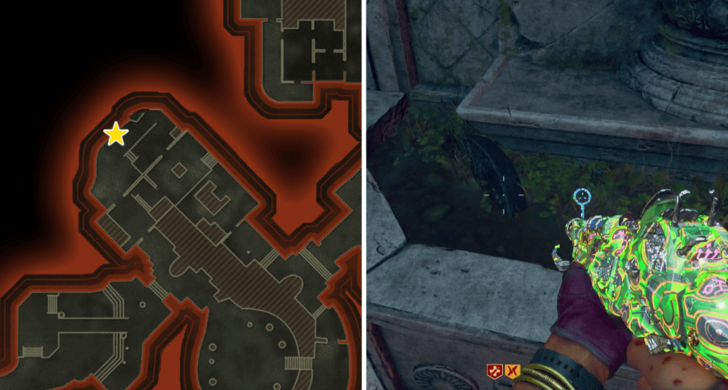
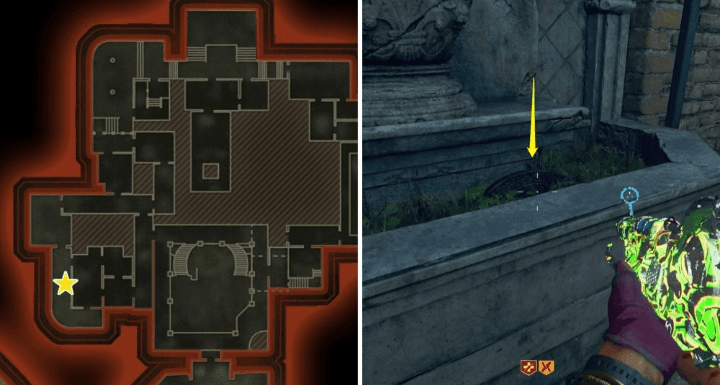 . The first Reflector can be found in the fountain in the South West Balcony. Look for a dark circular object and press the interact button to grab it. |
|
 The second Reflector is in the fountain on the Conservatory. It is easier to see than the one in the South West Balcony. |
|
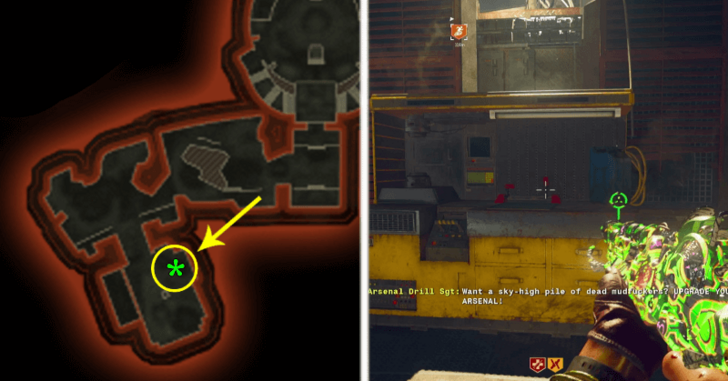
| 3 | Look for the Essence Bomb |
 Destroy the white boxes found throughout the map to get the Essence Bomb. One of them will drop an Essence Bomb and the others will drop three salvages. It is random which one will drop, so you might have to break several boxes to get it. ▶ All Essence Bomb Locations |
|
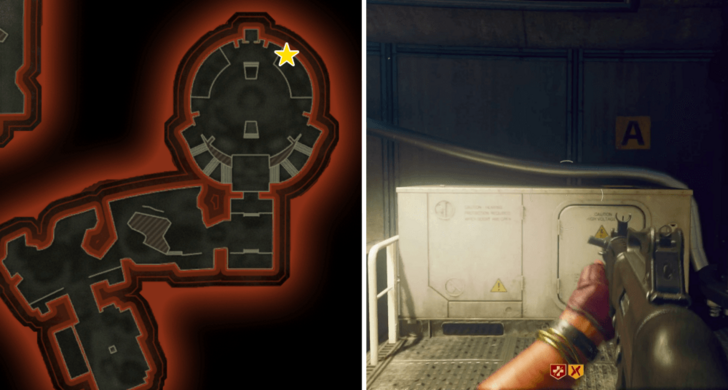
| 4 | Place the Essence Bomb in the Service Tunnel |
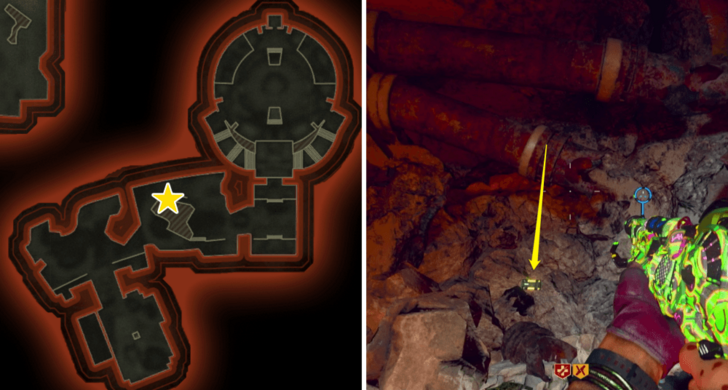 Place the Essence Bomb on the rubble next to the 3-Plate Armor Vest wall buy in the Service Tunnel. It will destroy the rubble and unlock the Serpent Mound area. |
|
| 5 | Put the Empty Canister in the Machine |
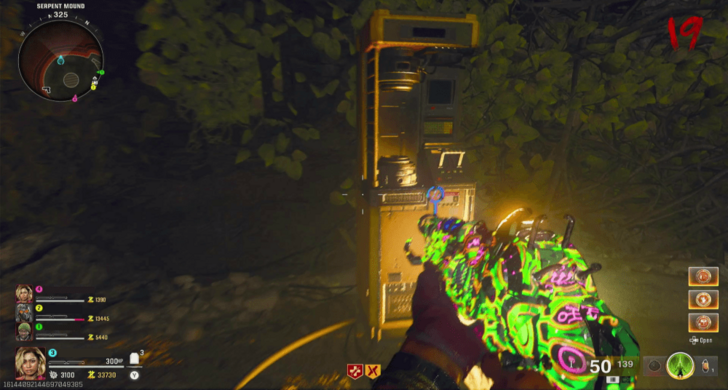 Head inside the Serpent Mound area and go behind the Serpent Statue. You will find a machine there where you can place the Empty Canister. Placing the Empty Canister in the machine will activate the lasers in the area. |
|
| 6 | Point the Laser towards the Doppelghast Statues |
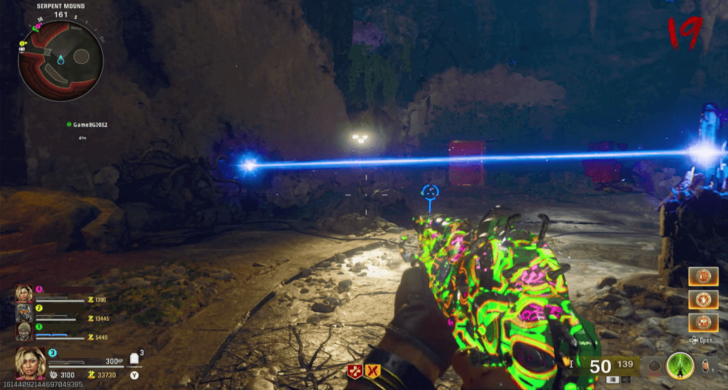 Place the 2 Reflectors on the pedestals so that the laser is directed towards the 3 Doppelghast statues found in the area. You'll have to melee the 2 Reflectors on the ground level to adjust their position. |
|
| 7 | Revive and Kill the Doppelghasts |
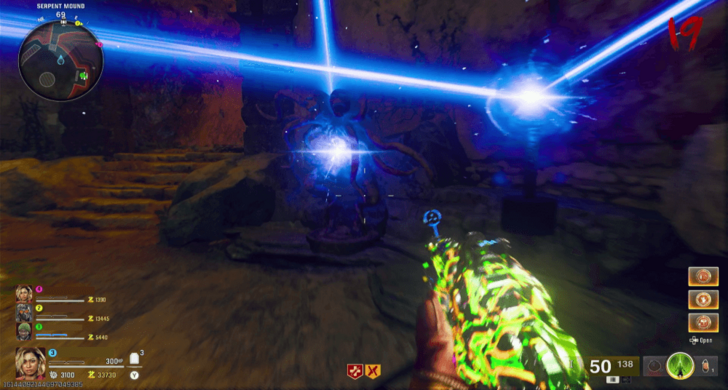 When the laser hits the Doppelghast statue, you have to melee the crystal itself for it to send a pulse to bring the Doppelghast to life. Kill the Doppelghast after to charge the Serpent Mound. The first two Doppleghasts can be revived without removing the Reflectors on the pedestals. |
|
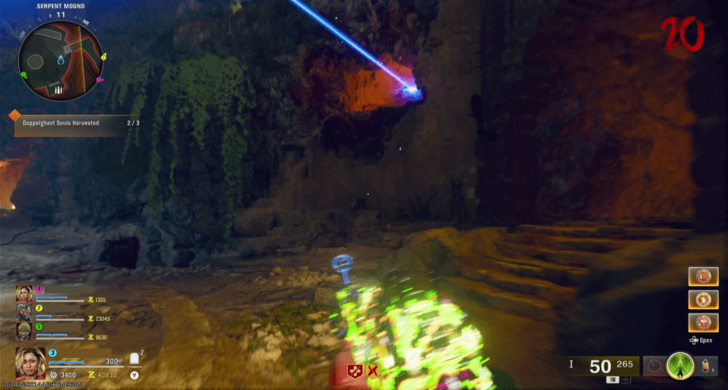 For the third Doppelghast statue, you have to remove the Reflector behind the Serpent Mound and put it on the Reflector stand on a cavern that you can reach by climbing up a staircase to the north. |
|
| 8 | Get the Light Canister |
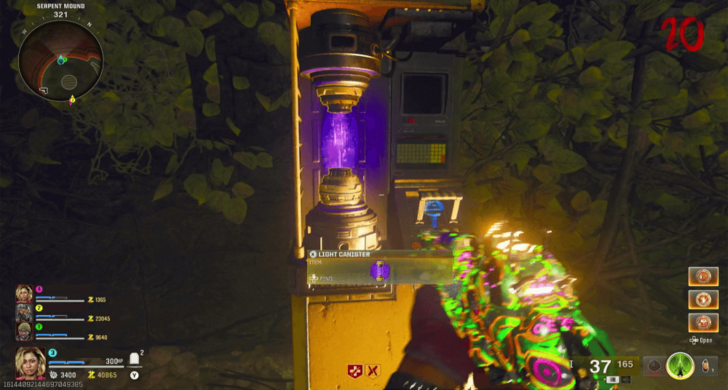 You can grab the Light Canister after killing the 3 Doppelghasts to craft the Ray Gun Mark II to Ray Gun Mark II-P. |
8. Obtain the Antler Carving
| 1 | Activate the Computer in Banquet Hall |
|---|---|
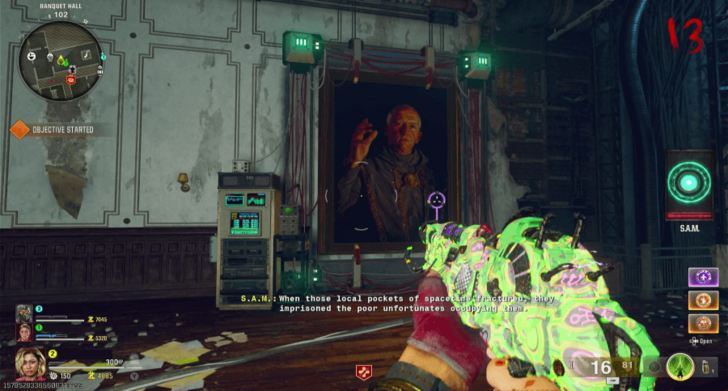 Interact with the computer in front of the painting in the Banquet Hall to start a time trial where you have to kill zombies with the Ray Gun Mark II-P. |
|
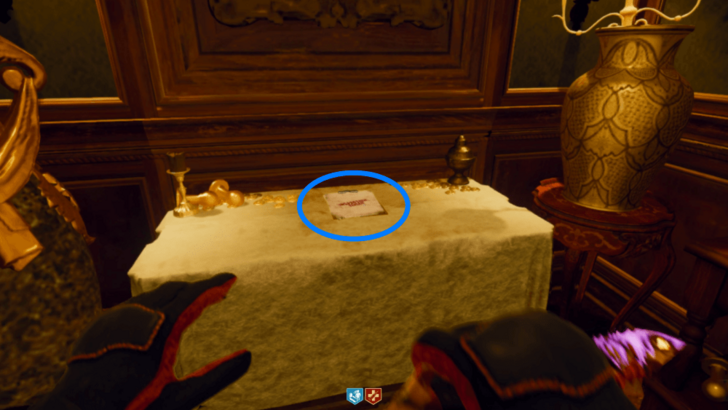
| 2 | Get the Ritual Elixir |
 Pick up the Ritual Elixir from the table inside the painting. |
|
| 3 | Activate the Three Chalices |
 Find and activate the 3 Chalices on the map next. Interacting with each will spawn an Elder Disciple that you must kill. They're weak to the Ray Gun Mark II-P, so be sure to use that. The first chalice is found in the Overlook, on a bench on the balcony above the main entrance. |
|
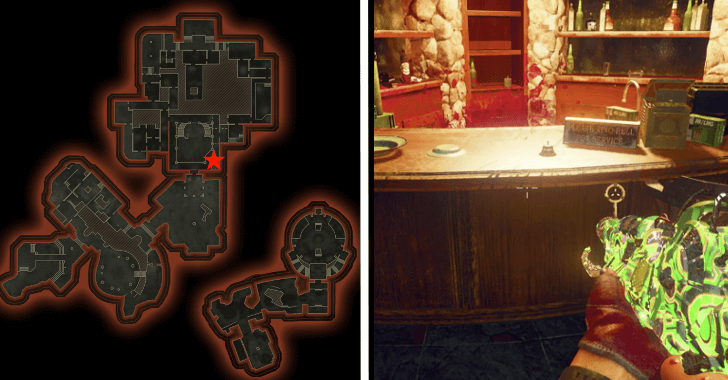
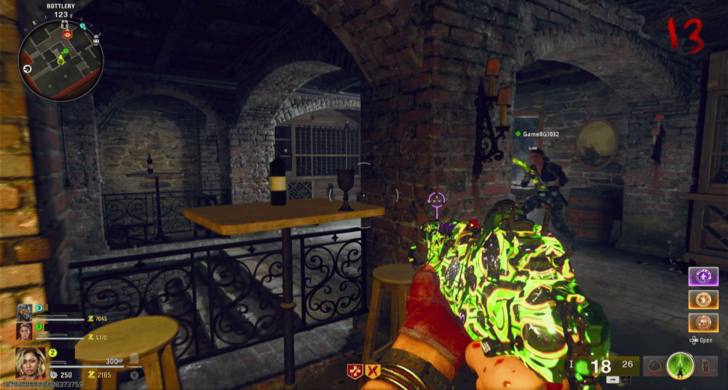 The second chalice is on a table in the Bottlery. |
|
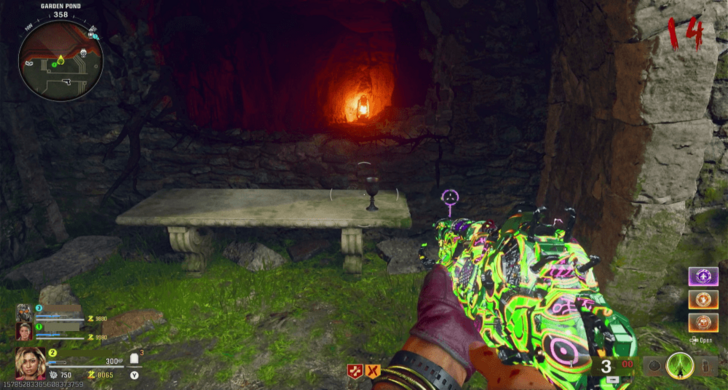 The final chalice is located on a bench in the Garden Pond (spawn area). |
|
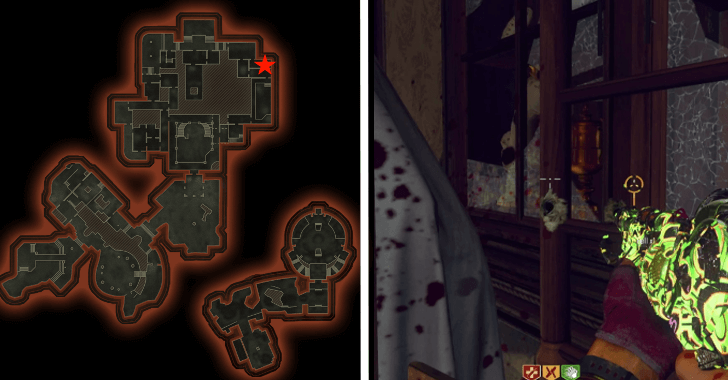
| 4 | Activate the Computer in Banquet Hall |
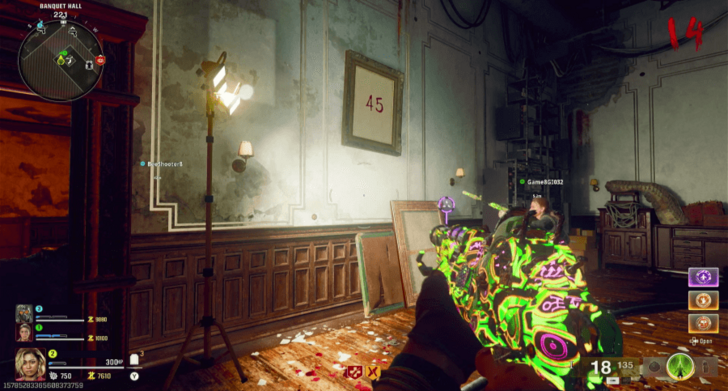 Head back to the elevator area and take note of the numbers painted in blood on the canvases around the elevator shaft. |
|
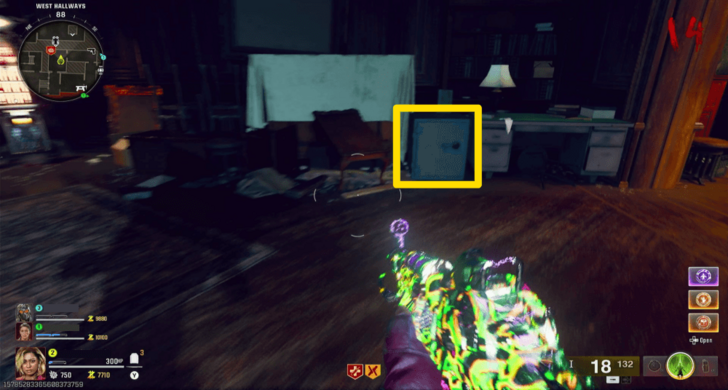 These numbers will be the code that unlocks the safe in the Western Hallway. |
|
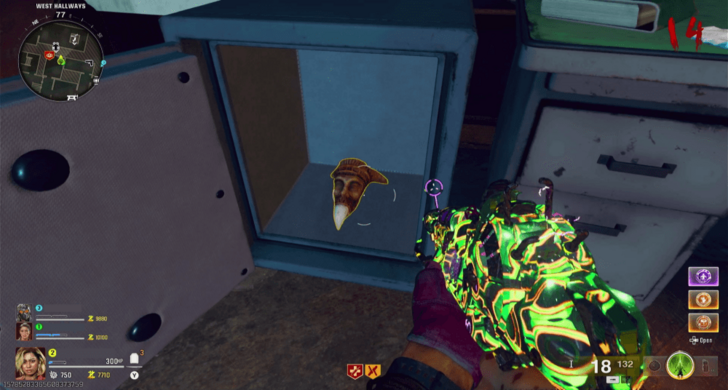
| 5 | Get the Antler Carving Ritual Item |
 Pick up the Antler Carving Ritual Item, which is needed to access the boss area. |
|
| 6 | Place the Ritual Item on the Pedestal |
 Return to the Painting Portal in the Banquet Hall and place the item on the pedestal near the table. If interacting with it doesn’t place the item, progress to the next round first and the ritual item should be placeable on the pedestal. Note: You cannot do the Rituals during Toxic Zombie rounds. |
|
| 7 | Defeat the Elder Disciple Boss |
 Defeat the Elder Disciple to retrieve the last Ritual Item needed for the Final Boss. If the Elder Disciple brings up a shield, shooting it with the Ray Gun Mark II-P will break it. The boss will also constantly spawn in Zombies and Parasites until it is defeated. |
|
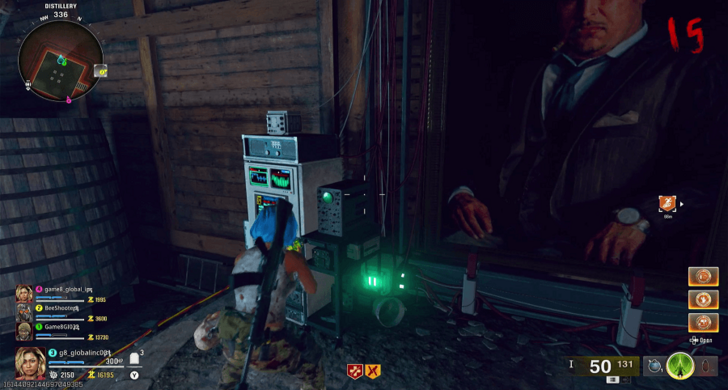
| 8 | Return to the Mainframe Chamber to Start the Final Boss Fight |
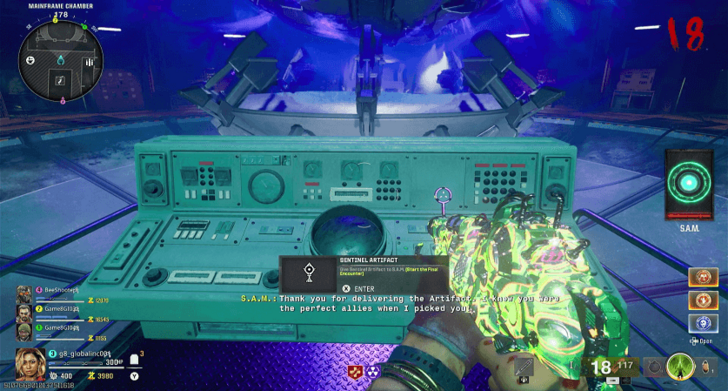 Return to the underground Mainframe Chamber to initiate the Final Sequence, triggering a cutscene followed by the Final Boss battle against the Z-Rex. ▶ Z-Rex Boss Fight Guide |
Black Ops 6 Related Guides

Zombies Guide: Everything You Need to Know
All Zombies Mode Guides
Zombies Easter Eggs
Comment
2  FireHunter551 11 months
The guide doesn't point out that there are two locations within the Study to check for hidden items. Check the fireplace as well as on top of the desk.
Author

Shattered Veil Easter Egg Walkthrough and Steps
Please participate in our site
improvement survey
03/2026
improvement survey
03/2026
Would you assist in
improving Game8's site?
improving Game8's site?

×
We are listening to our users' valuable opinions and discussing how to act on them.
The information collected through this survey will be used for the purpose of improving our services. In addition, the information will only be disclosed a part of a statistic in a format that will not allow identification of personal information.
Begin Survey
Not Now
×
Please rate each item regarding Game8.co's Advertisements.
Amount of Ads
Very Dissatisfied
Somewhat Dissatisfied
Fine
Somewhat Satisfied
Highly Satisfied
Placement of Ads
Timing of Ad Display
Ad Loading Speed
Safeness of Ads
Content of Ads
×
Please rate each item regarding Game8.co's Quality of Articles.
Amount of information
Very Dissatisfied
Somewhat Dissatisfied
Fine
Somewhat Satisfied
Highly Satisfied
Frequency of updates
Speed of new information
Accuracy of articles
Understandibility of articles
Readability of sentences
×
Please rate each item regarding Game8.co's Usability of the Site.
Ease of finding information
Very Dissatisfied
Somewhat Dissatisfied
Fine
Somewhat Satisfied
Highly Satisfied
Loading Speed
Use of Color
Font Size
Visibility of Images
Easy to Understand Layout
×
Please rate each item regarding Game8.co's Message Boards, Comments.
Ease of Writing
Very Dissatisfied
Somewhat Dissatisfied
Fine
Somewhat Satisfied
Highly Satisfied
Readability
Ease in Finding Information
Comment Quality
Comment Quantity
Admin Response
×
Please rate each item regarding Game8.co's Site's new design.
Please rate our site's new design
Very Dissatisfied
Somewhat Dissatisfied
Fine
Somewhat Satisfied
Highly Satisfied
Do you think that the website's design change makes the site easier to use?
Has the new design made it easier for you to find information on the site?
Has the new design improved the overall visual appeal of the site?
How would you rate your overall satisfaction with the new design of the site?
×
How likely are you to recommend Game8 to someone you know?
Very Unlikely
0
1
2
3
4
5
6
7
8
9
10
Very Likely
If you have other opinions regarding potential improvement to the website, please share them with us. We would appreciate your honest opinion.
Note: This is a free response section, so you can proceed without entering anything.
Note: Please be sure not to enter any kind of personal information into your response.
Note: Please be sure not to enter any kind of personal information into your response.
×
Thank You
×
Thank you for participating in our survey! Your answers will help us to improve the quality of our website and services.
We hope you continue to make use of Game8.
We hope you continue to make use of Game8.
Close
Rankings
- We could not find the message board you were looking for.
Gaming News


![Monster Hunter Stories 3 Review [First Impressions] | Simply Rejuvenating](https://img.game8.co/4438641/2a31b7702bd70e78ec8efd24661dacda.jpeg/thumb)
Popular Games

Genshin Impact Walkthrough & Guides Wiki
Honkai: Star Rail Walkthrough & Guides Wiki
Umamusume: Pretty Derby Walkthrough & Guides Wiki
Pokemon Pokopia Walkthrough & Guides Wiki
Resident Evil Requiem (RE9) Walkthrough & Guides Wiki
Monster Hunter Wilds Walkthrough & Guides Wiki
Wuthering Waves Walkthrough & Guides Wiki
Arknights: Endfield Walkthrough & Guides Wiki
Pokemon FireRed and LeafGreen (FRLG) Walkthrough & Guides Wiki
Pokemon TCG Pocket (PTCGP) Strategies & Guides Wiki


Recommended Games
Diablo 4: Vessel of Hatred Walkthrough & Guides Wiki
Cyberpunk 2077: Ultimate Edition Walkthrough & Guides Wiki
Fire Emblem Heroes (FEH) Walkthrough & Guides Wiki
Yu-Gi-Oh! Master Duel Walkthrough & Guides Wiki
Super Smash Bros. Ultimate Walkthrough & Guides Wiki
Pokemon Brilliant Diamond and Shining Pearl (BDSP) Walkthrough & Guides Wiki
Elden Ring Shadow of the Erdtree Walkthrough & Guides Wiki
Monster Hunter World Walkthrough & Guides Wiki
The Legend of Zelda: Tears of the Kingdom Walkthrough & Guides Wiki
Persona 3 Reload Walkthrough & Guides Wiki


All rights reserved
© 2024 Activision Publishing, Inc. ACTIVISION, CALL OF DUTY, CALL OF DUTY LEAGUE, MODERN WARFARE, CALL OF DUTY BLACK OPS, CALL OF DUTY WARZONE, and CALL OF DUTY VANGUARD are trademarks of Activision Publishing, Inc. All other trademarks and trade names are the property of their respective owners.
The copyrights of videos of games used in our content and other intellectual property rights belong to the provider of the game.
The contents we provide on this site were created personally by members of the Game8 editorial department.
We refuse the right to reuse or repost content taken without our permission such as data or images to other sites.
DO NOT KILL THE ABOMINATION AT SHEM'S HENGE. IT DOES NOTHING AND IS NOT REQUIRED FOR THE EASTER EGG. YOULL JUST HAVE TO GO BACK AND WASTE ANOTHER CANISTER TO START OVER. WHOEVER HOLDS THE RAY GUN CANNOT DIE OR DISCONNECT-- THE GUN WILL DISAPPEAR AND THE EASTER EGG CANT BE COMPLETED. THE RAY GUN FROM THE MYSTERY BOX CANNOT BE USED FOR THE EE.