Citadelle des Morts Easter Egg Walkthrough
This is a Citadelle des Morts easter egg walkthrough for Call of Duty Black Ops 6 (BO6) Zombies. Read on for a full guide of the Citadelle des Morts Main Quest and learn how to complete the Citadelle des Morts easter egg.
| Citadelle des Morts Guides | |
|---|---|
| Easter Egg | Interactive Map |
List of Contents
Citadelle des Morts Easter Egg Walkthrough
| Citadelle des Morts Easter Egg Steps | ||||||
|---|---|---|---|---|---|---|
| 1 | Activate the Pack-a-Punch and Talk to Krafft | |||||
| 2 | Obtain 4 Elemental Swords | |||||
| 3 | Collect the Ritual Items | |||||
| 4 | Unlock the Code Wall | |||||
| 5 | Find the Torn Page Fragments | |||||
| 6 | Activate the Eye Traps in the Correct Order | |||||
| 7 | Use Incantations on Each Knight Statue | |||||
| 8 | Obtain the Mystic Orb | |||||
| 9 | Defeat the Guardian (Final Boss) | |||||
Activate the Pack-a-Punch and Talk to Krafft
The first part of the Citadelle des Morts Easter Egg Main Quest requires you to enter the castle's Undercroft to activate the Pack-a-Punch machine. Afterward, you will have to talk to Krafft who is locked behind a door behind the Quick Revive Machine.
| 1 | Activate the Pack-a-Punch |
|---|---|
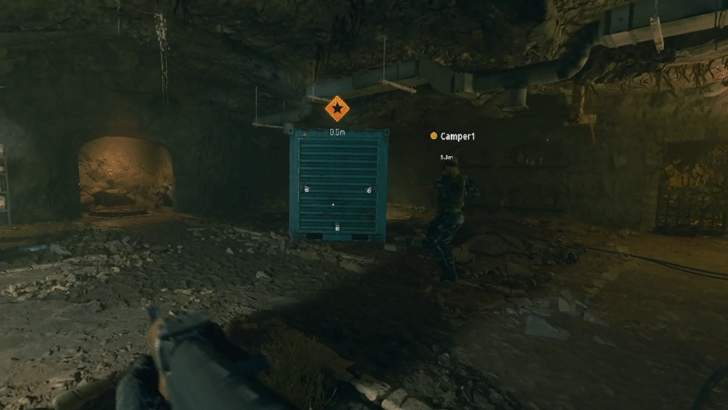 Follow your objective marker towards the castle and use the cannon to destroy its main doors. Make your way to the Undercroft and shoot the locks on the container. Kill the Doppelghast and pick up the Blood Aetherium Crystal. Place the crystal into the portal to activate the Pack-a-Punch machine. |
|
| 2 | Talk to Krafft |
 Speak to Krafft by interacting (F) with the door next to the Quick Revive Machine. |
Obtain 4 Elemental Swords
After talking to Krafft, you will need to collect 4 elemental swords. Progress to Round 10 first to spawn bucket helmet zombies. Each of them will drop a Stamp that you can use to get the base swords from the knight statues in the Dining Hall.
Afterward, you will have to do a series of tasks to upgrade the swords with elemental powers.
| 1 | Collect Four Stamps |
|---|---|
 Once you reach Round 10, zombies with bucket helmets will begin to spawn. Kill them and collect the Stamps that they will drop. You will need to collect 4 Stamps in total. |
|
| 2 | Give the Stamps to the Knight Statues |
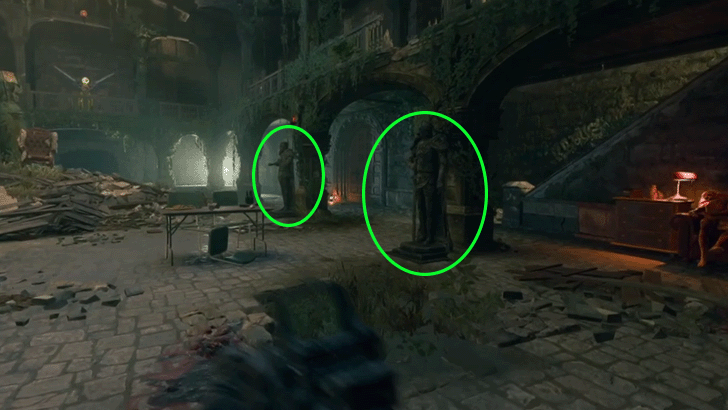 After getting 4 stamps, go to the Dining Hall of the castle and give the stamps to each knight statue by interacting with them. This allows you to pick up the base swords from them which you will need to upgrade with elemental powers next. |
|
| 3 | Obtain the Light Sword |
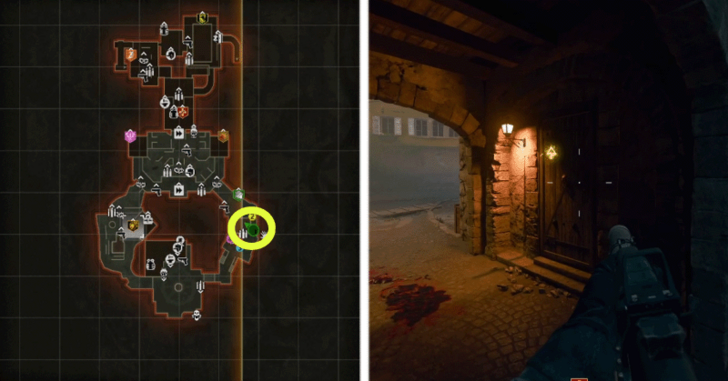 Pick up the sword from the Knight Statue with a Lion symbol engraved on it. Afterward, go to the door with a Lion Knob in the Upper Village. Kill one glowing parasite to make the sword glow yellow and then hit the door once using the sword to place a glowing symbol on it. Repeat the same step until you've successfully placed 4 symbols on the door. ► How to Get the Solais: Lion of Light Sword |
|
| 4 | |
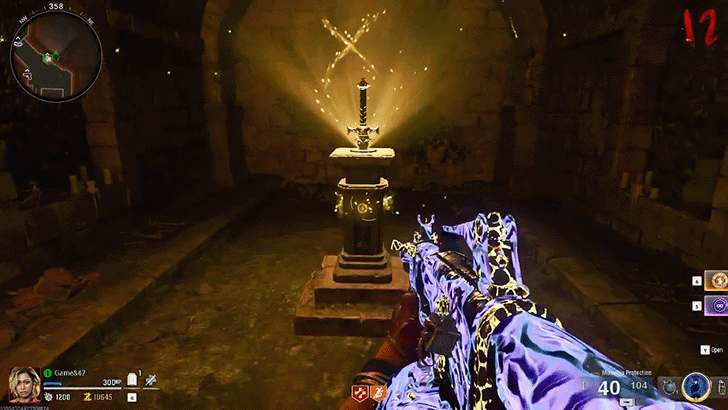 Interact with the door to enter it and place the sword on the pedestal. After that, shoot the symbol that matches the one on the pedestal. Each time you shoot one, the symbol on the pedestal will change. Once you've shot enough symbols, the complete Light Sword will then appear on the pedestal. |
|
| 5 | Obtain the Electric Sword |
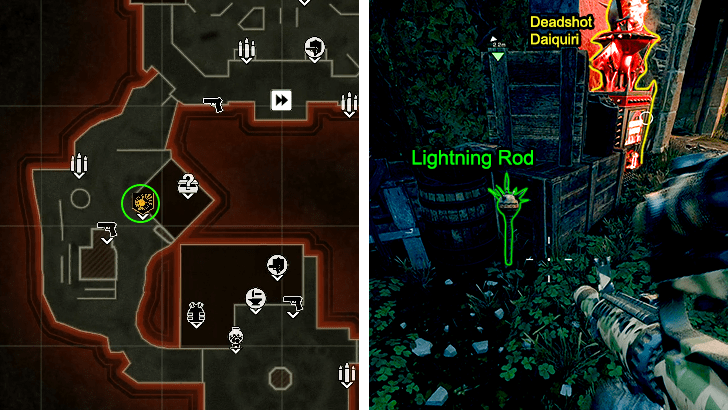 To get the Electric Sword, you will first need to collect three lightning rods. The 1st Lightning Rod is found beside the Deadshot Daiquiri perk machine at the west side of the map. ► How to Get Durendal Electric Sword |
|
| 6 | |
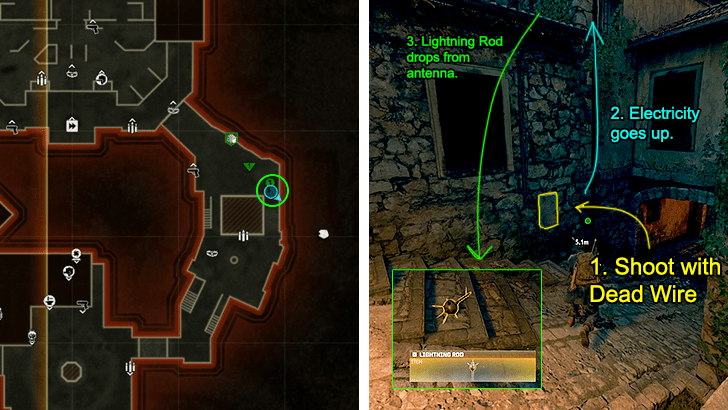 The 2nd Lightning Rod requires that you have a weapon with the Dead Wire Ammo Mod. Shoot the power box with the ammo mod to cause electricity to shoot through the wires upwards. The rod will drop from the antenna above it. |
|
| 7 | |
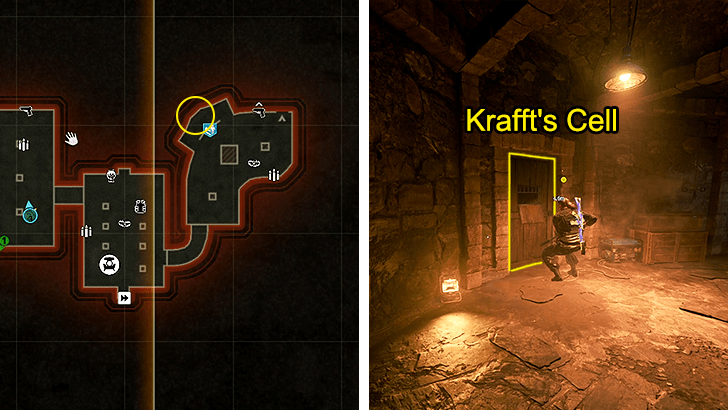 The 3rd Lightning Rod can start dropping from zombies when you talk to Krafft with the Electric Sword in your hand. It can also drop normally at random without talking to Krafft, but the drop rate is quite low. Talking to Krafft is more guaranteed. |
|
| 8 | |
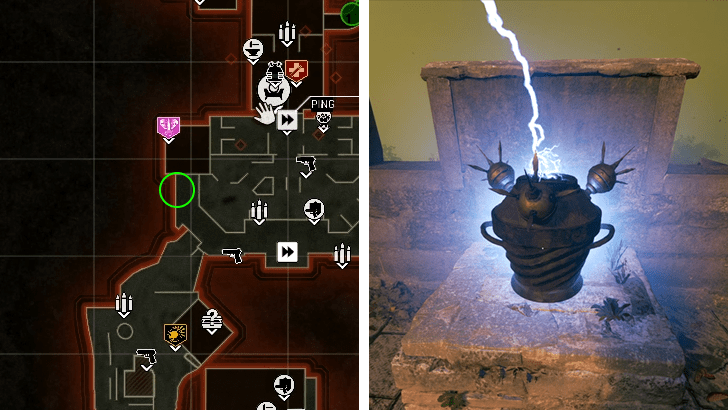 Climb up the west side of the Hillside Ramparts and place all three Lightning Rods inside the cauldron. A storm will spawn around you after that. Wait for the lightning to charge up your sword and then hit the cauldron to transfer the electricity to it. Repeat this 3 times and then insert the sword in the cauldron to transform it into the Lightning Sword. |
|
| 7 | Obtain the Void / Raven Sword |
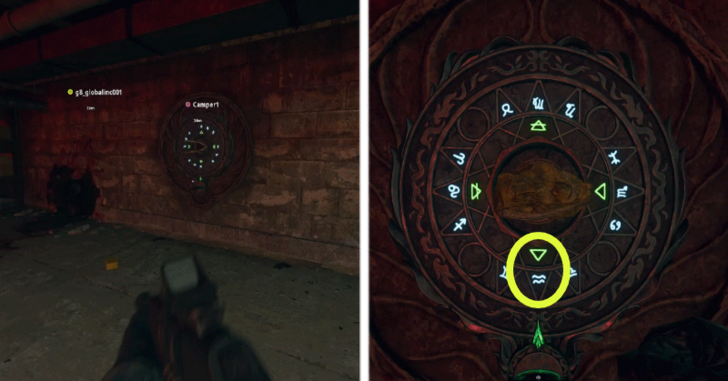 Grab the sword from the Raven knight statue and then get the Antiquity item from the shelf at the Alchemica Lab. The Antiquity varies for each playthrough and it can either be a fossil, an animal jaw, or a crow's skull. Go to the Tavern Cellar, then place the Antiquity item on the black circular stone and insert your sword in it. Next, rotate and line up the two bottom symbols depending on the astrology symbol related to the Antiquity item that you obtained. ► Raven Sword Code Solution |
|
| 8 | |
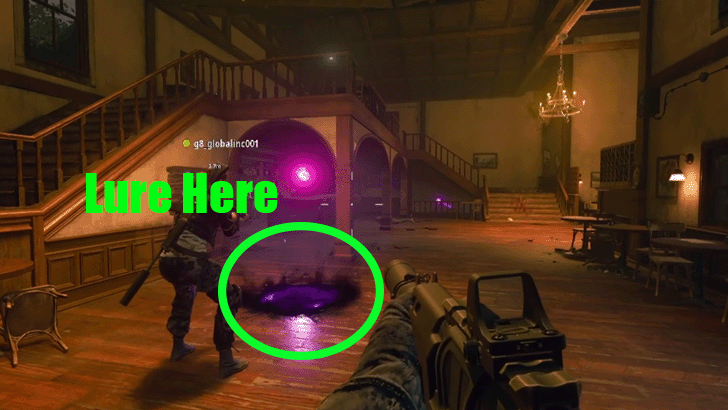 There will be 3 void portals that will appear around the tavern, with the first one appearing in the cellar next to you. Lure 3 void orbs into each portal - the orbs will damage you if you get too close. After finishing up the third portal, follow the orb back to the cellar and then retrieve the Void Sword. ► How to Get the Balmung Void Sword |
|
| 9 | Obtain the Fire Sword |
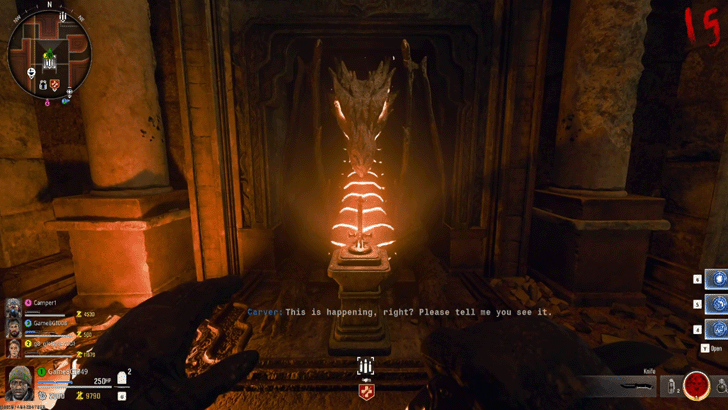 Get the sword from the Dragon knight statue and place the sword on the pedestal in front of the dragon statue at the main hallway of the castle. ► How to Get the Caliburn: Dragon's Fire Sword |
|
| 10 | |
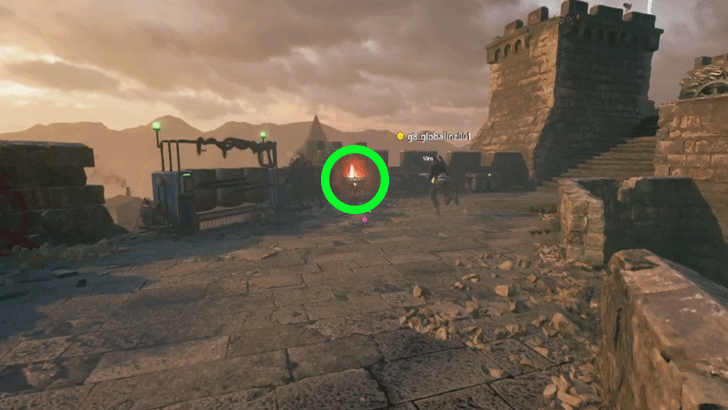 Go to the first brazier on the east side of the castle wall and interact with it to put yourself on fire. You will start losing health after catching fire and you'll have to sprint back to the dragon statue and interact with the pedestal to put it out. |
|
| 11 | |
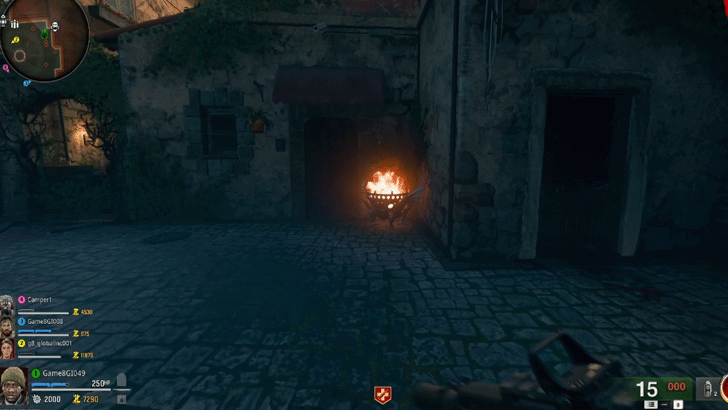 The second brazier is located at the town square. Same with the first one, interact with the brazier and then run all the way back to the pedestal before dying from the fire. |
|
| 12 | |
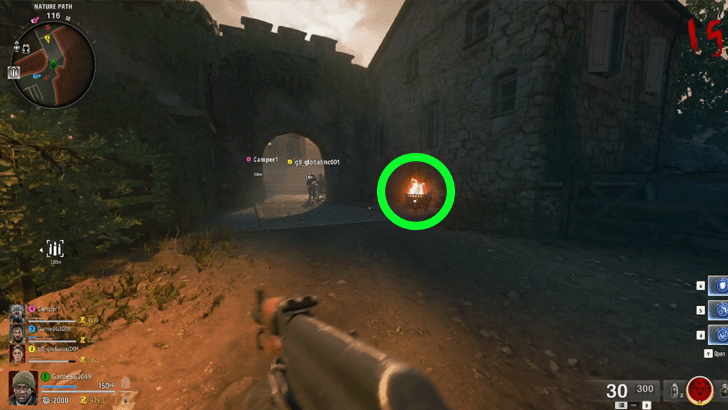 The last brazier is at the hillside path (where the Deadshot Daiquiri is located). Again, touch it and then run back to the pedestal. After successfully getting all 3 braziers, the dragon will breathe down fire on the sword, turning it into the Fire Sword. |
Collect the Ritual Items
| 1 | Pegasus' Horseshoe |
|---|---|
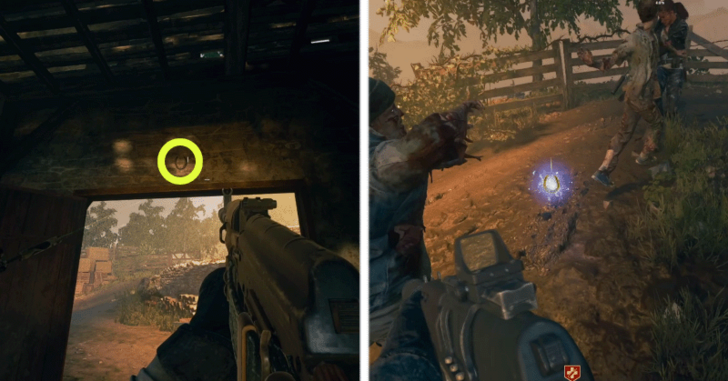 Proceed to the barn next to the Deadshot Daiquiri machine and shoot the horseshoe on top of the door, then grab it after it falls down. Go back to the cannon and activate it to launch yourself to the town square. Upon landing, look for a storm cloud and head towards it. Collect the Pegasus' Horseshoe right at the bottom of it. ► How to Get All Ritual Items |
|
| 2 | Ra's Ankh |
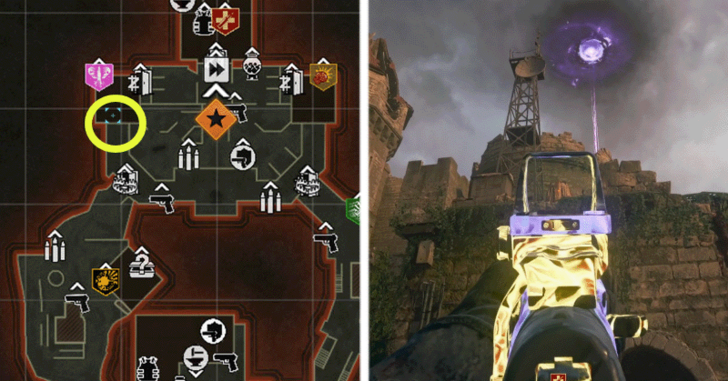 Craft a Molotov (350 Salvage) from a crafting table and then climb up the castle wall where the cannon is located. Go to the west side and throw the molotov at the wood pile found one floor above you. |
|
| 3 | |
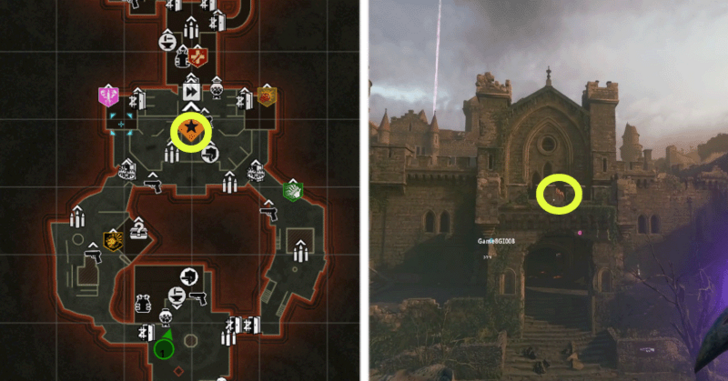 Go to the middle and throw a molotov at the second wood pile located on the balcony across the cannon. |
|
| 4 | |
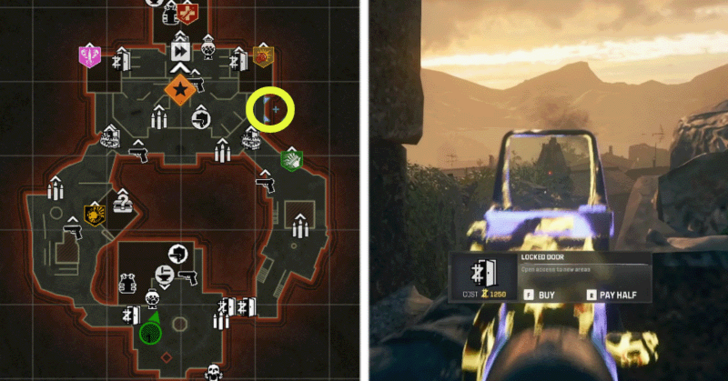 Run over to the east side of the castle wall and throw the molotov at the wood pile over at the cliff on the other side. Once that's done, kill the zombies that were summoned by the burning wood piles. Kill the Doppelghast too and collect the Ra's Ankh ritual item that it dropped. |
|
| 5 | Paladin's Brooch |
 Go to the Dining Hall where the knight statues are located and shoot the small mirror next to the Vulture Aid machine until it connects to the second mirror across it. |
|
| 6 | |
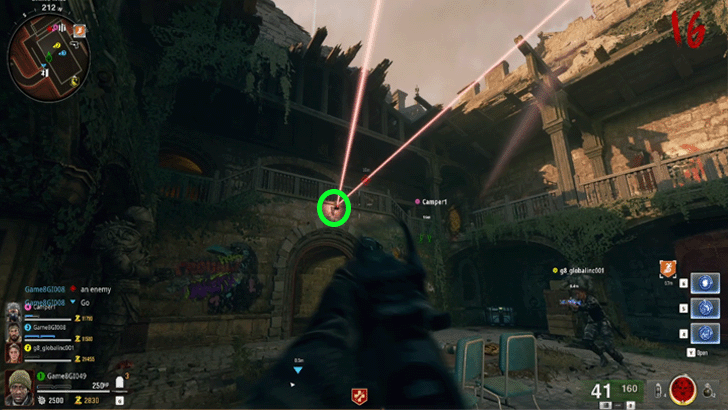 Stand on the east side of the dining hall and shoot the second mirror until it aligns with the third mirror. |
|
| 7 | |
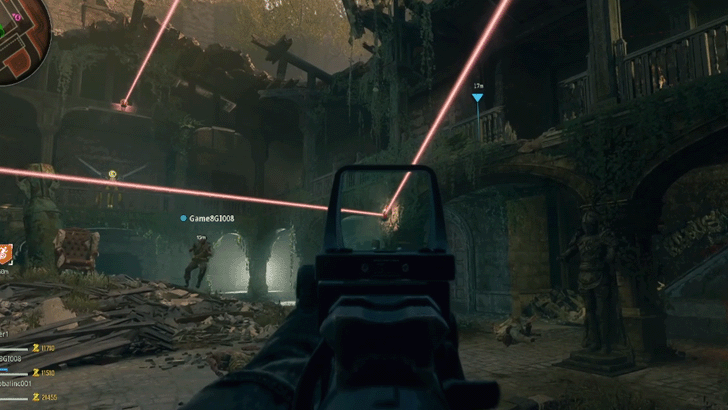 Stand on the south side and shoot the third mirror to connect it to the fourth mirror in the Alchemical Lab. |
|
| 8 | |
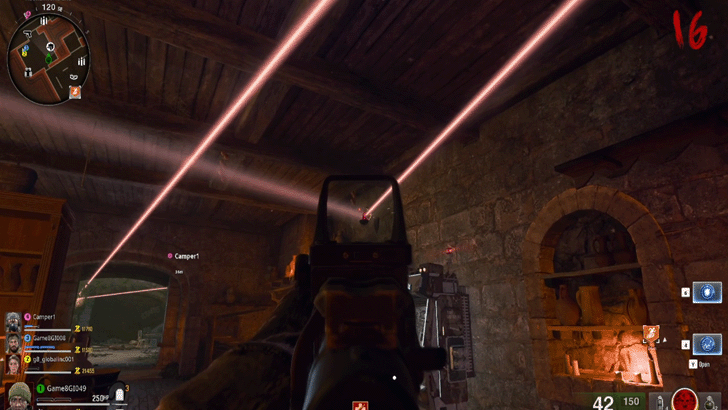 Stand on the north side of the Alchemical Lab and shoot the fourth mirror to connect it to the statue on the table. Afterward, collect Paladin's Brooch hanging on the head statue on the table. |
|
| 9 | Raven's Talon |
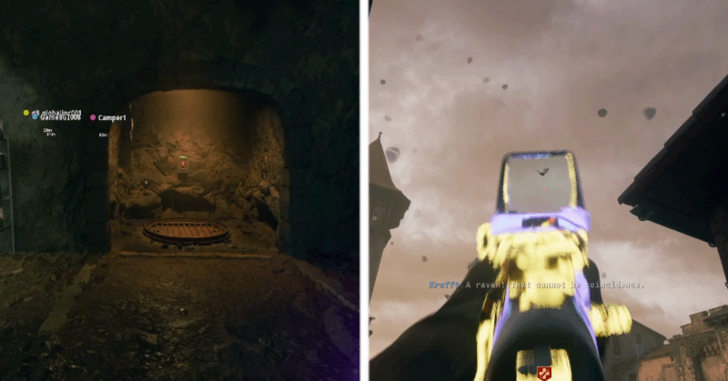 Activate the Cave Slide in the Undercroft. While sliding, look for a raven on the right side of the cave and shoot it. At the end of the slide, you will see the raven flying off to the horizon. Quickly shoot it and then get the Raven's Talon from it. |
Unlock the Code Wall
| 1 | Break the Wall in the Undercroft |
|---|---|
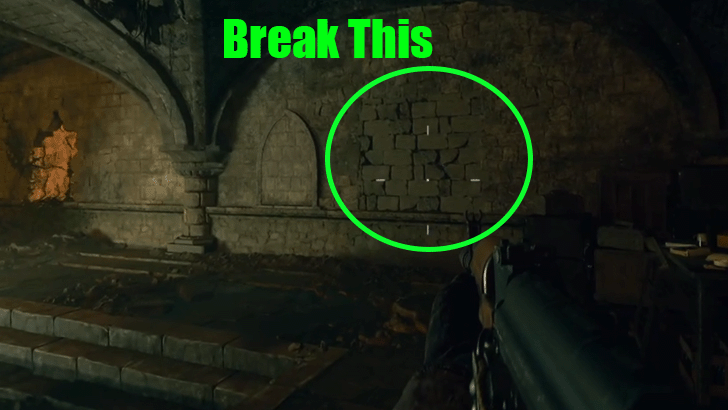 Buy the Melee Macchiato perk and go to the breakable wall in the Undercroft and then destroy it by using melee. You can tell if it's the correct wall if you can see glimpses of runes through the holes. |
|
| 2 | Activate the Jugs at the Tavern |
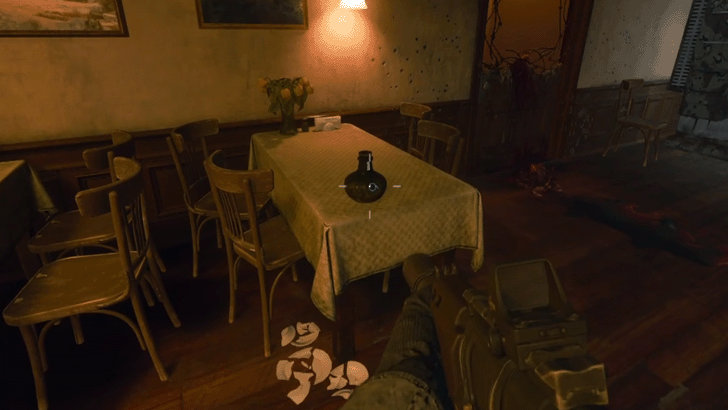 Proceed to the tavern and interact with six black jugs located around the tavern. Each jug will have a roman numeral and a rune symbol under it. Take note of each one as this dictates what order of runes you will have to shoot at the code wall in the Undercroft. ► What are the Roman Numerals? |
|
| 3 | Shoot the Runes in Correct Order |
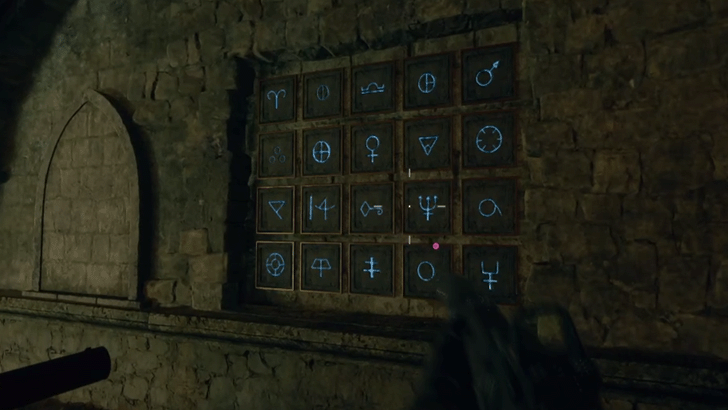 Go back to the code wall and using the jugs at the tavern as reference, shoot six runes in the correct order. Each time you shoot a rune, the arrangement of runes will rotate. After getting everything right, the wall next to the code will open up, revealing a book. |
Find the Torn Page Fragments
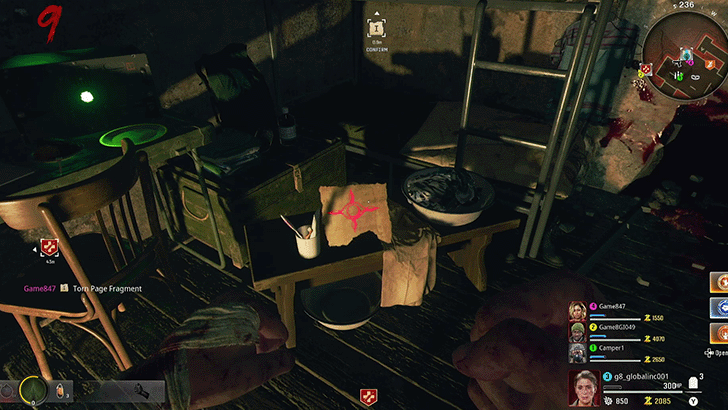
From the Undercroft, go back up to the Sitting Rooms area and collect four Torn Page Fragments located around the room. The pages will be highlighted with a red eye symbol so that you can easily find them.
Once you have all four Torn Page Fragments, place it on the ritual book back in the Undercroft.
Activate the Eye Traps in the Correct Order
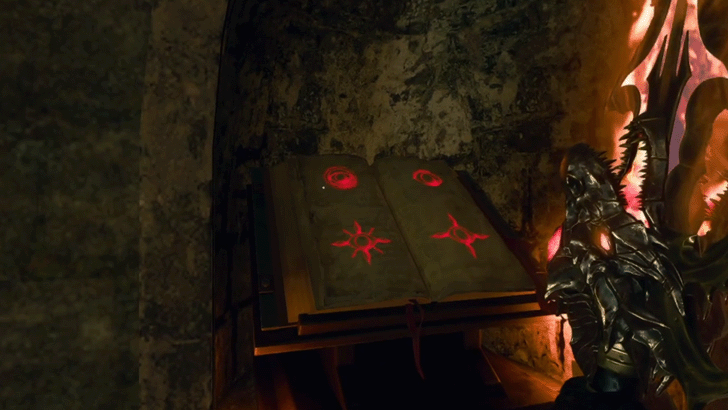
For the next part, you will have to activate 4 eye traps around the map (marked by a bear trap icon) and kill a certain amount of zombies while each trap is active.
The order of traps that you will activate is based on the symbols on the ritual book, arranged from top left, bottom left, top right, and bottom right (symbols are random for each playthrough).
Use Incantations on Each Knight Statue
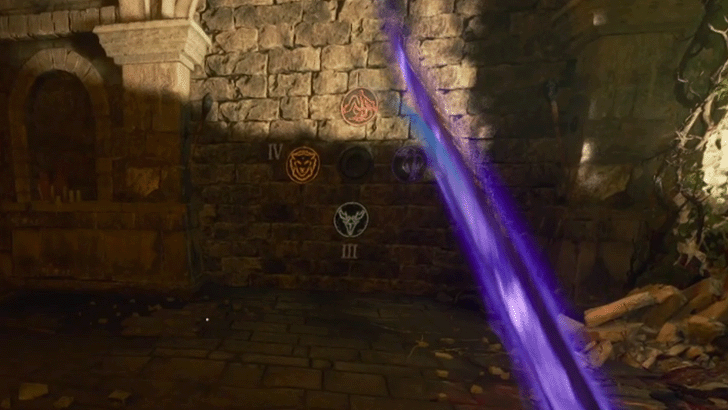
Head on over to the castle's northwest stairs leading to the Undercroft and you'll find four animal symbols, each representing the elemental swords. Beside them are numbers written in roman numeral form. This will be the order of incantations that you will do for each sword.
NOTE: The order for the sword incantations are random for each game session.
How to Get All Incantations
| 1 | Durendal (Deer Sword) Incantation |
|---|---|
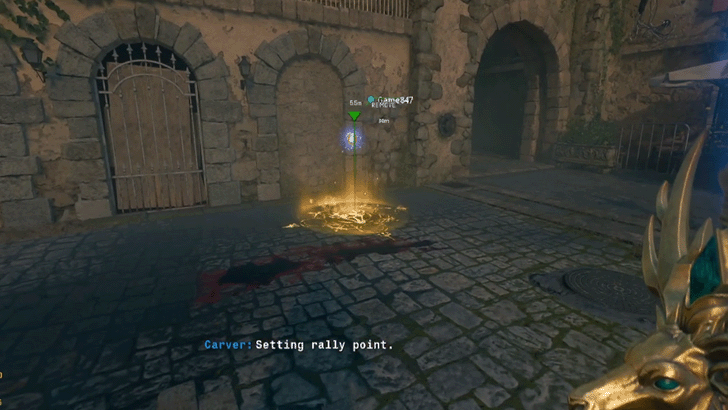 Take the Durendal, then go to the town center and look for a yellow circle. Place the Horseshoe ritual item and then kill the zombies near the circle. After killing a certain amount of zombies, a gold chest will appear. Hit it with the Durendal sword and then grab the Electric Incantation. |
|
| 2 | |
| Go back to the Deer knight statue and use your tactical button to hit it with the Electric Incantation. Afterward, inspect the Durendal in front of it. The knight statue will salute if done correctly. ► How to Inspect Swords |
|
| 3 | Caliburn (Dragon Sword) Incantation |
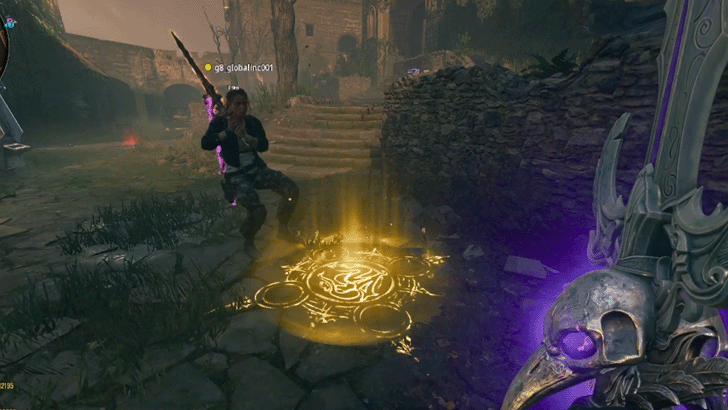 Equip the Caliburn and go to the yellow circle at the Courtyard. Place the Ra's Ankh ritual item and then kill zombies near it. Hit the gold chest using the Caliburn to get the Fire Incantation and then return to the Dragon knight statue. |
4 |
| Use the Fire Incantation on the Dragon knight statue and then inspect the Caliburn. | |
| 5 | Solais (Lion Sword) Incantation |
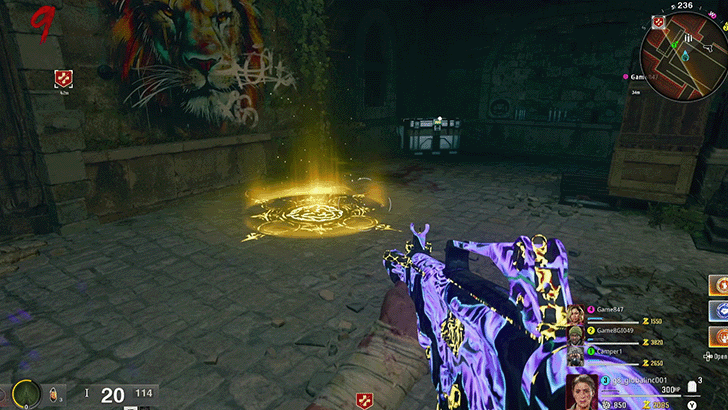 Grab the Solais and place the Paladin's Brooch ritual item on the yellow circle in the Dining Hall. Feed the circle with zombie souls by killing them and then smack the gold chest with the Solais to get the Light Incantation. |
6 |
| Use the Light Incantation on the Lion knight statue and then inspect the Caliburn. | |
| 7 | Balmung (Raven Sword) Incantation |
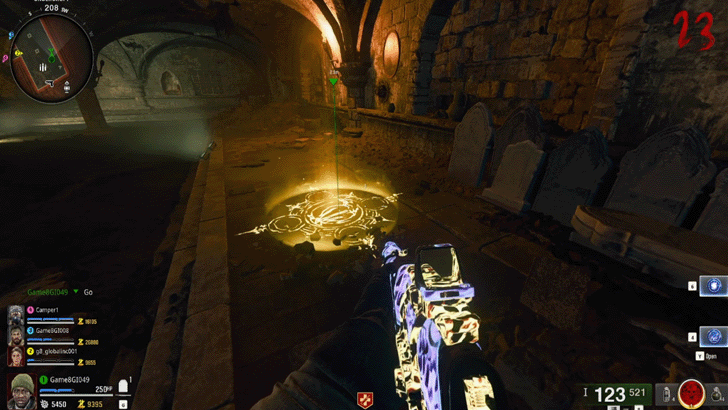 Equip the Balmung and put the Raven's Talon ritual item in the yellow circle at the Undercroft. Kill zombies near the circle to summon a gold chest. Hit the chest with the Balmung to get the Dark Incantation. |
8 |
| Use the Dark Incantation on the Raven knight statue and then inspect the Balmung. |
Obtain the Mystic Orb
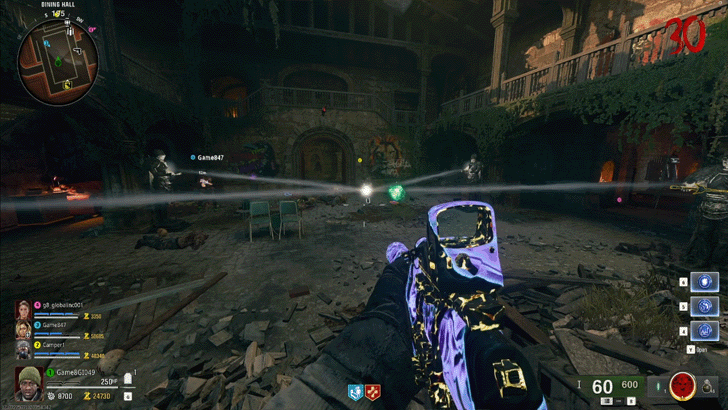
After you have used the incantations on all Knight Statues, the statues will summon a Mystic Orb at the middle of the Dining Hall. Grab it and then proceed with completing the four elemental challenges around the castle.
| 1 | First Elemental Challenge |
|---|---|
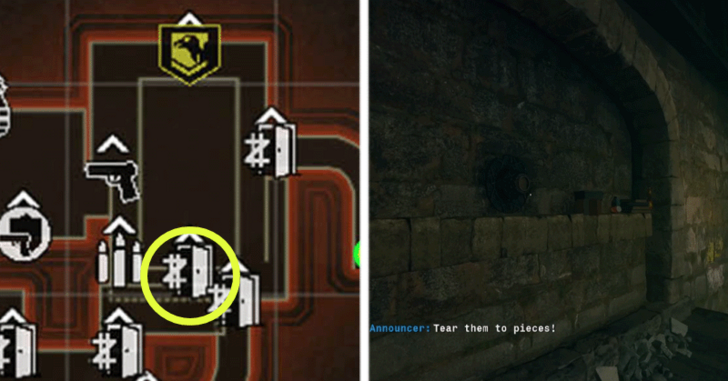 The first elemental challenge is located at the second floor of the Dining Hall, opposite of the Vulture Aid machine. Insert the Mystic Orb into the hole and interact with it to start the challenge. Equip the Light Sword (Solais) and collect the green orbs around the dining hall until you hear Krafft talk to you or once a small mini orb appears around the Mystic Orb. This indicates that the challenge is complete and you can move on to the next one. Don't forget to remove the mystic orb from the wall! |
|
| 2 | Second Elemental Challenge |
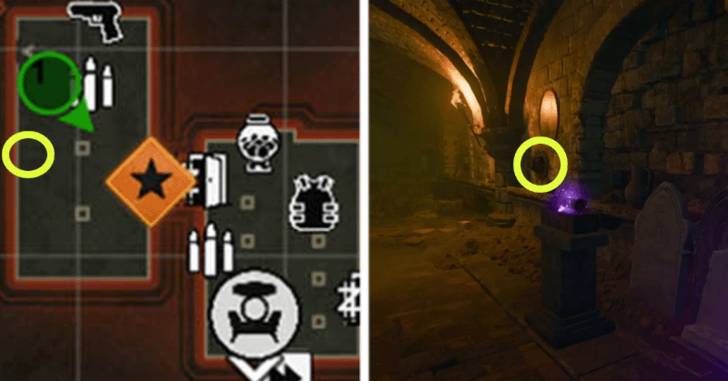 The second elemental challenge can be found in the Undercroft, beside the Void (Raven) Incantation. For this challenge, you will have to equip the Void Sword (Balmung) and then use its special charge attack to kill zombies near the mystic orb. You can use Dark Incantations as well for this challenge. |
|
| 3 | Third Elemental Challenge |
 The third elemental challenge is at the courtyard. Bring the Fire Sword (Caliburn) and just basic attack the zombies with it or use Fire Incantations to kill them. |
|
| 4 | Fourth Elemental Challenge |
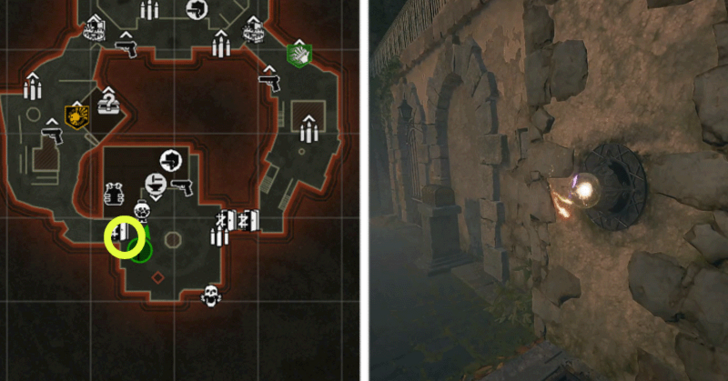 The fourth elemental challenge is located at the Town Square, west of the fountain. Equip the Electric Sword (Durendal) and use the sword's special charge attack or Electric Incantations to get zombie kills to complete this challenge. |
Defeat the Guardian (Final Boss)
Once all 4 elemental challenges are complete, put the Mystic Orb at the center of the wall with the four animal symbols on it. You will then open a secret room containing the Guardian Key. Take the Guardian Key and place it at the feet of the giant's statue in the town square to begin the final boss fight against the Guardian.
| 1 | Insert Mystical Orb on Animal Symbols Wall |
|---|---|
 Take the Mystic Orb and insert it at the center of the four animal symbols to open a secret room. |
|
| 2 | Obtain the Guardian Key |
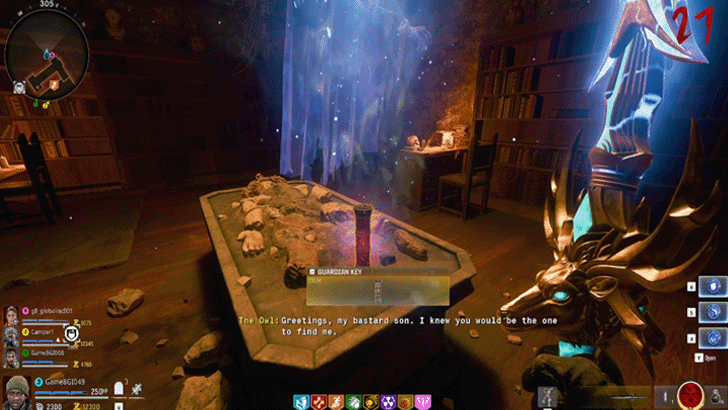 Activate the Ancient Mystic Recording on the table to summon the Owl who will deliver a short monologue. Afterward, take the Guardian Key on the table. |
|
| 3 | Place the Guardian Key at the Giant's Statue |
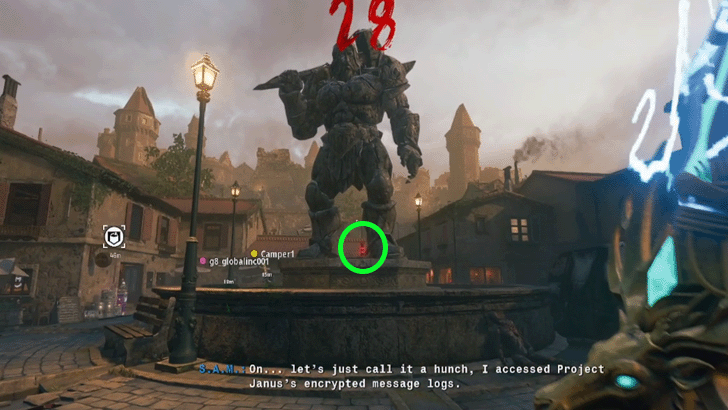 Place the Guardian Key at the feet of the giant's statue located in the town square. This will then initiate a vote to begin the Guardian boss fight. |
|
| 4 | Shoot the Guardian's Weak Points |
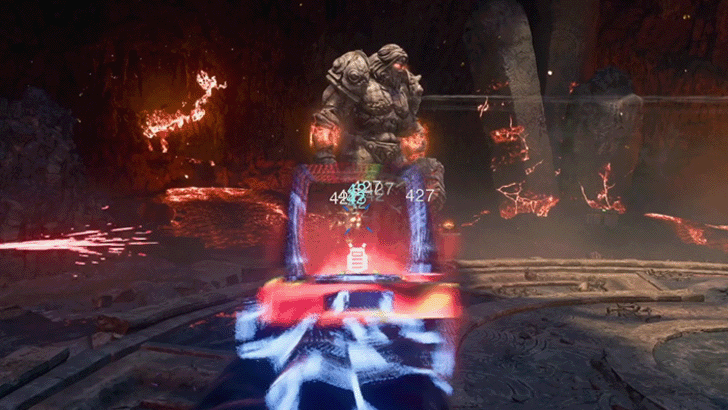 It's time to fight the Guardian. Start by breaking its armor by shooting the gauntlets, boots, shoulders, and back. Once you destroy a piece of armor, it will reveal a glowing spot, indicating that it's now a weak point. Shoot the weak point to deal damage. Eventually the glowing aura on the weak spot will wear off after damaging it enough and you will have to shift your focus on a different weak point. |
|
| 5 | Kill Zombies During Immunity Phase |
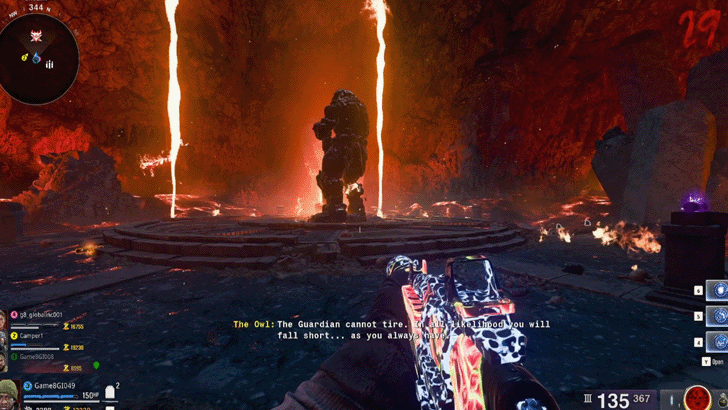 Throughout the fight, it will have three phases, with each having a short interval where the Guardian will be immune to damage and several hordes of zombies will spawn. After this short immunity phase, focus on damaging the Guardian's weak spots again to damage it until the fight is over. |
Black Ops 6 (BO6) Related Guides

Zombies Guide: Everything You Need to Know
All Zombies Mode Guides
Zombies Easter Eggs
Comment
For the step regarding the raven you shoot in the water slide; you don't need to shoot it before it flies off from the spawn area. Head up to the hilltop (just in front of the castle), and you should see a bird flying above the courtyard. You can shoot it down, and an item will drop!
Author
Citadelle des Morts Easter Egg Walkthrough
improvement survey
03/2026
improving Game8's site?

Your answers will help us to improve our website.
Note: Please be sure not to enter any kind of personal information into your response.

We hope you continue to make use of Game8.
Rankings
- We could not find the message board you were looking for.
Gaming News
Popular Games

Genshin Impact Walkthrough & Guides Wiki

Honkai: Star Rail Walkthrough & Guides Wiki

Umamusume: Pretty Derby Walkthrough & Guides Wiki

Pokemon Pokopia Walkthrough & Guides Wiki

Resident Evil Requiem (RE9) Walkthrough & Guides Wiki

Monster Hunter Wilds Walkthrough & Guides Wiki

Wuthering Waves Walkthrough & Guides Wiki

Arknights: Endfield Walkthrough & Guides Wiki

Pokemon FireRed and LeafGreen (FRLG) Walkthrough & Guides Wiki

Pokemon TCG Pocket (PTCGP) Strategies & Guides Wiki
Recommended Games

Diablo 4: Vessel of Hatred Walkthrough & Guides Wiki

Cyberpunk 2077: Ultimate Edition Walkthrough & Guides Wiki

Fire Emblem Heroes (FEH) Walkthrough & Guides Wiki

Yu-Gi-Oh! Master Duel Walkthrough & Guides Wiki

Super Smash Bros. Ultimate Walkthrough & Guides Wiki

Pokemon Brilliant Diamond and Shining Pearl (BDSP) Walkthrough & Guides Wiki

Elden Ring Shadow of the Erdtree Walkthrough & Guides Wiki

Monster Hunter World Walkthrough & Guides Wiki

The Legend of Zelda: Tears of the Kingdom Walkthrough & Guides Wiki

Persona 3 Reload Walkthrough & Guides Wiki
All rights reserved
© 2024 Activision Publishing, Inc. ACTIVISION, CALL OF DUTY, CALL OF DUTY LEAGUE, MODERN WARFARE, CALL OF DUTY BLACK OPS, CALL OF DUTY WARZONE, and CALL OF DUTY VANGUARD are trademarks of Activision Publishing, Inc. All other trademarks and trade names are the property of their respective owners.
The copyrights of videos of games used in our content and other intellectual property rights belong to the provider of the game.
The contents we provide on this site were created personally by members of the Game8 editorial department.
We refuse the right to reuse or repost content taken without our permission such as data or images to other sites.





![Monster Hunter Stories 3 Review [First Impressions] | Simply Rejuvenating](https://img.game8.co/4438641/2a31b7702bd70e78ec8efd24661dacda.jpeg/thumb)


The step where deadwire is required can be done with shock charges also the bonfires with the molotofs can be done with fire sword special attack