This survey will take about 1 minute.
Your answers will help us to improve our website.
Call of Duty Black Ops 6 (BO6)
All Campaign Safe Locations and Codes
This is a list of all nine safe locations in the Call of Duty Black Ops 6 (BO6) Campaign. Read on to learn all the safe locations and safe codes in the Campaign as well as the rewards for opening all of them.
All Campaign Safe Locations
| All Campaign Safe Locations | ||
|---|---|---|
| The Rook (Safehouse) | Blood Feud | Most Wanted |
| Hunting Season | The Cradle | Emergence |
| High Rollers | Ground Control | Under the Radar |
Click on a link to jump to a specific safe location guide!
The Rook (Safehouse) Safe Location
The Safehouse Safe is probably the earliest safe you can find and open in the campaign. Players will be able to find this safe as soon as they arrive at the KGB safehouse during The Rook: Arrival.
However, in order to open the safe, you will need to solve all Safehouse Puzzles since the game will not accept existing codes until you manage to reach the room of the final Safehouse Puzzle.
| How to Find the Safehouse Safe | |
|---|---|
| 1 | 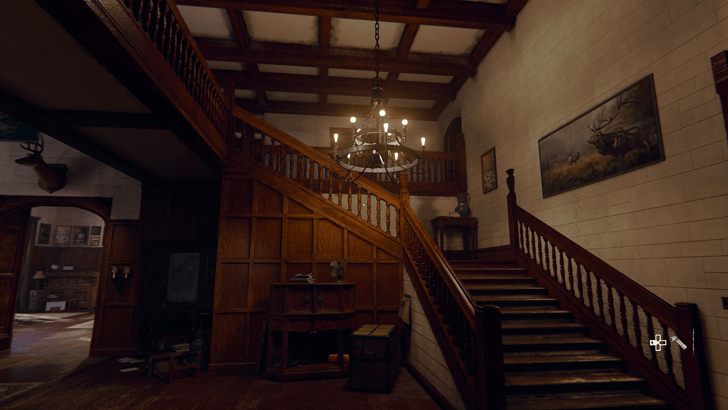 Starting from the Safehouse’s main entrance, go up to the second floor. |
| 2 | 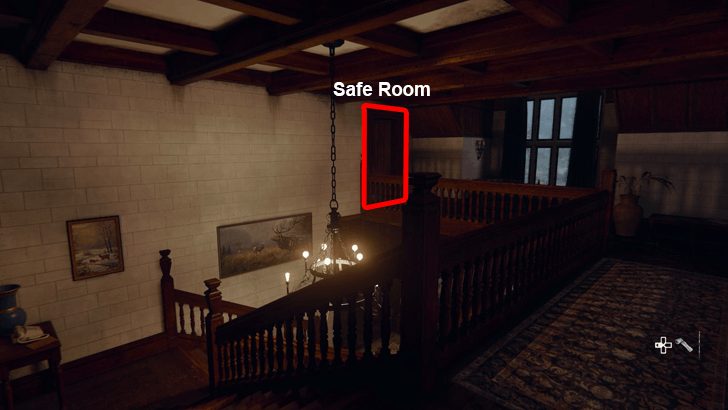 Once you reach the top of the stairs, take a left and continue until you spot the door near a second-floor window. This is the bedroom containing the safe. |
| 3 | 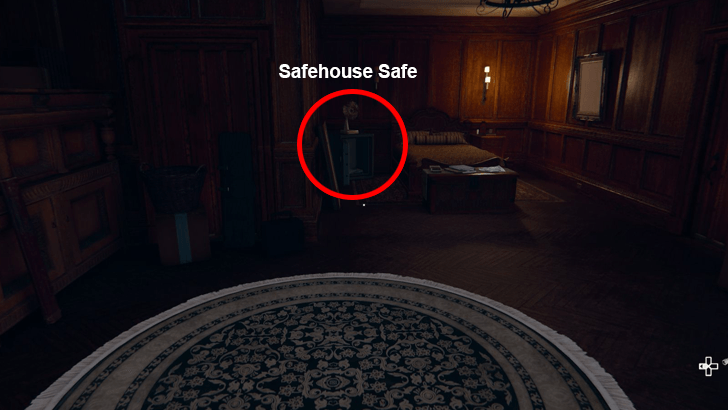 Head inside this bedroom to find the locked safe. |
Blood Feud Safe Location
The safe in Blood Feud can be found during the second part of the mission. After killing Yannik from the top of the church, meet up with Sev to reach a new building called the Chateau de la Haute Lune. Inside, you'll find the Blood Feud safe.
| 1 | Go to the Left Side of the Chateau |
|---|---|
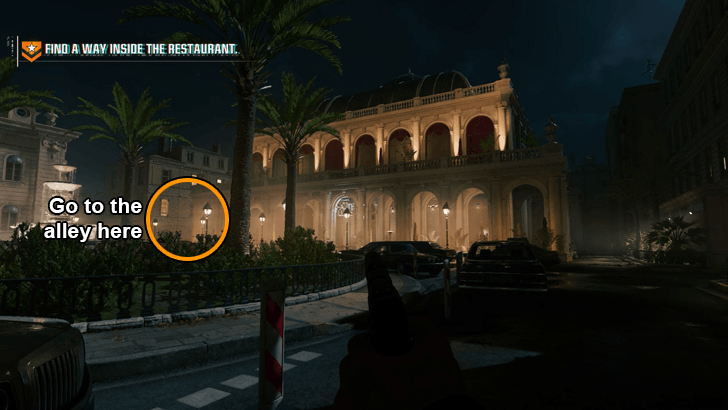 Upon arriving at the Chateau de la Haute Lune, Sev will leave the van first. After you've armed yourself, exit the vehicle and make your way to the left side of the building (facing the front of the chateau). |
|
| 2 | Climb the Truck to Reach the Vent |
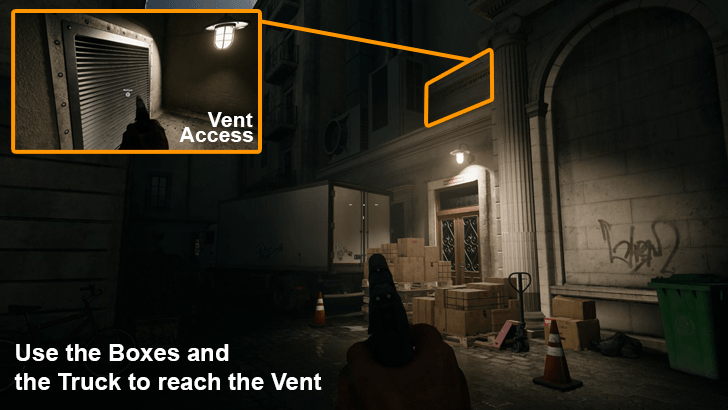 At the left side of the chateau will be a parked truck and some boxes. Climb them to reach one of the chateau's ledges where you'll find a vent that leads inside the building. |
|
| 3 | Turn Right Inside the Vent |
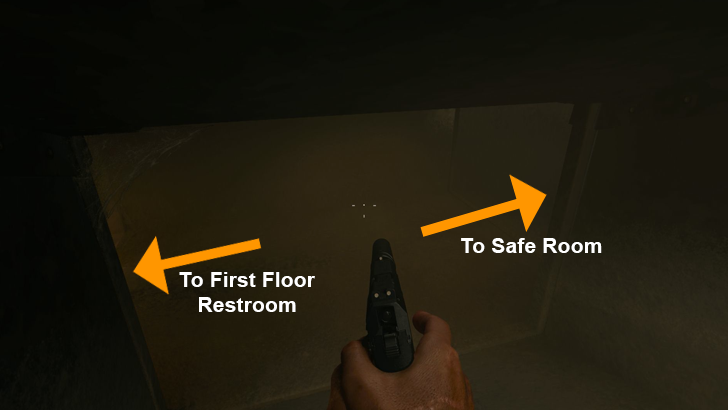 Once you enter the vent, follow it until you reach an intersection. At the intersection, go right to reach an exit vent above a room with 2 enemies talking about rats. |
|
| 4 | Drop Down Into the Safe Room |
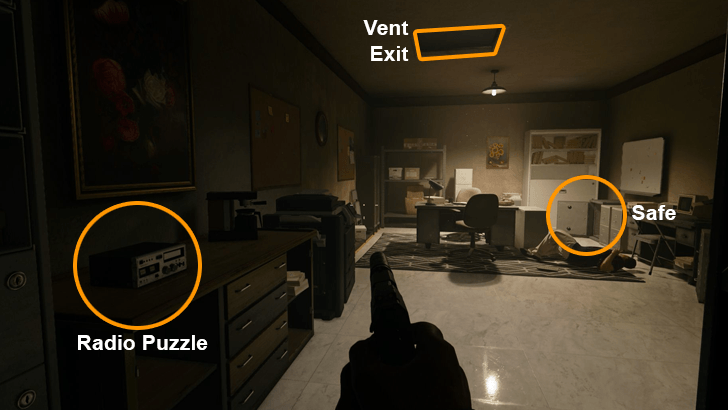 When you're ready, open the vent exit and kill the 2 enemies before dropping down into the room. The radio puzzle will be nearby. Solve it to get the Blood Feud safe code that opens the safe. |
Blood Feud Mission Walkthrough
Most Wanted Safe Location
The safe in Most Wanted is found behind the large, white curtained section to your right as you enter the gala. This is the quickest safe you can open and loot out of all the campaign safes.
| 1 | Enter the Gala and Take a Right |
|---|---|
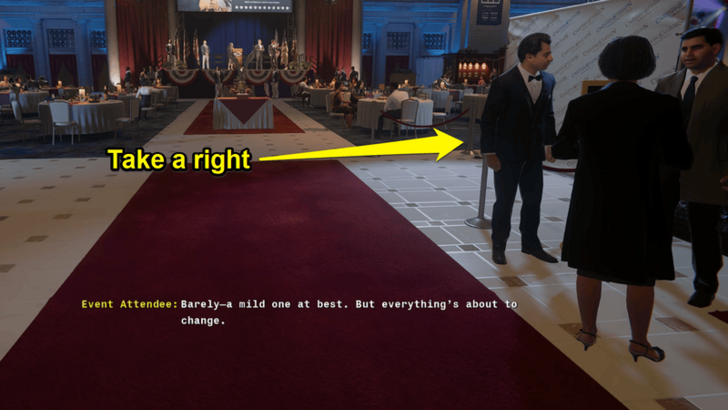 Take a right immediately after entering the gala. You should see a restricted area with a white booth on your immediate right and a guard pacing back and forth. |
|
| 2 | Enter the Room with Red and Yellow Drapes |
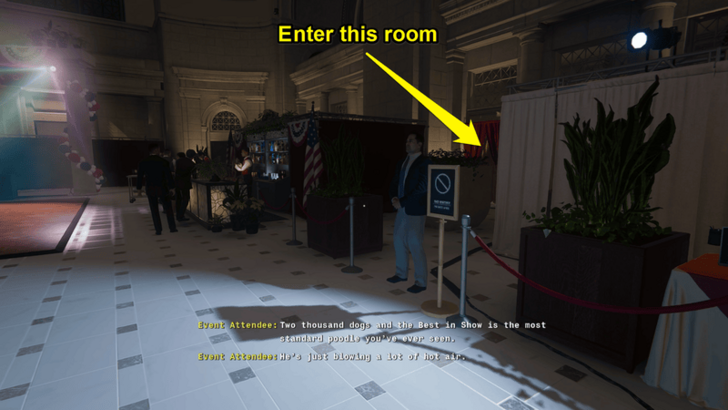 Enter the room in the restricted area with the red and yellow drapes. |
|
| 3 | Enter the Open Door |
 After entering the room with red and yellow drapes, take a right, and you should see an open door. The safe and radio should be inside that door. Solve the radio puzzle to get the Most Wanted safe code needed to open the safe. |
Most Wanted Mission Walkthrough
Hunting Season Safe Location
The safe in Hunting Season will be found in the middle of an enemy encampment in the southwest section of the TacMap. It'll be in the second floor of the largest building in the Village POI.
| 1 | Go to the Southwest Enemy Encampment |
|---|---|
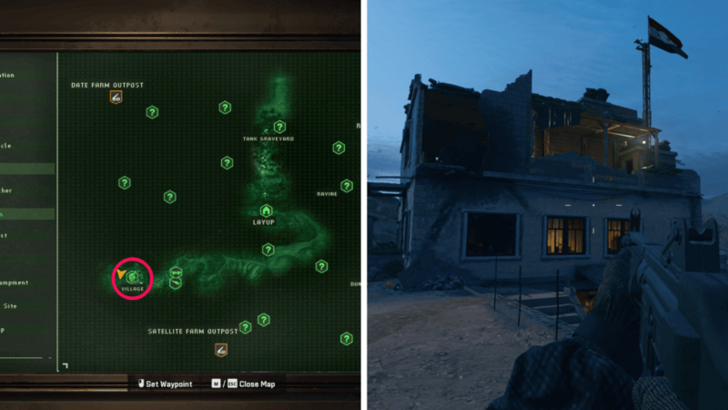 Go to the enemy encampment and look for a dilapidated building with a flag with three stars atop it, as seen in the image above. |
|
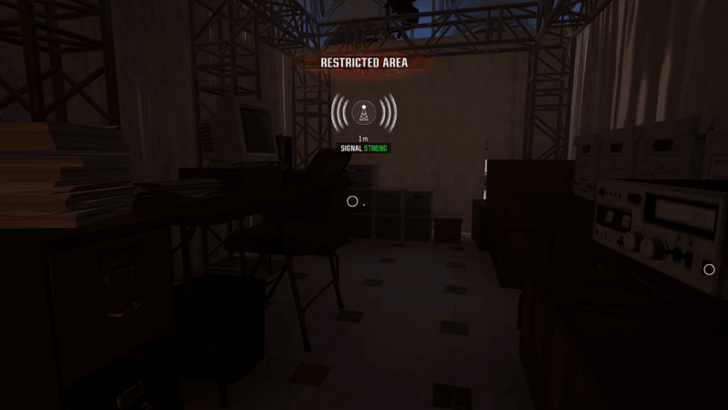
| 2 | Go to the Second Floor of the Building |
 The safe and radio are in separate rooms on the second floor of the dilapidated building. The safe is in the brightly lit room with rice bags and sand bags, while the radio is by a TV in a dark room with a broken window. Solve the radio puzzle to get the Hunting Season safe code that opens the safe. |
Hunting Season Mission Walkthrough
The Cradle Safe Location
The safe in The Cradle is located in the second floor of the left gatehouse at the start of the mission. Simply head up the stairs to start detecting the radio signal related to the safe and its code.
| 1 | Enter the building Past the Lion Statues |
|---|---|
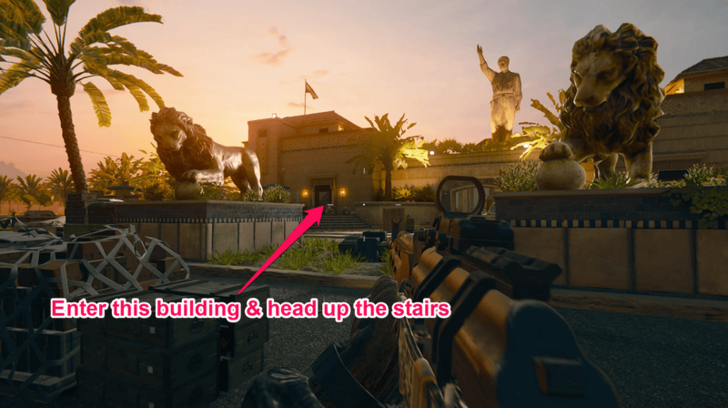 Enter the building past the two lion statues and head up the stairs. |
|
| 2 | The Safe is Embedded on the wall |
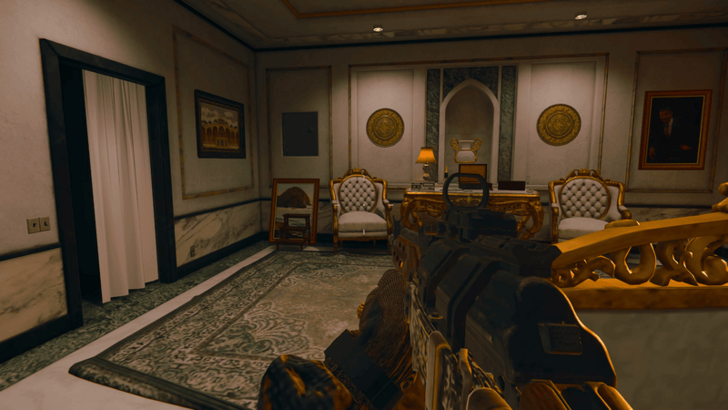 After going up the stairs, you should be able to see the safe and radio immediately (the safe is embedded in the wall). Solve the radio puzzle to get the Iraq safe code for the Cradle safe. |
The Cradle Mission Walkthrough
Emergence Safe Location
The safe in Emergence is located in the Cognitive Research Wing. It will be in a locker room opposite the entrance to the Bathysphere section of the research wing.
| 1 | Go to the Cognitive Research Wing |
|---|---|
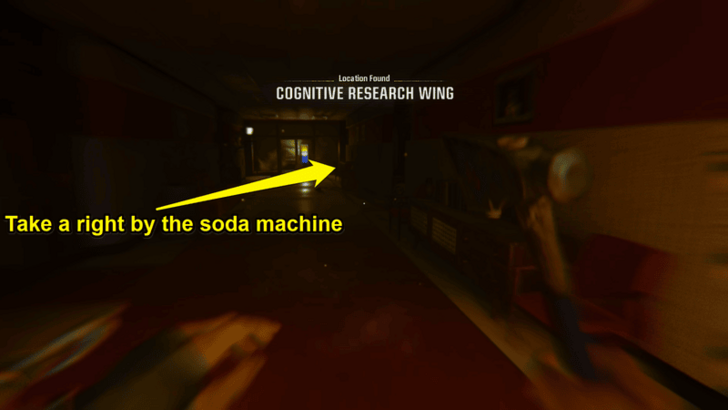 Head to the Cognitive Research Wing and take a right once you reach the soda machine up ahead. You will see a red wall with a black eye on it. Take another right, and you should see a locker room. |
|
| 2 | Enter the Locker Room |
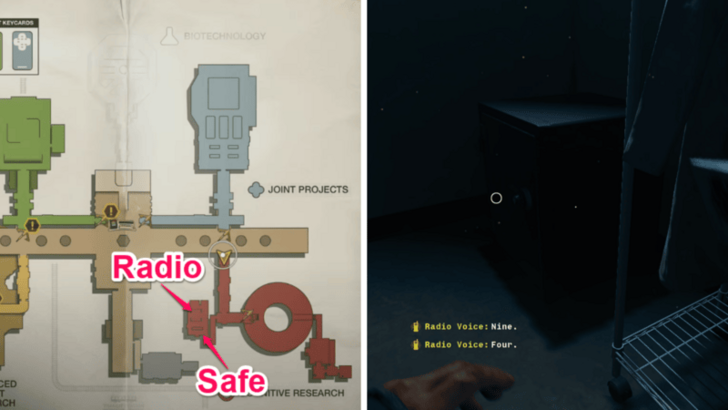 When you enter the locker room, the safe and the radio should be in the same room, not too far apart. Solve the radio puzzle to get the Emergence safe code that opens the safe. |
High Rollers Safe Location
The safe in High Rollers is located in the High Security Area of the casino. You'll gain access to this section of the building once Felix hands the hacked keycard to Sev at the casino bar.
| 1 | Complete the First 3 Parts of the Mission |
|---|---|
| Before you can access the High Security Area, you will first need to complete the first 3 parts of the mission. Take control of Marshall, Case, and Felix, until you reach the point where Felix hacks the keycard that Sev needs to access the High Security Area. | |
| 2 | Reach the High Security Area |
 Once Felix hands off the keycard, you'll switch to piloting Sev. Get her to the entrance of the High Security Area in the casino floor and use the keycard to unlock the door. Once inside, make your way down to the lower floor to reach the Casino Vault. |
|
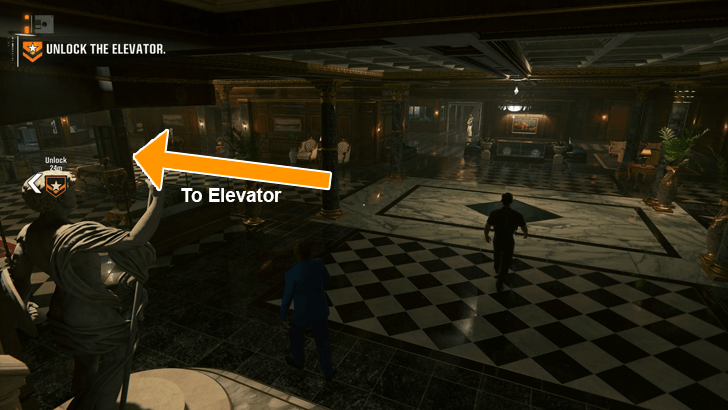
| 3 | Go to the Elevator to Find the Radio |
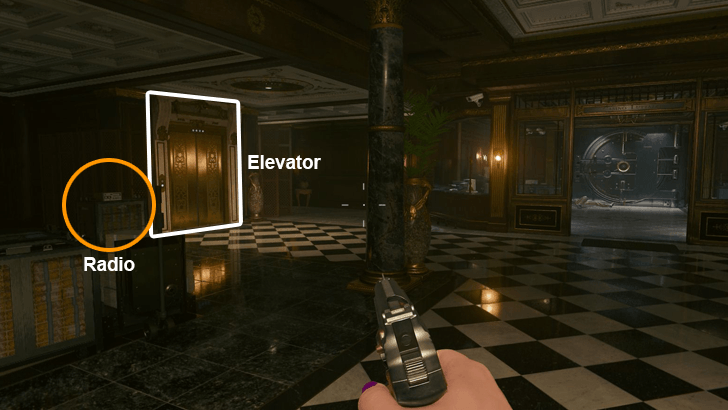 The Radio signal transmitting the safe code will be right next to the elevator of the Vault floor (to its immediate left). Solve it to get the High Rollers safe code needed to unlock the safe. |
|
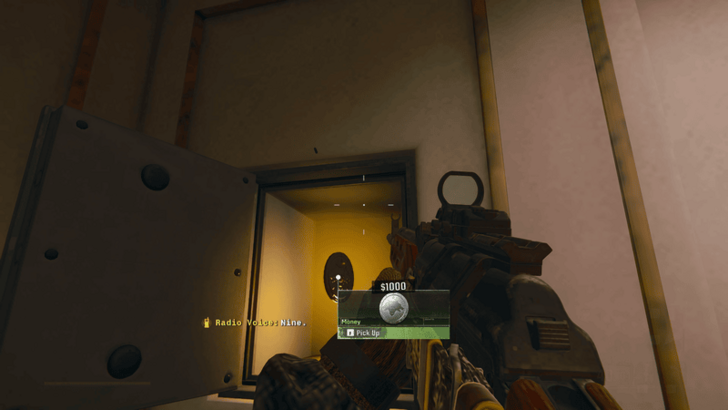
| 4 | Open the Safe to the Right of the Elevator |
 Once you have the High Rollers safe code, head to the right side of the elevator. Tucked away in a secluded corner is the safe. Input the code to open it and get $1000 dollars. |
Ground Control Safe Location
The safe in Ground Control will be in the Departure area of the airport terminal you enter near the start of the mission. Once you enter the actual Departures area of the terminal, you'll find the radio and the safe near the Information counters opposite of where you entered.
| 1 | Reach the Terminal 1 Departure Area |
|---|---|
 Your first order of business is to enter the airport. Once you get past the mortar teams and snipers outside, you'll arrive at the Terminal 1 Departure Area - this is where you'll find the safe. |
|
| 2 | Go to the Departure Area Information Counter |
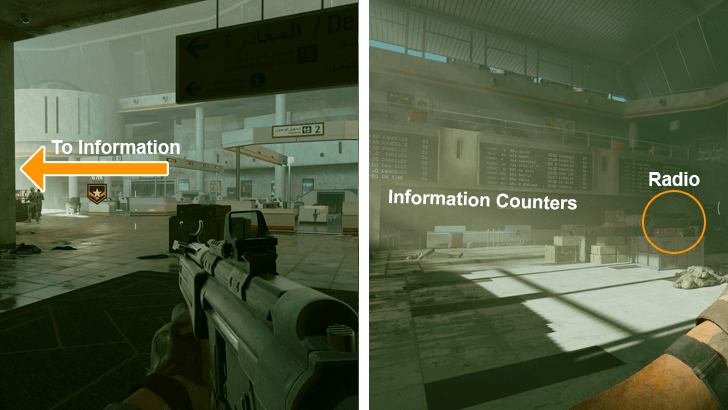 Opposite from where you first enter the Departure Area will be the Information counter of the terminal. Head over there once you've dealt with all of the enemies in the terminal. |
|
| 3 | Solve the Radio Puzzle |
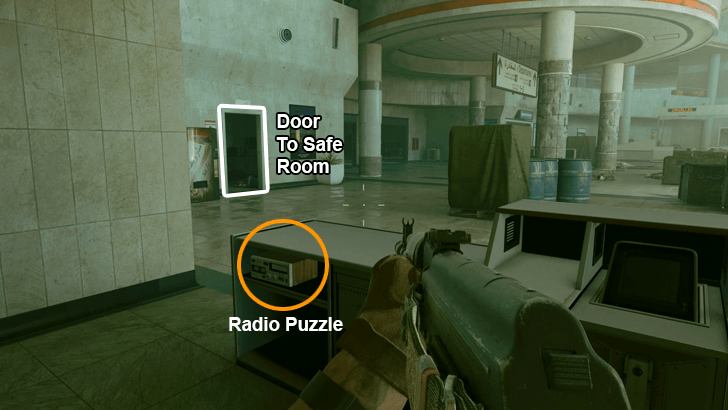 In one of the Information counters will be the Radio that transmits the code to open the safe. Solve it to get the Ground Control safe code. |
|
| 4 | Open the Safe Nearby |
 While facing the radio, look slightly to your left to see an open doorway with a vending machine next to it. Go inside and turn left to the see the safe on the wall. Input the code to open it and get the $1000 dollars inside. |
Under the Radar Safe Location
The safe in Under the Radar will be in 2nd floor of the building next to the Radar of the base. It'll require you to kill a few guards in order to access since the safe will be in a small, fenced-off restricted area.
| 1 | Exit the Tower You Started In |
|---|---|
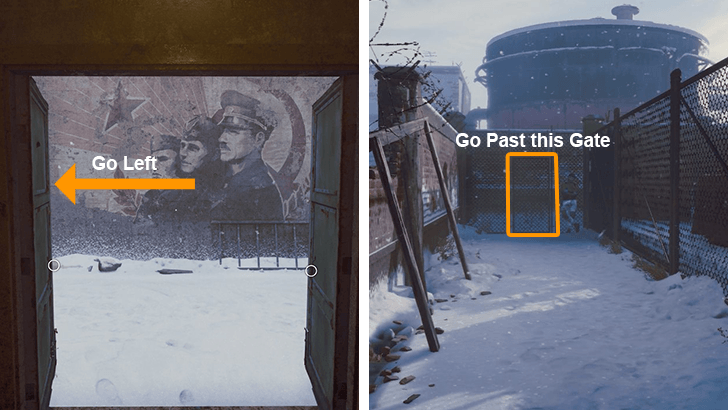 After you finish surveying the base, head down to the base of the tower and lockpick your way out of it. Once the doors are open, go left towards the guard by the chain link gate and pass through it to reach the base proper. |
|
| 2 | Go to the Radar Tower Building |
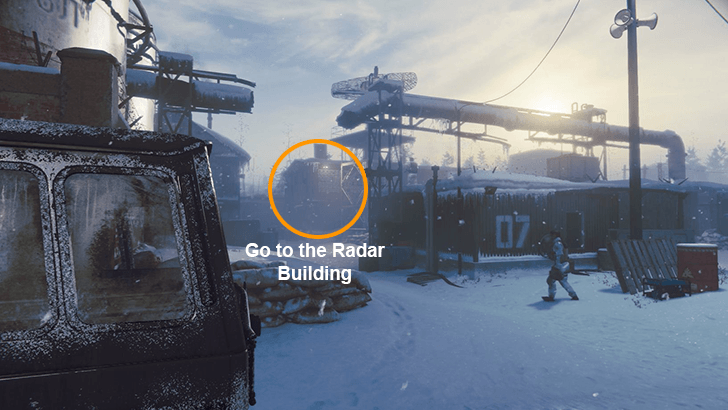 With the base in full view, head towards the Radar Tower. You'll want to enter the two-story building next to it. None of the doors are locked so you're free to enter. |
|
| 3 | Head up to the Second Floor |
 On the first floor will be a guard sleeping on a chair. Ignore him and go up the stairs to reach the safe area. |
|
| 4 | Kill the Guard in Front of the Radio |
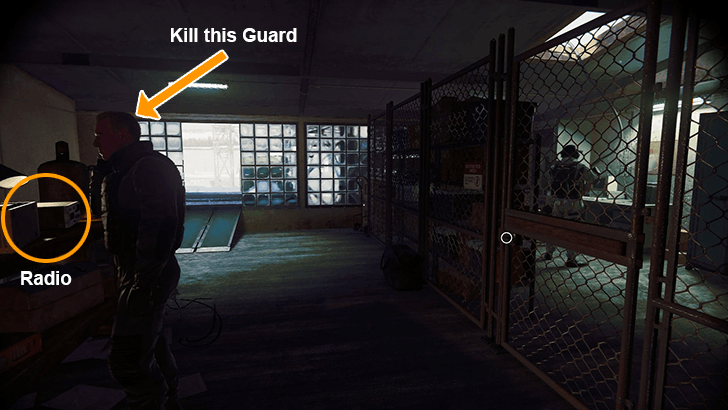 Immediately upon arriving at the top, you'll notice a guard standing in front of a table as well as 2 other guards inside a fenced off area of the floor. Use silent takedown on the guard nearest to you before lockpicking the chain link gate leading to the 2 guards. |
|
| 5 | Kill the Other 2 Guards |
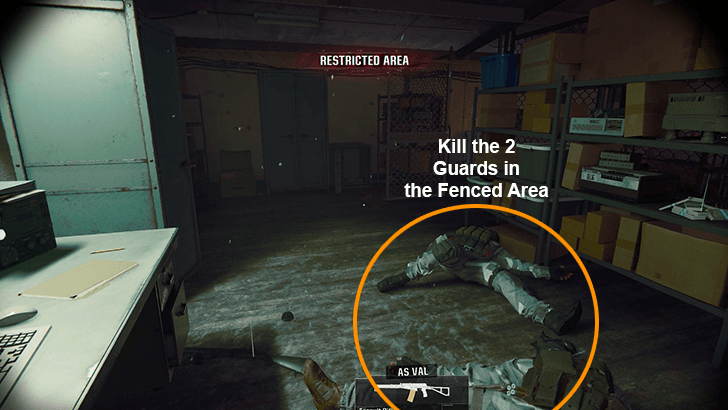 Kill the two guards using Throwing Knives or the Tranquilizer Trap on one of the nearby shelves. |
|
| 6 | Solve the Radio Puzzle |
| With everyone dead, return to where you killed the first guard and interact with the Radio on the table. Solve the radio puzzle to get the recording of the Under the Radar safe code. | |
| 7 | Open the Safe |
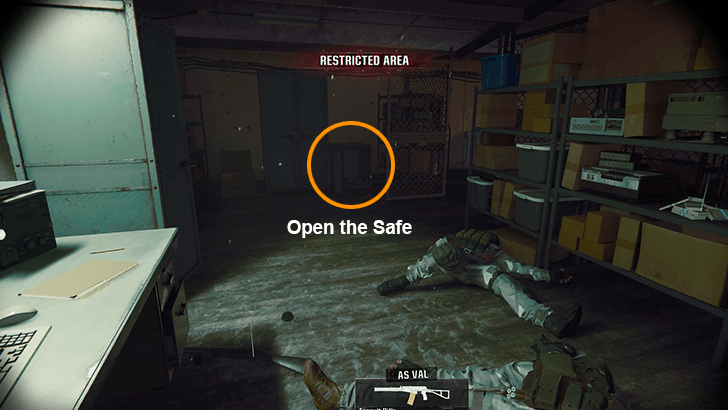 Use the code on the safe to get your $1000 dollars. The safe will be to the right of the chain link gate you picked back in Step 4. |
How to Get Safe Codes
Solve the Radio Signal Puzzle Near Each Safe

You can get each of the campaign safe codes by tuning the radios near a particular safe. Turn the Amplitude and Frequency knobs until the lights next to them turn green to quickly solve the puzzle. If done correctly, a voice on the radio will then tell you the code for the safe.
Note: Codes are randomly generated for each player. This requires you to actually tune the radios and solve the puzzle to get the safe code that unlocks the safe in your save.
All Campaign Safe Rewards
Get a Total of $9,000 Dollars
Each campaign safe will contain $1,000 Dollars. Since there are 9 campaign safes in total, you'll get a max of $9,000 Dollars if you manage to open all the safes in the campaign. This money can be used to purchase Perks and upgrades back at the safehouse.
Campaign Safe Rewards are a One-Time Payout
Unfortunately, campaign safes will only reward you once. If you open the safe of one mission and decide to replay it, the safe will already be open and empty when you return to it.
Safe Cracker Calling Card
| Safe Cracker Calling Card |
|---|
 Open every safe in the campaign. |
Opening all 9 campaign safes is tied to the Safe Cracker Challenge. Once you open all 9 safes, you'll be rewarded with a similarly titled calling card for your efforts.
Black Ops 6 (BO6) Related Guides
Campaign Missions List and Walkthrough
All Campaign Guides
Comment
2  Anonymous over 1 year
Anyone else having an issue where it’s on 8/9 but all safes have been opened?
Author
All Campaign Safe Locations and Codes
Please participate in our site
improvement survey
03/2026
improvement survey
03/2026
Would you assist in
improving Game8's site?
improving Game8's site?

×
We are listening to our users' valuable opinions and discussing how to act on them.
The information collected through this survey will be used for the purpose of improving our services. In addition, the information will only be disclosed a part of a statistic in a format that will not allow identification of personal information.
Begin Survey
Not Now
×
Please rate each item regarding Game8.co's Advertisements.
Amount of Ads
Very Dissatisfied
Somewhat Dissatisfied
Fine
Somewhat Satisfied
Highly Satisfied
Placement of Ads
Timing of Ad Display
Ad Loading Speed
Safeness of Ads
Content of Ads
×
Please rate each item regarding Game8.co's Quality of Articles.
Amount of information
Very Dissatisfied
Somewhat Dissatisfied
Fine
Somewhat Satisfied
Highly Satisfied
Frequency of updates
Speed of new information
Accuracy of articles
Understandibility of articles
Readability of sentences
×
Please rate each item regarding Game8.co's Usability of the Site.
Ease of finding information
Very Dissatisfied
Somewhat Dissatisfied
Fine
Somewhat Satisfied
Highly Satisfied
Loading Speed
Use of Color
Font Size
Visibility of Images
Easy to Understand Layout
×
Please rate each item regarding Game8.co's Message Boards, Comments.
Ease of Writing
Very Dissatisfied
Somewhat Dissatisfied
Fine
Somewhat Satisfied
Highly Satisfied
Readability
Ease in Finding Information
Comment Quality
Comment Quantity
Admin Response
×
Please rate each item regarding Game8.co's Site's new design.
Please rate our site's new design
Very Dissatisfied
Somewhat Dissatisfied
Fine
Somewhat Satisfied
Highly Satisfied
Do you think that the website's design change makes the site easier to use?
Has the new design made it easier for you to find information on the site?
Has the new design improved the overall visual appeal of the site?
How would you rate your overall satisfaction with the new design of the site?
×
How likely are you to recommend Game8 to someone you know?
Very Unlikely
0
1
2
3
4
5
6
7
8
9
10
Very Likely
If you have other opinions regarding potential improvement to the website, please share them with us. We would appreciate your honest opinion.
Note: This is a free response section, so you can proceed without entering anything.
Note: Please be sure not to enter any kind of personal information into your response.
Note: Please be sure not to enter any kind of personal information into your response.
×
Thank You
×
Thank you for participating in our survey! Your answers will help us to improve the quality of our website and services.
We hope you continue to make use of Game8.
We hope you continue to make use of Game8.
Close
Rankings
- We could not find the message board you were looking for.
Gaming News


![Monster Hunter Stories 3 Review [First Impressions] | Simply Rejuvenating](https://img.game8.co/4438641/2a31b7702bd70e78ec8efd24661dacda.jpeg/thumb)
Popular Games

Genshin Impact Walkthrough & Guides Wiki
Honkai: Star Rail Walkthrough & Guides Wiki
Umamusume: Pretty Derby Walkthrough & Guides Wiki
Pokemon Pokopia Walkthrough & Guides Wiki
Resident Evil Requiem (RE9) Walkthrough & Guides Wiki
Monster Hunter Wilds Walkthrough & Guides Wiki
Wuthering Waves Walkthrough & Guides Wiki
Arknights: Endfield Walkthrough & Guides Wiki
Pokemon FireRed and LeafGreen (FRLG) Walkthrough & Guides Wiki
Pokemon TCG Pocket (PTCGP) Strategies & Guides Wiki


Recommended Games
Diablo 4: Vessel of Hatred Walkthrough & Guides Wiki
Cyberpunk 2077: Ultimate Edition Walkthrough & Guides Wiki
Fire Emblem Heroes (FEH) Walkthrough & Guides Wiki
Yu-Gi-Oh! Master Duel Walkthrough & Guides Wiki
Super Smash Bros. Ultimate Walkthrough & Guides Wiki
Pokemon Brilliant Diamond and Shining Pearl (BDSP) Walkthrough & Guides Wiki
Elden Ring Shadow of the Erdtree Walkthrough & Guides Wiki
Monster Hunter World Walkthrough & Guides Wiki
The Legend of Zelda: Tears of the Kingdom Walkthrough & Guides Wiki
Persona 3 Reload Walkthrough & Guides Wiki


All rights reserved
© 2024 Activision Publishing, Inc. ACTIVISION, CALL OF DUTY, CALL OF DUTY LEAGUE, MODERN WARFARE, CALL OF DUTY BLACK OPS, CALL OF DUTY WARZONE, and CALL OF DUTY VANGUARD are trademarks of Activision Publishing, Inc. All other trademarks and trade names are the property of their respective owners.
The copyrights of videos of games used in our content and other intellectual property rights belong to the provider of the game.
The contents we provide on this site were created personally by members of the Game8 editorial department.
We refuse the right to reuse or repost content taken without our permission such as data or images to other sites.
I had this but I never opened safe in the Rook I did all the Puzzles And opened that one last