This survey will take about 1 minute.
Your answers will help us to improve our website.
Call of Duty Black Ops 6 (BO6)
Terminus Easter Egg Walkthrough (Updated)
This is a Terminus easter egg walkthrough for Call of Duty Black Ops 6 (BO6) Zombies. Read on for a full guide of the Terminus Main Quest and learn how to complete the Terminus easter egg.
| Terminus Guides | |
|---|---|
| Easter Egg | Interactive Map |
List of Contents
Terminus Easter Egg Walkthrough
Unlocking Research Office
The first part of the Terminus Easter Egg Main Quest requires you to build a DRI-11 Beamsmasher Wonder Weapon, but the process to do so is quite lengthy. If you've managed to acquire the Beamsmasher randomly via Mystery Box, you can skip the next 17 steps and jump to Releasing Nathan.
| 1 | Restore Facility Power |
|---|---|
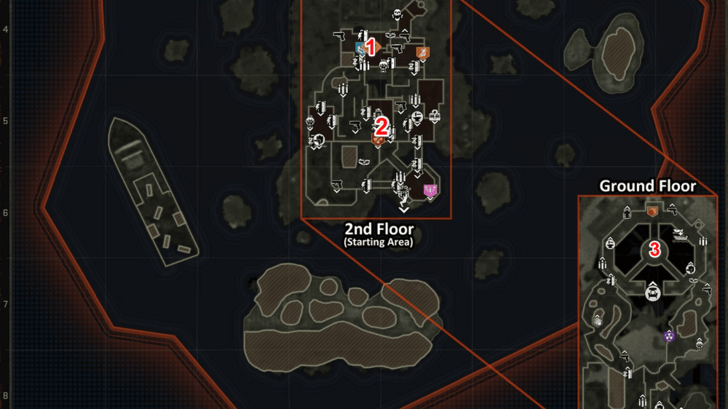 You restore facility power by turning on 3 AMP Generators in the (1) Guard Station, (2) Living Quarters, and (3) Bio Lab. You need to protect the AMP Generator for 30 seconds as it powers up. If you fail to protect it, you'll have to wait for the next round before it cools down and you can try again. |
|
| 2 | Resurface the Inclined Lift |
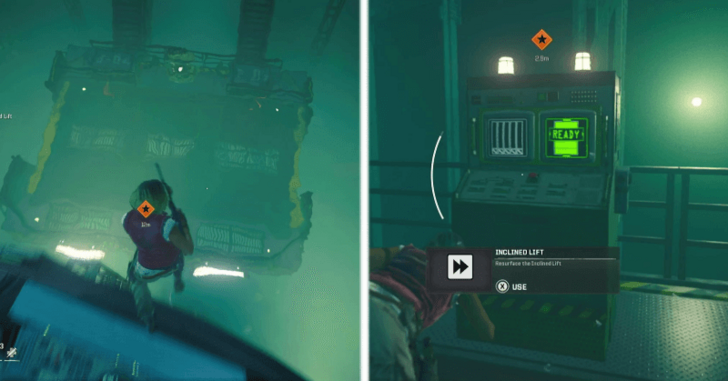 After succesffuly powering the AMP generator in the bio lab, you have to dive towards the submerged inclined lift, then raise it. After raising it above the water, you'll unlock the access to the lift and Terminus' Pack-a-Punch machine. |
|
| 3 | Acquire Dead Wire Ammo Mod |
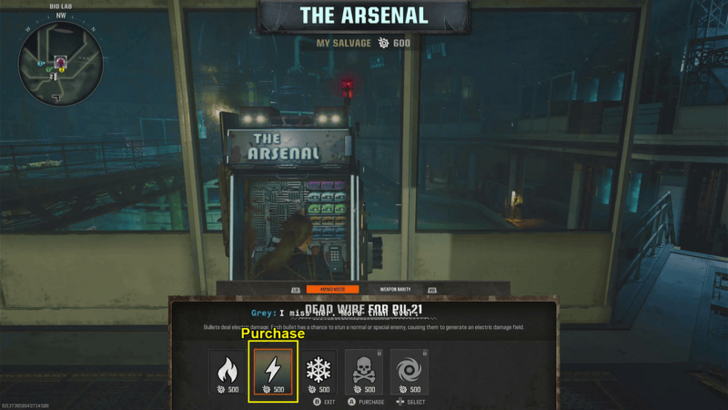 Go to the Arsenal Machine (there's one nearby inside the Bio Lab) and acquire the Dead Wire Ammo Mod for your gun for 500 Salvage. Tip: One of the bosses later on is weak to Dead Wire Ammo Mod, so it'd be good if this was the gun you kept throughout your whole playthrough. |
|
| 4 | Power the 3 Circuit Breakers |
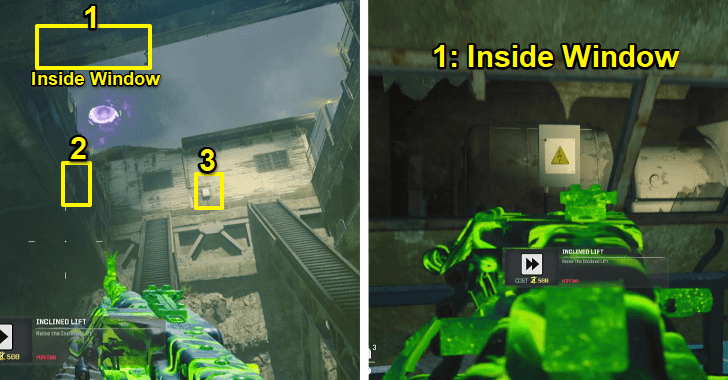 With the Dead Wire Ammo Mod, you need to power 3 Circuit Breakers around the area of the inclined lift. You have to shoot them in order. However, Circuit Breakers #1 and #2 are only visible while the lift is moving. Circuit Breaker #1 is found inside the window when facing north. Circuit Breaker #2 is outside but it's easier to shoot it when the lift is going down since it gets covered by the lift when you're going up. Tip: Also recommended to do the Void Cannon Meteor Easter Egg simultaneously at this point for free Ammo Mods, Equipment, and maybe a Wonder Weapon. |
|
| 5 | Power Circuit Breaker #4 |
 After shooting Circuit Breaker #3, an electrical current should run to Circuit Breaker #4 in the Living Quarters, the room of the 2nd AMP Generator (the room with the Jugger-Nog machine). Shoot it as well. |
|
| 6 | Power Circuit Breaker #5 |
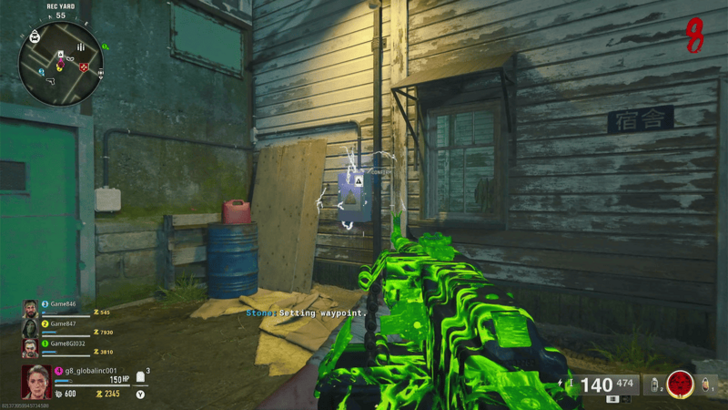 Head out west to the Rec Yard. Shoot the Circuit Breaker #5 on the wall of the Living Quarters in order to open the door to its left. |
|
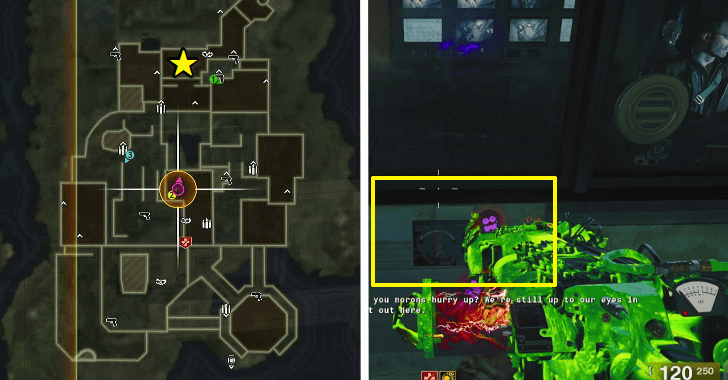
| 7 | Acquire the EMF FOB |
 In the unlocked room, there's a zombie pinned under the machine. Eliminate the zombie to pick up the EMF FOB. |
Solving Research Office Code
| 8 | Find X Coordinates |
|---|---|
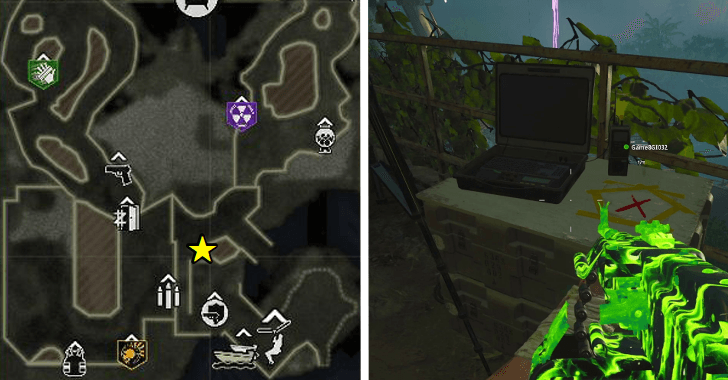 Afterward, head to the Docks below the Sea Tower. You'll find a computer marked with the letter X. Interact with it, even if an interact prompt doesn't appear. A symbol will appear on the screen, but you don't need to memorize that since it will appear again later. |
|
| 9 | Find Y Coordinates |
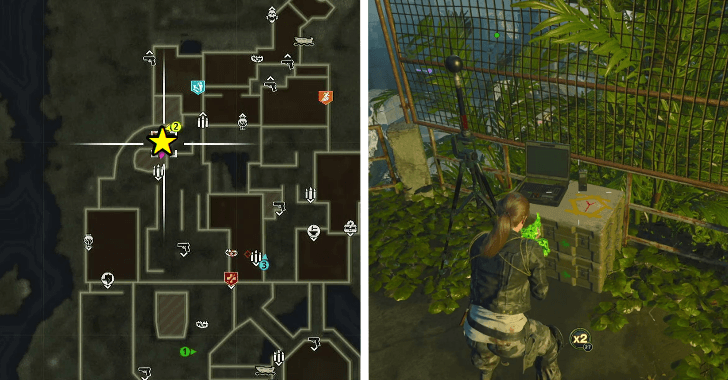 Go to the Storage Area to next find a computer marked with the letter Y. This area is north of the Rec Yard and south of the Interrogation Rooms (the room with the Quick Revive machine in it). Similarly, interact with the computer. |
|
| 10 | Find Z Coordinates |
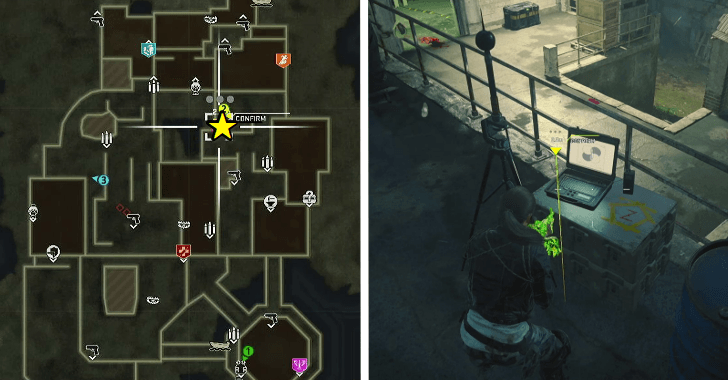 Finally, head to Communications for the computer marked with Z. This is south of the room with the Speed Cola machine. Interact with this computer as well. |
|
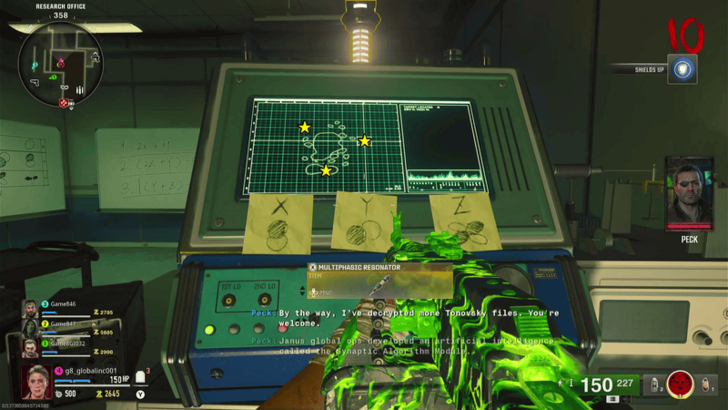
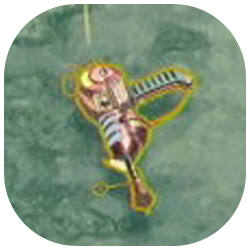
| 11 | Obtain the Multiphasic Resonator |
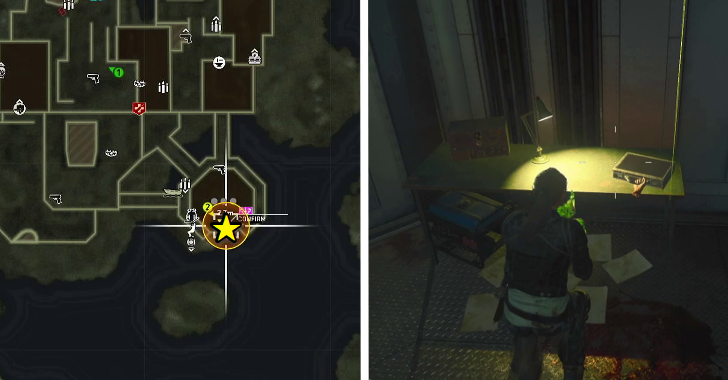 Afterward, head to the Sea Tower and open the case with a severed hand attached to it. Pick up the Multiphasic Resonator inside. You'll be attacked by a bunch of Vermin after. |
|
| 12 | Go Back to Research Office |
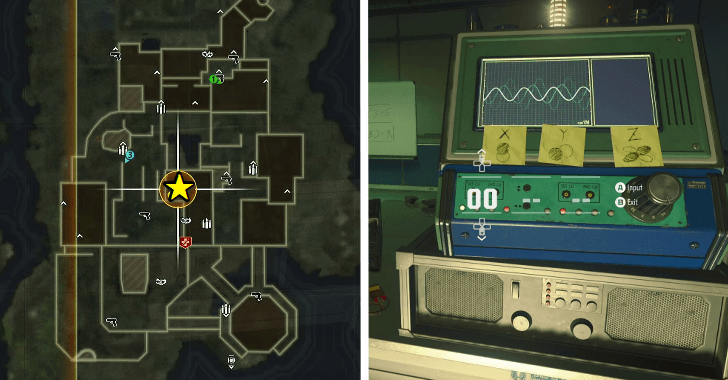 Next, go back to the Research Office with all these parts and interact with the computer. You'll need to input a code. |
|
| 13 | Research Office Code Solution |
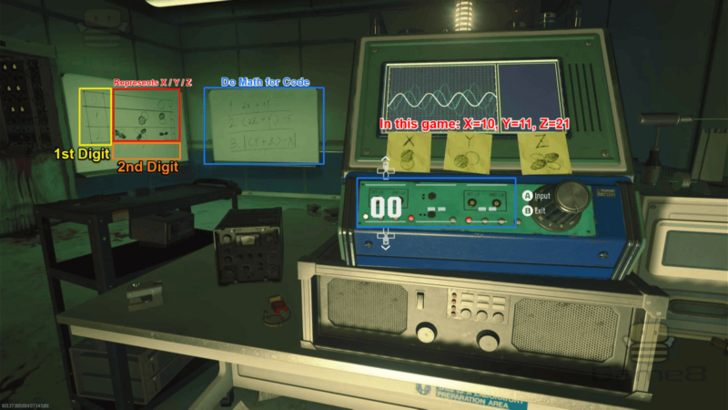 The Research Office code is random every time. To get the 3-number code, you need to do some symbol association and algebra. The post-it notes and the left whiteboard help you determine what number X, Y, and Z correspond to. Simply find the symbol on the whiteboard and determine the number's first digit through the numbers listed vertically and the number's second digit through the numbers listed horizontally at the bottom. (ex. 1st digit = 1, 2nd digit = 0, your number = 10). Once you know what X, Y, and Z are, input them in the formulas on the right side (make sure to follow PEMDAS) to get the 3 numbers that'll make up the code. If you're number is a negative integer, just place the absolute value (same number without the negative). ▶︎ Terminus Math Puzzle Calculator HOT |
|
 Alternatively, if you don't want to do math, you can spend 5,000 Essence to simply be given the number by Peck at the Guard Station. |
Crafting the Beamsmasher
| 14 | Head to the Coordinates on the Islands |
|---|---|
 After inputting the code, you'll have to wait till the next round for the coordinates to lock onto the next area. The computer will lock onto one of the 3 islands outside the main Terminus island: Castle Rock Island, Crab Island, and Temple Island. Wherever it locks onto, head there via boat. Be sure to take the Multiphasic Resonator from on top of the computer before you do. |
|
| 15 | Power Up 3 Island Orbs |
 At the 1st island, you'll encounter an orb. Interact with it even an interact prompt doesn't appear. This will trigger waves of zombies to spawn. Some zombies will be glow the color of the orb. Eliminate these zombies and they'll drop mini-orbs. Pick up the mini-orb (via the interact button) and carry it to the main orb. Do this 3 times and the orb will drop the Multiphasic Resonator for you to pick up. Afterward, repeat the same process on the next 2 islands. |
|
| 16 | Craft the Beamsmasher |
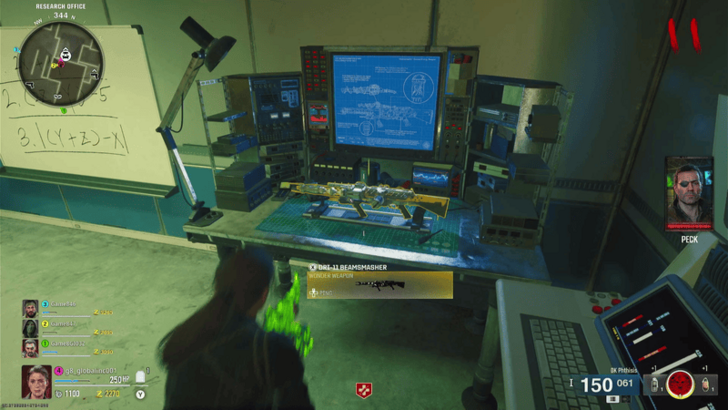 The last orb will drop an item called AMP Munition. You'll use this to craft the DRI-11 Beamsmasher back at the Research Office. In Squads, after crafting the Beamsmasher, make sure not to fully die before doing the next step, since you lose your Wonder Weapons when you die. |
Releasing Nathan
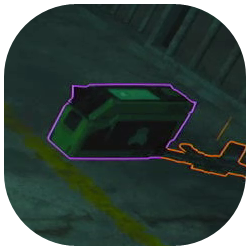
| 17 | Obtain the Hard Drive |
|---|---|
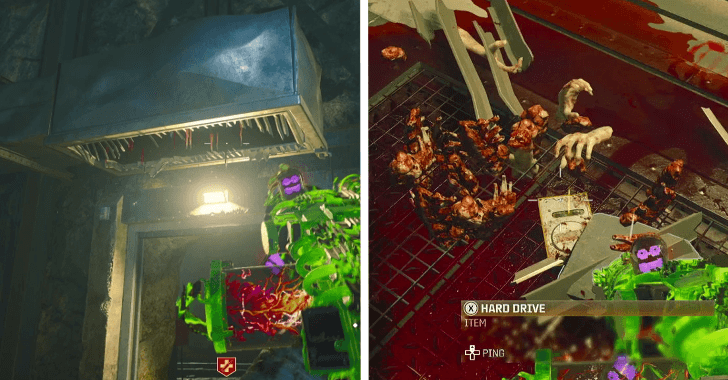 Go down to the Bio Lab and look for the destroyed vent where a Tentacle Trap should be. There are 2 Tentacle Traps in the Bio Lab and 1 in the Living Quarters. Activate the Tentacle Trap, then shoot the tentacles with your Beamsmasher. It will drop a Hard Drive afterward. ▶︎ All Trap Locations |
|
| 18 | Bring the Hard Drive to Peck |
 Bring the Hard Drive to Peck at the Guard Station. He'll tell you to go back to the Bio Lab and talk to Nathan. |
|
| 19 | Identify Nathan's Passcode |
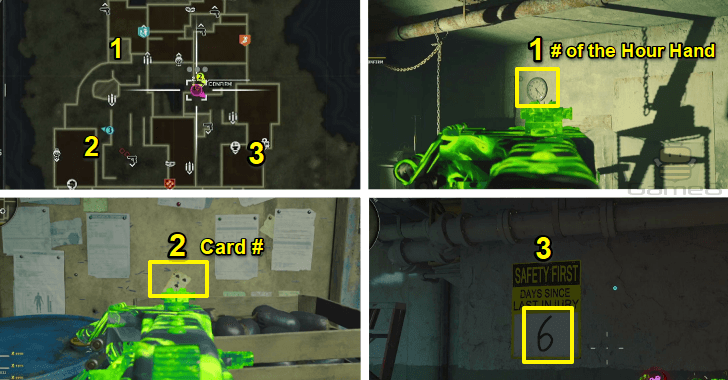 Before heading down to Nathan, it'd be good to already find out what the passcode would be to release him. To find that out, you have to check out the (1) clock in the Interrogation Rooms, (2) the card on the corkboard in the Mess Hall, and (3) Days Since Last Accident poster in Engineering. Those random numbers will be the passcode to release Nathan later on. |
|
| 20 | Talk to Nathan and Input Code |
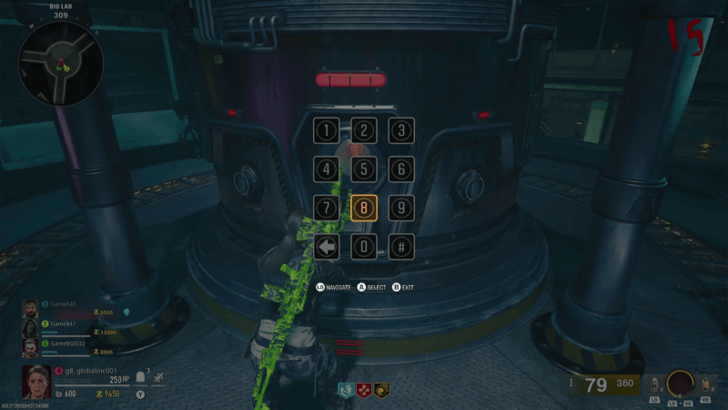 Talk to Nathan in the middle chamber in the Bio Lab. After his dialogue, you can input the numbers you learned above. |
|
| 21 | Release Nathan |
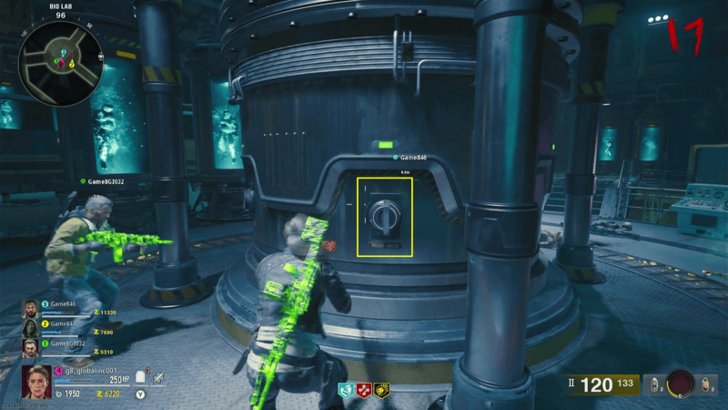 After inputting the code, you have to turn the valves to release him. If you're in a squad, you have to turn the valves simultaneously to release him. ▶︎ Nathan Boss Guide |
|
| 22 | Defeat Nathan |
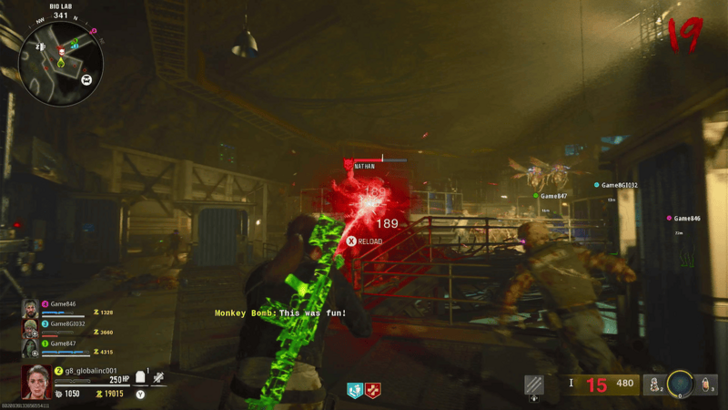 Pack-a-Punch 3 against Nathan shreds, but PaP 2 is also fine. Prepare Cymbal Monkeys, at least 2-Plate armor, and Self-Revives. The most important bit about this fight is that Nathan regenerates health, so don't focus on shooting zombies the whole time. Use the Cymbal Monkeys to lure them away while you focus on defeating Nathan. Other good items to have include Mutant Injection and Dead Wire Ammo Mod, as mentioned previously, since Nathan is weak to it. |
Unlocking the Final Encounter
| 23 | Retrieve the Key Card |
|---|---|
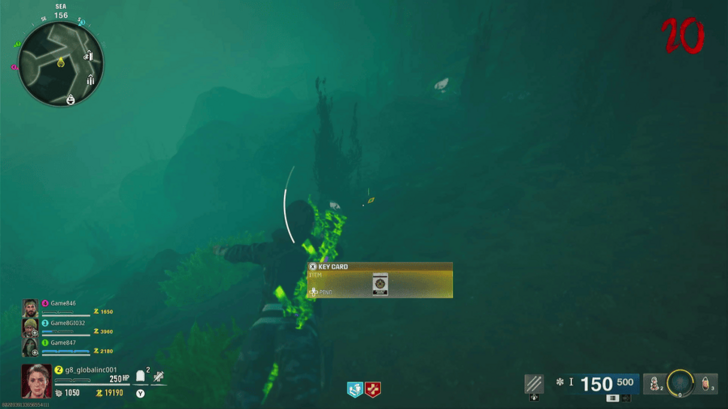 After defeating Nathan and the cutscene, jump into the water after the cutscene and pick up the Key Card somewhere. It's not at a set location every time. |
|
| 24 | Go to the Shipwreck |
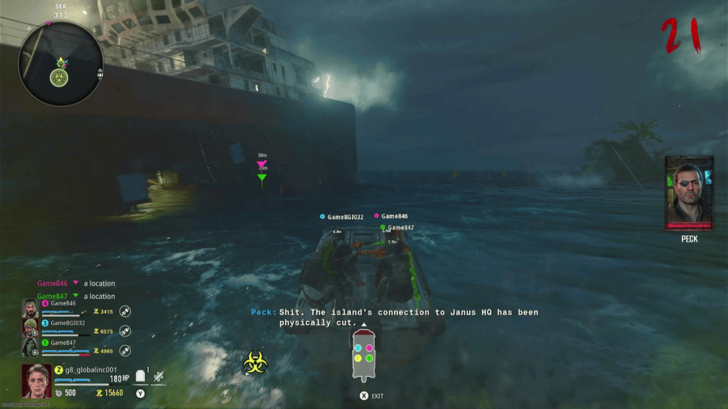 Afterward, head to the Shipwreck and enter the hole in the middle via boat. Be careful not to lure the Tentacle's poison cloud attack. There will also be parasites in the hole in the middle. |
|
| 25 | Enter the Shipwreck |
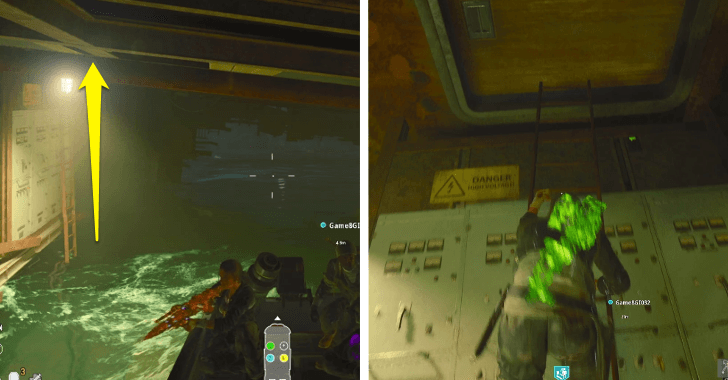 Enter through the hatch with the ladder using the Key Car. |
|
| 26 | Survive Waves of Zombies Inside Shipwreck |
 Interact with the Node Connector, then you'll get locked in the room. You'll need to fight off waves of zombies coming from 4 windows during this event. A Sentry Gun would be good for this, as well as Cymbal Monkeys and Decoy Grenades. |
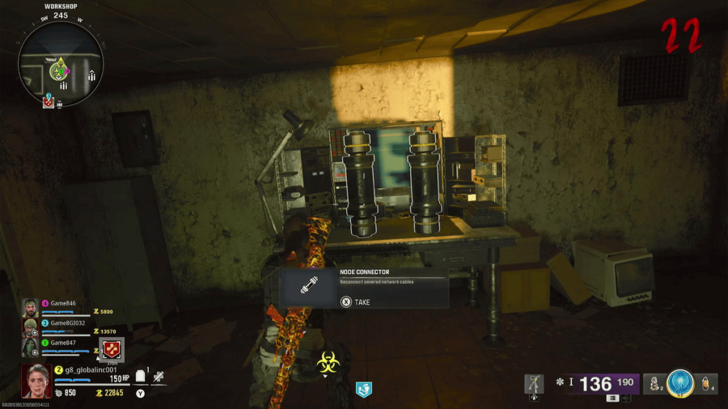
|
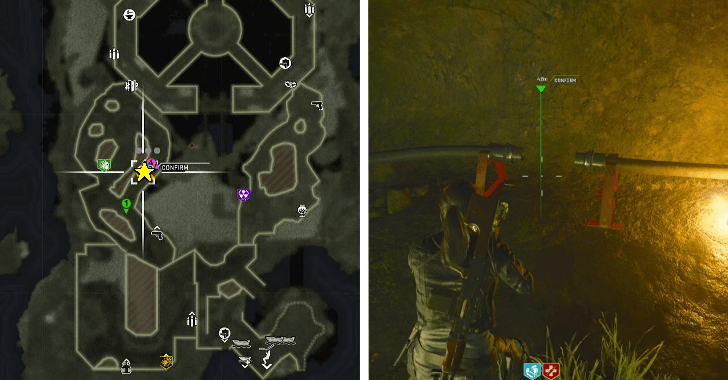
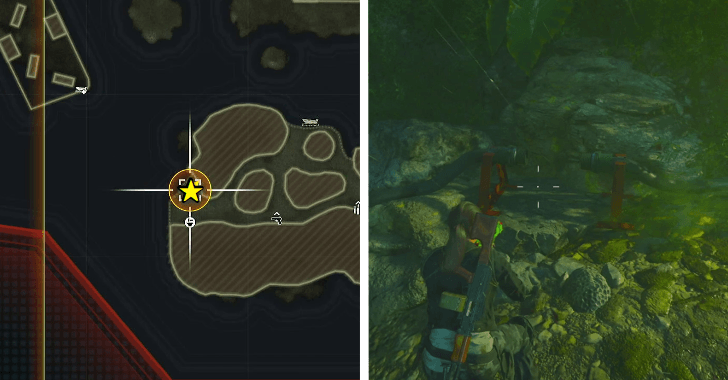
| 27 | Pick Up and Place Node Connectors |
  Afterward, pick up the Node Connector and bring them to the 2 damaged nodes found in the Sea Cave and the Crab Island. However, you can only pick up one at a time, so if you're a Solo, you'll need to go back to the ship after connecting one. |
|
| 28 | Obtain the Hacking Device |
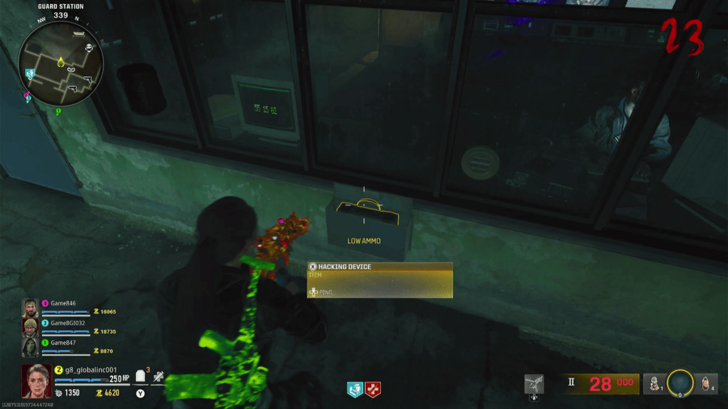 After the dialogue, you'll need to go back to Peck at the Guard Station and get the Hacking Device. |
|
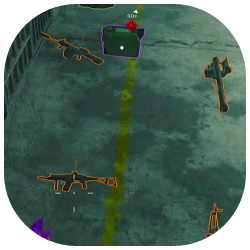
| 29 | Hack Sattelite Buoys (Timed Trial) |
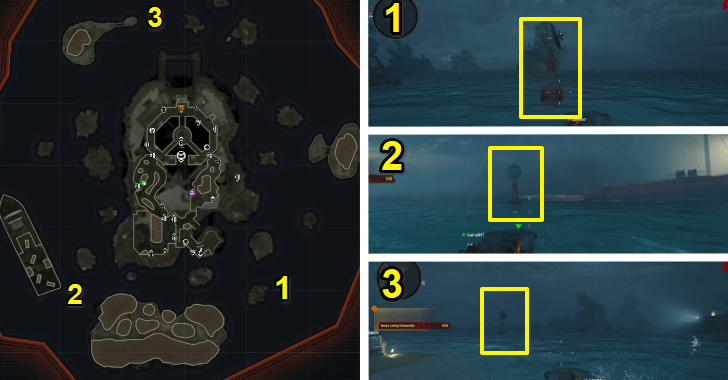 Make sure you're all prepared for this next part, as it's a timed trial. You'll have to find 3 satellite buoys floating; (1) east of Crab Island, (2) at the submerged part of the Ship Wreck, (3) west of Temple Island. Interact with the buoys and hold to begin Hacking Signal. You can either be standing on the boat or in the water in order to interact. You only have 2 minutes to hack the last 2 after finishing the first one. |
|
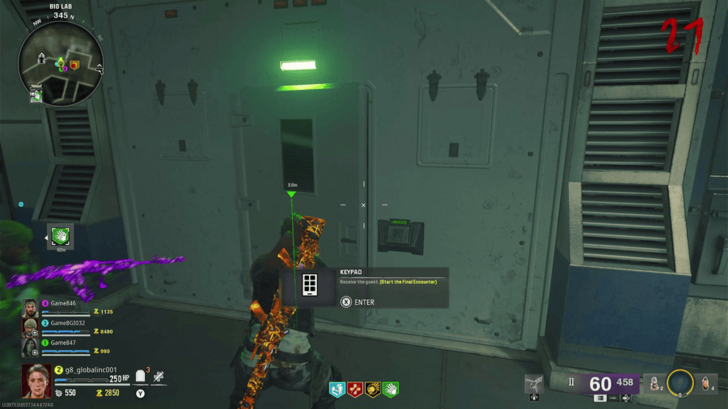
| 30 | Prevent Bomb Detonation at Bio Lab (Fatal Timed Trial) |
 Immediately after you'll have 5 minutes to head back to the Bio Lab and stop the bomb detonation by interacting with the 3 devices. If you fail this, you lose the game. |
|
| 31 | Unlock the Final Encounter |
 If you're successful, the Final Encounter will be available to you in the Bio Lab. This will be a boss fight with the Patient 13 Tentacle monster. |
|
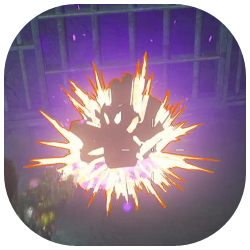
| 32 | Patient 13 Boss Fight |
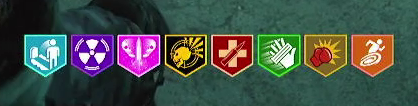
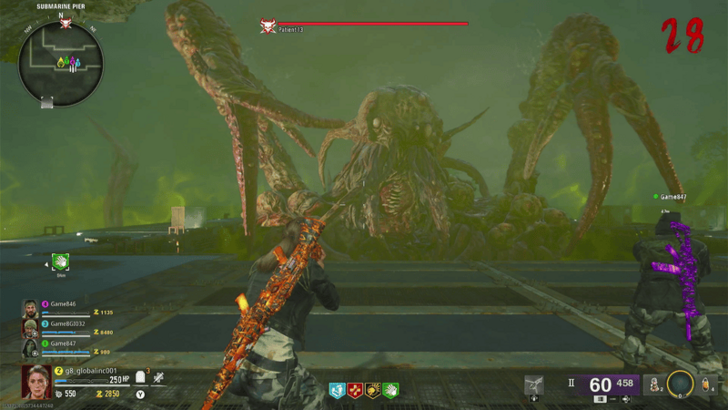 The Final Encounter is extremely challenging, so it's best to go into it with: Pack-a-Punch 3 Gold- or Wonder Weapon-rarity weapons, Chopper Gunner, Self-Revive, at least 10,000 Essence (for ammo refill), any 3 useful GobbleGums, and the following Perks: Jugger-Nog, Stamin-Up, Speed Cola, Deadshot Daiquiri, and Quick Revive (if Squads). ▶︎ Patient 13 Boss Fight Guide |
Terminus Easter Egg Rewards
| Rewards | ||
|---|---|---|
 Trophy Collector Maya Operator Skin |
 No Mo' Modi Achievement |
5,000 XP |
 Terminus Quest Complete (Standard) Calling Card |
||
 Terminus Quest Complete (Early) Calling Card (if you completed the Terminus Easter Egg prior to Guided Mode's release) |
||
| If You Choose "Continue" | ||
 Wonder Weapons |
 Random Legendary Weapons |
 Aetherium Crystals (Pack-a-Punch 1, 2, or 3) |
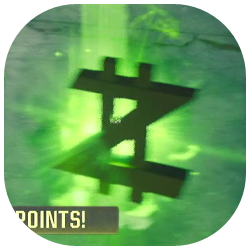 Bonus Points Power-Up |
 Random Ammo Mods |
 Salvage |
 Random Aether Tool Random Aether Tool |
 All Perks Acquired |
|
Black Ops 6 (BO6) Related Guides

Zombies Guide: Everything You Need to Know
All Zombies Mode Guides
Zombies Easter Eggs
Author
Terminus Easter Egg Walkthrough (Updated)
Please participate in our site
improvement survey
03/2026
improvement survey
03/2026
Would you assist in
improving Game8's site?
improving Game8's site?

×
We are listening to our users' valuable opinions and discussing how to act on them.
The information collected through this survey will be used for the purpose of improving our services. In addition, the information will only be disclosed a part of a statistic in a format that will not allow identification of personal information.
Begin Survey
Not Now
×
Please rate each item regarding Game8.co's Advertisements.
Amount of Ads
Very Dissatisfied
Somewhat Dissatisfied
Fine
Somewhat Satisfied
Highly Satisfied
Placement of Ads
Timing of Ad Display
Ad Loading Speed
Safeness of Ads
Content of Ads
×
Please rate each item regarding Game8.co's Quality of Articles.
Amount of information
Very Dissatisfied
Somewhat Dissatisfied
Fine
Somewhat Satisfied
Highly Satisfied
Frequency of updates
Speed of new information
Accuracy of articles
Understandibility of articles
Readability of sentences
×
Please rate each item regarding Game8.co's Usability of the Site.
Ease of finding information
Very Dissatisfied
Somewhat Dissatisfied
Fine
Somewhat Satisfied
Highly Satisfied
Loading Speed
Use of Color
Font Size
Visibility of Images
Easy to Understand Layout
×
Please rate each item regarding Game8.co's Message Boards, Comments.
Ease of Writing
Very Dissatisfied
Somewhat Dissatisfied
Fine
Somewhat Satisfied
Highly Satisfied
Readability
Ease in Finding Information
Comment Quality
Comment Quantity
Admin Response
×
Please rate each item regarding Game8.co's Site's new design.
Please rate our site's new design
Very Dissatisfied
Somewhat Dissatisfied
Fine
Somewhat Satisfied
Highly Satisfied
Do you think that the website's design change makes the site easier to use?
Has the new design made it easier for you to find information on the site?
Has the new design improved the overall visual appeal of the site?
How would you rate your overall satisfaction with the new design of the site?
×
How likely are you to recommend Game8 to someone you know?
Very Unlikely
0
1
2
3
4
5
6
7
8
9
10
Very Likely
If you have other opinions regarding potential improvement to the website, please share them with us. We would appreciate your honest opinion.
Note: This is a free response section, so you can proceed without entering anything.
Note: Please be sure not to enter any kind of personal information into your response.
Note: Please be sure not to enter any kind of personal information into your response.
×
Thank You
×
Thank you for participating in our survey! Your answers will help us to improve the quality of our website and services.
We hope you continue to make use of Game8.
We hope you continue to make use of Game8.
Close
Rankings
- We could not find the message board you were looking for.
Gaming News


![Monster Hunter Stories 3 Review [First Impressions] | Simply Rejuvenating](https://img.game8.co/4438641/2a31b7702bd70e78ec8efd24661dacda.jpeg/thumb)
Popular Games

Genshin Impact Walkthrough & Guides Wiki
Honkai: Star Rail Walkthrough & Guides Wiki
Umamusume: Pretty Derby Walkthrough & Guides Wiki
Pokemon Pokopia Walkthrough & Guides Wiki
Resident Evil Requiem (RE9) Walkthrough & Guides Wiki
Monster Hunter Wilds Walkthrough & Guides Wiki
Wuthering Waves Walkthrough & Guides Wiki
Arknights: Endfield Walkthrough & Guides Wiki
Pokemon FireRed and LeafGreen (FRLG) Walkthrough & Guides Wiki
Pokemon TCG Pocket (PTCGP) Strategies & Guides Wiki


Recommended Games
Diablo 4: Vessel of Hatred Walkthrough & Guides Wiki
Cyberpunk 2077: Ultimate Edition Walkthrough & Guides Wiki
Fire Emblem Heroes (FEH) Walkthrough & Guides Wiki
Yu-Gi-Oh! Master Duel Walkthrough & Guides Wiki
Super Smash Bros. Ultimate Walkthrough & Guides Wiki
Pokemon Brilliant Diamond and Shining Pearl (BDSP) Walkthrough & Guides Wiki
Elden Ring Shadow of the Erdtree Walkthrough & Guides Wiki
Monster Hunter World Walkthrough & Guides Wiki
The Legend of Zelda: Tears of the Kingdom Walkthrough & Guides Wiki
Persona 3 Reload Walkthrough & Guides Wiki


All rights reserved
© 2024 Activision Publishing, Inc. ACTIVISION, CALL OF DUTY, CALL OF DUTY LEAGUE, MODERN WARFARE, CALL OF DUTY BLACK OPS, CALL OF DUTY WARZONE, and CALL OF DUTY VANGUARD are trademarks of Activision Publishing, Inc. All other trademarks and trade names are the property of their respective owners.
The copyrights of videos of games used in our content and other intellectual property rights belong to the provider of the game.
The contents we provide on this site were created personally by members of the Game8 editorial department.
We refuse the right to reuse or repost content taken without our permission such as data or images to other sites.
Just had a go at the Easter Egg, on the Node Connector step, Crab Island was already completed, the Nodes I had to connect were under the Tower (Elemental Pop) and the Cave.