Liberty Falls Easter Egg Walkthrough (Updated)

This is a Liberty Falls main quest easter egg walkthrough Call of Duty Black Ops 6 (BO6) Zombies. Read on for a full guide of the Liberty Falls main quest, the Bye-Bye Dark Aether achievement, and find out the Liberty Falls easter egg rewards and side quests that help the main quest.
| Liberty Falls Guides | |
|---|---|
| Easter Egg | Interactive Map |
List of Contents
Liberty Falls Main Quest Easter Egg Walkthrough
Obtain the Jet Gun (Thrustodyne M23)
The first part of the Liberty Falls Easter Egg requires you to have a Thrustodyne M23. If you happen to randomly obtain the Thrustodyne M23 from the Mystery Box, you can skip the crafting process, but make sure to do the door unlocks and get the Perks, as they will help you navigate and get stronger.
| 1 | Farm Essence at the Start |
|---|---|
 You must stay at the spawn area for 3-4 rounds, as it will help you get enough Essence to unlock doors. You can also get the Double Points by shooting the support beam of the Water Tank from a distance to increase the amount of Essence you can get. Open the door on the second floor of the Motel where you can craft the Thrustodyne M23 during those rounds. It will help you save time and earn more Essence by killing the zombies coming out. |
|
| 2 | Unlock the Bowling Alley |
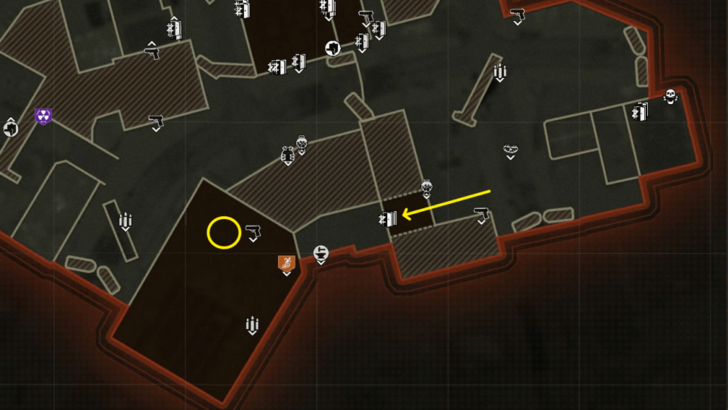 Unlock Bowling Alley once you have enough Essence and get the Stamin-Up Perk. If you're using the Sally and Forth weapon, it's best to save the Essence to buy the PhD Flopper on the staircase going to the church instead of the Stamin-Up. You can stay for 1-2 rounds to farm enough Essence to unlock the door to the West Main Street and the church. You can also do the Pool Table Easter Egg to get additional 100 Essence. |
|
| 3 | Collect the Toolshed Key |
 From the Bowling Alley, head over to the Church's Cemetery to get the Toolshed Key from the Groundskeeper zombie. You should be able to get enough Essence to reach the cemetery on Round 6. You can also shoot the Insta Kill Powerup on the Church's roof to kill zombies with one shot while you're there. |
|
| 4 | Collect the Handbrake |
 Farm Essence on Round 7 and 8 and unlock the Washington Ave. from the church. Head to the Groundkeeper's Yard and unlock the Toolshed using the Toolshed Key near the Crafting Table. Grab the Handbrake on the table once it's open. |
|
| 5 | Collect the Water Valve |
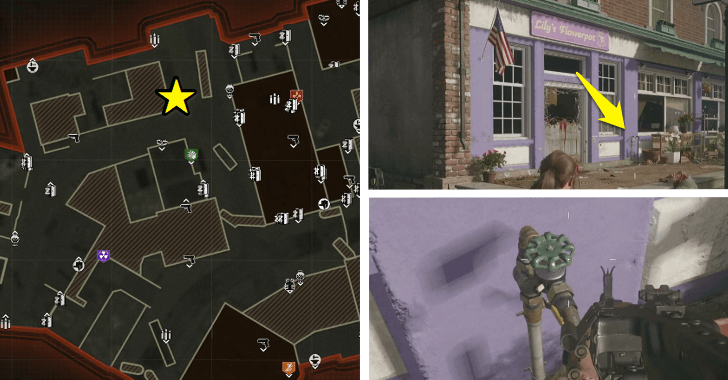 Go to Lily's Flower Shop down the road and grab the Water Valve. You will need it to get the Water Pressure Gauge from the Bowling Alley. Get a Speed Cola on the opposite side before you head back to the Bowling Alley. |
|
| 6 | Collect the Water Pressure Gauge |
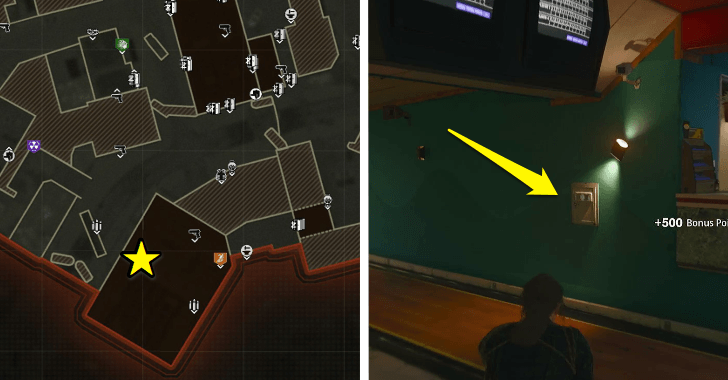 You can unlock the Bank to reach the Bowling Alley quickly from Washington Ave. if you have extra Essence. If not, backtrack your way to the Bowling Alley. Once there, melee the Water Pressure Panel and place the Water Valve to it to start applying pressure. Press and hold the valve to fill the Water Pressure Bar until it's fully complete. If you're in a squad, protect the player doing it as they won't be able to shoot. But if you're playing solo, you'll have to play in between rounds to complete it. Try to finish it before Round 11 to avoid encountering a Mangler inside. |
|
| 7 | Go Back to Spawn Area |
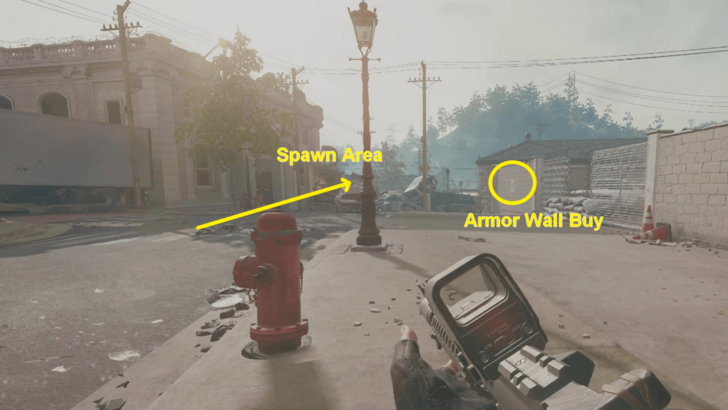 Go back to spawn from the West Main Street to reach the Radio House in Riverside. Upgrade your Armor from the Armor Wall Buy before going back to spawn. Stay at the spawn until Round 11 and wait for a Mangler to come out. |
|
| 8 | Unlock the Radio House |
 A Mangler will spawn at Round 11, and you can lure it on the Radio House to hit and destroy the door. If you accidentally killed the Mangler, you can craft a Mangler Cannon or Mutant Injection to destroy the door of the Radio House. Kill the Mangler and other zombies before going in if you're solo to avoid getting trapped. |
|
| 9 | Collect the Electrical Wires |
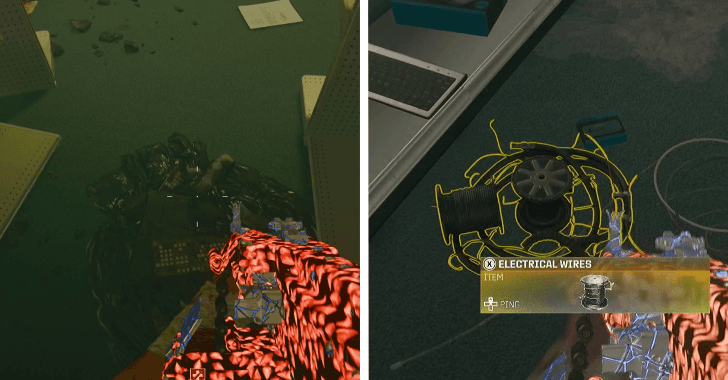 Collect the Electrical Wires hiding from one of the junk piles inside. The position of the junk piles and the Electrical Wires change each match so you will have to check them one by one. After that, go behind the Comic Store and shoot the Bonus Points on top of an Air Condition's back for extra Essence. |
|
| 10 | Craft the Thrustodyne M23 |
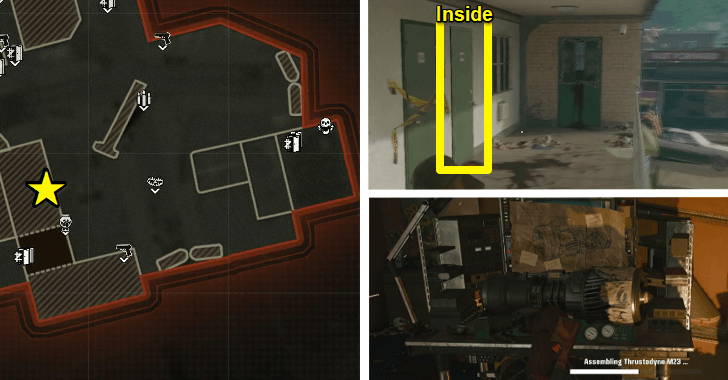 Go back to the Motel on the second floor to craft the Thrustodyne M23. Try to do this after or before a round, so you won't need to worry about getting stuck inside. After crafting, head outside and get the Aetherella Figure on the Motel's sign on the right side. This is optional but it can help you with the Final Encounter later on. |
Craft the L.T.G.
| 11 | Unlock Comic Store and Get the L.T.G. Part |
|---|---|
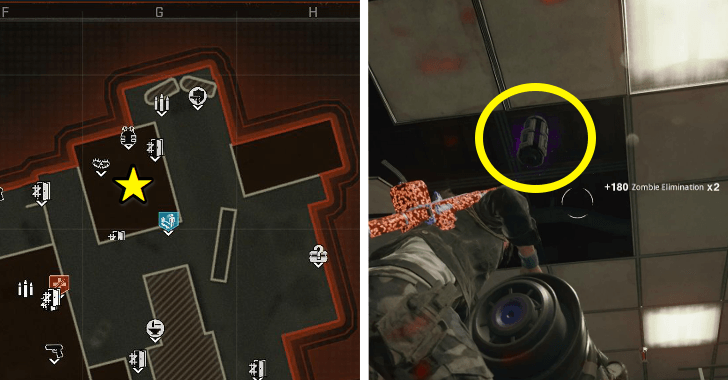 Go back to the Riverside to unlock Olly's comic book store. Use the Thrustodyne M23 and collect the L.T.G. part inside the comic book store. The part is inside the ceiling above the counter. While you're inside the store, make sure to grab the four Aetherella Figures before you leave. |
|
| 12 | Get the Second L.T.G. Part in the Barber Shop |
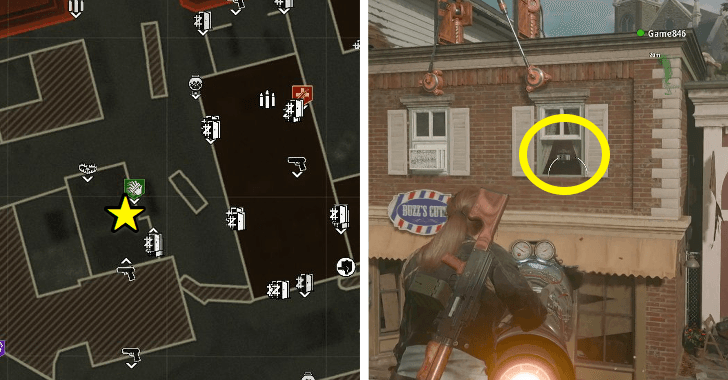 Unlock the staircase leading to Washington Ave. from the comic store. Collect the part floating inside the barber shop's 2nd floor on Washington Ave. You'll need to jump from the roof of the barber shop to the truck to get an angle on it. This is a good part to get a Jugger-Nog from the bank before continuing with the Easter Egg. |
|
| 13 | Get the Third L.T.G. Part in the Church |
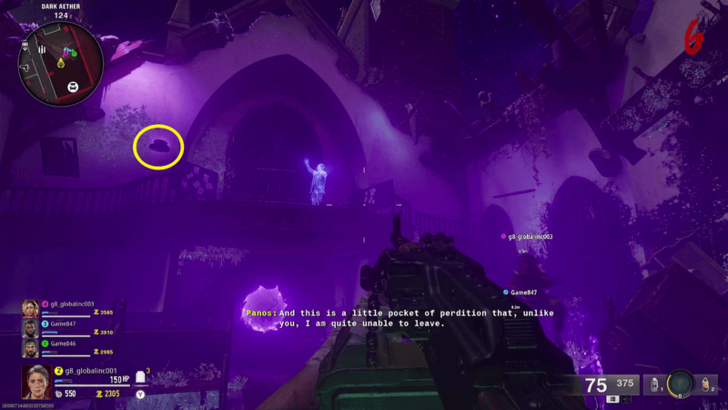 Head back to the Church an interact with the SDG Generator inside to get the last L.T.G. part. Grab the last part near Panos after interacting with the generator. You can start Pack-A-Punching before or during this part and do the Raining Zombies Easter Egg for an Aether Tool to increase your weapon's firepower. Additionally, you can use the Arsenal Machine outside of the church to upgrade the rarity of the weapon or buy a Mutant Injection if you have spare Salvage. |
|
| 14 | Craft the L.T.G. |
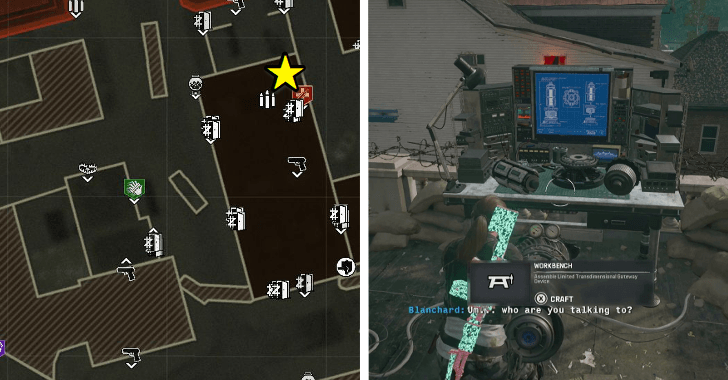 After getting the upgrades, unlock the Bank's Roof using the Zipline from the Church or the Barber Shop. Craft the L.T.G. on the left corner once you get to the roof. You can also unlock the path to the Ice Cream Shop's roof afterward. Unlocking it will allow you to save time later when doing the Light Particles Projector objective. If there are a lot of zombies, you can shoot the Nuke inside the bank to clear the area. Try to complete this before Round 15 to make it a little bit easier for the next steps. |
Fill the 1st Dark Aether Container (Cemetery L.T.G.)
| 15 | Collect an Aether Cannister |
|---|---|
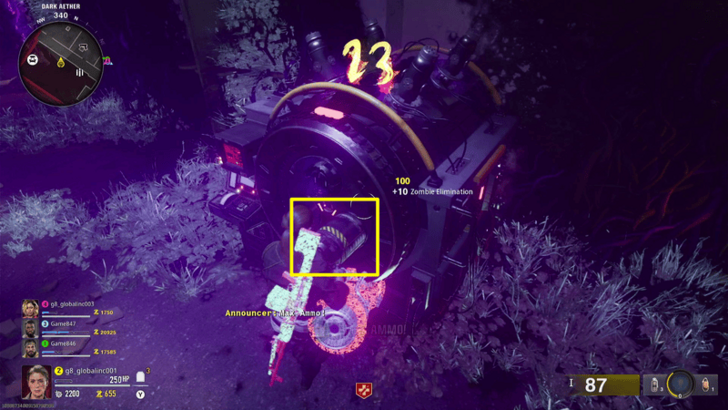 Return to the church and pick up an Aether Cannister at the SDG Generator. Interact with the cannister that's slightly popping out of the generator. Grabbing it will make you unable to sprint, but you can always drop it if you're getting surrounded. |
|
| 16 | Ready the Dark Aether Trap |
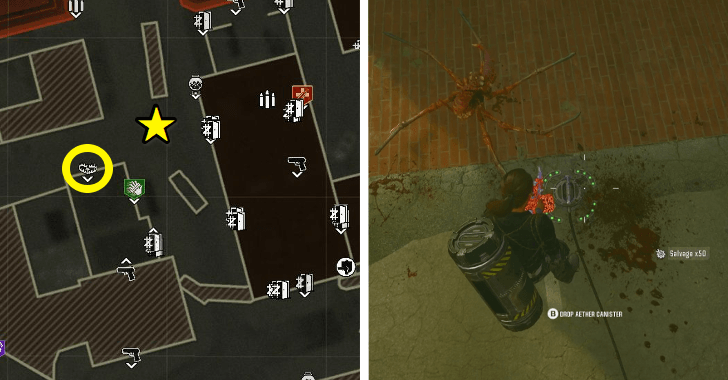 Bring the Aether Cannister to the Dark Aether Field Generator (trap) closest to the Church on Washington Ave. Just drop it directly on the trap. This is to ready it for later, as you won't be able to sprint while carrying the Aether Cannister. |
|
| 17 | Activate the L.T.G. at the Cemetery |
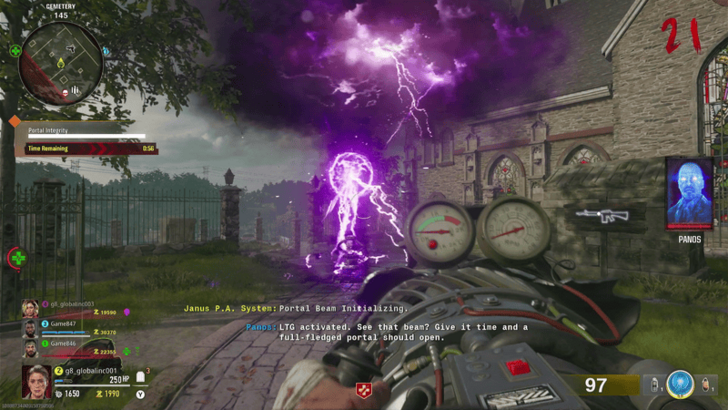 Place the L.T.G. under the small, purple lightning storm at the Cemetery. Protect it for 1 minute and it will spawn an elite zombie afterward. The Thrustodyne M23 will be a good weapon to use here to clear out the zombies quickly and prevent them from reaching the L.T.G. |
|
| 18 | Trap the Dark Aether Elite |
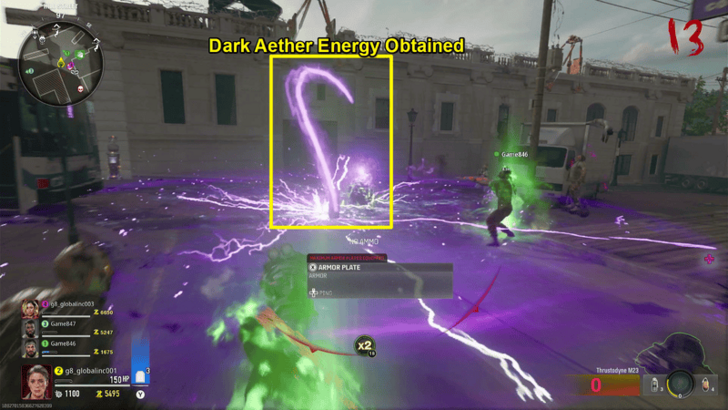 Lure the Elite Zombie to the Dark Aether Trap on Washington Ave. Weaken the Elite Zombie until it glows purple. Activate the Dark Aether Field Generator trap and make sure the Elite Zombie is eliminated in the trap. |
|
| 19 | Return the Aether Cannister |
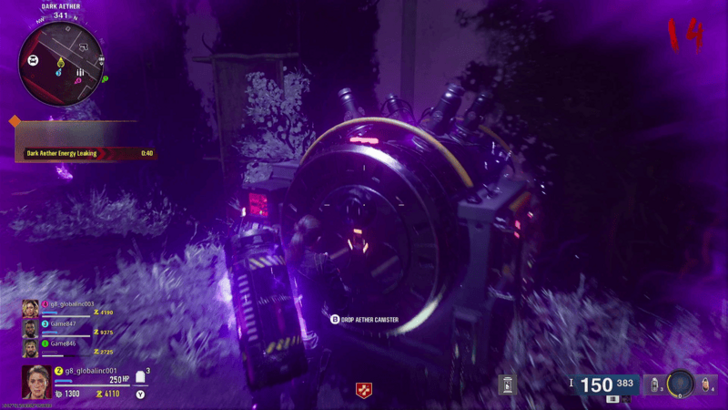 Bring the Aether Cannister, now filled with energy, back to the SDG Generator in the church. You have 1 minute and 30 seconds to do so. Try to leave one zombie alive to make it easier for you to return to the church and the generator. |
|
| Duplicate the Cannister (Optional) | |
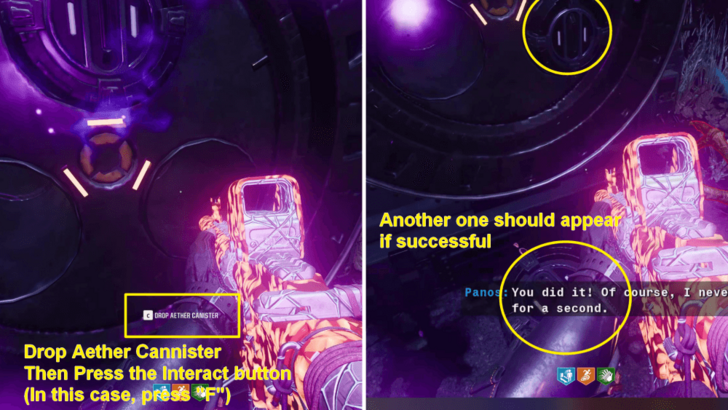 You can try to duplicate the Cannister before placing it inside the generator. To do it, press the Drop Aether Cannister button then press the interact button quickly. Doing so will allow you to skip several objectives and start the Final Encounter immediately. |
|
| 20 | Collect the Strauss Counter |
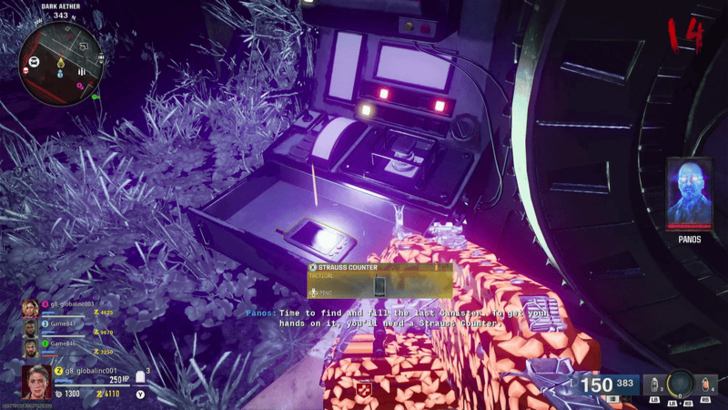 A Strauss Counter will come out of the SDG Generator after delivering the cannister. It will go to your Tactical Equipment Slot, dropping your currently equipped Tactical Equipment. Before moving out, grab the L.T.G. from the cemetery as you will need it for the next cannister. |
Strauss Counter Walkthrough
If you've successfully performed the Cannister Duplication Glitch, you can skip this part until Step 26 and prepare for the Final Encounter. You can still get all the remaining Aetherella Figures to help you with the Final Encounter.
You can also farm Essence or Salvage on the succeeding rounds to get your weapon to Pack-A-Punch III, Epic or Legendary Rarity, and obtain the Perks you want on Round 25.
| 21 | Activate 3 Projectors |
|---|---|
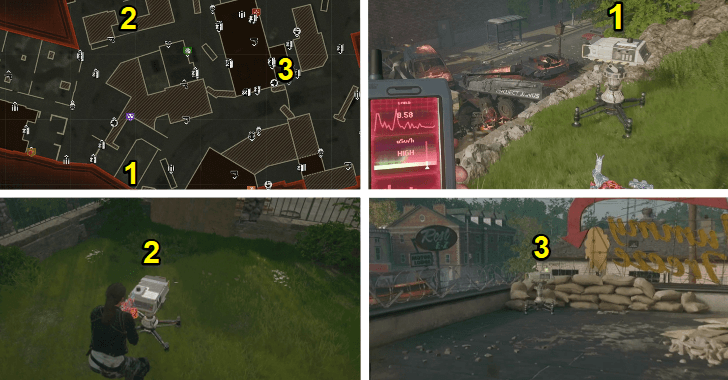 Using the Strauss Counter, head to the 3 projectors; (1) in front of the bowling alley, (2) near the groundskeeper's toolshed, and (3) on the Ice Cream Shop's roof. Try to do this while leaving one Zombie alive to navigate around the map safely. Be sure to grab the Aetherella Figure on the Bowling Alley sign, on the roof next to the Ice Cream Shop's roof, and the left side of the Flower Shop while doing this. This is to save time and avoid running around the map again to collect them. |
|
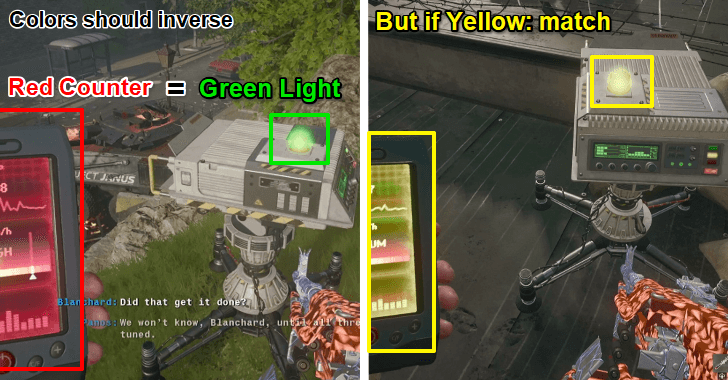 You have to activate the projectors and set the lights to a certain color. The colors are different for every playthrough. Pull out the Strauss Counter. If the counter is red, set the projector to green. If the counter is green, set the projector to red. If the counter is yellow, set the projector to yellow. |
Fill the 2nd Dark Aether Container (Riverside L.T.G.)
| 22 | Ready Another Aether Cannister |
|---|---|
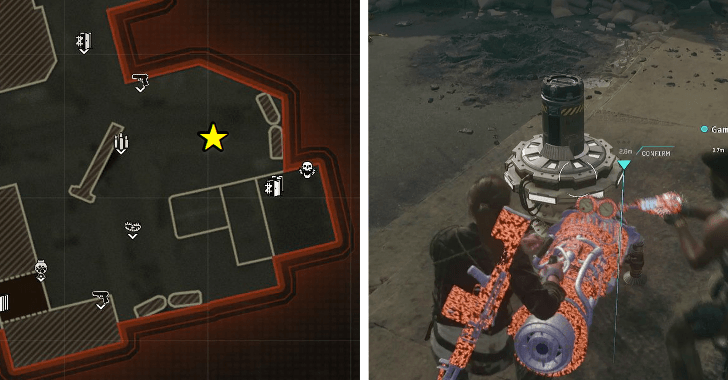 Pick up another Aether Cannister from the contraption in the starting area after setting up the projectors. |
|
| 23 | Ready the Trap at the Motel |
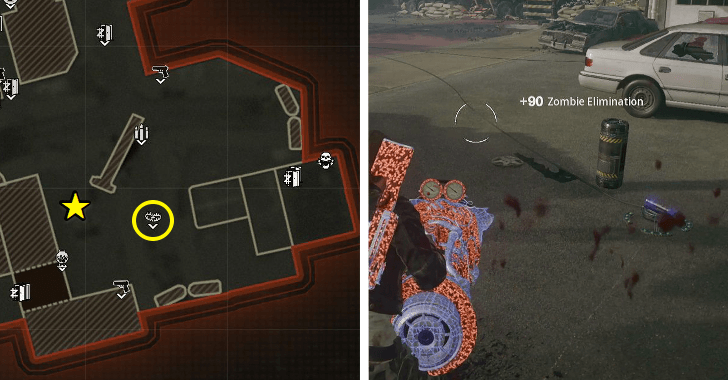 Place the Aether Cannister at a Dark Aether Field Generator in the motel area. |
|
| 24 | Activate the L.T.G. at Riverside |
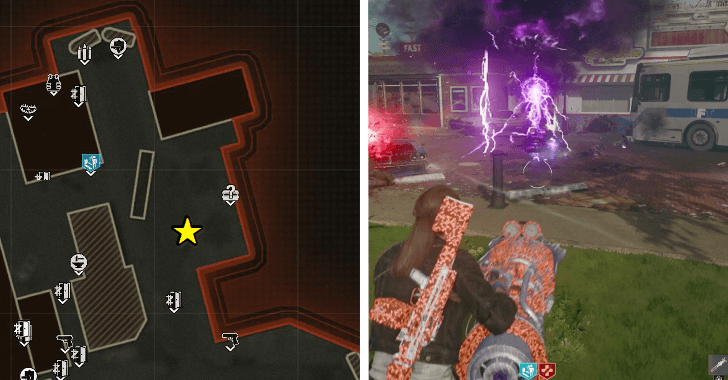 Place the L.T.G. at the small, purple lightning storm in Riverside (in front of Freedom Fried Chicken). Protect it again for 1 minute, and it will spawn an elite zombie afterward. |
|
| 25 | Trap the Dark Aether Zombie |
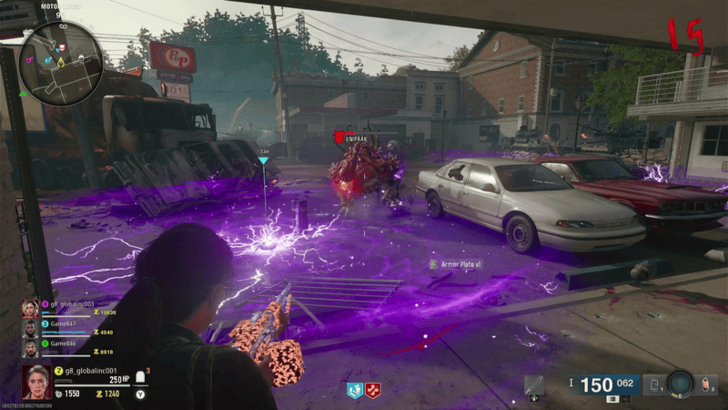 Lure the Elite Zombie to the Dark Aether Field Generator in the motel area and weaken it until it starts glowing purple. Activate the Dark Aether Field Generator trap and make sure the Elite Zombie is eliminated in it. |
|
| 26 | Return the Dark Aether Cannister |
| Bring the new Aether Cannister back to the SDG Generator in the church after filling it with dark energy. You have 1 minute and 30 seconds to do so again. |
Start the Final Encounter
| 27 | Pull the Last Aetherella Figure in the Church |
|---|---|
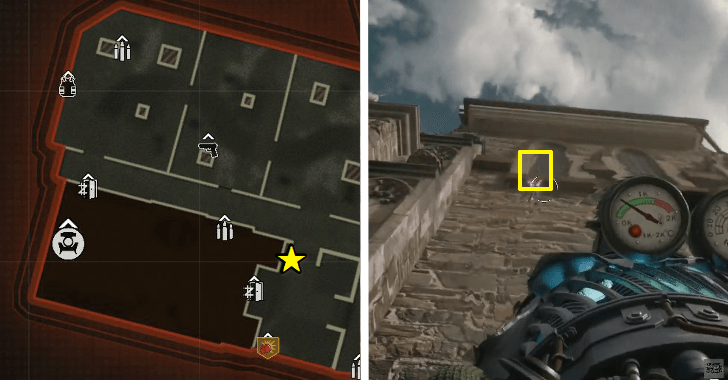 Before starting the Final Encounter, pull the last Aetherella Figure inside the church. Doing so will allow you to absorb it during the boss fight. The best time to absorb it and transform is during the last wave when the Mega Abomination spawns. |
|
| 28 | Start the Final Encounter |
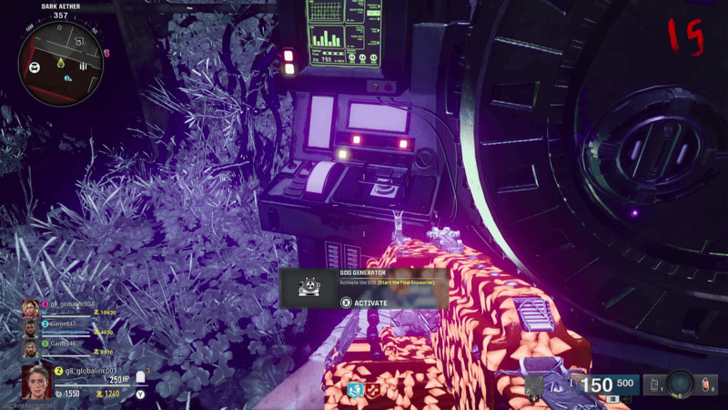 Activate the SDG Generator for the final encounter. This will trap you in the church with 3 waves of zombies, so be prepared. A good strategy on this part is to sprint, slide, and shoot to avoid getting pinned down by the zombies. You can also use the Thrustodyne M23's Alt-Fire to clear the area swiftly. |
|
| Absorb the Aetherella in the Final Wave | |
| Absorb the final Aetherella Figure that you pulled in during Step 27 during the final wave. This will guarantee your success of finishing the Main Easter Egg if done correctly.If you're in a squad and can't transform into Aetherella, you can use a Mutant Injection in the 3rd wave instead to help out and guarantee your survival. In the 3rd wave, you only need to kill the Abomination to complete the Liberty Falls easter egg. You do not need to kill the Special Manglers that spawn here. |
|
| 29 | Exit or Continue |
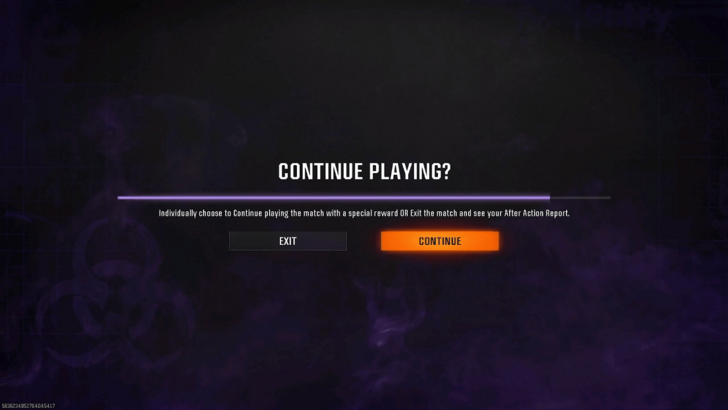 After surviving the Final Encounter, you'll have completed the Liberty Falls Main Quest. You'll be treated to a cutscene then be given the option to Exit or Continue. If you exit, then you'll automatically exfil from the game, back to the Zombies menu. If you Continue, then you'll respawn in the starting area with a bunch of rewards you can use during the rest of the match including: random Legendary Weapons, Bonus Points Power-Ups, Raw Aetherium Crystals (Pack-a-Punch 1/2), random Ammo Mods, and Salvage. |
Liberty Falls Easter Egg Rewards
Liberty Falls Main Quest Rewards
| Rewards | ||
|---|---|---|
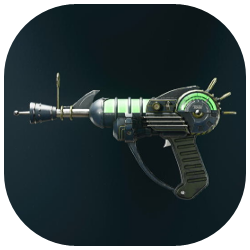 Ray Gun PJ-SRU (Weapon Skin) |
 Bye-Bye, Dark Aether Achievement |
5,000 XP |
 Liberty Falls Quest Complete (Standard) Calling Card |
||
 Liberty Falls Quest Complete (Early) Calling Card (if you completed the Liberty Falls Easter Egg prior to Guided Mode's release) |
||
| If You Choose "Continue" | ||
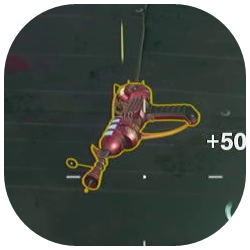 Wonder Weapons |
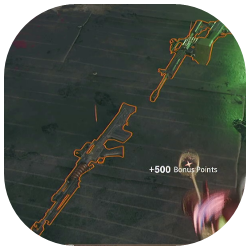 Random Legendary Weapons |
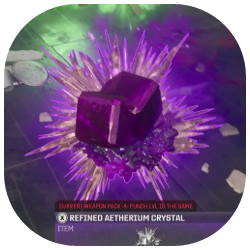 Aetherium Crystals (Pack-a-Punch 1 or 2) |
 Bonus Points Power-Up |
 Random Ammo Mods |
Salvage |
Liberty Falls Side Quest Easter Eggs
Side Quest Easter Eggs That are Useful fo the Main Quest Easter Egg
| # | Easter Egg | Usefulness to Main Quest |
|---|---|---|
| 1 | Aetherella | ★★★★★ Collect Aetherella figurines to turn into an invincible mobile Aetherella trap. This can be used during the Main Quest Easter Egg's FInal Encounter if you bring the final Aetherella figurine into the church. |
| 2 | Liberty Falls Deadshot Daiquiri | ★★★★☆ Gets you a free Deadshot Daiquiri, which is useul for dealing more damage and getting more Essence via critical kills. |
| 3 | Free Powerups | ★★★★☆ Use the free Max Ammo prior to starting the Final Encounter. You can use the Nuke or Insta-Kill when getting overwhelmed during any point of the Main Quest. |
| 4 | Raining Zombies | ★★★☆☆ Rewards you with random equipment and possibly an Aether Tool, so could be helpful if you need to upgrade your gun. |
| 5 | Dancing Zombies | ★★☆☆☆ Side Easter Egg, not very useful for the Main Easter Egg, unless you activate it when you need to lure the Elite Zombie to the Dark Aether trap at the motel. |
| 6 | Liberty Lanes Bowling | ★★☆☆☆ Side Easter Egg, not very useful for the Main Easter Egg. |
Liberty Falls Easter Egg Tips and Strategies
| Easter Egg Tips |
|---|
|
|
Use the Best Guns for Zombies
| Zombies Weapon Guides | |
|---|---|
| Best Starting Weapon Loadout | Best Zombies Guns |
| Best Explosive Weapons | |
Use the best guns for Zombies to finish the Liberty Falls Main Easter Egg easier and faster. These weapons don't lack firepower to clear zombies, including Elite ones, and will not hinder you in any way in a match.
If you haven't unlock any of the guns yet, the XM4 is still a good weapon to use to complete it.
Get Napalm Burst or Dead Wire
 Napalm Burst Napalm Burst(Unlocked at Level 6) |
 Dead Wire Dead Wire(Unlocked by Default) |
Napalm Burst and Dead Wire are good on Liberty Falls. Most Elite Zombies are weak against Napalm Burst, while the Dead Wire can help you with crowd-control.
If you haven't unlocked Napalam Burst yet, you can opt to use the Dead Wire, for now.
Equip Augments on the Ammo Mod You'll Use
You can equip Augments on these Ammo Mods to increase their firepower and effects. It is not required, but it can still help with your Liberty Falls Easter Egg runs.
Best Augments
Best Perks to Use
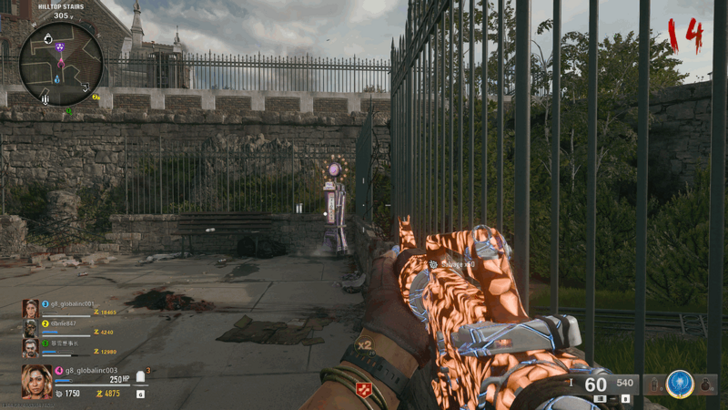
You can aim to get all the Perks in Liberty Falls, but the the ones below that should be enough to help you complete its Main Easter Egg.
Note that all Perks that are not available in Liberty Falls at the start will appear on the Bank's Roof on Round 25.
| Perk | Explanation |
|---|---|
 Stamin-Up Stamin-Up
|
Increases your movement speed in a match. A must-have perk since you'll be running around every time, especially in the Boss Fight. |
 Quick Revive Quick Revive
|
Speeds up your health regen. It can also increase the reviving speed, which is very useful when playing with a squad. |
 Speed Cola Speed Cola
|
Increases your Armor Replating and Reload Speed. A good combo for the Stamin-Up perk. |
 Jugger-Nog Jugger-Nog
|
Increases your Health. This will help you take more damage, especially after you reach round 20 and up. |
 Deadshot Daiquiri Deadshot Daiquiri
|
Increases your Headshot Damage and allows auto-aim on the head when scoping (controller only). This won't be available until Round 25, but you can do the Easter Egg to obtain it. Deadshot Daiquiri Easter Egg |
 PhD Flopper PhD Flopper
|
Allows you to perform a damaging dive and become inmmune to your own explosives. Great to have if you are using an Explosive Weapon. |
Skip the 2nd Cannister Objective

| Duplication Glitch | Press the Drop Aether Cannister Button and press the Interact Button in front of the generator. |
|---|
You can skip the Second Cannister Objective and head straight to the Final Encounter by doing the Cannister Duplication Glitch. To do so, press the Drop Aether Cannister Button and then quickly press the Interact Button to do the glitch.
Note that you only have a 1 minute and 30 seconds total to bring the Cannister to the church and do the glitch, so be quick!
Use the Thrustodyne M23 When Surrounded

The Thrustodyne M23 has an Alt-Fire that can obliterate normal zombies and stun Elite ones in an area in exchange for overheating it and using up all its ammo. The radius of the explosion will match the current ammo of the Thrustodyne M23 (100 being the max).
You will have to wait again before it starts recovering ammo, so use the Alt-Fire only when surrounded. You will have plenty of chances to use it at the Final Encounter.
How to Get the Thrustodyne M23
Can Also Be Used to Farm Essence and Salvage
Since the Thrustyodyne M23 can replenish its ammo over time, you can use it to kill zombies and farm Essence and Salvage that you need to upgrade your weapons, get perks, and obtain some equipment.
Get Double Points at the Start

You can obtain a Double Points at the start by scoping in on the water tank and shooting the Double Points at the right side beam. This will help you get more Essence at the start and unlock doors quickly.
Terminus Free Powerup Locations
Do SAM Trials Along the Way
You can do SAM Trials as you try to complete the Main Easter Egg to earn additional Essence, Salvage, and other items like Aether Tools and Support Items. They randomly spawn on the map, so there will be instances that it is near one of the objectives you're currently doing.
How to Achieve SAM Trial Mastery Target
Leave One Zombie Alive When Completing an Objective
You can leave one Zombie alive during a round when completing an objective. Doing so will allow you to focus on the objective while only worrying about one Zombie chasing you around the map.
Note that this can only work in some scenarios, like delivering the Cannister back to the church, unlocking the Toolshed, or doing the Light Particles Projector task.
Black Ops 6 (BO6) Related Guides

Zombies Guide: Everything You Need to Know
All Zombies Mode Guides
Zombies Easter Eggs
Comment
LTG order does not matter which one is done first, abomination can spon on both. Placing the canister on any trap spot works so far
Author
Liberty Falls Easter Egg Walkthrough (Updated)
improvement survey
03/2026
improving Game8's site?

Your answers will help us to improve our website.
Note: Please be sure not to enter any kind of personal information into your response.

We hope you continue to make use of Game8.
Rankings
- We could not find the message board you were looking for.
Gaming News
Popular Games

Genshin Impact Walkthrough & Guides Wiki

Honkai: Star Rail Walkthrough & Guides Wiki

Umamusume: Pretty Derby Walkthrough & Guides Wiki

Pokemon Pokopia Walkthrough & Guides Wiki

Resident Evil Requiem (RE9) Walkthrough & Guides Wiki

Monster Hunter Wilds Walkthrough & Guides Wiki

Wuthering Waves Walkthrough & Guides Wiki

Arknights: Endfield Walkthrough & Guides Wiki

Pokemon FireRed and LeafGreen (FRLG) Walkthrough & Guides Wiki

Pokemon TCG Pocket (PTCGP) Strategies & Guides Wiki
Recommended Games

Diablo 4: Vessel of Hatred Walkthrough & Guides Wiki

Cyberpunk 2077: Ultimate Edition Walkthrough & Guides Wiki

Fire Emblem Heroes (FEH) Walkthrough & Guides Wiki

Yu-Gi-Oh! Master Duel Walkthrough & Guides Wiki

Super Smash Bros. Ultimate Walkthrough & Guides Wiki

Pokemon Brilliant Diamond and Shining Pearl (BDSP) Walkthrough & Guides Wiki

Elden Ring Shadow of the Erdtree Walkthrough & Guides Wiki

Monster Hunter World Walkthrough & Guides Wiki

The Legend of Zelda: Tears of the Kingdom Walkthrough & Guides Wiki

Persona 3 Reload Walkthrough & Guides Wiki
All rights reserved
© 2024 Activision Publishing, Inc. ACTIVISION, CALL OF DUTY, CALL OF DUTY LEAGUE, MODERN WARFARE, CALL OF DUTY BLACK OPS, CALL OF DUTY WARZONE, and CALL OF DUTY VANGUARD are trademarks of Activision Publishing, Inc. All other trademarks and trade names are the property of their respective owners.
The copyrights of videos of games used in our content and other intellectual property rights belong to the provider of the game.
The contents we provide on this site were created personally by members of the Game8 editorial department.
We refuse the right to reuse or repost content taken without our permission such as data or images to other sites.





![Monster Hunter Stories 3 Review [First Impressions] | Simply Rejuvenating](https://img.game8.co/4438641/2a31b7702bd70e78ec8efd24661dacda.jpeg/thumb)


BlackOps Elite Strategies https://94863bnfy24tbt25n3f62e2cap.hop.clickbank.net