 How to Beat Wither Sabbat
 How to Beat Gunkin Perry
 How to Beat Naomi Randall
 How to Beat Winery Chinery
 How to Beat Kasane (Phase 4)
 How to Beat Gunkin Fisher
 How to Beat Kasane (Phase 5)
 How to Beat Kyoka and Kagero
 How to Beat Kasane, Arashi, and Shiden
 How to Beat Nagi (Phase 7)
 How to Beat Coil Moil
 How to Beat Nagi (Phase 9)
 How to Beat Karen (Phase 9)
 How to Beat Kagero Donne
 How to Beat Dominus Circus
 How to Beat Dispen Perry
 How to Beat Brawn Yawn
 How to Beat Yuito Sumeragi
 How to Beat Kodama Melone
 How to Beat Shiden Ritter
 How to Beat Yuito (Phase 4)
 How to Beat Yuito (Phase 5)
 How to Beat Rotunda Pagoda
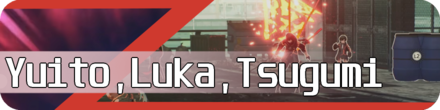 How to Beat Yuito, Luka, and Tsugumi
 How to Beat Kodama (Phase 7)
 How to Beat Yuito,Hanabi,Gemma
 How to Beat Kyoka Eden
 How to Beat Kodama and Yuta Melone
 How to Beat Dispen Fisher
This survey will take about 1 minute.
Your answers will help us to improve our website.
Scarlet Nexus
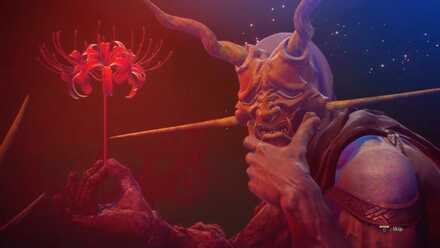
Final Boss | How to Beat Karen Travers (Final Phase Encounter): Boss Fight Guide
The password from Episode 6 of Scarlet Nexus for the password-cracking mini-game has been found! Refer to our page on Scarlet Nexus Musubi Codes for the latest Musubi code update!

This is a guide to Karen Travers (Final Phase Encounter), the final boss in Scarlet Nexus for the Playstation, XBOX, and Steam. Read on to learn how to beat Karen in both stages, Karen's strengths, and weaknesses to use against this boss!
| Karen Travers Boss Guides | |
|---|---|
 Karen Travers (Phase 3) Karen Travers (Phase 3) |
 How to Beat Karen (Final Boss) How to Beat Karen (Final Boss) |
List of Contents
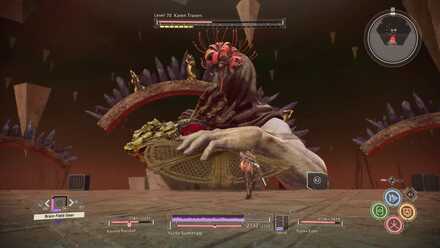
Karen Travers (Final Boss Form 1) Stats and Information
Karen Travers (Form 1) Stats
 |
|
| Karen Travers | |
|---|---|
| Level | 70 |
| Weaknesses | Karen has no particular weakness, however, using Clairvoyance, Teleportation, and Sclerokinesis goes a long way. |
Attack Patterns
Ground Spikes

Karen can animate ground spikes with a wide reach. We highly recommend using Sclerokinesis to not take damage. Alternatively, use Teleportation or Hypervelocity to dodge this attack.
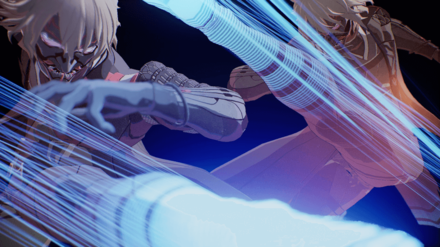
Hand-to-Hand Combat

Karen is proficient in hand-to-hand combat. If you cannot execute a Perfect Dodge, we highly recommend using Sclerokinesis, Teleportation, or Hypervelocity to not take damage from this attack.
Brain Field Convergence

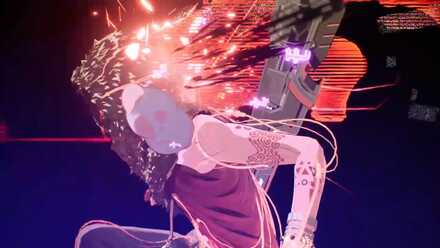
Karen can access Brain Field Convergence when you deplete a quarter of his health. Keep mobile during this phase and survive through his Brain Field.
Duplication

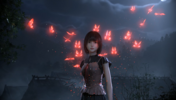
Karen can duplicate 2 more of himself. To determine the real Karen, use Clairvoyance and then attack him to delete the 2 duplicates.
Electrokinesis
Karen has access to Electrokinesis, which can momentarily paralyze you. Dodge this attack as best as you can because Sclerokinesis cannot prevent you from getting paralyzed, even if you take no damage.
Electric Spheres

Sometimes, Karen will use Electric Spheres instead of his typical Electrokinesis attacks. These spheres will home in on players and will have a high chance to stun on impact. We recommend using Invisibility as this will dispel the attack immediately.
Sclerokinesis or Clairvoyance
If you enter Invisibility, Karen will react in one of two ways. If you or your companions get close to him and attack, Karen will use Sclerokinesis preventing him from being damaged while dealing damage in a small AOE around himself.
If you are far away from him, Karen will instead use Clairvoyance to reveal you and your allies' positions.
Teleportation

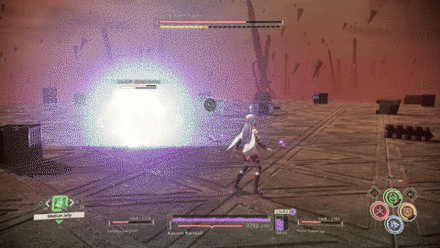
Teleportation gives Karen crazy speed. This is his primary method of getting around the battlefield. Use the same SAS or Hypervelocity to keep up with the openings he gives you.
Psychokinesis + Pyrokinesis

When you manage to bring Karen down to below 1/4th of his HP, he will initiate a Psychokinesis + Pyrokinesis attack, gathering all the crates in the arena and hurling it at you in 3 phases.
The first phase will be single flaming projectiles, easily dodged by sidestepping. The second phase will be a barrage of flaming crates. The final attack will be a large flaming projectile. We recommend using Hypervelocity, Teleportation, or Sclerokinesis to dodge/tank the damage.
How to Beat Karen Travers (Final Boss Form 1)
| Tips & Strategies |
|---|
Keep Mobile During His Brain Field Convergence

Karen is more powerful than you in this state, and he will be relentless. We suggest keeping mobile during his brain field convergence to survive and carry on with the battle.
Remember: The goal here is to waste time. Wait out the timer and focus on staying alive. Also, try to save your recovery items as this boss fight still has a 2nd phase.
Use Invisibility when Stunned

Since the goal is to waste time until his Brain Field runs out, use Invisibility if you get stunned by Karen's Electrokinesis to have him miss his attacks.
Note: This can also be used to have his Duplication Rush Attack miss you entirely. When you see him duplicate into 3, activate Invisibility immediately and all his attacks will miss.
Use Sclerokinesis to Avoid Damage

Karen is proficient in hand-to-hand combat and can animate ground spikes. If you cannot execute a Perfect Dodge, we suggest using Sclerokinesis to avoid taking damage from his attacks.
Warning: Even with Sclerokinesis active, your character can still get stunned by Karen's Electrokinesis. Try not to over rely on Gemma's SAS and save it for when damage is unavoidable.
Use Clairvoyance to Find the Real Karen

When Karen uses Duplication, activate Clairvoyance to highlight him in green. Attack the real one to delete the 2 copies.
Additionally, players can use Hypervelocity or Teleportation to close the distance between themselves and the true copy of Karen. This allows you to get more hits in before he teleports away.
Use Teleportation or Hypervelocity to Keep Up with Karen

Karen is extremely agile in this fight. Use Teleportation or Hypervelocity to match his speed and land normal and psychokinetic attacks on him. You can also use these SAS to escape his Ground Spikes Attack.
Buy As Many Brain Field Gears As You Can
Use Brain Field Gear to enter Brain Field Convergence as fast as possible. You will be able to deal a lot more damage to Karen in this state. However, do note that using them will put them on cooldown for a certain amount of time.
Beware of Psychokinesis + Pyrokinesis

If you get hit by any one of Karen's attacks during his Psychokinesis + Pyrokinesis phase, he will do a multiple hit combo that leaves you at very low health.
Make sure to dodge properly using either Hypervelocity or Sclerokinesis to avoid taking this major damage burst.
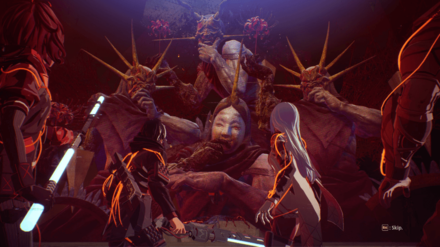
Karen Travers (Final Boss Form 2) Stats and Information
Karen Travers (Form 2) Stats
 |
|
| Karen Travers | |
|---|---|
| Level | 70 |
| Weaknesses | Karen has no particular weakness, however, using Clairvoyance, Teleportation, and Sclerokinesis goes a long way. |
Attack Patterns
Same as Phase 1

All his attacks will be the same as in Phase 1. However, they will be dealt by shadowy clones of Karen rather than himself. You can only attack his kneeling form. His shadowy clones can be dispelled in one hit but they will respawn.
Sorrow
Sorrow Stats and Information
 |
|
|---|---|
| Sorrow | |
| Level | 70 |
| Weaknesses | Psychokinesis |
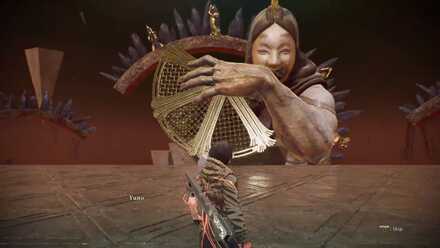
Sorrow is the first statue you will have to deal with. It carries the fan that conceals the real Karen Travers behind it. Destroy and use its Big Dipper Fan to disable it.
Rancor
Rancor Stats and Information
 |
|
|---|---|
| Rancor | |
| Level | 70 |
| Weaknesses | Psychokinesis |
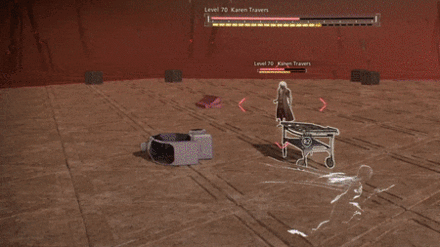
Rancor will drop a Cluster Crystal at the center of the arena. It will be in the shape of a Dump Truck. Destroy it to disable this statue.
Warning: When the Cluster Crystal first drops, it will cause a shockwave of damage to explode outwards. It will also be surrounded by mini-tornadoes which players will have to avoid.
Rage
Rage Stats and Information
 |
|
|---|---|
| Rage | |
| Level | 70 |
| Weaknesses | Psychokinesis |
Rage will have 2 Forms. The first drops Anchor Crystals that players will have to break in order to use against the statue. Only one will be the real anchor crystal among the many that spawn.
Alternatively, the second Rage can also drop Column Crystals that can only be broken using Pyschokinetic Attacks. Break either type of crystal to use it against the statue.
How to Beat Karen Travers (Final Boss Stage 2)
| Tips & Strategies |
|---|
Destroy Sorrow's Big Dipper Fan to Expose the Real Karen
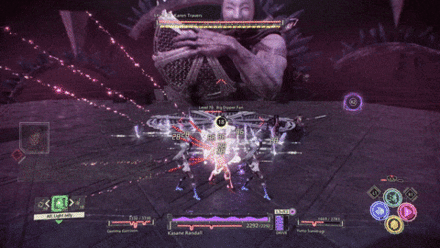
During Sorrow's turn, destroy the Big Dipper Fan using Psychokinesis or a combination of Duplication and Electrokinesis. Afterwards, hurl the thing at the statue to have it drop the Sorrow Mask. Use it to expose the real Karen to damage.
Warning: If the fan is left too long without being destroyed, it will begin to rotate around the arena making it harder to hit within the time limit.
Destroy Rancor's Cluster Crystal to Expose the Real Karen

During Rancor's turn, destroy the Cluster Crystal that descends. It will come in the form of a massive Dump Truck. Afterwards, hurl the thing at the statue to have it drop the Rancor Mask. Use it to expose the real Karen to damage.
Warning: When the crystal drops it will deploy a black shockwave that deals massive damage. Use Sclerokinesis to avoid taking damage. Additionally, the crystal will be guarded by huge tornadoes. Use Hypervelocity to bypass their spins.
Use Clairvoyance to Find the Real Anchor Crystal

During one of Rage's turns, it will drop multiple Anchor Crystals that you must destroy within 10 seconds. Activate Clairvoyance to find the real crystal and destroy it.
Afterwards, hurl the crystal at the statue to have it drop the Rage Mask. Use Psychokinesis on it to disrupt the arena and expose the real Karen to damage.
Destroy Rage's Column Crystal Using Psychokinesis

Another of Rage's special object drops will be the Column Crystal. While players can hit it using jump attacks, they will be ineffective. Use Duplication and Psychokinetic Attacks to hurl objects at the crystal and break it.
Afterwards, hurl the column at the statue to have it drop the Rage Mask again. Use Psychokinesis on it to disrupt the arena and expose the real Karen to damage.
Brain Field Convergence is Highly Recommended

We highly recommend activating Brain Field Convergence as fast as possible in order to maximize damage against the kneeling Karen. Use Brain Field Gear to enter the state, repeatedly.
If that isn't possible, use the Concurrent SAS Activation skill to deploy mixture of SAS to take out the statues' Special Objects and Karen, afterwards.
Use Sclerokinesis or Hypervelocity to Prevent Interruption

Each time players manage to destroy a type of special object, the statues' masks will drop in the center of the arena. Using Psychokinesis on them will disrupt the arena and expose the real Karen to damage.
During channeling, shadowy clones can still attack you. Use Sclerokinesis or Hypervelocity to prevent Karen from interrupting your Psychokinesis channel.
Use Hypervelocity + Duplication While Attacking Karen

Hypervelocity buys a lot of time while attacking Karen. Use it when he's vulnerable. Combine this with Duplication and Electrokinesis / Pyrokinesis to deal extra damage.
Use Combo Visions to Directly Deal Damage

If players have high enough Bond Levels with everyone, they can use Combo Visions to chip away at Karen's HP. This way, when the crush gauge is depleted, a significant amount of HP should already be gone.
Kagero, Gemma, Tsugumi, and Arashi all have Combo Visions that are easy to hit and quick to use.
Scarlet Nexus Related Boss Guides

Yuito Route Bosses
Kasane Route Bosses
Author

Final Boss | How to Beat Karen Travers (Final Phase Encounter): Boss Fight Guide
Please participate in our site
improvement survey
03/2026
improvement survey
03/2026
Would you assist in
improving Game8's site?
improving Game8's site?

×
We are listening to our users' valuable opinions and discussing how to act on them.
The information collected through this survey will be used for the purpose of improving our services. In addition, the information will only be disclosed a part of a statistic in a format that will not allow identification of personal information.
Begin Survey
Not Now
×
Please rate each item regarding Game8.co's Advertisements.
Amount of Ads
Very Dissatisfied
Somewhat Dissatisfied
Fine
Somewhat Satisfied
Highly Satisfied
Placement of Ads
Timing of Ad Display
Ad Loading Speed
Safeness of Ads
Content of Ads
×
Please rate each item regarding Game8.co's Quality of Articles.
Amount of information
Very Dissatisfied
Somewhat Dissatisfied
Fine
Somewhat Satisfied
Highly Satisfied
Frequency of updates
Speed of new information
Accuracy of articles
Understandibility of articles
Readability of sentences
×
Please rate each item regarding Game8.co's Usability of the Site.
Ease of finding information
Very Dissatisfied
Somewhat Dissatisfied
Fine
Somewhat Satisfied
Highly Satisfied
Loading Speed
Use of Color
Font Size
Visibility of Images
Easy to Understand Layout
×
Please rate each item regarding Game8.co's Message Boards, Comments.
Ease of Writing
Very Dissatisfied
Somewhat Dissatisfied
Fine
Somewhat Satisfied
Highly Satisfied
Readability
Ease in Finding Information
Comment Quality
Comment Quantity
Admin Response
×
Please rate each item regarding Game8.co's Site's new design.
Please rate our site's new design
Very Dissatisfied
Somewhat Dissatisfied
Fine
Somewhat Satisfied
Highly Satisfied
Do you think that the website's design change makes the site easier to use?
Has the new design made it easier for you to find information on the site?
Has the new design improved the overall visual appeal of the site?
How would you rate your overall satisfaction with the new design of the site?
×
How likely are you to recommend Game8 to someone you know?
Very Unlikely
0
1
2
3
4
5
6
7
8
9
10
Very Likely
If you have other opinions regarding potential improvement to the website, please share them with us. We would appreciate your honest opinion.
Note: This is a free response section, so you can proceed without entering anything.
Note: Please be sure not to enter any kind of personal information into your response.
Note: Please be sure not to enter any kind of personal information into your response.
×
Thank You
×
Thank you for participating in our survey! Your answers will help us to improve the quality of our website and services.
We hope you continue to make use of Game8.
We hope you continue to make use of Game8.
Close
Rankings
- We could not find the message board you were looking for.
Gaming News


![Marathon Review [First Impressions] | Playing The Long Game](https://img.game8.co/4435736/b9b1ec1e9219416dfc2599f85295d6ef.png/thumb)

Popular Games

Genshin Impact Walkthrough & Guides Wiki
Honkai: Star Rail Walkthrough & Guides Wiki
Umamusume: Pretty Derby Walkthrough & Guides Wiki
Pokemon Pokopia Walkthrough & Guides Wiki
Resident Evil Requiem (RE9) Walkthrough & Guides Wiki
Monster Hunter Wilds Walkthrough & Guides Wiki
Wuthering Waves Walkthrough & Guides Wiki
Arknights: Endfield Walkthrough & Guides Wiki
Pokemon FireRed and LeafGreen (FRLG) Walkthrough & Guides Wiki
Pokemon TCG Pocket (PTCGP) Strategies & Guides Wiki


Recommended Games
Fire Emblem Heroes (FEH) Walkthrough & Guides Wiki
Diablo 4: Vessel of Hatred Walkthrough & Guides Wiki
Yu-Gi-Oh! Master Duel Walkthrough & Guides Wiki
Super Smash Bros. Ultimate Walkthrough & Guides Wiki
Pokemon Brilliant Diamond and Shining Pearl (BDSP) Walkthrough & Guides Wiki
Elden Ring Shadow of the Erdtree Walkthrough & Guides Wiki
Monster Hunter World Walkthrough & Guides Wiki
The Legend of Zelda: Tears of the Kingdom Walkthrough & Guides Wiki
Persona 3 Reload Walkthrough & Guides Wiki
Cyberpunk 2077: Ultimate Edition Walkthrough & Guides Wiki


All rights reserved
© BANDAI NAMCO Entertainment America Inc. All third party content, brands, names, and logos are used under license and remain property of their respective owners. All rights reserved.
The copyrights of videos of games used in our content and other intellectual property rights belong to the provider of the game.
The contents we provide on this site were created personally by members of the Game8 editorial department.
We refuse the right to reuse or repost content taken without our permission such as data or images to other sites.