This survey will take about 1 minute.
Your answers will help us to improve our website.
Tower of Fantasy
Gold Nucleus Map and Locations
Please note that the Tower of Fantasy Team has stopped covering the game as of Update 2.0. Information on certain pages may not be up-to-date. Thank you for continuing support!
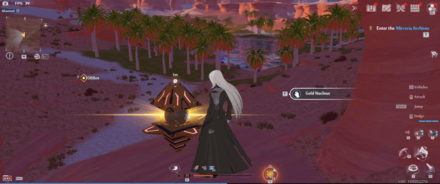
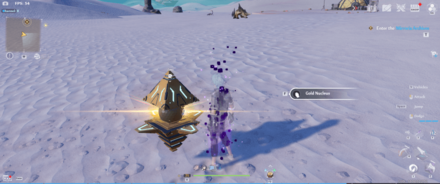
Gold Nucleus can be used to get characters and weapons through the Gacha Banners in Tower of Fantasy. Read on to learn how to get Gold Nucleus in the game, with a full map of each area and locations of each Gold Nucleus!
| Gacha Currency Farming Guides | ||
|---|---|---|
List of Contents
- List of all Gold Nucleus Locations
- Aesperia Gold Nucleus Map Locations
- Astra
- Banges
- Navia
- Crown
- Warren
- Tower of Fantasy Area
- Artificial Island
- Vera Gold Nucleus Map Locations
- Rock Pillar Gobby
- Sandstorm Grounds
- Quicksand Belt
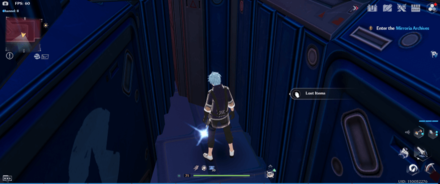
- Mirroria District A
- Best Way to Earn Gold Nucleus
- Where to Spend Gold Nucleus
- Difference Between Red, Gold, and Black Nucleus
- Related Guides
List of all Gold Nucleus Locations
| Aesperia Gold Nucleus Locations | |||
|---|---|---|---|
| Astra | Banges | Navia | Crown |
| Warren | Tower of Fantasy Area | Artificial Island | |
| Vera Gold Nucleus Locations | |||
| Rock Pillar Gobby | Sandstorm Grounds | Quicksand Belt | Mirroria District A |
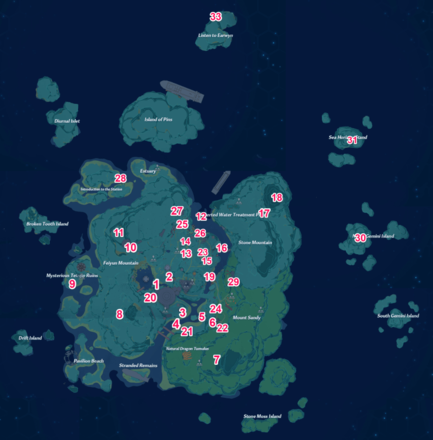
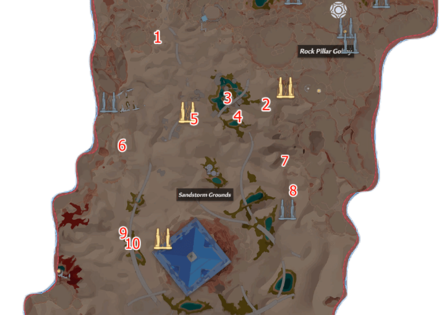
Aesperia Gold Nucleus Map Locations
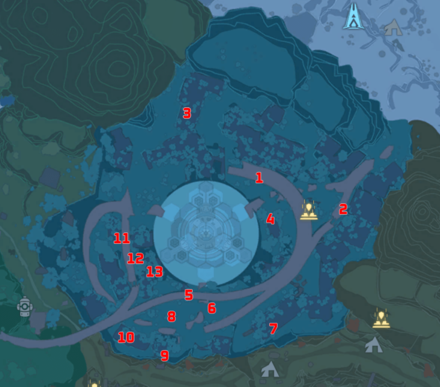
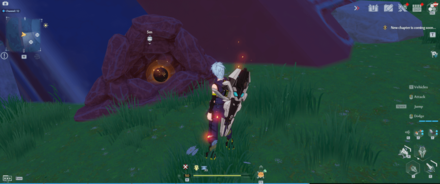
Astra Gold Nucleus Locations
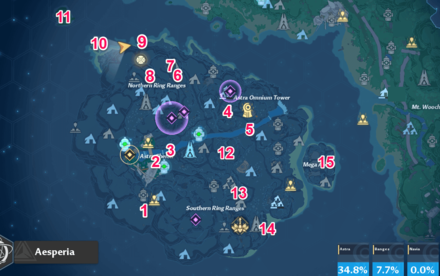 View Full Image |
||
| No. | Map View | World View |
|---|---|---|
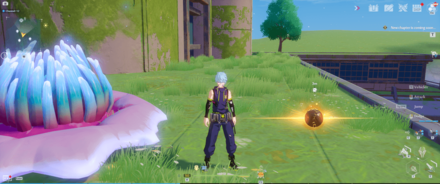
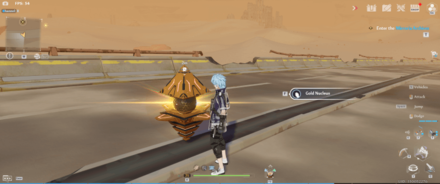
| 1 |  View Full Image |
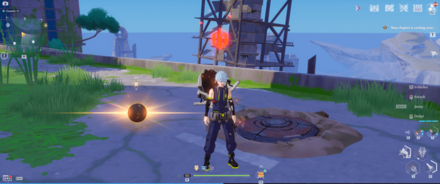
 View Full Image |
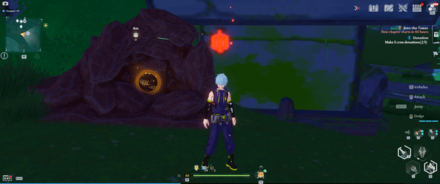
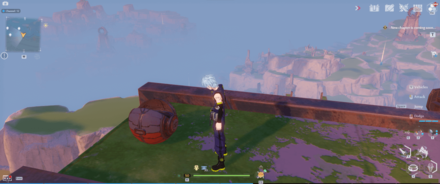
| Use a Fire Weapon to open up the Tar Pit. You won't need to climb the mountain to find it. | ||
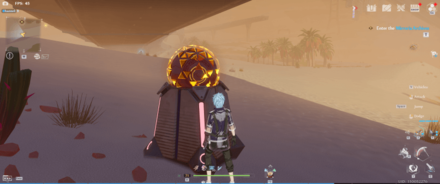
| 2 |  View Full Image |
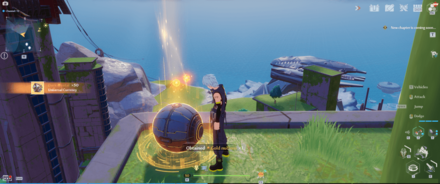
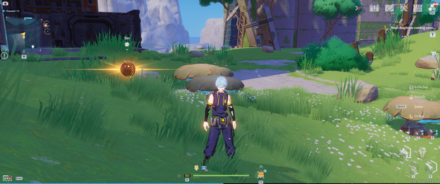
 View Full Image |
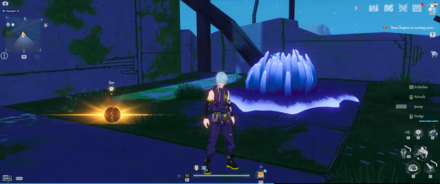
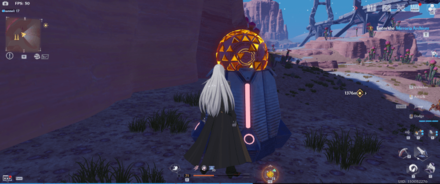
| Head up the highest structure and open the sphere container to receive a Gold Nucleus. | ||
| 3 |  View Full Image |
 View Full Image |
| Grab the Gold Nucleus in the middle of the river. | ||
| 4 |  View Full Image |
 View Full Image |
| Grab a nearby water core and throw it into the Chowchow to receive a Gold Nucleus. | ||
| 5 |  View Full Image |
 View Full Image |
| From the 4th location, use the jet pack to glide towards the Gold Nucleus above the river. | ||
| 6 |  View Full Image |
 View Full Image |
| Climb the ruined tower all the way up and open the sphere crate with the Gold Nucleus inside. | ||
| 7 | View Full Image |
 View Full Image |
| Climb the ruined tower all the way up and open the sphere crate with the Gold Nucleus inside. | ||
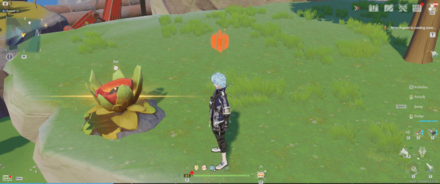
| 8 |  View Full Image |
 View Full Image |
| On the ground near the tower, use your Fire Bow to destroy the rock covering the hole. You won't need to climb the mountain to find it. | ||
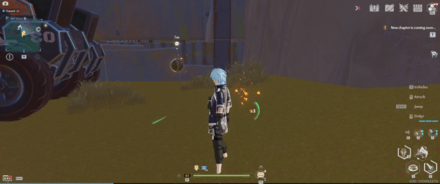
| 9 |  View Full Image |
 View Full Image |
| Use a Fire Weapon to open up the Tar Pit. | ||
| 10 |  View Full Image |
 View Full Image |
| Use a Fire Weapon to open up the Tar Pit located behind the tall rock pillars by the water. | ||
| 11 |  View Full Image |
 View Full Image |
| Go to the small island in the north and open the chest above the facility. | ||
| 12 |  View Full Image |
 View Full Image |
| Step on the notes in the right order. A Gold Nucleus will appear afterward. | ||
| 13 |  View Full Image |
 View Full Image |
| Jump on the mushrooms in the right order. A Gold Nucleus will appear afterward. | ||
| 14 |  View Full Image |
 View Full Image |
| Use a Fire Weapon to open up the Tar Pit located on the beach. | ||
| 15 |  View Full Image |
 View Full Image |
| Throw a water core to the Chowchow to reveal a Gold Nucleus. | ||
Banges Gold Nucleus Locations
 View Full Image |
||
| No. | Map View | World View |
|---|---|---|
| 1 |  View Full Image |
 View Full Image |
| Jump on the mushrooms in the right order (smallest to biggest) to get the Gold Nucleus. | ||
| 2 |  View Full Image |
 View Full Image |
| Throw a water core on the Chowchow inside a metal cylinder. | ||
| 3 |  View Full Image |
 View Full Image |
| Throw a water core on the Chowchow inside a metal cylinder. | ||
| 4 |  View Full Image |
 View Full Image |
| Defeat the treasure guard and open the golden chest. | ||
| 5 |  View Full Image |
 View Full Image |
| Use your Omnium Handcannon on the circular platform to spawn a Gold Nucleus. | ||
| 6 |  View Full Image |
 View Full Image |
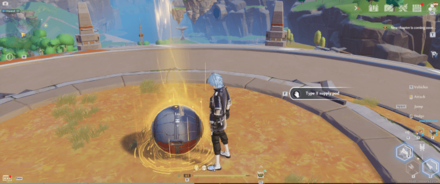
| Use Strange Cube relic near the stone statue to release the metal ball and get the Gold Nucleus. | ||
| 7 |  View Full Image |
 View Full Image |
| Open up the Tar Pit using a weapon with Fire attribute. | ||
| 8 |  View Full Image |
 View Full Image |
| Jump on the mushrooms in the right order (smallest to biggest) to get the Gold Nucleus. | ||
| 9 |  View Full Image |
 View Full Image |
| Get the Gold Nucleus floating under the bridge. | ||
| 10 |  View Full Image |
 View Full Image |
| Use a weapon with Ice element to remove the lava from the pit. | ||
| 11 |  View Full Image |
 View Full Image |
| Use your Omnium Handcannon on the circular platform to spawn a Gold Nucleus. | ||
| 12 |  View Full Image |
 View Full Image |
| Climb the building until you reach the Gold Nucleus. | ||
| 13 |  View Full Image |
 View Full Image |
| Get the Gold Nucleus floating on top of an air balloon. | ||
| 14 |  View Full Image |
 View Full Image |
| Hit the lava pit with a Frost weapon to get the Gold Nucleus. | ||
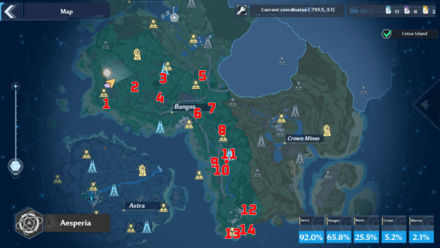
Navia Gold Nucleus Locations
 View Full Image |
||
| No. | Map View | World View |
|---|---|---|
| 1 |
 View Full Image |
 View Full Image |
| Aim the Omnium Handcannon below the water enemy to create an elevated platform. Throw the enemy into the Chow Chow inside the wreckage to spawn the Gold Nucleus. | ||
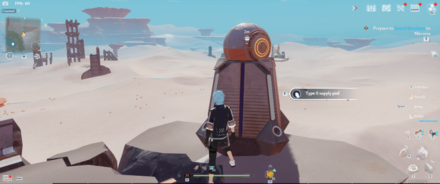
| 2 |  View Full Image |
 View Full Image |
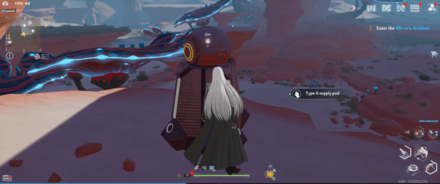
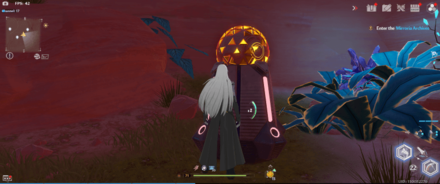
| Climb up the rock pillar to open the supply pod. | ||
| 3 |  View Full Image |
 View Full Image |
| Use a flame weapon to remove the tar. | ||
| 4 |  View Full Image |
 View Full Image |
| Use an Ice Shell weapon to remove the lava and spawn the Gold Nucleus. | ||
| 5 |  View Full Image |
 View Full Image |
| Defeat the treasure guardian at the stronghold to open the supply pod containing the Gold Nucleus. | ||
| 6 |  View Full Image |
 View Full Image |
| Use your Omnium Handcannon on the circular platform to spawn a Gold Nucleus. | ||
| 7 |  View Full Image |
 View Full Image |
| Defeat the treasure guardian at the stronghold to open the supply pod containing the Gold Nucleus. | ||
| 8 |  View Full Image |
 View Full Image |
| Perform a double jump and attack on the platform to spawn the Gold Nucleus. | ||
| 9 |  View Full Image |
 View Full Image |
| Climb on top of the pillar to find the Gold Nucleus. | ||
| 10 |  View Full Image |
 View Full Image |
| Climb up to the peak of the mountain and get the floating Gold Nucleus. | ||
| 11 |  View Full Image |
 View Full Image |
| Use an Ice Shell weapon to remove the lava and spawn the Gold Nucleus. | ||
| 12 |  View Full Image |
 View Full Image |
| Head down to the area below Cetus Island to find the Gold Nucleus. | ||
| 13 |  View Full Image |
 View Full Image |
| Head to one of the wires leading to Cetus Island to find the Gold Nucleus. | ||
| 14 |  View Full Image |
 View Full Image |
| Use the Strange Cube to remove the ball and spawn the Gold Nucleus. | ||
| 15 |  View Full Image |
 View Full Image |
| Jump on the mushrooms from smallest to biggest to spawn the Gold Nucleus. | ||
| 16 |  View Full Image |
 View Full Image |
| Climb on top of the cliffside to find the Gold Nucleus floating near the area. | ||
| 17 |  View Full Image |
 View Full Image |
| Throw the water enemy into the Chow Chow to obtain the Gold Nucleus. | ||
| 18 |  View Full Image |
 View Full Image |
| You can find the Gold Nucleus floating near the cable. Get it by gliding down the Cetus Island. | ||
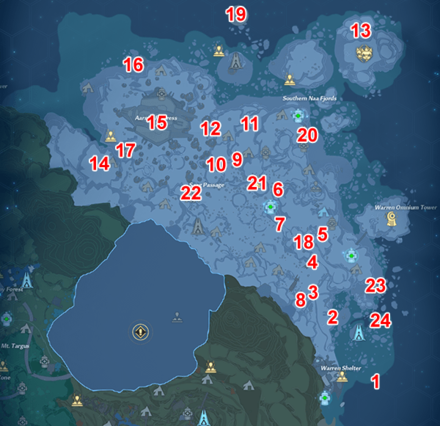
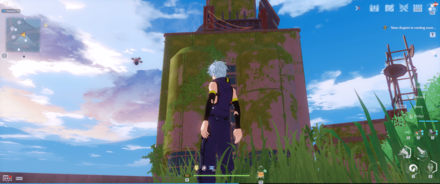
Crown Gold Nucleus Locations
 View Full Image |
||
| No. | Map View | World View |
|---|---|---|
| 1 |  View Full Image |
 View Full Image |
| Use the Omnium Handcannon on the platform to spawn the Gold Nucleus. | ||
| 2 |  View Full Image |
 View Full Image |
| Move the blocks to form a circular logo to spawn the Gold Nucleus. | ||
| 3 |  View Full Image |
 View Full Image |
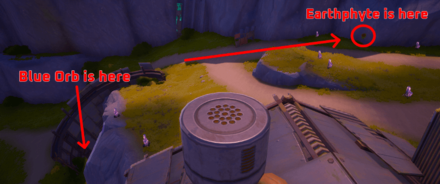
| Find the blue node hiding behind the metal scraps down the road and bring it to the Earthphyte to spawn the Gold Nucleus. | ||
| 4 |  View Full Image |
 View Full Image |
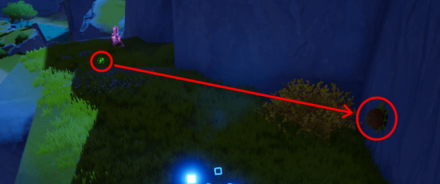
| Find the green node south of the Earthphyte and place it on the plant to spawn the Gold Nucleus. | ||
| 5 |  View Full Image |
 View Full Image |
| Perform a downward strike on the platform to spawn the Gold Nucleus. | ||
| 6 |  View Full Image |
 View Full Image |
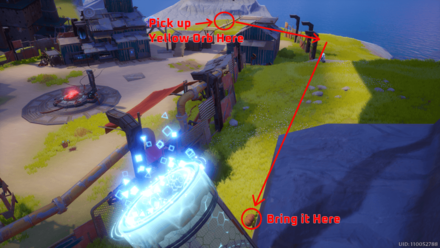
| Pick up the water core and bring it to the Chowchow on the top of the building to spawn the Gold Nucleus. | ||
| 7 |  View Full Image |
 View Full Image |
| Use an Ice Shell weapon to remove the lava from the lava pit. | ||
| 8 |  View Full Image |
 View Full Image |
| Climb the top of the tower to find the supply pod containing the Gold Nucleus. | ||
| 9 |  View Full Image |
 View Full Image |
| Throw the water enemy toward the hole on the wreckage for it to land on the Chow Chow. | ||
| 10 |  View Full Image |
 View Full Image |
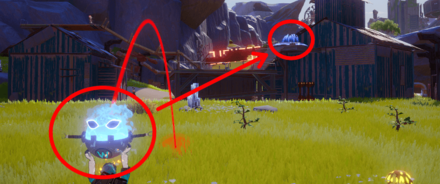
| Find the green node and place it on the Earthphyte plant to spawn the Gold Nucleus. | ||
| 11 |  View Full Image |
 View Full Image |
| Use an Ice Shell weapon to remove the lava and spawn the Gold Nucleus. | ||
| 12 |  View Full Image |
 View Full Image |
| Find the supply pod near the cliffside and open it to obtain a Gold Nucleus. | ||
| 13 |  View Full Image |
 View Full Image |
| Use an Ice Shell weapon to remove the lava from the lava pit. | ||
| 14 |  View Full Image |
 View Full Image |
| Use the Strange Cube to remove the ball and spawn the Gold Nucleus. | ||
| 15 |  View Full Image |
 View Full Image |
| Jump on the mushrooms from smallest to biggest to spawn the Gold Nucleus. | ||
| 16 |  View Full Image |
 View Full Image |
| Find the blue ball and bring it to the Earthphyte plant to spawn the Gold Nucleus. | ||
| 17 |  View Full Image |
 View Full Image |
| Use the Strange Cube to remove the ball from the statue to spawn the Gold Nucleus. | ||
| 18 |  View Full Image |
 View Full Image |
| Use the Omnium Handcannon to create a platform to reach the floating Gold Nucleus. | ||
| 19 |  View Full Image |
 View Full Image |
| Destroy the drone to pick up the Gold Nucleus. | ||
| 20 |  View Full Image |
 View Full Image |
| Find the yellow orb behind Lucia's base and bring it to the Earthphyte to get the Gold Nucleus. | ||
| 21 |  View Full Image |
 View Full Image |
| Find the supply pod near the shoreline and open it to obtain the Gold Nucleus. | ||
| 22 |  View Full Image |
 View Full Image |
| Destroy the drone to pick up the Gold Nucleus. | ||
| 23 |  View Full Image |
 View Full Image |
| Find the supply pod on top of the building and open it to obtain the Gold Nucleus. | ||
| 24 |  View Full Image |
 View Full Image |
| Find the treasure chest with an orange umbrella and type the password, 4753, to open it. | ||
| 25 |  View Full Image |
 View Full Image |
| You can find the Gold Nucleus floating on this area. | ||
| 26 |  View Full Image |
 View Full Image |
| Destroy the drone to pick up the Gold Nucleus. | ||
| 27 |  View Full Image |
 View Full Image |
| Use the Omnium Handcannon to move the water enemy upward and throw it to the Chow Chow | ||
| 28 |  View Full Image |
 View Full Image |
| Type the password, 1024, on the door to reach the supply pod containing the Gold Nucleus. | ||
| 29 |  View Full Image |
 View Full Image |
| Find the inverter triangle with a red umbrella on top of the ship. Type the password, 7268, to open it and obtain the Gold Nucleus. | ||
| 30 |  View Full Image |
 View Full Image |
| Open the supply pod to obtain the Gold Nucleus. | ||
| 31 |  View Full Image |
 View Full Image |
| Climb on top of the building to find the Gold Nucleus floating on top of the light fixture. | ||
Warren Gold Nucleus Locations
 View Full Image |
||
| No. | Map View | World View |
|---|---|---|
| 1 |  View Full Image |
 View Full Image |
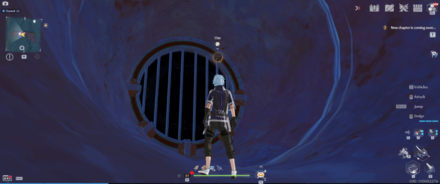
| Head inside the large pipe to find the Gold Nucleus. | ||
| 2 |  View Full Image |
 View Full Image |
| Pick up the yellow node and throw it at the Earthphyte plant on the side of the iceberg. | ||
| 3 |  View Full Image |
 View Full Image |
| Hit the black drone to spawn the Gold Nucleus. | ||
| 4 |  View Full Image |
 View Full Image |
| Hit the black drone to spawn the Gold Nucleus. | ||
| 5 |  View Full Image |
 View Full Image |
| Use your Omnium Handcannon on the circular platform to spawn a Gold Nucleus. | ||
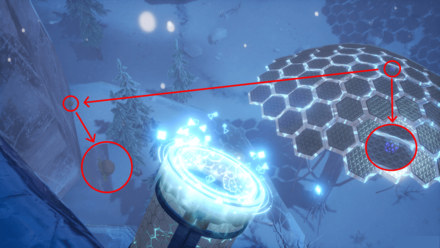
| 6 |  View Full Image |
 View Full Image |
| Find the yellow node on top of the cliff. Throw it down to where the Earthphyte plant is located to spawn the Gold Nucleus. | ||
| 7 |  View Full Image |
 View Full Image |
| Find the blue node on top of the cliff. Throw it down to where the Earthphyte plant is located to spawn the Gold Nucleus. | ||
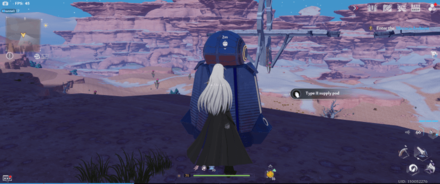
| 8 |  View Full Image |
 View Full Image |
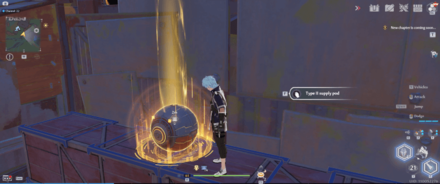
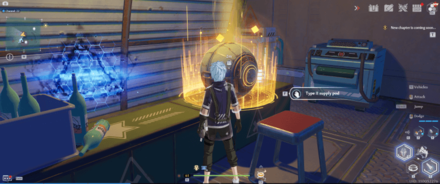
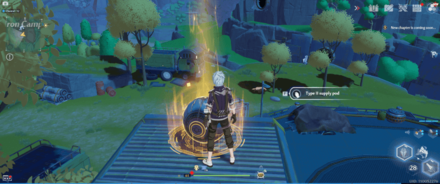
| Find the supply pod at the edge of the cliff and open it to obtain the Gold Nucleus. | ||
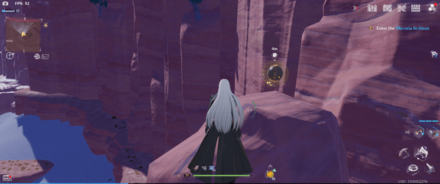
| 9 |  View Full Image |
 View Full Image |
| Perform a double jump and attack on the platform to spawn the Gold Nucleus. | ||
| 10 |  View Full Image |
 View Full Image |
| Pick up the first module shard under the white tree. The second module shard can be found behind the tent in Saag Passage. The third can be found below the cliff near the tower. Once you have picked up all three shards, activate the tower to spawn the Gold Nucleus at the top. | ||
| 11 |  View Full Image |
 View Full Image |
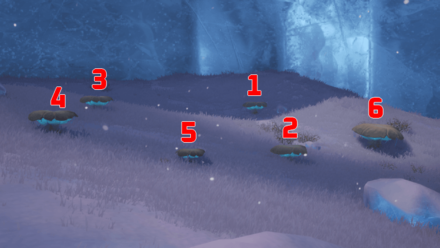
| Jump on the mushroom on the right order to get the Gold Nucleus. Refer to the image for the order. | ||
| 12 |  View Full Image |
 View Full Image |
| Find the node with blue spots on the top of the mushroom cliff opposite of it. Lift it up and throw it down to the Earthphyte plant clinging to the side of the iceberg to spawn the Gold Nucleus. | ||
| 13 |  View Full Image |
 View Full Image |
| Push the blocks to form a circular logo on its top to spawn the Gold Nucleus. | ||
| 14 |  View Full Image |
 View Full Image |
| Use the Strange Cube relic to move the ball from the statue to spawn the Gold Nucleus. | ||
| 15 |  View Full Image |
 View Full Image |
| Look for the inverted red triangle with an umbrella and use the password "8521" to unlock it and obtain the Gold Nucleus. | ||
| 16 |  View Full Image |
 View Full Image |
| Find the node with yellow spots north of the Earthphyte plant. Place the node on the plant to spawn the Gold Nucleus. | ||
| 17 |  View Full Image |
 View Full Image |
| Defeat the treasure guardian to open the supply pod.. | ||
| 18 |  View Full Image |
 View Full Image |
| Defeat the three treasure guardians to unlock the supply pod at the top of the tower. | ||
| 19 |  View Full Image |
 View Full Image |
| Head to the top of the dome and enter the password, 7092, on the door to enter inside. Avoid the enemies and drones until you reach the small hallway with the supply pod. | ||
| 20 |  View Full Image |
 View Full Image |
| Defeat the treasure guardian to open the supply pod. | ||
| 21 |  View Full Image |
 View Full Image |
| Climb the top of the dome to find the supply pod containing the Gold Nucleus. | ||
| 22 |  View Full Image |
 View Full Image |
| Defeat the treasure guardian to open the supply pod. | ||
| 23 |  View Full Image |
 View Full Image |
| Defeat the treasure guardian to open the supply pod. | ||
| 24 |  View Full Image |
 View Full Image |
| Throw the water enemy into the Chow Chow to spawn the Gold Nucleus. | ||
Tower of Fantasy Area Gold Nucleus Locations
 View Full Image |
||
| No. | Map View | World View |
|---|---|---|
| 1 | 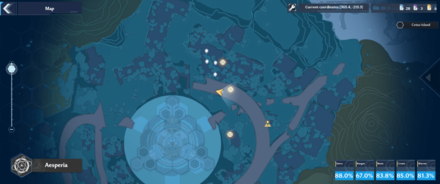 View Full Image |
 View Full Image |
| Use a Flame weapon to remove the tar and get the Gold Nucleus. | ||
| 2 | 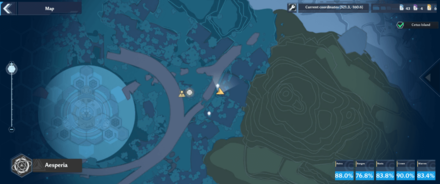 View Full Image |
 View Full Image |
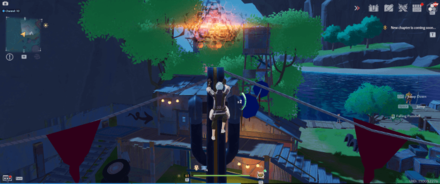
| Glide to the floating Gold Nucleus to get it. | ||
| 3 | 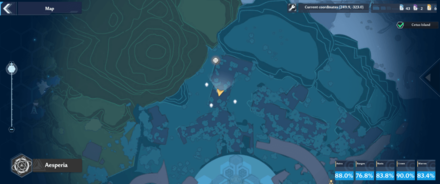 View Full Image |
 View Full Image |
| Throw a water core on the Chowchow to get the Gold Nucleus. | ||
| 4 | 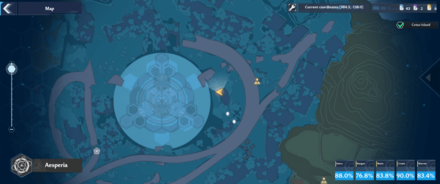 View Full Image |
 View Full Image |
| Open the golden chest above the building. | ||
| 5 | 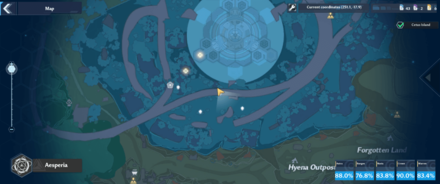 View Full Image |
 View Full Image |
| Use Plunge attack on the Induction Plate to reveal the Gold Nucleus. | ||
| 6 | 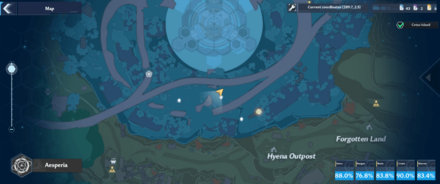 View Full Image |
 View Full Image |
| Jump on the Mushrooms at the right order to get the Gold Nucleus. | ||
| 7 | 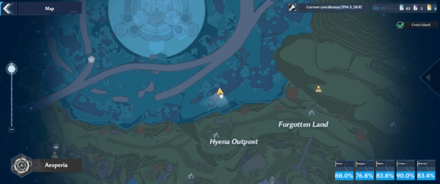 View Full Image |
| Open up the Tar Pit using a Flame weapon. | ||
| 8 | 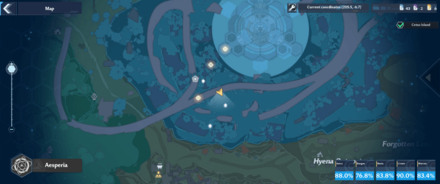 View Full Image |
 View Full Image |
| Climb at the top of the building and use your Jetpack to get the Gold Nucleus. | ||
| 9 | 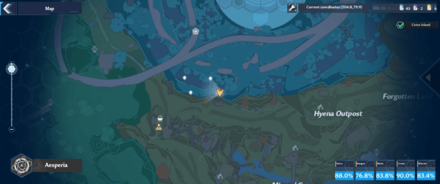 View Full Image |
 View Full Image |
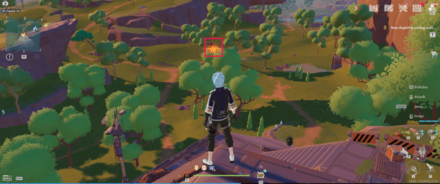
| Get the Gold Nucleus floating on top of the building. | ||
| 10 | 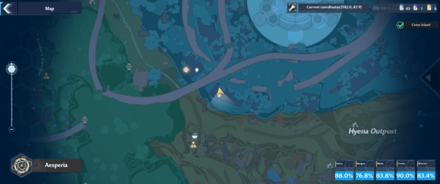 View Full Image |
 View Full Image |
| Find a water core and feed it to the Chowchow. | ||
| 11 | 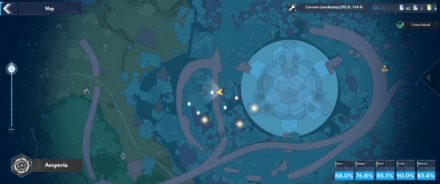 View Full Image |
 View Full Image |
| Fly to the Gold Nucleus using your Jetpack to get it. | ||
| 12 | 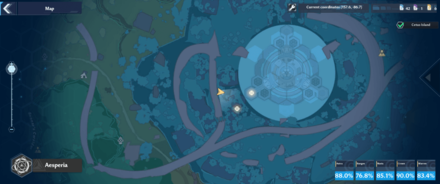 View Full Image |
 View Full Image |
| Use a Flame weapon to open up the Tar Pit. | ||
| 13 | 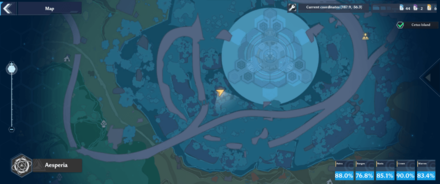 View Full Image |
 View Full Image |
| Open the gold chest on top of the building to get the Gold Nucleus. | ||
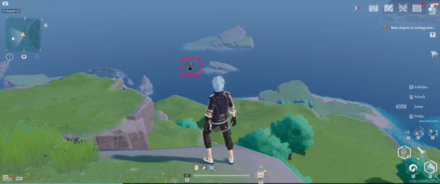
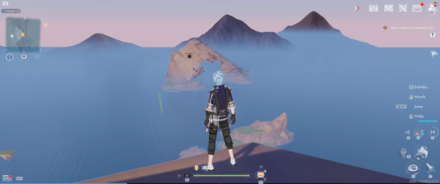
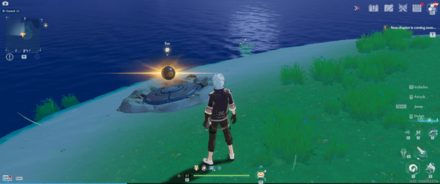
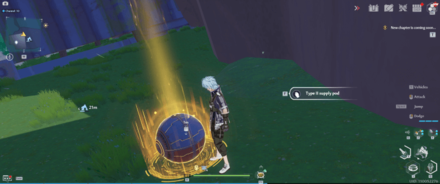
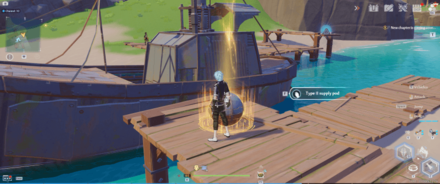
Artificial Island Gold Nucleus Locations
 View Full Image |
||
| No. | Map View | World View |
|---|---|---|
| 1 |  View Full Image |
 View Full Image |
| Bounce on the mushrooms in the correct order. | ||
| 2 | 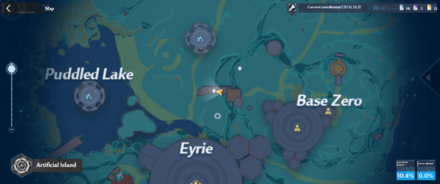 View Full Image |
 View Full Image |
| Go underneath the pipe and jump inside. | ||
| 3 | 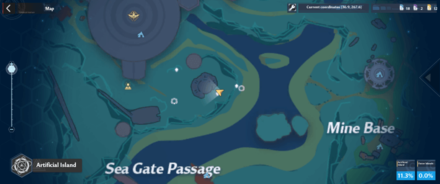 View Full Image |
 View Full Image |
| Use the Omnium Handcannon on the plate. | ||
| 4 |  View Full Image |
 View Full Image |
| Climb the top of the crane. | ||
| 5 | 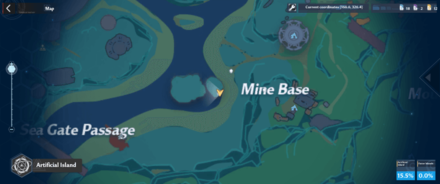 View Full Image |
 View Full Image |
| Use a fire weapon to melt the oil inside the Kerosenia. | ||
| 6 | 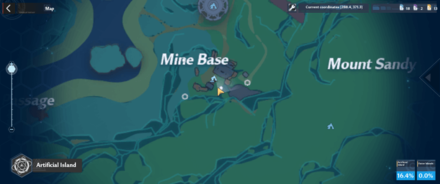 View Full Image |
 View Full Image |
| Go underneath the platform by the ramp infront of the van. | ||
| 7 | 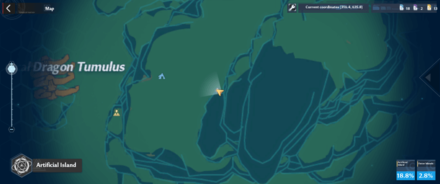 View Full Image |
 View Full Image |
| Use a ranged weapon or climb the cliffs and use your jetpack to hover and kill the drone. | ||
| 8 | 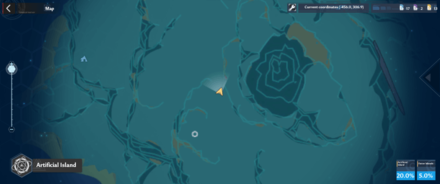 View Full Image |
 View Full Image |
| Use a ranged weapon or climb the cliffs and use your jetpack to hover and kill the drone. | ||
| 9 | 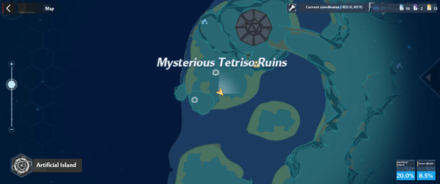 View Full Image |
 View Full Image |
| Use a ranged weapon or climb the floating island and use your jetpack to hover and kill the drone. | ||
| 10 | 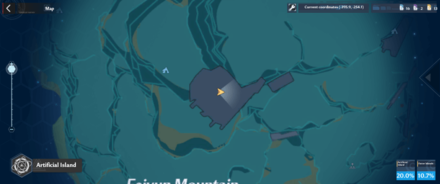 View Full Image |
 View Full Image |
| Go inside the giant propeller, climb, and grab it mid-air. | ||
| 11 | 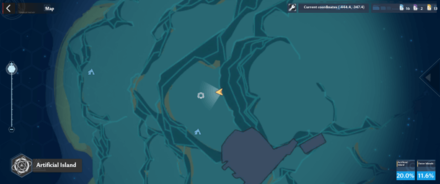 View Full Image |
 View Full Image |
| Use a ranged weapon or climb the cliffs and use your jetpack to hover and kill the drone. | ||
| 12 | 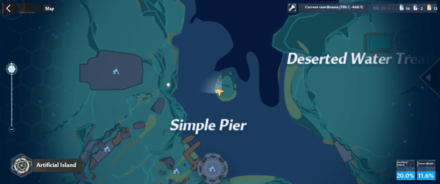 View Full Image |
 View Full Image |
| Use a diving attack on the plate. | ||
| 13 | 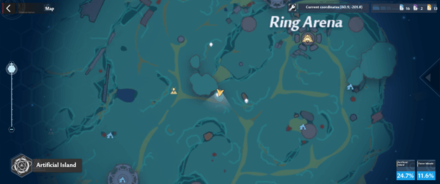 View Full Image |
 View Full Image |
| Throw in ice ball into the chowchow. | ||
| 14 | 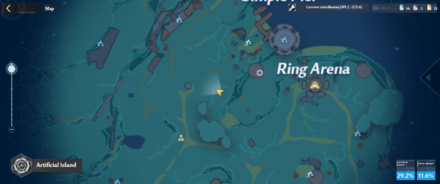 View Full Image |
 View Full Image |
| Climb the nearby floating island using your Jetpack/Cybernetic Arm and use your Jetpack again once on top to fly higher to grab it. | ||
| 15 | 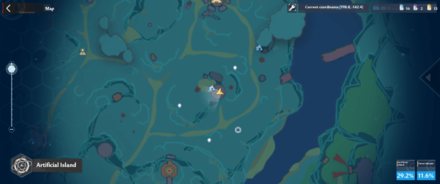 View Full Image |
 View Full Image |
| Climb the top of the satellite using your Cybernetic Arm then use your Jetpack to grab it mid-air. | ||
| 16 | 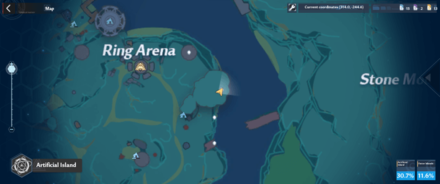 View Full Image |
 View Full Image |
| Use the Strange Cube to knock the large ball off. | ||
| 17 | 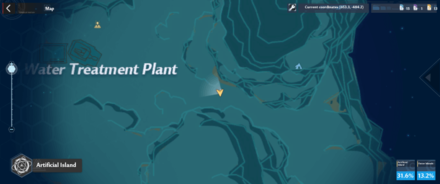 View Full Image |
 View Full Image |
| Use a ranged weapon or climb the cliffs and use your jetpack to hover and kill the drone. | ||
| 18 | 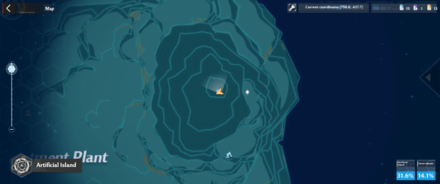 View Full Image |
 View Full Image |
| Climb the top of the mountain. | ||
| 19 | 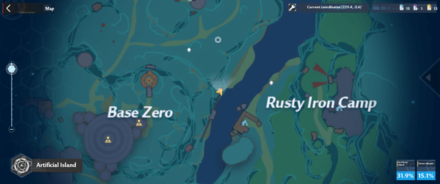 View Full Image |
 View Full Image |
| Use a fire weapon to melt the oil inside the Kerosenia. | ||
| 20 | 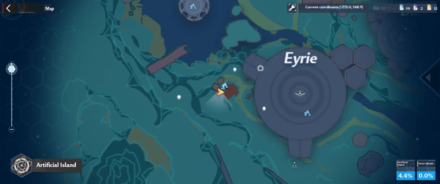 View Full Image |
 View Full Image |
| Kill the Treasure Guardian. | ||
| 21 | 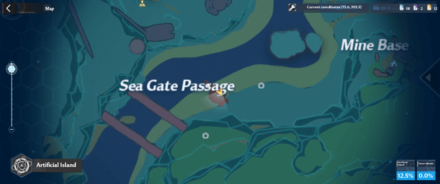 View Full Image |
 View Full Image |
| Kill the Treasure Guardian. | ||
| 22 |  View Full Image |
 View Full Image |
| Kill the Treasure Guardian. | ||
| 23 | 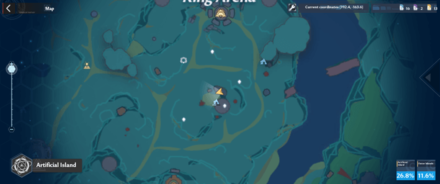 View Full Image |
 View Full Image |
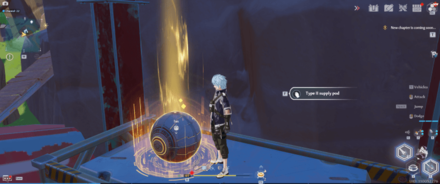
| Use the Red Teleporter at the top of the Satellite nearby. | ||
| 24 | 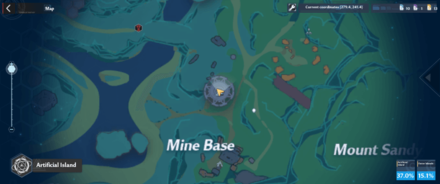 View Full Image |
 View Full Image |
| From the Spacerift: Eyrie, use your Jetpack to fly your way towards it. | ||
| 25 | 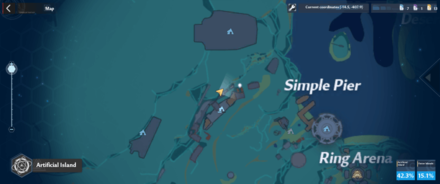 View Full Image |
 View Full Image |
| Use the Red Teleporter at the top of the Anchor nearby. | ||
| 26 |  View Full Image |
 View Full Image |
| Use the Red Teleporter near another Island stronghold. | ||
| 27 | 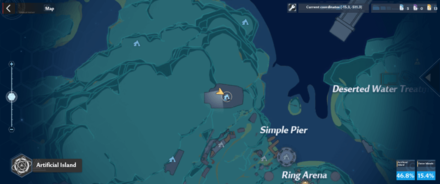 View Full Image |
 View Full Image |
| Kill the Treasure Guardian. | ||
| 28 | 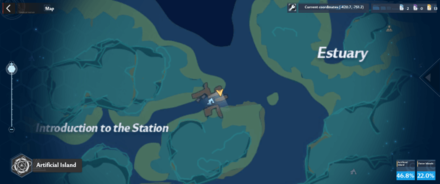 View Full Image |
 View Full Image |
| Kill the Treasure Guardian. | ||
| 29 | 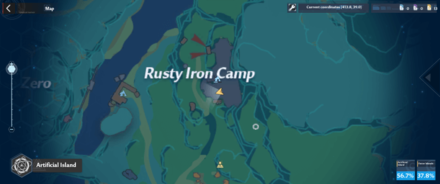 View Full Image |
 View Full Image |
| Kill the Treasure Guardian. | ||
| 30 | 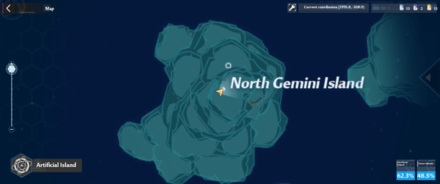 View Full Image |
 View Full Image |
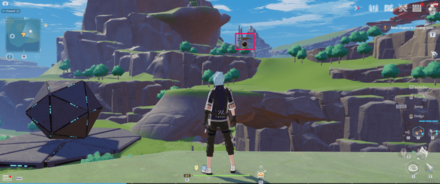
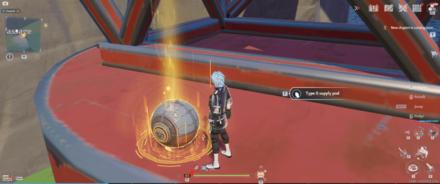
| Obtain an Institute Key Card from Mutant Abberants around Artificial Island and take the teleporter East of Stone Mountain. | ||
| 31 | 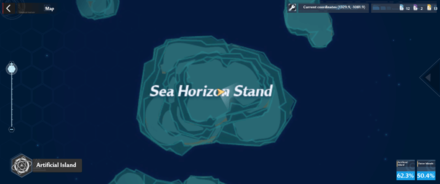 View Full Image |
 View Full Image |
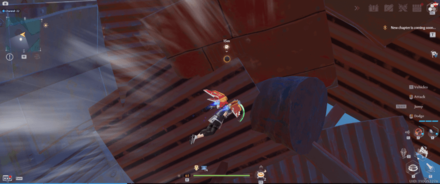
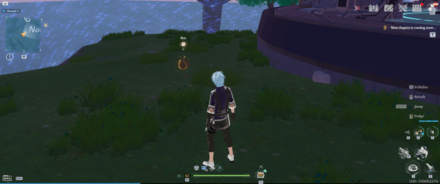
| Obtain the Permission Card: Tyrone from South Gemini Island and take the teleporter at North Gemini Island. | ||
| 32 | 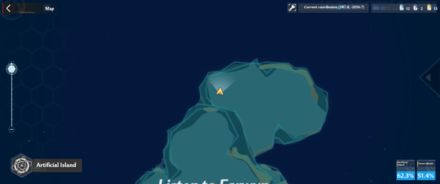 View Full Image |
 View Full Image |
| Obtain the Permission Card: Morris from Sea Horizon Island and take the teleporter at Island of Pins near the ship. | ||
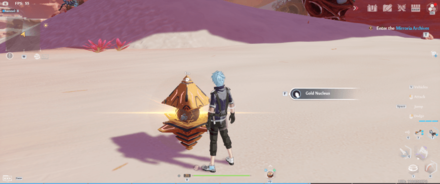
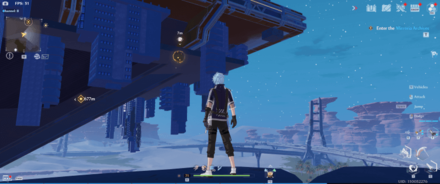
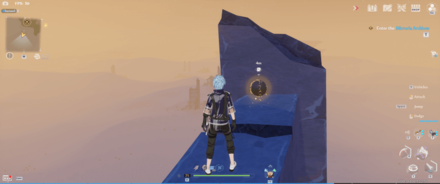
Vera Gold Nucleus Map Locations
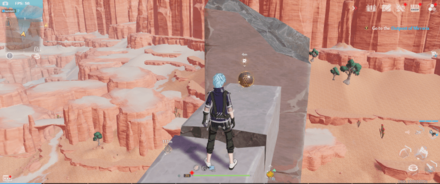
Rock Pillar Gobby Gold Nucleus Locations
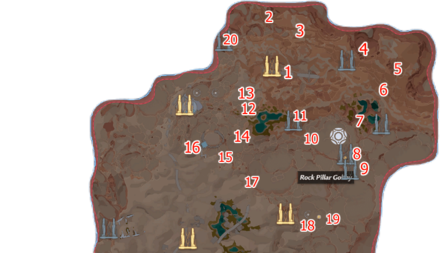 View Full Image |
||
| No. | Map View | World View |
|---|---|---|
| 1 | 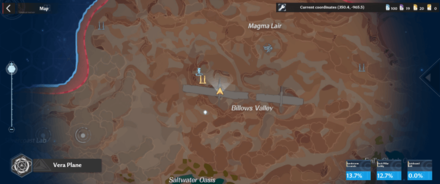 View Full Image |
 View Full Image |
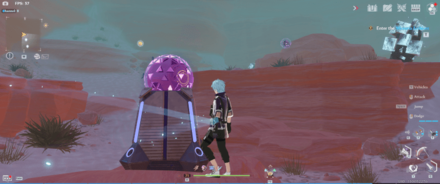
| Climb to the top of the bridge. | ||
| 2 | 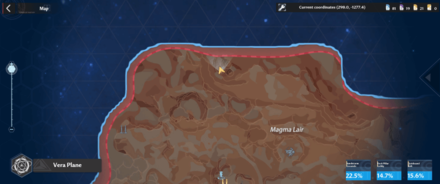 View Full Image |
 View Full Image |
| Climb the top of the mountain. | ||
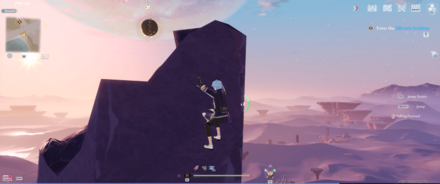
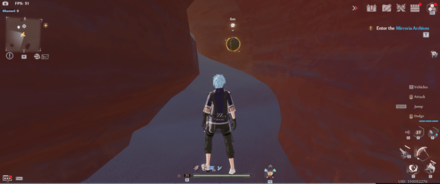
| 3 | 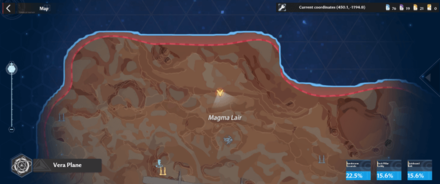 View Full Image |
 View Full Image |
| Use the corresponding element to break 4 floating orbs nearby. | ||
| 4 | 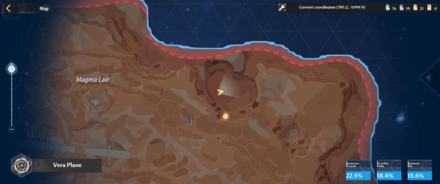 View Full Image |
 View Full Image |
| Climb the top of the mountain. | ||
| 5 | 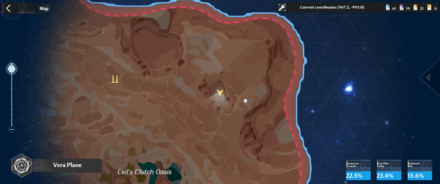 View Full Image |
 View Full Image |
| Climb the top of the mountain. | ||
| 6 | 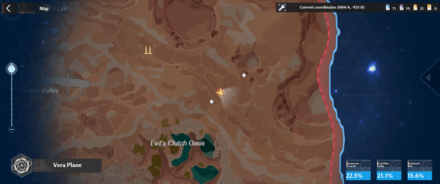 View Full Image |
 View Full Image |
| Use the corresponding element to break 4 floating orbs nearby. | ||
| 7 | 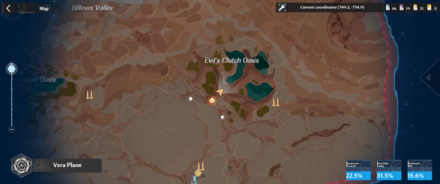 View Full Image |
 View Full Image |
| Dash or use the Quantum Cloak and interact with it to stop it from closing. | ||
| 8 | 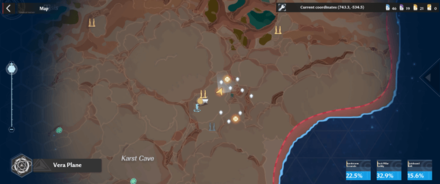 View Full Image |
 View Full Image |
| Use the corresponding element to break 4 floating orbs nearby. | ||
| 9 | 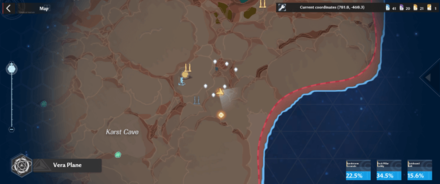 View Full Image |
 View Full Image |
| Use the corresponding element to break 4 floating orbs nearby. | ||
| 10 | 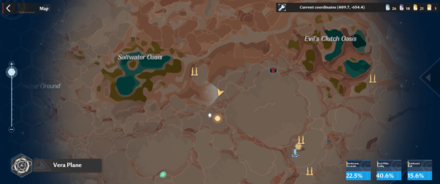 View Full Image |
 View Full Image |
| Dash or use the Quantum Cloak and interact with it to stop it from closing. | ||
| 11 | 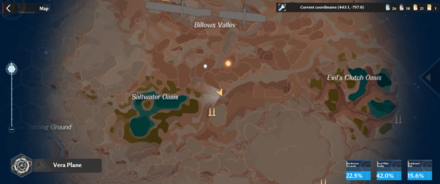 View Full Image |
 View Full Image |
| Dash or use the Quantum Cloak and interact with it to stop it from closing. | ||
| 12 | 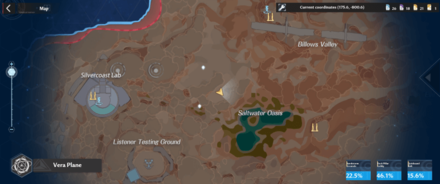 View Full Image |
 View Full Image |
| Dash or use the Quantum Cloak and interact with it to stop it from closing. | ||
| 13 | 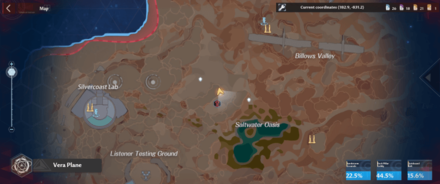 View Full Image |
 View Full Image |
| Use the corresponding element to break 4 floating orbs nearby. | ||
| 14 | 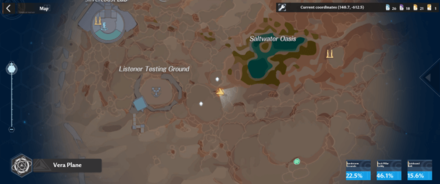 View Full Image |
 View Full Image |
| Use the corresponding element to break 4 floating orbs nearby. | ||
| 15 |  View Full Image |
 View Full Image |
| Use the corresponding element to break 4 floating orbs nearby. | ||
| 16 |  View Full Image |
 View Full Image |
| Use the corresponding element to break 4 floating orbs nearby. | ||
| 17 | 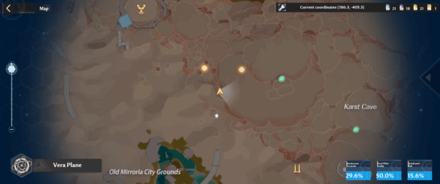 View Full Image |
 View Full Image |
| Dash or use the Quantum Cloak and interact with it to stop it from closing. | ||
| 18 | 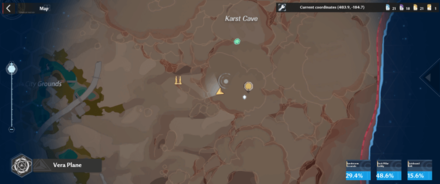 View Full Image |
 View Full Image |
| Dash or use the Quantum Cloak and interact with it to stop it from closing. | ||
| 19 | 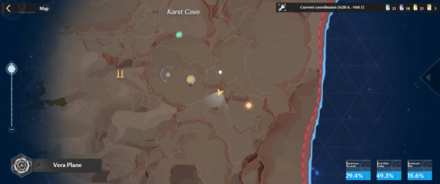 View Full Image |
 View Full Image |
| Drop down into a small pit. | ||
| 20 | 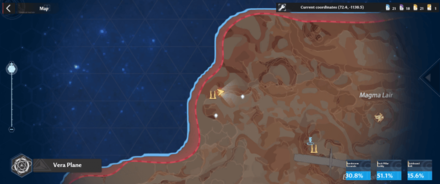 View Full Image |
 View Full Image |
| Use the corresponding element to break 4 floating orbs nearby. | ||
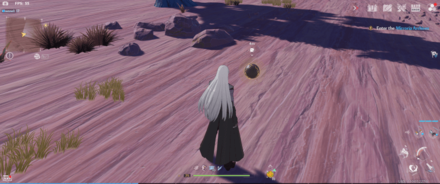
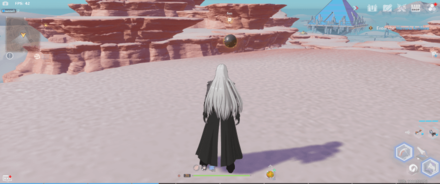
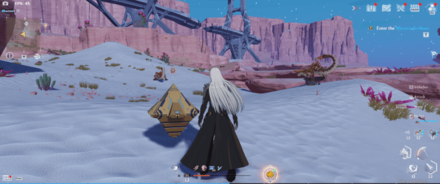
Sandstorm Grounds Gold Nucleus Locations
 View Full Image |
||
| No. | Map View | World View |
|---|---|---|
| 1 | 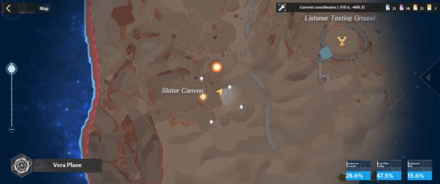 View Full Image |
 View Full Image |
| Climb the top of the mountain. | ||
| 2 | 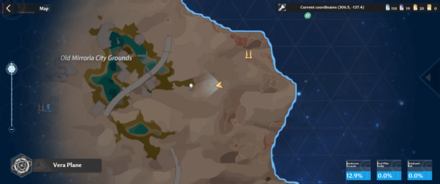 View Full Image |
 View Full Image |
| Use the corresponding element to break 4 floating orbs nearby. | ||
| 3 | 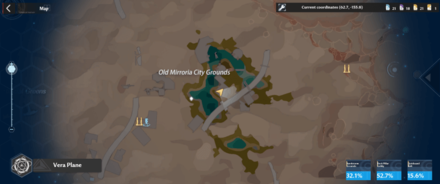 View Full Image |
 View Full Image |
| Dash or use the Quantum Cloak and interact with it to stop it from closing. | ||
| 4 | 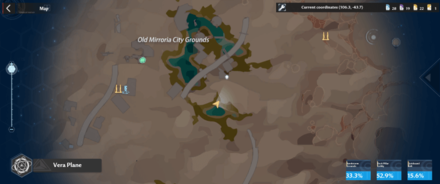 View Full Image |
 View Full Image |
| Climb the tree. | ||
| 5 | 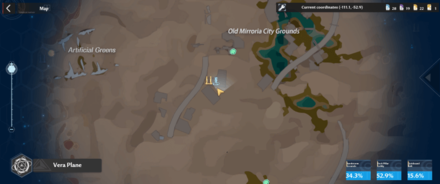 View Full Image |
 View Full Image |
| Dash or use the Quantum Cloak and interact with it to stop it from closing. | ||
| 6 |  View Full Image |
 View Full Image |
| Use the corresponding element to break 4 floating orbs nearby. | ||
| 7 |  View Full Image |
 View Full Image |
| Dash or use the Quantum Cloak and interact with it to stop it from closing. | ||
| 8 | 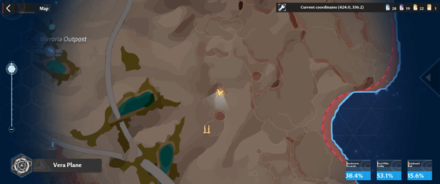 View Full Image |
 View Full Image |
| Use the corresponding element to break 4 floating orbs nearby. | ||
| 9 | 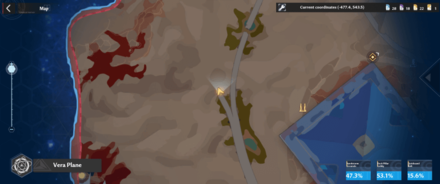 View Full Image |
 View Full Image |
| Use the corresponding element to break 4 floating orbs nearby. | ||
| 10 | 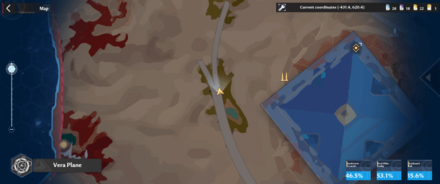 View Full Image |
 View Full Image |
| Climb the top of the bridge. | ||
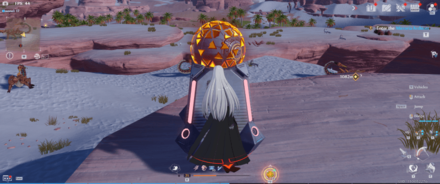
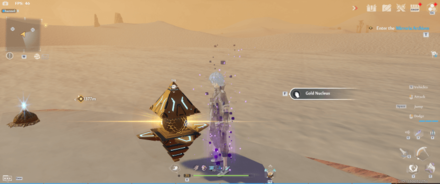
Quicksand Belt Gold Nucleus Locations
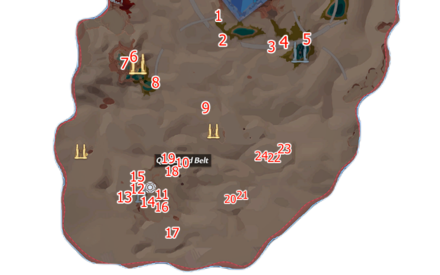 View Full Image |
||
| No. | Map View | World View |
|---|---|---|
| 1 | 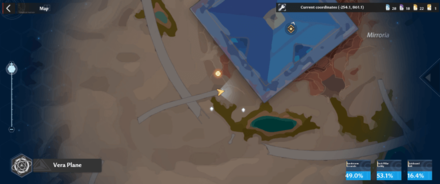 View Full Image |
 View Full Image |
| Climb the building. | ||
| 2 | 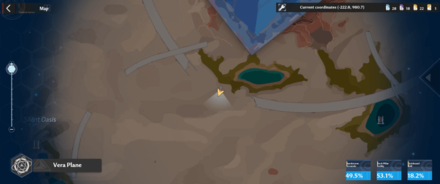 View Full Image |
 View Full Image |
| Climb the top of the broken off bridge. | ||
| 3 | 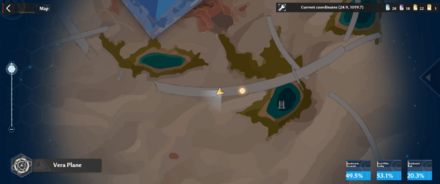 View Full Image |
 View Full Image |
| Dash or use the Quantum Cloak and interact with it to stop it from closing. | ||
| 4 |  View Full Image |
 View Full Image |
| Use the corresponding element to break 4 floating orbs nearby. | ||
| 5 | 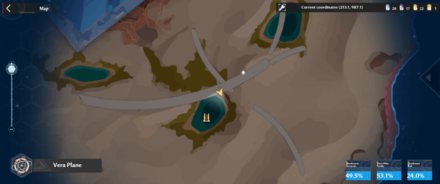 View Full Image |
 View Full Image |
| Climb the top of the bridge. | ||
| 6 | 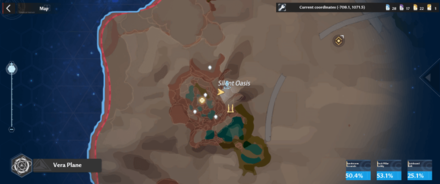 View Full Image |
 View Full Image |
| Dash or use the Quantum Cloak and interact with it to stop it from closing. | ||
| 7 | 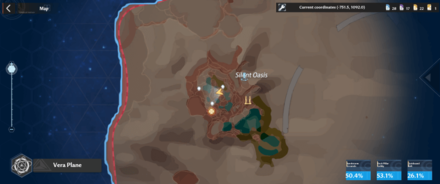 View Full Image |
 View Full Image |
| Use the corresponding element to break 4 floating orbs nearby. | ||
| 8 | 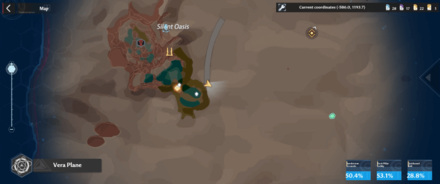 View Full Image |
 View Full Image |
| Use the corresponding element to break 4 floating orbs nearby. | ||
| 9 | 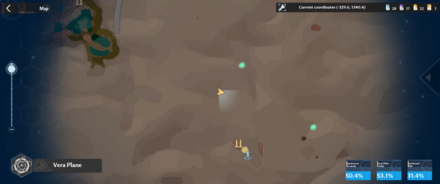 View Full Image |
 View Full Image |
| Dash or use the Quantum Cloak and interact with it to stop it from closing. | ||
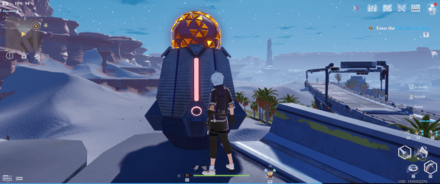
| 10 | 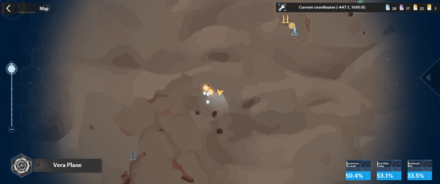 View Full Image |
 View Full Image |
| Use the jetpack to fly and grab it mid-air. | ||
| 11 | 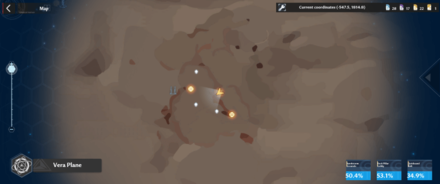 View Full Image |
 View Full Image |
| Use the corresponding element to break 4 floating orbs nearby. | ||
| 12 | 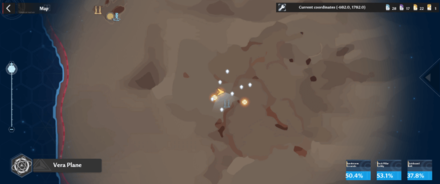 View Full Image |
 View Full Image |
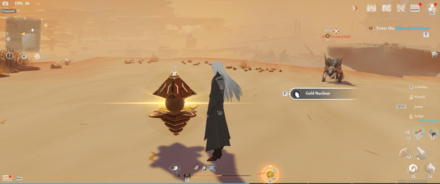
| Land on the swirling quicksand. | ||
| 13 | 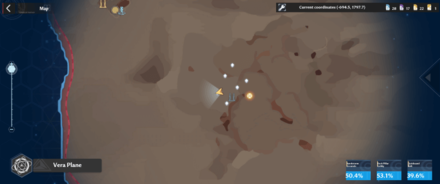 View Full Image |
 View Full Image |
| Use the Jetpack to grab it mid-air. | ||
| 14 | 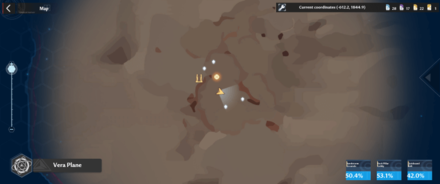 View Full Image |
 View Full Image |
| Use the Jetpack to grab it mid-air. | ||
| 15 |  View Full Image |
 View Full Image |
| Dash or use the Quantum Cloak and interact with it to stop it from closing. | ||
| 16 | 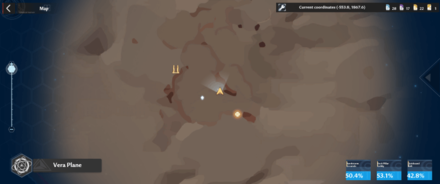 View Full Image |
 View Full Image |
| Climb the rocks or use the Cybernetic Arm. | ||
| 17 | 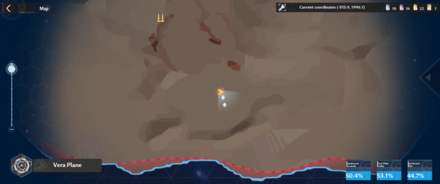 View Full Image |
 View Full Image |
| Use the corresponding element to break 4 floating orbs nearby. | ||
| 18 | 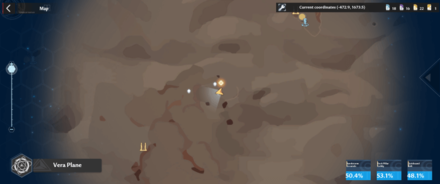 View Full Image |
 View Full Image |
| Climb the rocks or use the Cybernetic Arm. | ||
| 19 | 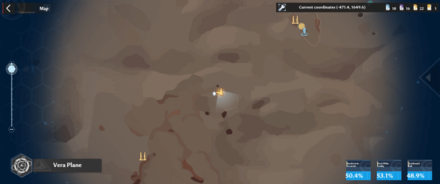 View Full Image |
 View Full Image |
| Use the corresponding element to break 4 floating orbs nearby. | ||
| 20 | 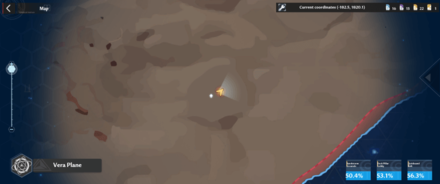 View Full Image |
 View Full Image |
| Land on the swirling quicksand. | ||
| 21 | 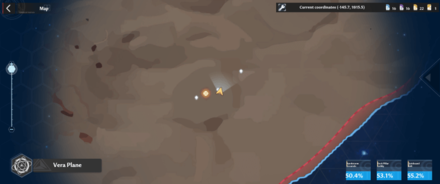 View Full Image |
 View Full Image |
| Climb the rocks or use the Cybernetic Arm. | ||
| 22 | 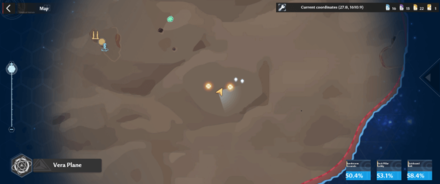 View Full Image |
 View Full Image |
| Use the corresponding element to break 4 floating orbs nearby. | ||
| 23 | 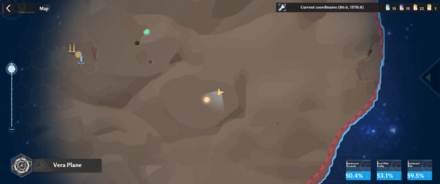 View Full Image |
 View Full Image |
| Land on the swirling quicksand then climb the rocks or use the Cybernetic Arm. | ||
| 24 | 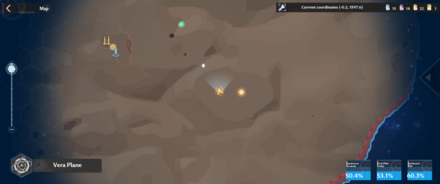 View Full Image |
 View Full Image |
| Use the corresponding element to break 4 floating orbs nearby. | ||
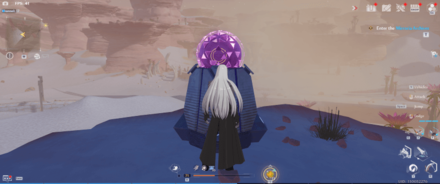
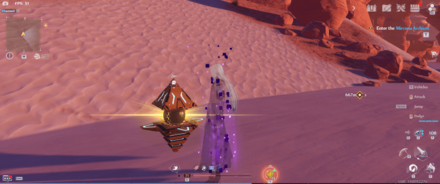
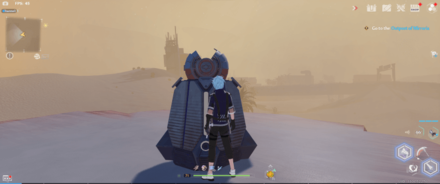
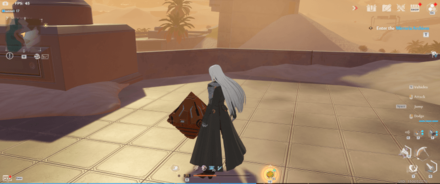
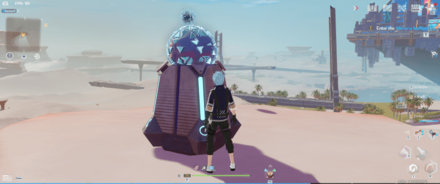
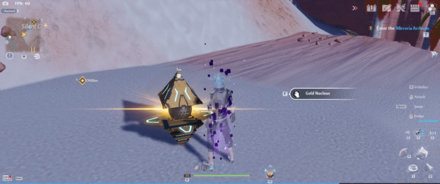
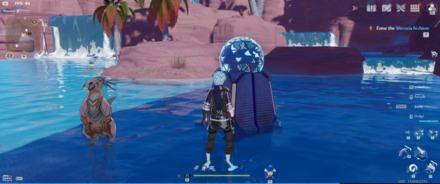
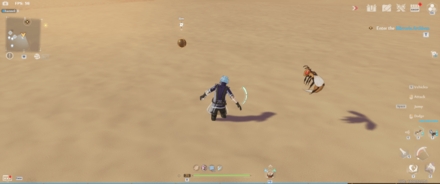
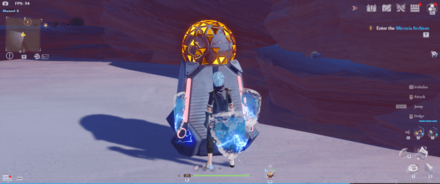
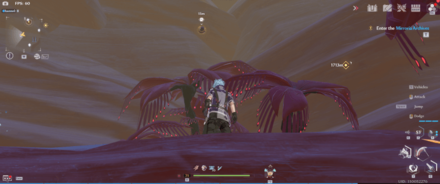
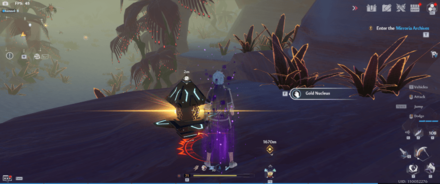
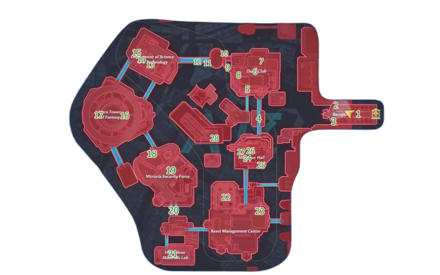
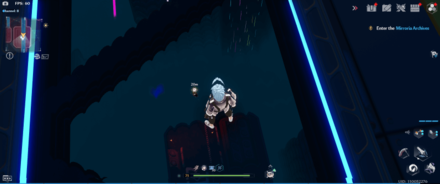
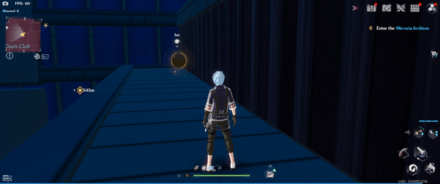
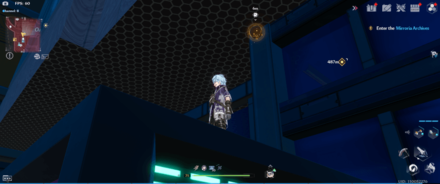
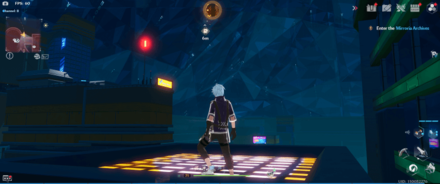
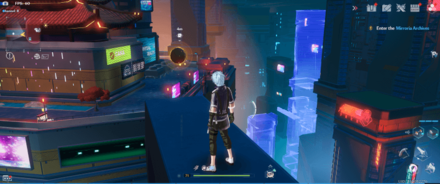
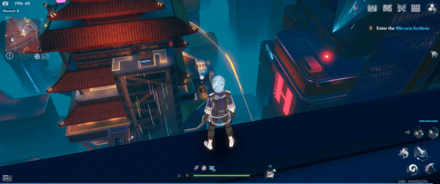
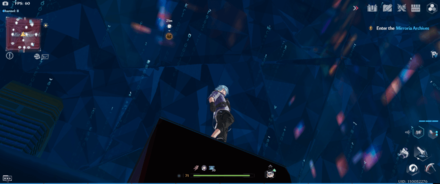
Mirroria District A Gold Nucleus Locations
 View Full Image |
||
| No. | Map View | World View |
|---|---|---|
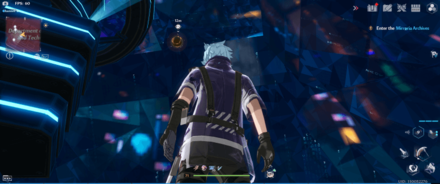
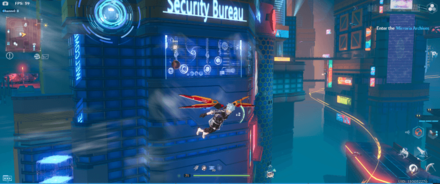
| 1 | 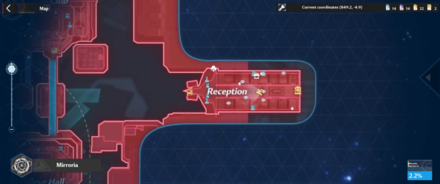 View Full Image |
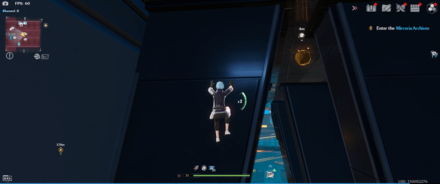 View Full Image |
| Use Jetpack/Cybernetic Arm to climb the ceiling. | ||
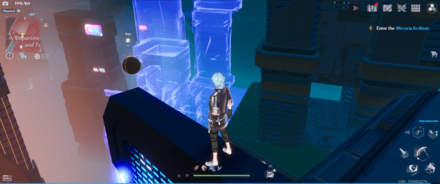
| 2 | 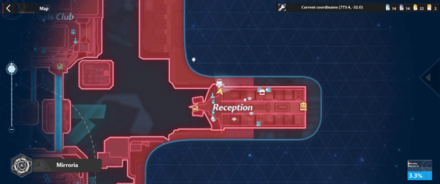 View Full Image |
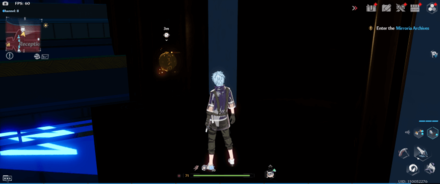 View Full Image |
| Use Jetpack/Cybernetic Arm to climb the "Welcome to Vera" sign. | ||
| 3 | 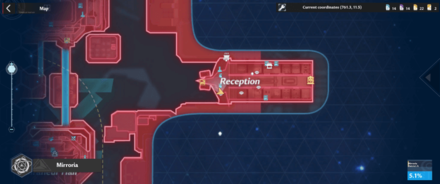 View Full Image |
 View Full Image |
| Climb the top of the Booster Store. | ||
| 4 | 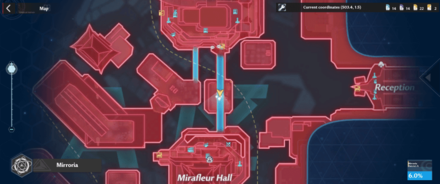 View Full Image |
 View Full Image |
| Use Jetpack to glide beneath the bridge. | ||
| 5 | 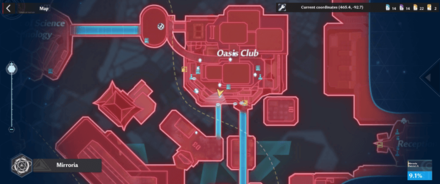 View Full Image |
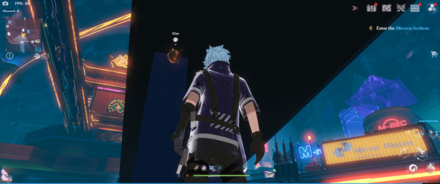 View Full Image |
| Use Jetpack to glide beneath the building. | ||
| 6 |  View Full Image |
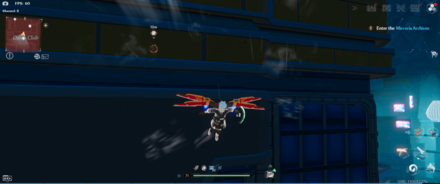 View Full Image |
| Use Jetpack/Cybernetic Arm to climb the building. | ||
| 7 | 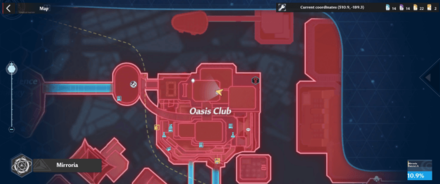 View Full Image |
 View Full Image |
| Use Jetpack/Cybernetic Arm to glide towards a horizontal building. | ||
| 8 | 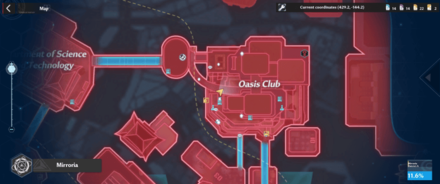 View Full Image |
 View Full Image |
| Use Jetpack to glide underneath the building. | ||
| 9 | 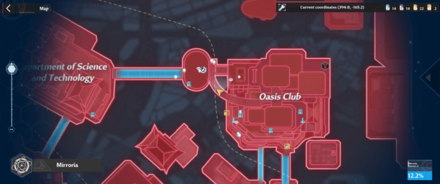 View Full Image |
 View Full Image |
| Use Jetpack/Cybernetic Arm to reach the bridge. | ||
| 10 | 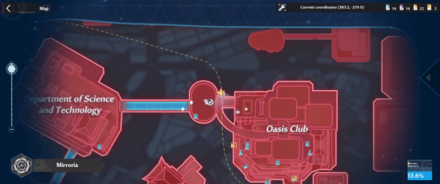 View Full Image |
 View Full Image |
| Use Jetpack to glide downwards. | ||
| 11 | 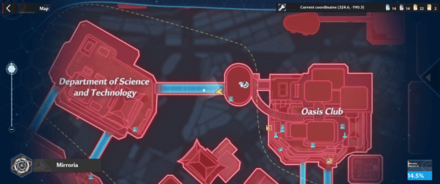 View Full Image |
 View Full Image |
| Use Jetpack/Cybernetic Arm to climb the higher. | ||
| 12 | 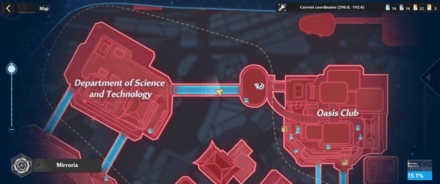 View Full Image |
 View Full Image |
| Use Jetpack/Cybernetic Arm to climb the roof of the bridge. | ||
| 13 | 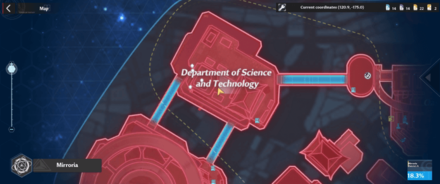 View Full Image |
 View Full Image |
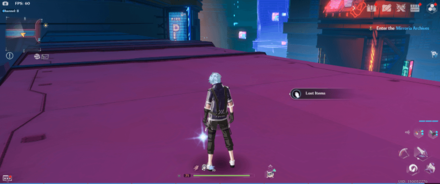
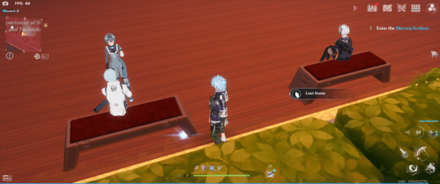
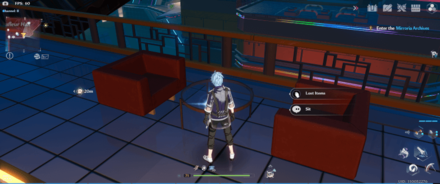
| Found underneath a bench. | ||
| 14 | 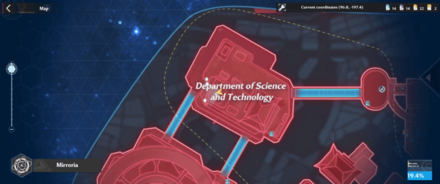 View Full Image |
 View Full Image |
| Use Jetpack/Cybernetic Arm to climb the highest roof of the building. | ||
| 15 | 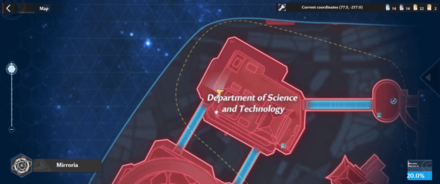 View Full Image |
 View Full Image |
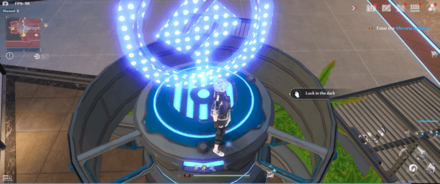
| Use Jetpack/Cybernetic Arm to climb the billboard. | ||
| 16 | 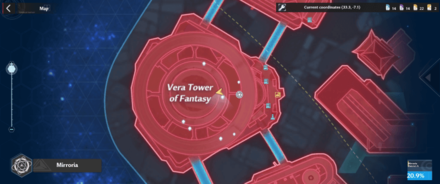 View Full Image |
 View Full Image |
| Use Jetpack/Cybernetic Arm to climb the to the highest circle around the building and climb a bit more. | ||
| 17 | 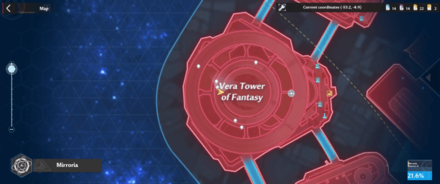 View Full Image |
 View Full Image |
| Use Jetpack/Cybernetic Arm to climb the to the highest circle around the building and climb some more. | ||
| 18 | 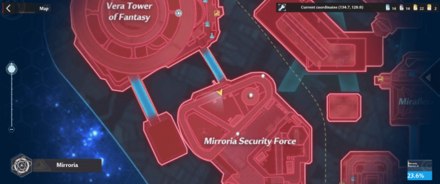 View Full Image |
 View Full Image |
| Use Jetpack/Cybernetic Arm to climb the to the billboard. | ||
| 19 | 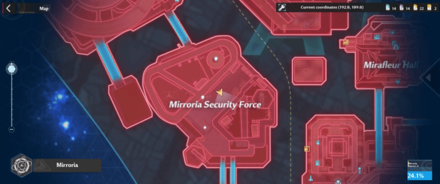 View Full Image |
 View Full Image |
| Use Jetpack/Cybernetic Arm to glide beneath into the space between the building. | ||
| 20 | 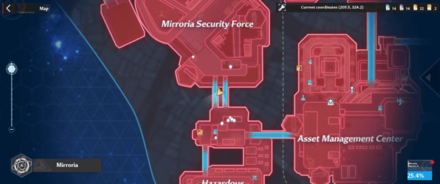 View Full Image |
 View Full Image |
| From the roof of a nearby building, use Jetpack/Cybernetic Arm to glide downwards towards the bridge. | ||
| 21 | 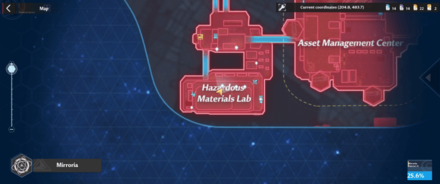 View Full Image |
 View Full Image |
| Use the Handcannon & Jetpack to reach it on top of the roof. | ||
| 22 | 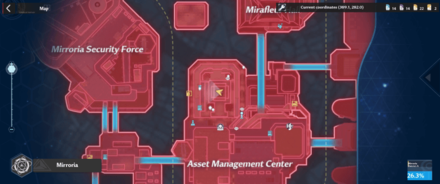 View Full Image |
 View Full Image |
| Climb the pillar and use the Handcannon & Jetpack to reach it. | ||
| 23 | 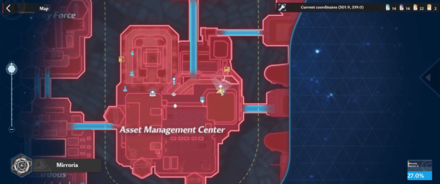 View Full Image |
 View Full Image |
| Use Jetpack/Cybernetic Arm to climb the to the roof. | ||
| 24 | 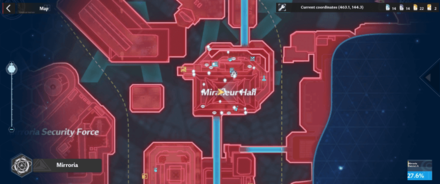 View Full Image |
 View Full Image |
| Use Jetpack/Cybernetic Arm to climb the to the roof. | ||
| 25 | 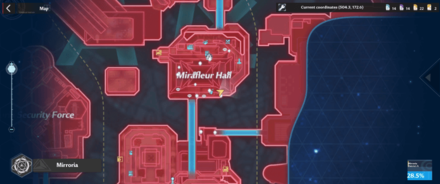 View Full Image |
 View Full Image |
| Use Jetpack/Cybernetic Arm to climb and reach the table. | ||
| 26 | 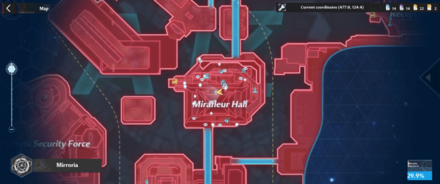 View Full Image |
 View Full Image |
| Use Jetpack/Cybernetic Arm to climb to the roof behind the text. | ||
| 27 | 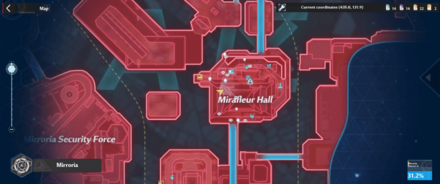 View Full Image |
 View Full Image |
| Use Jetpack/Cybernetic Arm to climb to the left side of the roof. | ||
| 28 | 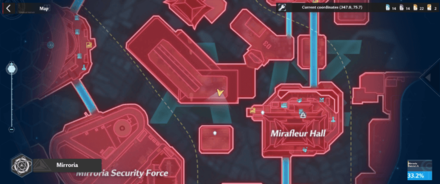 View Full Image |
 View Full Image |
| Found between the crates. | ||
Best Way to Earn Gold Nucleus
| How to Get Gold Nucleus |
|---|
|
|
Explore the World

You can earn tons of Gold Nucleus as you travel and explore around the open world. You will get Gold Nucleus on some chests and by reaching certain exploration progress in an area.
Solve Harder Puzzles and Get to Hard-to-Reach Areas
There are some puzzles that are a bit harder to reach and solve. Try to be patient and look for ways to clear and get to that puzzle, as there is a high chance that it rewards Gold Nucleus.
Complete Quests

Completing quests will also get you some Gold Nuclei. Track those quests that reward Gold Nuclei to clear and get them faster.
Get the Advancement Reward on Battle Pass

Battle Pass gives lots of Gold Nuclei as well. Increase the Battle Pass to specific levels to obtain Gold Nucleus. Gold Nuclei are only available in the Advancement Reward, and you can buy them using real money in the game.
Exchange Dark Crystals for Gold Nucleus

Gather enough Dark Crystals, and you will be able to exchange them for a Gold Nucleus. You will need 150 Dark Crystals to get one Gold Nucleus. Other activities may give both Dark Crystals and Gold Nuclei, meaning you may obtain both if you clear them!
Do Daily Bounties
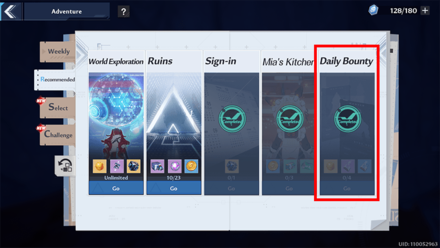
You will get a Gold Nucleus after clearing the four daily Bounties as a bonus reward.
It might be a little bit underwhelming compared to other methods, but it is a surefire way to get Gold Nucleus consistently. Be patient and wait for the server to reset every day to clear it again!
Where to Spend Gold Nucleus
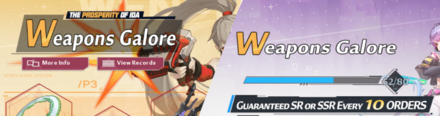
Special Order Gacha Banners

The only use of the Gold Nucleus is to get characters and weapons on the Gacha banner. You can roll once using one Gold Nucleus and ten times using ten Gold Nuclei.
All Special Order (Gacha) Banners For Characters, Weapons, and Matrices
Difference Between Red, Gold, and Black Nucleus
Gold and Black Nuclei Banners Have Different Pity System
The main difference between Gold and Black Nuclei Banners is their Pity System. You can get guaranteed rarity weapons on the Gold Nucleus Banner, while the Black Nucleus doesn't have any guaranteed rolls.
However, both Banners use the same list of characters and weapons you can get. It means you can still get an SSR on the Black Nucleus Banner even if its drop rates are low and there is no pity system.
Differences Between Gold and Black Nucleus
| Category | Differences | |
|---|---|---|
| Gold Nucleus | Black Nucleus | |
| How to Get | Get using Dark Crystal, exploration, quests, and top-up | Obtainable through exploration and quests only |
| SR Pity System | Guaranteed on 10th Pull | No Pity System |
| SSR Pity System | Guaranteed on 80th Pull | No Pity System |
| Cost | Consumes 1 Gold or Black Nucleus for each pull | |
| Pull Rates | SSR: 2% overall SR: 12% overall |
SSR: 0.3% overall SR: 3% overall |
Red Nucleus is Only Usable on the Limited-Time Banner

The Red Nucleus is the only Gacha Currency you can use in the limited character banner. The only way to get it in the game is to exchange Dark Crystals as of the moment. They might add it to the Advanced Rewards on the Battle Pass in the future, just like in the ToF CN version!
Tower of Fantasy Related Guides

Beginner's Guide: All Tips and Tricks
Beginner Guides
Farming Guides
Game Mechanics
Frequently Asked Questions
Miscellaneous Guides
Author

Gold Nucleus Map and Locations
Please participate in our site
improvement survey
03/2026
improvement survey
03/2026
Would you assist in
improving Game8's site?
improving Game8's site?

×
We are listening to our users' valuable opinions and discussing how to act on them.
The information collected through this survey will be used for the purpose of improving our services. In addition, the information will only be disclosed a part of a statistic in a format that will not allow identification of personal information.
Begin Survey
Not Now
×
Please rate each item regarding Game8.co's Advertisements.
Amount of Ads
Very Dissatisfied
Somewhat Dissatisfied
Fine
Somewhat Satisfied
Highly Satisfied
Placement of Ads
Timing of Ad Display
Ad Loading Speed
Safeness of Ads
Content of Ads
×
Please rate each item regarding Game8.co's Quality of Articles.
Amount of information
Very Dissatisfied
Somewhat Dissatisfied
Fine
Somewhat Satisfied
Highly Satisfied
Frequency of updates
Speed of new information
Accuracy of articles
Understandibility of articles
Readability of sentences
×
Please rate each item regarding Game8.co's Usability of the Site.
Ease of finding information
Very Dissatisfied
Somewhat Dissatisfied
Fine
Somewhat Satisfied
Highly Satisfied
Loading Speed
Use of Color
Font Size
Visibility of Images
Easy to Understand Layout
×
Please rate each item regarding Game8.co's Message Boards, Comments.
Ease of Writing
Very Dissatisfied
Somewhat Dissatisfied
Fine
Somewhat Satisfied
Highly Satisfied
Readability
Ease in Finding Information
Comment Quality
Comment Quantity
Admin Response
×
Please rate each item regarding Game8.co's Site's new design.
Please rate our site's new design
Very Dissatisfied
Somewhat Dissatisfied
Fine
Somewhat Satisfied
Highly Satisfied
Do you think that the website's design change makes the site easier to use?
Has the new design made it easier for you to find information on the site?
Has the new design improved the overall visual appeal of the site?
How would you rate your overall satisfaction with the new design of the site?
×
How likely are you to recommend Game8 to someone you know?
Very Unlikely
0
1
2
3
4
5
6
7
8
9
10
Very Likely
If you have other opinions regarding potential improvement to the website, please share them with us. We would appreciate your honest opinion.
Note: This is a free response section, so you can proceed without entering anything.
Note: Please be sure not to enter any kind of personal information into your response.
Note: Please be sure not to enter any kind of personal information into your response.
×
Thank You
×
Thank you for participating in our survey! Your answers will help us to improve the quality of our website and services.
We hope you continue to make use of Game8.
We hope you continue to make use of Game8.
Close
Rankings
- We could not find the article you were looking for.
- We could not find the message board you were looking for.
Gaming News


![Monster Hunter Stories 3 Review [First Impressions] | Simply Rejuvenating](https://img.game8.co/4438641/2a31b7702bd70e78ec8efd24661dacda.jpeg/thumb)
Popular Games

Genshin Impact Walkthrough & Guides Wiki
Honkai: Star Rail Walkthrough & Guides Wiki
Umamusume: Pretty Derby Walkthrough & Guides Wiki
Pokemon Pokopia Walkthrough & Guides Wiki
Resident Evil Requiem (RE9) Walkthrough & Guides Wiki
Monster Hunter Wilds Walkthrough & Guides Wiki
Wuthering Waves Walkthrough & Guides Wiki
Arknights: Endfield Walkthrough & Guides Wiki
Pokemon FireRed and LeafGreen (FRLG) Walkthrough & Guides Wiki
Pokemon TCG Pocket (PTCGP) Strategies & Guides Wiki


Recommended Games
Diablo 4: Vessel of Hatred Walkthrough & Guides Wiki
Cyberpunk 2077: Ultimate Edition Walkthrough & Guides Wiki
Fire Emblem Heroes (FEH) Walkthrough & Guides Wiki
Yu-Gi-Oh! Master Duel Walkthrough & Guides Wiki
Super Smash Bros. Ultimate Walkthrough & Guides Wiki
Pokemon Brilliant Diamond and Shining Pearl (BDSP) Walkthrough & Guides Wiki
Elden Ring Shadow of the Erdtree Walkthrough & Guides Wiki
Monster Hunter World Walkthrough & Guides Wiki
The Legend of Zelda: Tears of the Kingdom Walkthrough & Guides Wiki
Persona 3 Reload Walkthrough & Guides Wiki


All rights reserved
TOWER OF FANTASY©HOTTA STUDIO, A PERFECT WORLD COMPANY. ALL RIGHTS RESERVED.
©2022 PROXIMA BETA PTE, LTD. ALL RIGHTS RESERVED
The copyrights of videos of games used in our content and other intellectual property rights belong to the provider of the game.
The contents we provide on this site were created personally by members of the Game8 editorial department.
We refuse the right to reuse or repost content taken without our permission such as data or images to other sites.