This survey will take about 1 minute.
Your answers will help us to improve our website.
Zelda: Echoes of Wisdom (EoW)
Gerudo Sanctum Walkthrough
▲ 100% the game with our Interactive Map!
▲ Zelda amiibo give Ingredients & Outfits.
▲ Best Dungeon Order and Best Echoes.
▲ Heart Pieces | Might Crystals | Tri Power
▲ Best Smoothies | All 69 Recipes
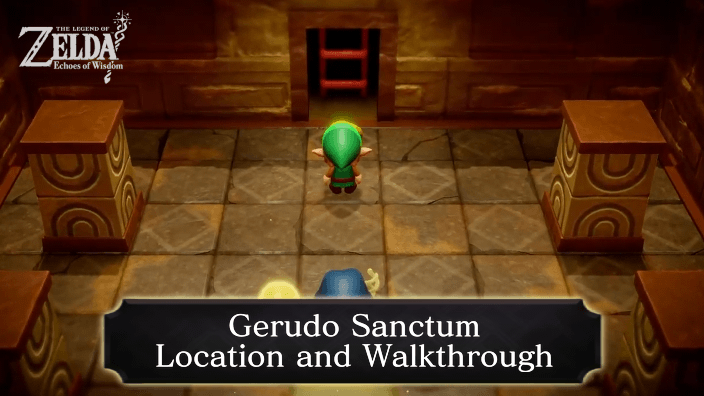
Gerudo Sanctum is a dungeon in The Legend of Zelda: Echoes of Wisdom (EoW) and is located in Gerudo region. Read on for a complete walkthrough guide, boss guide, all treasures, map, and all new Echoes learned.
| ◀︎ Previous Quest | Next Quest ▶︎︎ |
|---|---|
| The Mysterious Rifts | Still Missing |
| Searching for Everyone Questline | |
| Searching for Everyone ┣ The Jabul Waters Rift ┗ A Rift in the Gerudo Desert ┣ Southern Oasis Ruins Rift ┣ Ancestor's Cave of Rest Rift ┣ Southern Gerudo Desert Rift ┗ ▶︎︎ ★ Gerudo Sanctum |
|
List of Contents
Gerudo Sanctum Preparation
Best Echoes For Gerudo Sanctum
| Echo | Usage |
|---|---|
 Boulder Boulder
|
・Can block environmental hazards |
 Boomerang Boarblin Boomerang Boarblin
|
・Can defeat enemies and help with both the miniboss and boss |
 Old Bed Old Bed
|
・Can be used as a staircase to reach higher platforms ・Can be used to restore hearts |
 Flying Tile Flying Tile
|
・Can destroy environmental obstructions from a distance ・Can be used to glide across areas |
 Holmill Holmill
|
・Can dig up holes on sandy surfaces |
 Peahat Peahat
|
・Can spin and attack enemies continuously in combat |
 ReDead ReDead
|
・Can immobilize enemies near its vicinity when it screeches |
 Wind Cannon Wind Cannon
|
・Can be used to get rid of sand dunes ・Can be used to blow away flames when set ablaze |
|
Holmill
|
・Can dig holes on sand surfaces |
 Platboom Platboom
|
・Can be used to ascend and reach high areas ・Can be used to crush enemies |
Best Smoothies For Gerudo Sanctum
| Smoothies | Benefit |
|---|---|
| Smoothies that Restore Hearts | Smoothies that restore hearts are generally recommended when exploring the Gerudo Sanctum, given the amounts of environmental hazards and enemies that you will encounter as you progress through the area. |
Gerudo Sanctum Location
Gerudo Desert
The Gerudo Sanctum is located in the Gerudo Desert as part of the A Rift in the Gerudo Desert Main Quest.
A Rift in the Gerudo Desert Walkthrough
How to Get to Gerudo Sanctum
| # | Objectives |
|---|---|
| 1 |
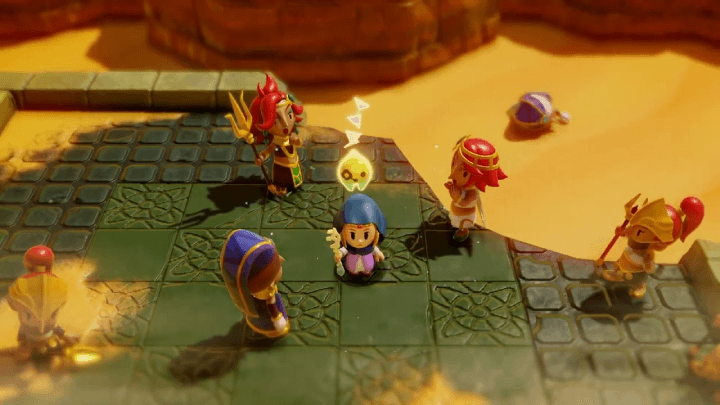
 Head to the north of Gerudo Town and enter the Gerudo Palace. Talk to Dohna and wait for the cutscene between the characters to end. |
| 2 |
 After the dialogue ends, warp to the waypoint on the oasis and head northeast towards the Rift. From there, progress the Stilled Desert Temple Ruins until you find all Tri's friends and mend the rift. A cutscene will play out once you exit the Still World. ▶︎ Stilled Desert Temple Ruins Walkthrough |
| 3 |
 When progressing the Stilled Desert Temple Ruins, you will encounter platforms with eyes trying to crush you as you move along the dungeon area. Defeat this platform when it descends to acquire the Platboom echo. This echo is particularly useful when trying to reach high areas or crushing enemies with its weight, so be sure to get it for easier progression in the Gerudo Sanctum. |
| 4 |
Head south of the Gerudo Desert or warp there using a waypoint. From there, talk to the guard located at the cave entrance. Progress the Cryptic Cavern, and pull the drainage block you find along the end. A cutscene will appear where the sand blocking the entrance to the Gerudo Sanctum will descend. |
Gerudo Sanctum Walkthrough
|
|
Get the Small Key
| Objectives | |
|---|---|
| 1 | 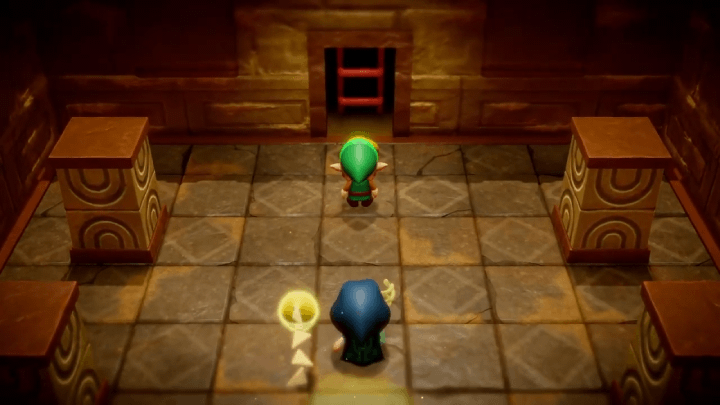 Go inside the entrance and interact with the yellow swirl. After Tri creates the entrance, dive in to access a dungeon room where someone who looks like Link is standing. Follow Link to where he's headed and climb the ladder. |
| 2 |
Head to the right and conjure a Boulder Echo to block the wind coming out of the wind cannon. Once blocked, climb the walls and jump towards the platform where a Boulder is blocking your path. Push the Boulder down and block the wind from the wind cannon below. From there, jump to the left and climb the ladders leading up the room. |
| 3 | 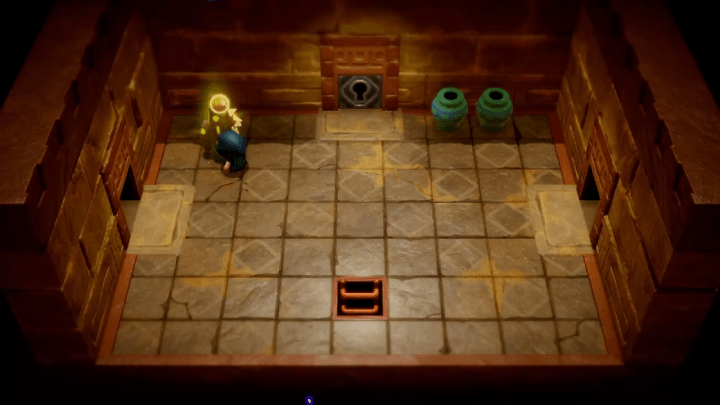 You'll reach a room that has three entrances, with both the east and west ones being accessible while the north one requiring a key. Activate the waypoint you find inside and head to the west entrance first. |
| 4 |
 Once you've entered the room, flying tiles will head in your direction. Interact with a glowing tile and learn the Flying Tile echo. Avoid the Flying Tiles or summon a Boulder Echo and hide behind it until all the Flying Tiles are gone. Open the treasure chest that spawns after all the tiles are gone to get 20 Rupees. |
| 5 |
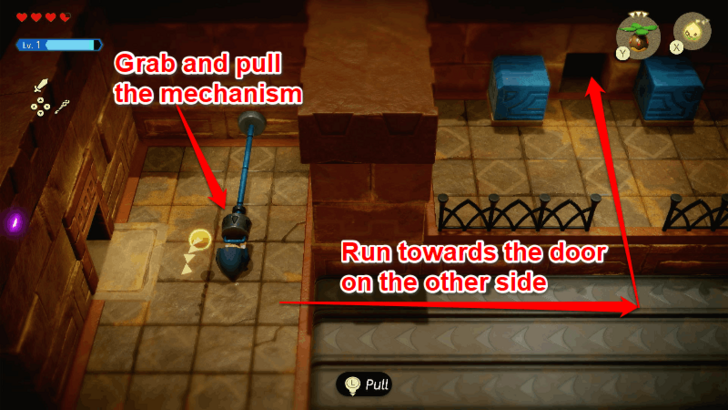 Head back to the east room, and enter the doorway on the right. Grab and pull the mechanism near the entrance to open the blue door on the other side. |
| 6 |
You'll notice that the floor leading to the other platform is moving towards the left. Use the Flying Tile Echo, Strandtula Echo, or Trampoline Echo to reach it. Summon any of these Echoes to reach the ledge leading to the next room. |
| 7 |
Use Bind to pull the entrance to the north sideways. Once the entrance is revealed, head inside and open the treasure chest you find there. Acquire the key and return to the dungeon room with the three entrances. |
Get the Hawk Statue Echo
| Objectives | |
|---|---|
| 1 | 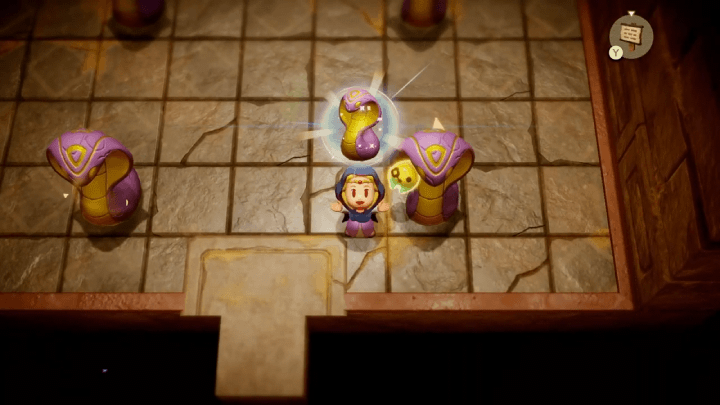 Use the small key you've acquired and open the entrance to the north. From there, learn the Snake Statue Echo by interacting with one of the four statues in the room. Proceed north of the room. |
| 2 | 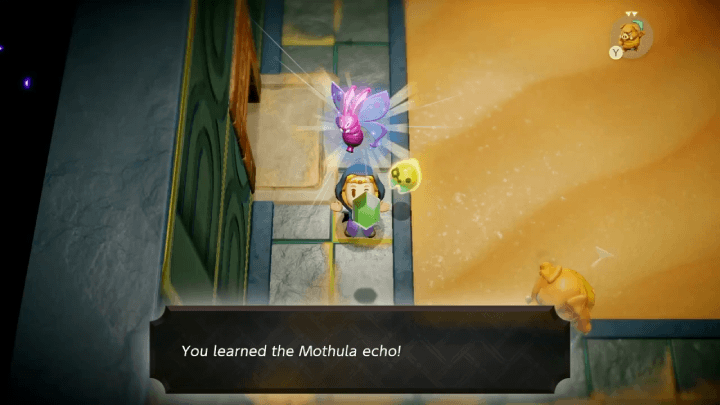 Defeat the flying Mothulas in the room. You can accomplish this easily by spamming Spear Moblins and holding them with Bind. You can also summon an Ignizol Echo and throw it towards the enemies to burn them. Proceed west to exit the room and head south to the exit to progress. There is also another side of this room with a chest, but its behind a wall. Ignore it for now and head south to exit. |
| 3 |
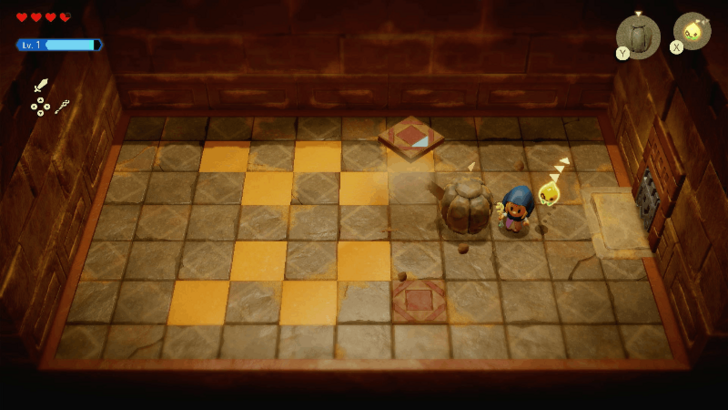
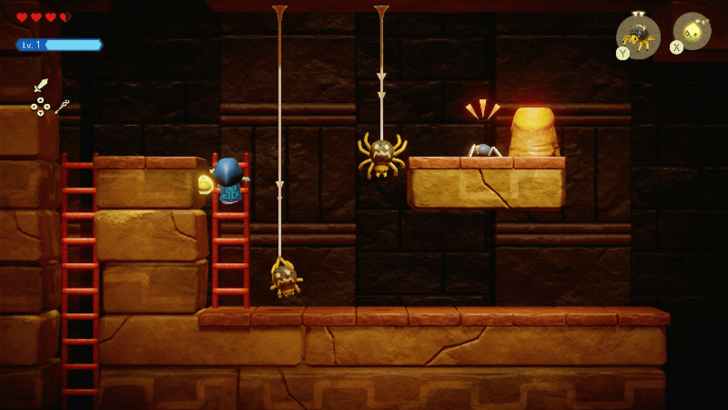
Conjure the Flying Tile or Rock and aim it towards the boxes located on the other platform located west. You can cross the gaps between the moving and unmoving platforms by jumping or using the Old Bed Echo or the Water Block echo. Climb down the ladder once you've landed. |
| 4 |  Descend the dungeon room and defeat the Caromadillos you encounter on your path. Use Monster Echoes or activate Swordfighter Form to beat them and acquire their echo. |
| 5 | 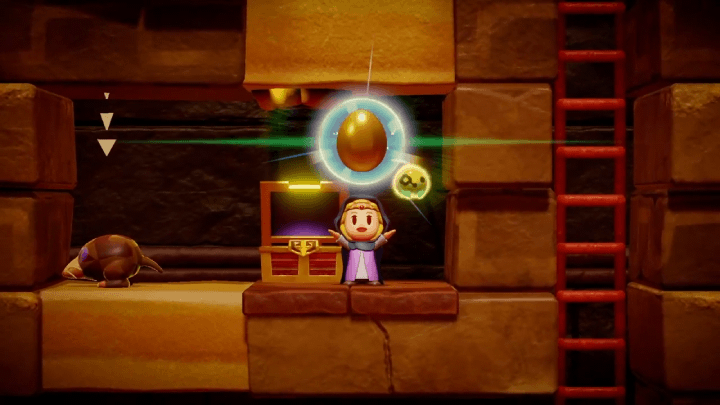 The dungeon room can be descended by either using the Holmill Echo to dig holes in the sand blocks or climbing down the ladders. A treasure chest with a golden egg can be found when using the former to descend the dungeon room. |
| 6 |
After climbing down the stairs, activate the waypoint in the room. You'll notice that the north entrance has two pedestals to its front, which will be important to remember later. Use Bind to open the east gate sideways and pass through. |
| 7 | 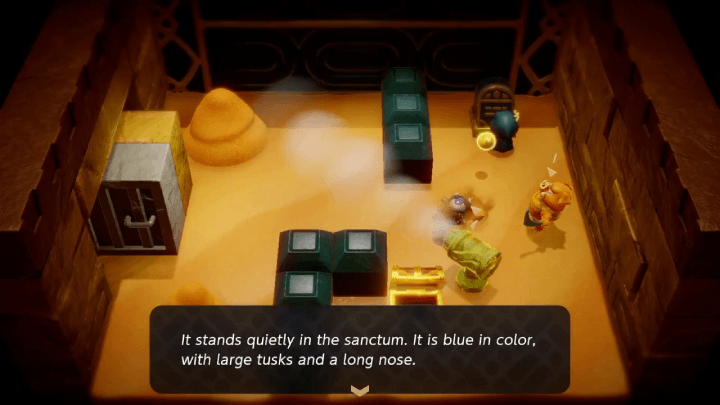 Defeat the Holmill you find inside the room. Use Bind to remove it from its nesting hole. From there, blow away the sand dunes using the Wind Cannon echo. Removing the sand dunes will reveal a treasure chest containing 10 portions of Rock Salt and a stone tablet that can lead to a clue regarding the entrance with the two pedestals. |
| 8 | 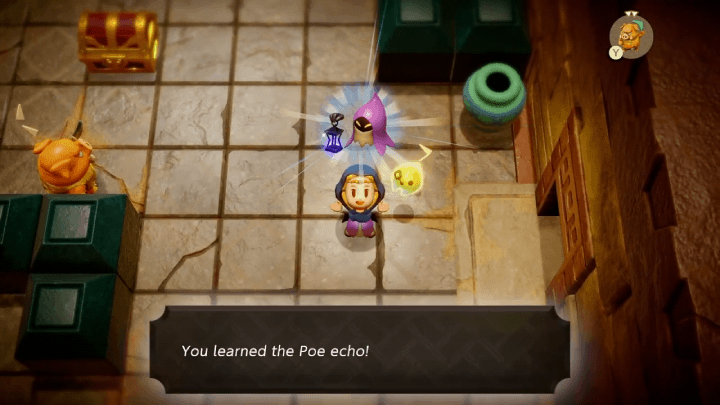 Go back to the room with the Waypoint and head west to enter a room with a Poe. Defeat it using the Crow Echo or using Swordfighter Form to learn its Echo. Open the treasure chest to obtain the Dungeon Map. Leave the room by heading to the south exit. |
| 9 | 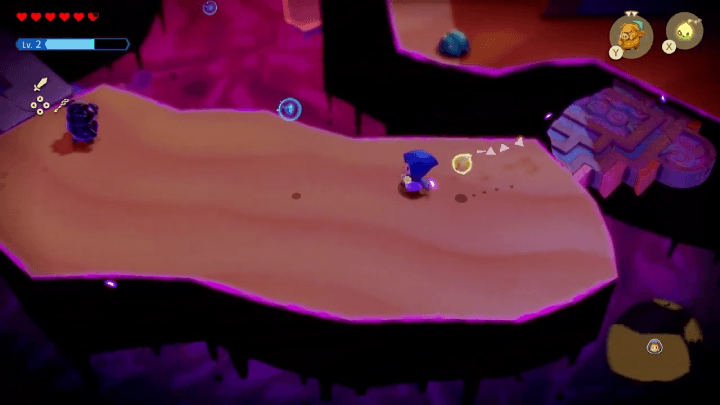 Once you've exited the dungeon, you will notice Link lurking about outside. Follow him, and proceed north of the area as you continue along the path and defeat enemies you encounter. Open the buried treasure chest found on an elevated platform to receive 20 rupees. |
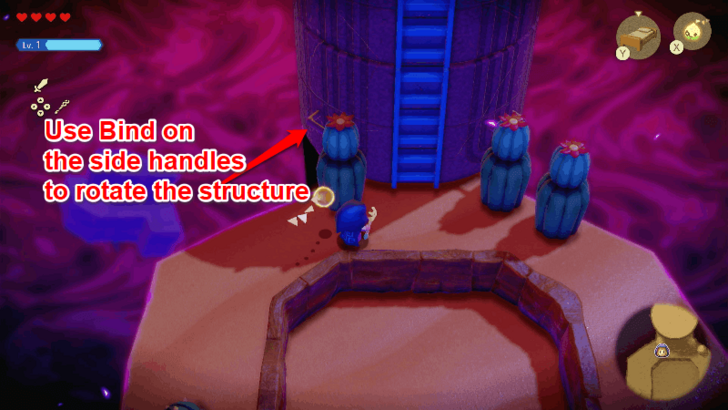
| 10 |
You will notice a circular, stone structure divided into two sections on your path. Use Bind and pull the section below towards the left to realign it to create a ladder that allows you to ascend to the top. You can also use the Platboom Echo to ascend the top. Open the treasure chest at the top of the circular pillar to get 50 Rupees. |
| 11 | 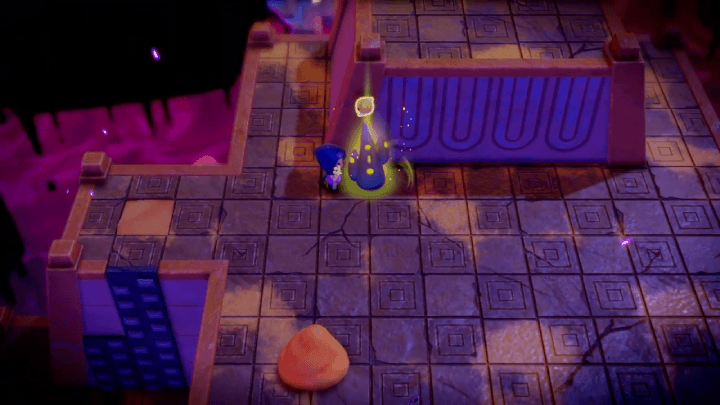 You will encounter a Waypoint that you can activate when using your map. Defeat the enemies in the area and blow away the sand dunes using the Wind Cannon to reveal a treasure chest containing a Monster Stone. From there, head to the east portion of the area and descend down using the climbable walls you find. |
| 12 |  You can also choose to dig the sand surface just west of the waypoint using the Holmill Echo and descend down the blocked treasure chest room just west of the boss entrance to acquire the 50 Rupees inside the chest. Use another Holmill Echo on the sand to exit this room. Once you head back to the Stilled Gerudo Sanctum, open the map and warp to the previous Waypoint you just unlocked. |
| 13 |
 After climbing down the wall on the right side, you will notice an entrance to your left leading inside the Gerudo Sanctum. Ignore the entrance for now and proceed to the right. Use a Wind Cannon Echo to push away the ReDeads on the narrow hallway and throw an Ignizol Echo at them to burn them from a safe distance. You will need to ascend the area until you reach another stone structure. Use Bind to realign the stone structure and climb it to acquire the Hawk Statue echo. You can skip realigning the stone pillar by using a Platboom Echo to reach the top part of the pillar. |
Get the Elephant Statue Echo
| Objectives | |
|---|---|
| 1 |  Head back to the entrance to Gerudo Sanctum and pull the opening mechanism that opens the entrance located on the other platform. Conjure a Flying Tile Echo, Strandtula Echo, or Trampoline Echo and use either of them to reach across so you can enter the next area. |
| 2 |  Defeat the enemies you encounter in the room. Press the ZR button near one of the Cat Statues to acquire it as an echo. |
| 2 |
 Head towards the north entrance and activate the waypoint in the next room. You can try breaking the six pots in the area to get some ingredients. |
| 3 | 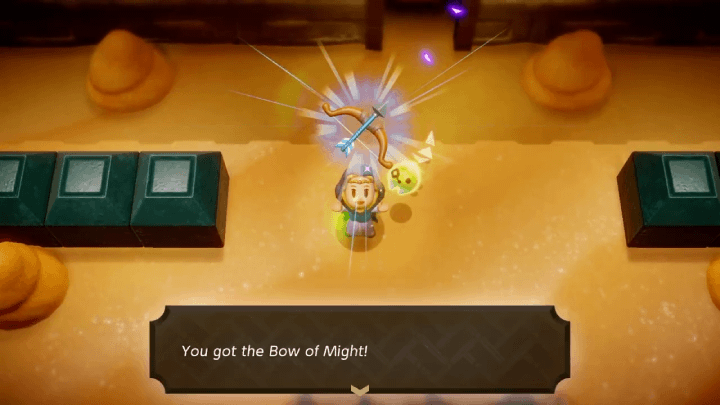 You will need to defeat Link to progress the area. Use two Aruroda Echoes to distract and attack Link. Once you defeat him, you will acquire the Bow of Might that lets you fire arrows during Swordfighter Form. Head to the north entrance to progress the dungeon. ▶︎ How to Beat Archer Link |
| 4 |
Once you reach the succeeding area, defeat the Beetles that appear from the mound to learn its Echo. You can also learn the Beetle-Mound Echo by reacing the ledge in the middle of the area. If you accidentally destroyed the mound, you can go back to the previous and reenter to respawn it. |
| 5 | 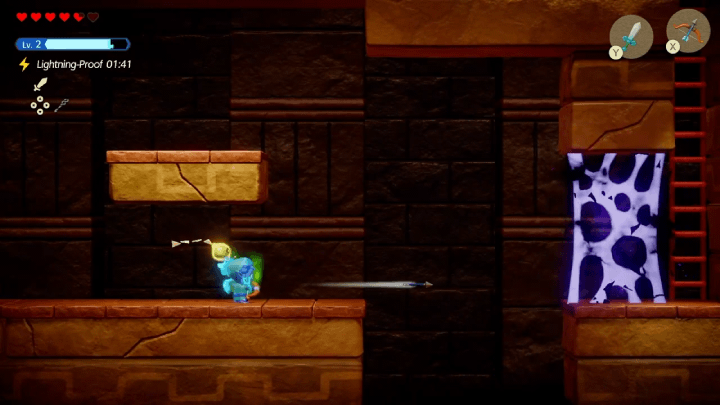 After learning the Beetle and Beetle-Mound Echoes, activate Swordfighter Form and use the Bow to destroy the rift wall on the right side. Climb the ladder to proceed to the next room. |
| 6 |  Activate the Waypoint and use Bind to redirect the flame spewing out from the Flame Cannon on your right. Once redirected, use the moving platform to reach the area across. For the succeeding Flame Cannons, you can use Bind to redirect the cannons or use an Echo like the Boulder or Statue to block the fire while hiding behind it when using the moving platforms. |
| 7 |
Once you've reached the other end of the moving platform, interact with one of the Elephant Statues and get it as an echo. From there, open the treasure chest containing a small key. |
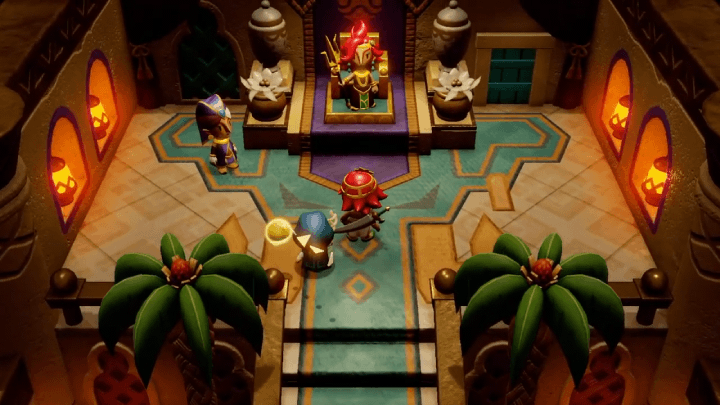
Defeat Mogryph
| Objectives | |
|---|---|
| 1 |  Head back to the Waypoint preceding the area where you fought Link and proceed to the area where you can find the cat statues. Continue south, and you'll find the area where the entrance needs an opening mechanism. Head right to open the door using the Small Key you got. |
| 2 |
Use Bind to pull the entrance gate sideways. |
| 3 |
Activate Swordfighter Form and use the Bow to remove the Wooden Box on the bottom of the Wind Cannon. Use Bind on the Flame Cannon to redirect its spewing flames and light the torches in the area. Once all three torches are lit, a stone tablet will reveal itself in the area. |
| 4 | 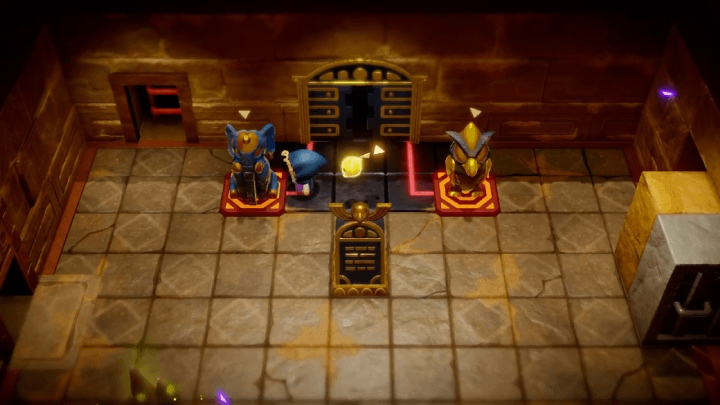 Travel back to the Waypoint area where the entrance has two pedestals in front of it. Conjure an Elephant Statue echo and place it on the left pedestal. For the right pedestal, conjure the Hawk Statue and place it on top. Proceed to the north entrance. |
| 5 | 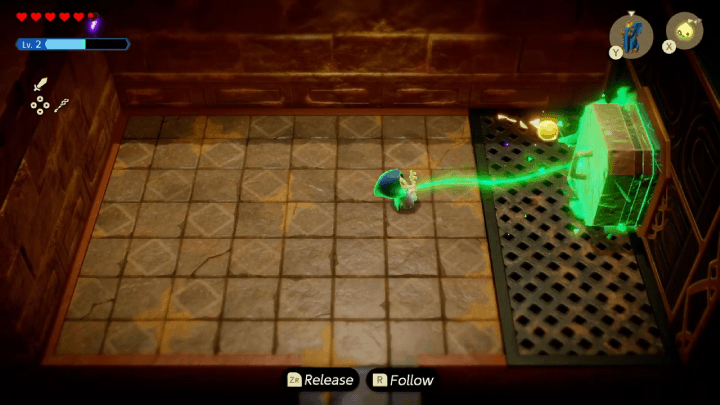 Use Bind to pull the entrance block and enter the area that was being blocked. Use the mechanism on the southwest area and adjust it to spin the blue circular wall housing the treasure chest. |
| 6 |
You will need to realign the slit of the blue circular wall to the slit of the red circular wall. Once realigned, you will need to use Bind and the blue wheel on the bottom-left to realign the slit of the green circular wall to the other slit. Open the treasure chest to acquire the Big Key and head to the entrance on the northeast. |
| 7 | 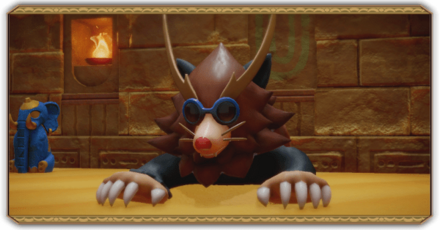 Activate the Waypoint found in the succeeding area and use the Big Key to open the door that leads to Mogryph. Defeat the boss and pick up the Heart Container that the boss drops. Interact with Tri to choose between exiting the dungeon or staying to explore some more. ▶︎ How to Beat Mogryph |
| ◀︎ Previous Quest | Next Quest ▶︎ |
|---|---|
| The Mysterious Rifts | Still Missing |
| Searching for Everyone Questline | |
| Searching for Everyone ┣ The Jabul Waters Rift ┗ A Rift in the Gerudo Desert ┣ Southern Oasis Ruins Rift ┣ Ancestor's Cave of Rest Rift ┣ Southern Gerudo Desert Rift ┗ ▶︎ ★ Gerudo Sanctum |
|
Gerudo Sanctum Bosses
Dark Link (Bow)
|
|
Mogryph

|
|
Use Statue Echoes to Block Its Attacks
You can use the statue echoes that you've learned throughout the dungeon, like the Hawk Statue, to incapacitate Mogryph. Summon a statue and let Mogryph crash into it while charging or plunging and it will be vulnerable for a few seconds.
Gerudo Sanctum Treasure and Item Locations
Treasure Chest Room West of Mogryph Entrance
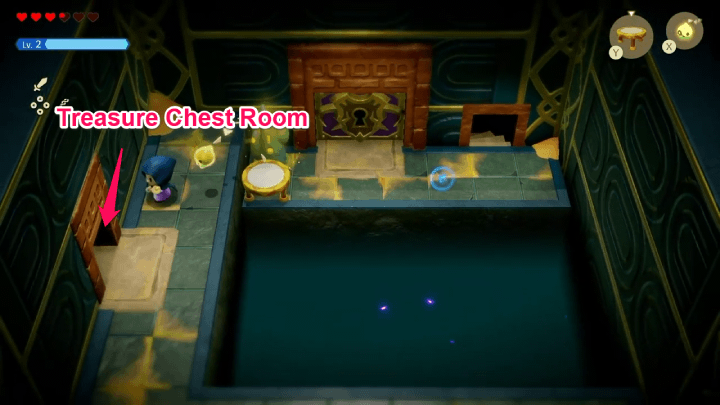
There is a treasure chest room just west of the area where the entrance to Mogryph's fight is located. When you enter the room, a treasure chest is located on the left which is inaccessible due to the wall blocking off your path.
Travel to Stilled Gerudo Sanctum Waypoint and Use Holmill Echo
Access the area by travelling to the waypoint located outside the Stilled Gerudo Sanctum. You will see a sand surface just left of the waypoint.
Use the Holmill Echo to make a hole through the sand, and descend down the room to open the treasure chest and acquire 50 Rupees.
Holmill Echo Location and How to Get
Gerudo Sanctum Map
Full Map
| Gerudo Sanctum Map |
|---|
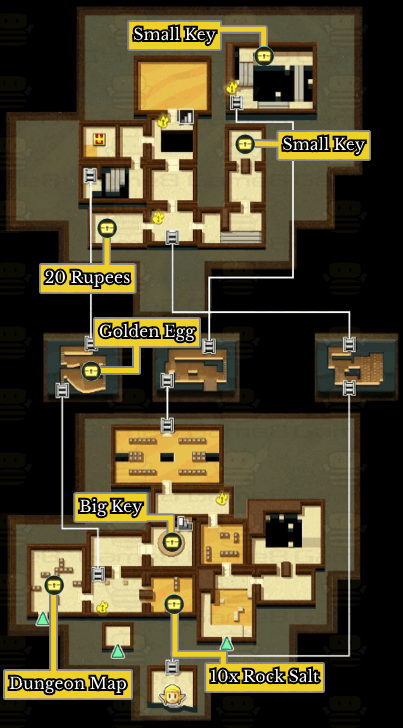 Treasures List:
• 20 Rupees • Golden Egg • 10x Rock Salt • Dungeon Map • Small Key • Small Key • Big Key |
New Echoes Learned in Gerudo Sanctum
List of Gerudo Sanctum Echoes
The list above shows the following echoes you can acquire when progressing the Gerudo Sanctum Main Quest.
Echoes List: All 127 Echo Locations
The Legend of Zelda: Echoes of Wisdom (EoW) Related Guides

| Complete Walkthrough | All Dungeons |
| Best Dungeon Order | |
Story Walkthrough Chart
Guides marked with a ★ are Dungeon Guides
Comment
Author

The Legend of Zelda: Echoes of Wisdom Walkthrough & Guides Wiki
Gerudo Sanctum Walkthrough
Please participate in our site
improvement survey
03/2026
improvement survey
03/2026
Would you assist in
improving Game8's site?
improving Game8's site?

×
We are listening to our users' valuable opinions and discussing how to act on them.
The information collected through this survey will be used for the purpose of improving our services. In addition, the information will only be disclosed a part of a statistic in a format that will not allow identification of personal information.
Begin Survey
Not Now
×
Please rate each item regarding Game8.co's Advertisements.
Amount of Ads
Very Dissatisfied
Somewhat Dissatisfied
Fine
Somewhat Satisfied
Highly Satisfied
Placement of Ads
Timing of Ad Display
Ad Loading Speed
Safeness of Ads
Content of Ads
×
Please rate each item regarding Game8.co's Quality of Articles.
Amount of information
Very Dissatisfied
Somewhat Dissatisfied
Fine
Somewhat Satisfied
Highly Satisfied
Frequency of updates
Speed of new information
Accuracy of articles
Understandibility of articles
Readability of sentences
×
Please rate each item regarding Game8.co's Usability of the Site.
Ease of finding information
Very Dissatisfied
Somewhat Dissatisfied
Fine
Somewhat Satisfied
Highly Satisfied
Loading Speed
Use of Color
Font Size
Visibility of Images
Easy to Understand Layout
×
Please rate each item regarding Game8.co's Message Boards, Comments.
Ease of Writing
Very Dissatisfied
Somewhat Dissatisfied
Fine
Somewhat Satisfied
Highly Satisfied
Readability
Ease in Finding Information
Comment Quality
Comment Quantity
Admin Response
×
Please rate each item regarding Game8.co's Site's new design.
Please rate our site's new design
Very Dissatisfied
Somewhat Dissatisfied
Fine
Somewhat Satisfied
Highly Satisfied
Do you think that the website's design change makes the site easier to use?
Has the new design made it easier for you to find information on the site?
Has the new design improved the overall visual appeal of the site?
How would you rate your overall satisfaction with the new design of the site?
×
How likely are you to recommend Game8 to someone you know?
Very Unlikely
0
1
2
3
4
5
6
7
8
9
10
Very Likely
If you have other opinions regarding potential improvement to the website, please share them with us. We would appreciate your honest opinion.
Note: This is a free response section, so you can proceed without entering anything.
Note: Please be sure not to enter any kind of personal information into your response.
Note: Please be sure not to enter any kind of personal information into your response.
×
Thank You
×
Thank you for participating in our survey! Your answers will help us to improve the quality of our website and services.
We hope you continue to make use of Game8.
We hope you continue to make use of Game8.
Close
Rankings
- We could not find the message board you were looking for.
Gaming News


![Everwind Review [Early Access] | The Shaky First Step to A Very Long Journey](https://img.game8.co/4440226/ab079b1153298a042633dd1ef51e878e.png/thumb)

![Monster Hunter Stories 3 Review [First Impressions] | Simply Rejuvenating](https://img.game8.co/4438641/2a31b7702bd70e78ec8efd24661dacda.jpeg/thumb)
Popular Games

Genshin Impact Walkthrough & Guides Wiki
Honkai: Star Rail Walkthrough & Guides Wiki
Umamusume: Pretty Derby Walkthrough & Guides Wiki
Pokemon Pokopia Walkthrough & Guides Wiki
Resident Evil Requiem (RE9) Walkthrough & Guides Wiki
Monster Hunter Wilds Walkthrough & Guides Wiki
Wuthering Waves Walkthrough & Guides Wiki
Arknights: Endfield Walkthrough & Guides Wiki
Pokemon FireRed and LeafGreen (FRLG) Walkthrough & Guides Wiki
Pokemon TCG Pocket (PTCGP) Strategies & Guides Wiki


Recommended Games
Diablo 4: Vessel of Hatred Walkthrough & Guides Wiki
Fire Emblem Heroes (FEH) Walkthrough & Guides Wiki
Yu-Gi-Oh! Master Duel Walkthrough & Guides Wiki
Super Smash Bros. Ultimate Walkthrough & Guides Wiki
Pokemon Brilliant Diamond and Shining Pearl (BDSP) Walkthrough & Guides Wiki
Elden Ring Shadow of the Erdtree Walkthrough & Guides Wiki
Monster Hunter World Walkthrough & Guides Wiki
The Legend of Zelda: Tears of the Kingdom Walkthrough & Guides Wiki
Persona 3 Reload Walkthrough & Guides Wiki
Cyberpunk 2077: Ultimate Edition Walkthrough & Guides Wiki


All rights reserved
© Nintendo. The Legend of Zelda and Nintendo Switch are trademarks of Nintendo.
The copyrights of videos of games used in our content and other intellectual property rights belong to the provider of the game.
The contents we provide on this site were created personally by members of the Game8 editorial department.
We refuse the right to reuse or repost content taken without our permission such as data or images to other sites.