
 Ingot Isle
 Lagoon Layer
 Hilltop Layer
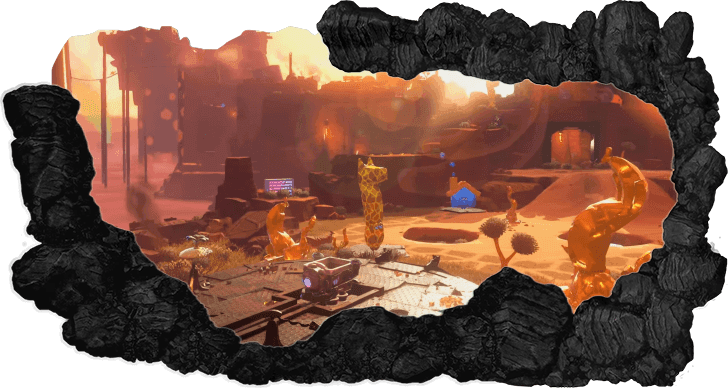 Canyon Layer
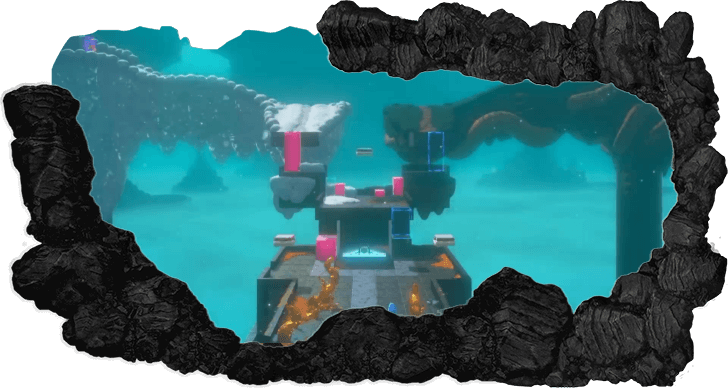 The Divide
 Freezer Layer
 Forest Layer
 The Junction
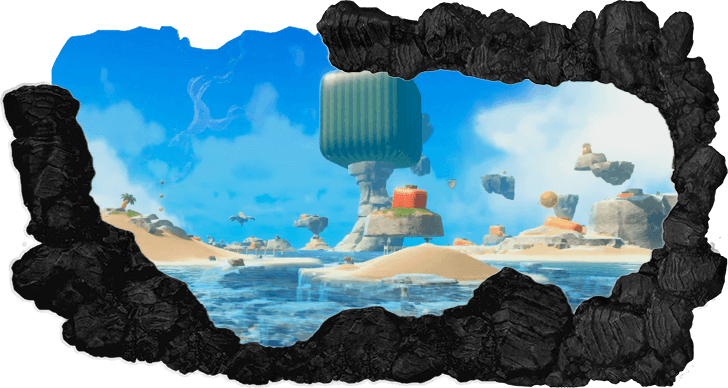 Resort Layer
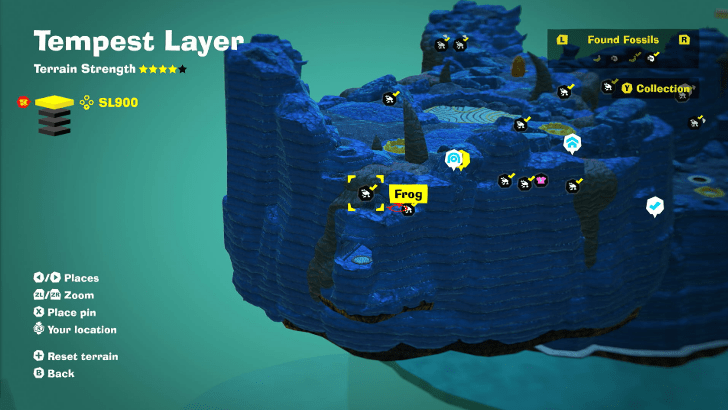
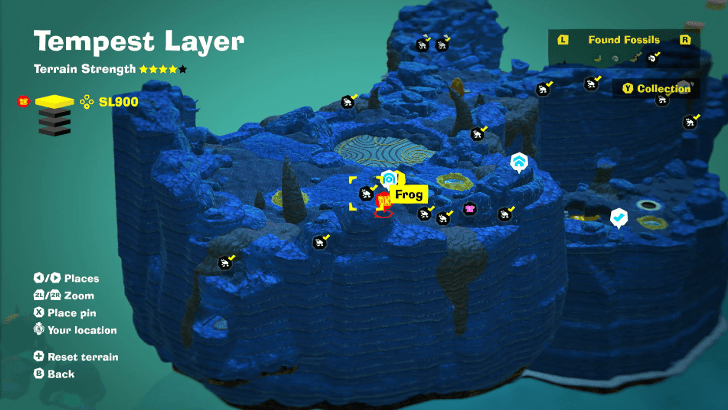
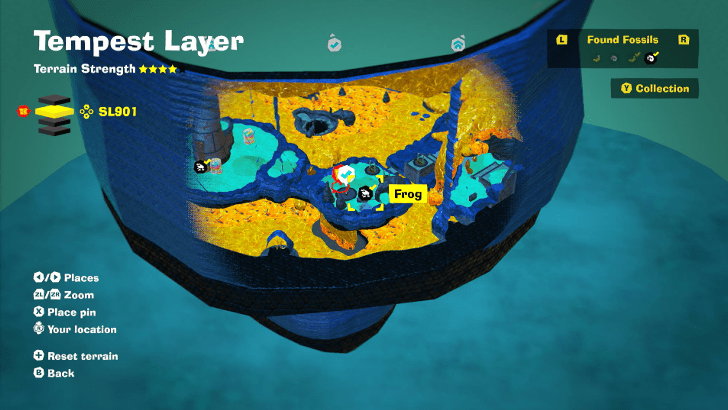
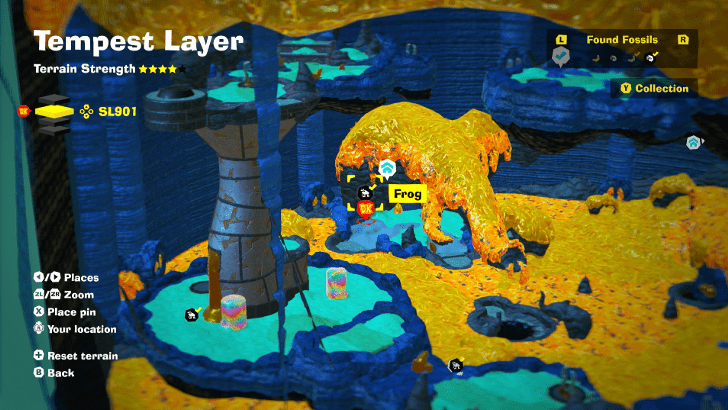
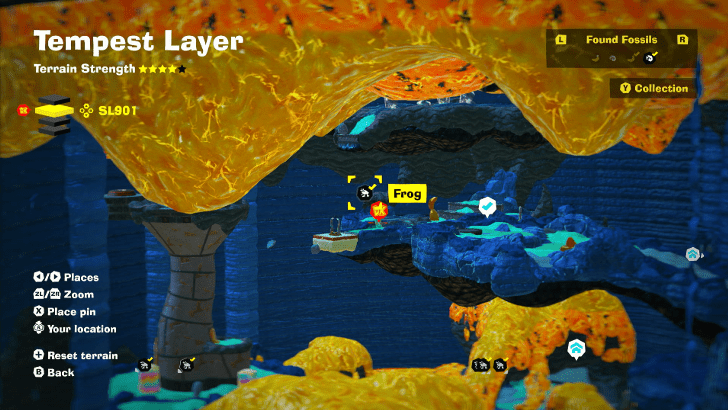
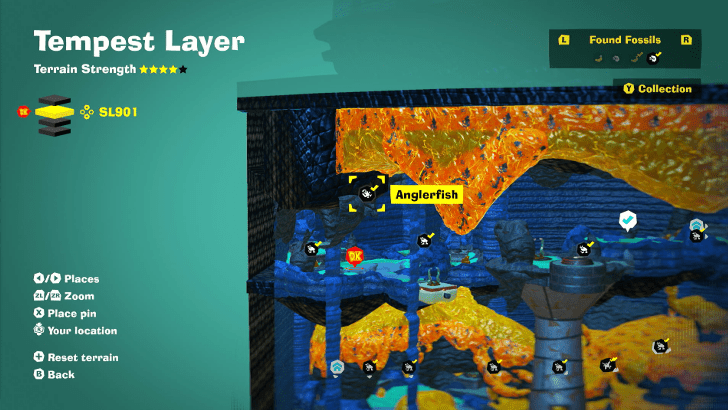
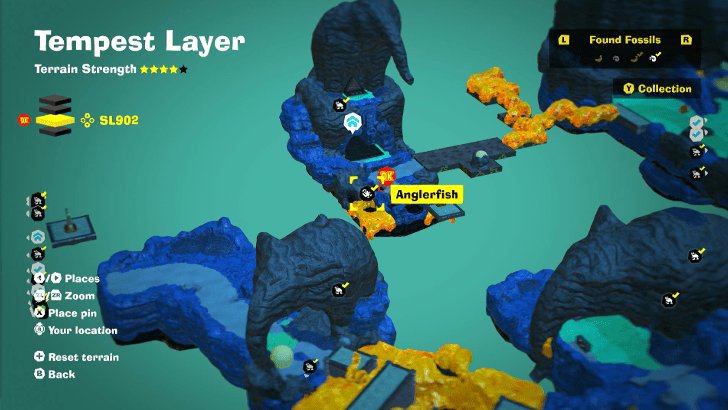
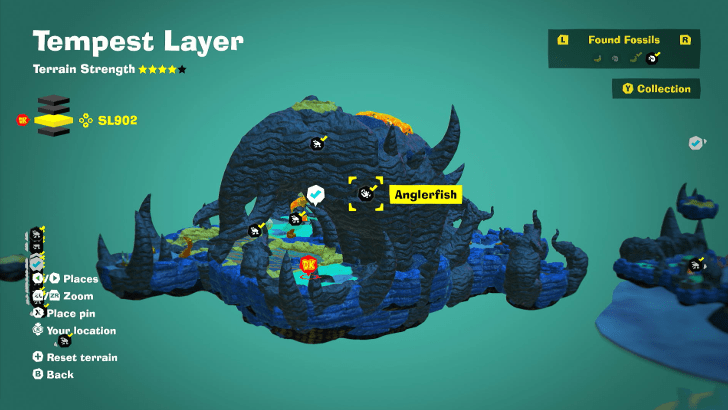
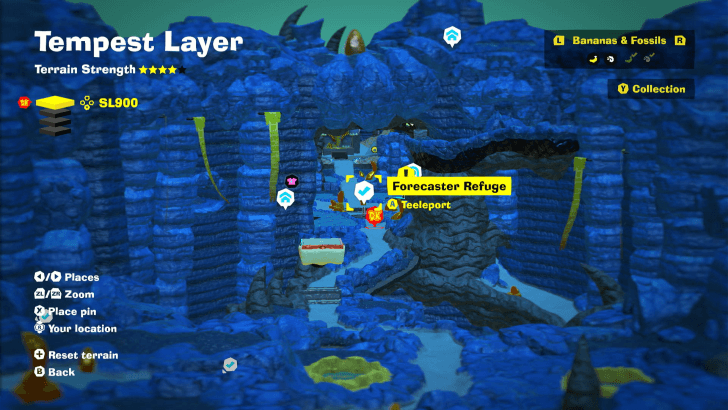
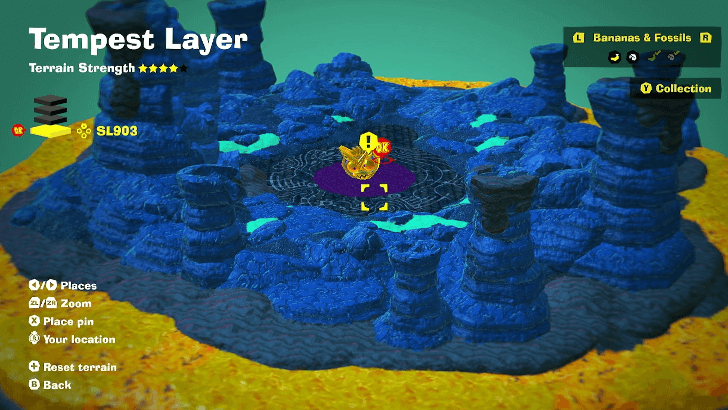
 Tempest Layer
 Landfill Layer
 Racing Layer
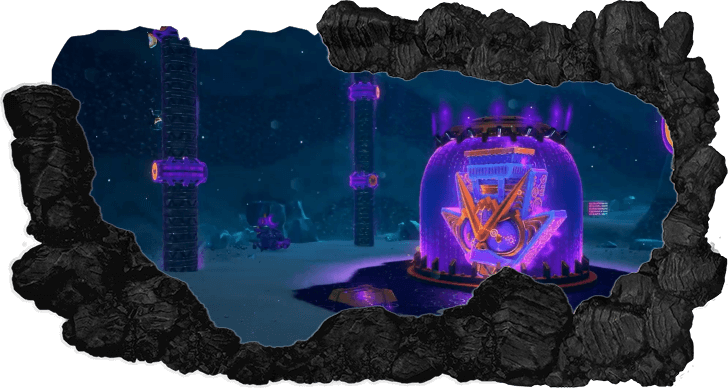 Radiance Layer
 Groove Layer
 Feast Layer
 Forbidden Layer
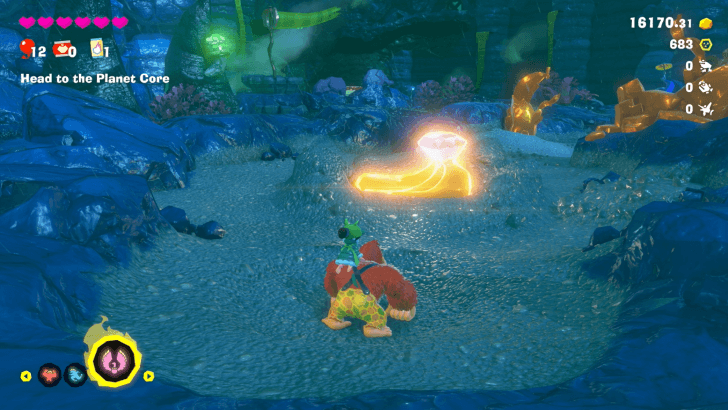
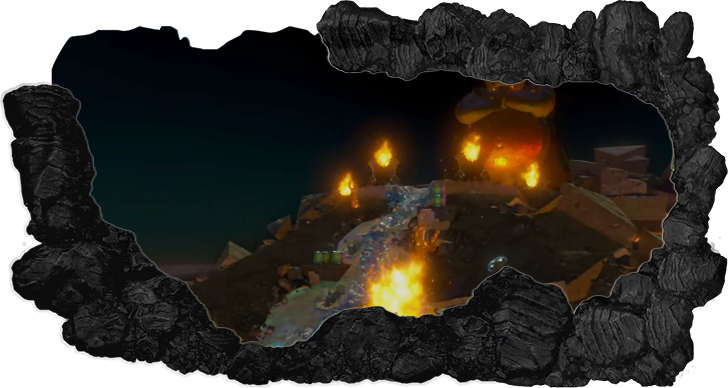 Planet Core
 DK Island
This survey will take about 1 minute.
Your answers will help us to improve our website.
Donkey Kong Bananza
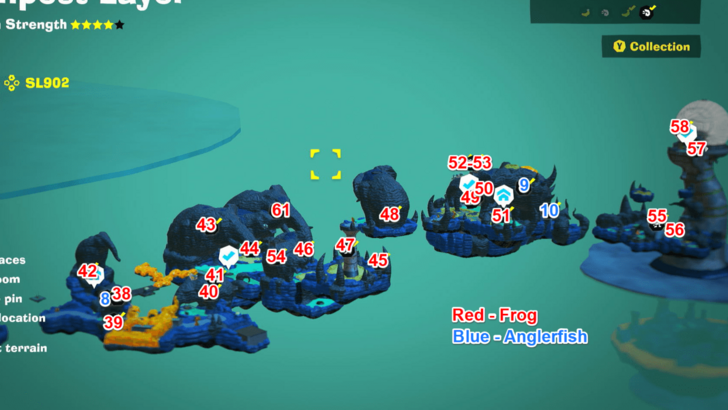
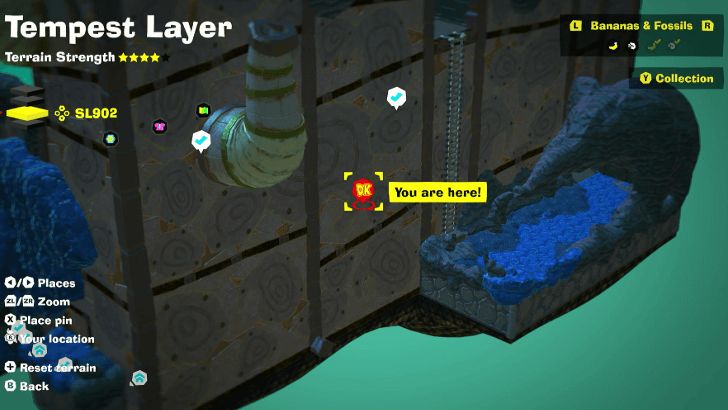
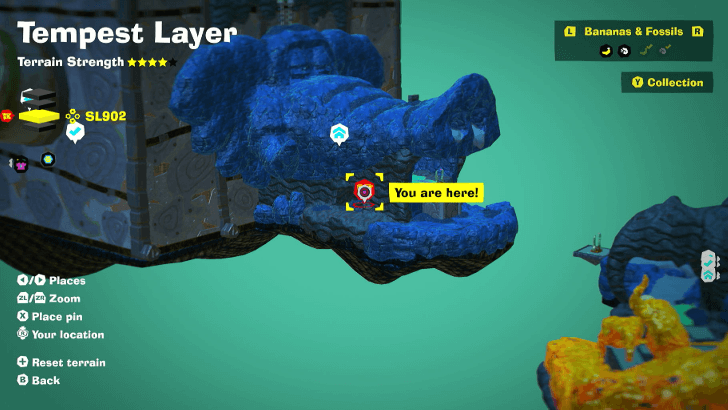
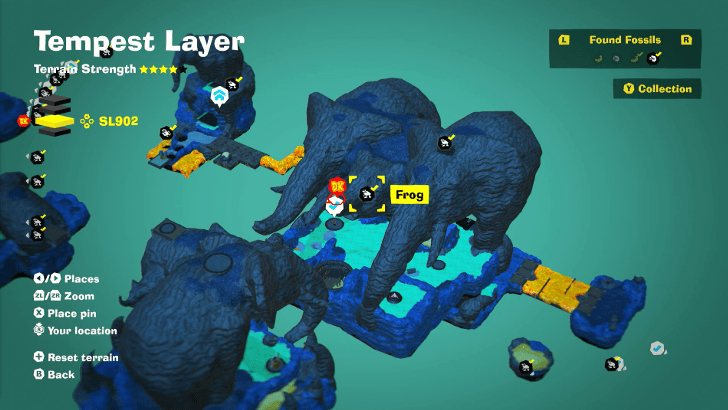
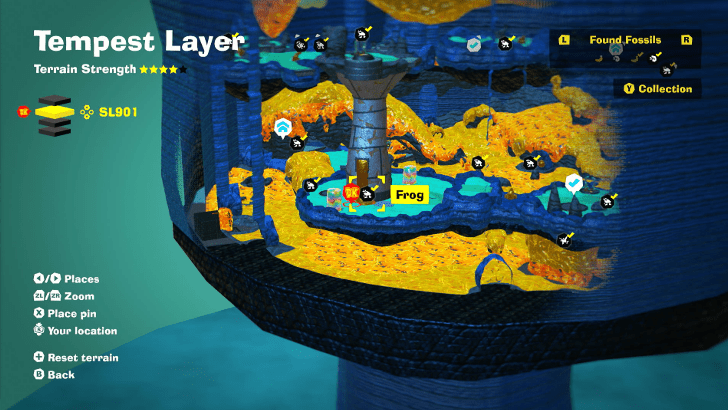
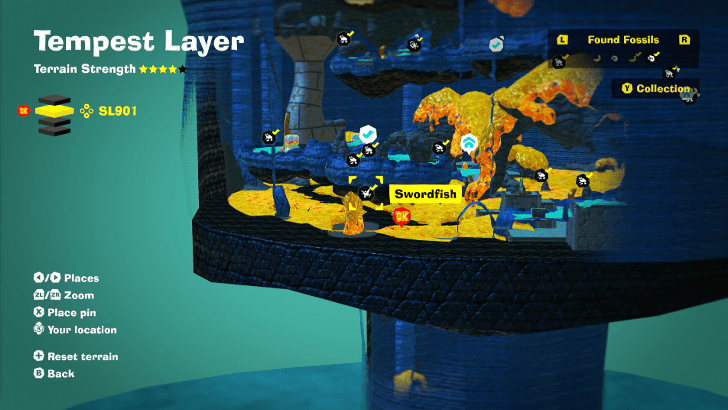
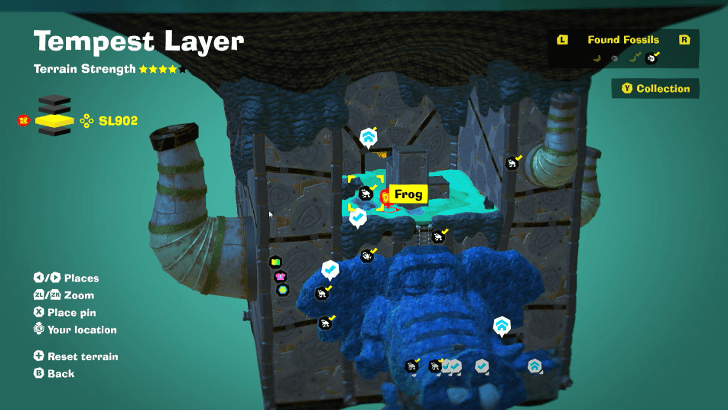
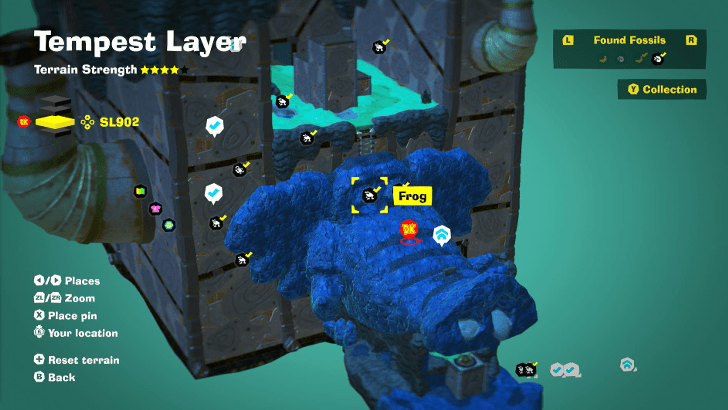
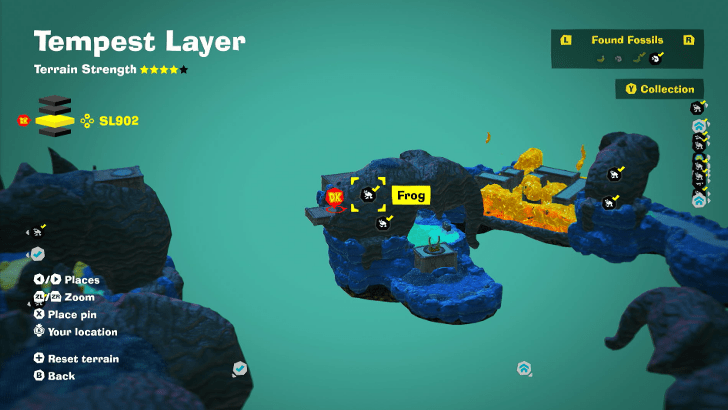
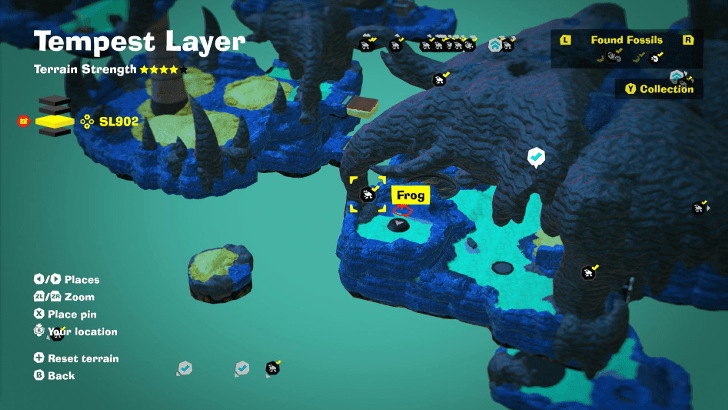
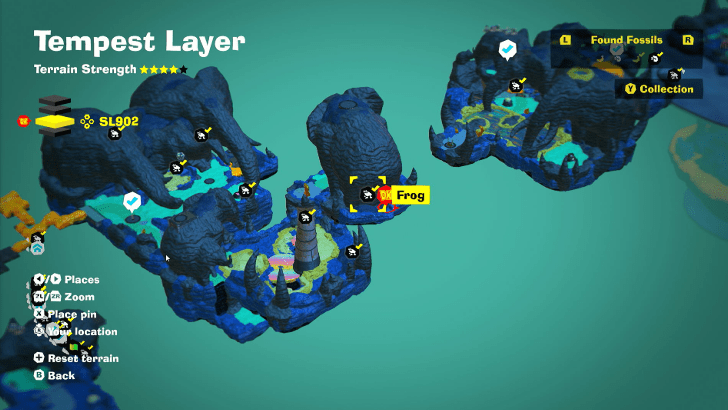
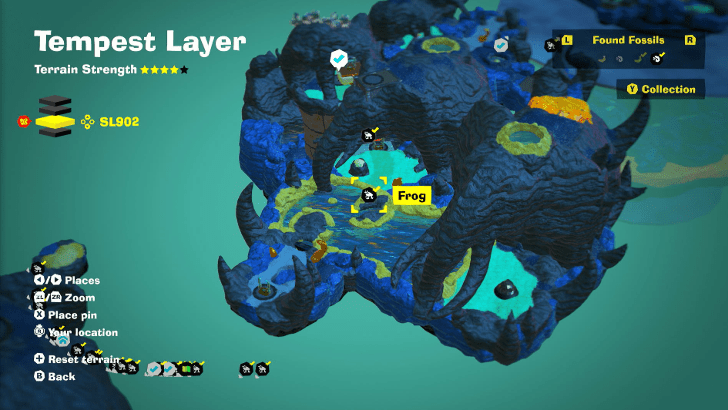
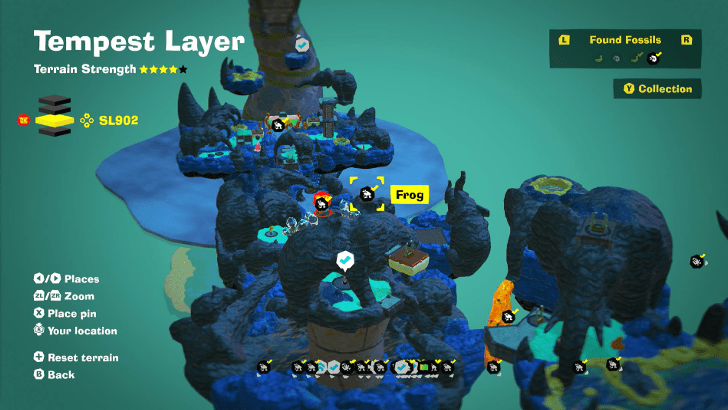
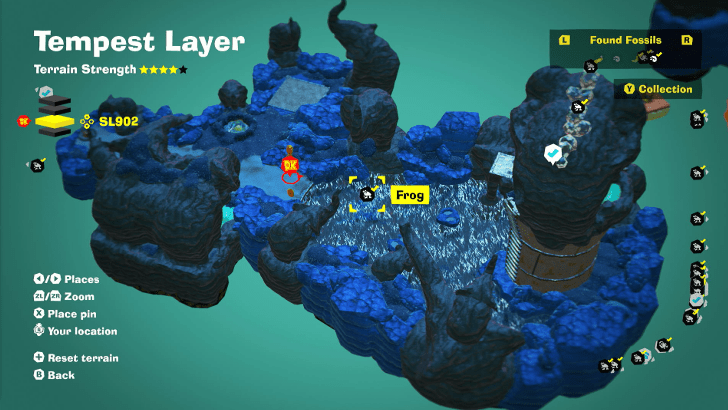
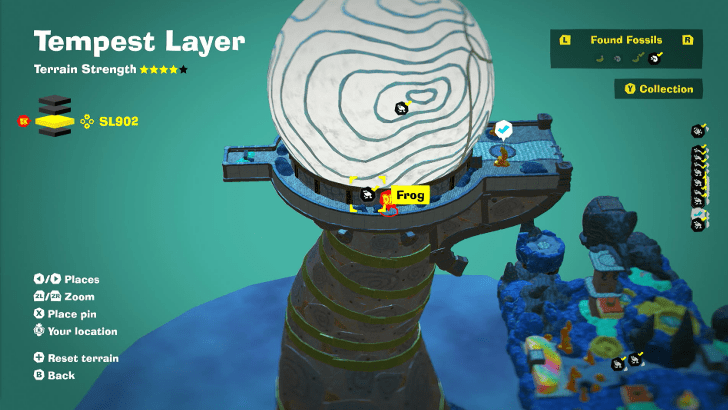
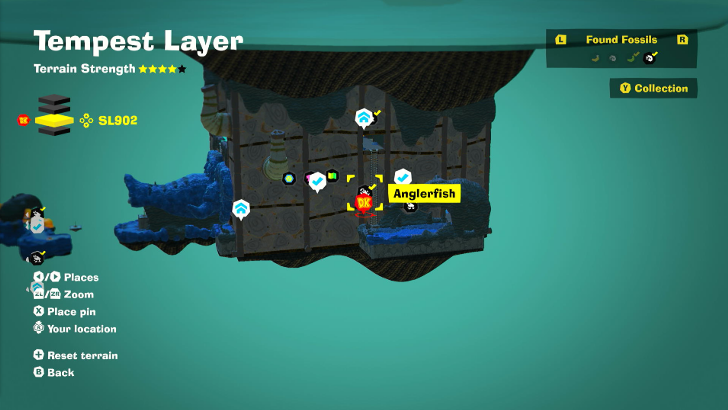
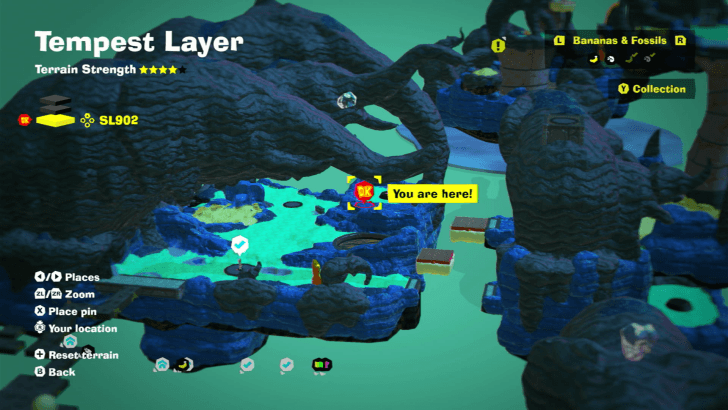
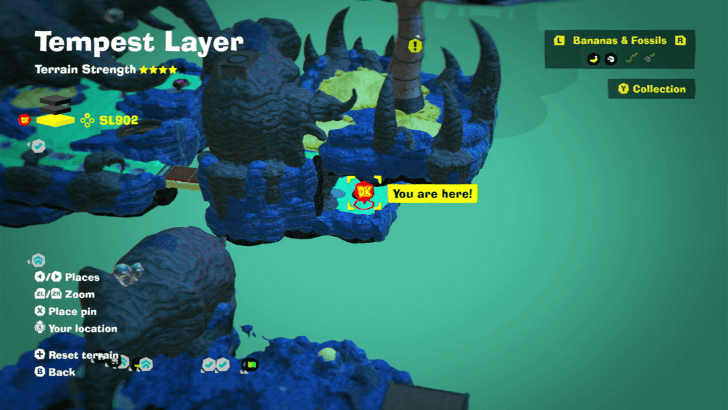
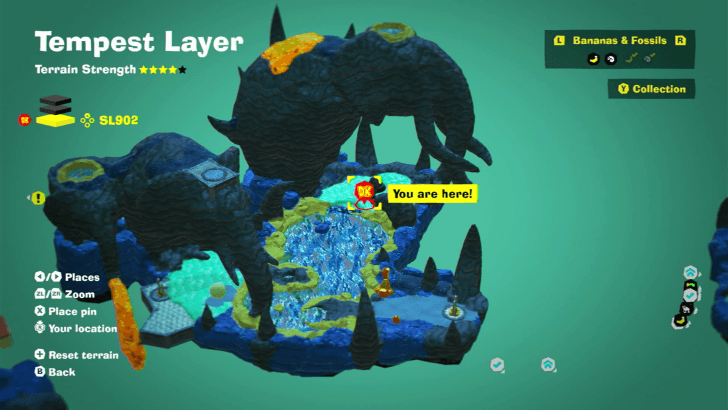
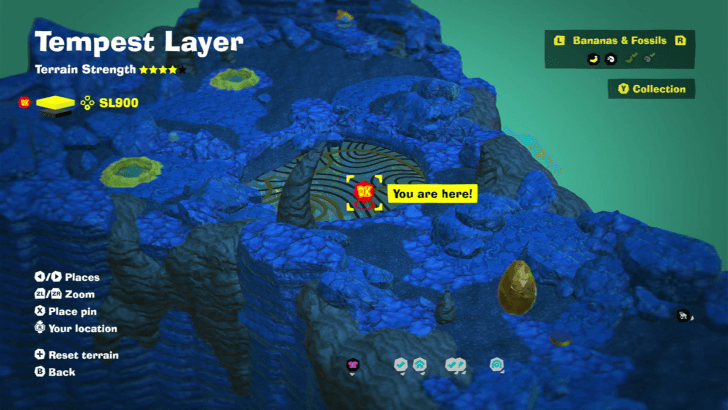
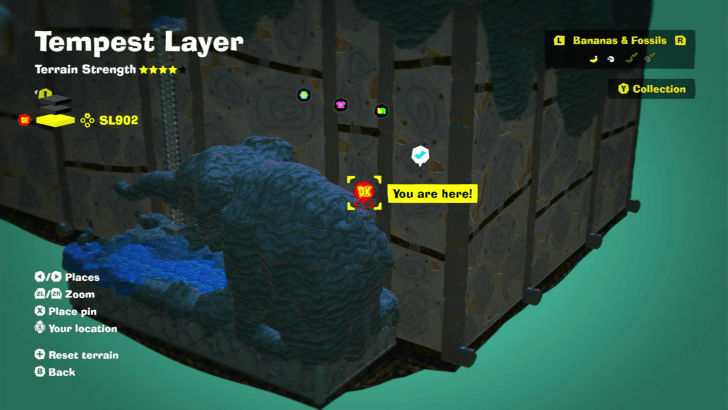
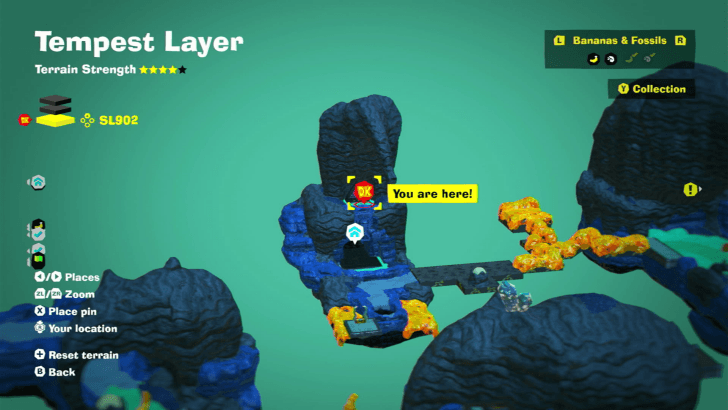
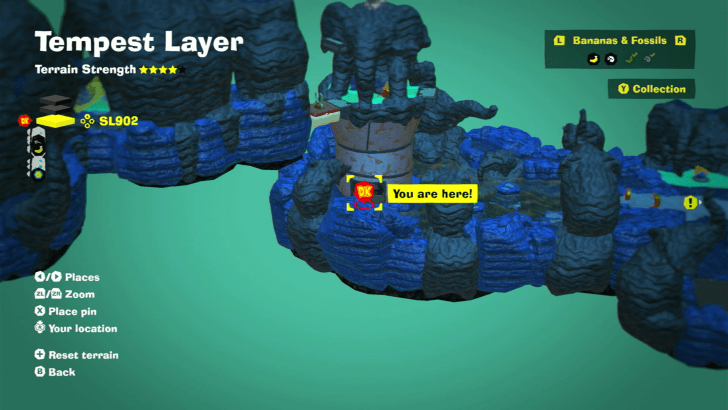
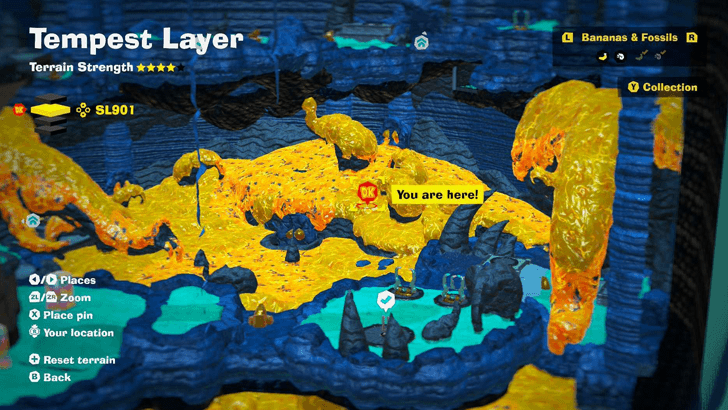
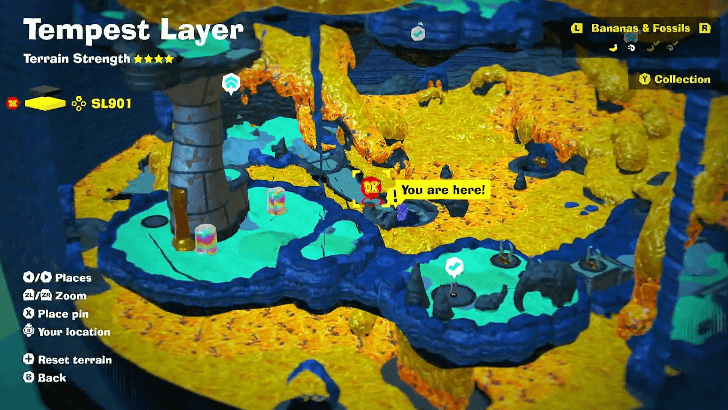
Tempest Layer Banana and Fossil Locations (SL 900-902)
☽ DK Island and Emerald Rush DLC out now!
☽ Learn how to solve Banandiumtone's Puzzles.
☽ All Collectibles: Banandium Gems and Fossils
☽ Learn How to Skip Layers Entirely!
☽ How to Beat the Final Boss
☽ Post-Game: Rehearsal Halls | Secret Ending
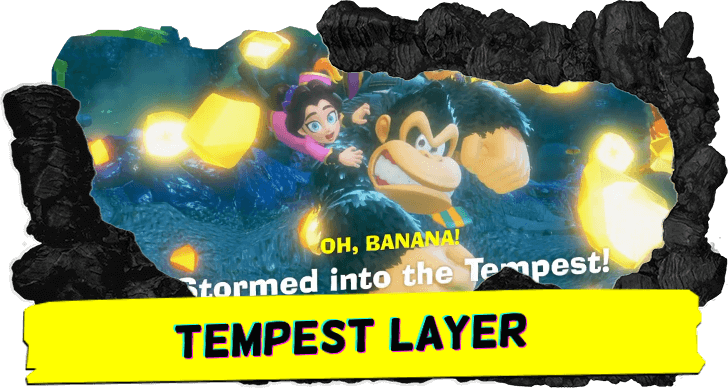
Tempest Layer is the tenth layer in Donkey Kong Bananza. Check out where to find the locations of all Tempest Layer Bananas, fossils, and other collectibles in this level!
| Tempest Layer Guides | |
|---|---|
| Walkthrough | Collectibles |
List of Contents
Tempest Layer Collectibles Overview
List of Collectibles
| Banandium Gems | Total: 70
・SL 900: 24 ・SL 901: 9 ・SL 902: 37 |
|---|---|
| Fossils | Total: 72
|
| Checkpoints | Total: 11 |
| Challenges | Total: 11 |
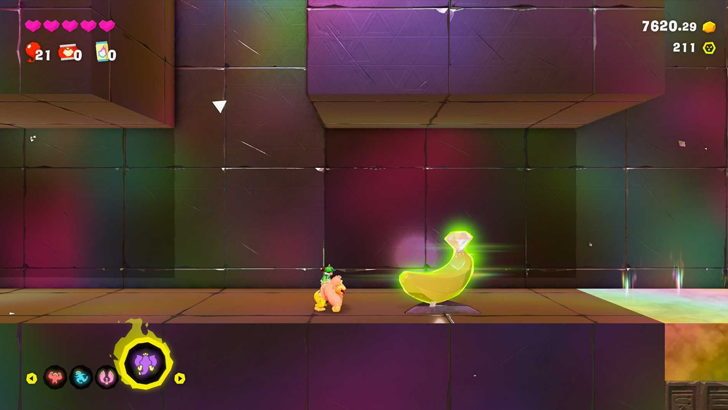
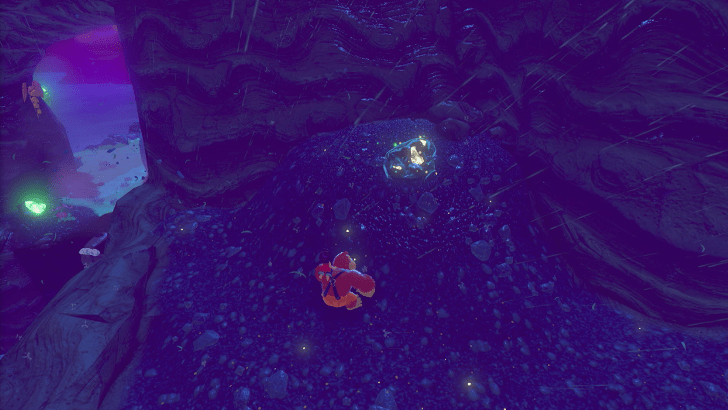
There are 70 bananas and 72 fossils available in Tempest Layer.
Tempest Layer Bananas
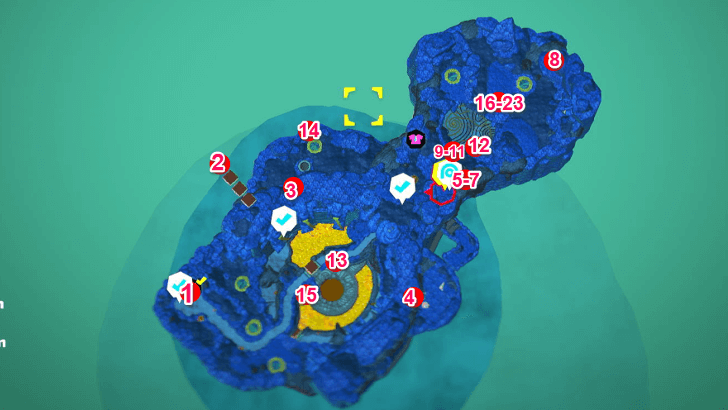
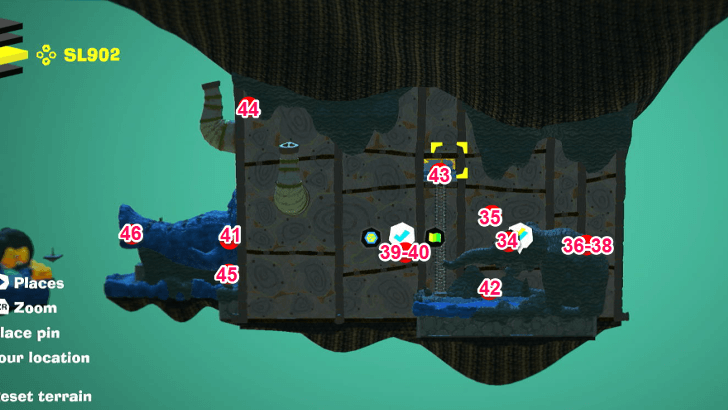
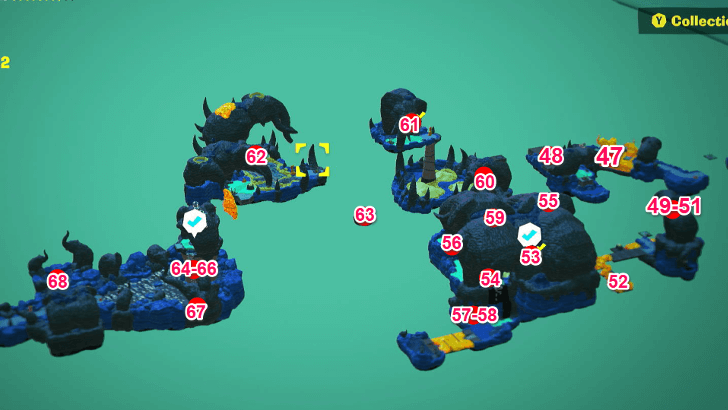
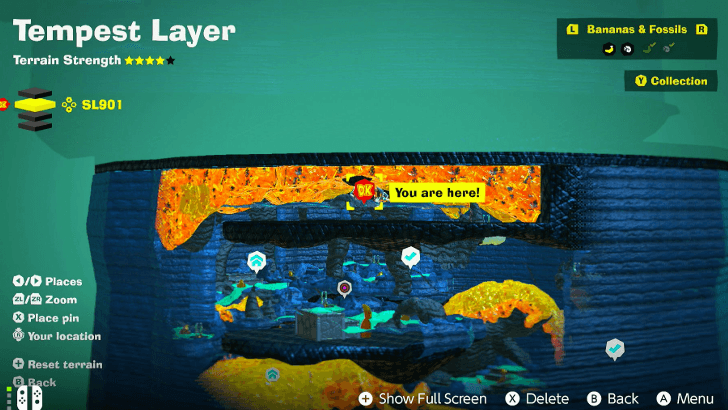
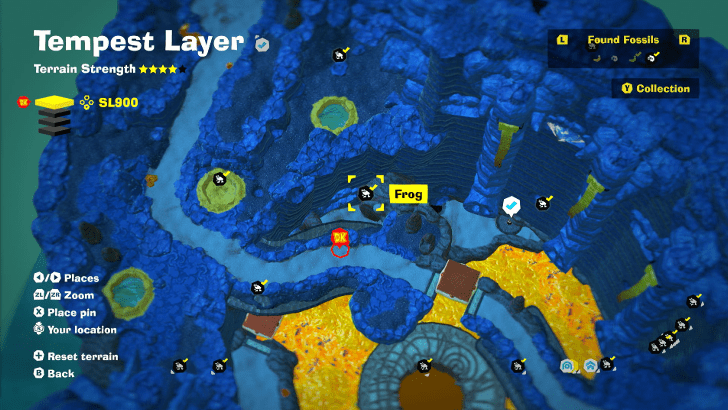
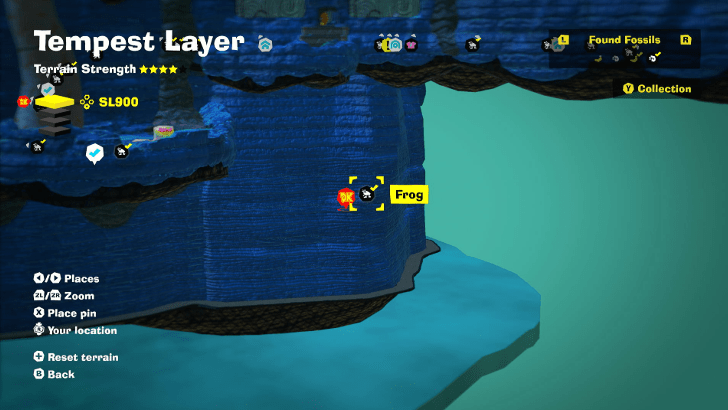
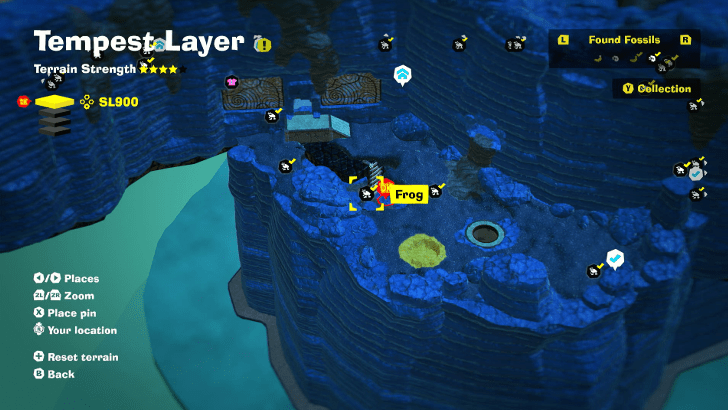
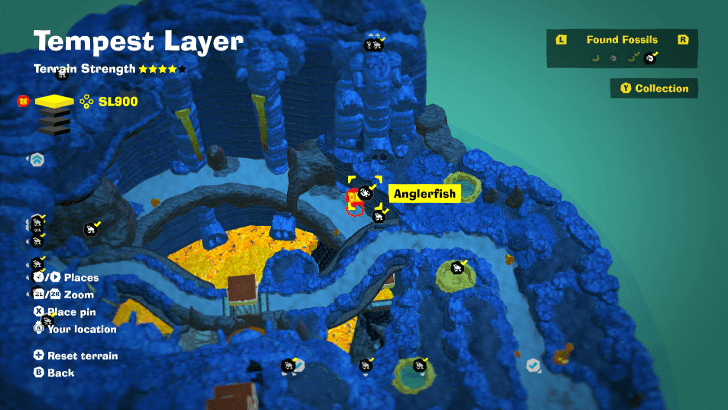
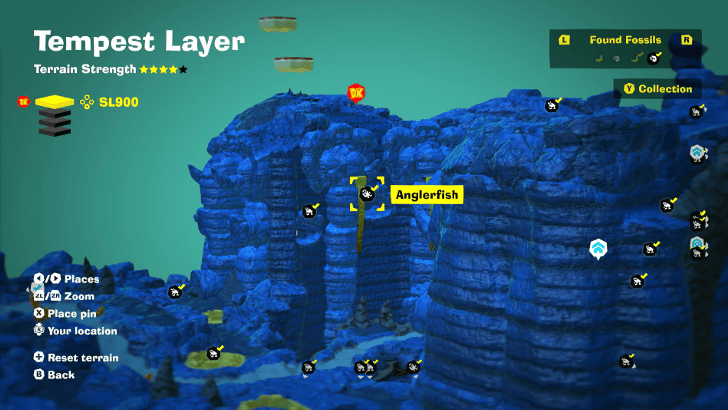
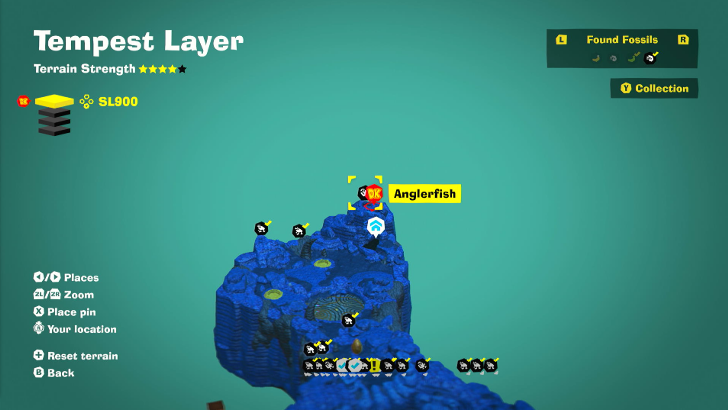
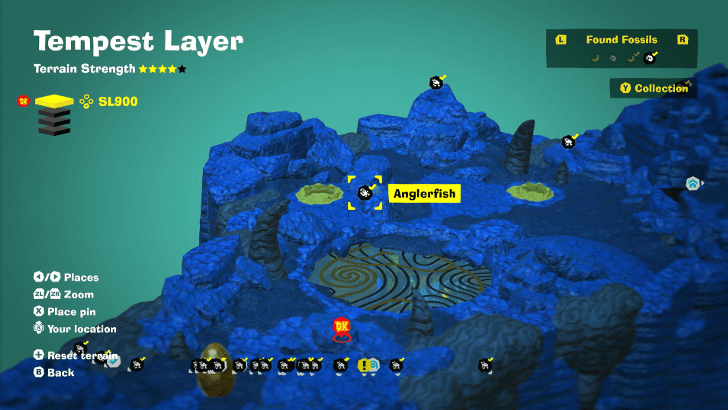
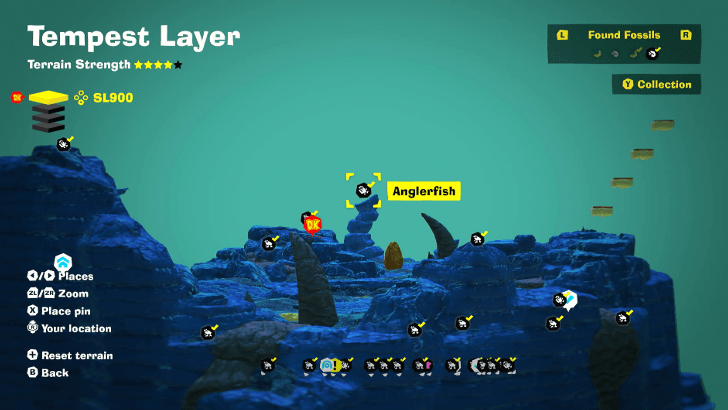
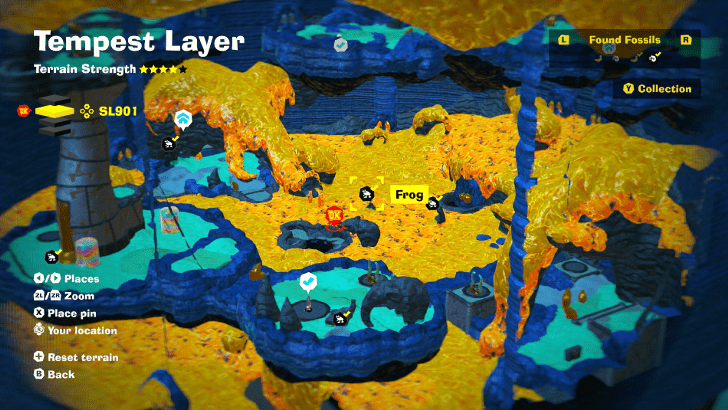
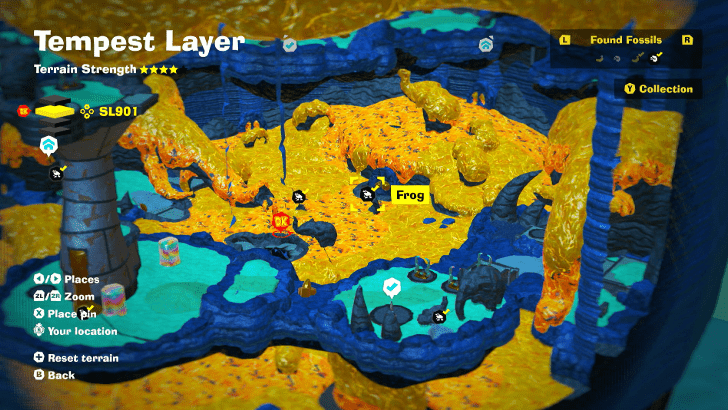
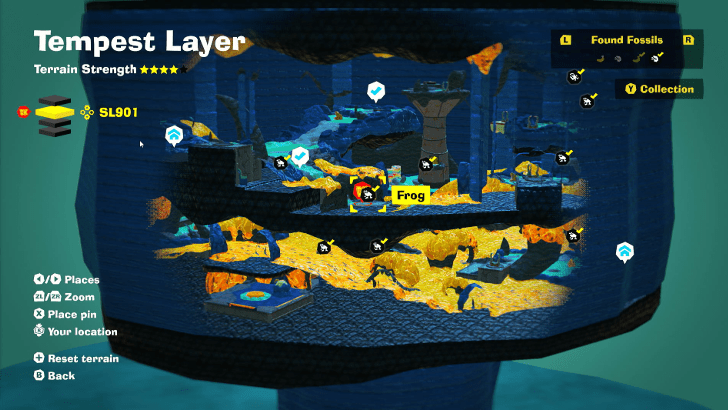
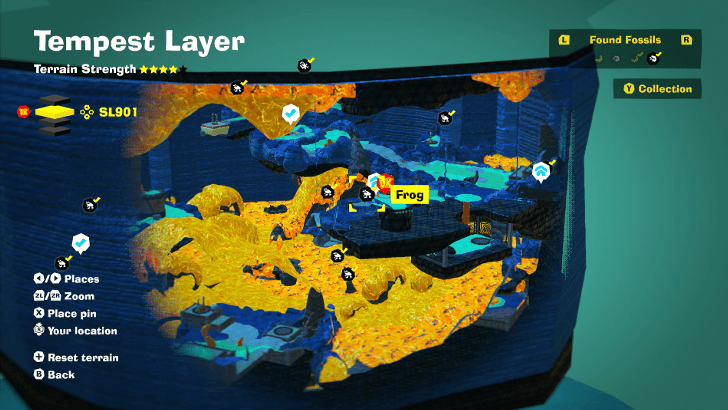
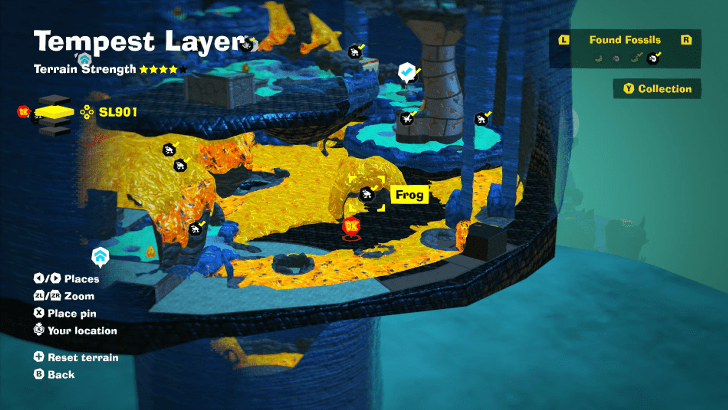
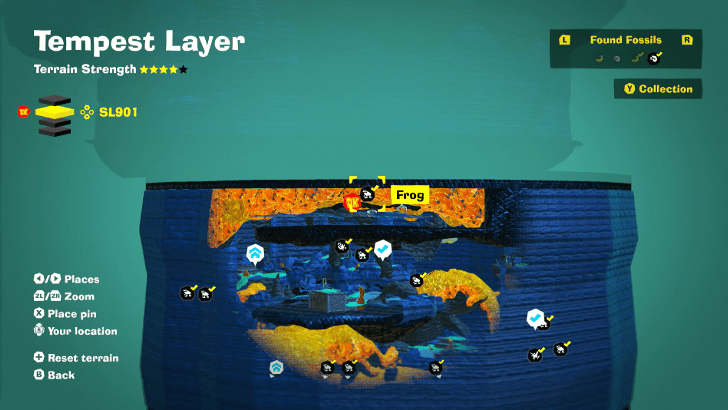
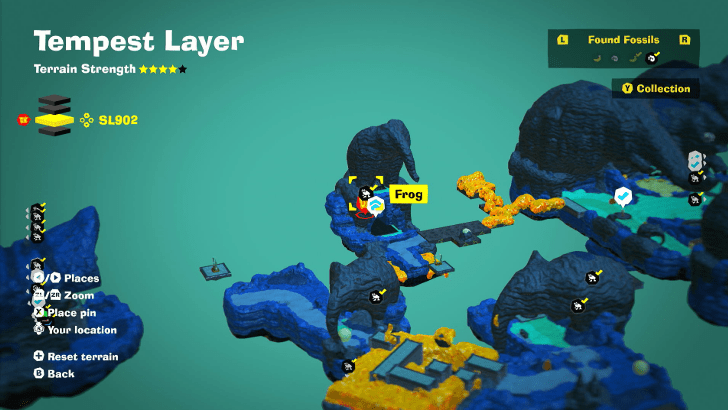
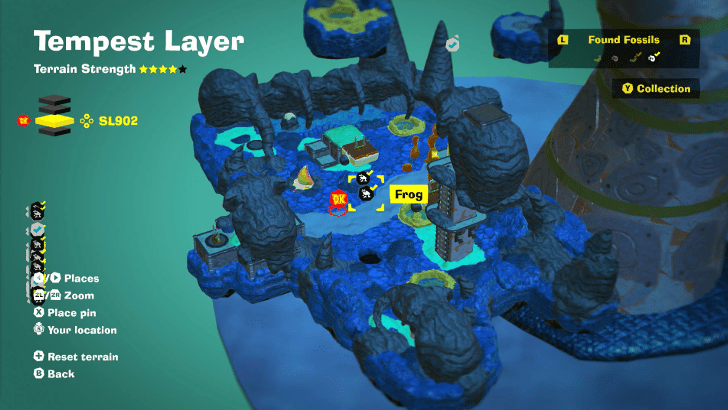
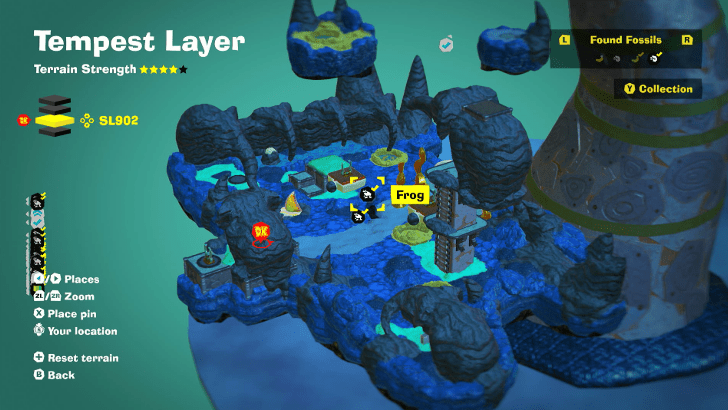
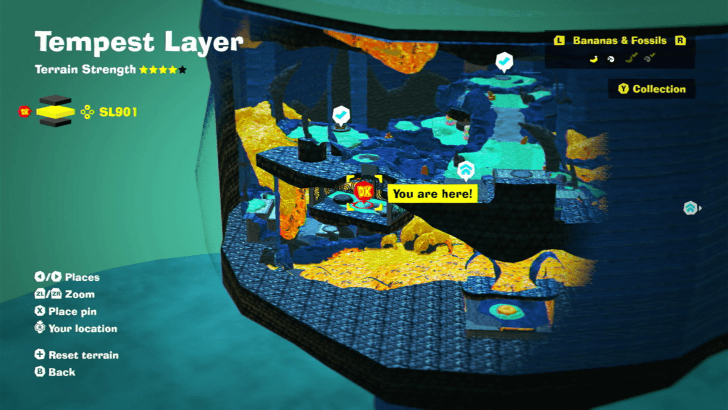
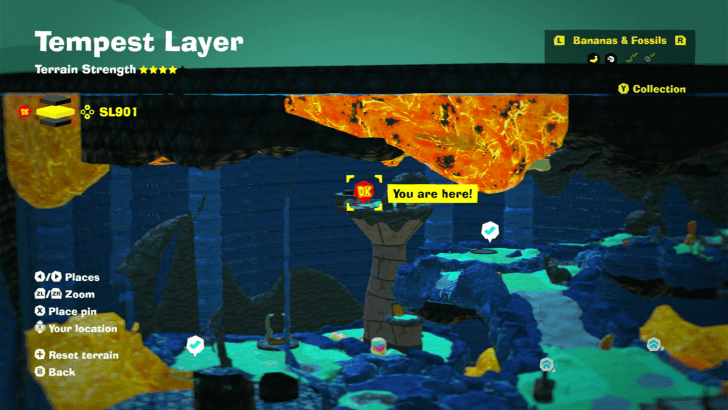
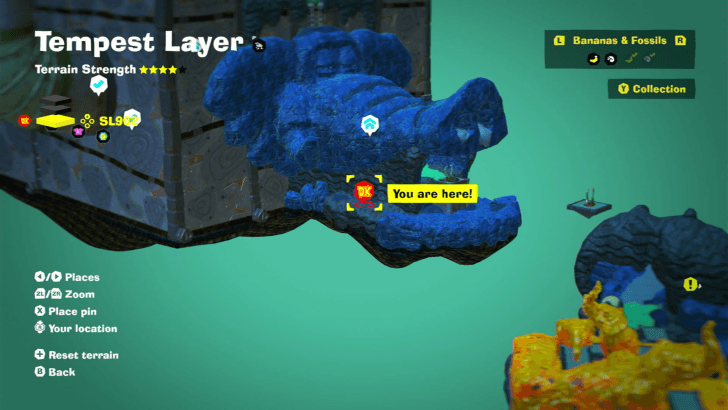
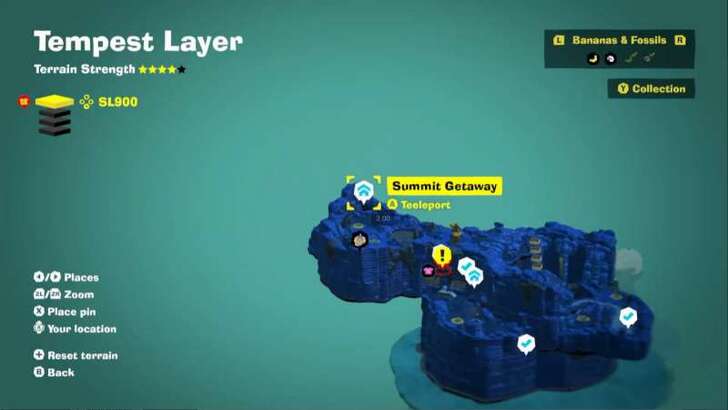
Banandium Gems Map Overview
900
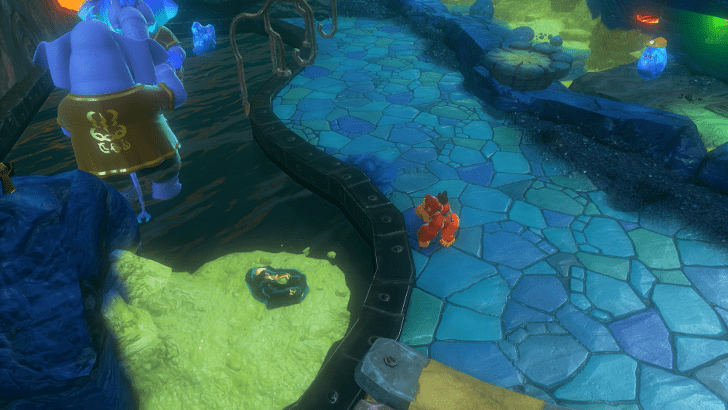
901
901 A
902 B
902 C
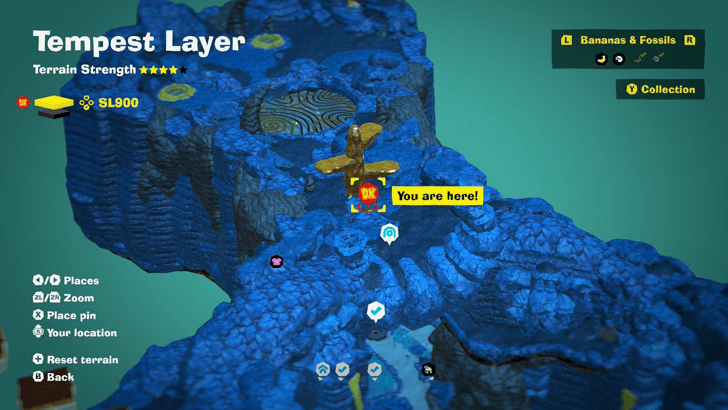
SL 900 Banana Locations
| Overworld View | Map Location | |
|---|---|---|
| 01 |
 |
 |
|
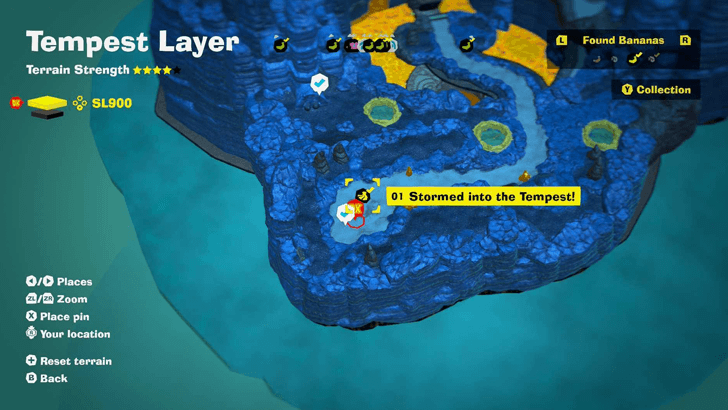
Found with story progression. |
||
| 02 |
 |
 |
|
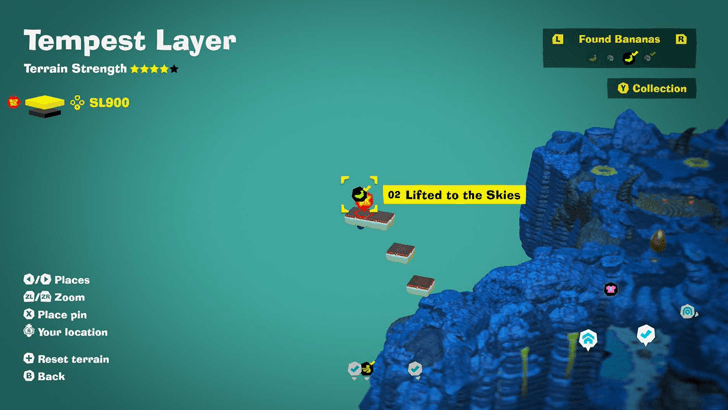
Throw rocks at the floating platforms to lower them, and hand slap to raise them until you reach the banana. Elephant Bananza is recommended. |
||
| 03 |
 |
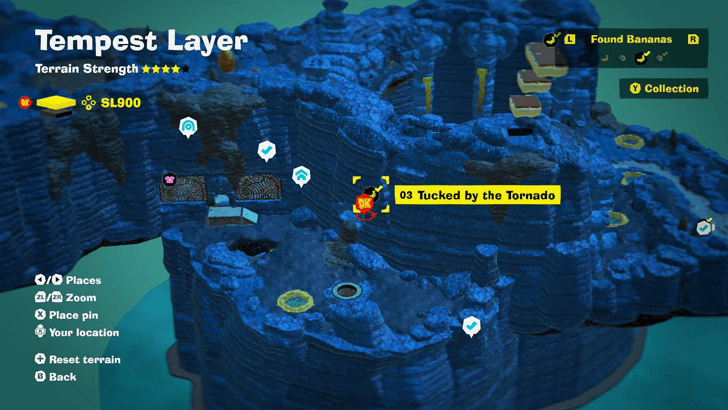 |
|
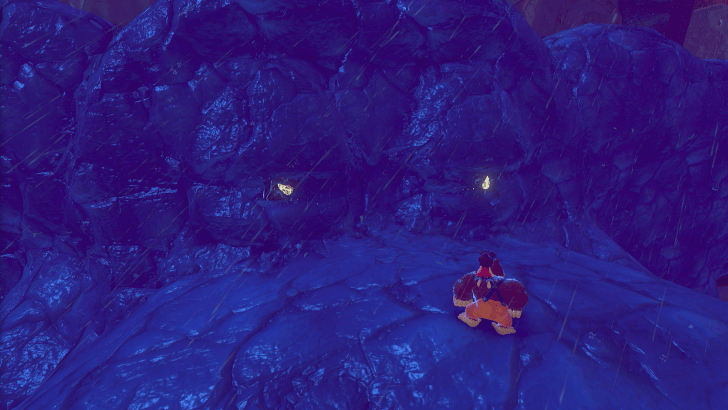
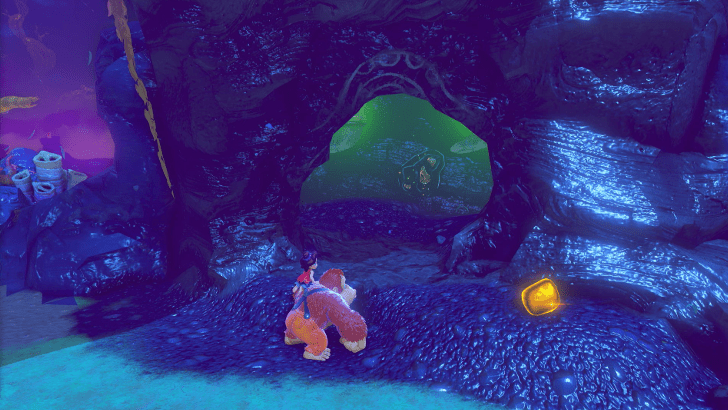
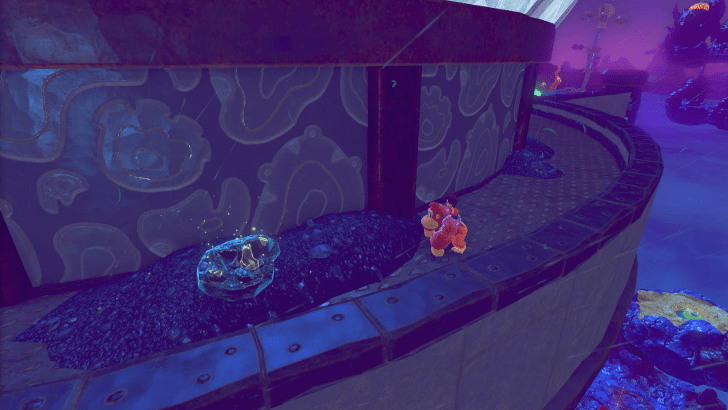
Found inside a cave near the field with a tornado. |
||
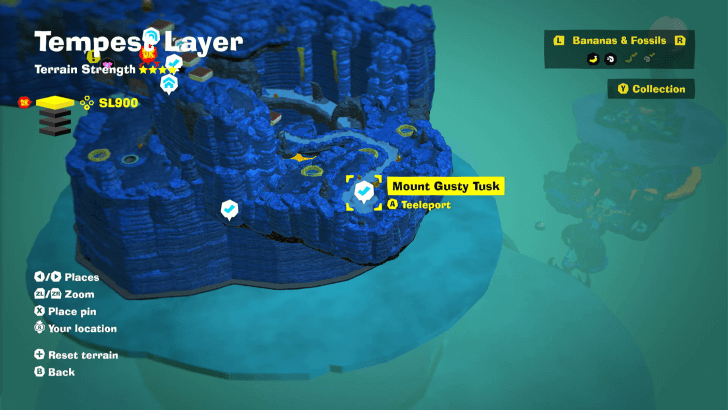
| 04 |
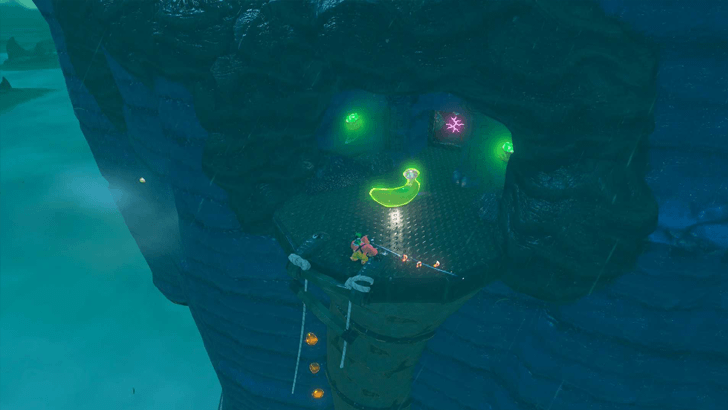 |
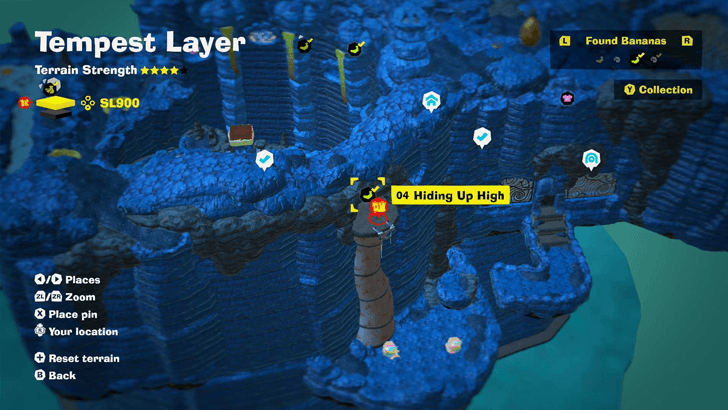 |
|
Found in a cave on the right side from the Mount Gusty Tusk checkpoint. |
||
| 05 |
 |
 |
|
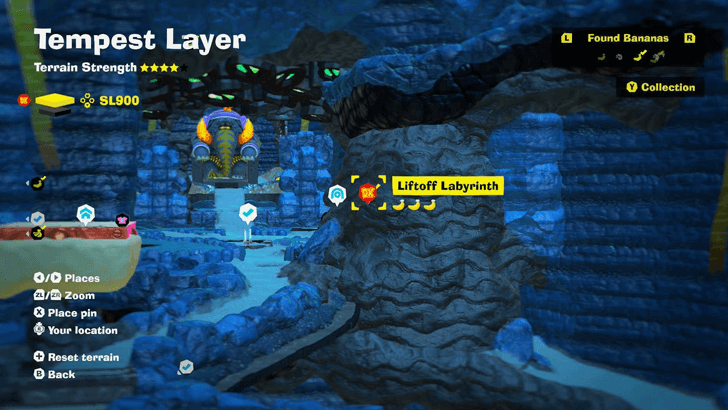
Found inside Liftoff Labyrinth Challenge Course 1. It is found along the course. |
||
| 06 |
|
|
|
Found inside Liftoff Labyrinth Challenge Course 1. Dig through the stone to reach the Gem. |
||
| 07 |
 |
|
|
Found at the end of Liftoff Labyrinth Challenge Course 1. |
||
| 08 |
 |
 |
|
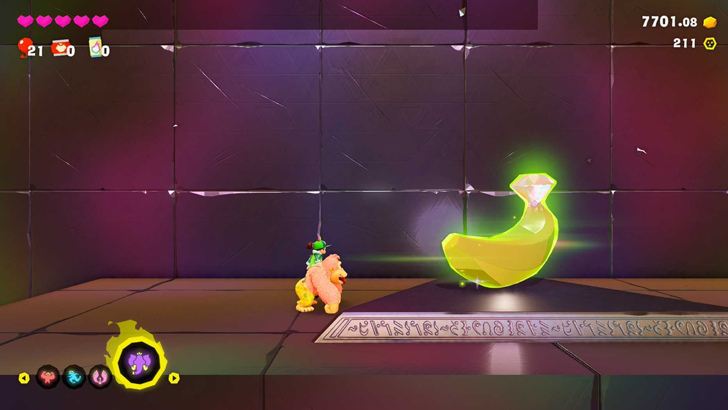
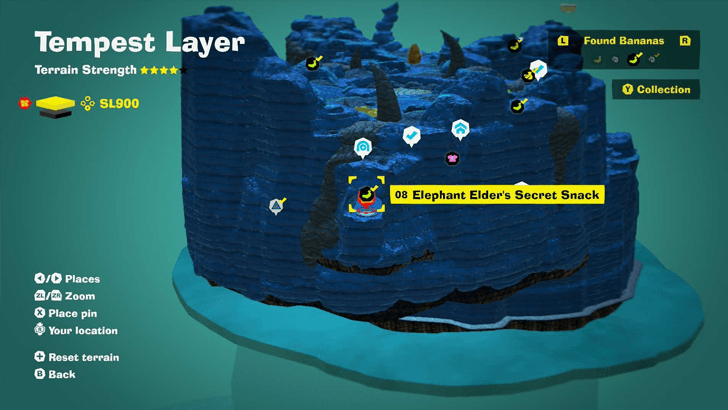
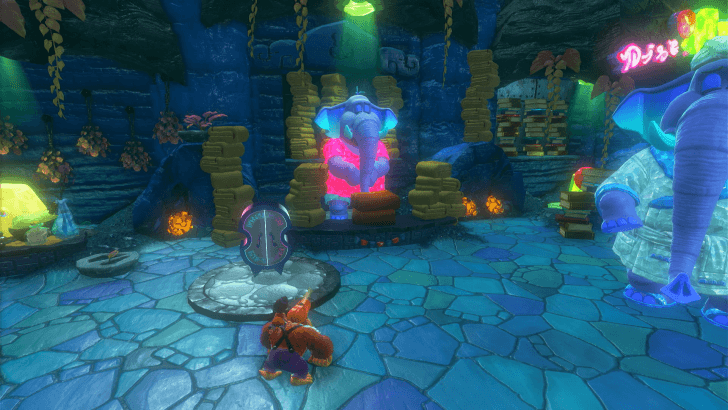
Hidden behind the wall behind the Elephant Elder. |
||
| 09 |
 |
 |
|
Give gold to the Tempest Growtone. |
||
| 10 |
|
|
|
Give gold to the Tempest Growtone. |
||
| 11 |
|
|
|
Give gold to the Tempest Growtone. |
||
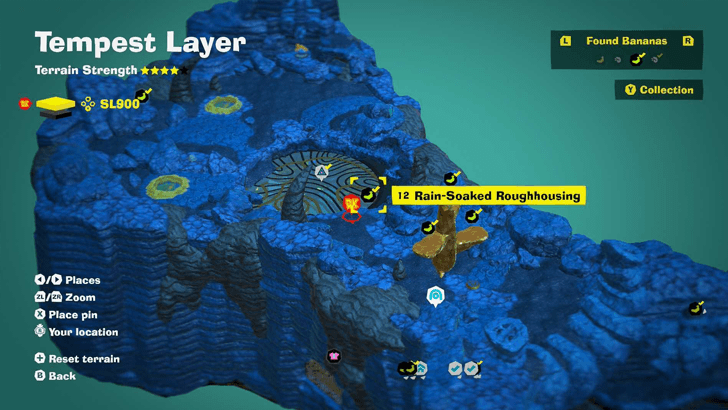
| 12 |
 |
 |
|
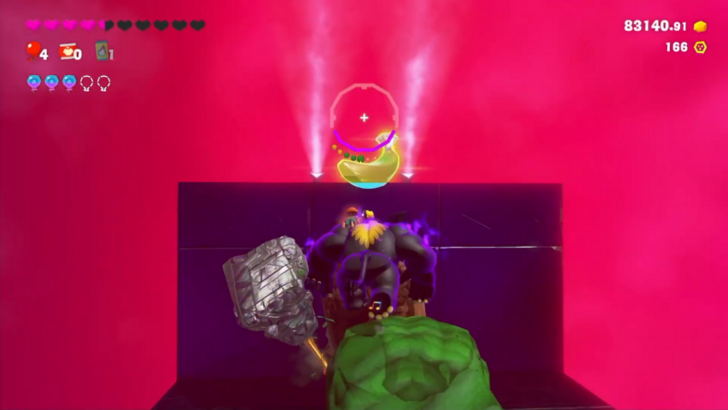
Defeat three waves of enemies at the top of the mountain. |
||
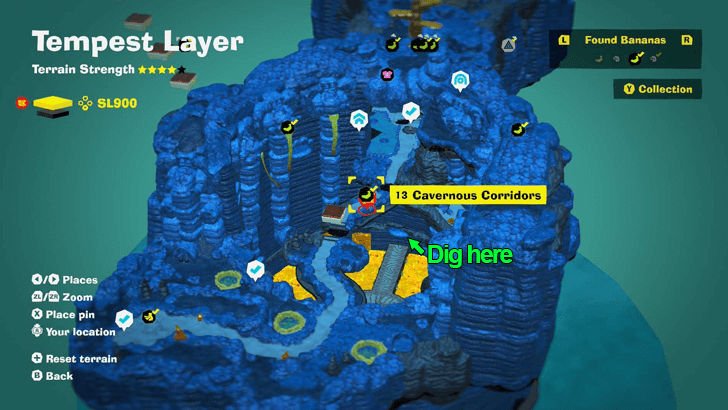
| 13 |
 |
|
|
Dig through the tunnel underground. |
||
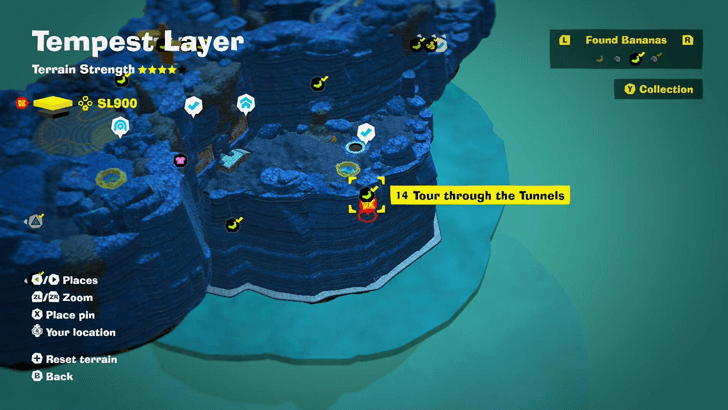
| 14 |
 |
|
|
From Gem #13, dig deeper into the tunnels. |
||
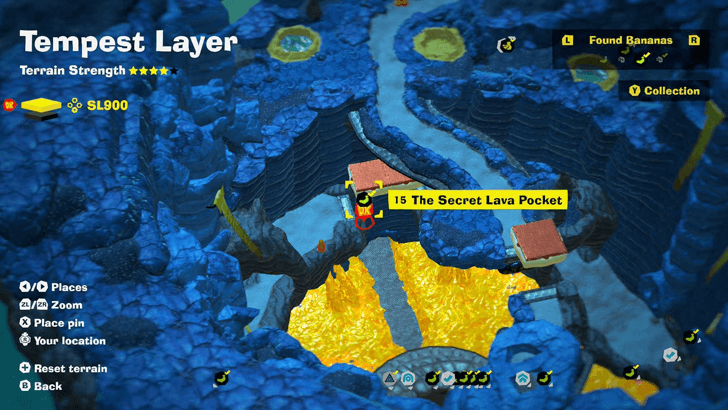
| 15 |
 |
|
|
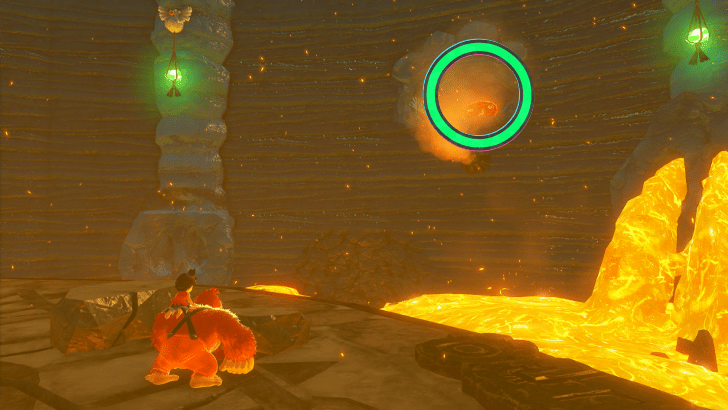
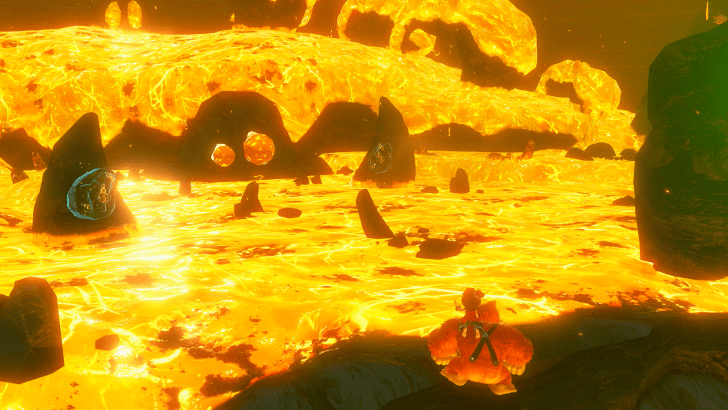
In the area with lava at the bottom, use the Elephant Bananza to inhale the lava and clear a path to the Gem. |
||
| 16 |
 |
 |
|
Reach the end of the salt room. |
||
| 17 |
 |
|
|
At the end of the salt room, head right, then inhale the ice cube to create a ramp and climb it to get the gem. |
||
| 18 |
 |
|
|
Reach the end of the Glowing Forecast Room. |
||
| 19 |
 |
|
|
Throw a Glow Stone into the Barrel Cannon, then shoot yourself up to the gem using the new Barrel Cannon. |
||
| 20 |
 |
|
|
Reach the end of the Golden Forecast Room. |
||
| 21 |
 |
|
|
At the end of the Golden Forecast room, head right and follow the path. Use the wood Crockoid to make a bridge towards the gem. |
||
| 22 |
 |
|
|
During the ice portion of the challenge just before reaching the very end, make a path for the ice to fall in to the bowl. |
||
| 23 |
 |
|
|
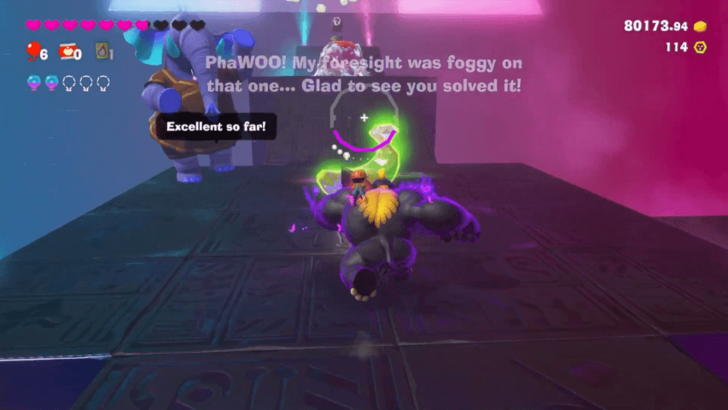
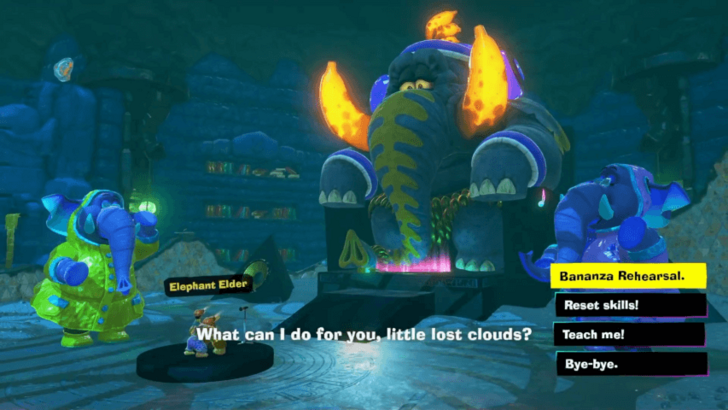
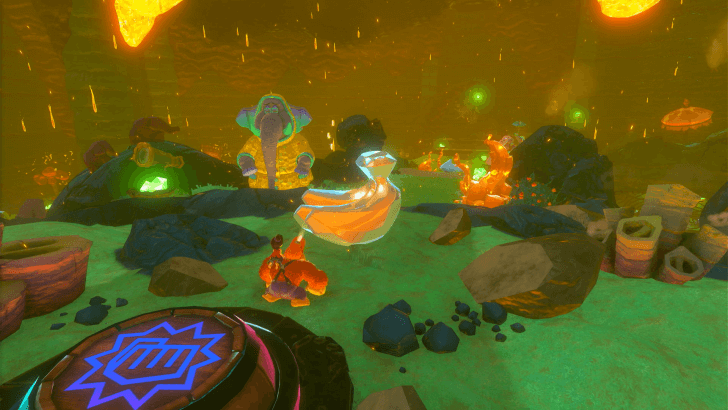
Complete the Elder Elephant Bananza Rehearsal. |
||
| 24 |
 |
 |
|
Buy with Banandium Chips to get a Gem. The price will vary depending on how many you have purchased from other layers. You only need to exchange once for the collectible to count. |
||
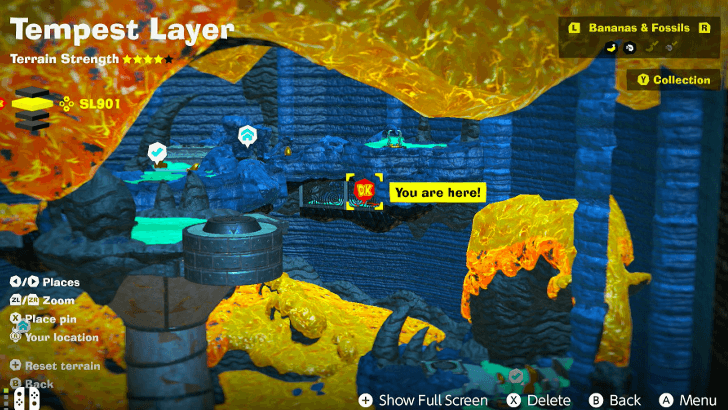
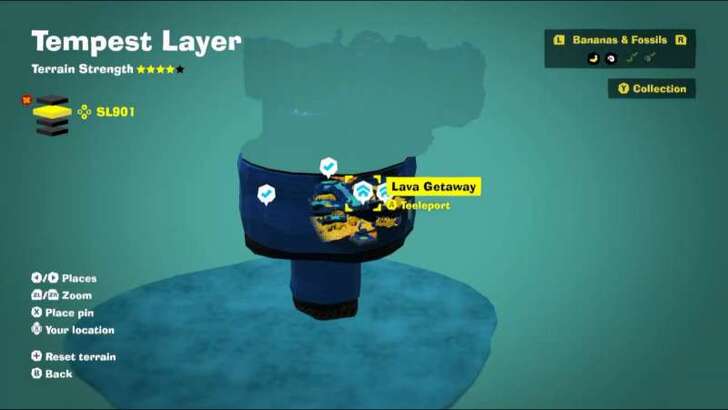
SL 901 Banana Locations
| Overworld View | Map Location | |
|---|---|---|
| 25 |
 |
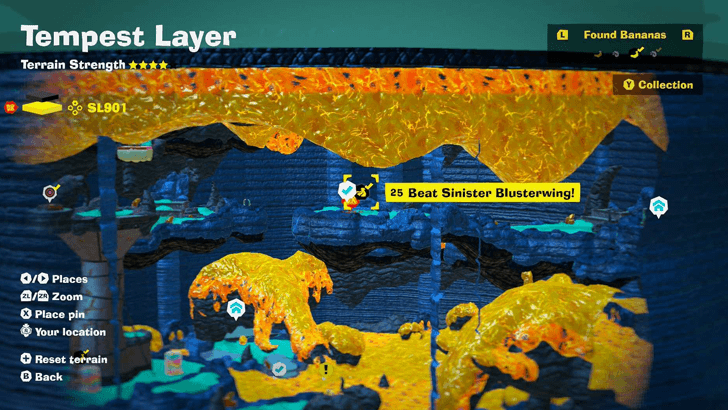 |
|
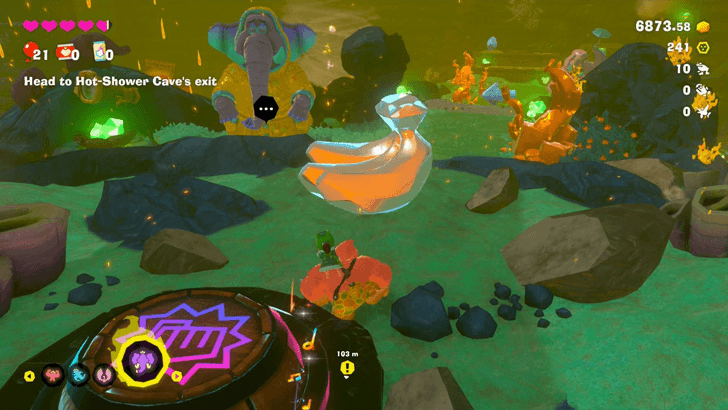
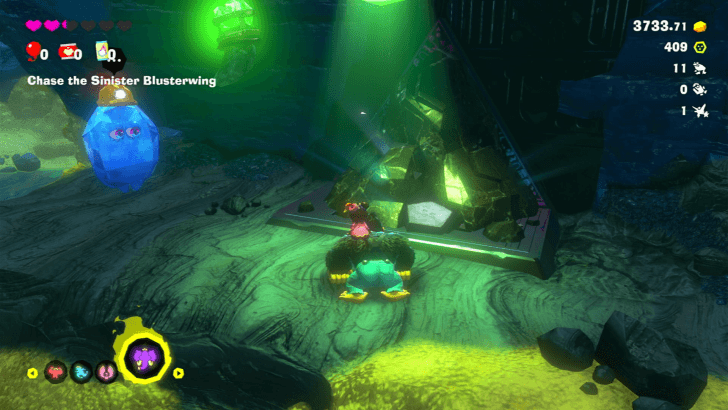
Found at SL901 right after beating Blusterwing. |
||
| 26 |
 |
|
|
Found at SL 901, near the Lava Getaway Teeleport Point. Enter the manhole and defeat the enemies. |
||
| 27 |
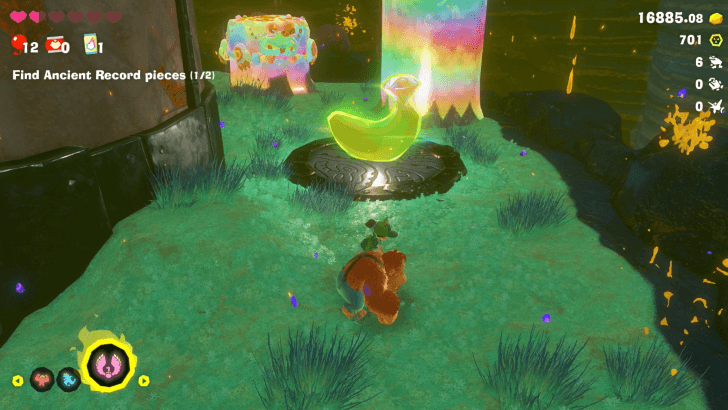 |
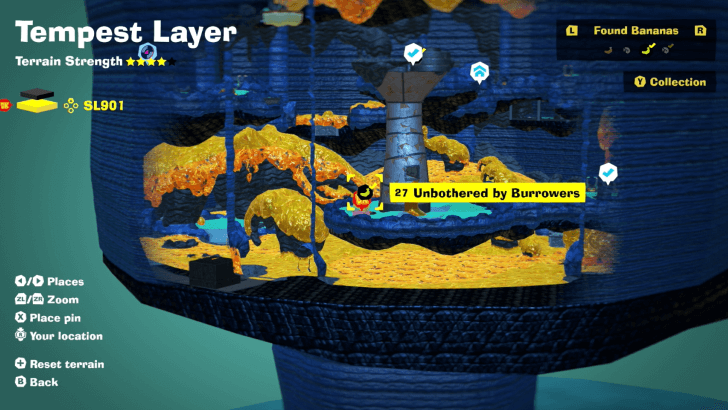 |
|
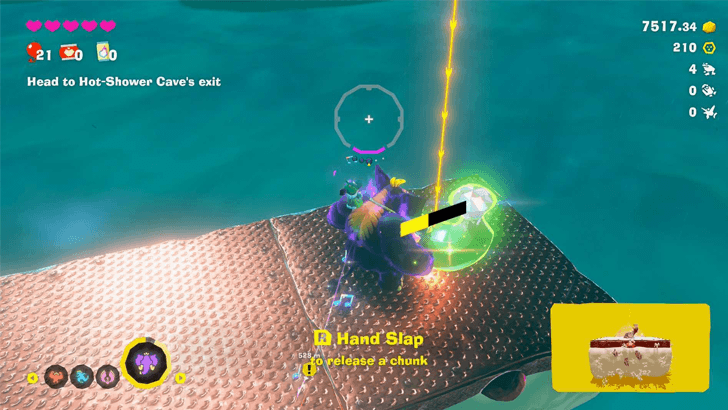
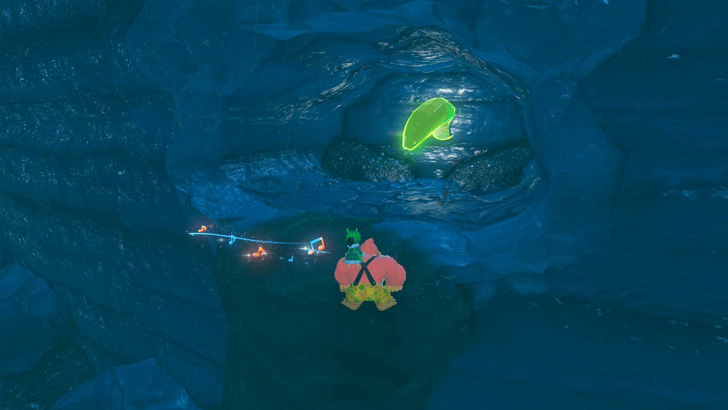
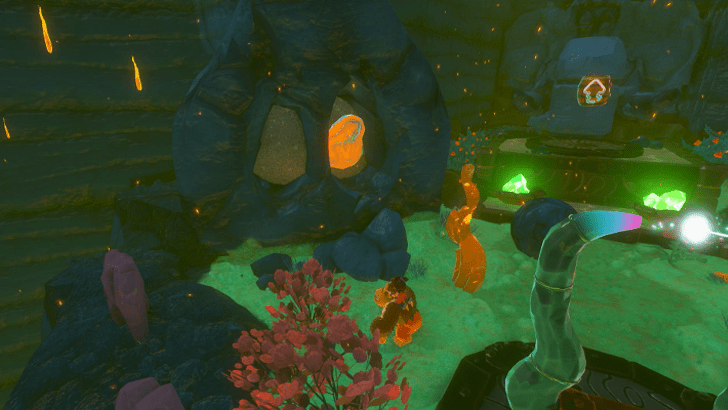
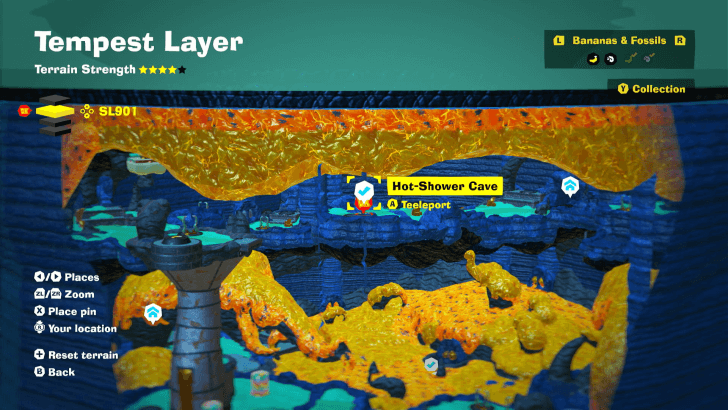
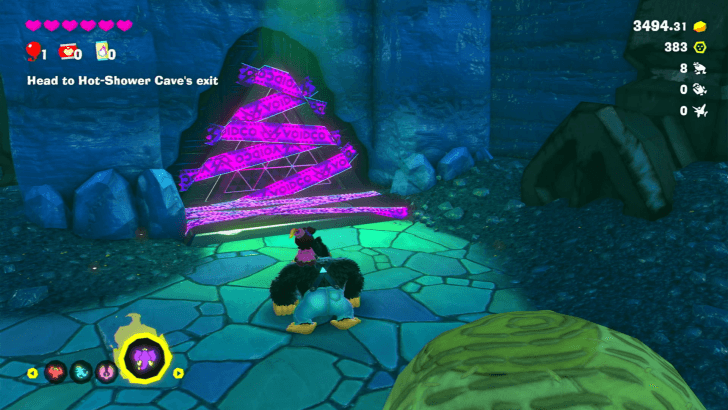
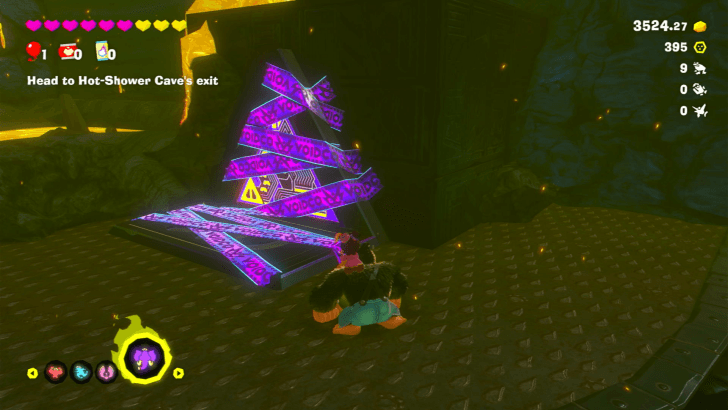
In Hot-Shower Cave, on the way to the second Ancient Record piece, remove the Void Terrain on the platform with the Burrowers to reveal the Gem. |
||
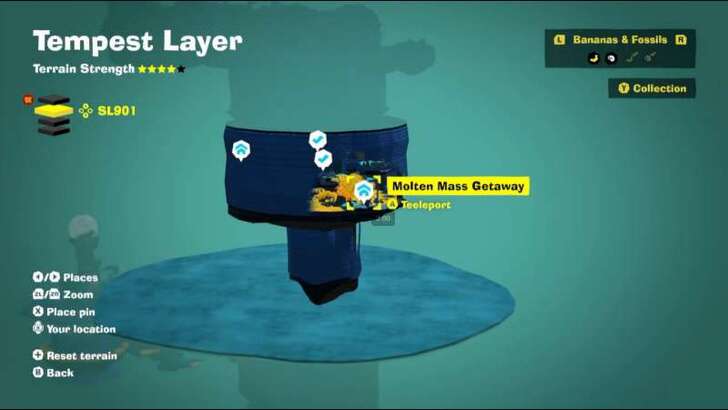
| 28 |
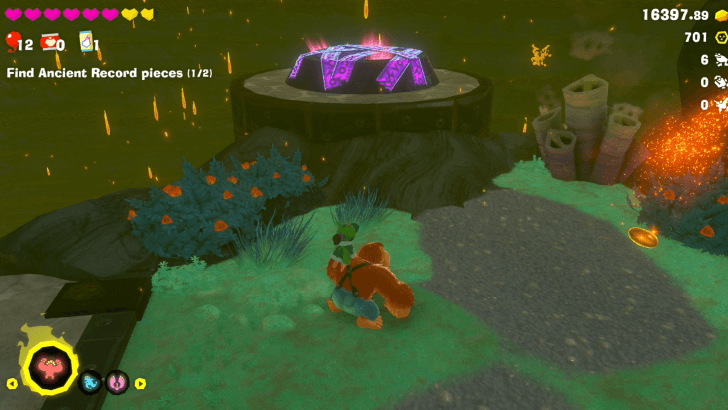 |
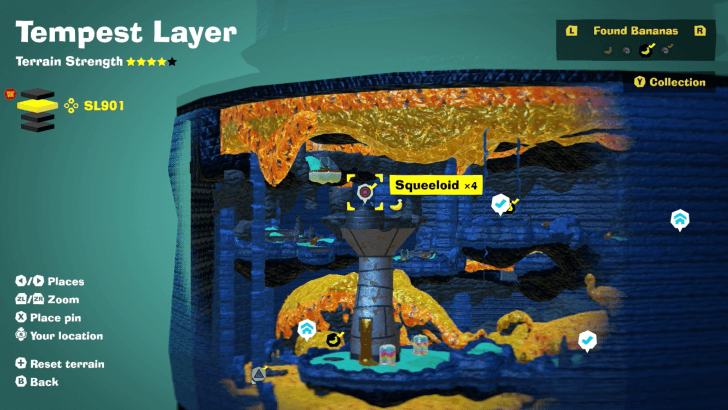 |
|
Use Liftoff Ore to fly to the top of the building and find the entrance. Enter the manhole and defeat four Squeeloids. |
||
| 29 |
 |
|
|
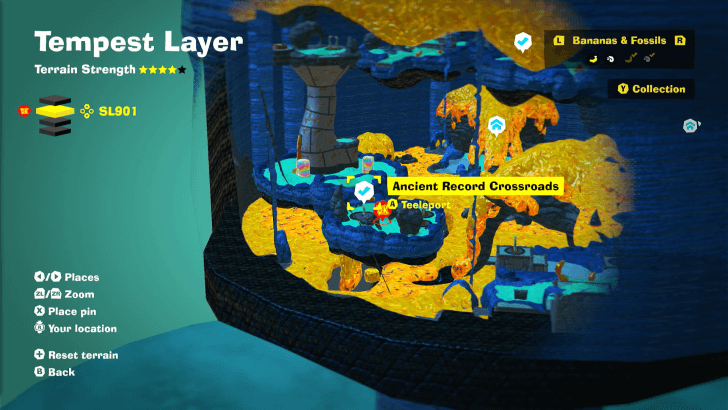
Found at SL 901, just start from the Ancient Record Crossroads Teeleport Point. You need to reach the ceiling area of SL901. |
||
| 30 |
 |
|
|
Found at SL 901, just start from the Hot-Shower Cave Teeleport Point. You need to inhale magma using the Elephant Bananza Form. |
||
| 31 |
 |
 |
|
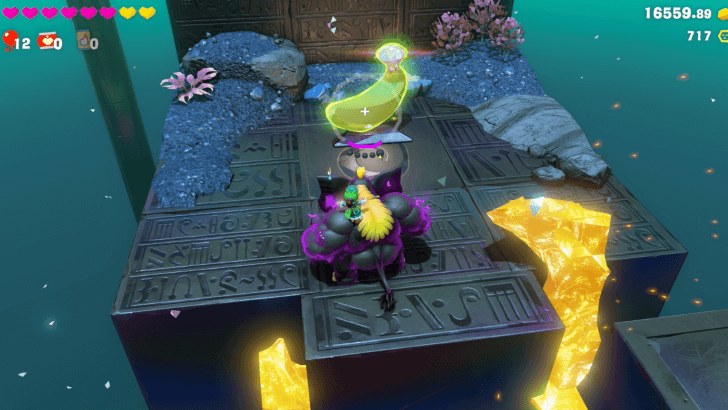
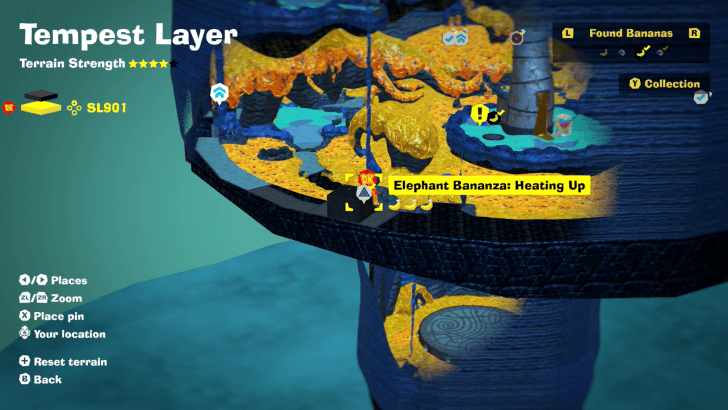
Found inside Elephant Bananza Heating Up Challenge Course 2. The Gem is found along the course. |
||
| 32 |
|
|
|
Before the end of the course, turn to the left and inhale the lava while progressing. At the far end, inhale the pile of lava to find a Banandium Gem inside. |
||
| 33 |
 |
|
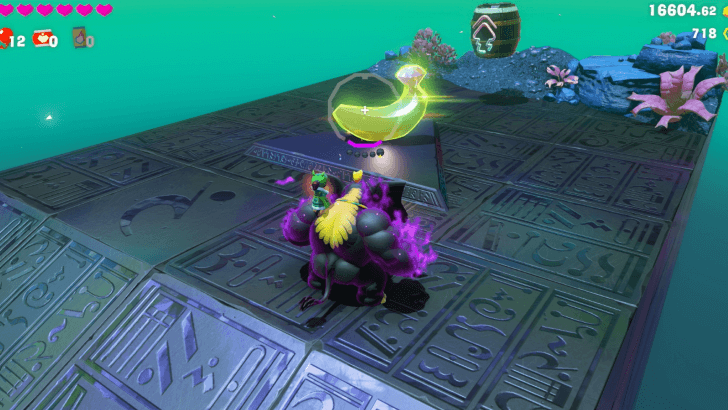
|
Found at the end of the Elephant Bananza Heating Up Challenge Course 2. |
||
SL 902 Banana Locations
| Overworld View | Map Location | |
|---|---|---|
| 34 |
 |
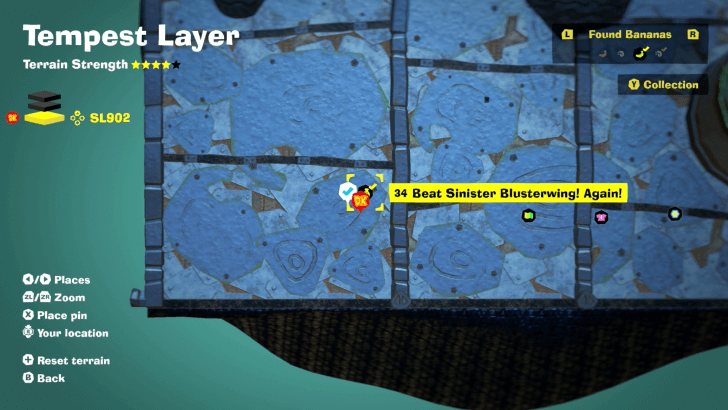 |
|
Found with story progression. |
||
| 35 |
 |
|
|
Found at SL 902, just start from the Trunk-Dunk Hot Springs Teeleport Point. You need to inhale magma blocking the drainage pipe using the Elephant Bananza Form. |
||
| 36 |
 |
|
|
Found inside Zip-Line Valley Challenge Course 3. Climb the wall where the door to the course is and ride the zipline to reach the Gem. |
||
| 37 |
|
|
|
Found inside Zip-Line Valley Challenge Course 3. It is found in the middle of the course. |
||
| 38 |
|
|
|
Found at the end of Zip-Line Valley Challenge Course 3. |
||
| 39 |
 |
|
|
Travel to the area just left of the Trunk-Dunk Hot Springs Teeleport Point, and talk to the blue Fractone floating beside two elephants. She will ask you to smash through 70000 m3 of Lava in this layer before she gives you the Banandium Gem. |
||
| 40 |
|
|
|
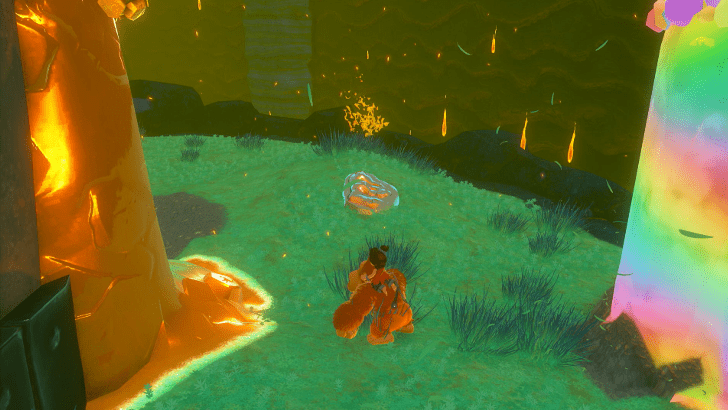
Head to the blue Fractone requesting you to smash 70000 cubic meters of lava, and inhale the surrounding lava in its area using the Elephant Bananza Form. The Bananandium Gem in the upper area will be visible once the lava is gone in the area. |
||
| 41 |
 |
|
|
Talk to the Seekertone near the Hot-Springs Getaway, and find all 4 of her friends to be rewarded a Banandium Gem. It is recommended to use the Elephant Bananza Form to inhale the materials surrounding her friends. |
||
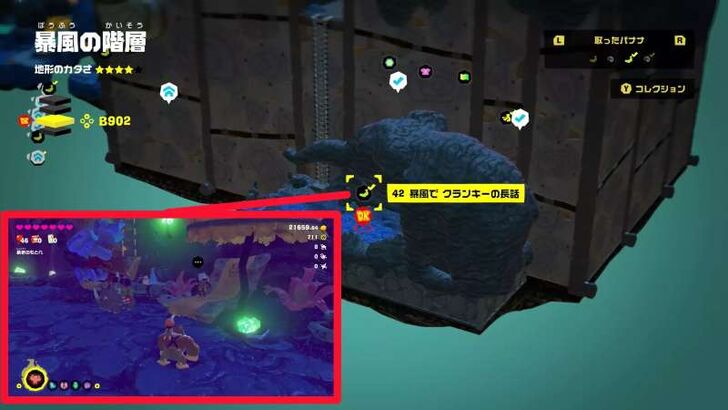
| 42 |
 |
 |
|
On the story progression route, when you pass through the outside area with lounge chairs, find Cranky Kong sitting in one. Talk to him to get a Banandium Gem. |
||
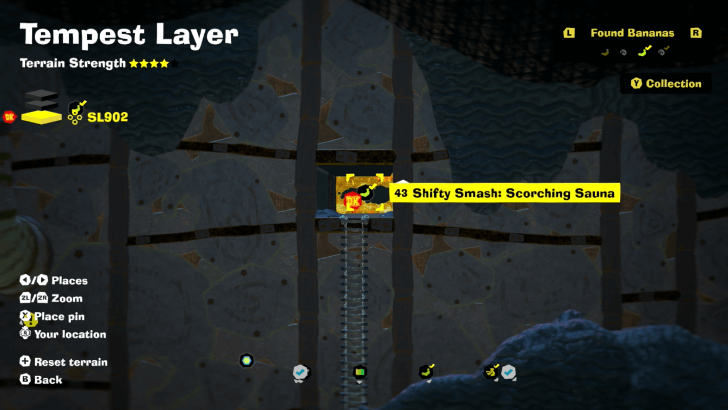
| 43 |
 |
|
|
Activate the Shifty Smash Challenge to start the timer, then use Elephant Bananza and inhale all the white walls that appear to get 100%. |
||
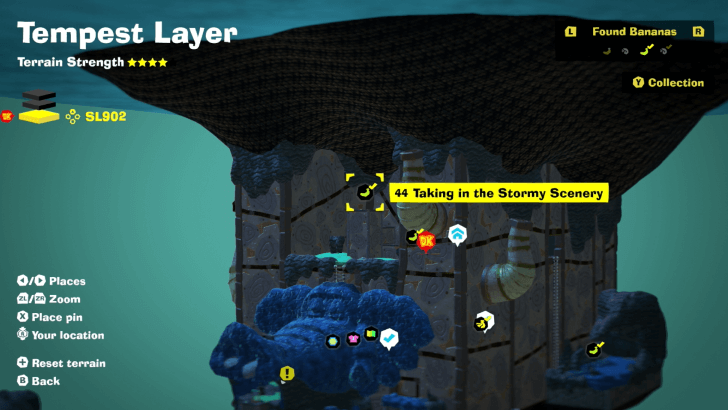
| 44 |
 |
|
|
Use Elephant Bananza to inhale several pieces of Turf, then use Chunk Jump to climb up each block to reach the top of the stack and get the Banandium Gem. |
||
| 45 |
 |
|
|
From the Trunk-Dunk Hot Springs Teeleport Point, proceed towards the path until you've reached the part of the map where a giant elephant cave is located. Enter the manhole and defeat eight Antickoids. |
||
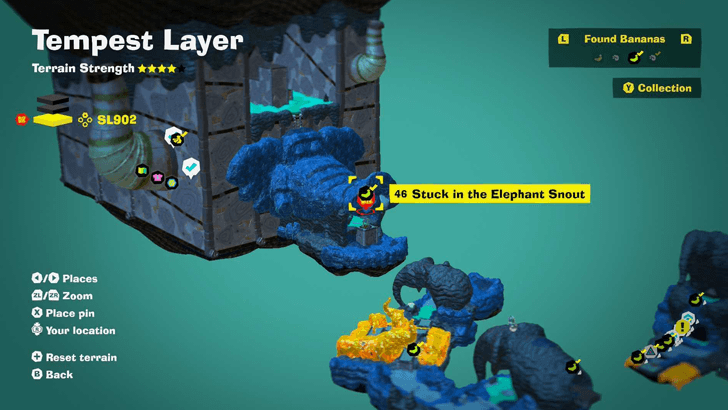
| 46 |
 |
 |
|
Found in the elephant snout near the Sauna Getaway. |
||
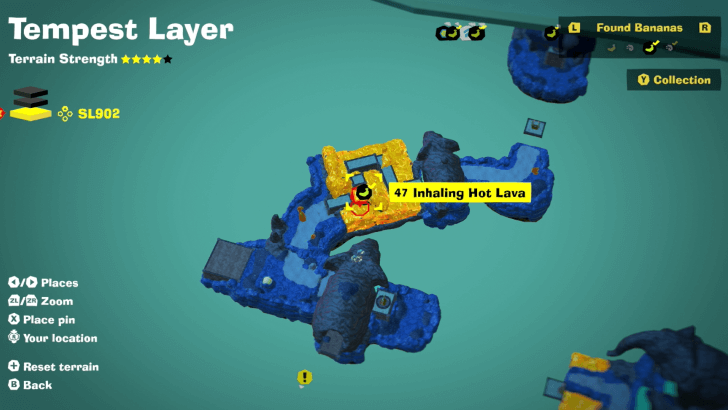
| 47 |
 |
 |
|
Under the lava on the floor; inhale it to reveal the Banandium Gem. |
||
| 48 |
 |
|
|
Near the Cliff-Edge Getaway Teeleport Point. Use a zipline to reach the area with a melon fruit covered in stone. Activate the Shift Smash Challenge, then climb the crystal steps to reveal them and use Elephant Bananza to inhale the crystal steps. |
||
| 49 |
 |
|
|
Found inside Hot Lava Hotfoot Challenge Course 4. It is located inside the course. |
||
| 50 |
|
|
|
Found inside Hot Lava Hotfoot Challenge Course 4. It is located in the middle part of the course. |
||
| 51 |
|
|
|
Found at the end of Hot Lava Hotfoot Challenge Course 4. |
||
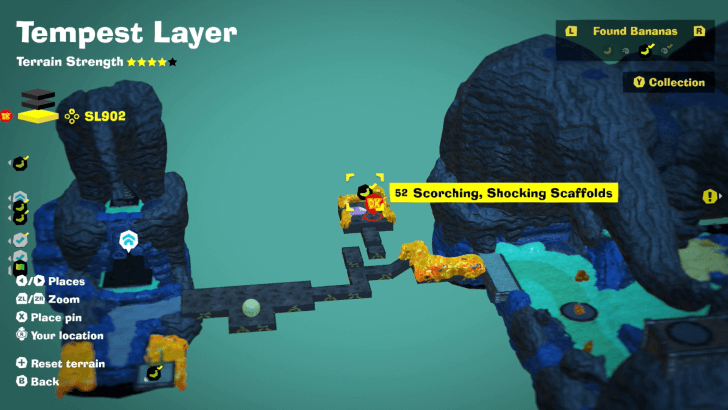
| 52 |
 |
 |
|
Inhale the lava while avoiding the thunderbolts to find a Banandium Gem buried in the lava. |
||
| 53 |
 |
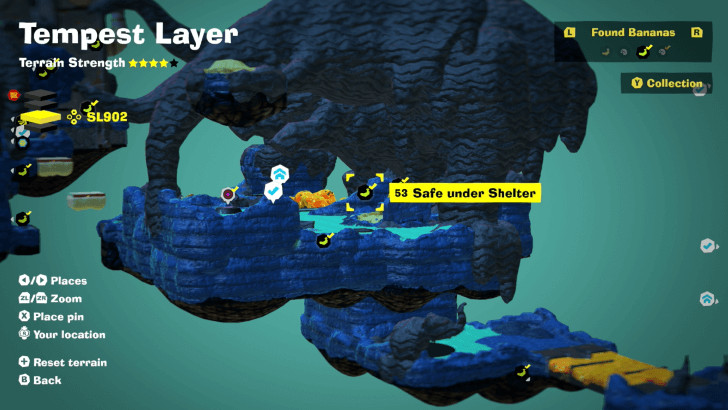 |
|
Found in the side of a rock. |
||
| 54 |
 |
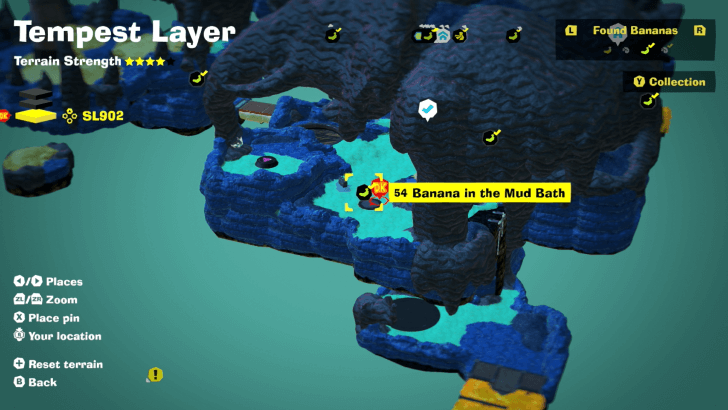 |
|
Dig down into the mud bath to find it in the corner. |
||
| 55 |
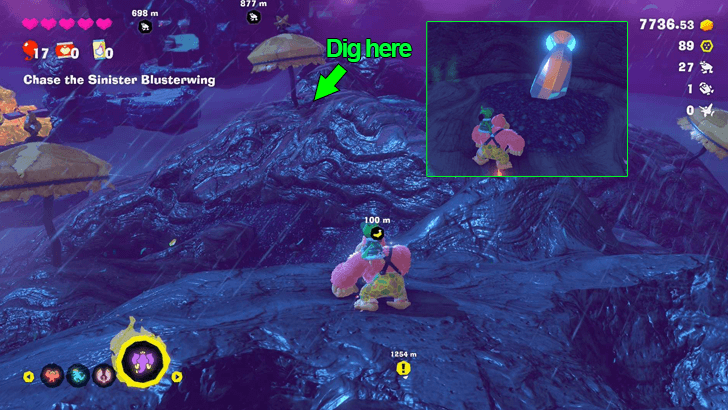 |
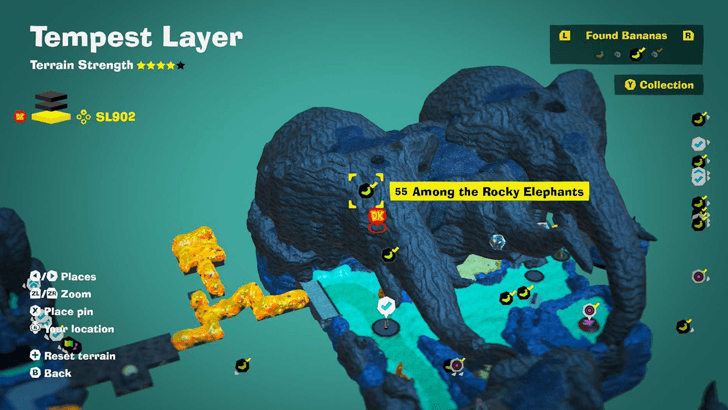 |
|
From the Big-Roof Shelter checkpoint, use the barrel going up. Dig down the area marked by the umbrella in the middle. |
||
| 56 |
 |
 |
|
Enter the manhole and defeat three Crockoids. |
||
| 57 |
 |
|
|
From the Big-Roof Shelter checkpoint, go down the path behind the elephant taking a mud bath. Use Elephant Bananza to inhale the lava, then escort the Fragmentones back to safety. Be wary of the lightning as it brings the Fragmentones back to their starting position. |
||
| 58 |
|
|
|
From the Big-Roof Shelter checkpoint, go down the path behind the elephant taking a mud bath. Use Elephant Bananza to inhale the lava, then escort the Fragmentones back to safety. Be wary of the lightning as it brings the Fragmentones back to their starting position. |
||
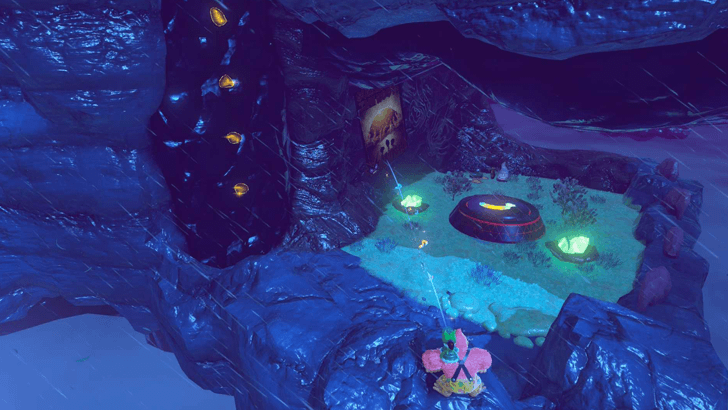
| 59 |
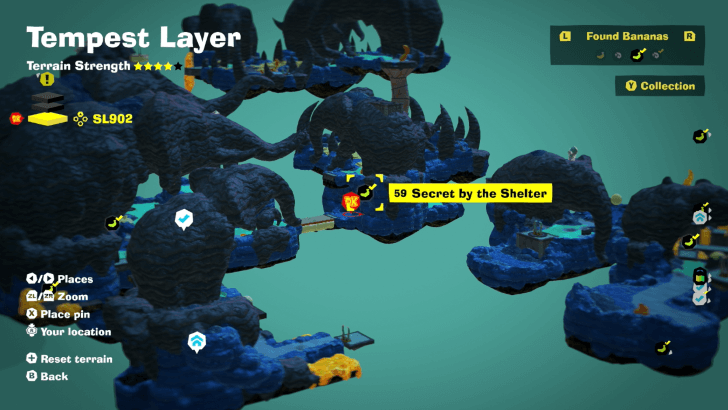 |
|
|
Throw rocks at the bottom of the platforms covered with Gloo Gum on the bottom to lower them down. Go across the platforms and break through the wall at the end to find a hidden cave with a Banandium Gem. |
||
| 60 |
 |
 |
|
Found near the Big-Roof Shelter checkpoint, below the area with Liftoff Ores and tornadoes. Enter the manhole and defeat five Rolluskoids. |
||
| 61 |
 |
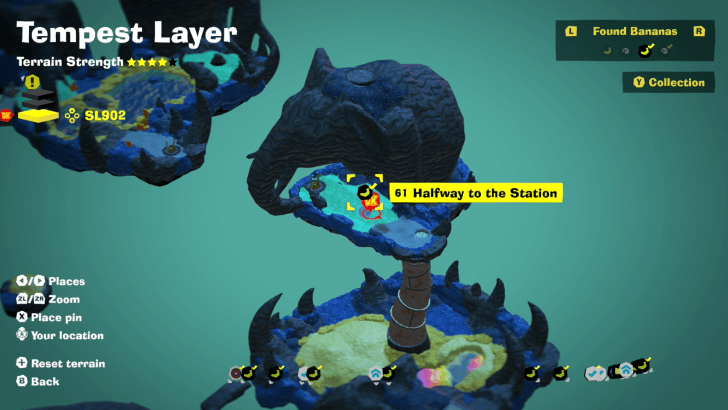 |
|
Found with story progression. |
||
| 62 |
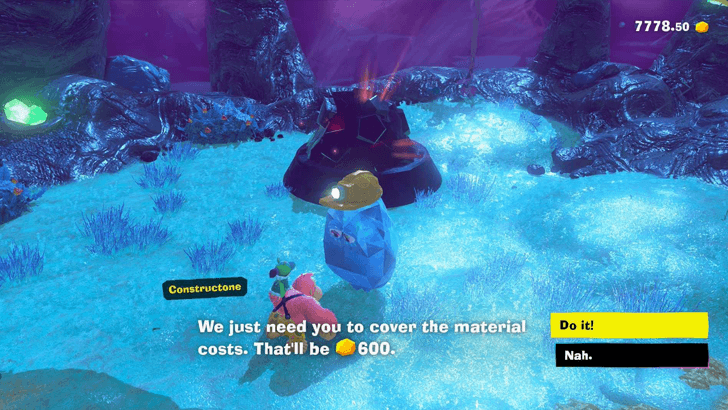 |
 |
|
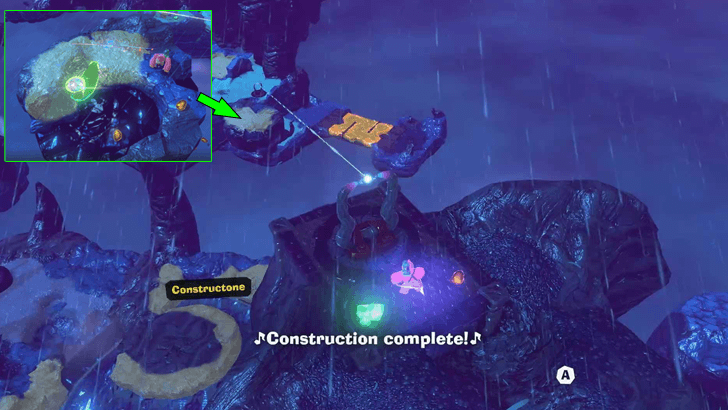
Pay the Constructone 600 Gold to unlock the challenge. Enter the manhole and defeat two Crockoids. |
||
| 63 |
 |
 |
|
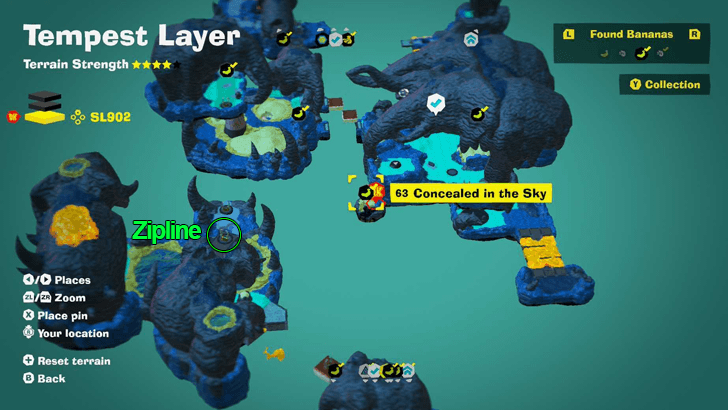
Pay the Constructone 100 Gold to construct a zipline, then use the zipline to get on the floating island with the Gem. |
||
| 64 |
 |
 |
|
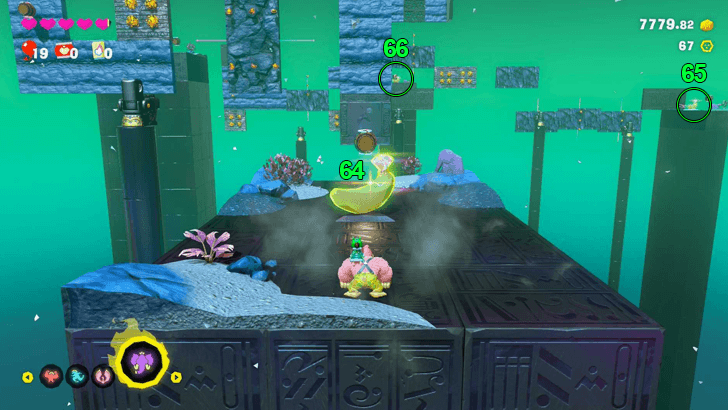
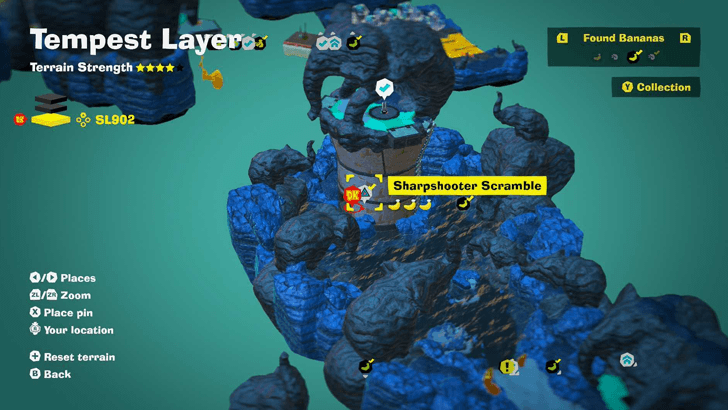
Found inside Sharpshooter Scramble Challenge Course 5. It is located at the start of the course. |
||
| 65 |
 |
|
|
Found inside Sharpshooter Scramble Challenge Course 5. Scale the walls to the right after Gem 64. |
||
| 66 |
 |
|
|
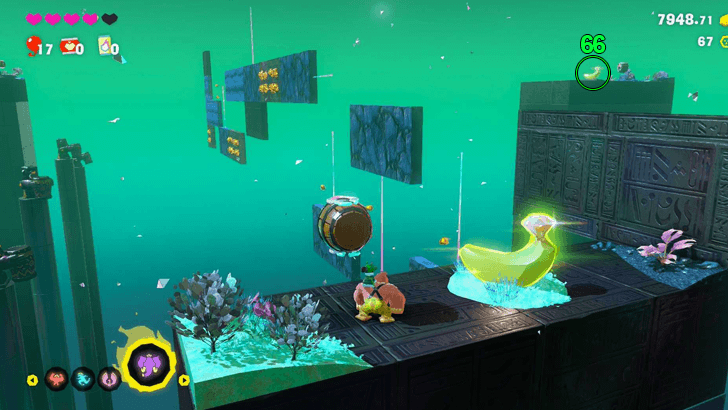
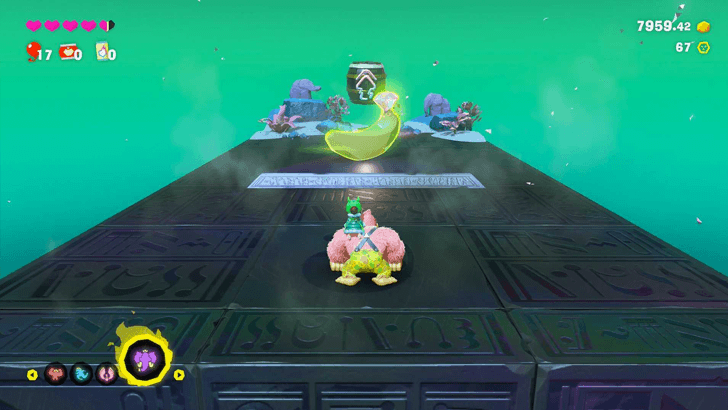
Found at the end of Sharpshooter Scramble Challenge Course 5. |
||
| 67 |
 |
 |
|
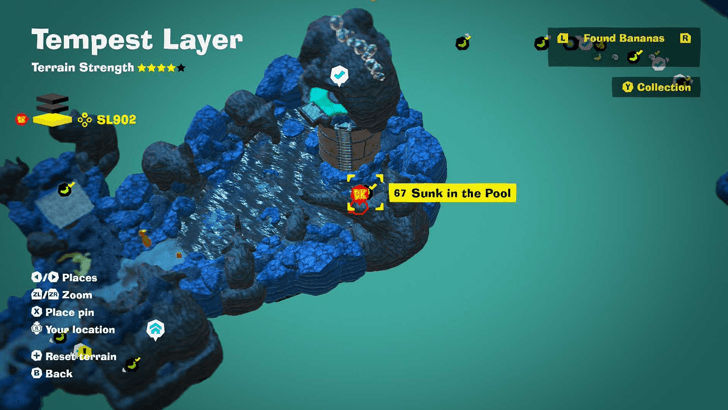
Found in the water below the Clifftop Shelter checkpoint. Jump and do a downward punch to get the Gem. |
||
| 68 |
 |
|
|
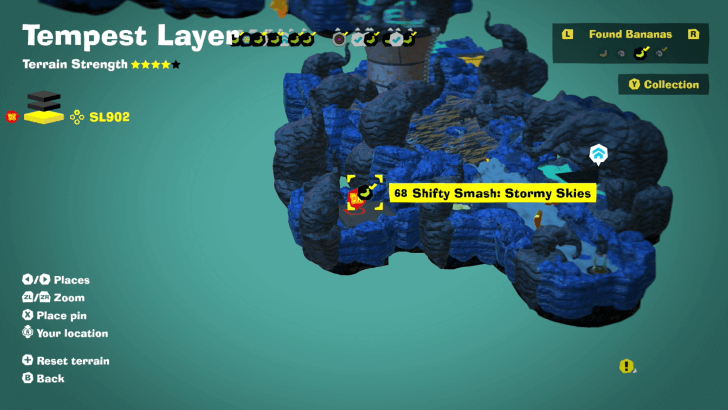
Activate the Shifty Smash Challenge, then use the Liftoff Ore to fly up and reach the platform with the white walls. Break them to reach 100%, then fall back down to get the Banandium Gem. |
||
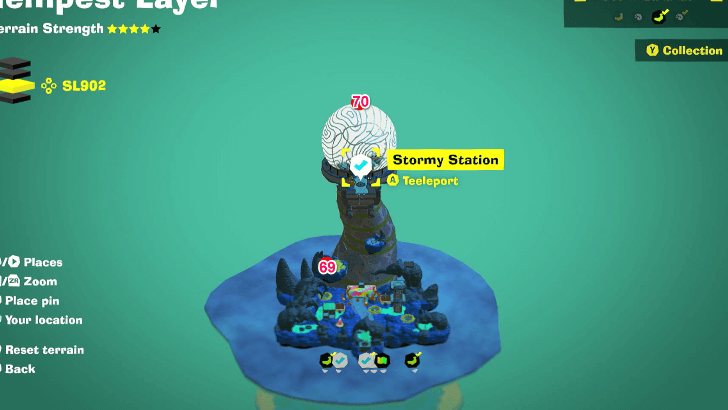
| 69 |
 |
 |
|
Use a Liftoff Ore to get to the floating island. Can also be reached by jumping from Stormy Station. |
||
| 70 |
 |
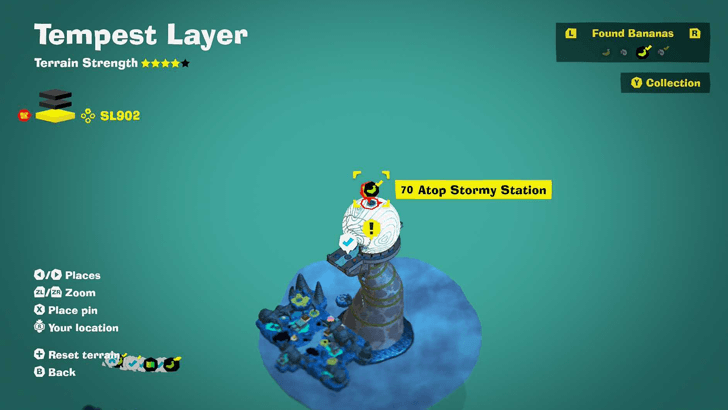 |
|
Use a Liftoff Ore to get to the top of Stormy Station. |
||
Banandium Gems List and Locations
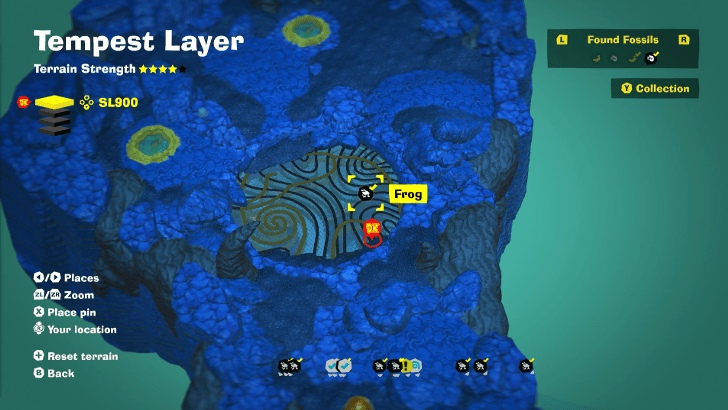
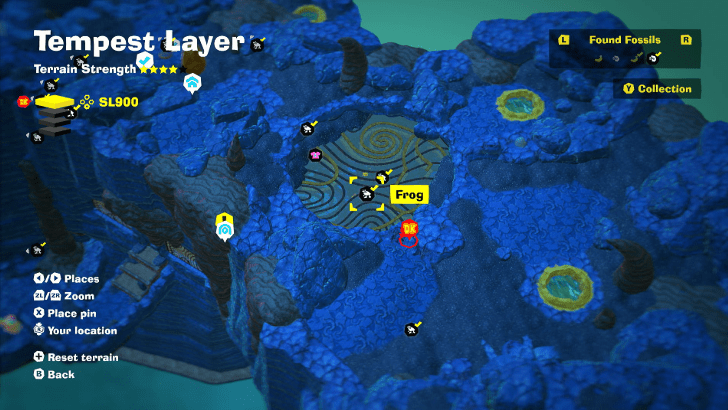
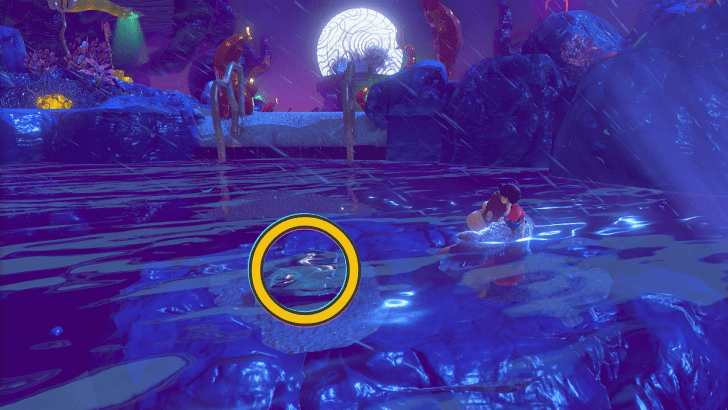
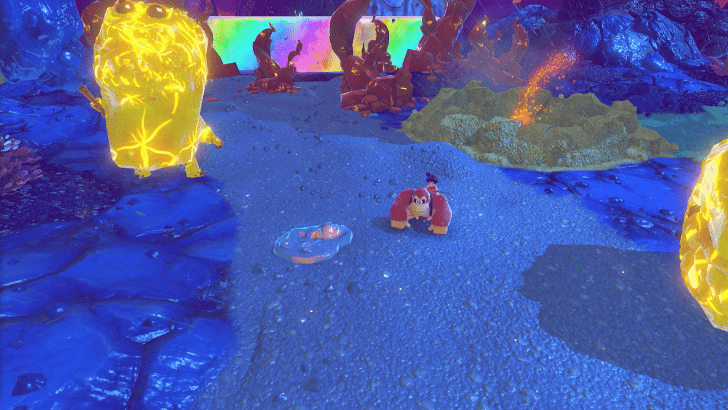
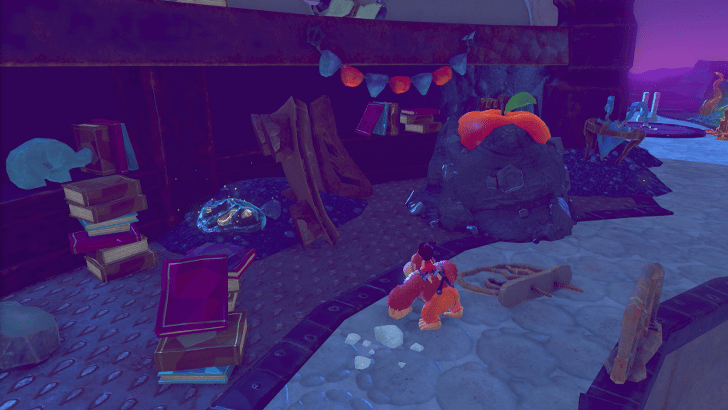
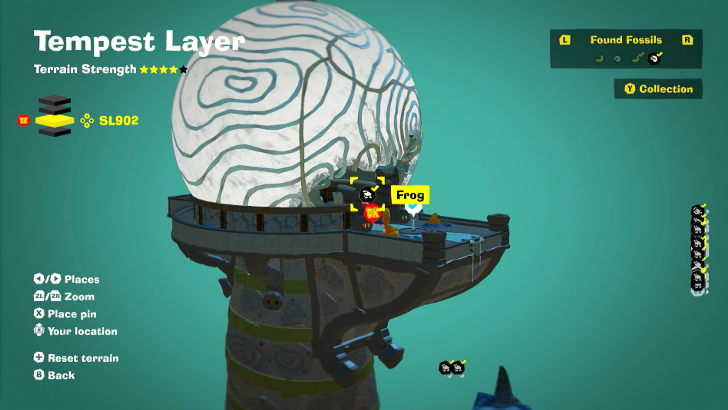
Tempest Layer Fossils
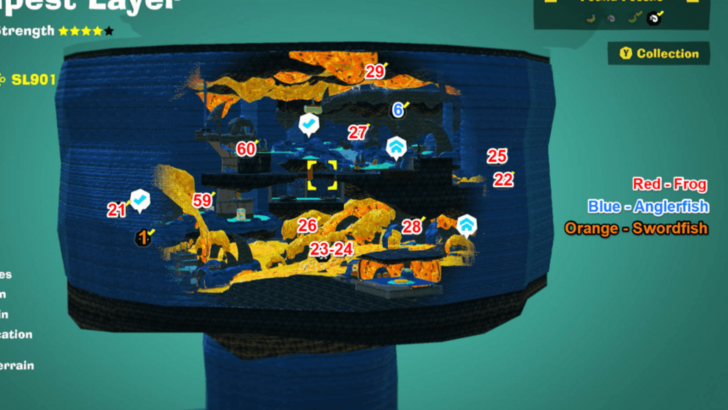
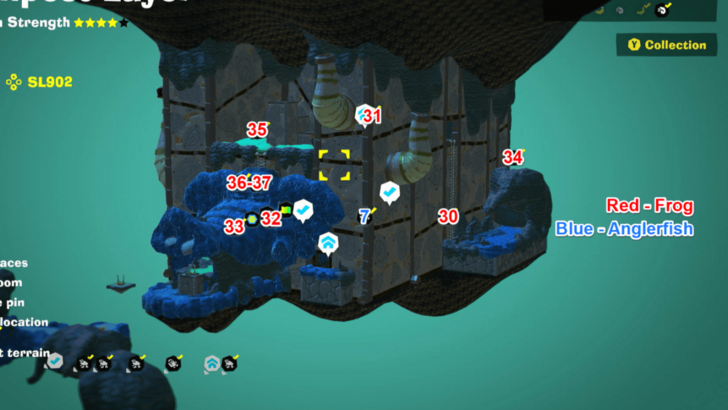
Fossils Map Overview
SL 900
SL 901
SL 902 (Left)
SL 902 (Right)
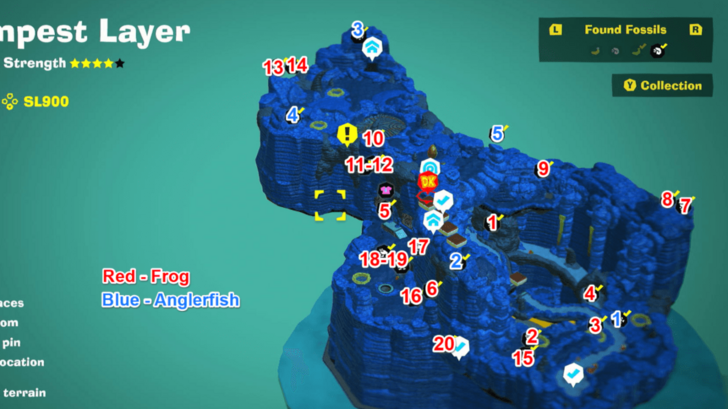
SL 900 Fossil Locations
| Overworld View | Map Location | |
|---|---|---|
 |
 |
|
|
Right before the entrance to Forecaster Refuge |
||
 |
 |
|
|
Located at Mount Gusty Tusk |
||
 |
 |
|
|
Located at Mount Gusty Tusk |
||
 |
 |
|
|
Located Mount Gusty Tusk, it is found outside of the bridge |
||
 |
 |
|
|
Located at Forecaster Refuge. It is found near the Clothes Shop right at the exit |
||
 |
 |
|
|
Located at Forecaster Refuge. Found outside at the exit near the Clothes Shop |
||
 |
 |
|
|
Located Mount Gusty Tusk. It is found at the top of the mountain |
||
 |
 |
|
|
Located Mount Gusty Tusk. It is found at the edge of the map on top of the mountain |
||
 |
 |
|
|
Located at Forecaster Refuge. Found outside on top of a floating rock at the exit near the Warp Gong |
||
 |
||
|
Located beside the Elephant Elder. It is hidden by a few scrolls |
||
 |
 |
|
|
Located beside the Elephant Elder. It is found near the entrance |
||
|
|
|
|
|
Located beside the Elephant Elder. It is found near the entrance |
||
 |
 |
|
|
Located near the Elephant Elder. It is found outside behind the room. |
||
 |
 |
|
|
Located at the Elephant Elder. It found on top of the room |
||
 |
 |
|
|
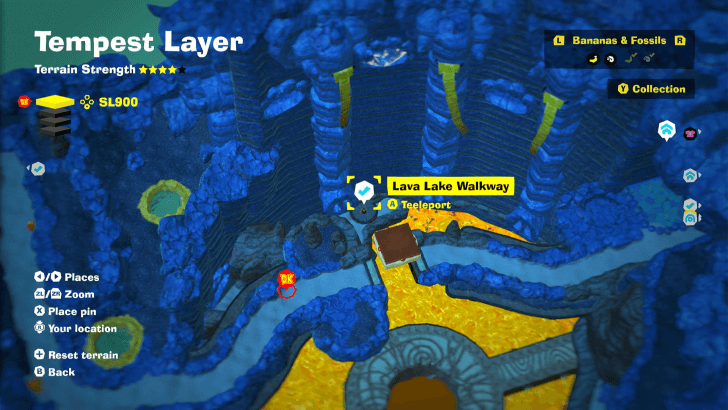
Located right beside Lava Lake Walkway Checkpoint |
||
 |
 |
|
|
Located at Lava Lake Walkway Checkpoint. Found up the stairs on a wall |
||
 |
||
|
Located at Lava Lake Walkway. It is found at the center. Proceed in to the walkway and destroy the wall at the entrance |
||
 |
||
|
Located at Forecaster Refuge. Found outside down a ladder at the exit near the Clothes shop |
||
|
|
||
|
Located at Forecaster Refuge. Found outside down a ladder at the exit near the Clothes shop |
||
 |
||
|
Located at Lava Lake Walkway. It is found at the center. Proceed in to the walkway and destroy the wall at the entrance and continue going down until you find it. |
||
 |
 |
|
|
Located at Lava Lake Walkway. It will be in an alcove at the side of the wall |
||
 |
 |
|
|
Located near Mount Gusty Tusk. It is in between two elephant carvings |
||
 |
 |
|
|
Located at the top of Summit Getaway |
||
 |
 |
|
|
Located at Elder Elephants, It is found on his left side |
||
 |
 |
|
|
Located at the Summit. It is found on top of a rock formation |
||
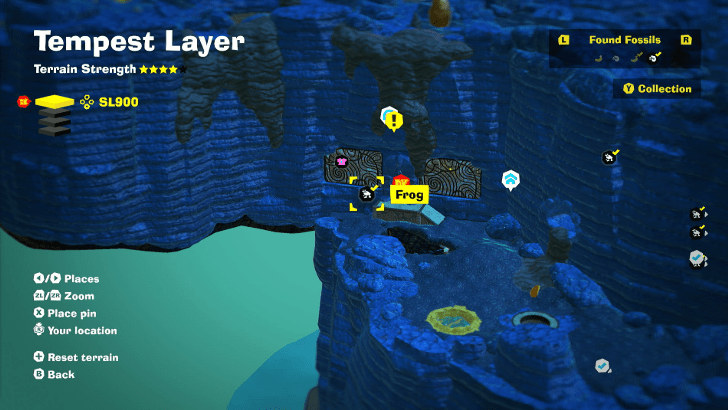
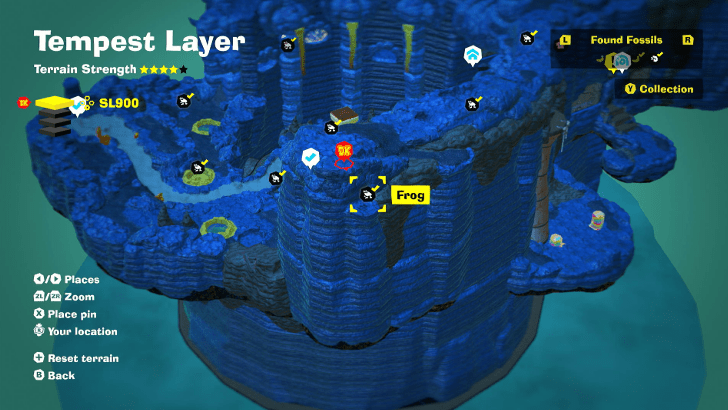
SL 901 Fossil Locations
| Overworld View | Map Location | |
|---|---|---|
 |
 |
|
|
Located at Ancient Record Crossroads |
||
 |
 |
|
|
Located near the Molten Mass Getaway |
||
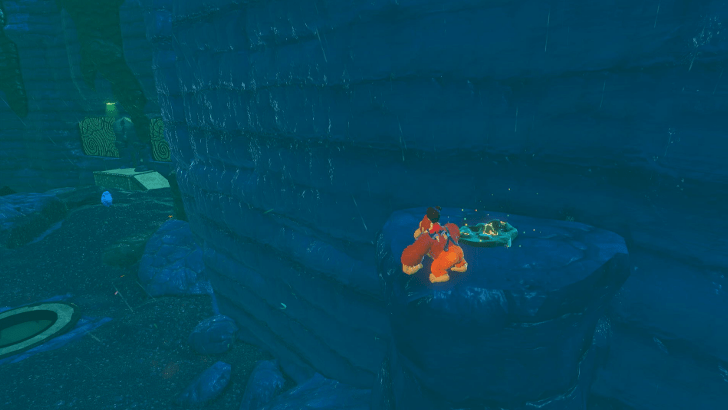
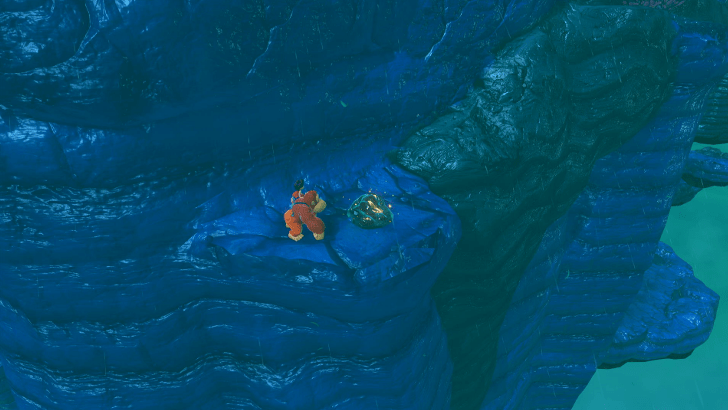
 |
 |
|
|
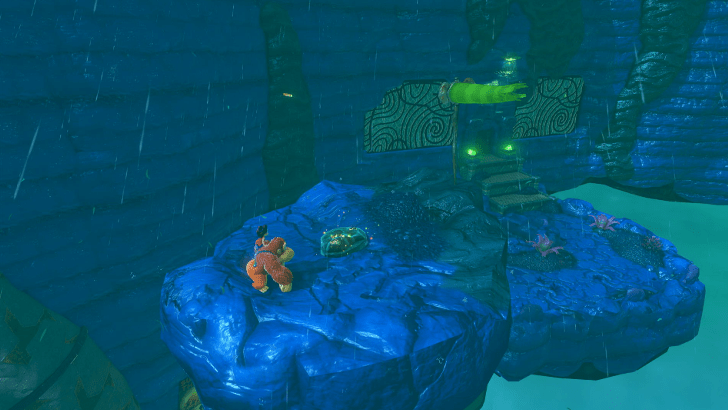
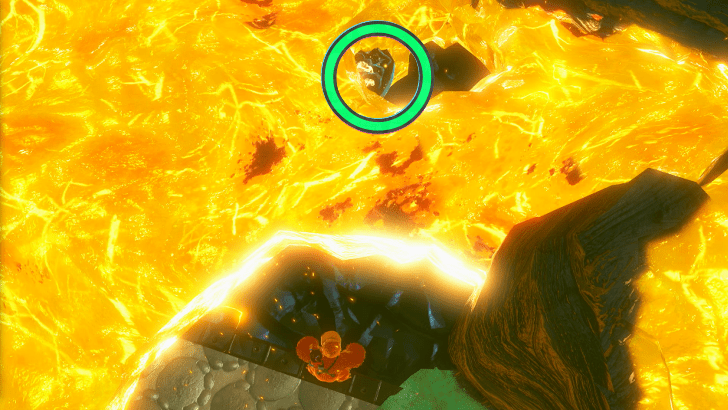
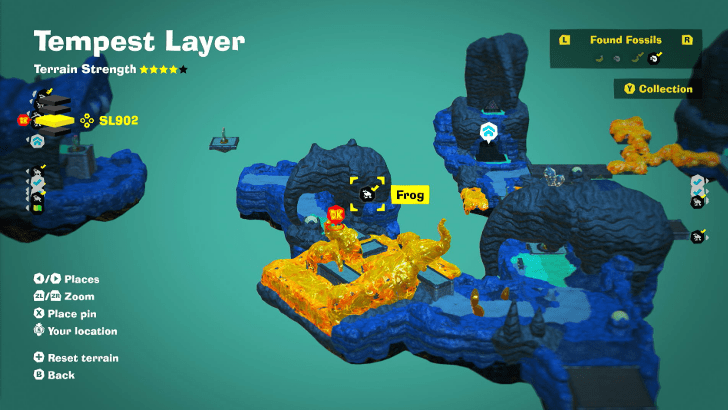
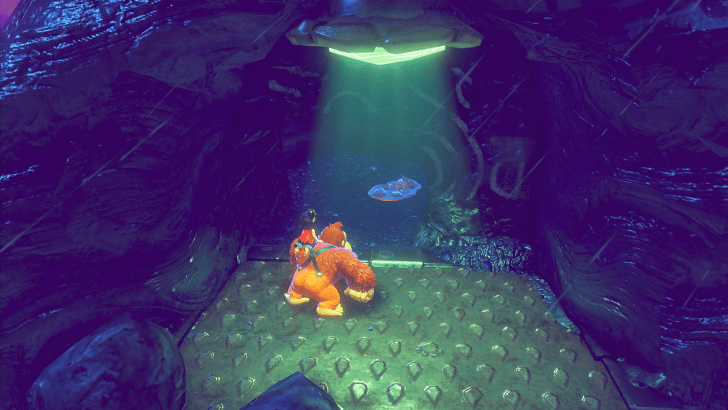
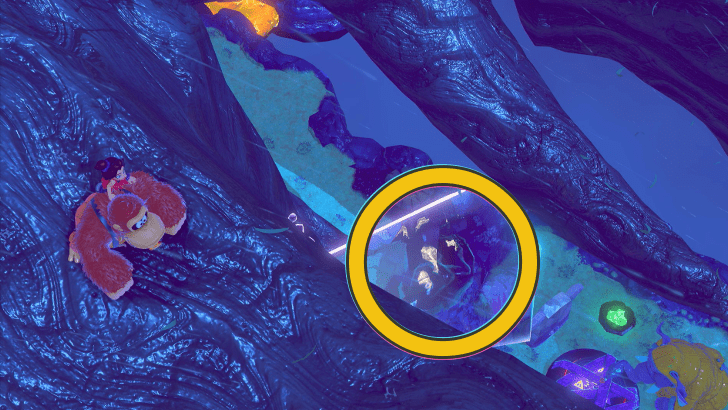
Located near at the center of the map next to another Frog Fossil. |
||
|
|
 |
|
|
Located near at the center of the map next to another Frog Fossil. |
||
 |
 |
|
|
Located near Hot-Shower Cave. Use the ziplines in order get this Fossil |
||
 |
 |
|
|
Located near the Lava Getaway. Clear out the lava by using Elephant Bananza Form |
||
 |
 |
|
|
Located below the zipline at Lava Getaway |
||
 |
 |
|
|
Located near Molten Mass Getaway. Clear out the lava to get the fossil |
||
 |
 |
|
|
Near Ancient Record Crossroads. Make the Gloo Gum Zipline lift and you can get the fossil |
||
 |
 |
|
|
Located right next to Cliff-Edge Getaway |
||
 |
 |
|
|
Located at the back of the three stone elephants at Big-Roof Shelter |
||
 |
 |
|
|
Located near Ancient Record Crossroads |
||
 |
 |
|
|
Use a zipline to get here at Ancient Record Crossroads |
||
 |
 |
|
|
Use a zipline to get here at Ancient Record Crossroads. Throw a rock to get it |
||
 |
 |
|
|
Located below Ancient Record Crossroads clear out the lava to get through here. |
||
SL 902 Fossil Locations
| Overworld View | Map Location | |
|---|---|---|
 |
 |
|
|
Located close to Trunk-Dunk Hot Springs |
||
 |
 |
|
|
Located at Sauna Getaway |
||
 |
 |
|
|
Located near Trunk-Dunk Hot Springs |
||
 |
 |
|
|
It is found on a Fractone near Chiptone Shop |
||
 |
 |
|
|
It is inside of an elephant nose near Chiptone |
||
 |
 |
|
|
It is on a Stone Elephant near Sauna Getaway |
||
 |
 |
|
|
It is close to a Small Stone Elephant near Sauna Getaway |
||
|
|
 |
|
|
The Fossils are inside of the eyes of an Elephant head |
||
 |
 |
|
|
The Fossils are inside of the eyes of an Elephant head |
||
 |
 |
|
|
The fossil is inside of a rock below a stone elephant. You have to break the wall |
||
 |
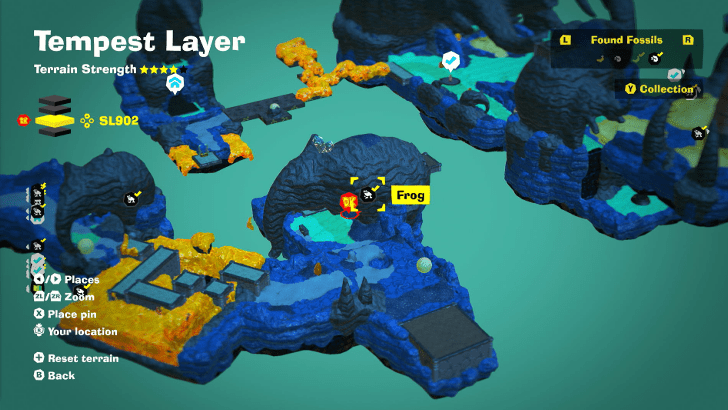 |
|
|
Located on a pit of lava. |
||
 |
 |
|
|
Located inside of a rock below a stone elephant. Break the wall to get it |
||
 |
 |
|
|
Located at the nose of the small stone elephant at Big-Roof Shelter |
||
 |
 |
|
|
Located below of an Elephant on a mud bath |
||
 |
 |
|
|
Located near Big-Roof Getaway |
||
 |
 |
|
|
Located on a pile of sand near Big-Roof Getaway |
||
 |
 |
|
|
Located close to the sand near Big-Roof Getaway |
||
 |
 |
|
|
Located at the back of a stone elephant near the sand |
||
 |
 |
|
|
Located near a small lake. It is found on the rocks |
||
 |
 |
|
|
Located near the zipline to the Clifftop Shelter |
||
 |
 |
|
|
Located on top of the Clifftop Shelter |
||
 |
 |
|
|
Located on top of the Clifftop Shelter |
||
 |
 |
|
|
Located on the lake near the Clifftop Shelter |
||
 |
 |
|
|
Located at the bottom of Stormy Station |
||
 |
 |
|
|
Located at the bottom of Stormy Station. Found at the back of an enemy |
||
 |
 |
|
|
Located at Stormy Station. Found inside near the Giant Apple |
||
 |
 |
|
|
Located at Stormy Station. Found outside |
||
 |
||
|
Located at the Big-Roof Shelter |
||
 |
 |
|
|
Located near Trunk-Dunk Hot Springs |
||
 |
 |
|
|
Located near Cliff-Edge Getaway |
||
 |
||
|
Located at the floating island in between Clifftop Shelter and Big-Roof Shelter. It is found inside in one of the elephant statues |
||
 |
||
|
Located near the Thundery Gateway |
||
Tempest Layer Checkpoints
All Checkpoint Locations
| Overworld View | Map Location | |
|---|---|---|
 |
 |
|
|
Forecaster Refuge Checkpoint (SL 900)
Located near the entrance to the Elephant Elder's room. |
||
 |
 |
|
|
Lava Lake Walkway Checkpoint (SL 900)
Located below the Forecaster Refuge near the lava pool. |
||
 |
 |
|
|
Mount Gusty Tusk Checkpoint (SL 900)
This is the starting point of the Tempest Layer when you drop down from the Resort Layer. |
||
 |
 |
|
|
Ancient Record Crossroads Checkpoint (SL 901)
Located below Hot-Shower Cave. |
||
 |
 |
|
|
Hot-Shower Cave Checkpoint (SL 901)
This is where you land after dropping down to SL 901 from Forecaster Refuge. |
||
 |
 |
|
|
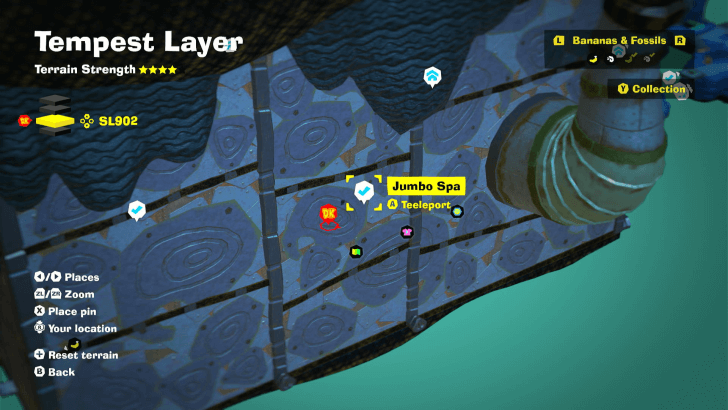
Jumbo Spa Checkpoint (SL 902)
Located at Trunk-Dunk Hot Springs near the shops. |
||
 |
 |
|
|
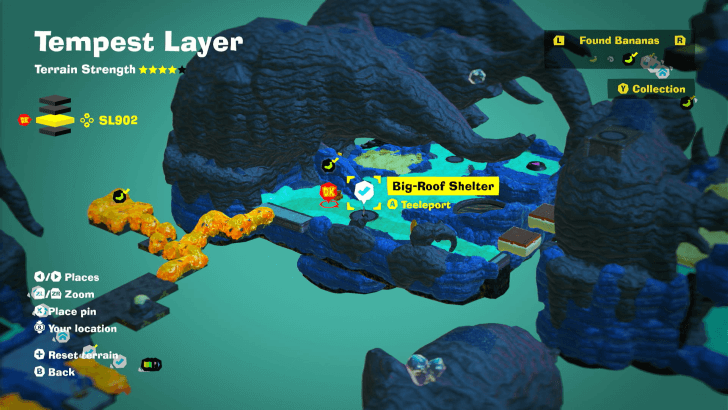
Big-Roof Shelter Checkpoint (SL 902)
Located near Cliff-Edge Getaway in the middle of Sublayer 902. |
||
 |
 |
|
|
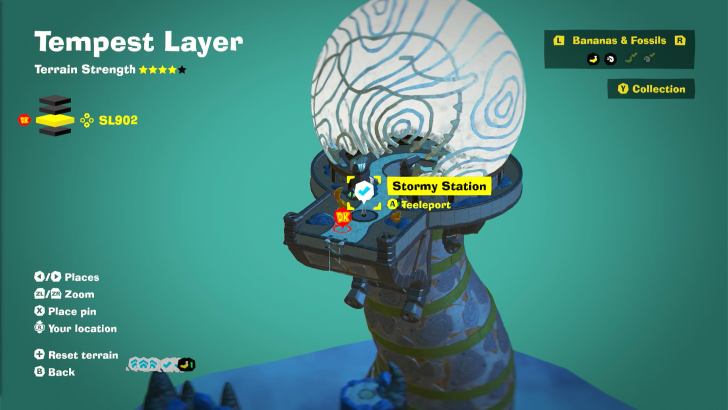
Stormy Station Checkpoint (SL 902)
Located at the entrance to the station. |
||
 |
 |
|
|
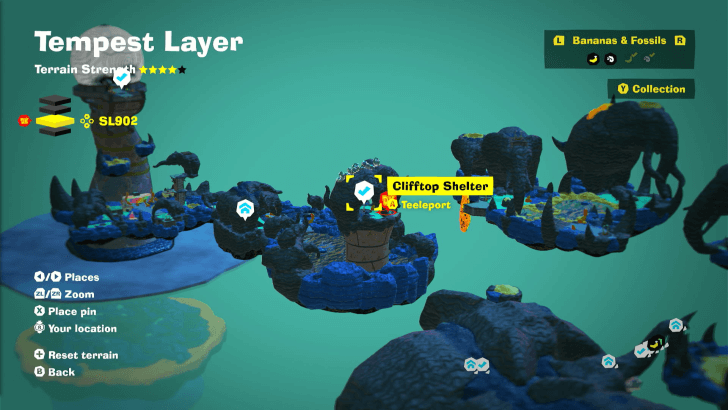
Clifftop Shelter Checkpoint (SL 902)
Located near Thundery Getaway before you reach the Stormy Station. |
||
 |
 |
|
|
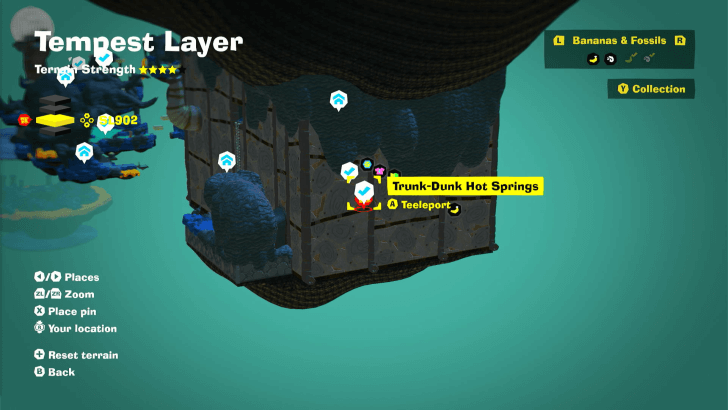
Trunk-Dunk Hot Springs Checkpoint (SL 902)
This is where you land after dropping down to SL 902 from Hot-Shower Cave. |
||
 |
 |
|
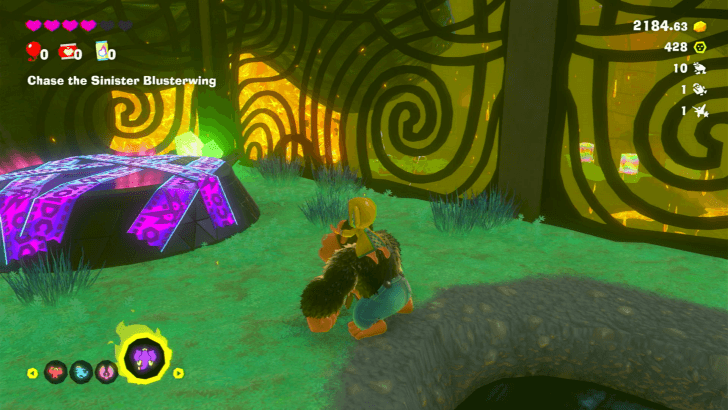
|
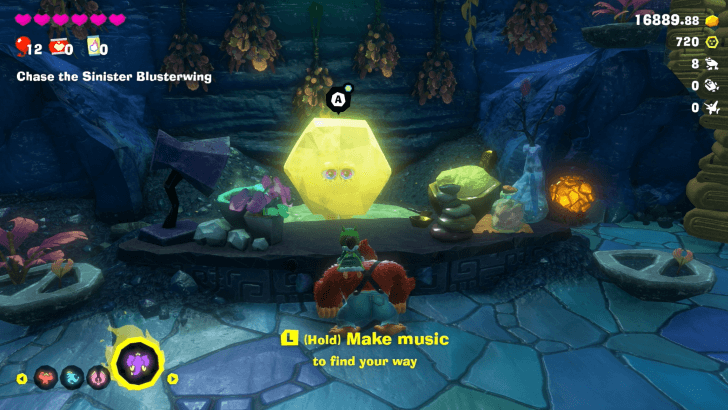
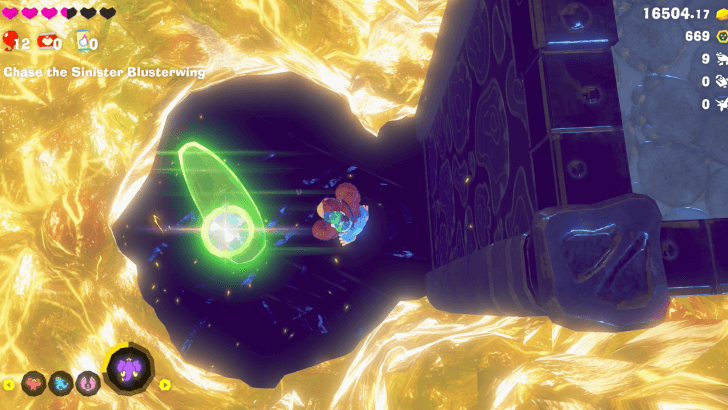
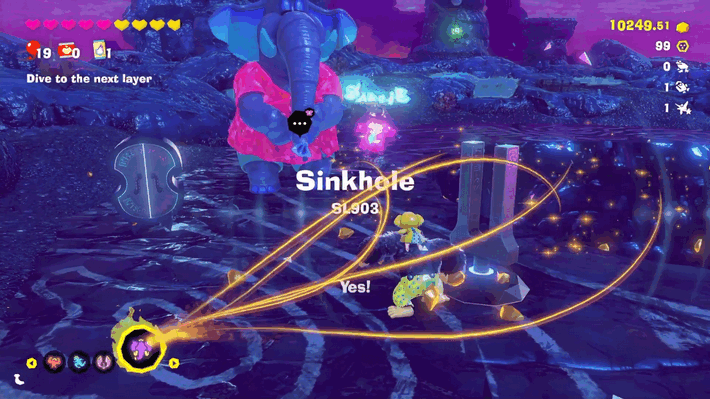
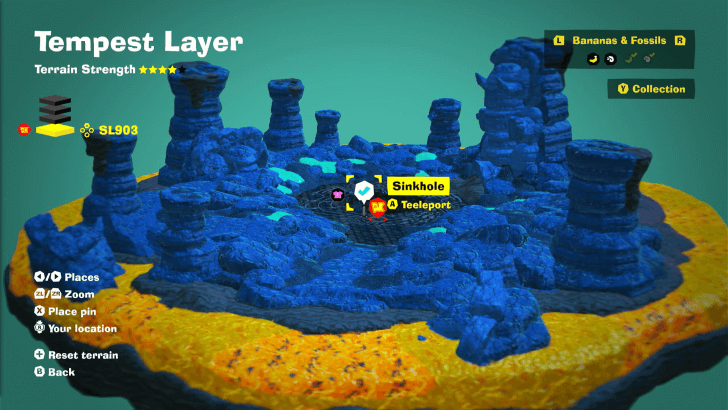
Sinkhole SL903 Checkpoint (SL 903)
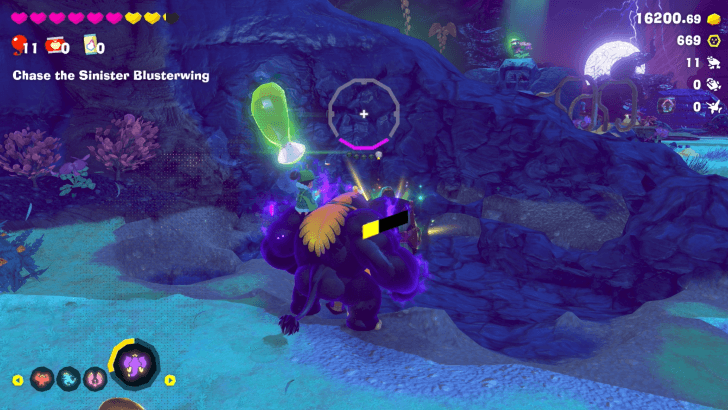
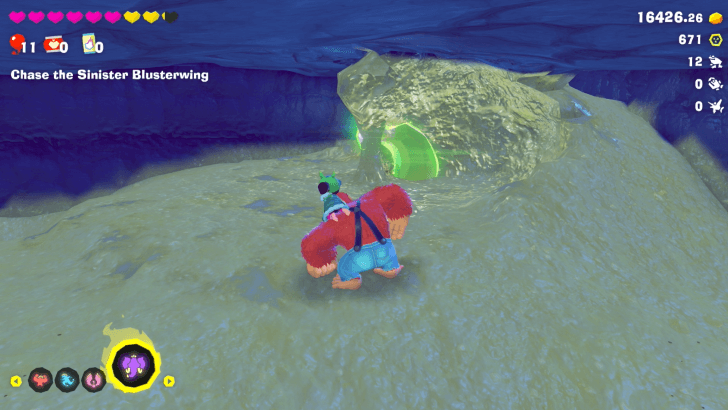
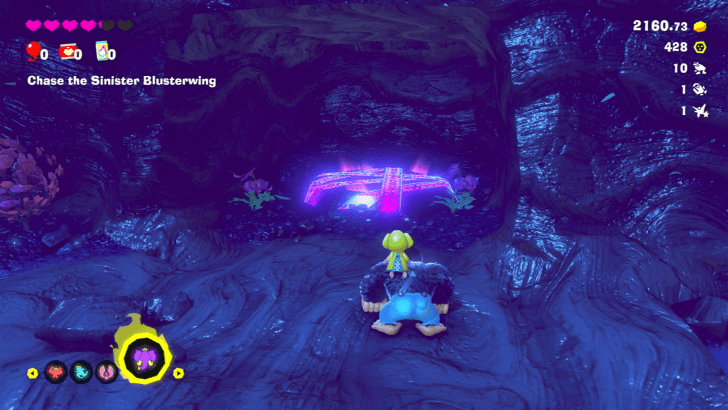
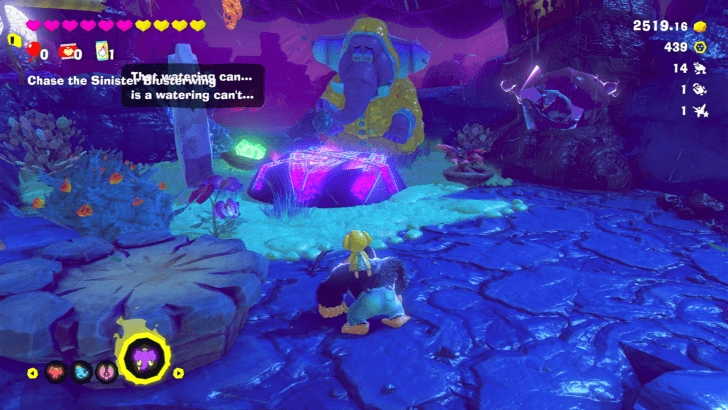
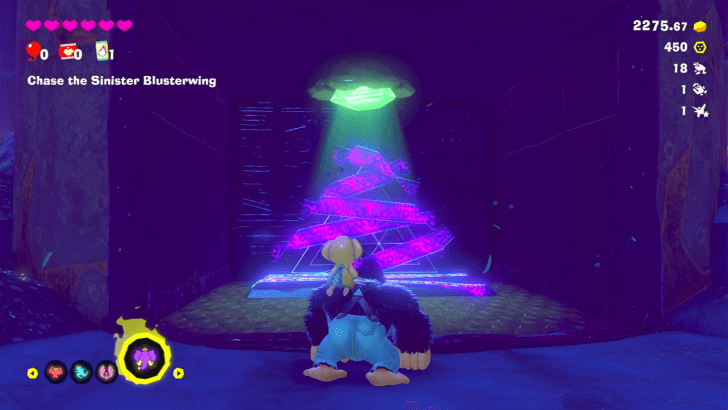
Appears once the skinhole opens up after destroying the Void Stake left by Sinister Blusterwing. |
||
Warp Gong Location
| Layer | Overworld View | Map Location |
|---|---|---|
| SL 900 |
 |
 |
|
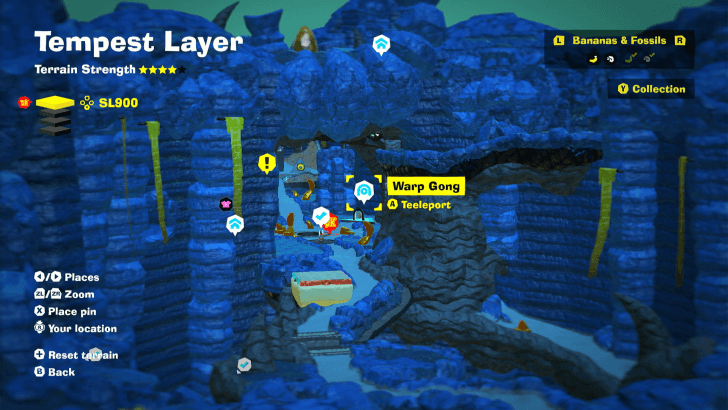
Forecaster Refuge Warp Gong
Located at Forecaster Refuge near the Style Shop. |
||
How to Teeleport: Fast Travel Guide
Tempest Layer Challenges
All Challenge Locations
| Layer | Overworld View | Map Location |
|---|---|---|
| SL 901 |
 |
 |
|
Batteroid x3 Tempest Layer Battle Challenge 1 Located underground to the left of the Lava Getaway. Look for a large mushroom with a grass patch underneath and dig underground to get to the Challenge Ruins. |
||
| SL 901 |
 |
 |
|
Squeeloid x4 Tempest Layer Battle Challenge 2 Located on the tower behind the Hot-Shower Cave entrance. You'll need to use Liftoff Ore to get to the top area where the challenge ruins is located. |
||
| SL 902 |
 |
 |
|
Antickoid x8 Tempest Layer Battle Challenge 3 On a small alcove just before the zipline heading to Stormy Station. |
||
| SL 902 |
 |
 |
|
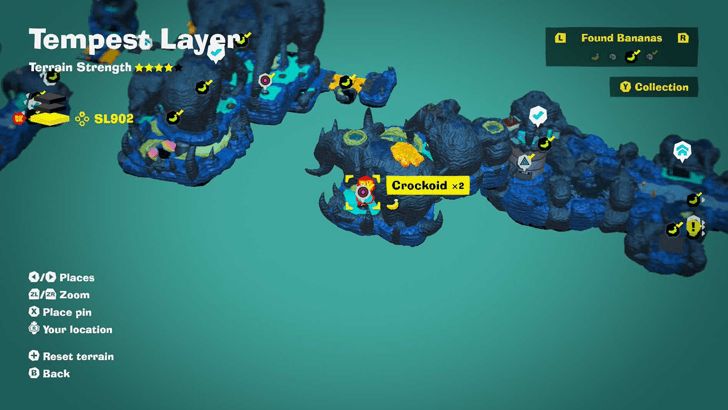
Crockoid x4 Tempest Layer Battle Challenge 4 Slightly northeast of Big-Roof Shelter. |
||
| SL 902 |
 |
 |
|
Rolluskoid x5 Tempest Layer Battle Challenge 5 Follow the right path from Big-Roof Shelter checkpoint. The challenge ruin is behind the rocky wall you need to dig through. |
||
| SL 902 |
 |
 |
|
Crockoid x2 Tempest Layer Battle Challenge 6 Speak to the Constructone and pay 600 Gold to clear the debris blocking the ruins. |
||
| SL 900 |
 |
 |
|
Liftoff Labyrinth Tempest Layer Challenge Course 1 Located to the right of the Elephant Elder in Forecaster Refuge. |
||
| SL 901 |
 |
 |
|
Elephant Bananza: Heating Up Tempest Layer Challenge Course 2 East of Molten Mass Getaway. You'll need to use the Elephant Bananza form to clear the magma to access the challenge ruin. |
||
| SL 902 |
 |
 |
|
Zip-LIne Valley Tempest Layer Challenge Course 3 Right below the starting area of Jumbo Spa. Speak to the Fractone and pay 1000 gold to clear the debris blocking the entrance. |
||
| SL 902 |
 |
 |
|
Hot-Lava Hotfoot Tempest Layer Challenge Course 4 Located above Cliff-Edge Getaway. |
||
| SL 902 |
 |
 |
|
Sharpshooter Scramble Tempest Layer Challenge Course 5 At the base of the mettalic structure just on the island just before the final Sinister Blusterwing confrontation. |
||
Bonus Stage Location
| Layer | Overworld View | Map Location |
|---|---|---|
| SL 901 |
 |
|
|
Smashing for Gold
Found in the Ancient Record Crossroads. Use Elephant Bananza to inhale the lava near the barrel. |
||
Tempest Layer Shops
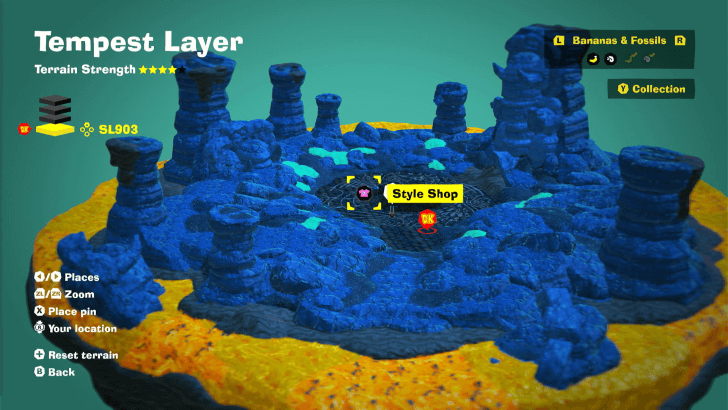
Tempest Layer Style Shop
Style Shop Locations
| Layer | Overworld View | Map Location |
|---|---|---|
| SL 900 |
 |
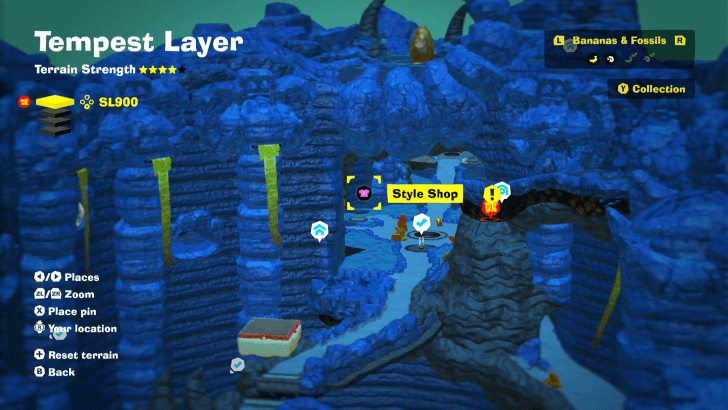 |
|
Forecaster Refuge Style Shop
Found near the Forecaster Refuge checkpoint, just before the Elephant Elder. |
||
| SL 902 |
 |
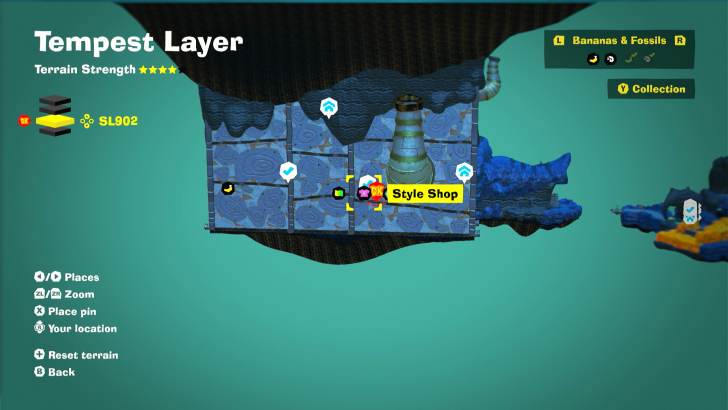 |
|
Jumbo Spa Style Shop
Located in the Jumbo Spa area near the Stuff Shop. |
||
| SL 903 |
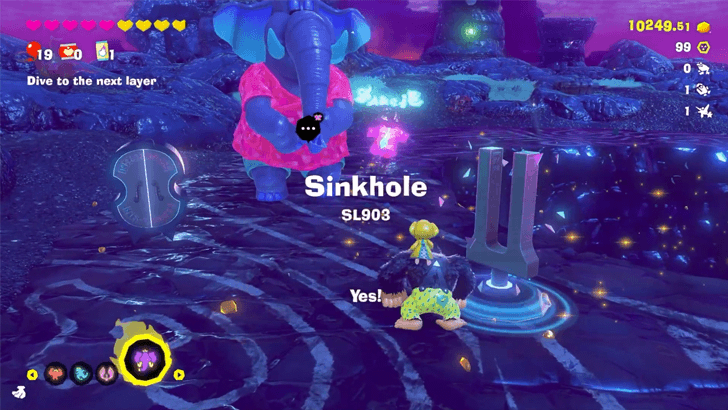 |
 |
|
Stormy Station Sinkhole Style Shop
Appears once the skinhole opens up after destroying the Void Stake left by Sinister Blusterwing. |
||
Available Outfits
| Name | Type | Cost | Effect | |||||||
|---|---|---|---|---|---|---|---|---|---|---|
|
|
Britches |
|
Reduces burn damage from lava or oil by 10 percent. | |||||||
|
|
Britches |
|
Reduces burn damage from lava or oil by 20 percent. | |||||||
|
|
Neckwear |
|
Increases the amount of health an apple will restore by 25 percent. | |||||||
|
|
Pauline Outfits |
|
Extends your Elephant Bananza time by 40 percent. | |||||||
|
|
Pauline Outfits |
|
Extends your Elephant Bananza time by 40 percent. | |||||||
|
|
Pauline Outfits |
|
Extends your Elephant Bananza time by 40 percent. | |||||||
|
|
Fur Color |
|
Crisp and colorful, like a freshly cut tropical fruit. | |||||||
|
|
Fur Color |
|
Mysterious and intriguing, like a sip from a cup of peculiar tea. | |||||||
Stuff Shop Locations
| Layer | Overworld View | Map Location |
|---|---|---|
| SL 902 |
 |
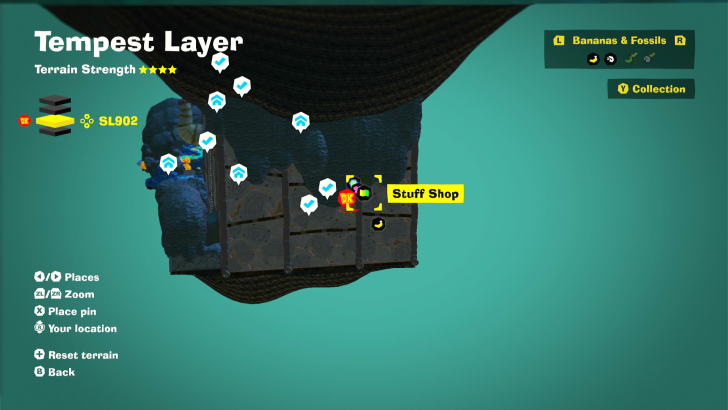 |
|
Jumbo Spa Stuff Shop
Located in the Jumbo Spa area near the Style Shop. |
||
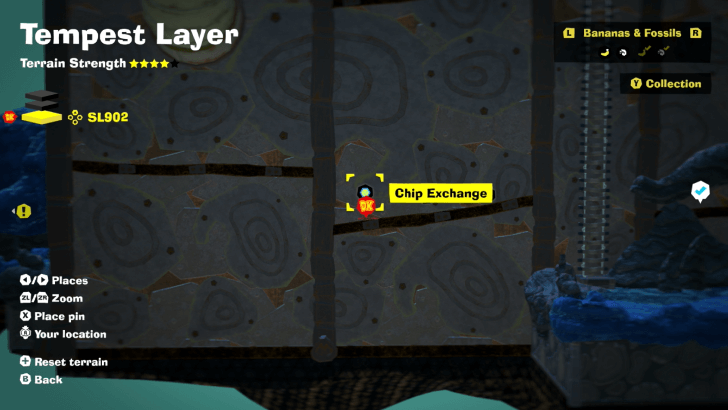
Chip Exchange Location
| Layer | Overworld View | Map Location |
|---|---|---|
| SL 902 |
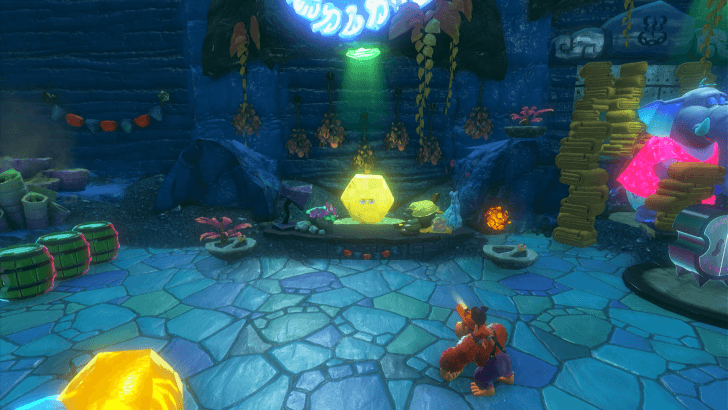 |
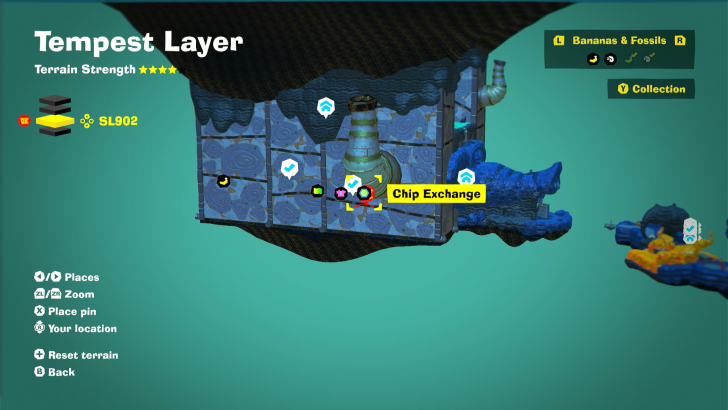 |
|
Jumbo Spa Chip Exchange
Located in the Jumbo Spa area near the shops. |
||
Tempest Layer Void Stakes
Void Stake Locations
| Layer | Overworld View | Map Location |
|---|---|---|
| SL 901 |
 |
 |
|
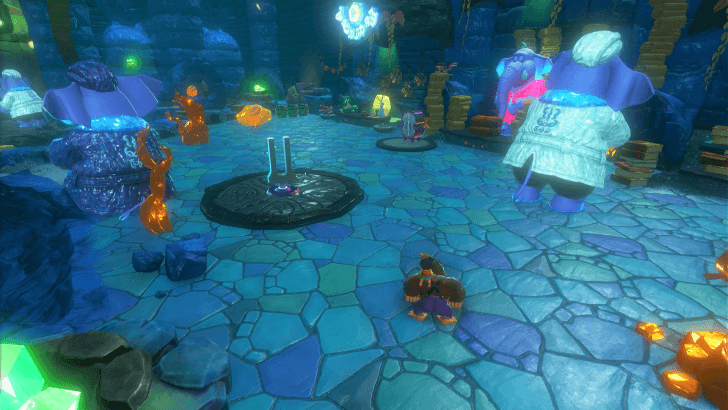
Hot Shower Cave Void Stake
Use the Elephant Bananza Inhale to recover the Key from the Tornado. Once the key is inserted, break the Void Stake to reveal the tunnel. |
||
| SL 903 |
 |
 |
|
Sinkhole SL903 Void Stake
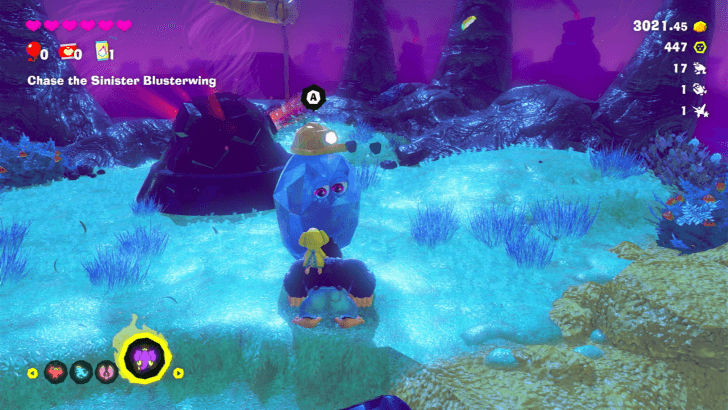
Revealed after defeating the Sinister Blusterwing |
||
Cranky Kong Location
Jumbo Spa Outside Area
| Map / Overworld Image | Video Directions |
|---|---|
 |
In SL902’s spa, head to the back-left corner, away from the main path to find Cranky.
Tempest Layer Getaways
All Getaway Locations
| Map Location | Overworld Image |
|---|---|
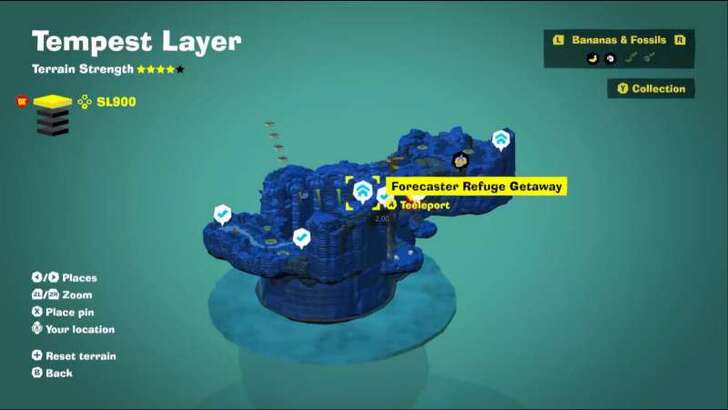 Tempest Layer (SL 900) |
 Forecaster Refuge Getaway |
 Tempest Layer (SL 900) |
 Summit Getaway |
 Tempest Layer (SL 900) |
 Lava Getaway |
 Tempest Layer (SL 901) |
 Molten Mass Getaway |
 Tempest Layer (SL 901) |
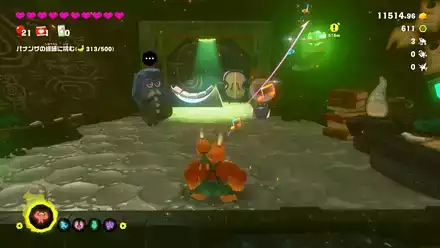
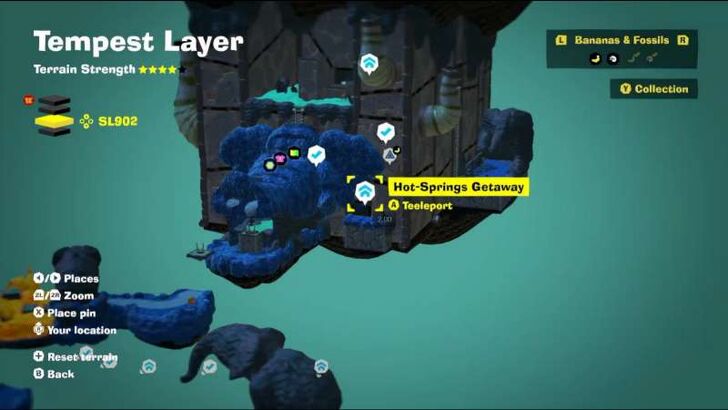
 Hot-Springs Getaway |
 Tempest Layer (SL 902) |
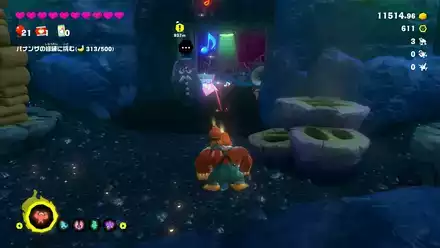
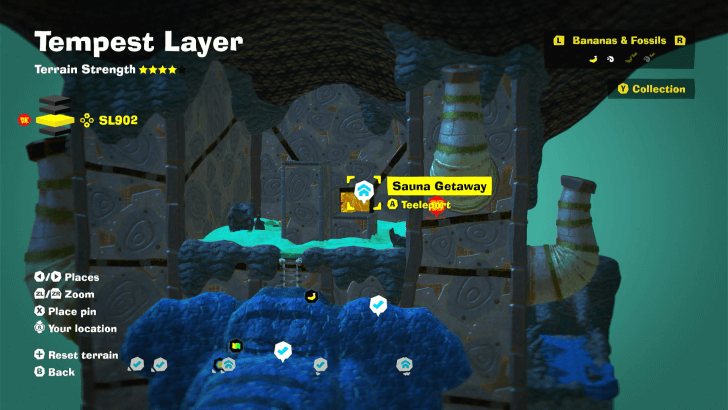
 Sauna Getaway |
 Tempest Layer (SL 902) |
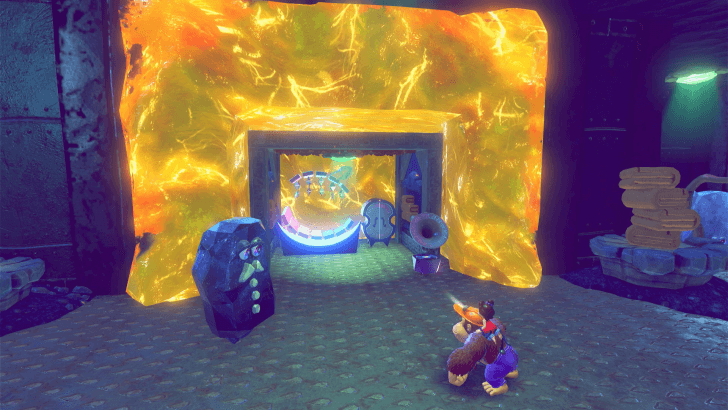
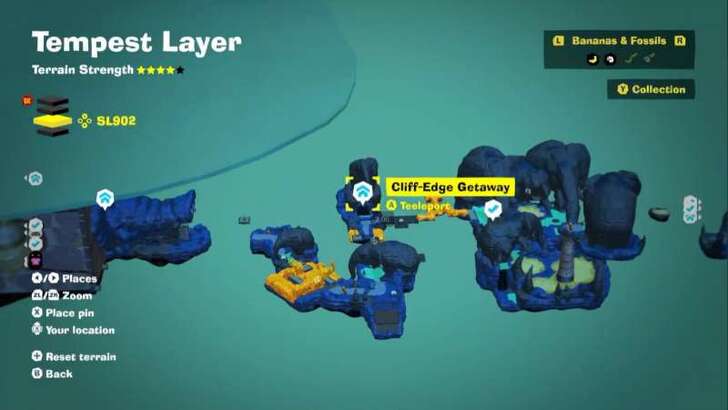
 Cliff-Edge Getaway |
 Tempest Layer (SL 902) |
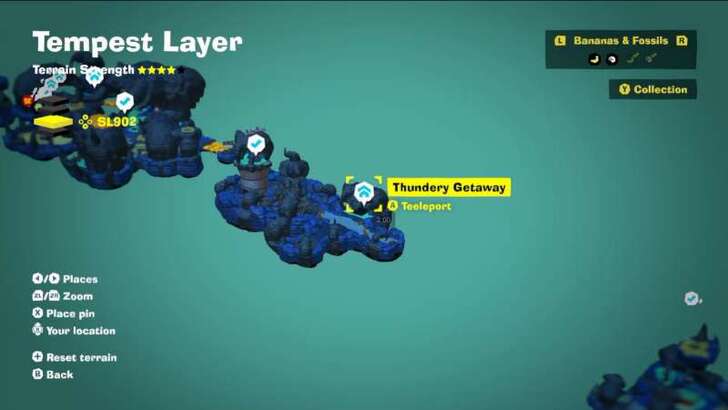
 Thundery Getaway |
Getaway Guide: All Getaway Locations
Donkey Kong Bananza Related Guides
All Layers
Comment
Author

Tempest Layer Banana and Fossil Locations (SL 900-902)
Please participate in our site
improvement survey
04/2026
improvement survey
04/2026
Would you assist in
improving Game8's site?
improving Game8's site?

×
We are listening to our users' valuable opinions and discussing how to act on them.
The information collected through this survey will be used for the purpose of improving our services. In addition, the information will only be disclosed a part of a statistic in a format that will not allow identification of personal information.
Begin Survey
Not Now
×
Please rate each item regarding Game8.co's Advertisements.
Amount of Ads
Very Dissatisfied
Somewhat Dissatisfied
Fine
Somewhat Satisfied
Highly Satisfied
Placement of Ads
Timing of Ad Display
Ad Loading Speed
Safeness of Ads
Content of Ads
×
Please rate each item regarding Game8.co's Quality of Articles.
Amount of information
Very Dissatisfied
Somewhat Dissatisfied
Fine
Somewhat Satisfied
Highly Satisfied
Frequency of updates
Speed of new information
Accuracy of articles
Understandibility of articles
Readability of sentences
×
Please rate each item regarding Game8.co's Usability of the Site.
Ease of finding information
Very Dissatisfied
Somewhat Dissatisfied
Fine
Somewhat Satisfied
Highly Satisfied
Loading Speed
Use of Color
Font Size
Visibility of Images
Easy to Understand Layout
×
Please rate each item regarding Game8.co's Message Boards, Comments.
Ease of Writing
Very Dissatisfied
Somewhat Dissatisfied
Fine
Somewhat Satisfied
Highly Satisfied
Readability
Ease in Finding Information
Comment Quality
Comment Quantity
Admin Response
×
Please rate each item regarding Game8.co's Site's new design.
Please rate our site's new design
Very Dissatisfied
Somewhat Dissatisfied
Fine
Somewhat Satisfied
Highly Satisfied
Do you think that the website's design change makes the site easier to use?
Has the new design made it easier for you to find information on the site?
Has the new design improved the overall visual appeal of the site?
How would you rate your overall satisfaction with the new design of the site?
×
How likely are you to recommend Game8 to someone you know?
Very Unlikely
0
1
2
3
4
5
6
7
8
9
10
Very Likely
If you have other opinions regarding potential improvement to the website, please share them with us. We would appreciate your honest opinion.
Note: This is a free response section, so you can proceed without entering anything.
Note: Please be sure not to enter any kind of personal information into your response.
Note: Please be sure not to enter any kind of personal information into your response.
×
Thank You
×
Thank you for participating in our survey! Your answers will help us to improve the quality of our website and services.
We hope you continue to make use of Game8.
We hope you continue to make use of Game8.
Close
Rankings
- We could not find the message board you were looking for.
Gaming News

![Forza Horizon 6 Review [Preview] | Beautiful Roads With a Whole Lot of Oversteer](https://img.game8.co/4460981/a7254c24945c43fbdf6ad9bea52b5ce9.png/show)


![Forza Horizon 6 Review [Preview] | Beautiful Roads With a Whole Lot of Oversteer](https://img.game8.co/4460981/a7254c24945c43fbdf6ad9bea52b5ce9.png/thumb)
Popular Games

Genshin Impact Walkthrough & Guides Wiki
Crimson Desert Walkthrough & Guides Wiki
Umamusume: Pretty Derby Walkthrough & Guides Wiki
Honkai: Star Rail Walkthrough & Guides Wiki
Monster Hunter Stories 3: Twisted Reflection Walkthrough & Guides Wiki
Wuthering Waves Walkthrough & Guides Wiki
The Seven Deadly Sins: Origin Walkthrough & Guides Wiki
Pokemon TCG Pocket (PTCGP) Strategies & Guides Wiki
Pokemon Pokopia Walkthrough & Guides Wiki
Zenless Zone Zero Walkthrough & Guides Wiki


Recommended Games
Monster Hunter World Walkthrough & Guides Wiki
Fire Emblem Heroes (FEH) Walkthrough & Guides Wiki
Pokemon Brilliant Diamond and Shining Pearl (BDSP) Walkthrough & Guides Wiki
Super Smash Bros. Ultimate Walkthrough & Guides Wiki
Diablo 4: Vessel of Hatred Walkthrough & Guides Wiki
Cyberpunk 2077: Ultimate Edition Walkthrough & Guides Wiki
Yu-Gi-Oh! Master Duel Walkthrough & Guides Wiki
Elden Ring Shadow of the Erdtree Walkthrough & Guides Wiki
The Legend of Zelda: Tears of the Kingdom Walkthrough & Guides Wiki
Persona 3 Reload Walkthrough & Guides Wiki


All rights reserved
© Nintendo. Games are property of their respective owners. Nintendo of America Inc.
The copyrights of videos of games used in our content and other intellectual property rights belong to the provider of the game.
The contents we provide on this site were created personally by members of the Game8 editorial department.
We refuse the right to reuse or repost content taken without our permission such as data or images to other sites.