 Paper Mario: Origami King Wiki Top Page
This survey will take about 1 minute.
Your answers will help us to improve our website.
Paper Mario: The Origami King (Switch)
All Toad Locations List

This is a guide to finding All Toad Locations in Paper Mario: The Origami King for Nintendo Switch. Read on to see where to find the Toads in each area!
| All Toad Locations: Red Streamer | |
|---|---|
| ▼ Whispering Woods | ▼ Toad Town |
| ▼ Graffiti Underground | ▼ Picnic Road |
| ▼ Overlook Mountain | ▼ Earth Vellumental Temple |
| ▼ Overlook Tower | - |
| All Toad Locations: Blue Streamer | |
| ▼ Autumn Mountain | ▼ Chestnut Valley |
| ▼ Water Vellumental Shrine | ▼ Eddy River |
| ▼ Shogun Studios | ▼ Ninja Attraction |
| ▼ Big Sho' Theater | - |
| All Toad Locations: Yellow Streamer | |
| ▼ Sweet Paper Valley | ▼ Breezy Tunnel |
| ▼ Scorching Sandpaper Desert | ▼ Scorching Sandpaper Minor |
| ▼ Scorching Sandpaper West | ▼ Scorching Sandpaper East |
| ▼ Shroom City | ▼ Scorching Sandpaper Far West |
| ▼ Scorching Sandpaper Far East | ▼ Fire Vellumental Cave |
| ▼ Temple of Shrooms | - |
| All Toad Locations: Purple Streamer | |
| ▼ The Great Sea | ▼ The Princess Peach |
| ▼ Bonehead Island | ▼ Mushroom Island |
| ▼ Heart Island | ▼ Spade Island |
| ▼ Club Island | ▼ Full Moon Island |
| ▼ ? Island | ▼ Hammer Island |
| ▼ Scuffle Island | ▼ Diamond Island |
| ▼ Ice Vellumental Mountain | ▼ Sea Tower |
| All Toad Locations: Green Streamer | |
| ▼ Shangri-Spa | - |
Whispering Woods Toad Locations
Here is a list of All Toad Locations in Whispering Woods.
12 Locations Total
| Location and Explanation | |
|---|---|
|
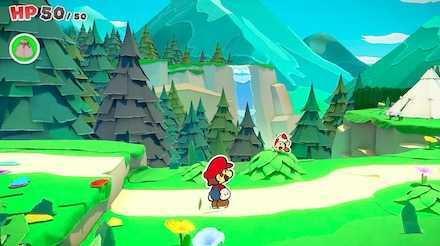
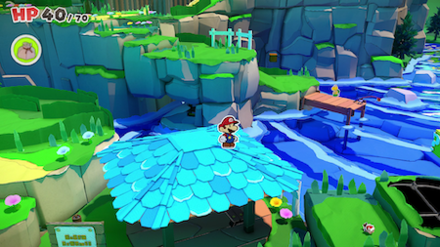
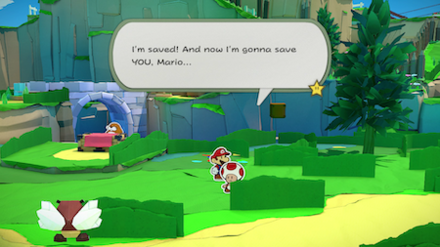
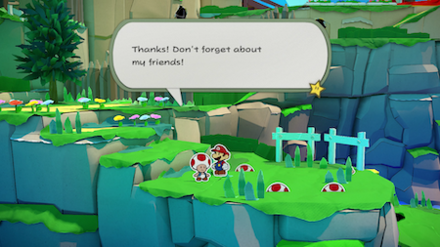
After escaping the Whispering Woods, this Toad is encountered normally on the route, and rescued as part of the story. |
|
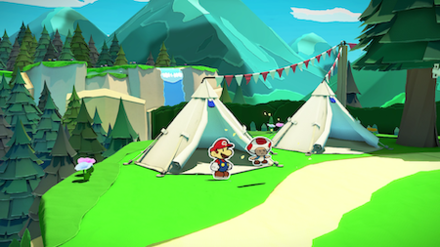
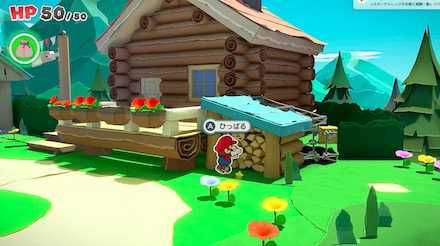
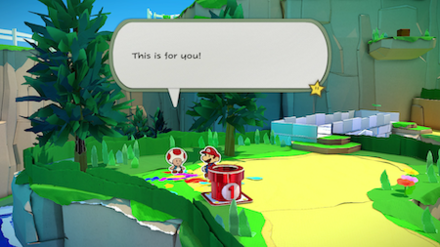
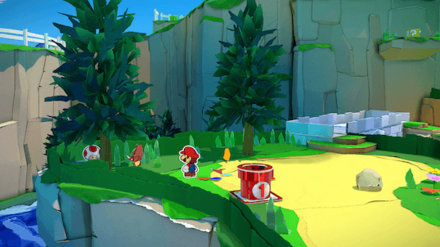
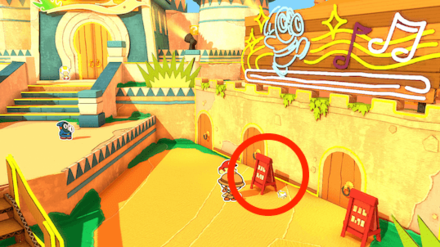
In the park area, open the pyramid-shaped tent to the left and hammer the Toad that comes out to rescue it. |
|
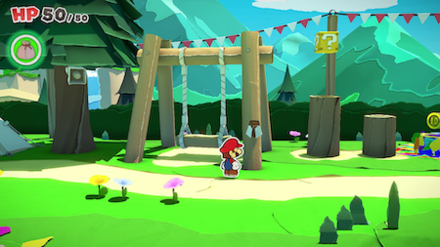
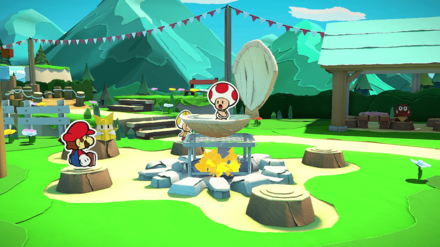
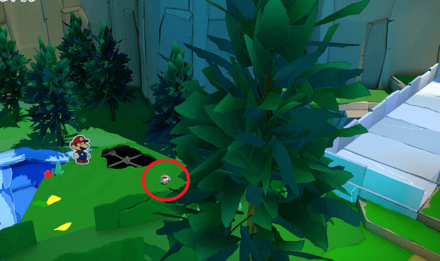
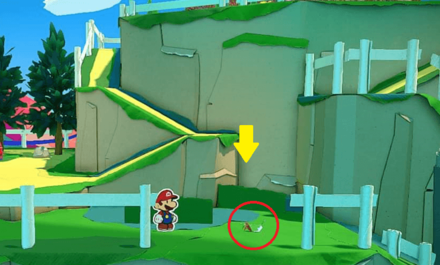
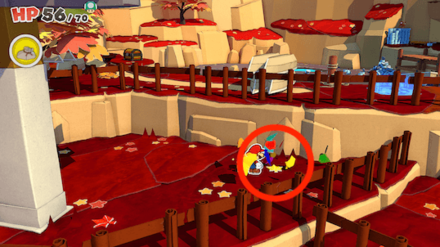
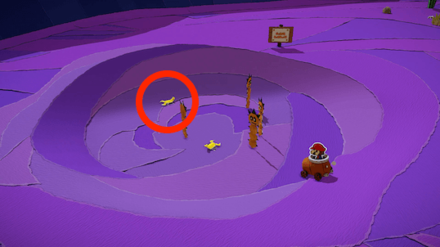
In the park area, fight the Goomba on the swingset, then find this Toad folded up to look like a resting cicada on one of the ropes of the swingset. If you Hammer the swingset, it will fly onto the right vertical board. |
|
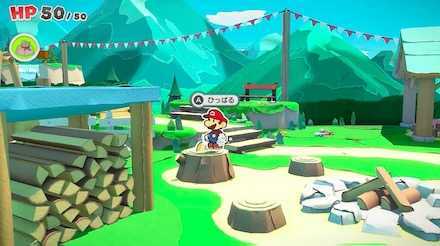
Jump onto the stump by the campfire and pull the Toad out. |

|
Go left of the campfire to find another cicada in need of hammering. |
|
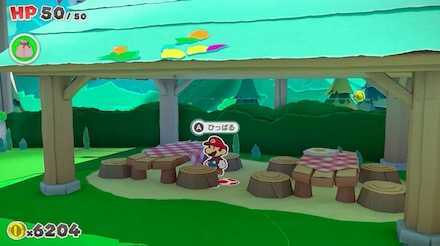
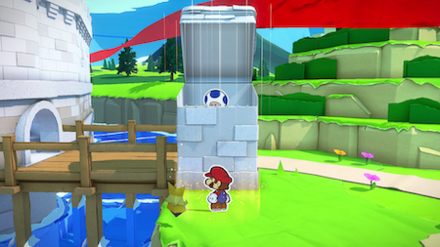
In the pavilion in the park area, under the stump to the right of the table on the left. Press A to pull it out. |
|
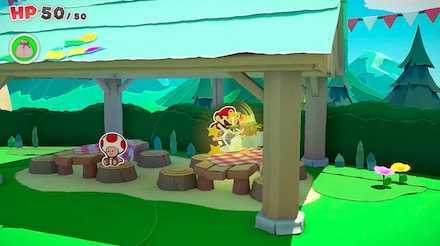
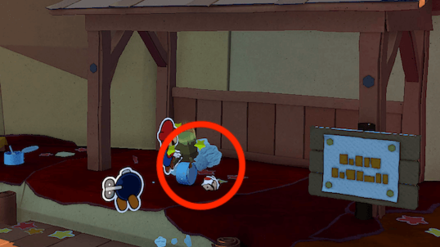
Hit the fried egg on the right table under the pavilion to free a very relieved Toad. |
|
Hit the pile of leaves in front of the pavilion with the Hammer to rescue a Toad. |
|
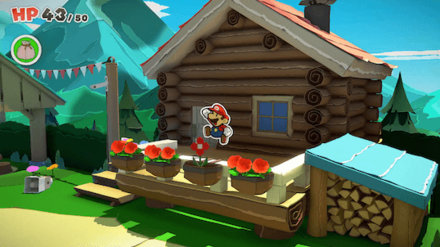
There is a flower box by the cabin without flowers. Hit it from below by jumping, then go up and hit the flower that appears with your hammer. |
|
Next to the log cabin, press A to interact with the front of the log pile. Mario will pull out a Toad. |
|
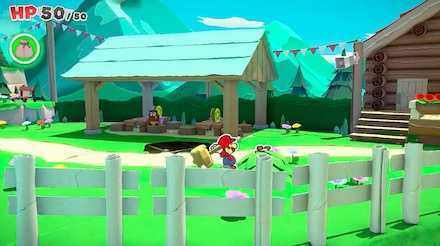
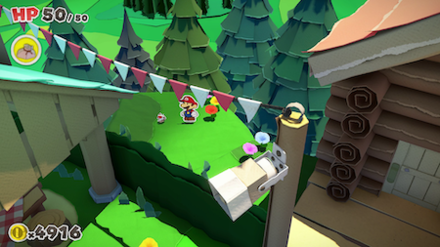
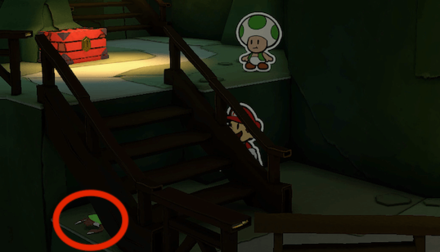
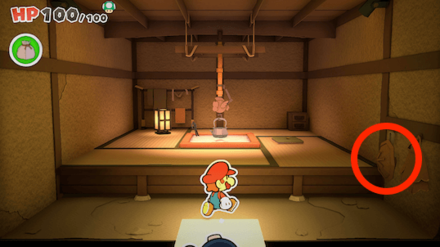
Climb up the staircase to the Log Cabin and jump off to the left, behind the fence. You'll find a crumpled-up Toad. |
|
Clear the Yellow Streamer, then sail out and find the Shy Guy on the border between C3 and D3 in The Great Sea (Use the Sea Chart). Dive with the D-pad to get the Shell, then bring it to Whispering Woods and grill it with Fire Vellumental magic! |
Whispering Woods 100% Walkthrough
Toad Town Toad Locations
Here is a list of All Toad Locations Toad Town.
1 Location Total
| Location and Explanation | |
|---|---|
|
After leaving the grounds where Peach's Castle formerly stood, you'll need to rescue this Toad to continue the story. Check the Story Walkthrough to continue along until you reach this Toad. |
Graffiti Underground Toad Locations
Here is a list of All Toad Locations in Graffiti Underground.
2 Locations Total
| Locations | |
|---|---|
|
You'll find this Toad at the end of the second screen as you progress through Graffiti Underground for the story. |
|
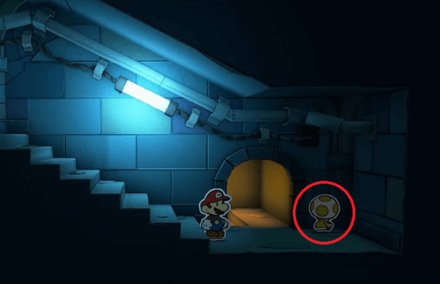
When you reach the exit Pipe at the end of Graffiti Underground, instead of going through, head up and right to find a staircase. Continue down the path and into the next room and you can find this Toad at the end. |
Graffiti Underground 100% Walkthrough
Picnic Road Toad Locations
Here is a list of All Toad Locations on Picnic Road.
32 Locations Total
| Location and Explanation | |
|---|---|
|
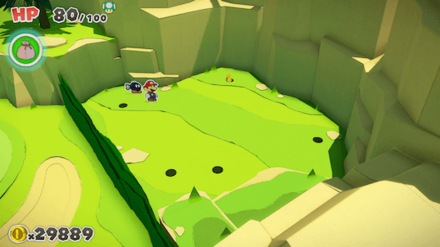
Right when you enter Picnic Roads, there's a huge Not-Bottomless hole to the left. Fill it and destroy the bush to find the Toad. |
|
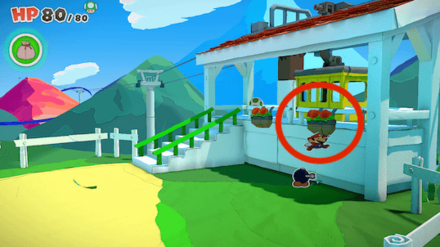
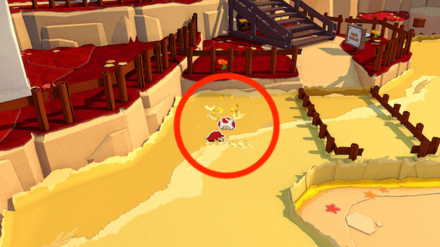
Up the first slope and to the left, there's another large Confetti hole. Fix it, hammer the small round hole that appears once, then press A to pull out the Toad. |
|
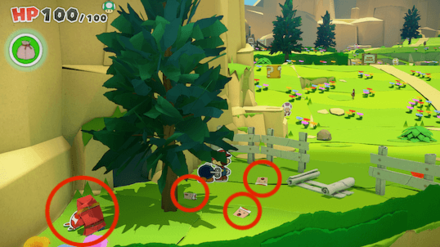
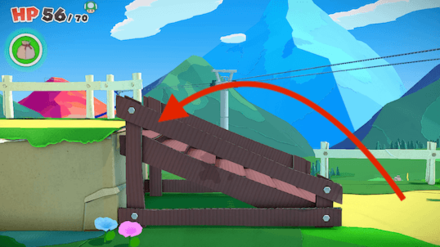
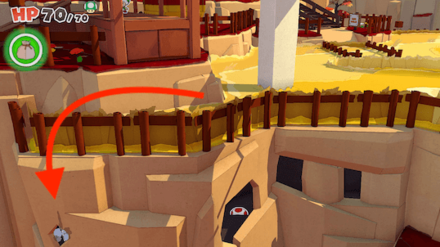
On the left side of the hill is a small fenced-in area. Hit the fence with your Hammer to cave it in and crush the Shy Guy. You'll find 3 Toads on the ground, and you'll need to battle a Shy Guy to find 1 more. |

|
At the foot of the slope to the left, a pink butterfly is flying around. Hit it with your hammer. |
|
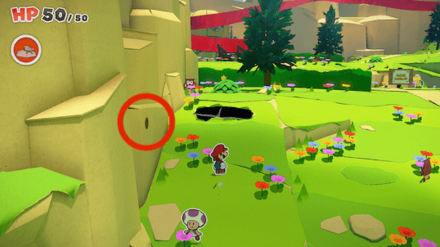
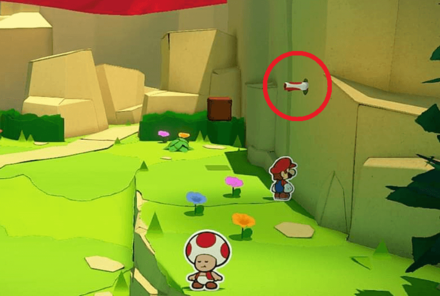
Just north of the pink butterfly, there's a hole in the wall to the left. Hit the wall to get the Toad down. |
|
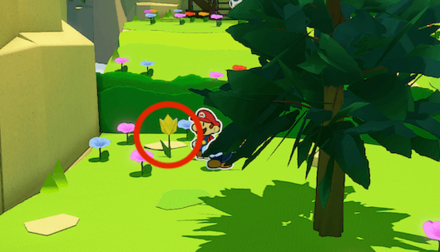
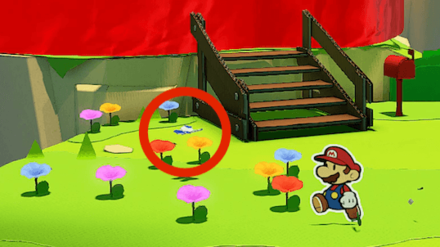
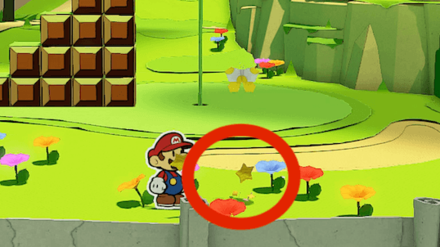
North of the pink butterfly, there's a yellow tulip-like flower in a circle of normal flowers. This one also needs the hammer. |
|
The Signpost by the lake can also be whacked for a Toad. |

|
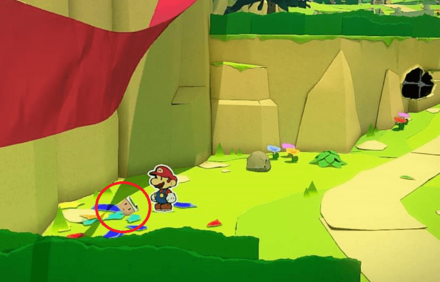
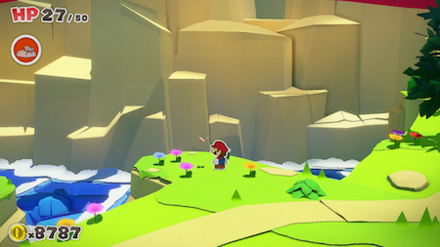
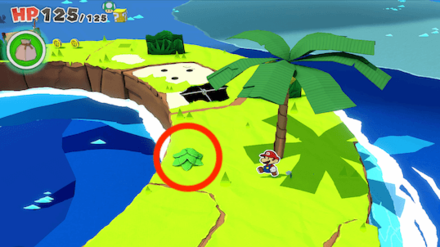
From the house covered in red streamer, go straight down the hill to the far left side. Before the straight bushes, you'll see a Toad crumpled up on the ground. |
|
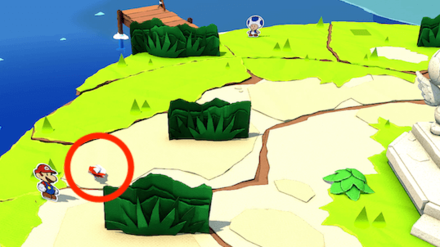
In front of the house covered in the red streamer, there's a small flower patch with a butterfly. Hit the butterfly with your Hammer and it will change back into a Toad! |
(After Colored Pencils fight) |
After clearing the Red Streamer, hit the signpost by the house to find a crumbled Toad. Hit it again to free it. Will be available after you defeat the Overlook Tower boss. |
|
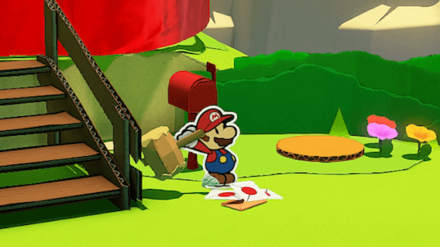
Hit the mailbox next to the house covered in the red streamer and some letters will come out. Hit the letters four times and three of them will turn into Toads. |
|
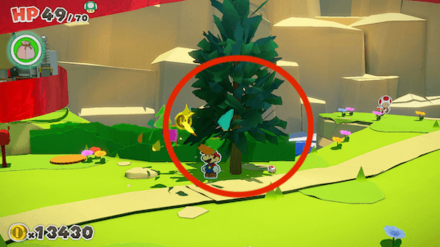
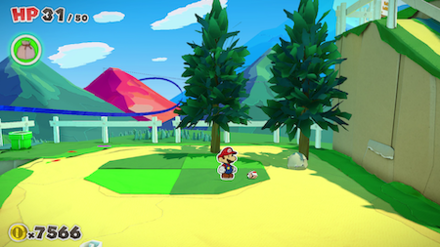
To the right of the House and mailbox there's a lonely tree, so hit it and a crumbled Toad will come down. A hammer blow will straighten him out. |
 Red Butterfly above Confetti Hole Red Butterfly above Confetti Hole |
To get the red butterfly to come down, you need to fix the Confetti hole. This will make flowers appear and get the butterfly within hammer range. |
|
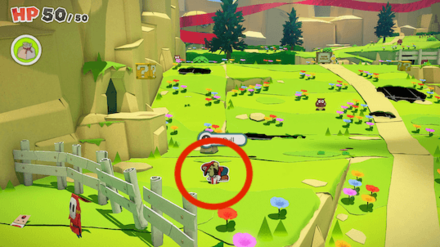
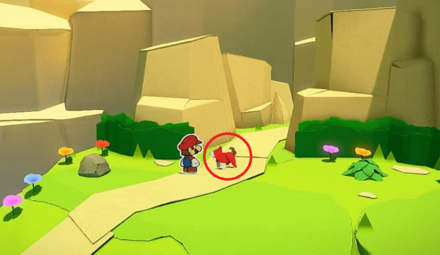
At the end of the path, you'll find a dog blocking the path. Hit it with the hammer to find a Toad and continue on your path. This Toad will also give access to the Battle Lab! |
|
To the right of the origami dog Toad, there's a slope. Hug the wall on it and hit the mountain side with your hammer below the hole in the wall. Four Toads are hiding in there! |

|
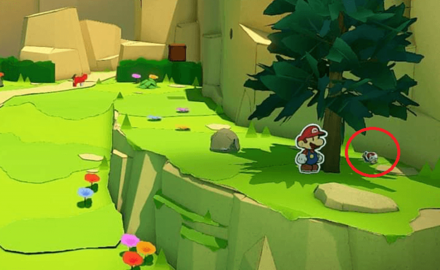
Continue and destroy the Rock between the two confetti holes. A beetle pops out. Hammer time. |
|
Hit the tree to shake down a folded Toad, then hit the Toad to unfold it. |
|
Instead of going back the ledge, head to the right and you'll find a small area with a Mole. Hit all the holes except the two close to eachother to get the drop on this tricky Toad. |
|
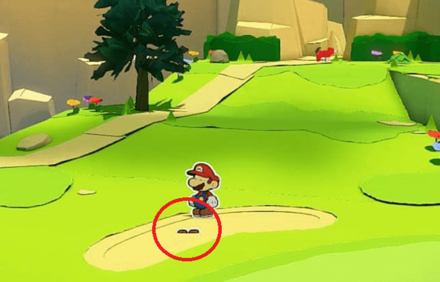
Back and to the left from the flagpole, a Toad is stuck feet-up in a sand trap. Press A to pull it out. |
|
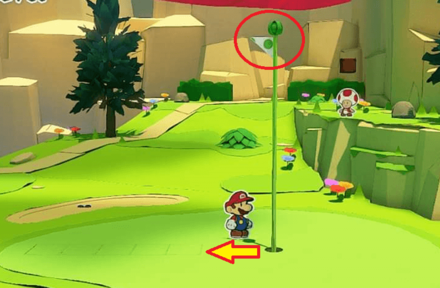
To the left of the flagpole, you'll see a faint indentation of blocks in the ground. Hit them with your hammer to make the blocks come out. Climb on them and jump to the top of the flagpole to find seven new Toads! |

|
Before you leave the Flagpole, make sure to hit the flag when it's down as well. This is another Toad! |
|
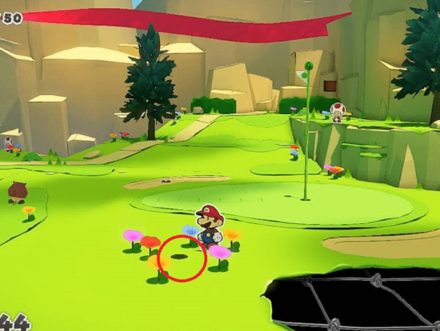
Down and to the left from the flagpole there's a ring of flowers with a hole in the middle. Hit it to make a flower appear, then hit the flower. |
|
Fill the large Confetti hole south of the flagpole, then hit the small hole that appears. A yellow butterfly will pop up so hit that as well. |
|
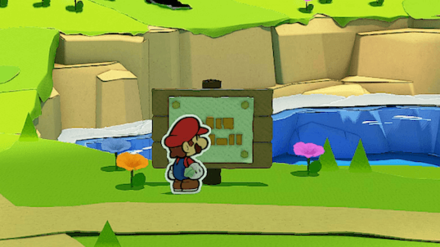
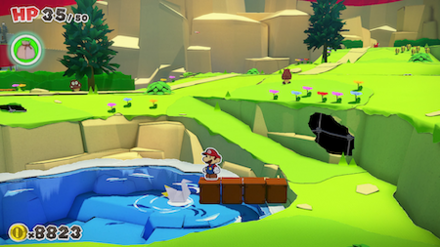
Walk onto the brown block on the right side of the lake and swing your Hammer to the left to reveal a hidden ? Block. Continue walking left and swinging the hammer to reveal more blocks until you can reach the swan. That's your Toad! |
|
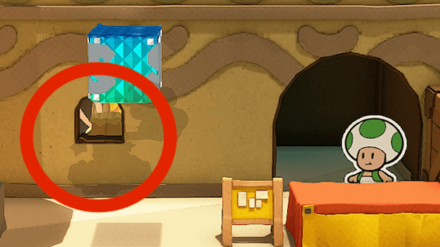
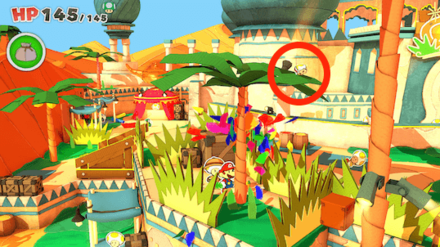
Open the yellow parasol by the Vellumental Temple Shops, then go up, drop onto it and get to the folded-up Toad in a hole in the wall. |
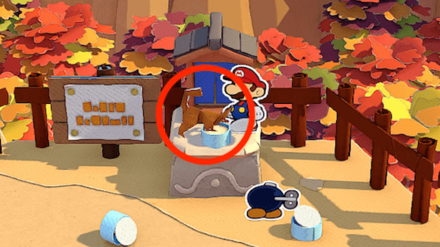
|
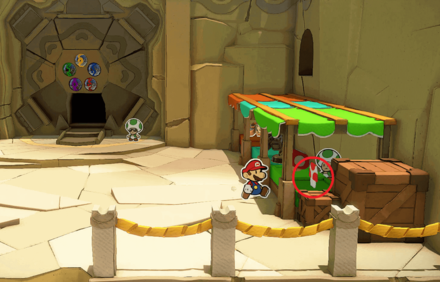
To the right of the yellow parasol, there's a table with a folded Toad on top. Grants access to the Accessory Shop in Toad Town. |
|
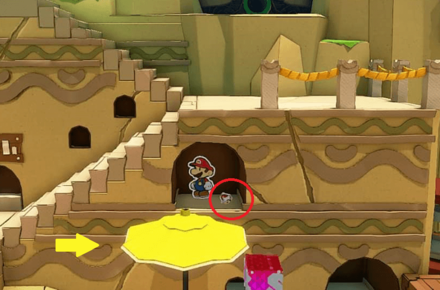
Behind the shop stand without a parasol, there's an open door. Go inside and left, standing just before Mario can be seen in the window, then hit the ground with your hammer. |
(After Earth Vellumental) |
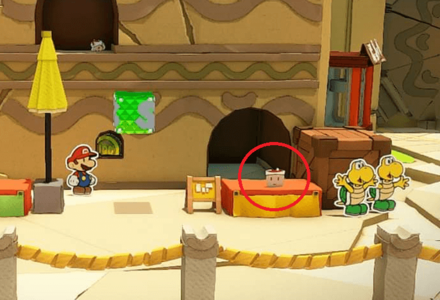
To the right of the Vellumenal Temple entrance, there's a shop. The item closest to the screen can't be bought, but you can hammer it for a free Toad. Will be available after you defeat the Temple boss. |
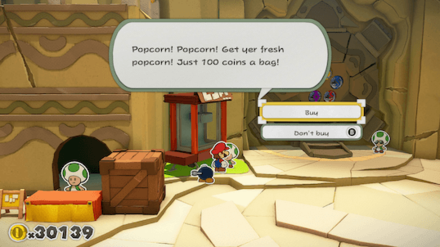
(After Earth Vellumental) |
To the left of the Vellumenal Temple entrance, there's a popcorn stand. Buy Popcorn for 100 Coins to save these Toads from a buttery fate. Will be available after you defeat the Temple boss. |
|
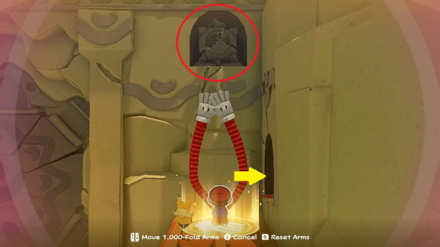
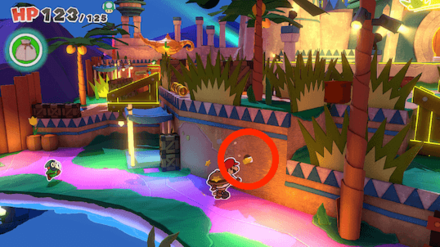
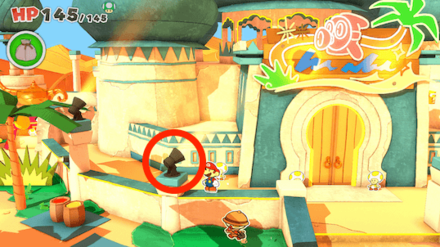
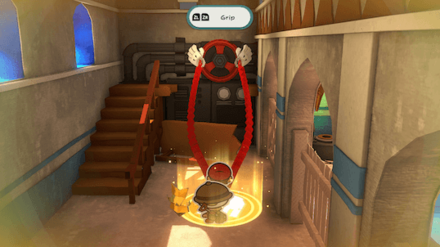
To the bottom right from the Temple door, jump on the crates to get up on the stalls. At the far end, hit the lower hole in the wall to create a Magic Circle. Use the 1,000-Fold Arms to hit the barrier up high, revealing a big group of Toads. |
|
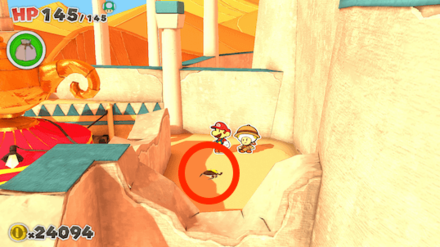
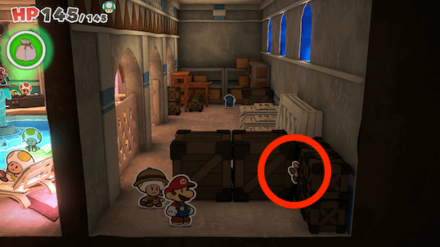
Go straight down from the Temple door to a staircase. Go down and hit the cracked barrier on the far left to go inside. Inside, walk right until you encounter a Scaredy Rat. Defeat it to get the Toad. |
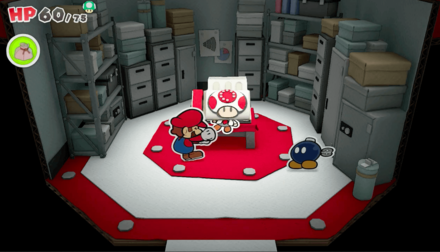
|
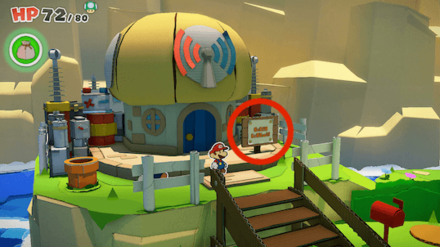
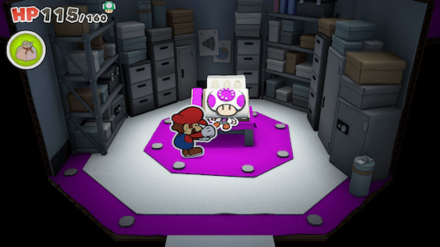
After clearing the Red Streamer, enter the Sensor Lab, and you will find a folded Toad on the Fax Machine. Hit it with your Hammer to free it. Will be available after you defeat the Overlook Tower boss. |
Overlook Mountain Toad Locations
Here is a list of All Toad Locations at Overlook Mountain.
18 Locations Total
| Locations | |
|---|---|

|
At the very start of the area, a Toad is folded into the shape of a signpost. Hit it with your Hammer to rescue it. |
|
To the left of the area entrance, on the same ledge with the chest containing Collectible Treasure No. 17, you can find a Toad behind the grass. |
|
If you go up the slope by the blue pavilion, you'll find a hedged-in area with grasshoppers. Hit all three with your Hammer – each one will turn into a Toad. You need to hit them twice, once to knock them down, then more more to free the Toad! |
|
From the grasshopper location, go right and jump onto the blue roof. Jump off on the opposite side to reach a ledge with a Toad. |
|
To the left of the area with the grasshoppers, there's a Toad in the shape of a beetle crawling aorund one of the hedges. Like always, it gets the hammer. |
|
Before the bridge, behind the Pipe labeled with the number 1, there's a small rock. Hit it with your Hammer to reveal a Toad. |
(After Earth Temple) |
Before the bridge, behind the Pipe labeled with the number 1, there's a small rock. Hit it with your Hammer to reveal a Toad. Come back later in the story if this Toad isn't appearing. |
|
Right before the bridge, go far to the back and you'll find a ledge where a Toad is crumpled up on the ground. |

|
After crossing the bridge, take a left around the ledge and hammer the Toad on the far wall. |
|
On the steps leading down to the fishing area, five Toads are poking out of the ground. Pull each of them up. |

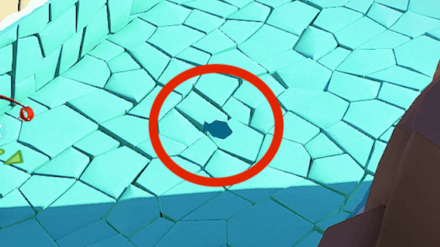
|
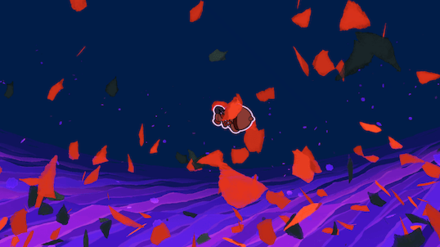
At the fishing spot, one of the smaller shadows in the fishing mini-game will look more like origami than the others. Catch it to reveal a Toad. |

|
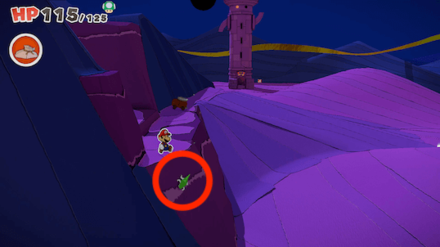
After blowing away the Thwomps, head down the slope to the left of the stake path and hammer the crumbled Toad. |
(After clearing the Red Streamer) |
Hit the right flower box by the Tram station from below by jumping, then hit the crumbled Toad that comes out. |
|
To the left of the Tram station, there's a staircase heading up to Overlook Tower. Go behind it to find an area with a wrapped bundle of Toads. |
|
Going down to the left from the peak, you'll find two hedges. There's another grasshopper that needs hammering behind the back one. |
|
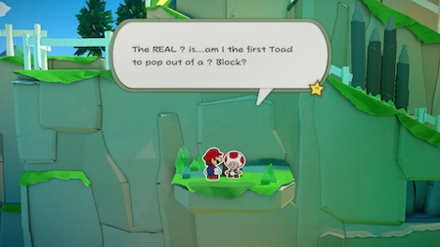
In front of the slope coming down from Overlook Tower, you'll be able to walk to the bottom through a hole in the fence and fall off onto a ledge. Hit the ? Block here to reveal a Toad. |
|
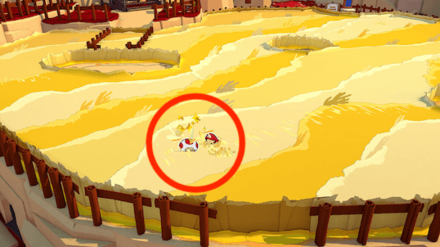
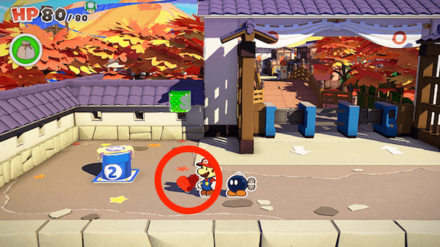
Going down to the left from the peak, two Shy Guys are using a crumpled-up Toad as a soccer ball. Defeat them or hit it mid-roll to rescue it. |

|
Defeat all three of the Paper Macho Shy Guys playing soccer with the Red Shell Stone and three Toads will burst out. |
Overlook Mountain 100% Walkthrough
Earth Vellumental Temple Toad Locations
Here is a list of All Toad Locations in Earth Vellumental Temple.
7 Locations Total
| Locations | |
|---|---|
|
Interact with the second donation box and insert 10 coins. After the dialogue, a folded paper in the shape of a bug will appear. Hit it with your Hammer to free it. |
|
Hit the third chest with the Hammer, then jump on top and pull to get the Toad out. |
|
Following the path right from the third donation box, jump up into the last light from the right. It's the one that isn't on. A Toad in need of hammering will fall down. |
(After Smashing Rock) |
Just before the last donation box, you can smash a big a cracked rock to release three beetle Toads. One will stay on the wall, so it it with your Hammer. This Toad will give access to the Accessories shop outside the Earth Vellumental Temple. |
(After Smashing Rock) |
On the ground directly after the cracked rock is another Toad. |
(After Smashing Rock) |
Another beetle Toad is hiding under the staircase right after the second donation box. |
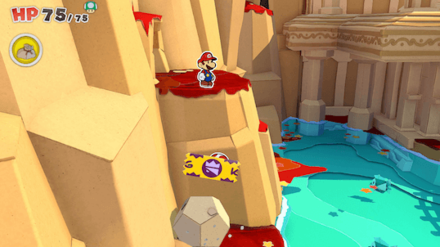
|
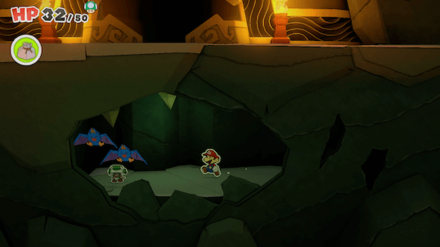
In the second room where you see the Boss entrance for the first time, cross the area with spikes below and go in the back to fix a cylinder with a Confetti hole. Ride it down, break the rock inside and rescue the Toad from the Swoops. |
Earth Vellumental Temple 100% Walkthrough
Overlook Tower Toad Locations
Here is a list of All Toad Locations in Overlook Tower.
14 Locations Total
| Locations | |
|---|---|

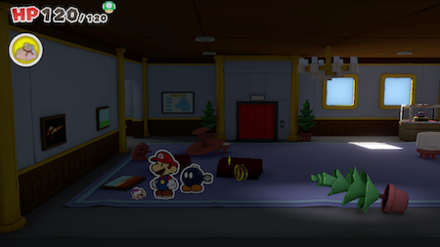
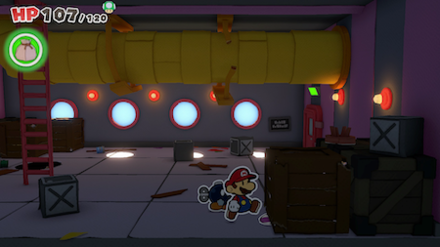
|
After filling the hole in front of the elevator, press the button to the right to open it and get the Toad out. |
|
Use the box shelves on the right to jump up and hit the red-dotted flag on the wall. |

|
There's a bucket in need of hammering next to the box shelves. It will fall and three Toads will spill out. |

|
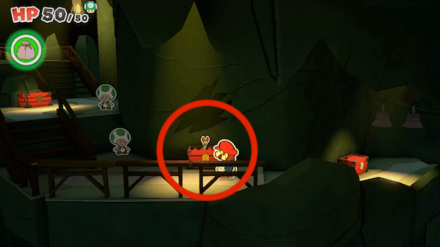
Go to the table to the bottom right and hit the triangles on the table there. Hit them again to free the Toads. |

|
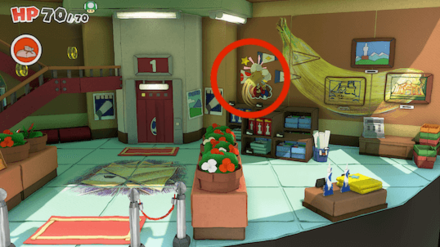
Hit the Card Rack to the left of the entrance several times to get a Toad out. |

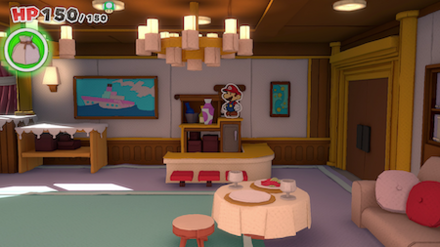
|
Open the cupboard in the far back of the restaurant. |
|
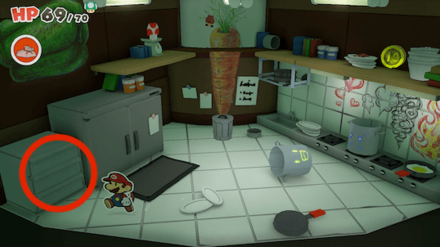
Hit the drawers to the left of the fridge to find a Toad. |
|
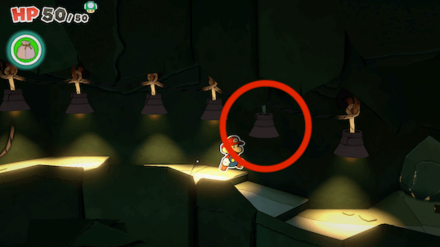
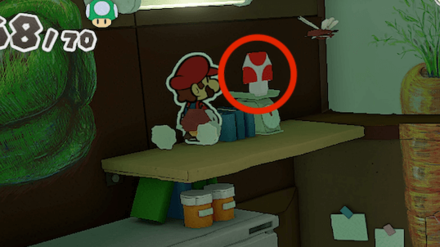
On the top left shelves in the kitchen, there's a folded mushroom you can hit to find a Toad. |
|
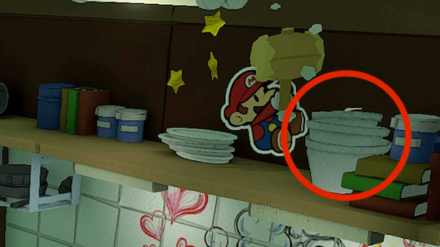
Hit the Toad inside the deep, white bowls on the top right shelf to get it down. |
|
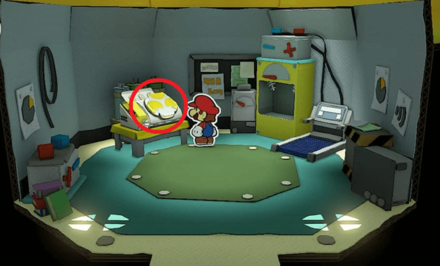
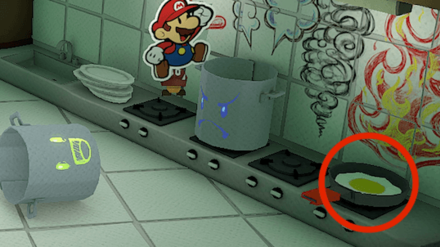
Hit the fried egg on the stove in the kitchen to free a Yellow Toad. |
|
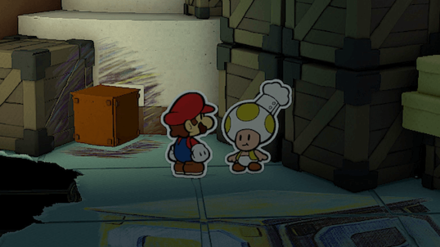
After getting rid of all Mini Goombas, talk to the Chef in the room with the staircase. |

|
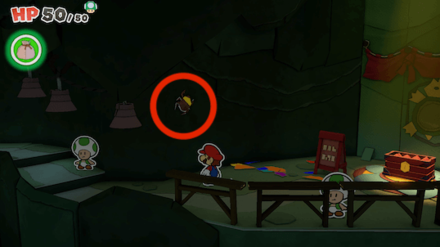
Hit the blank square with sketch lines around it for a ? Block to appear. Use this to jump up and free the Toad from the Sticker. |

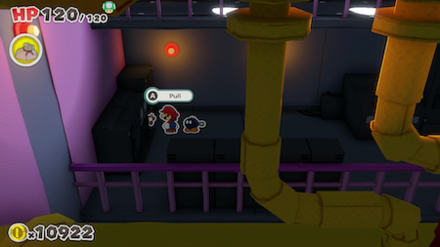
|
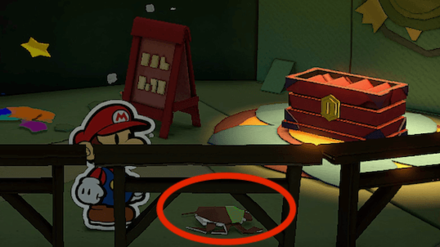
The small blue pencil stuck by the elevator is a fake, so hammer it to find a Toad. |
|
On the floor where the Red Streamer was, hit the right Telescope to get a Toad. You can pay first to see a close-up of this Toad's face, if you want! |
Overlook Tower 100% Walkthrough
Autumn Mountain Toad Locations
Here is a list of All Toad Locations at Autumn Mountain.
20 Locations Total
| Locations | |
|---|---|
|
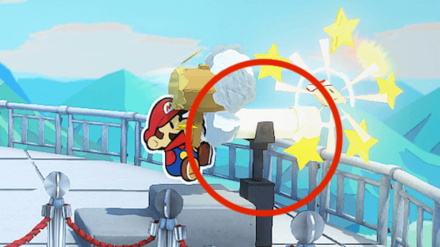
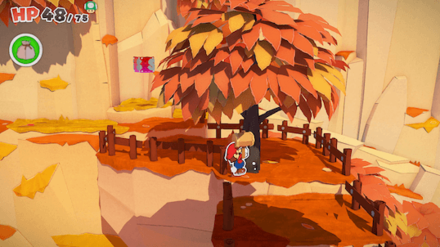
Once you arrive at the Autumn Mountain, check the area near the railings of the tram. You will find a Toad folded into the shape of a crumpled paper. Hit it with your Hammer to rescue it. |
|
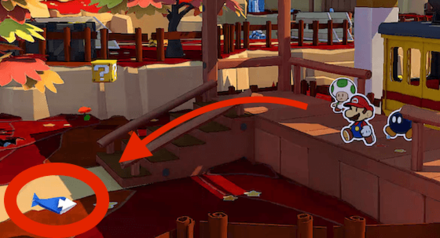
In the same area, you will see a flip flopping paper folded into the shape of a fish near the stairs of the Tram's platform. Hit it with your Hammer to find the next Toad. This will unlock the Great Sea area accessible from Toad Town. |
|
Go to the area behind the Tram platform, then hit the red leaf south by the station pillar. |
|
In the area behind the Tram platform, then hit the pile of leaves to the far right. A yellow leaf will appear so hit that too to find the Toad. |
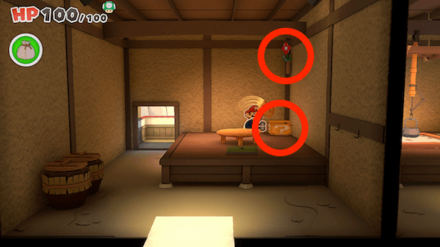
|
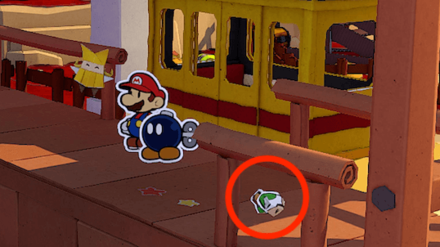
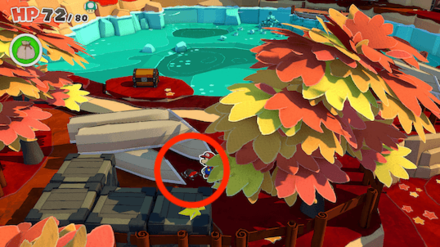
Go to the shelter near the dock by using the stairs, then hit the half-opened tin can on the ground with your Hammer to rescue the Toad. |
|
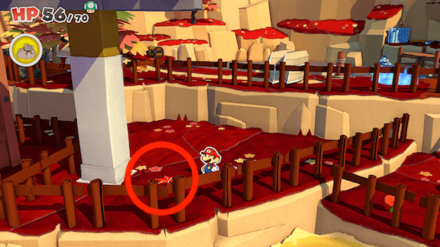
To the left of the fence right when you enter the field, you can hit the ground to find an invisible Toad. It might take some tries to find the right spot! |
|
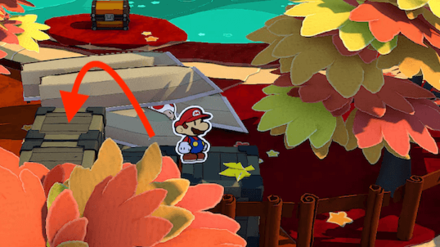
In Tall Grassy Plains area, walk to the left side and down a narrow path until you drop down to the cave below. You will find a Toad stuck on the ground, pull it up to rescue. |
|
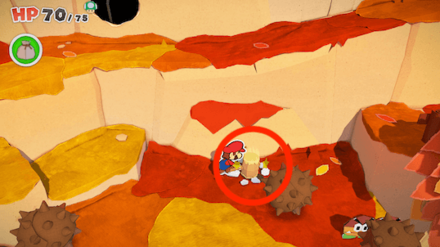
Like the Toad in the western part, this Toad can't be seen from the top. It's in the slightly round area with the lightest colour, close to the hole in the southern fence. |

|
Hit the grass sticking up close to the left of the edge fence with your Hammer. |
(After Water Shrine) |
After getting the can opened, offer it to the Monkey and hit it with your Hammer while it's eating. Available after defeating the Water Vellumental. |

|
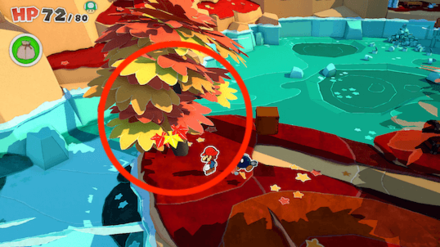
Close to the staircase after the bridge you can hit a tree for the red leaf to fall down and reveal a Toad. |
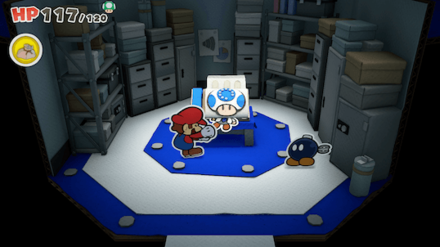
|
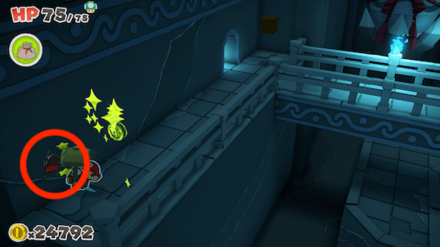
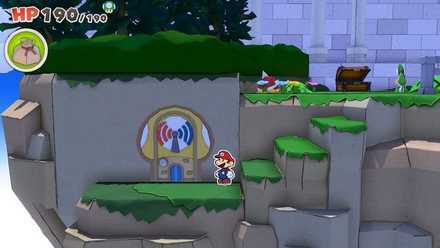
Filling the mushroom shaped Confetti hole on the top of the stairs will give you access to the Autumn Mountain Sensor Lab. Save the Toad stuck in the fax machine inside. |
|
Move left past the Save Point and the ? Block and enter the alcove next to a tree. Move up the ramp inside and hit the rock at the top, then drop down onto the rock and pull off the sticker. |
|
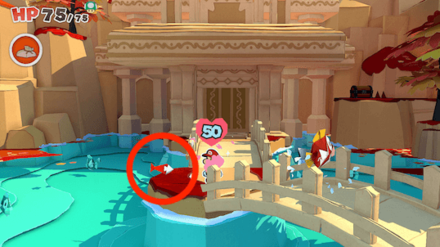
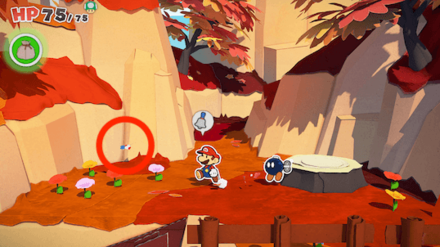
A fish will flop onto the ground on the left side of the land between the two bridges by the Water Shrine. Hammer it to save the Toad. |
|
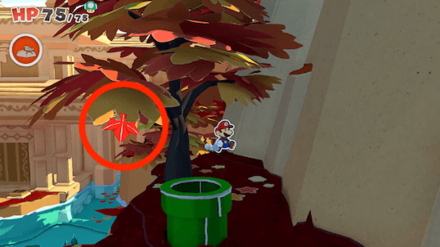
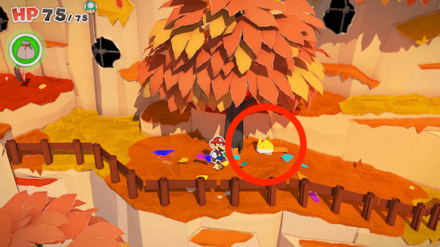
From the Save Point, go up the slope and hit the tree by the Pipe. A red leaf will fall down and unfold into a Toad. |
|
Use the green Pipe to go to the opposite mountain top, then hit the Dragonfly here to unfold it. |
|
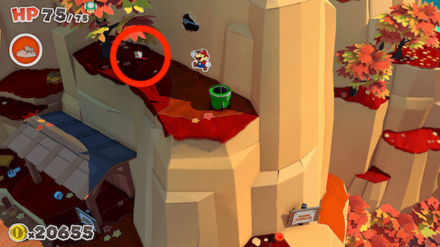
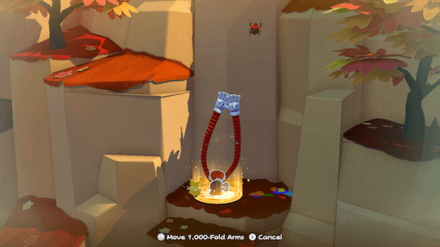
From the Dragonfly Toad location, jump down onto the boat shed, then onto the ledge in the back. Hit the leaf pile and use 1,000-Fold Arms to hit the beetle Toad on the cliff wall. |
(After Water Shrine) |
A beetle is crawling between the stacked boats to the left of the Magic Circle. Hit it when it's in reach. Available after defeating the Water Vellumental. |
(After Water Shrine) |
Jump up the stacked boats and onto the crates to find a yellow leaf. Hammer it to free the Toad. Available after defeating the Water Vellumental |
(After Water Shrine) |
Hit the tree to make three leaves fall down and unfold into Toads. Available after defeating the Water Vellumental |
Autumn Mountain 100% Walkthrough
Chestnut Valley Toad Locations
Here is a list of All Toad Locations at Chestnut Valley.
4 Locations Total
| Locations | |
|---|---|
|
At the top of the second slope, hit the tree the Goomba was using to drop chestnuts on you, then hit the chestnut origami that falls down. |
|
Hitting this tree once will start a battle with Goombas and Galoombas, so fight those first. Then hit it again to find the Toads hiding in it. |
|
After getting past the Galoomba + Chestnut wall, look for a small hole in the back of the area. Hit it once with your hammer and pull out the Toad. |
|
After saving Bob-omb, a butterfly will float down on the left side, so hit it to get the Toad. |
Chestnut Valley 100% Walkthrough
Water Vellumental Shrine Toad Locations
Here is a list of All Toad Locations in Water Vellumental Shrine.
3 Locations Total
| Location | |
|---|---|
|
In the large entrance room of the Water Vellumental Shrine, head left and fill the Confetti hole. This will allow you to hit the beetle Toad on the wall, freeing it. |
|
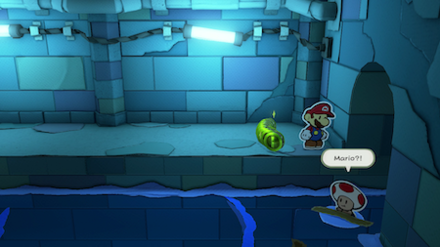
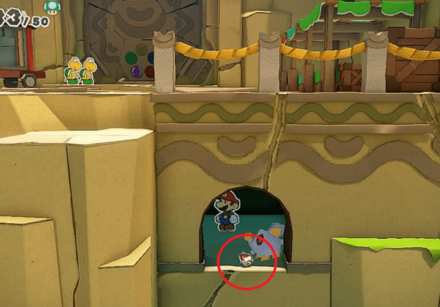
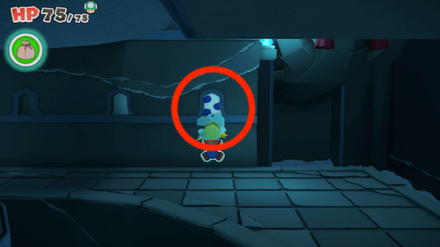
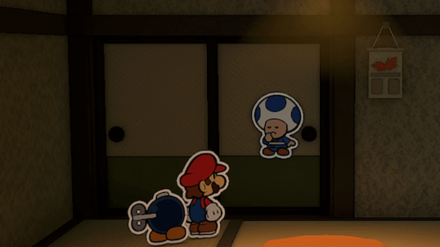
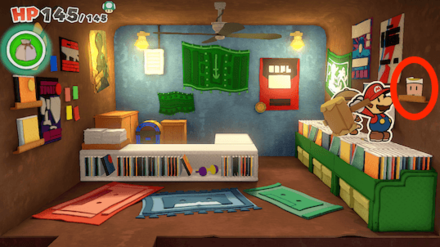
After making the middle platform in the entrance room spin around, head down the stairs below and go north. A Blue Toad will be hiding in the window to the right. |
|
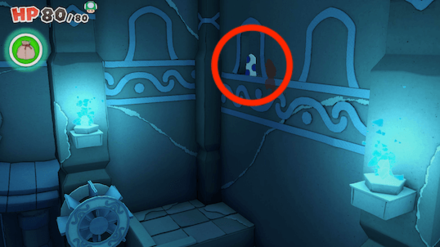
In the room before the second puzzle room, go to the bottom-right of the screen and up the stairs. At the top, another Blue Toad will be in the window here. |
Water Vellumental Shrine 100% Walkthrough
Eddy River Toad Locations
0 Locations Total
There are no Toads Locations found on the way down Eddy River.
Shogun Studios Toad Locations
Here is a list of All Toad Locations at Shogun Studios.
34 Locations Total
| Location | |
|---|---|
|
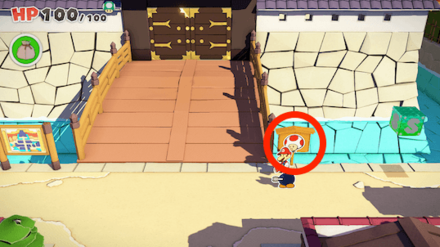
There's a Heart origami by the Save Point and Pipe to the left of the gate to Shogun Studios. Hit it to free a Toad. This Toad will tell you what areas you can find Max UP Hearts if you talk to him in Toad Town. |
|
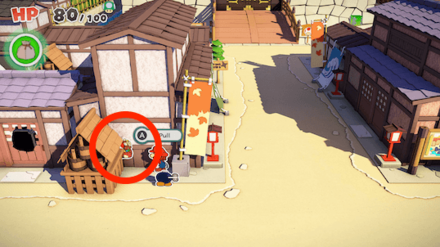
In the second house to the left when entering Shogun Studios, there's an origami fan you can hit for a Toad on top of some drawers. |
|
At the big crossroad in the middle of the Studios, a Shop Keeper Toad can be pulled out from the left side wall. This unlocks the Shogun Studios Accessory shop. |
|
Fix the Confetti hole on the door of the first house to the left of the crossroads, then head inside and hit the flower on the wall above the drawers. |
|
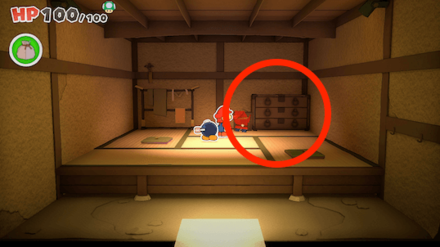
In the second house to the left of the crossroads, a Shy Guy is rummaging through some drawers. Hit the big drawers next to them to reveal three Toads. Hit them all with your Hammer to unfold them. |
|
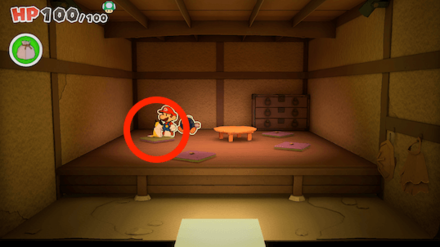
Enter the house furthest to the left from the crossroads, then hit the pink cushion (zabuton) on the left. Hit the origami cat that appears for the Toad. |
|
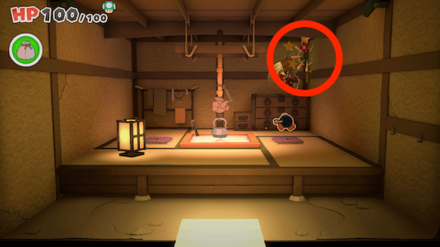
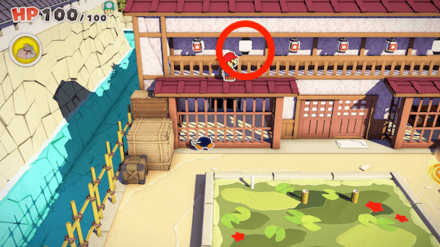
In the house to the right just after heading north in the crossroads, hit the straw hat on the wall to free a Toad. |
|
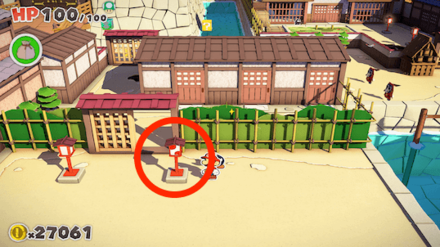
On the sign right by the bridge to the castle, left of the center Save Point. |
|
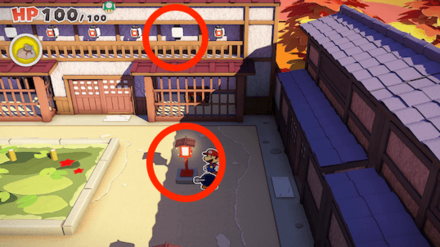
Head right in the crossroads and hit the right lantern with your Hammer. |
|
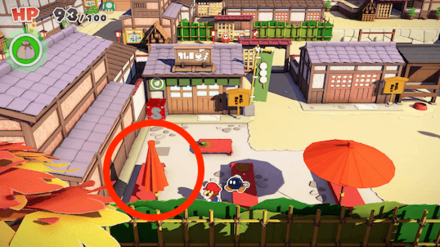
In the area in front of the tea house, hit the parasol in the bottom-left corner for a Toad to come out. |

|
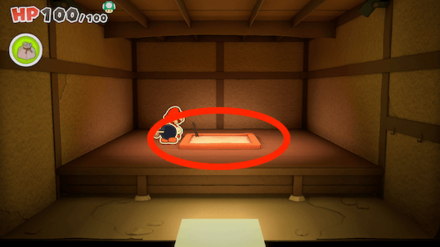
Inside the tea house, hit the middle cushion (zabuton) with your Hammer to flip it and reveal a Toad. |
|
Head right from the center Save Point and you will see a dragonfly flying close to some potted plants. Hammer it to free the Toad. |

|
To the right of the compound of buildings with the green pond for another dragonfly in need of hammering. |
|
Enter the first house on the right in the compound with the green pond, then hit the ash pile in the middle for the Toads to appear. |
|
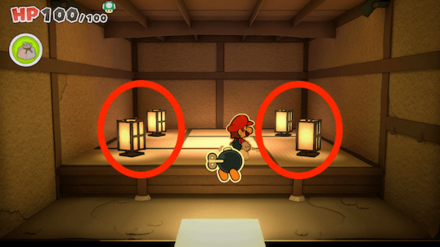
If you hit the second red lantern in the green pond area, a Magic Circle will appear. Use it to hit the white paper lantern above for a Toad. |
|
In the same area, jump up the crates to the left and hit the white paper lantern with your Hammer. |
|
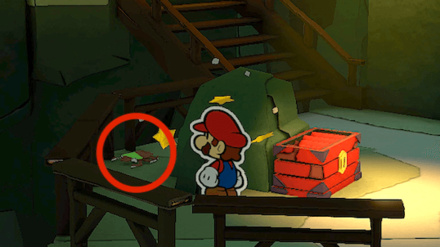
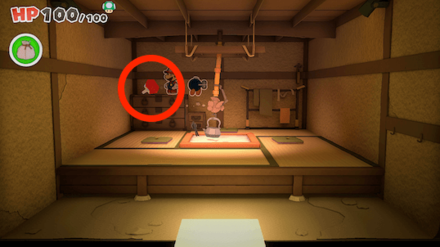
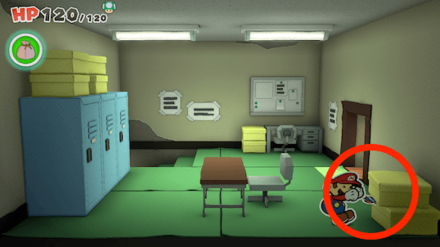
In the Staff Room, there's a visible folded Toad on the table to the left. |
|
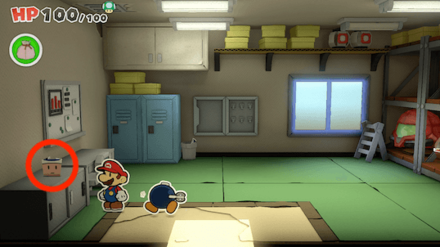
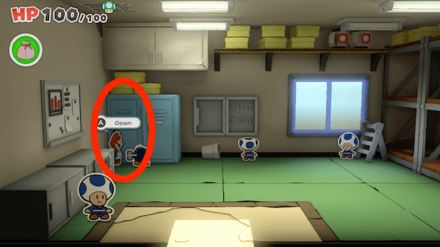
In the left of the two lockers in the staff room, the Shuriken Dojo Toad can be found napping. |
|
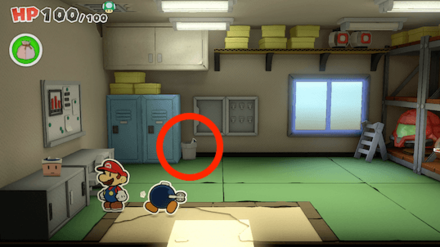
Next to the two blue lockers in the staff room, there's a bucket with a crumbled Toad in it. |

|
In the right side of the Staff Room there's a Paper Macho Goomba Mask you need to pull a Toad out of. |

|
Climb the crates to the left of the Shuriken Dojo and hit the black and white Shuriken with your Hammer. |

|
Head into the right-most house in the gated area between the two Save Points. Inside, hit all four barrels on the right side to reveal a variety of origami figures. Hit them all with your hammer to free them. |
|
From the room with the barrels, jump up on the drawers in the back and break the wall to head into the neighbouring room. Hit the fish on the hearth here for a Toad. |
|
In the last room to the left of the three, hit the top-right corner to reveal a ? Block, then stand on that and jump into the flower for a Toad. |
|
If you go into the shed behind the Chain-Chomp, a beetle Toad will appear. Hit it with your Hammer to free it. This unlocks Shogun Studious Fishing area. |
(After Chain-Chomp) |
The south of the House of Tricky Ninjas. Fish here for the square, folded fish to get a Toad. |
(After getting the Master Key) |
After getting the Master Key, go back to the area with the green pond and open the door behind it, then head left and fill the Confetti hole. Inside is another Toad stuck in a fax. |
(After getting the Master Key) |
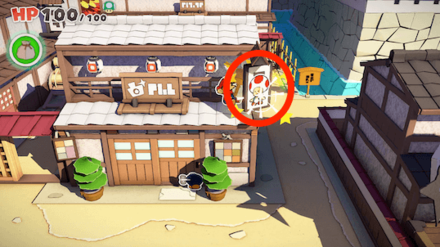
After getting the Master Key, go to the Souvenir Shop close to the Shogun Studios gates and head inside. Inside, go to the second floor and close the door to find the Toad. This unlocks the Shogun Studios shop. |
|
Head directly left from the center Save Point and enter the house there. Inside, hit all four lanterns with your hammer. |
|
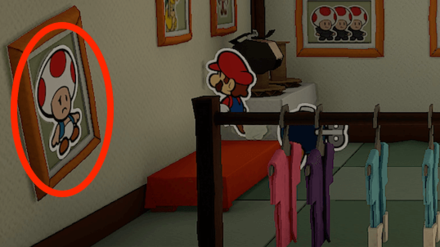
Inside the Photo Studio, head left and hit the Toad in the photo frame on the wall. |
|
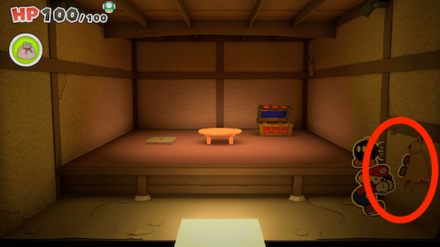
Enter the house on the left just after the gate behind the Photo Studio. Inside there's a chest and Toad stuck in a straw coat on the right wall. |
|
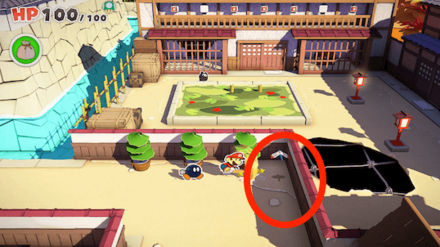
Go through the gate left of the Photo Studio and up the barrels, then make your way to the roof of the Photo Studio. Hit the sign on the right side to flip it for a Toad. |

|
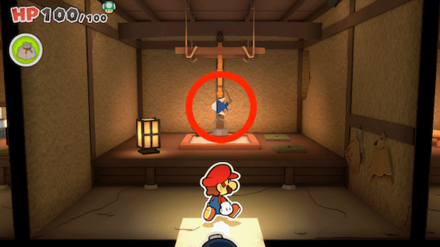
Go through the gate left of the Photo Studio and up the barrels, then enter the bell tower on the bottom-right. Go to the top and ring the bell 30 times for a Toad to appear. |
|
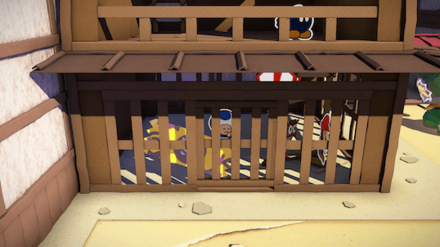
Go through the gate left of the Photo Studio and up the barrels, then enter the bell tower on the bottom-right. Drop down to the lowest floor and save the Toad there from Goombas. |
Shogun Studios 100% Walkthrough
Ninja Attraction Toad Locations
Here is a list of All Toad Locations inside Ninja Attraction.
2 Locations Total
| Locations | |
|---|---|
|
From the garden area, enter the staff room and pull out the Toad from the boxes in the bottom-right corner. |

|
Open the middle locker in the Staff Room and pull off the sticker to free the Toad. |
House of Tricky Ninjas 100% Walkthrough
Big Sho' Theater Toad Locations
Here is a list of All Toad Locations at Big Sho' Theater.
1 Location Total
| Locations | |
|---|---|

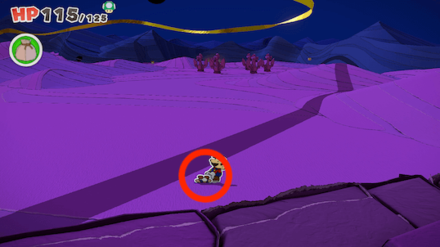
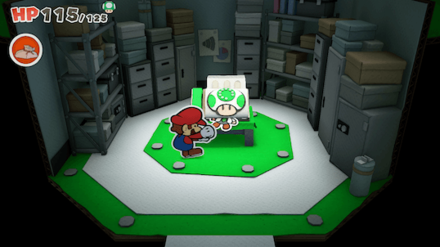
(After Boss battle) |
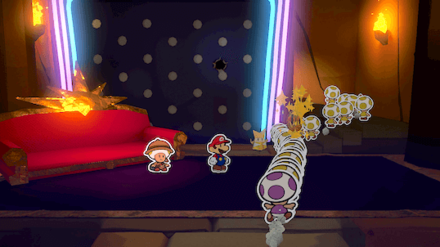
After defeating Rubber Bands, go onto the Western stage on the bottom floor and head to the right for a secret area. Hit the cactus origami here for the Toad. |
Big Sho' Theater 100% Walkthrough
Sweetpaper Valley Toad Locations
0 Locations Total
There are no Toads Locations in this area.
Sweetpaper Valley 100% Walkthrough
Breezy Tunnel Toad Locations
Here is a list of All Toad Locations in Breezy Tunnel.
2 Locations Total
| Locations | |
|---|---|
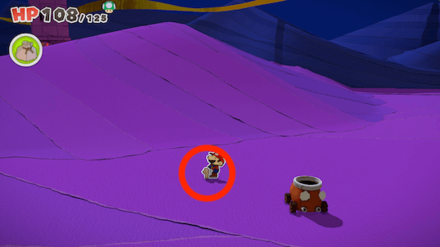
|
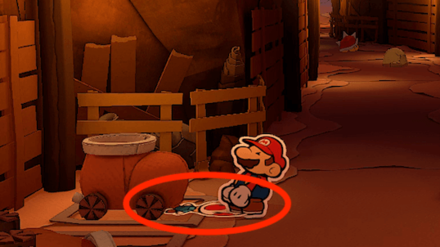
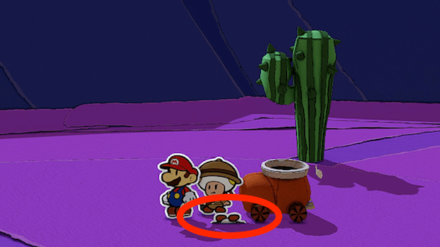
Pull out from under the small, boot-shaped cart right after you open the door to the second area in Breezy Tunnel. This also gives you access to a car, so definitely help this fellow out! |
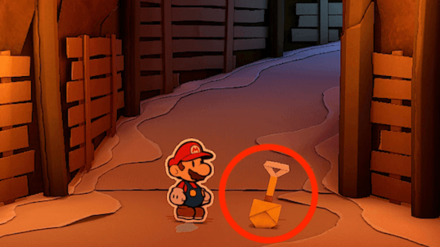
|
Hit the shovel origami in the long tunnel area in Breezy tunnel. It's in the middle of your path, hard to miss. |
Breezy Tunnel 100% Walkthrough
Scorching Sandpaper Desert Toad Locations
Here is a list of All Toad Locations at Scorching Sandpaper Desert.
10 Locations Total
| Locations | |
|---|---|
|
Pull out of the sand directly south of the bird statues by the Fire Vellumental Cave |

|
Find the scorpion origami in the south-east ruins of Scorching Sandpaper Desert. |
|
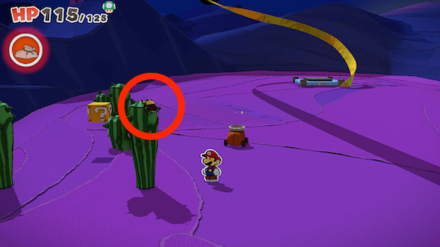
Hammer the cactus in the somewhat hidden area farthest south-east of the Desert three times. |

|
Free this Toad close to the sand dune walls south-east of the Sun Altar by pulling him out of the sand. |
|
Pull out of the sand south-east of the Tower, or south-west of the Pipe in the area. |

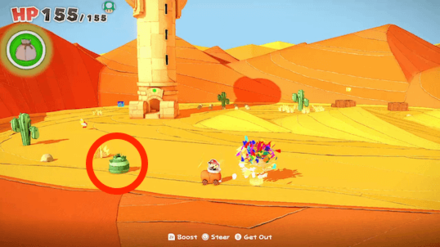
|
On the left side of the Tower, a Toad in the form of an origami beetle can be found. |
|
On the ledge at the western part of the desert, you can find the door to the Scorching Sandpaper Desert Sensor Lab. Free the Toad inside. |
|
Slide down the western slope to hit the origami lizard on the way down, then hit it with your Hammer. |
|
Free Professor Toad by defeating the Mega Paper Macho Pokey. |

|
Enter the Sun Altar after finding all Jewels and free the Toad enclosed in ice. |
Scorching Sandpaper Desert 100% Walkthrough
Scorching Sandpaper Minor Toad Locations
Here is a list of All Toad Locations at Scorching Sandpaper Minor.
2 Locations Total
| Locations | |
|---|---|
|
Found in the form of a beetle on a cactus in the western part. |
|
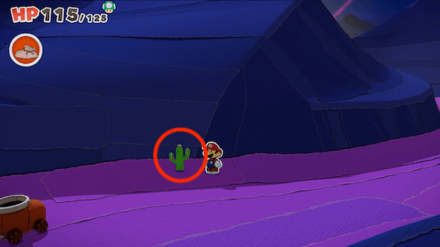
Found on the way to Shroom (Snif) City, shaped like an origami cactus. |
Scorching Sandpaper Minor 100% Walkthrough
Scorching Sandpaper West Toad Locations
Here is a list of All Toad Locations at Scorching Sandpaper West.
6 Locations Total
| Locations | |
|---|---|
|
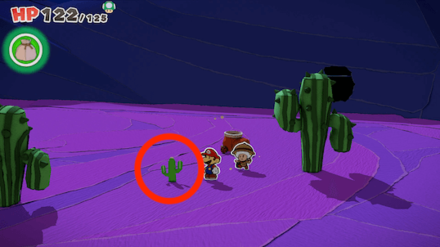
Not far from the area entrance, there's an origami cactus in need of hammering mixed in with the real cacti. |

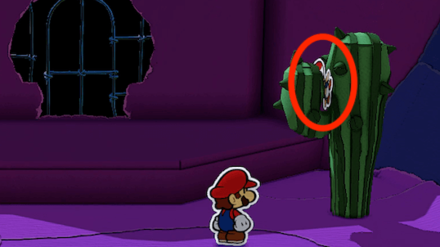
|
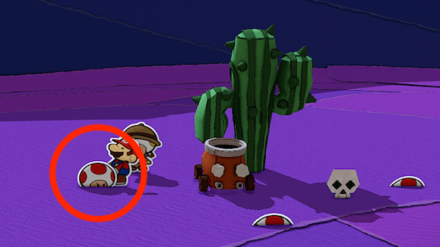
Hit the cactus to the north with a skull origami on it, then hit the skull. |

|
One of three Toads buried in the sand by the cactus with the skull. |

|
One of three Toads buried in the sand by the cactus with the skull. |
|
One of three Toads buried in the sand by the cactus with the skull. |
|
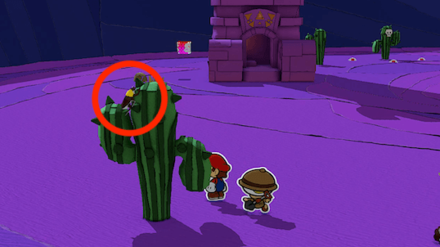
South of the tower, there's a cactus with an origami beetle on it. Hit the cactus, then the beetle to free the Toad. |
Scorching Sandpaper West 100% Walkthrough
Scorching Sandpaper East Toad Locations
Here is a list of All Toad Locations at Scorching Sandpaper East.
5 Locations Total
| Locations | |
|---|---|
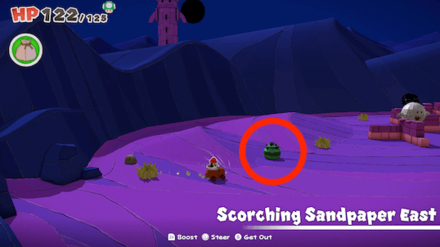
|
A Toad is buried in the sand under the round cactus close to the area entrance, so destroy it and get him out. |
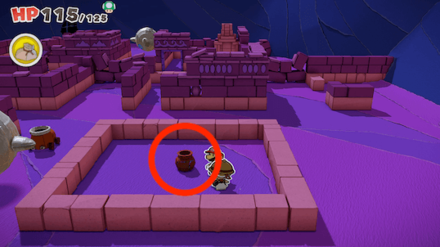
|
There's a pot in a square where all walls are low, so hit the pot and then the origami snake that appears from it. It's necessary to smash the pot to find the rest of the Toads in this area! |
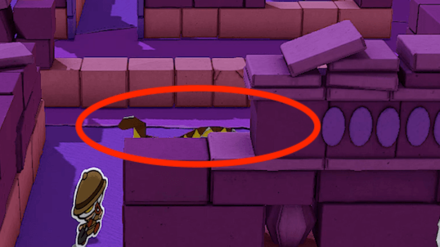
|
North of where the pot was, in the ruin building with ovals on the walls, an origami snake will have appeared, so hammer it. |
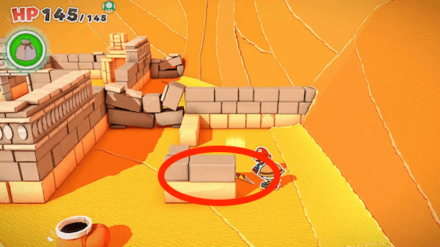
|
To the east of the Oval house, there's a small ruin wall with a snake behind it. Hammer it to free the Toad. |
|
The last origami snake is hiding under a breakable wall in the south-east corner. |
Scorching Sandpaper East 100% Walkthrough
Shroom City (Snif City) Toad Locations
Here is a list of All Toad Locations at Shroom City (Snif City).
14 Locations Total
| Locations | |
|---|---|
|
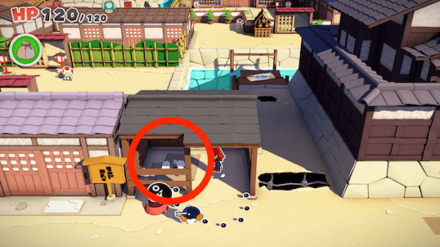
Go behind the first building you see to find crates you can climb to go onto the roof, then hit the beetle on the right pillar. |
|
Go behind the building in the front of Shroom City and hop up on the crates. Jump onto the seesaw to fling this Snifit into the Shroom City sign, knocking this Toad down. |
|
There's a stack of Toads tied up at the south western part of the lake. |
|
In the top right corner by the shops, hit the sign on the left and a crumbled Toad will fall out. This unlocks the Shroom City shop. |
|
Jump on to the counter, then jump onto the record racks on the right and free the Toad in the corner. |
|
On the path north of the lake there's a hole in the wall behind a breakable create, so hit the wall to free the Toad. |
|
Make the hidden block appear by the tent stall north of the lake, then hit the palm tree on the top of the platform. |

|
Hit the flower on the small barrels in the north west corner of the lake. |
|
South-west of the Hotel, from the area behind the ledge with the palm tree, jump up the staircase railing leading to the hotel and onto the wall. There, hit the spotlight to make an origami you can Hammer appear. |
|
Go inside the Lamp tent from the left side, then make your way up the crates to the top right platform. Break the crates and hit the beetle. |
|
In the right area of the indoor pool party, destroy the crates at the bottom of the screen and pull out the Toad. |
|
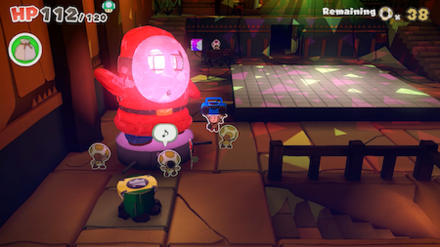
Use the shelves left of the DJ by the indoor pool to jump to the left area. Defeat the Rats in the crates and use the Magic Circle to empty the pool. Hit the "suftboard" to free the Toad. |
|
In the hotel lobby, hit the baggage trolley from the left with your Hammer to free a Toad. |
|
Head to the hallway on the right of the hotel lobby, then hit the white pot for a origami beetle in need of whacking to jump out. |
Shroom City (Snif City) 100% Walkthrough
Scorching Sandpaper Far West Toad Locations
Here is a list of All Toad Locations Scorching Sandpaper Far West.
1 Location Total
| Locations | |
|---|---|
|
Destroy the left round cactus south of the Tower and pull the Toad out of the sand. |
Scorching Sandpaper Far West 100% Walkthrough
Scorching Sandpaper Far East Toad Locations
Here is a list of All Toad Locations at Scorching Sandpaper Far East.
3 Locations Total
| Locations | |
|---|---|
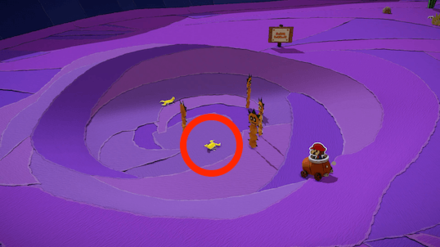
|
Enter the round area and follow the movement of the scorpions that burrow underground along with the Pokeys. Once they stop moving, hit the sand where the scorpion stopped and free the Toad. |
|
Enter the round area and follow the movement of the scorpions that burrow underground along with the Pokeys. Once they stop moving, hit the sand where the scorpion stopped and free the Toad. |
|
Find the cactus in the nothern part of the area, then pull the nearby Toad out of the sand. |
Scorching Sandpaper Far East 100% Walkthrough
Fire Vellumental Cave Toad Locations
0 Locations Total
There are no Toad Locations to find in Fire Vellumental Cave.
Fire Vellumental Cave 100% Walkthrough
Temple of Shrooms Toad Locations
Here is a list of All Toad Locations at Temple of Shrooms.
1 Location Total
| Locations | |
|---|---|
|
You will automatically rescue 100% of Toads in Temple of Shrooms after defeating the Hole Punch boss and destroying the Yellow Streamer. |
Faceless Toad Locations
| Locations | |
|---|---|
Toads: 6 |
Turning the Shy Guy figures in bottom right and left corners. |
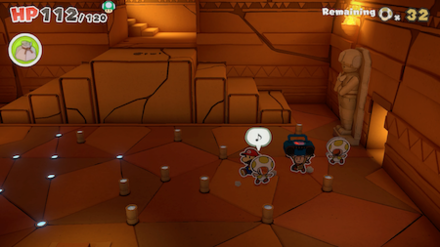
Toads: 3 |
Stuck to the small poles, hammer the poles to get them free. |

Toads: 3 |
They will drop down from the ceiling, so pull them down to get them free. |
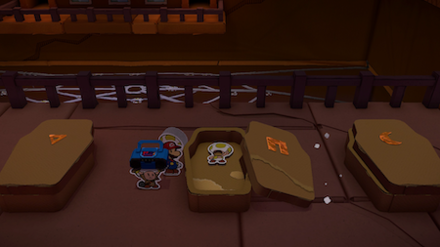
Toads: 2 |
Inside coffins: Bottom-left and second from the right on the top row. You will need to have other Toads help you push to open the coffins. |

Toads: 1 |
First Toad you find, get rid of the Scuttlebugs to free it. |
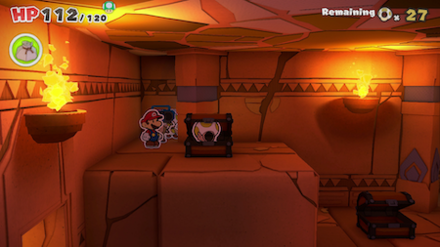
Toads: 1 |
Head up the ramp in the top-right corner and open the treasure chest. |
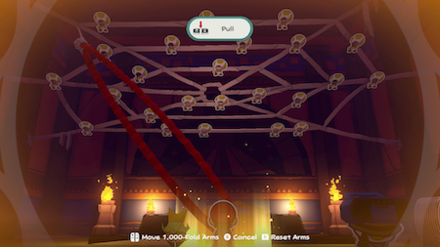
Toads: 24 |
Open the middle coffin with the crescent moon symbol in the second column from the left. Go down the stairs and pull down the net to free the Toads. |
Temple of Shrooms 100% Walkthrough
The Great Sea Toad Locations
0 Locations Total
While many of the areas accessible from The Great Sea have Toads Locations, The Great Sea itself does not.
The Great Sea 100% Walkthrough
The Princess Peach Toad Locations
Here is a list of All Toad Locations aboard The Princess Peach.
7 Locations Total
| Locations | |
|---|---|
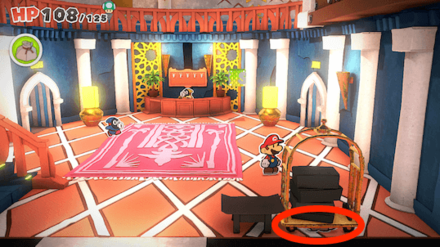
|
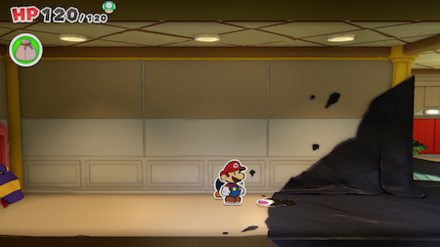
Folded up in the southwest corner of the Main Hall. |
|
In the Lounge, jump up on the shelf to reach this vase-shaped Toad. |
|
On the upper level, one of the ropes in the railing is broken. Fall through it and go to the west corner to find it. |
|
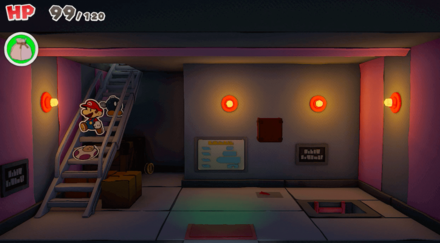
In the basement room with the ladder, under the crate in the southeast. |
|
As you walk up the stairs, you will step on a Toad. It is still unconscious after you stepped on it, but counted as rescued. |
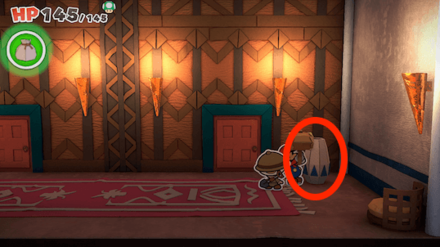
|
After riding the elevator up, in the southwest part of the hall. |

|
When you defeat Gooper Blooper, the Toads trapped inside it will all be freed. |
The Princess Peach 100% Walkthrough
Bonehead Island Toad Locations
Here is a list of All Toad Locations on Bonehead Island.
1 Location Total
| Locations | |
|---|---|
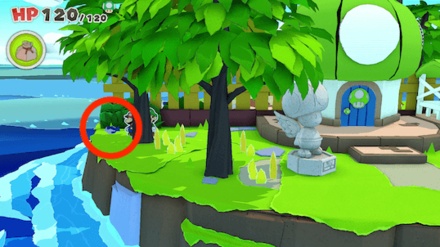
|
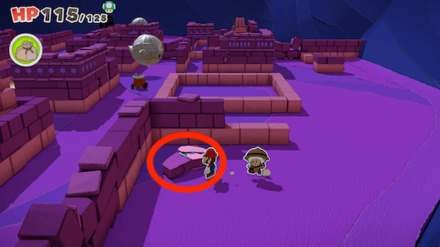
Semi-obscured path on the west side of the island. |
Bonehead Island 100% Walkthrough
Mushroom Island Toad Locations
Here is a list of All Toad Locations on Mushroom Island.
3 Locations Total
| Locations | |
|---|---|
|
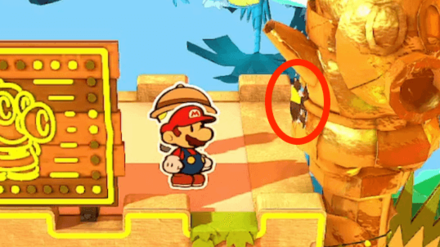
Origami-fish, east of the island. |
|
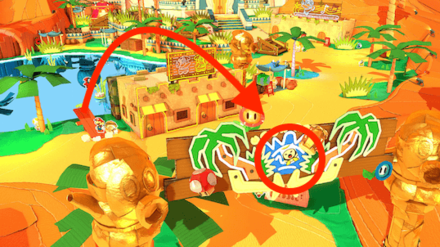
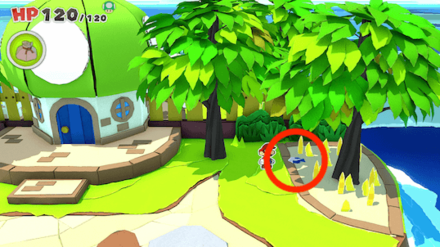
Go through the house and find the fish in the western corner. |
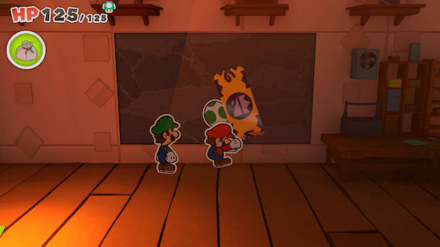
|
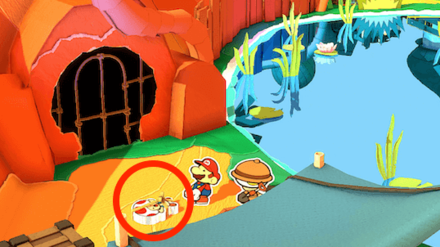
Free the Origami Craftsman in the basement of the house. |
Mushroom Island 100% Walkthrough
Heart Island Toad Locations
Here is a list of All Toad Locations on Heart Island.
2 Locations Total
| Locations | |
|---|---|
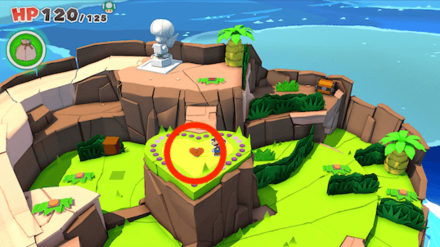
|
Origami Heart on the heart platform. (See Max UP Heart guide) |
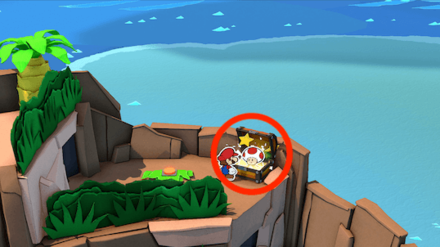
|
In the treasure chest on the top right platform. |
Spade Island Toad Locations
Here is a list of All Toad Locations on Spade Island.
5 Locations Total
| Locations | |
|---|---|
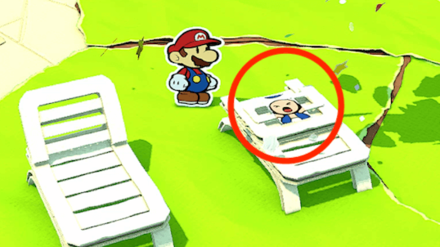
|
Under the right lounge chair headrest, hit the chair then the folded Toad. |
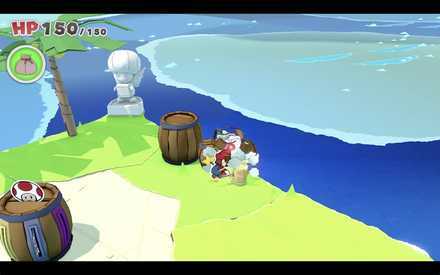
|
Break the middle barrel of the small barrels on the right side. |
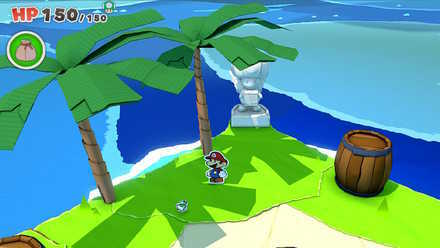
|
Hit the tree closest to the Toad Statue. |
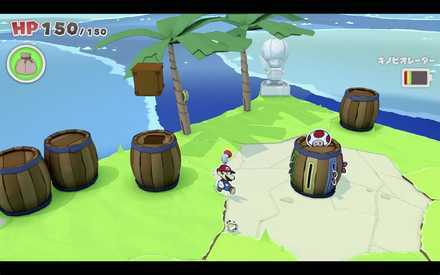
|
Appears from the Hidden ? Block on top of the west barrel |
|
Push all the other Toads inside to free the last one. |
Club Island Toad Locations
Here is a list of All Toad Locations on Club Island.
4 Locations Total
| Locations | |
|---|---|

|
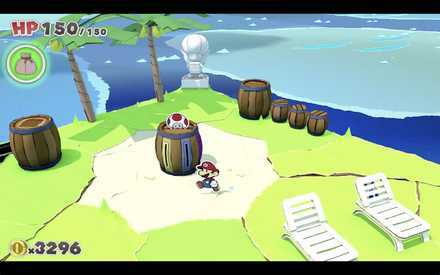
Joy Toad at the island's entrance. Lead all Toads to the lounge area to rescue them. |
|
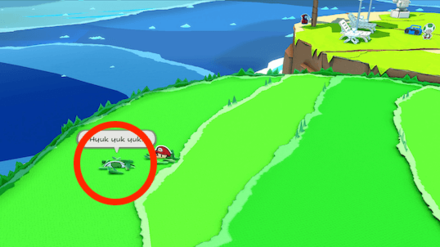
Humor Toad on the west side of the island. Lead all Toads to the lounge area to rescue them. |
|
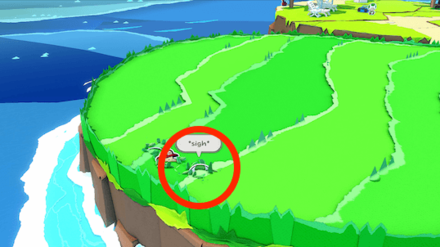
Pathos Toad to in the tall grass to the south-west. Lead all Toads to the lounge area to rescue them. |
|
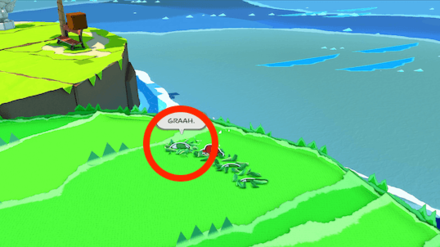
Anger Toad on the east side of the island. Lead all Toads to the lounge area to rescue them. |
Cresecent Island (Full Moon Island) Toad Locations
Here is a list of All Toad Locations on Full Moon Island.
3 Locations Total
| Locations | |
|---|---|
|
Hit the leaf pile to the left of the tree, then hit the origami bunny that appears. |
|
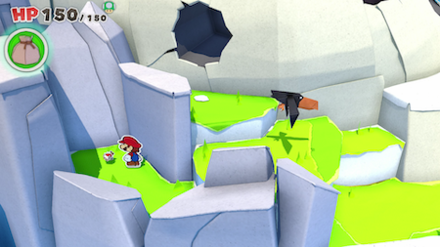
Red origami fish in need of hammering on the west side, after the island turns into Full Moon Island. |

|
Fish up the origami fish at the northern fishing spot. |
Crescent Island (Full Moon Island) 100% Walkthrough
? Island Toad Locations
Here is a list of All Toad Locations on ? Island (Question Mark Island).
2 Location Total
| Locations | |
|---|---|

|
By the Toad Statue on the top of the slope. |
|
Drop down the ledge south of the Statue and free the Toad inside the Sensor Lab here. |
? Island (Question Mark Island) 100% Walkthrough
Hammer Island Toad Locations
Here is a list of All Toad Locations on Hammer Island.
1 Locations Total
| Locations | |
|---|---|

|
After defeating the Hammer Bros on both sides, go back down and hit the middle hole in the ground with your Hammer, then pull out the Toad. |
Hammer Island 100% Walkthrough
Scuffle Island Toad Locations
0 Locations Total
There are no Toad Locations on Scuffle Island.
Scuffle Island 100% Walkthrough
Diamond Island
0 Locations Total
There are no Toad Locations hiding on Diamond Island.
Diamond Island 100% Walkthrough
Ice Vellumental Mountain Toad Locations
0 Locations Total
This icy shrine to the Ice Vellumental does not have Toad Locations.
Ice Vellumental Mountain 100% Walkthrough
Sea Tower Toad Locations
0 Locations Total
There are no Toad Locations found in Sea Tower
Shangri-Spa Toad Locations
Here is a list of All Toad Locations at Shangri-Spa.
1 Locations Total
| Location and Explanation | |
|---|---|
|
Find the Sensor Lab door and help the Toad inside. |
Related Guides
Guides
Completionist Guides
Settings and Other Info
Pre-Release Articles
Author

Paper Mario: The Origami King (Switch) Walkthrough & Guides Wiki
All Toad Locations List
Please participate in our site
improvement survey
03/2026
improvement survey
03/2026
Would you assist in
improving Game8's site?
improving Game8's site?

×
We are listening to our users' valuable opinions and discussing how to act on them.
The information collected through this survey will be used for the purpose of improving our services. In addition, the information will only be disclosed a part of a statistic in a format that will not allow identification of personal information.
Begin Survey
Not Now
×
Please rate each item regarding Game8.co's Advertisements.
Amount of Ads
Very Dissatisfied
Somewhat Dissatisfied
Fine
Somewhat Satisfied
Highly Satisfied
Placement of Ads
Timing of Ad Display
Ad Loading Speed
Safeness of Ads
Content of Ads
×
Please rate each item regarding Game8.co's Quality of Articles.
Amount of information
Very Dissatisfied
Somewhat Dissatisfied
Fine
Somewhat Satisfied
Highly Satisfied
Frequency of updates
Speed of new information
Accuracy of articles
Understandibility of articles
Readability of sentences
×
Please rate each item regarding Game8.co's Usability of the Site.
Ease of finding information
Very Dissatisfied
Somewhat Dissatisfied
Fine
Somewhat Satisfied
Highly Satisfied
Loading Speed
Use of Color
Font Size
Visibility of Images
Easy to Understand Layout
×
Please rate each item regarding Game8.co's Message Boards, Comments.
Ease of Writing
Very Dissatisfied
Somewhat Dissatisfied
Fine
Somewhat Satisfied
Highly Satisfied
Readability
Ease in Finding Information
Comment Quality
Comment Quantity
Admin Response
×
Please rate each item regarding Game8.co's Site's new design.
Please rate our site's new design
Very Dissatisfied
Somewhat Dissatisfied
Fine
Somewhat Satisfied
Highly Satisfied
Do you think that the website's design change makes the site easier to use?
Has the new design made it easier for you to find information on the site?
Has the new design improved the overall visual appeal of the site?
How would you rate your overall satisfaction with the new design of the site?
×
How likely are you to recommend Game8 to someone you know?
Very Unlikely
0
1
2
3
4
5
6
7
8
9
10
Very Likely
If you have other opinions regarding potential improvement to the website, please share them with us. We would appreciate your honest opinion.
Note: This is a free response section, so you can proceed without entering anything.
Note: Please be sure not to enter any kind of personal information into your response.
Note: Please be sure not to enter any kind of personal information into your response.
×
Thank You
×
Thank you for participating in our survey! Your answers will help us to improve the quality of our website and services.
We hope you continue to make use of Game8.
We hope you continue to make use of Game8.
Close
Rankings
- We could not find the message board you were looking for.
Gaming News


![Monster Hunter Stories 3 Review [First Impressions] | Simply Rejuvenating](https://img.game8.co/4438641/2a31b7702bd70e78ec8efd24661dacda.jpeg/thumb)
Popular Games

Genshin Impact Walkthrough & Guides Wiki
Honkai: Star Rail Walkthrough & Guides Wiki
Umamusume: Pretty Derby Walkthrough & Guides Wiki
Pokemon Pokopia Walkthrough & Guides Wiki
Resident Evil Requiem (RE9) Walkthrough & Guides Wiki
Monster Hunter Wilds Walkthrough & Guides Wiki
Wuthering Waves Walkthrough & Guides Wiki
Arknights: Endfield Walkthrough & Guides Wiki
Pokemon FireRed and LeafGreen (FRLG) Walkthrough & Guides Wiki
Pokemon TCG Pocket (PTCGP) Strategies & Guides Wiki


Recommended Games
Diablo 4: Vessel of Hatred Walkthrough & Guides Wiki
Cyberpunk 2077: Ultimate Edition Walkthrough & Guides Wiki
Fire Emblem Heroes (FEH) Walkthrough & Guides Wiki
Yu-Gi-Oh! Master Duel Walkthrough & Guides Wiki
Super Smash Bros. Ultimate Walkthrough & Guides Wiki
Pokemon Brilliant Diamond and Shining Pearl (BDSP) Walkthrough & Guides Wiki
Elden Ring Shadow of the Erdtree Walkthrough & Guides Wiki
Monster Hunter World Walkthrough & Guides Wiki
The Legend of Zelda: Tears of the Kingdom Walkthrough & Guides Wiki
Persona 3 Reload Walkthrough & Guides Wiki


All rights reserved
©2020 Nintendo
The copyrights of videos of games used in our content and other intellectual property rights belong to the provider of the game.
The contents we provide on this site were created personally by members of the Game8 editorial department.
We refuse the right to reuse or repost content taken without our permission such as data or images to other sites.