 Paper Mario: Origami King Wiki Top Page
This survey will take about 1 minute.
Your answers will help us to improve our website.
Paper Mario: The Origami King (Switch)
Collectibles List | Locations for All Collectible Treasure

This is a guide for finding all collectible treasures in every area of Paper Mario: The Origami King for Nintendo Switch. Read on to find out where to find all 120 collectibles, as well as how to find and check your treasure!
List of Contents
Collectible Treasure Locations
There are 120 treasures to collect in Paper Mario: The Origami King. Collect all treasure to earn a trophy!
| Collectible Treasure | Location |
|---|---|
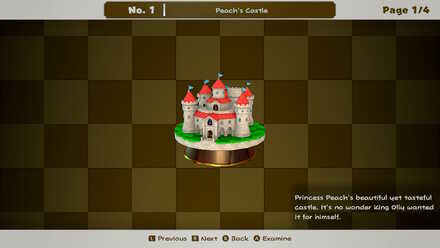
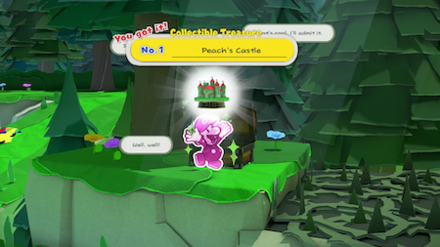 Enlarge Enlarge
Peach's Castle |
Whispering Woods
Bottom left treasure chest accessed by walking over the spiny ground. |
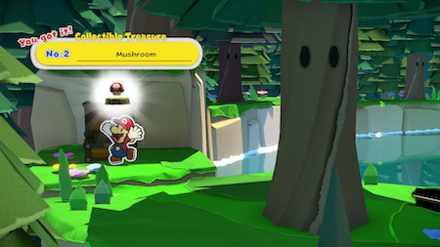 Enlarge Enlarge
Mushroom |
Whispering Woods
In the first area when Goombas start appearing, go to the far left to find it in a chest. |
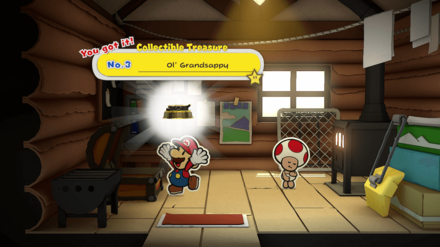 Enlarge Enlarge
Ol' Grandsappy |
Whispering Woods
Dive down in the Great Sea in 3C near the Shy Guy and get the Big Shell Toad. Go to the BBQ and use the Fire Vellumental to start a fire, then get it from a treasure chest in the cabin. |
 Enlarge Enlarge
Torch from Peach's Castle |
Toad Town
Beside the Battle Lab (Red Mushroom House), there's a hidden entrance behind the two boxes. It will lead you to a tunnel that lets you cross under the bridge. You will find the Treasure Chest on the other side. |
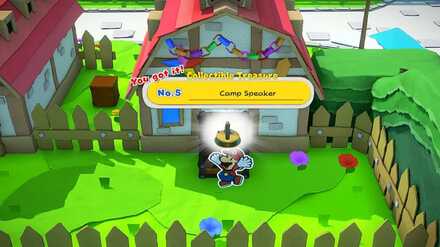 Enlarge Enlarge
Camp Speaker |
Toad Town
From the location of Paper Macho, take the path on the west. Then, enter the house next to it. Inside the house, exit to the door near the bed. Move east to find the Treasure Chest behind a house. |
 Enlarge Enlarge
Coins |
Toad Town
Hit the closed parasol near the coffee shop to create a Magic Circle and pull open a platform. Jump up to the 2nd floor of the mansion and go up the stairs to battle a Paper Macho Goomba. The Snifit inside will give you this. |
 Enlarge Enlarge
Colored Pencils |
Toad Town
Find a hidden path behind the red brick building to reach a pier. After you've beaten Colored Pencils, the Monty Mole here will sell this to you for 698 coins. |
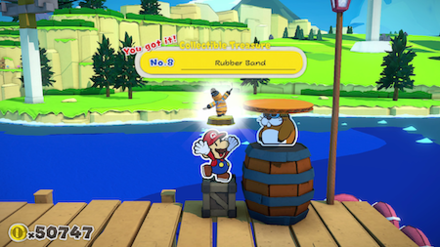 Enlarge Enlarge
Rubber Band |
Toad Town
After you've beaten Rubber Band, the Monty Mole will sell this to you for 398 coins. |
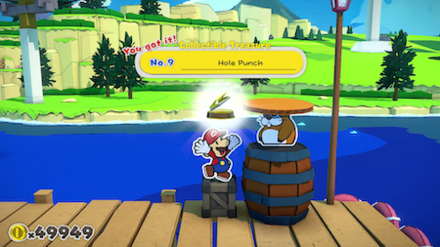 Enlarge Enlarge
Hole Punch |
Toad Town
After you've beaten Hole Punch, the Monty Mole will sell this to you for 798 coins. |
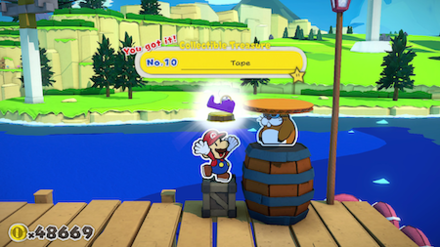 Enlarge Enlarge
Tape |
Toad Town
After you've beaten Tape, the Monty Mole will sell this to you for 1280 coins. |
 Enlarge Enlarge
Scissors |
Toad Town
After you've beaten Scissors, the Monty Mole will sell this to you for 1580 coins. |
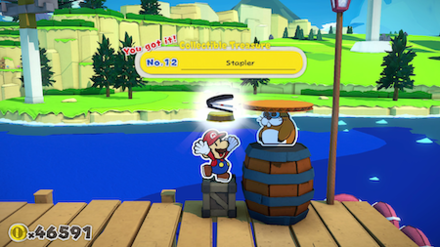 Enlarge Enlarge
Stapler |
Toad Town
After you've beaten Stapler, the Monty Mole will sell this to you for 498 coins. |
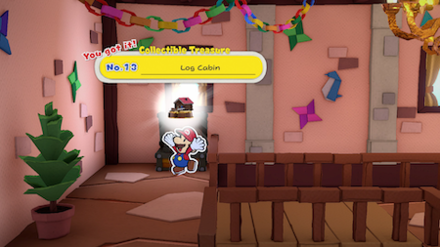 Enlarge Enlarge
Log Cabin |
Toad Town
Same as Treasure No. 6, on the 2nd floor of the mansion, take the door inside to find this chest. |
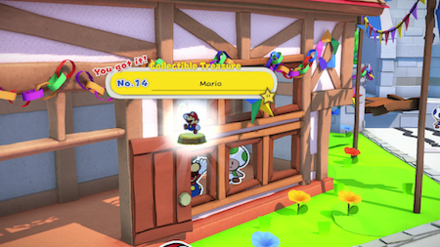 Enlarge Enlarge
Mario |
Toad Town
Later in the game, return to the building where you rescued the first Shy Guy. Return the Manhole Hook to get this Treasure. |
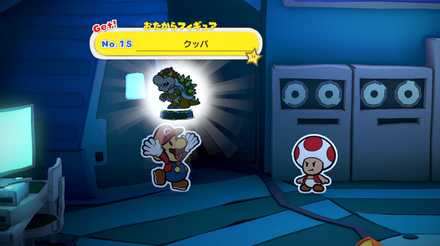 Collectible Treasure No. 15:
 Bowser |
Toad Town
Defeat all bosses in the Battle Machine. |
 Enlarge Enlarge
Manhole Cover |
Graffiti Underground
In the Graffiti Underground, after draining the water from the upper basin, you can find this Treasure in a chest inside the now-empty basin. |
 Enlarge Enlarge
Lush Greenery |
Overlook Mountain
On the very first path, take a left at the entrance and continue to the far left to find a chest with this Treasure. |
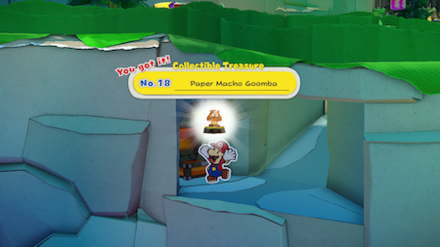 Enlarge Enlarge
Paper Macho Goomba |
Overlook Mountain
Directly back and to the left from Monty Mole's table, you'll find a path winding down and around to the front. Find this Treasure in a chest at the end. |
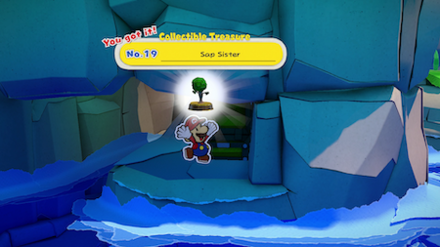 Enlarge Enlarge
Sap Sister |
Overlook Mountain
Right before the fishing pier, you'll find a ? Block with 100 coins. Continue left from there and you'll find a hidden path winding down and around to the front. Find this Treasure in a chest at the end. |
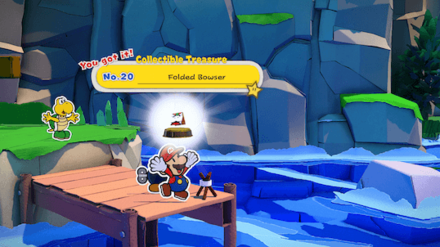 Enlarge Enlarge
Folded Bowser |
Overlook Mountain
In the Fishing Spot, after catching the Toad in the water, you can sometimes see one of the shadows start to sparkle. Catch it to reel in this Treasure. |
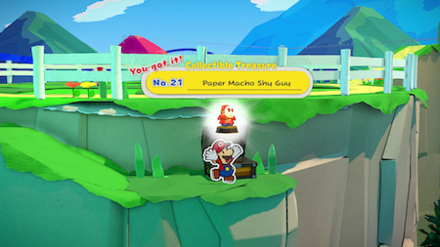 Enlarge Enlarge
Paper Macho Shy Guy |
Overlook Mountain
Go south from the clearing with the three Paper Macho Shy Guys to find a slope leading down. At the bottom, you'll find a chest with this Treasure. |
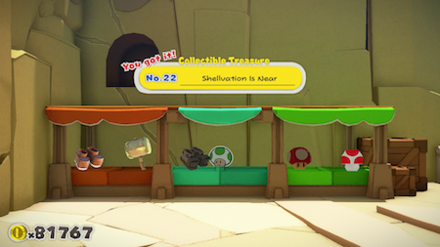 Enlarge Enlarge
Shellvation is Near |
Picnic Road
Purchase from the shop for 2400 Coins |
 Enlarge Enlarge
Vellumental Idol |
Picnic Road
Purchase from the shop for 3800 Coins |
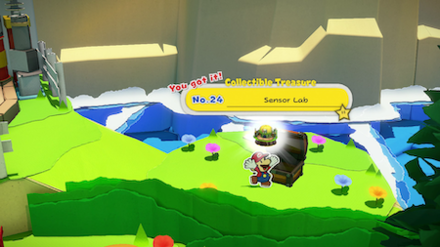 Enlarge Enlarge
Sensor Lab |
Picnic Road
On the second visit to Picnic Road, after the Red Streamer has disappeared, go to the house which was previously covered in Red Streamer (the Sensor Lab) and down the path to the right of the house to find the chest with this Treasure. |
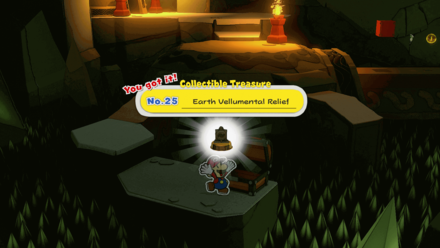 Enlarge Enlarge
Earth Vellumental Relief |
Earth Vellumental Temple
After the first battle with Koopa Troopas, go down and to the left along the narrow path to find this chest. |
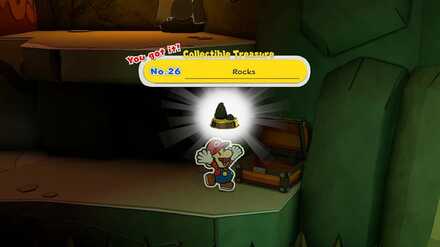 Enlarge Enlarge
Rocks |
Earth Vellumental Temple
In the room with the sliding blocks, at the far end, fall down onto the ledge in front to find a chest with this treasure. |
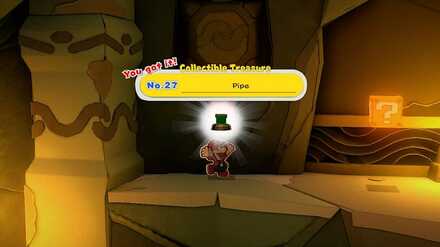 Enlarge Enlarge
Pipe |
Earth Vellumental Temple
Go to the west side of the entrance to the Earth Vellumental Boss. Underneath the turtle figure on the wall, jump to reveal a hidden block. Jump again to receive the Treasure. |
 Enlarge Enlarge
Chef's TRULY WILD Special |
Overlook Tower
After clearing Overlook Tower, return to the restaurant. Talk to the chef in the kitchen to receive Treasure No. 28. |
 Enlarge Enlarge
Overlook Tower |
Overlook Tower
After clearing Overlook Tower, return to Open-Air Cafe on the 3rd Floor. Talk to the Blue Toad at the coffee stand to receive Treasure No. 29. |
 Enlarge Enlarge
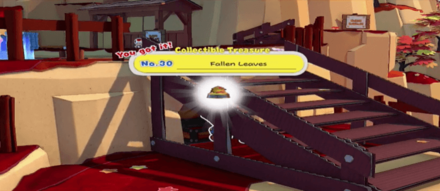
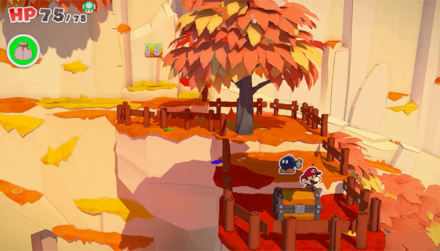
Fallen Leaves |
Autumn Mountain
After reading the signage about Tall Grass Plains, you will find a treasure box inside the wall under the stairs. Hit the treasure box with your Hammer to obtain the Collectible Treasure No. 30 (Fallen Leaves). |
 Enlarge Enlarge
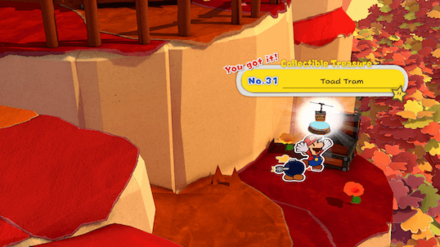
Toad Tram |
Autumn Mountain
From the sign by the gate to Chestnut Valley, head up the first stairs, then hug the right side of the platform. You'll find a slope leading down to the right to the treasure chest. |
 Enlarge Enlarge
Confetti Bag |
Autumn Mountain
From the green Pipe by the Water Shrine Save Point, hug the wall and head to the north. The path will wind and lead you to the chest. |
 Enlarge Enlarge
Toad Researcher |
Autumn Mountain
After clearing the Water Shrine, head left from the Magic Circle used to fill the river and you'll find this chest along the path. |
 Enlarge Enlarge
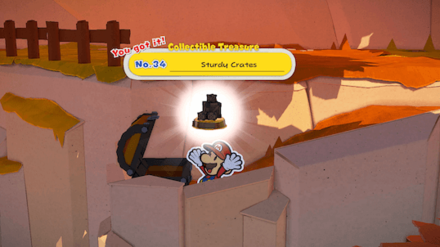
Sturdy Crates |
Chestnut Valley
Upon arriving, go south near the fence and follow the pathway down the mountain to find the treasure box. |
 Enlarge Enlarge
Sign |
Chestnut Valley
You will find Collectible Treasure No. 35 (Sign) while saving Bob-omb from getting stuck on the ground, it is inside a hole on the wall next to Bob-omb. |
 Enlarge Enlarge
Spinning Shells |
Chestnut Valley
Go south of the Save Point, past the tree and onto a ledge with the treasure. |
 Enlarge Enlarge
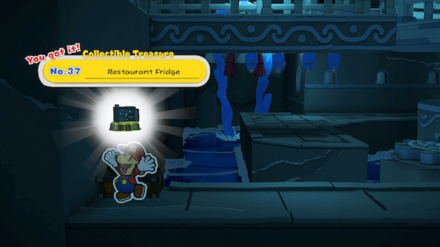
Restaurant Fridge |
Water Vellumental Shrine
In the central room, go up the right staircase, then south, and fill in the hole to make a staircase accessible. Go down the staircase to reach a lower area. Go directly left in the lower area to find the chest with this Treasure. |
 Enlarge Enlarge
Max UP Heart |
Water Vellumental Shrine
On the same floor as Treasure No. 37, go to the north west corner and hit the space off the ledge to the north to make an invisible ? Block appear. Jump on the block and continue hitting forward to make more blocks appear, then go east through the door and to the end of the corridor to find the chest with this Treasure. |
 Enlarge Enlarge
POW Block |
Water Vellumental Shrine
Go inside the room with breakable blocks in a maze. Right when you enter, destroy the ones in the north-west corner to gain access to a hidden staircase. Go up the stairs to find a chest with Collectible Treasure No.39 POW Block. |
 Enlarge Enlarge
Downriver Tour Boat |
Shogun Studios
On entering Shogun Studios, go into the house on the left. Try to open the chest and you will need to present your Pass; if you have a Royalty Pass, it will open and give you the Treasure. |
 Enlarge Enlarge
Chestnuts |
Shogun Studios
Use a Royalty Pass on the chest in the green shop where you got the Straw. |
 Enlarge Enlarge
Water Vellumental's Wheel |
Shogun Studios
On the path back and to the left from the Photo Studio, in the house on the left. Try to open the chest and you will need to present your Pass; if you have a Royalty Pass, it will open and give you the Treasure. |
 Enlarge Enlarge
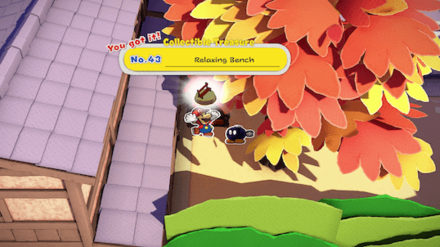
Relaxing Bench |
Shogun Studios
In the courtyard in front of the staff room, in the back-left corner, a chest contains this Treasure. |
 Enlarge Enlarge
Paper Mario Koopa Troopa |
Shogun Studios
In the Shuriken mini-game, play on Expert Mode and get at least 80 Points to score this Treasure. |
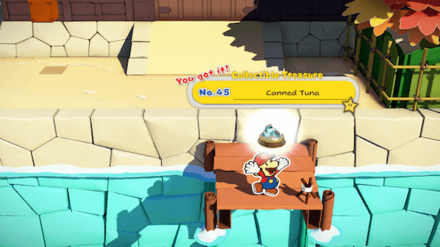 Enlarge Enlarge
Canned Tuna |
Shogun Studios
Free the Toad in charge of the fishing dock in Shogun Studios, then fish up the square, folded fish. |
 Enlarge Enlarge
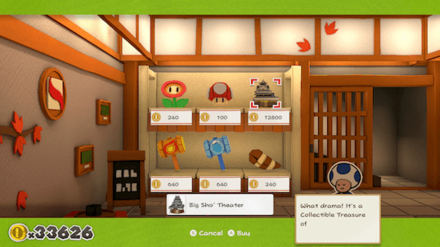
Big Sho’ Theater |
Shogun Studios
Buy from the Souvenir Shop after getting the Master Key and freeing the shop keeper Toadon the second floor. |
 Enlarge Enlarge
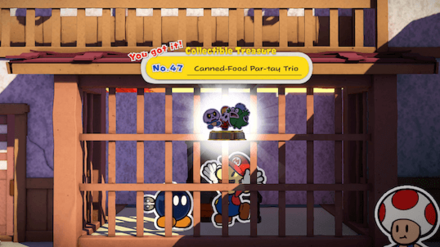
Canned-Food Par-tay Trio |
Shogun Studios
Get the Master Key and go through the door behind the pond the Ninjis are practicing with straws, then go to the right side. |
 Enlarge Enlarge
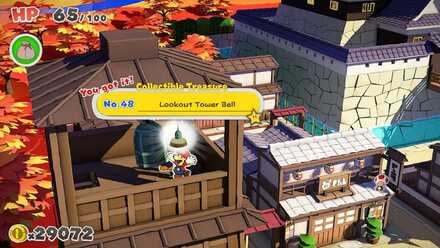
Lookout Tower Bell |
Shogun Studios
Return to the top of the Tower and talk to the Blue Toad. Hit the bell 100 times; the toad will help you count. Once you reach 100, you will receive the treasure! |
 Enlarge Enlarge
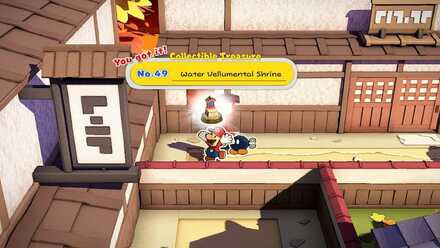
Water Vellumental Shrine |
Shogun Studios
Walk to the end of the path near the House of Riddles. Then, jump near the lantern to reveal a hidden block. Jump again to receive the treasure! |
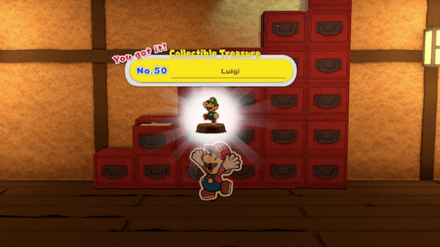 Enlarge Enlarge
Luigi |
Ninja Attraction (House of Tricky Ninjas)
In the House of Tricky Ninjas, the room with the staircase made of iron boxes has a box on the far right which is slightly open. Hit that box with the Hammer, and all others that open after it, until this Treasure pops out. |
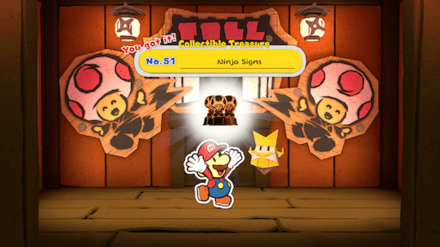 Enlarge Enlarge
Ninja Statue |
Ninja Attraction (House of Tricky Ninjas)
Find all 25 Ninjas in the House of Tricky Ninjas. |
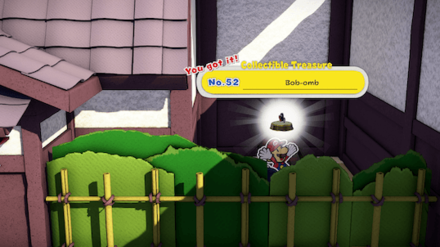 Enlarge Enlarge
Bob-Omb |
Ninja Attraction (House of Tricky Ninjas)
After fixing the gears in House of Tricky Ninjas, jump onto the moving Shurikens over the entrance to it. Hug the wall and drop down in the top right corner to access this Treasure. |
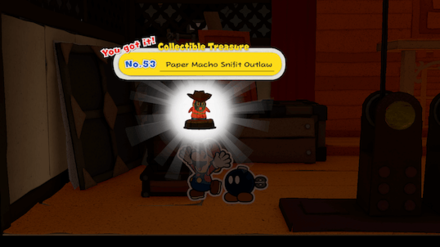 Enlarge Enlarge
Paper Macho Snifit Outlaw |
Big Sho' Theater
After defeating Rubber Band, go down to the first floor and onto the Western stage again. Exit the stage to the left for a hidden area with a chest. |
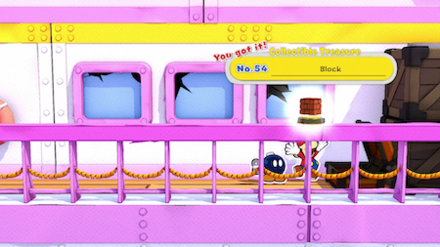 Enlarge Enlarge
Block |
The Princess Peach
On the first floor, go past the pool and staircase on the east side and wrap around back to find a hidden path with this treasure. |
 Enlarge Enlarge
Super Star |
The Princess Peach
In the Wheelhouse (westernmost room on the 2nd Floor Deck). |
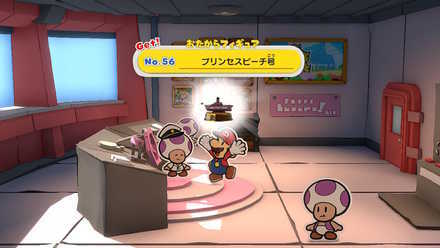 Collectible Treasure No. 56:
 The Princess Peach |
The Princess Peach
Fix all the Confetti holes on The Princess Peach and save all Toads in The Great Sea, then talk to the captain. |
 Enlarge Enlarge
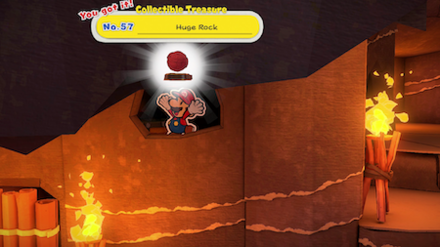
Huge Rock |
Breezy Tunnel
In the northwest section of the room, on the middle floor, you can hit a cracked wall with your Hammer to break it. Go through to find this Treasure in a chest. |
 Enlarge Enlarge
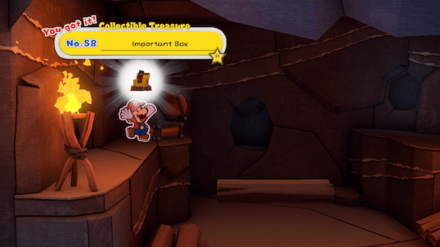
Important Box |
Breezy Tunnel
In Breezy Tunnel, find the door the furthest to the left from the entrance and enter. In this room, go up the ramp on the right and hit the cinnamon bark to create a step for you to stand on and hit the back wall. Once the wall has opened, jump in and head left, then back towards the screen. The treasure chest is visible on the ledge you appear on. |
 Collectible Treasure No. 59:
 Paper Macho Boo |
Scorching Sandpaper East
North-east, behind the buildings with mountain and wave symbols on their walls. |
 Collectible Treasure No. 60:
 Boot Car |
Scorching Sandpaper Desert
Dig the glowing hole, west of the ruins. |
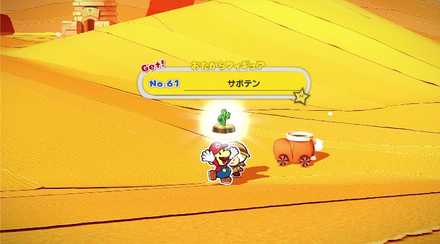 Collectible Treasure No. 61:
 Cactus |
Scorching Sandpaper Desert
Currently unavailable |
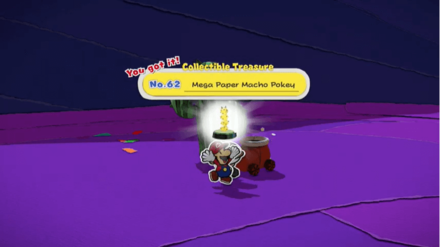 Enlarge Enlarge
Mega Paper Macho Pokey |
Scorching Sandpaper Far West
Destroy all the rocks near the cactus. Dig in front of it to find the treasure! |
 Collectible Treasure No. 63:
 Professor Toad |
Scorching Sandpaper Minor
Dig the glowing ground behind the Temple of Shrooms. |
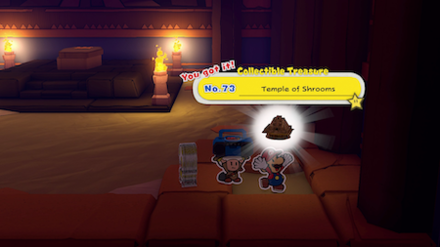
|
Collectible Treasure No. 64: Temple of Shrooms Statues |
Scorching Sandpaper Desert
At the altar, hit the hidden ? Block to the west of the green box. |
 Enlarge Enlarge
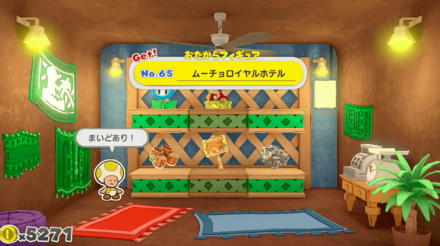
Snif City Royal Hotel |
Shroom City (Snif City)
Buy at the item shop. |
 Enlarge Enlarge
Bag of Confetti |
Shroom City (Snif City)
In the broken wall of the house, next to the item shop. |
 Enlarge Enlarge
Ring Trainer |
Shroom City (Snif City)
Inside the room, in front of the western passage, on the 1st level. |
 Enlarge Enlarge
Gold Snif |
Shroom City (Snif City)
Dig where the Toad lying on the table tells you to dig. |
 Enlarge Enlarge
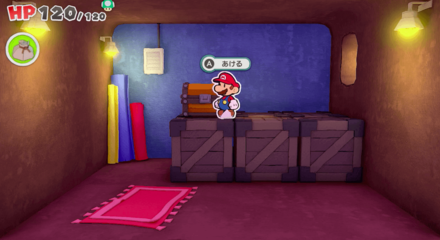
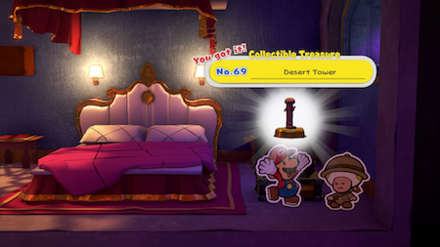
Desert Tower |
Shroom City (Snif City)
In the room on the second floor of the hotel, continue through the door to the east to find the chest with this Treasure. |
 Enlarge Enlarge
Lamp Scam |
Shroom City (Snif City)
Talk to the Toad at the Lamp stall. |
 Enlarge Enlarge
Fire Flower |
Fire Vellumental Cave
In the room with Fire Bros, climb up the left platform to find this chest. |
 Enlarge Enlarge
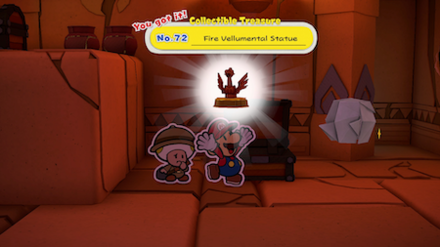
Fire Vellumental Statue |
Temple of Shrooms
In the room to the right of the Triangle Switch puzzle. |
 Enlarge Enlarge
Temple of Shrooms |
Temple of Shrooms
In the room where 24 Toads were in the web above you, dig in the southeast patch of dirt to find it. |
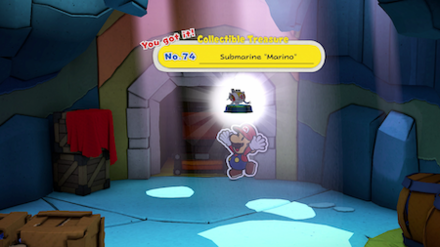 Enlarge Enlarge
Submarine "Marino" |
Bonehead Island
Treasure Chest at northeast corner, inside the skull. |
 Enlarge Enlarge
Paper Macho Koopa Paratroopa |
Crescent Island (Full Moon Island)
Fish for and battle Sidestepper at the northwest pier, after island becomes Full Moon. |
 Enlarge Enlarge
? Block |
? Island
Far east of the island, into the west passage, inside the Treasure Chest |
 Enlarge Enlarge
Sea Captain Toad |
? Island
After climbing the northeast slope westward, drop south to the lower ledge and open the Treasure Chest. |
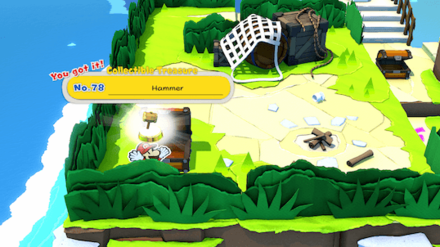 Enlarge Enlarge
Hammer |
Hammer Island
Treasure Chest in front of Winged Toad Statue. |
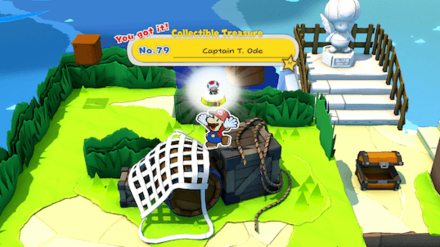 Enlarge Enlarge
Captain T. Ode |
Hammer Island
Hidden ? Block above the southwest Treasure Chest. |
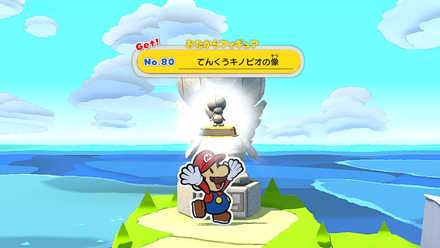 Collectible Treasure No. 80:
 Shangri-Spa Toad Statue |
The Great Sea
Get after interacting with all Toad statues. |
 Collectible Treasure No. 81:
 Paper Macho Mummy Goomba |
The Great Sea
Sea Chart: dive for Treasure Chest at northwest corner of E5. |
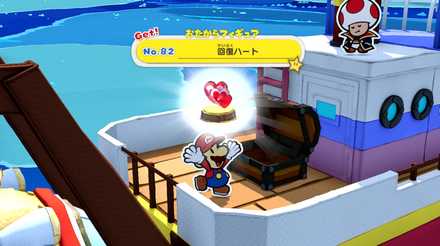 Collectible Treasure No. 82:
 Healing Hearts |
The Great Sea
Sea Chart: dive for Treasure Chest at southern border between D3 & E3. |
 Collectible Treasure No. 83:
 Spade Island Barrel |
The Great Sea
Sea Chart: dive for Treasure Chest at eastern border of D2. |
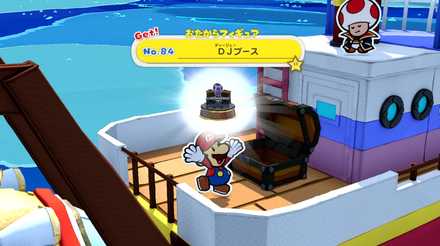 Collectible Treasure No. 84:
 DJ Booth |
The Great Sea
Sea Chart: dive for Treasure Chest near eastern border of G3. |
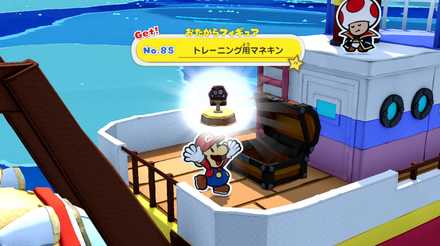 Collectible Treasure No. 85:
 Training Mannequin |
The Great Sea
Sea Chart: dive for Treasure Chest at southwest corner of B3. |
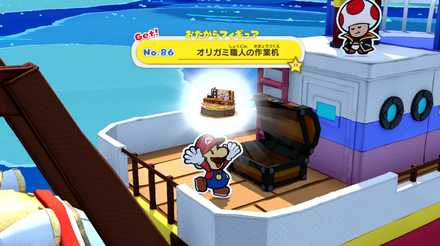 Collectible Treasure No. 86:
 Origami Workbench |
The Great Sea
Sea Chart: dive near the southeast corner of D6, break the stone with 1000-Fold Arms, and opne the Treasure Chest. |
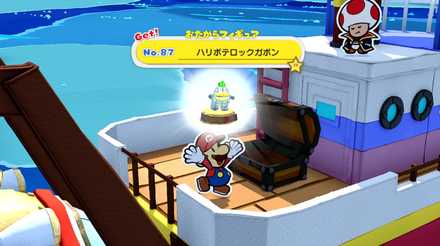 Collectible Treasure No. 87:
 Paper Macho Stone Spike |
The Great Sea
Sea Chart: dive for Treasure Chest at southwest corner of F6. |
 Collectible Treasure No. 88:
 King Shroomses's Coffin |
The Great Sea
Sea Chart: dive for Treasure Chest at southeast corner of A1. |
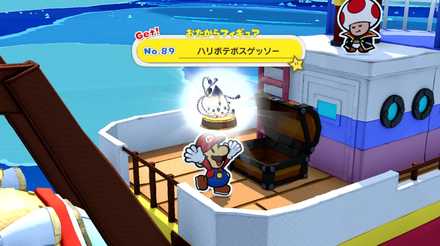 Collectible Treasure No. 89:
 Paper Macho Gooper Blooper |
The Great Sea
Sea Chart: dive for Treasure Chest near eastern border of G7. |
 Enlarge Enlarge
Paper Macho Buzzy Beetle |
Ice Vellumental Mountain
Treasure Chest along spiral staircase |
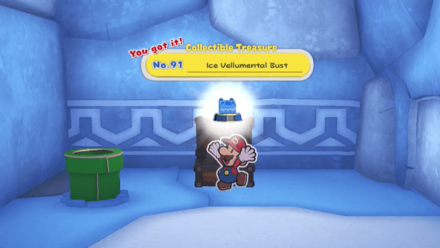 Enlarge Enlarge
Ice Vellumental Bust |
Ice Vellumental Mountain
Treasure Chest down a pipe, 3 rooms after the spiral staircase |
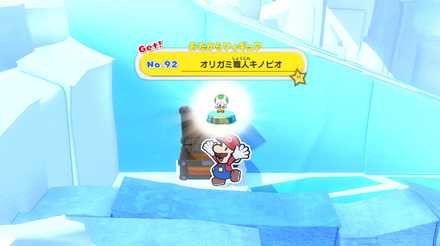 Collectible Treasure No. 92:
 Origami Craftsman |
Ice Vellumental Mountain
Southwest corner of Ice Vellumental's chamber, after it has been defeated and Olivia has frozen the water. |
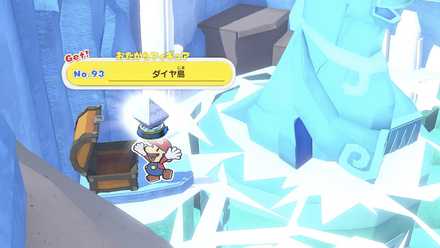 Collectible Treasure No. 93:
 Diamond Island |
Ice Vellumental Mountain
Down Ice Vellumental Mountain, after defeating Ice Vellumental |
 Enlarge Enlarge
Sea Captain's Boat |
Sea Tower
Before jumping to the upper level, in Step 4 of the walkthrough, wait for the southwest pillar to go down to access a Hidden Treasure Chest. |
 Collectible Treasure No. 95:
 Earth Vellumental Idol |
Shangri-Spa
Treasure Chest at the back of the Spring of Purification. |
 Collectible Treasure No. 96:
 Water Vellumental Idol |
Shangri-Spa
Treasure Chest down the southwest slope. |
 Collectible Treasure No. 97:
 Fire Vellumental Idol |
Shangri-Spa
Head to the Treasure chest on a small island, using the moving platform, west of the lower tunnel. |
 Enlarge Enlarge
Ice Vellumental Idol |
Shangri-Spa
Treasure Chest east of Bowser's Castle. |
 Enlarge Enlarge
Water Buckets |
Shangri-Spa
Buy for 10,000 coins from a Spike, just southwest of the Banquet Hall steps. |
 Collectible Treasure No. 100:
 Sea Tower |
Shangri-Spa
Buy for 10,000 coins from a Shy Guy, at the foot of the Spring of Bliss bridge. |
 Enlarge Enlarge
Shangri-Spa Fountain |
Shangri-Spa
Hit the sleeping Shy Guy in the shop on the left side to wake it up, then buy from the shop. |
 Collectible Treasure No. 102:
 Shangri-Spa Toad |
Shangri-Spa
Hit the sleeping Shy Guy in the shop on the left side to wake it up, then buy from the shop. |
 Collectible Treasure No. 103:
 Boss Sumo Bro Cloud |
Shangri-Spa
Before entering Bowser's Castle, go left to find a hidden ? Block. |
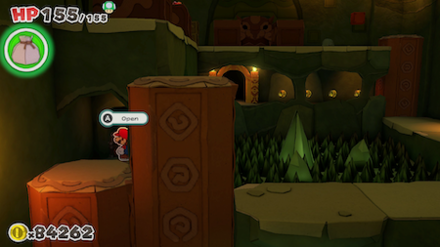
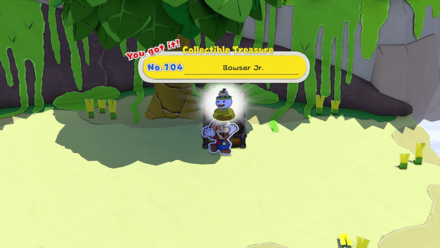 Enlarge Enlarge
Bowser Jr. |
Spring of Jungle Mist
At the second fork in the road, go right and break the wall, then use the 1,000-Fold Arms to obtain. |
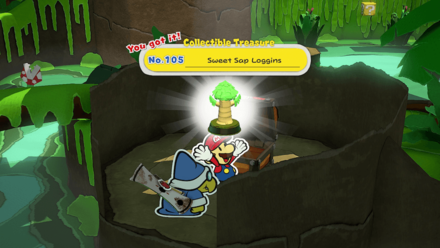 Enlarge Enlarge
Sweet Sap Loggins |
Spring of Jungle Mist
In the hidden path behind the Spring of Jungle Mist. |
 Enlarge Enlarge
Stamp Booth |
Spring of Jungle Mist
After going down the hidden path behind the Spring of Jungle Mist. |
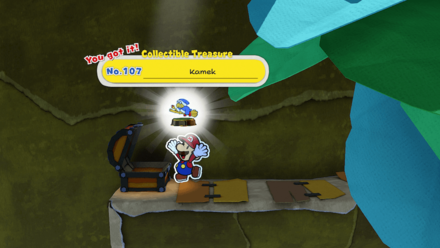 Enlarge Enlarge
Kamek |
Spring of Jungle Mist
At the save point when you're about to climb the huge tree, climb the ladder and go east to find this treasure chest. |
 Enlarge Enlarge
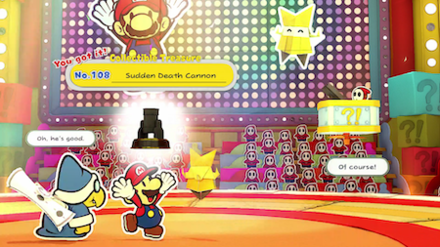
Sudden Death Cannon |
Spring of Rainbows
Receive after winning Sudden Death for the first time, in the Shy Guys Finish Last minigame. |
 Enlarge Enlarge
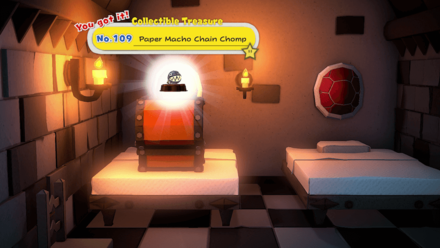
Paper Macho Chain Chomp |
Bowser's Castle
After finding Luigi and he leaves, return to the room where you found him and open the Treasure Chest. |
 Enlarge Enlarge
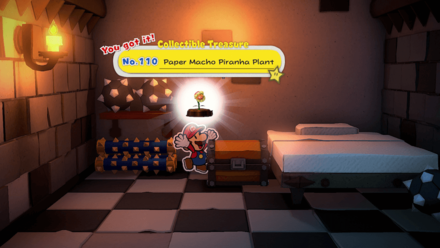
Paper Macho Piranha Plant |
Bowser's Castle
In the last room in the hall of Bowser paintings, behind the Treasure Chest. |
 Enlarge Enlarge
Cutout Soldiers |
Bowser's Castle
East side of the engine room, after destroying the Green Streamer. |
 Enlarge Enlarge
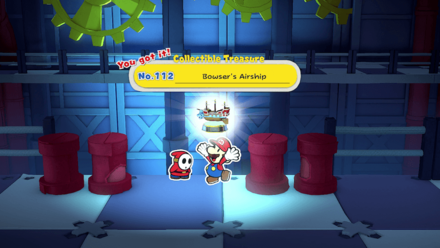
Bowser's Airship |
Bowser's Castle
After Bowser's airship has taken off, talk to the Shy Guy in the airship dock in the west end of the first floor of Bowser's Castle. |
 Enlarge Enlarge
Luigi's Kart |
Origami Castle
In a ? Block inside the origami house after the Koopa Troopa puzzle. |
 Enlarge Enlarge
Bullet Bill |
Origami Castle
In a ? Block in Origami Castle |
 Enlarge Enlarge
Paper Plane Squadron |
Origami Castle
After finishing the block bridge in the block puzzle, in a hidden ? Block above the block second from the right. |
 Enlarge Enlarge
Paper Macho Castle Crashers |
Origami Castle
At the end of the main hall, in the area with the block puzzle, find it in a hidden ? Block. |
 Enlarge Enlarge
Paper Macho Buzzy Beetle |
Origami Castle
After finishing the block bridge in the block puzzle, in a hidden ? Block above the block second from the right. |
 Enlarge Enlarge
Origami Castle |
Origami Castle
In the final room before Olly, in a folded ? Block on the central platform. |
 Enlarge Enlarge
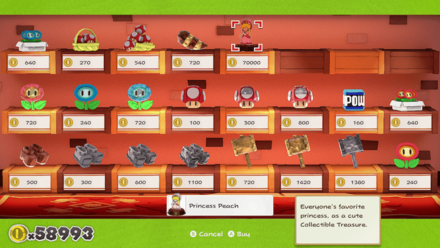
Princess Peach |
Toad Town
After completing the game, reload the save file from the last save. It will be available from the Toad Town shop for 70,000 Coins. |
 Enlarge Enlarge
Origami Cranes |
Toad Town
After completing the game, reload the save file from the last save. Go to Toad Town and check the center of the plaza to find it. |
How to Find Treasure Easily
Use the Treasure Alert

The Treasure Alert is an accessory that, when equipped, will make a sound and give an indication that treasure is nearby! This item is a must for all treasure hunters, and if you are set on finding treasure on your own, better pick this nifty tool up!
Treasure Alert Effect and How to Get
How to See Your Treasure
View from the museum in Toad Town!

After completing the events of Toad Town, you will be able to use the Museum there. Collectibles such as treasure, origami toads, and origami characters (enemies) can all be viewed using the galleries there.
Check the Treasure Gallery
Go into the room with the sign that says Treasure Gallery, and once inside, press A Button to select from the treasure on display.
Select a treasure to get more info about it
Each treasure can be viewed up close, and will have some interesting info about it written on the side.
Select Maps from the Pause screen to see your progress
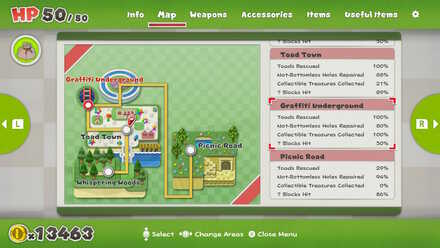
At any time, you can press + to open up the menu. If you go to the Map tab, you can see what % of treasures you have picked up for any given area you've visited.
Related Guides
Guides
Completionist Guides
Settings and Other Info
Pre-Release Articles
Author

Paper Mario: The Origami King (Switch) Walkthrough & Guides Wiki
Collectibles List | Locations for All Collectible Treasure
Please participate in our site
improvement survey
03/2026
improvement survey
03/2026
Would you assist in
improving Game8's site?
improving Game8's site?

×
We are listening to our users' valuable opinions and discussing how to act on them.
The information collected through this survey will be used for the purpose of improving our services. In addition, the information will only be disclosed a part of a statistic in a format that will not allow identification of personal information.
Begin Survey
Not Now
×
Please rate each item regarding Game8.co's Advertisements.
Amount of Ads
Very Dissatisfied
Somewhat Dissatisfied
Fine
Somewhat Satisfied
Highly Satisfied
Placement of Ads
Timing of Ad Display
Ad Loading Speed
Safeness of Ads
Content of Ads
×
Please rate each item regarding Game8.co's Quality of Articles.
Amount of information
Very Dissatisfied
Somewhat Dissatisfied
Fine
Somewhat Satisfied
Highly Satisfied
Frequency of updates
Speed of new information
Accuracy of articles
Understandibility of articles
Readability of sentences
×
Please rate each item regarding Game8.co's Usability of the Site.
Ease of finding information
Very Dissatisfied
Somewhat Dissatisfied
Fine
Somewhat Satisfied
Highly Satisfied
Loading Speed
Use of Color
Font Size
Visibility of Images
Easy to Understand Layout
×
Please rate each item regarding Game8.co's Message Boards, Comments.
Ease of Writing
Very Dissatisfied
Somewhat Dissatisfied
Fine
Somewhat Satisfied
Highly Satisfied
Readability
Ease in Finding Information
Comment Quality
Comment Quantity
Admin Response
×
Please rate each item regarding Game8.co's Site's new design.
Please rate our site's new design
Very Dissatisfied
Somewhat Dissatisfied
Fine
Somewhat Satisfied
Highly Satisfied
Do you think that the website's design change makes the site easier to use?
Has the new design made it easier for you to find information on the site?
Has the new design improved the overall visual appeal of the site?
How would you rate your overall satisfaction with the new design of the site?
×
How likely are you to recommend Game8 to someone you know?
Very Unlikely
0
1
2
3
4
5
6
7
8
9
10
Very Likely
If you have other opinions regarding potential improvement to the website, please share them with us. We would appreciate your honest opinion.
Note: This is a free response section, so you can proceed without entering anything.
Note: Please be sure not to enter any kind of personal information into your response.
Note: Please be sure not to enter any kind of personal information into your response.
×
Thank You
×
Thank you for participating in our survey! Your answers will help us to improve the quality of our website and services.
We hope you continue to make use of Game8.
We hope you continue to make use of Game8.
Close
Rankings
- We could not find the message board you were looking for.
Gaming News


![Monster Hunter Stories 3 Review [First Impressions] | Simply Rejuvenating](https://img.game8.co/4438641/2a31b7702bd70e78ec8efd24661dacda.jpeg/thumb)
Popular Games

Genshin Impact Walkthrough & Guides Wiki
Honkai: Star Rail Walkthrough & Guides Wiki
Umamusume: Pretty Derby Walkthrough & Guides Wiki
Pokemon Pokopia Walkthrough & Guides Wiki
Resident Evil Requiem (RE9) Walkthrough & Guides Wiki
Monster Hunter Wilds Walkthrough & Guides Wiki
Wuthering Waves Walkthrough & Guides Wiki
Arknights: Endfield Walkthrough & Guides Wiki
Pokemon FireRed and LeafGreen (FRLG) Walkthrough & Guides Wiki
Pokemon TCG Pocket (PTCGP) Strategies & Guides Wiki


Recommended Games
Diablo 4: Vessel of Hatred Walkthrough & Guides Wiki
Cyberpunk 2077: Ultimate Edition Walkthrough & Guides Wiki
Fire Emblem Heroes (FEH) Walkthrough & Guides Wiki
Yu-Gi-Oh! Master Duel Walkthrough & Guides Wiki
Super Smash Bros. Ultimate Walkthrough & Guides Wiki
Pokemon Brilliant Diamond and Shining Pearl (BDSP) Walkthrough & Guides Wiki
Elden Ring Shadow of the Erdtree Walkthrough & Guides Wiki
Monster Hunter World Walkthrough & Guides Wiki
The Legend of Zelda: Tears of the Kingdom Walkthrough & Guides Wiki
Persona 3 Reload Walkthrough & Guides Wiki


All rights reserved
©2020 Nintendo
The copyrights of videos of games used in our content and other intellectual property rights belong to the provider of the game.
The contents we provide on this site were created personally by members of the Game8 editorial department.
We refuse the right to reuse or repost content taken without our permission such as data or images to other sites.