This survey will take about 1 minute.
Your answers will help us to improve our website.
Honkai: Star Rail
All Creation Nymph Locations and Rewards
★ Exclusive: Check out the State of Meta in 4.0!
♦ Latest: 4.1 Livestream Redeem Codes
♦ Phase 2: Sparkxie, Sparkle, Cerydra, Rappa
♦ Upcoming: Ashveil, Silver Wolf Lv.999, Evanescia
♦ Events: Cosmicon, Roll On!, Ding! Arcadia Fun-Time Clock-In Essentials
Here are all the Creation Nymph locations in Honkai: Star Rail's Amphoreus. See where to find all Creation Nymphs and all the rewards you can get from them in this guide!
All Creation Nymph Locations in Amphoreus
Creation Nymph Locations Per Area
Use the table above to jump to an area in Amphoreus and see detailed guides for the locations of each Creation Nymph!
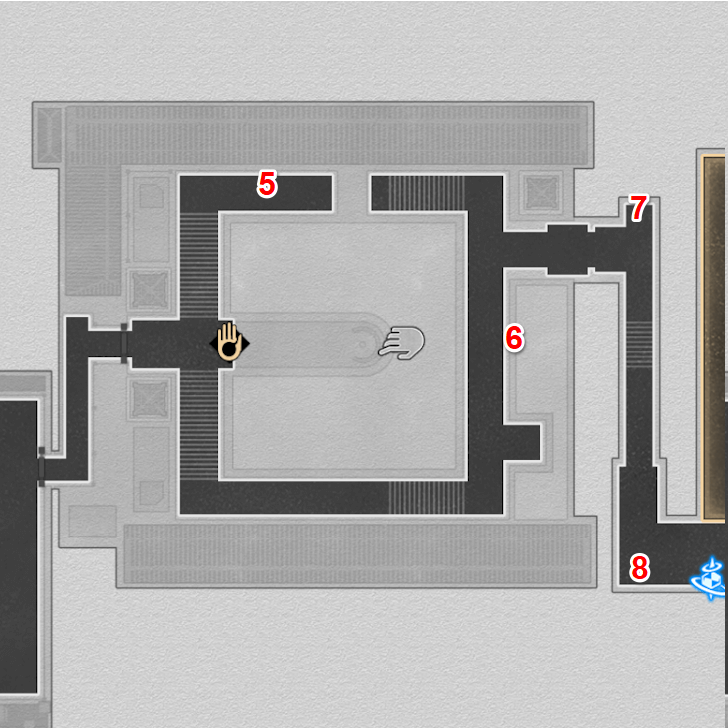
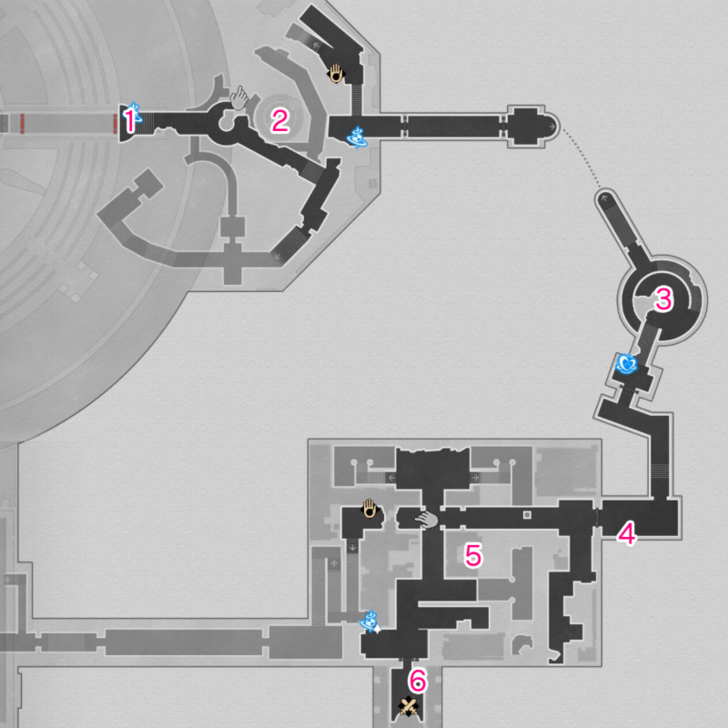
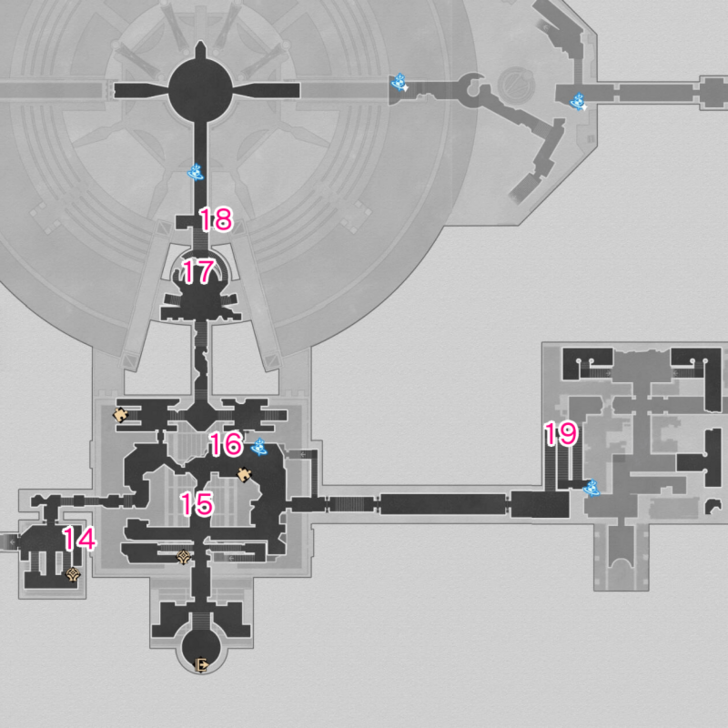
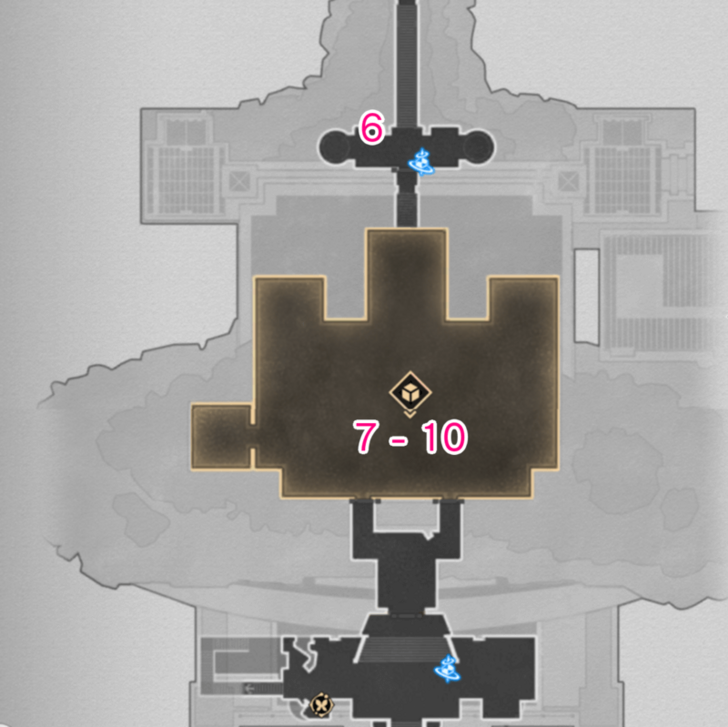
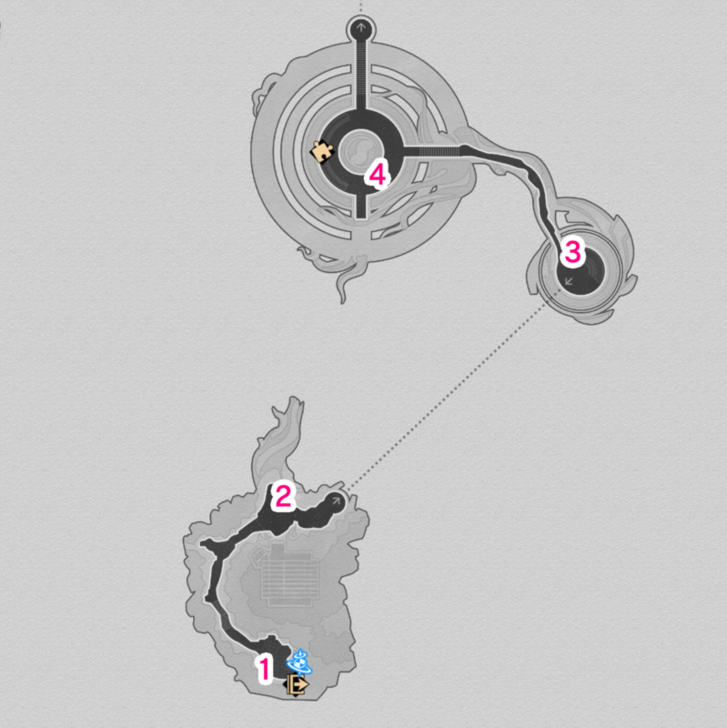
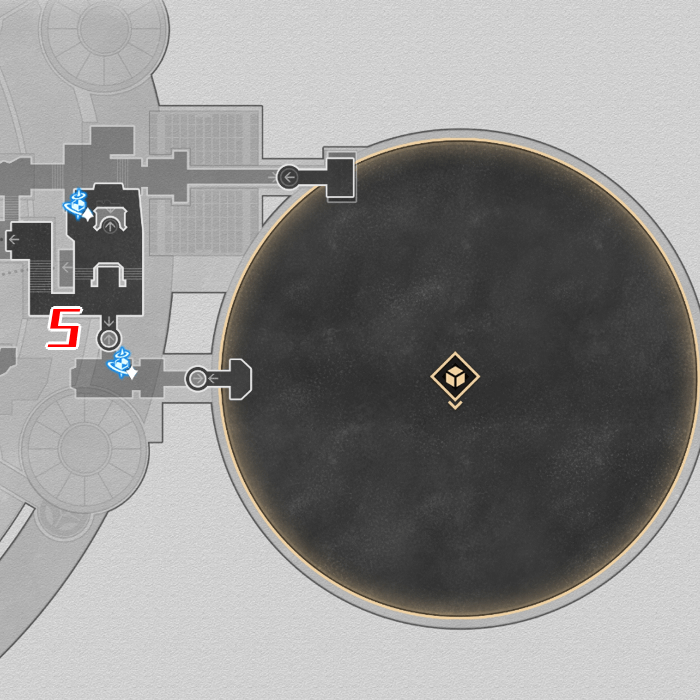
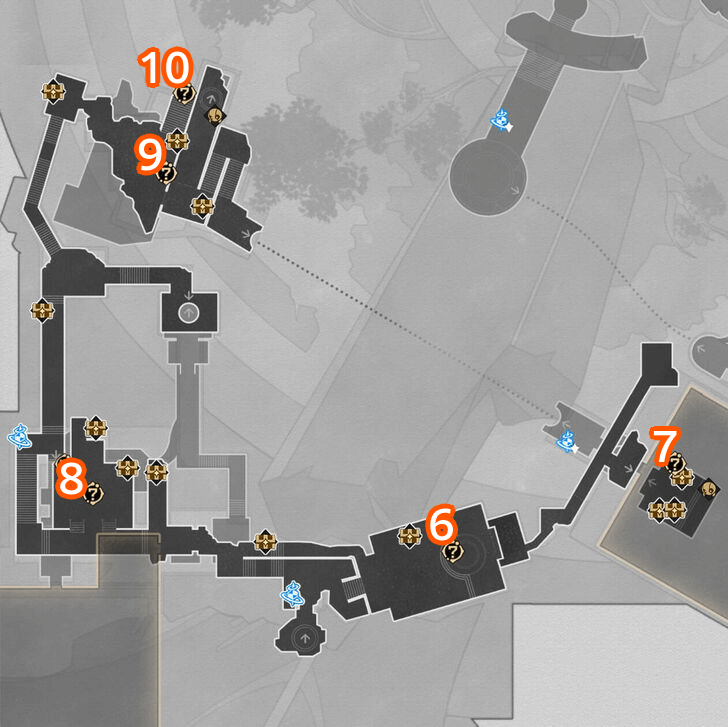
"Eternal Holy City" Okhema Creation Nymphs
| Okhema Creation Nymphs Map | |||||||
|---|---|---|---|---|---|---|---|
 See Full Image |
 See Full Image |
||||||
 See Full Image |
 See Full Image |
||||||
| Northeast | Southwest | ||||||
| F1 | F2 | F1 | F2 | ||||
Use the table above to jump to a floor in the "Eternal Holy City" Okhema!
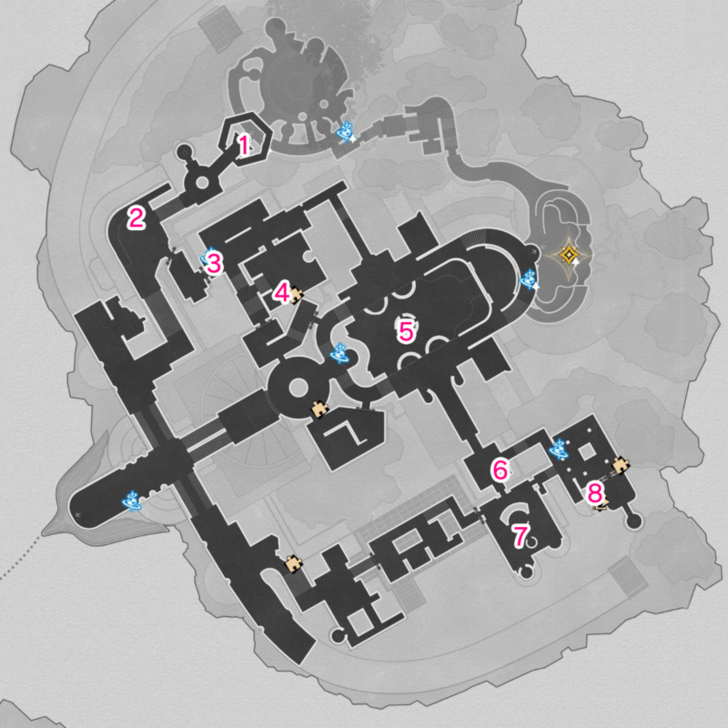
There are a total of 20 Creation Nymphs that can be found in "Eternal Holy City" Okhema. For "Fallen City" Okhema, all 20 Creation Nymphs are in the same locations as the ones in "Eternal Holy City" Okhema.
If you've already collected Creation Nymphs in "Eternal Holy City" Okhema, you can talk to the Garmentmaker in "Fallen City" Okhema to instantly gather the ones you've collected in the previous Okhema.
Eternal Holy City Okhema Map Guide
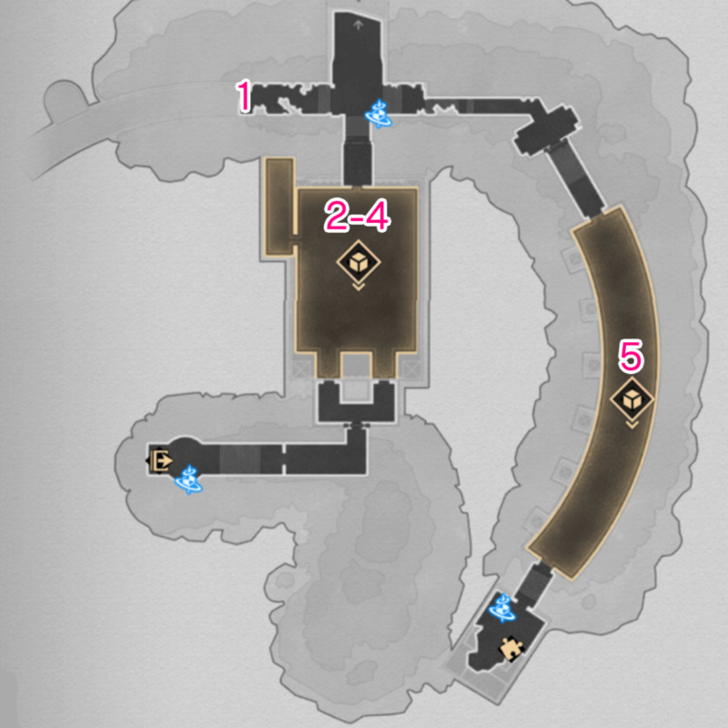
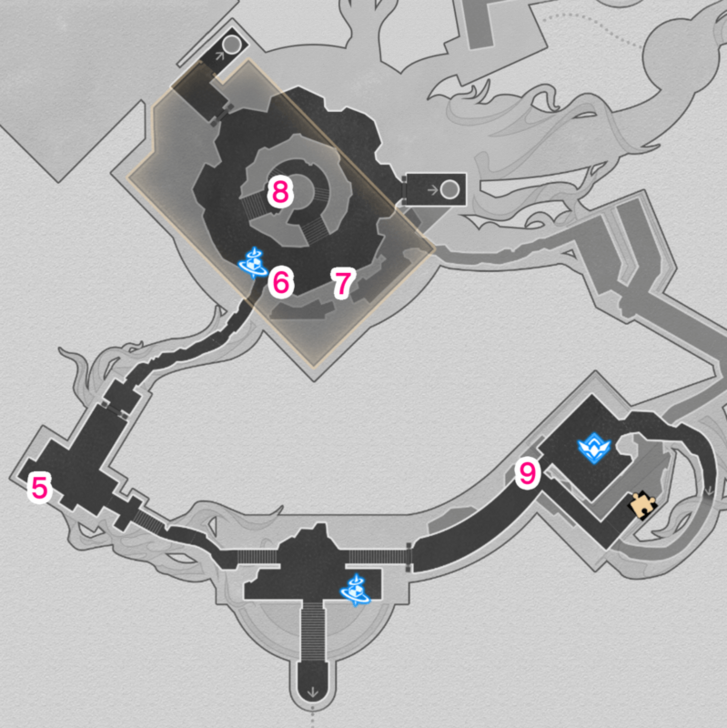
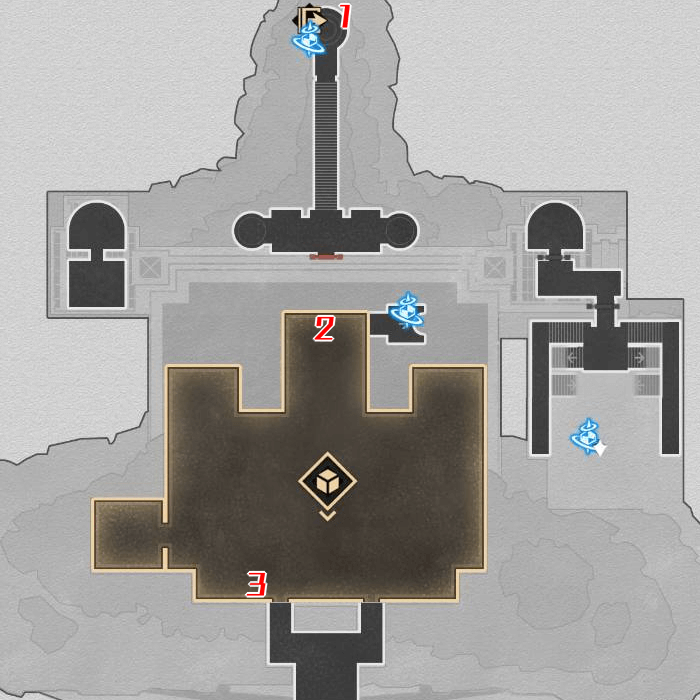
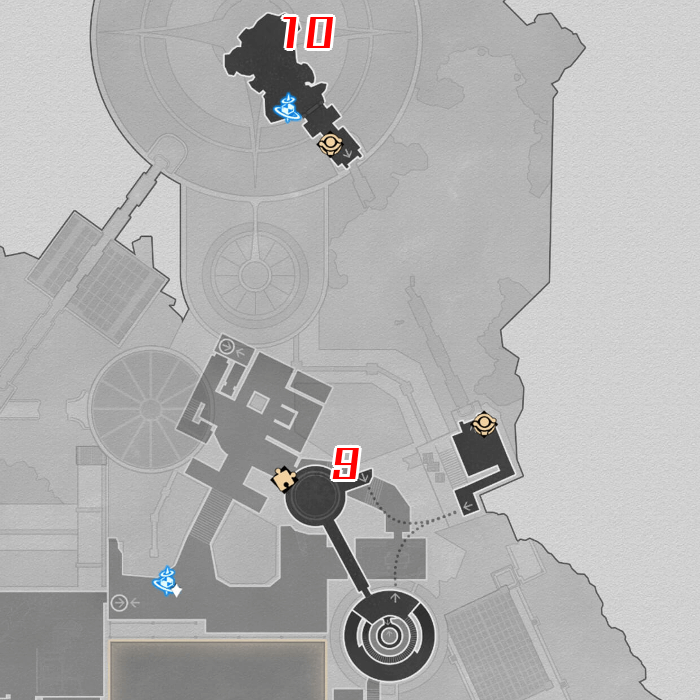
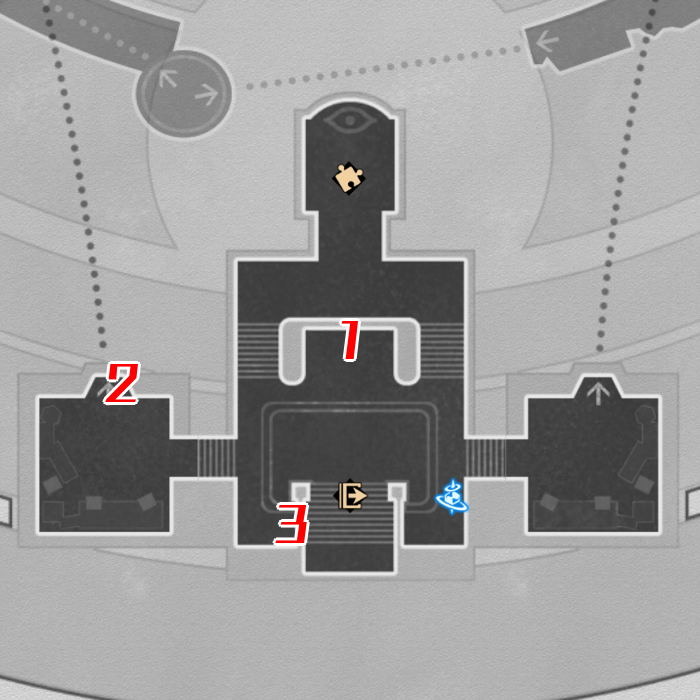
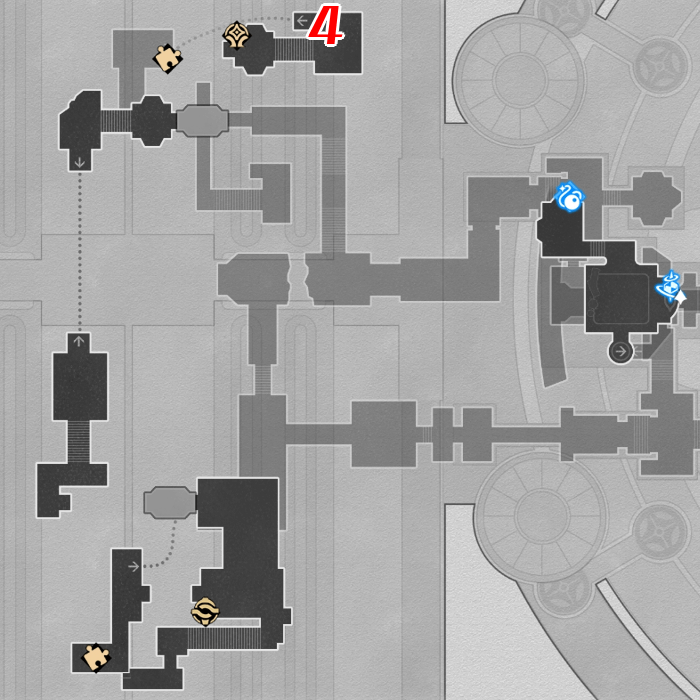
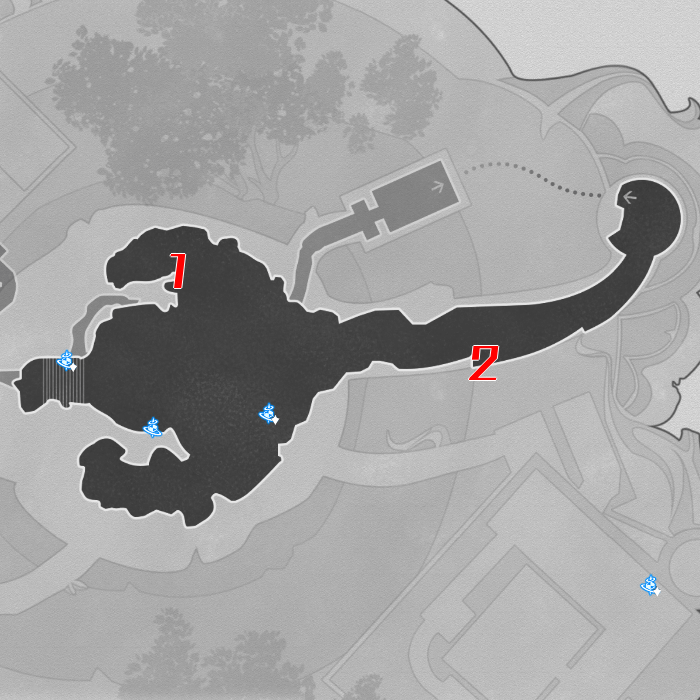
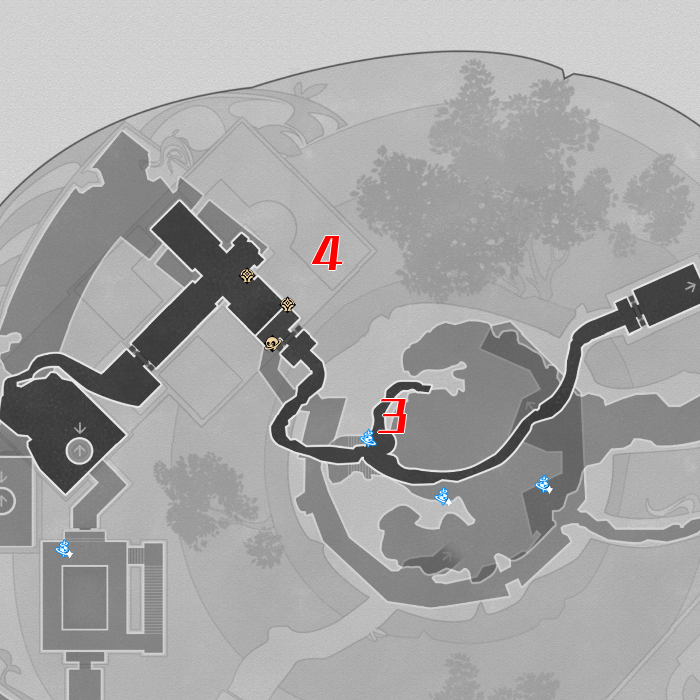
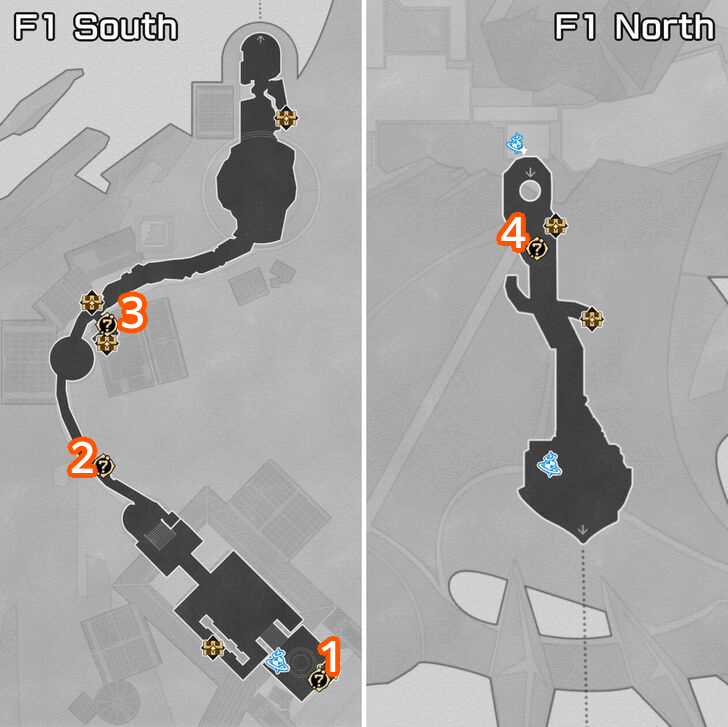
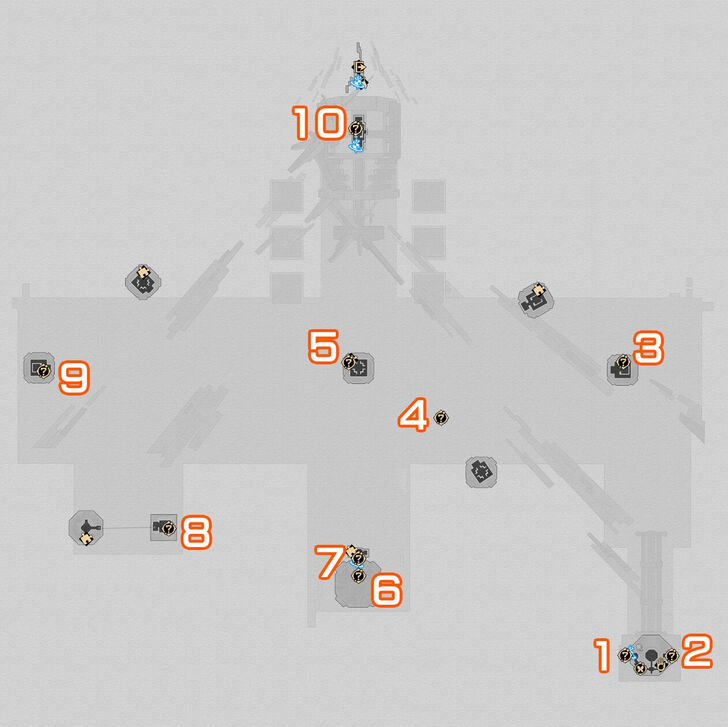
Okhema Northeast F1 Creation Nymph Locations
| No. | Image | How to Find |
|---|---|---|
| 1 | 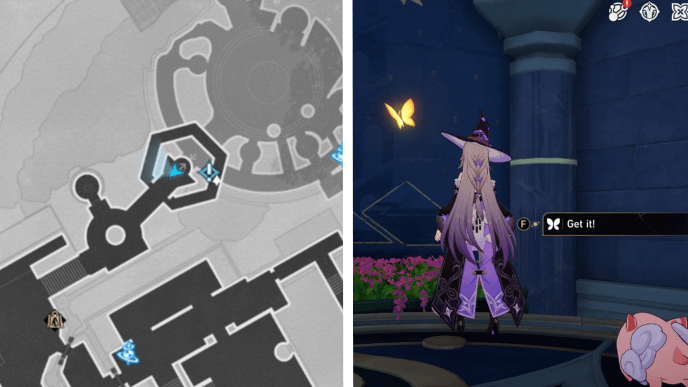 |
Use the elevator that leads to the second floor and interact with the Nymph on the way there. You need to be facing the entrance to see the Nymph. |
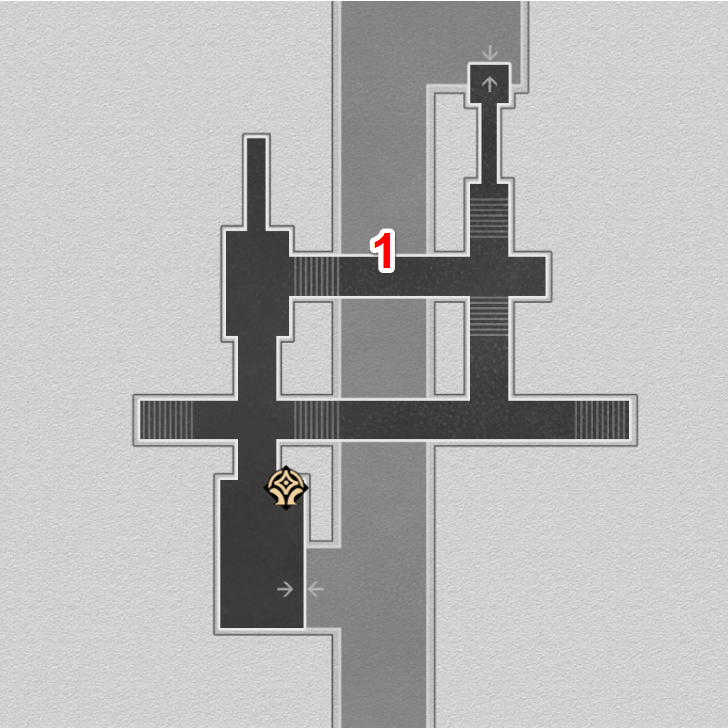
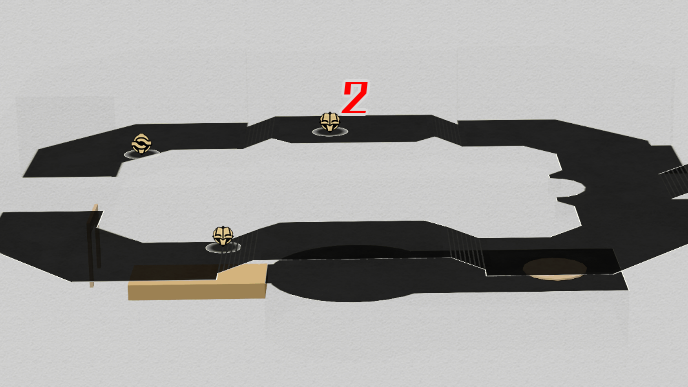
| 2 | 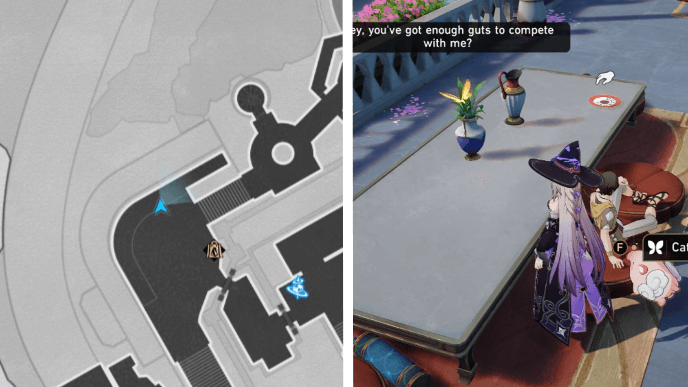 |
Found on top of a vase on a long table. You will have to chase it down |
| 3 | 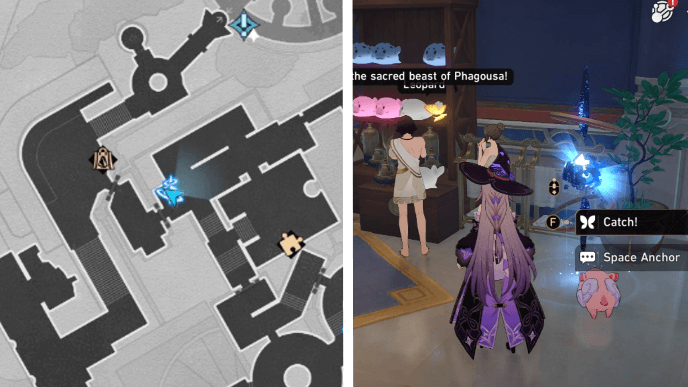 |
Found by the shelf near the Space Anchor. |
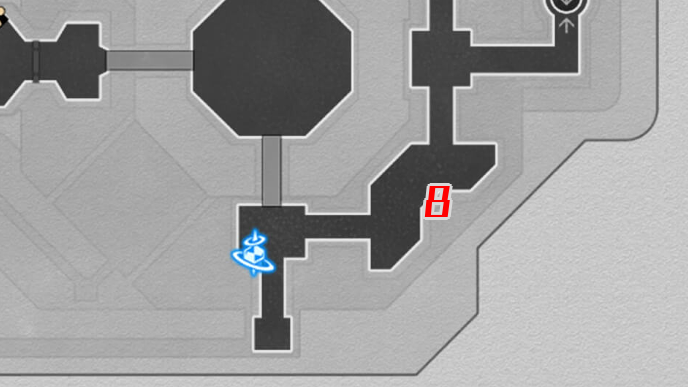
| 4 | 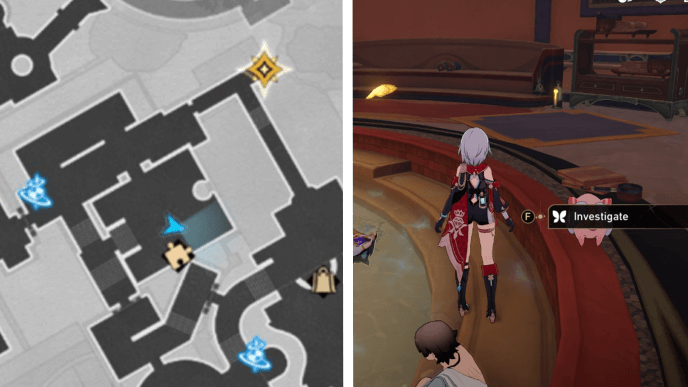 |
Found on the pool near the puzzle. |
| 5 | 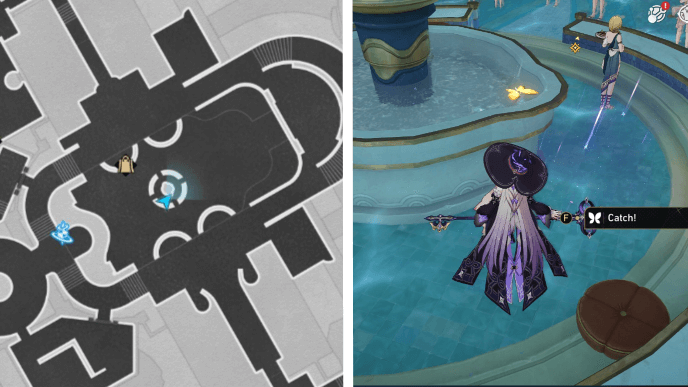 |
Found on the pool near the fountain. |
| 6 | 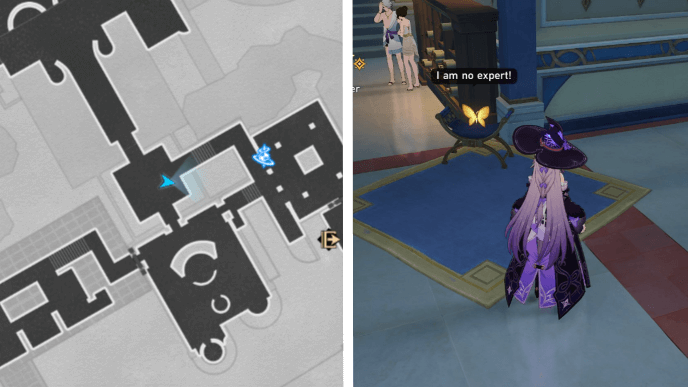 |
Found sitting on a chair on top of a blue rug. |
| 7 | 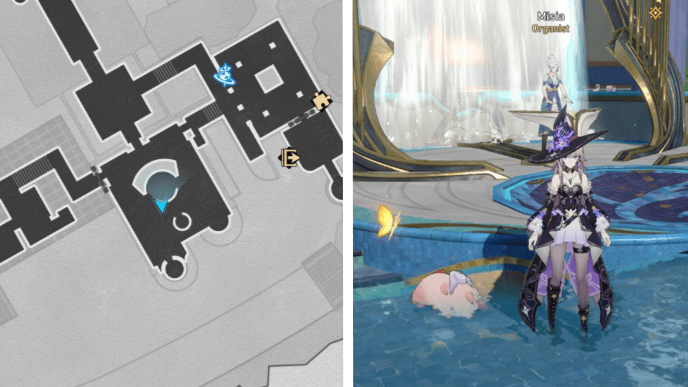 |
Found by the pool near Misia the Organist. |
| 8 | 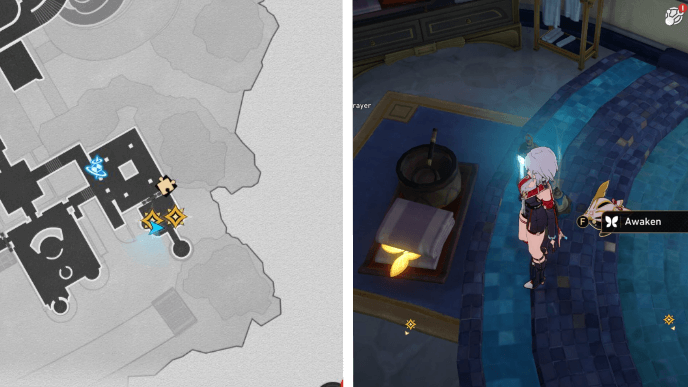 |
Found in the private bath chamber in between two purple towels. |
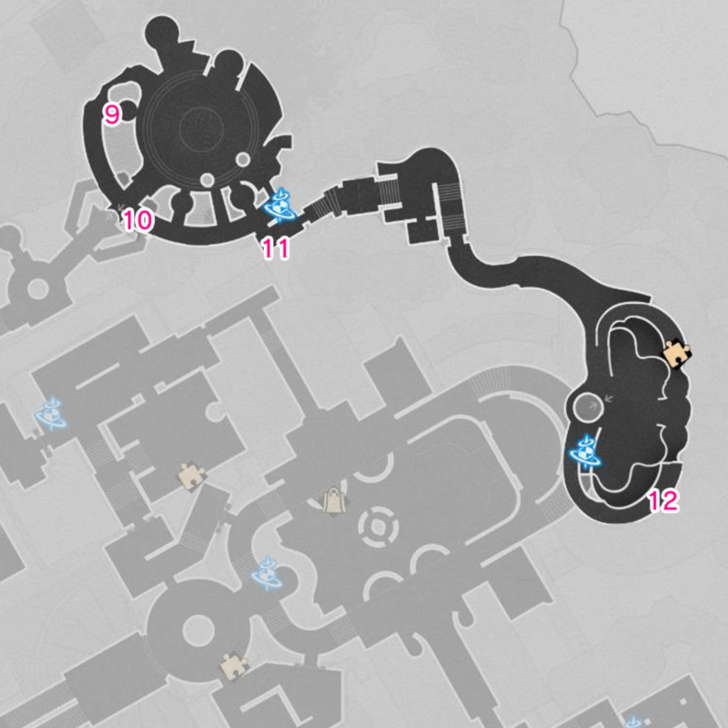
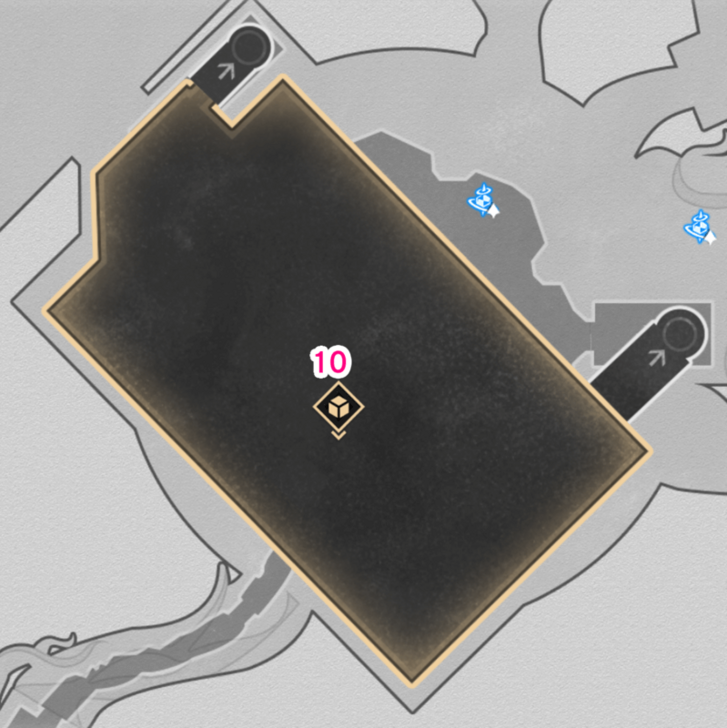
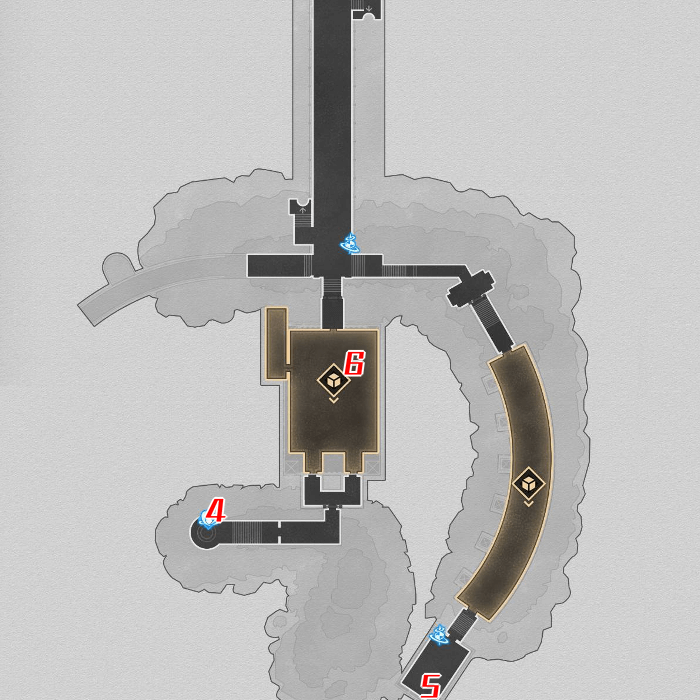
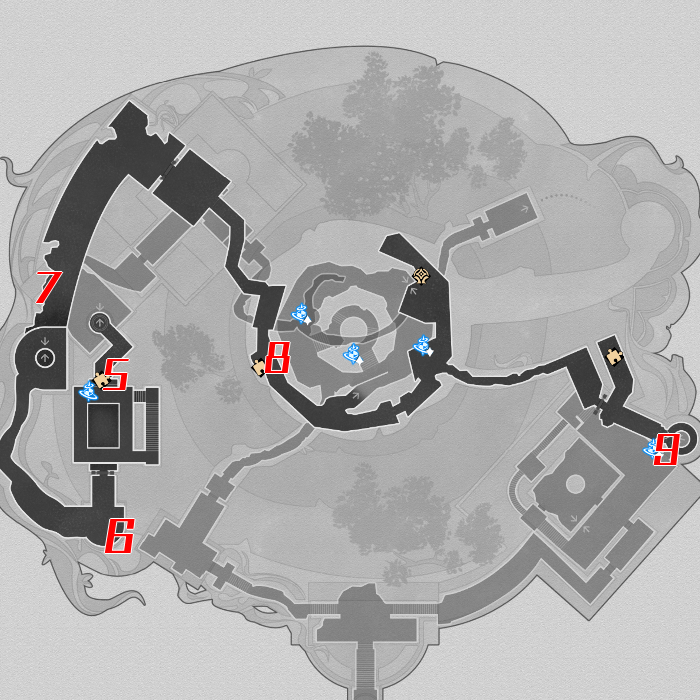
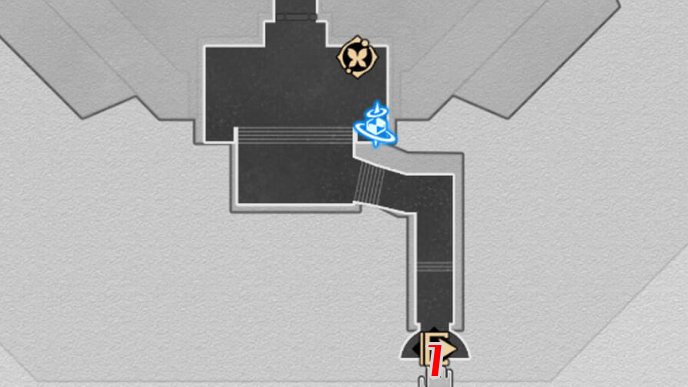
Okhema Northeast F2 Creation Nymph Locations
| No. | Image | How to Find |
|---|---|---|
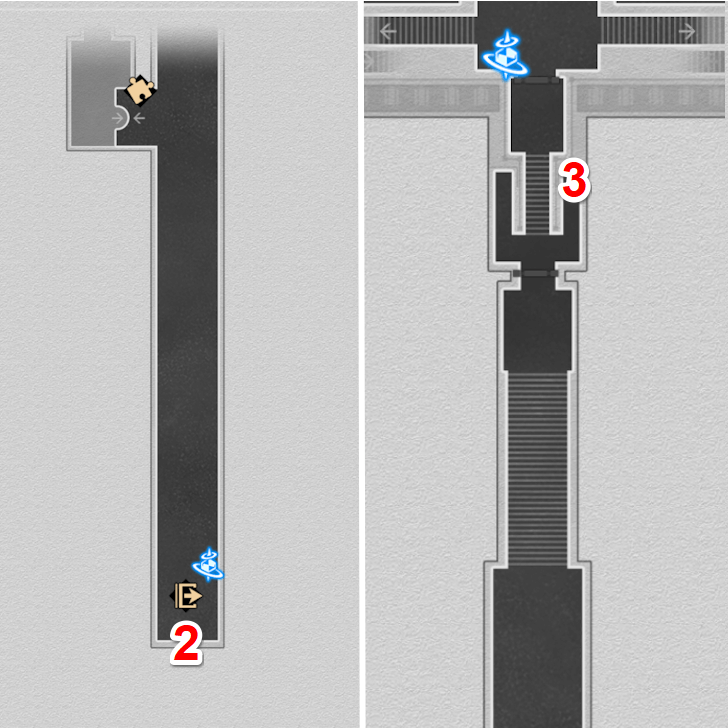
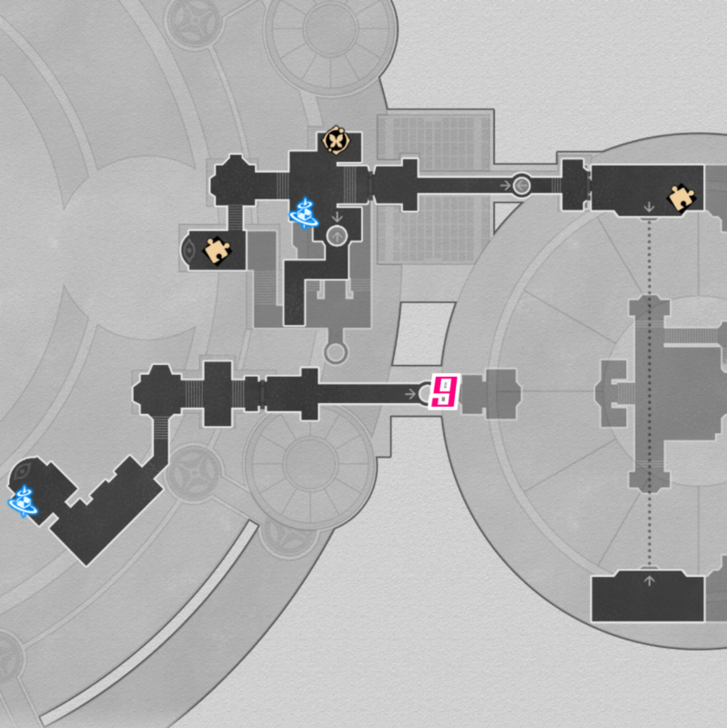
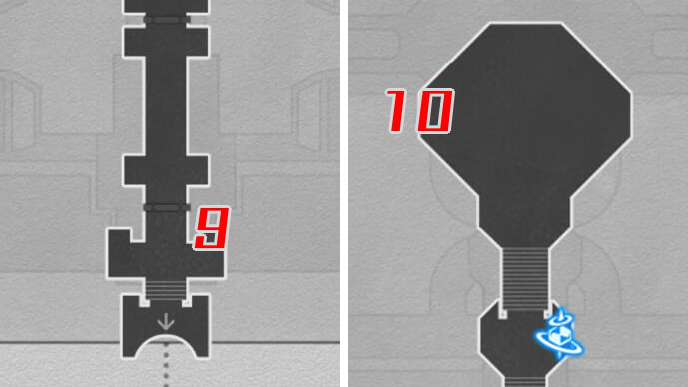
| 9 |  |
Found hanging by the flowers near the Garmentmaker. |
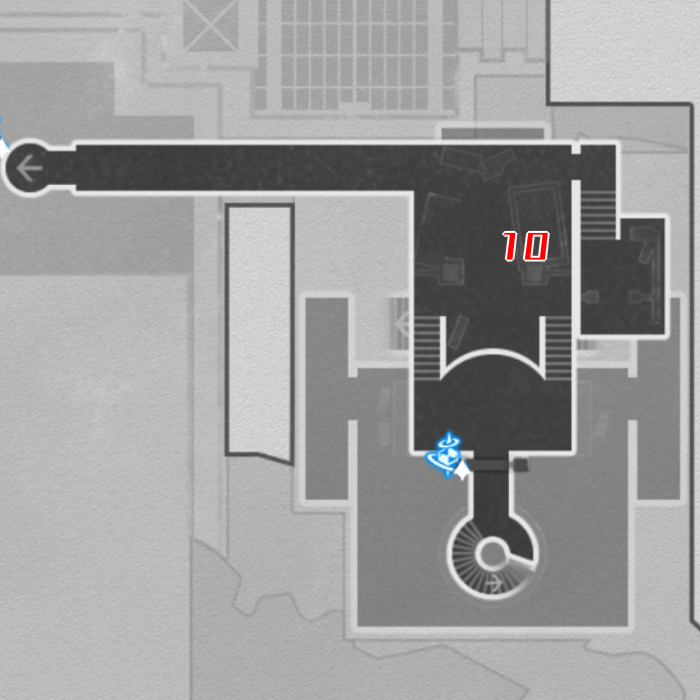
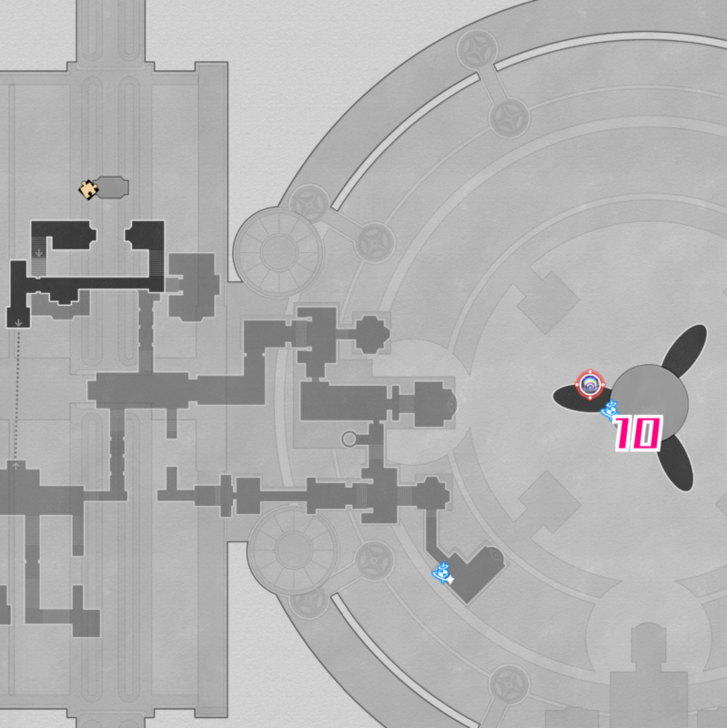
| 10 | 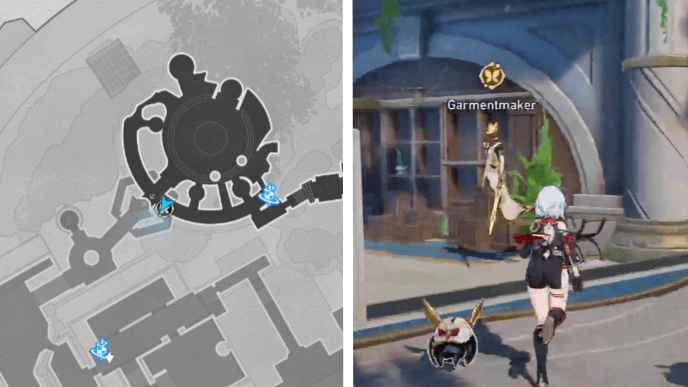 |
Interact with the Garmentmaker. You will trigger the Chirping Secret mission to get the Nymph. |
| 11 |  |
Found on the mural near the Space Anchor. |
| 12 |  |
Found by going up the ramp near the waterfalls. |
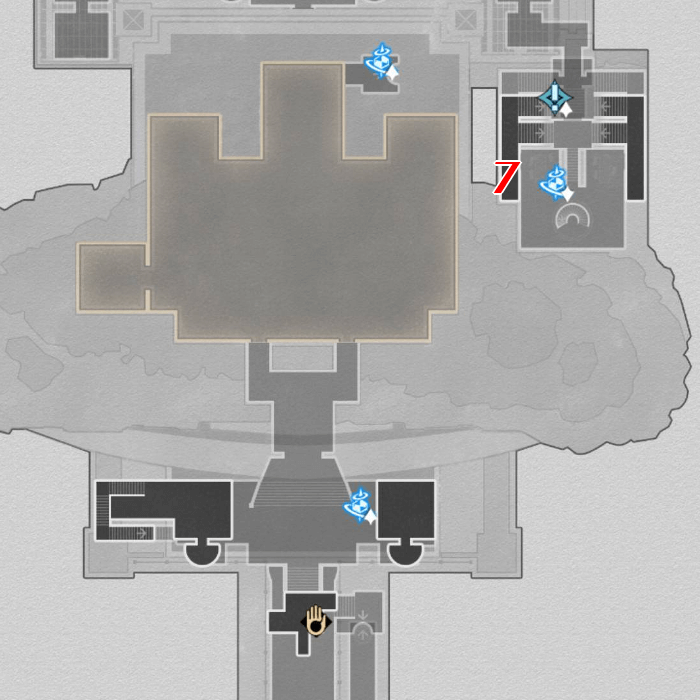
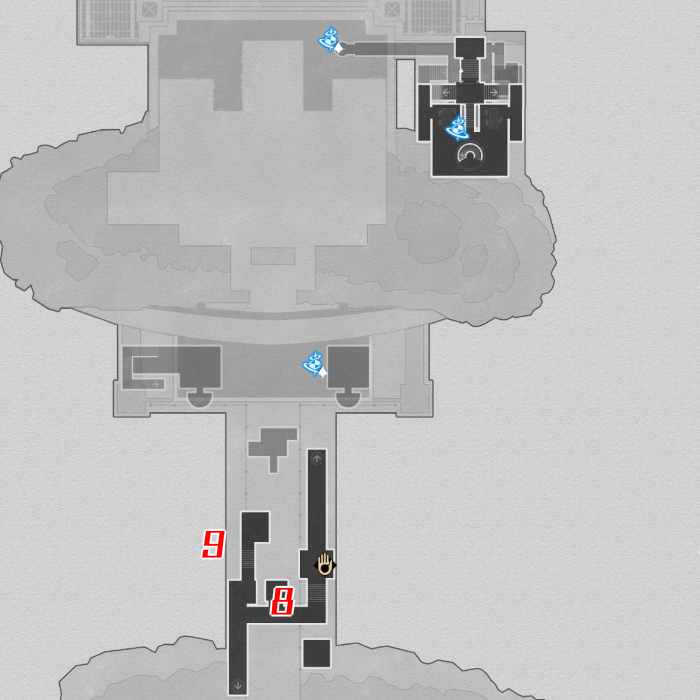
Okhema Southwest F1 Creation Nymph Locations
| No. | Image | How to Find |
|---|---|---|
| 13 |  |
Found in the middle of the circle by the stairs. |
| 14 | 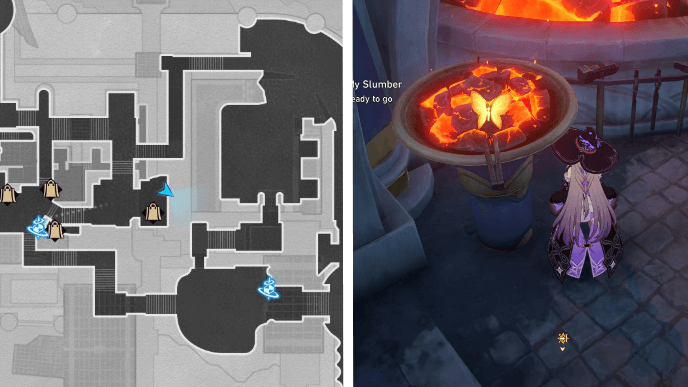 |
Found sitting on top of the small brazier. |
| 15 |  |
Found sticking on the column near the stairs. |
| 16 | 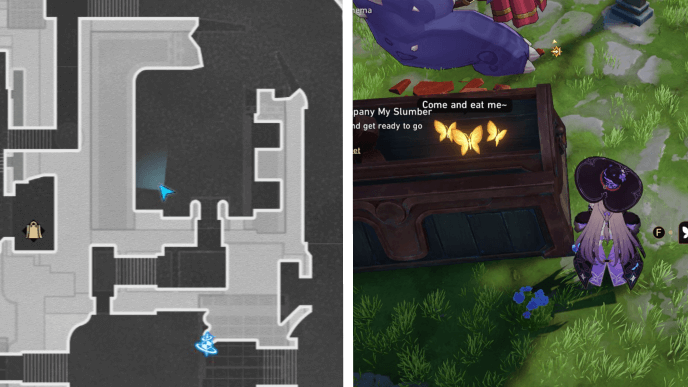 |
Found on the box beside a Dromas. |
| 17 |  |
Found on top of the guard's helmet near the tree. |
| 18 |  |
Found on top of the bell near the Space Anchor. |
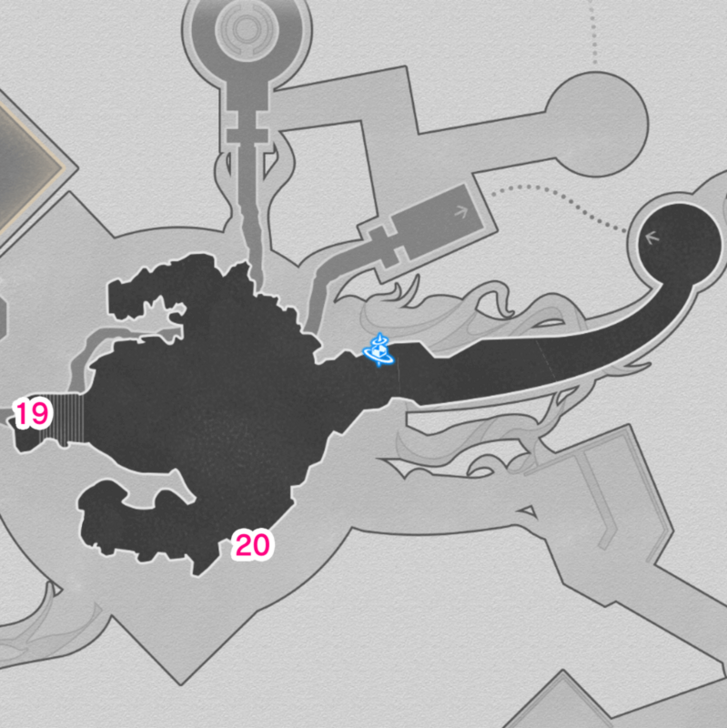
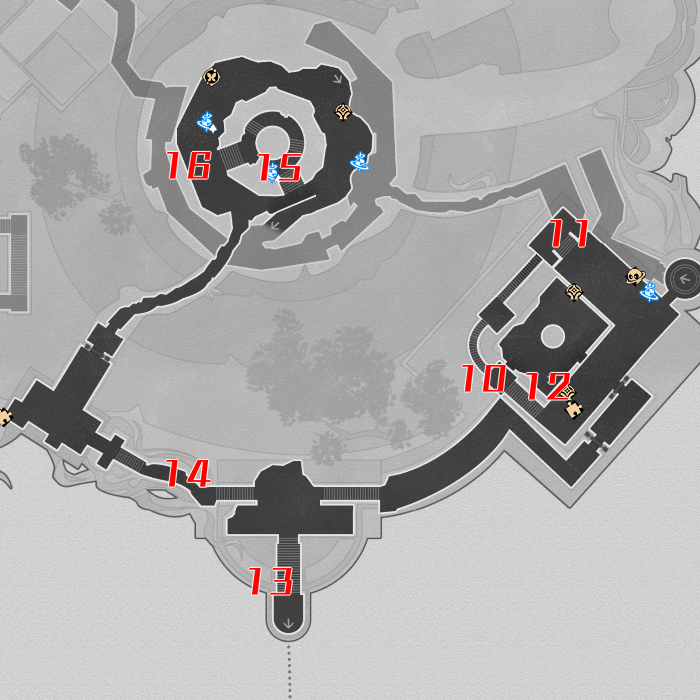
Okhema Southwest F2 Creation Nymph Locations
| No. | Image | How to Find |
|---|---|---|
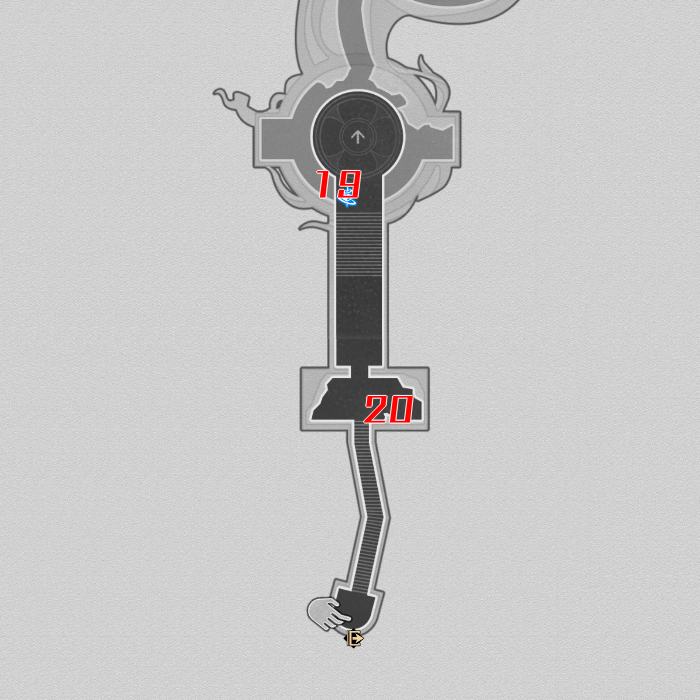
| 19 | 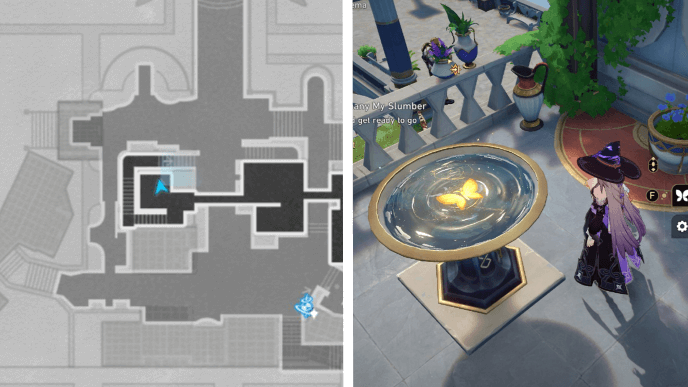 |
Found on top of a birdbath by the balcony. |
| 20 | 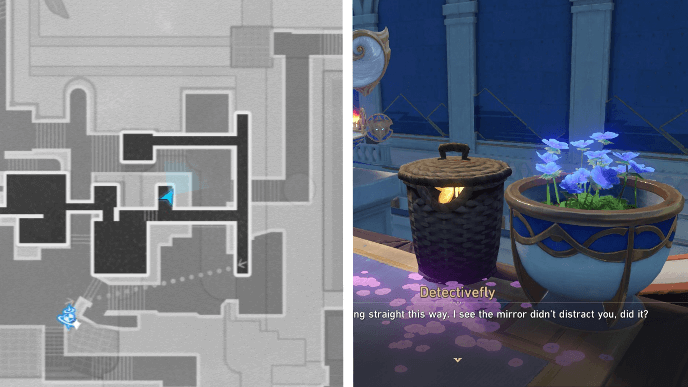 |
Found in a basket beside a vase with blue flowers. |
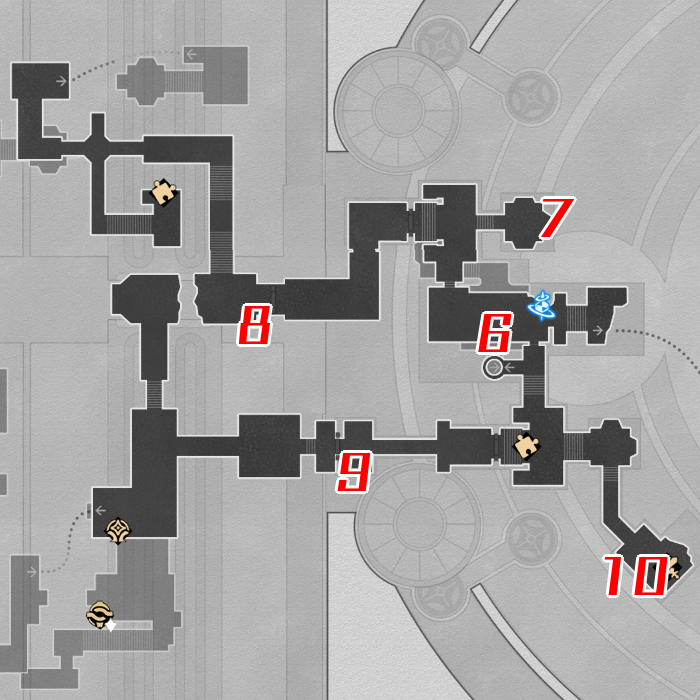
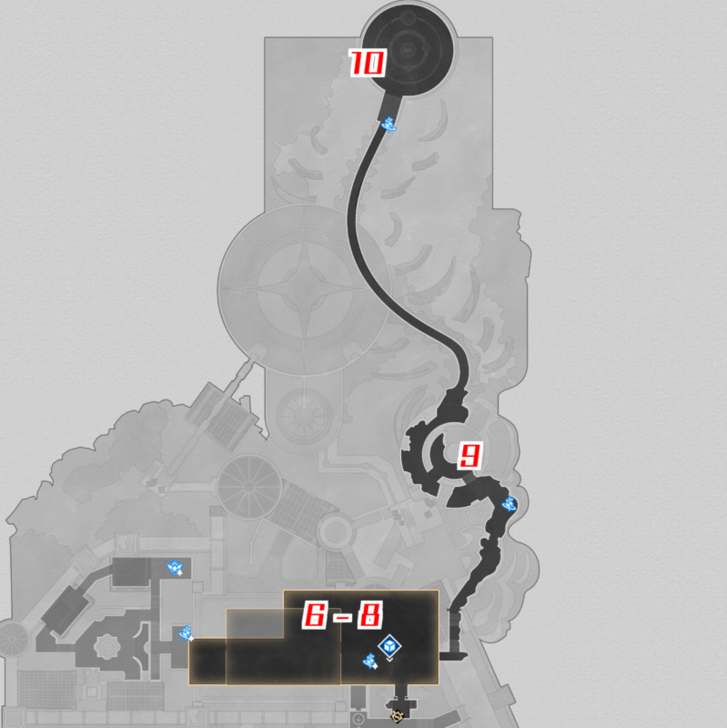
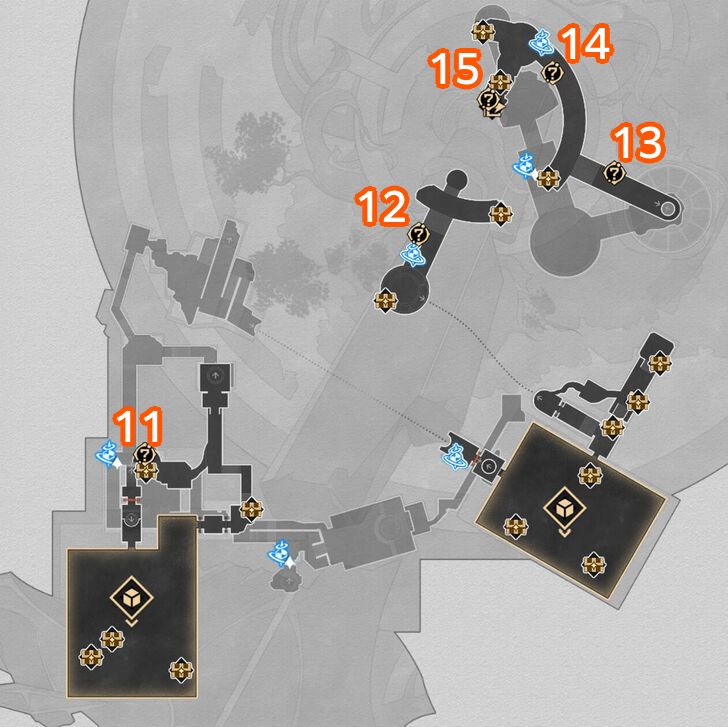
"Bloodbathed Battlefront" Castrum Kremnos Creation Nymphs
| Strife Ruins Creation Nymphs Map | |||||||
|---|---|---|---|---|---|---|---|
 See Full Image |
 See Full Image |
||||||
 See Full Image |
 See Full Image |
||||||
 See Full Image |
 See Full Image |
||||||
 See Full Image |
 "Bloodbathed Battlefront" Castrum Kremnos Soul Forging "Bloodbathed Battlefront" Castrum Kremnos Soul Forging See Full Image |
||||||
| Path of Conquest | Hall of Strife | ||||||
| B1 | F1 | F1 | |||||
| Middle Area | Excavation Ground | ||||||
| F2 | Dawn | Evernight | |||||
| Chisel Zone | Central Arena | ||||||
| F1 | B1 | ||||||
There are a total of 20 Creation Nymphs that can be found in "Bloodbathed Battlefront" Castrum Kremnos.
Bloodbathed Battlefront Castrum Kremnos
"Bloodbathed Battlefront" Path of Conquest B1 Creation Nymph Locations
| No. | Image | How to Find |
|---|---|---|
| 1 | 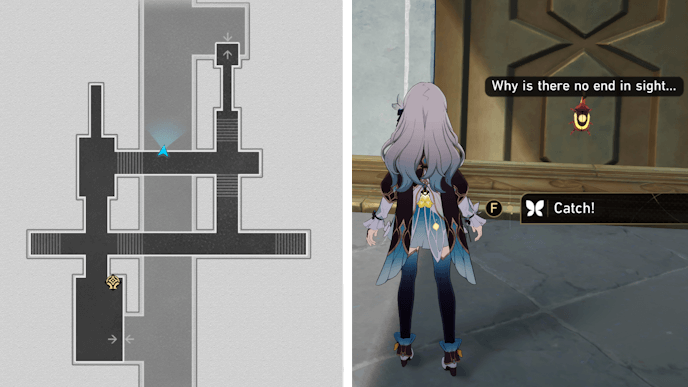 |
Use the elevator that leads to the basement and talk to the Nymph on the wall. |
"Bloodbathed Battlefront" Path of Conquest F1 Creation Nymph Locations
| No. | Image | How to Find |
|---|---|---|
| 2 |  |
Turn around after teleporting to the Path of Conquest Space Anchor. |
| 3 | 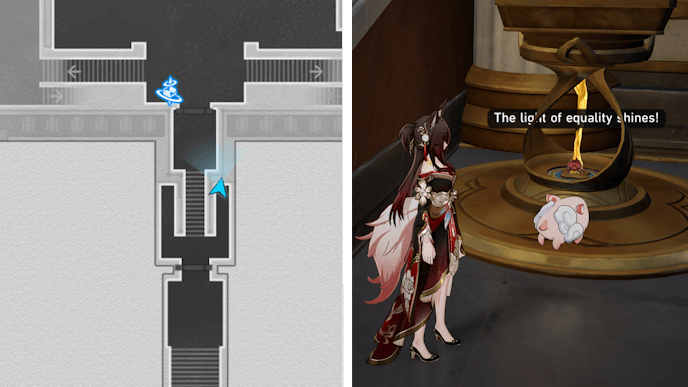 |
Go to the right side of the stairs leading up to the Hall of Strife. |
"Bloodbathed Battlefront" Hall of Strife F2 Creation Nymph Locations
| No. | Image | How to Find |
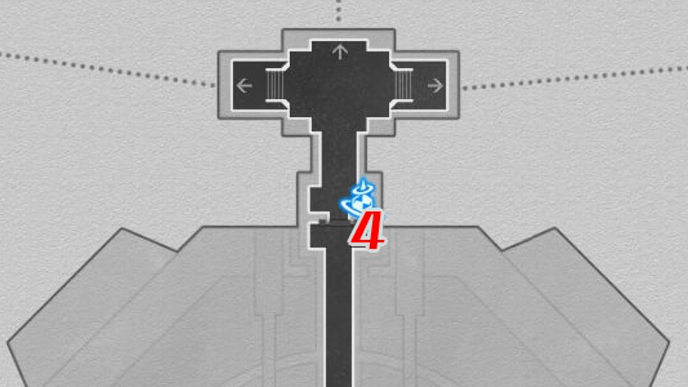
|---|---|---|
| 4 |  |
Walk up to the Creation Nymph on the floor. |
"Bloodbathed Battlefront" Middle Area F2 Creation Nymph Locations
| No. | Image | How to Find |
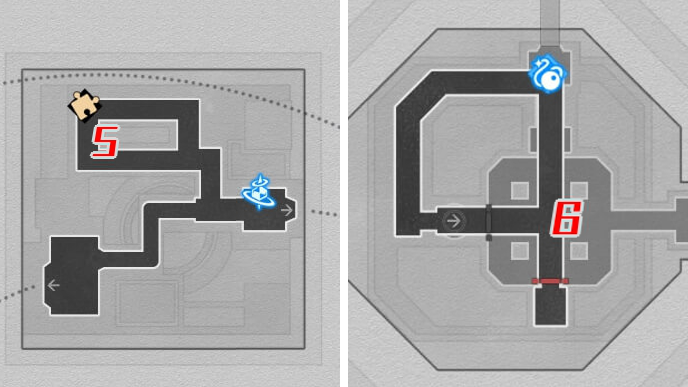
|---|---|---|
| 5 |  |
Walk up to the Creation Nymph on the ledge. |
| 6 | 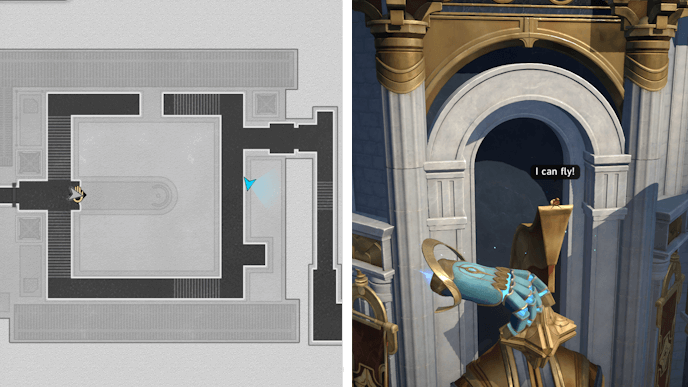 |
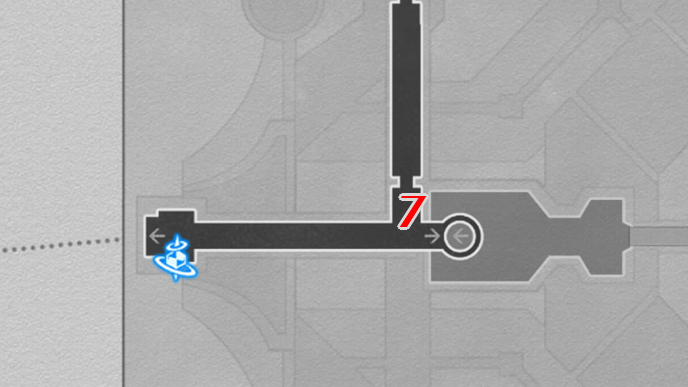
Take control of the Hand of Zagreus and head to the head of the statue. The Nymph is on the Statue's head. |
| 7 | 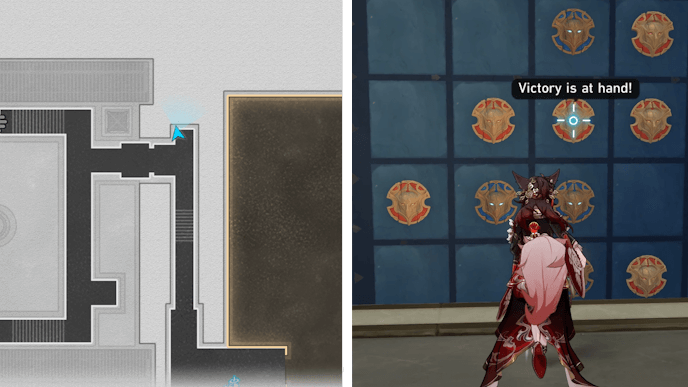 |
Shoot the shields on the wall to claim the Creation Nymph. |
| 8 |  |
Talk to the Creation Nymph on the wall. |
"Bloodbathed Battlefront" Excavation Ground Dawn Creation Nymph Locations
| No. | Image | How to Find |
|---|---|---|
| 9 |  |
Walk up to the Creation Nymph on the floor. |
| 10 |  |
Once you have opened the door, head to the wall on the right and pick up the Creation Nymph on the wall. You can choose to defeat the enemies before picking the Nymph up. |
"Bloodbathed Battlefront" Excavation Ground Evernight Creation Nymph Locations
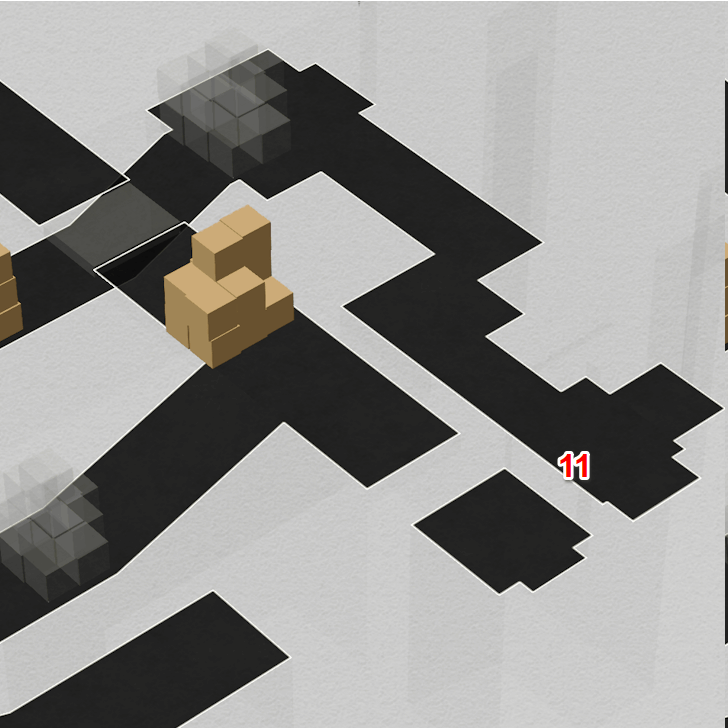
| No. | Image | How to Find |
|---|---|---|
| 11 |  |
Point the Miracle Orb on the right toward the boxes on the left. Follow the now open path to the end and pick up the Creation Nymph. |
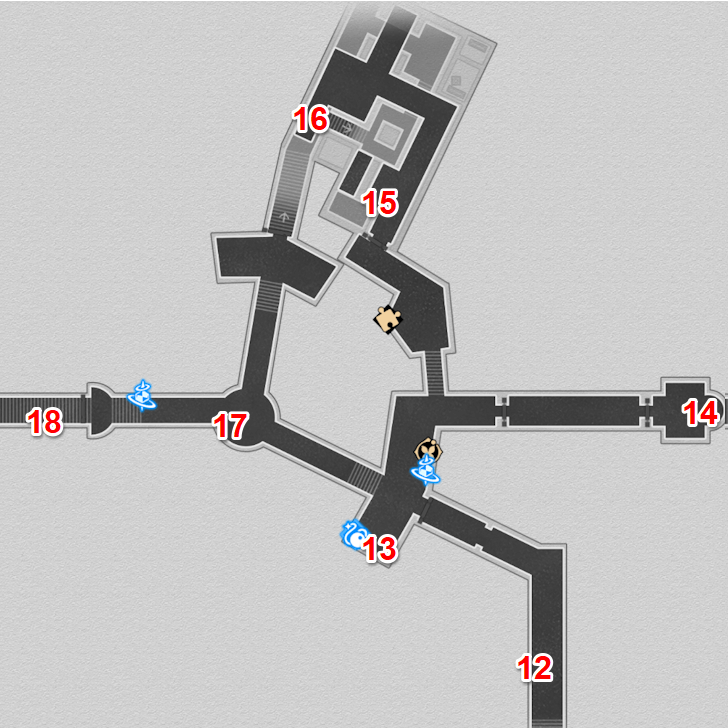
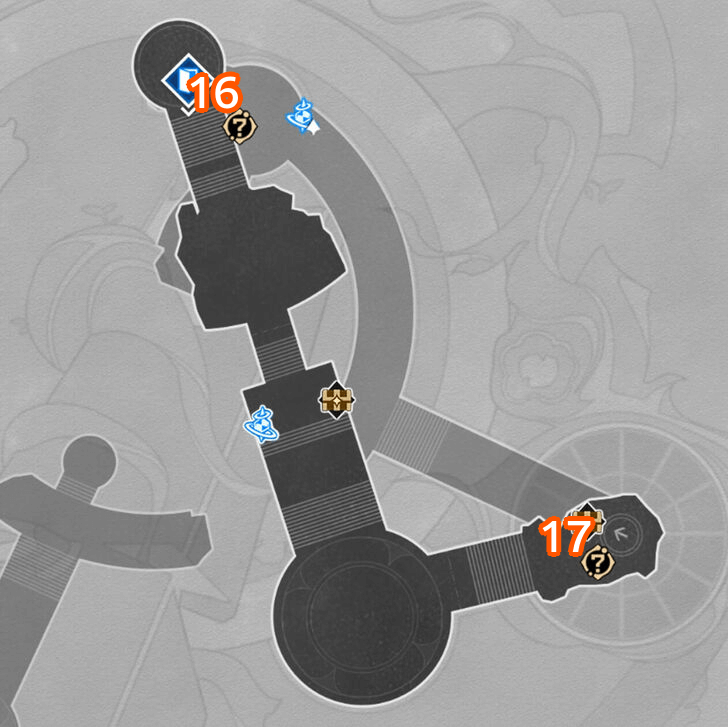
"Bloodbathed Battlefront" Chisel Zone F1 Creation Nymph Locations
| No. | Image | How to Find |
|---|---|---|
| 12 | 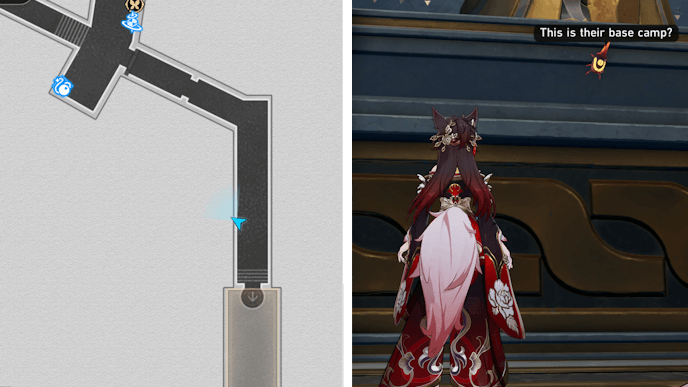 |
Pick up the Creation Nymph on the wall. A Spirithief will steal the Nymph, so deal with it before interacting with the Nymph again. |
| 13 |  |
Pick up the Creation Nymph on the floor beside the Cavern of Corrosion. |
| 14 | 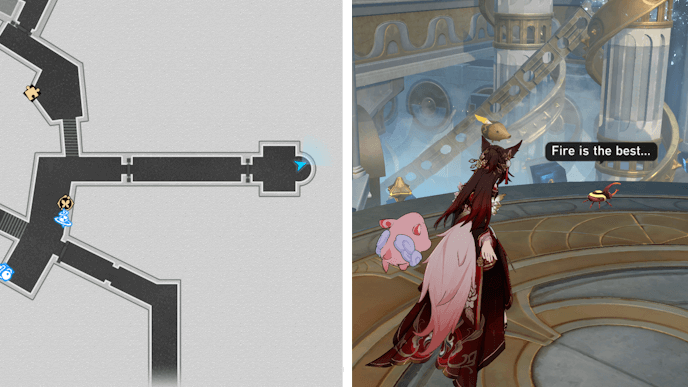 |
Walk to the end of the hallway and pick up the Creation Nymph. Tell it that there is no fire. |
| 15 |  |
The Creation Nymph is located beside the hole in the floor. |
| 16 | 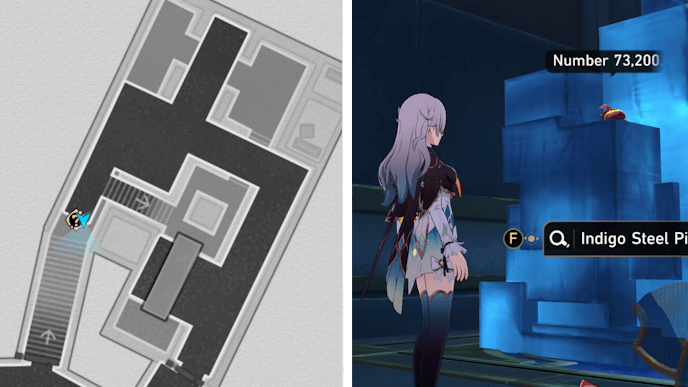 |
Get the Creation Nymph on top of the Indigo Steel Pile. |
| 17 |  |
The Creation Nymph is located on top of the unlit brazier. |
| 18 | 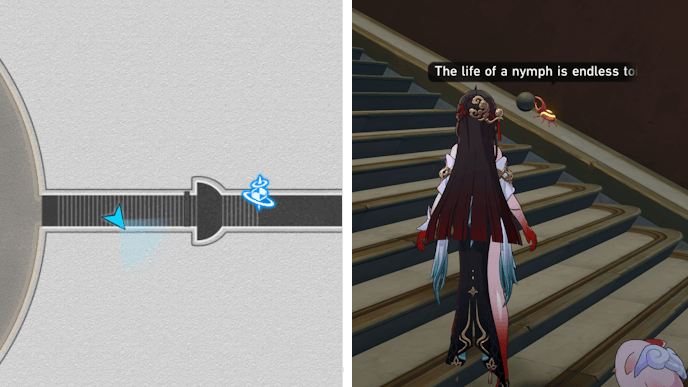 |
Halfway down the staircase is a Creation Nymph endlessly pushing a round rock. |
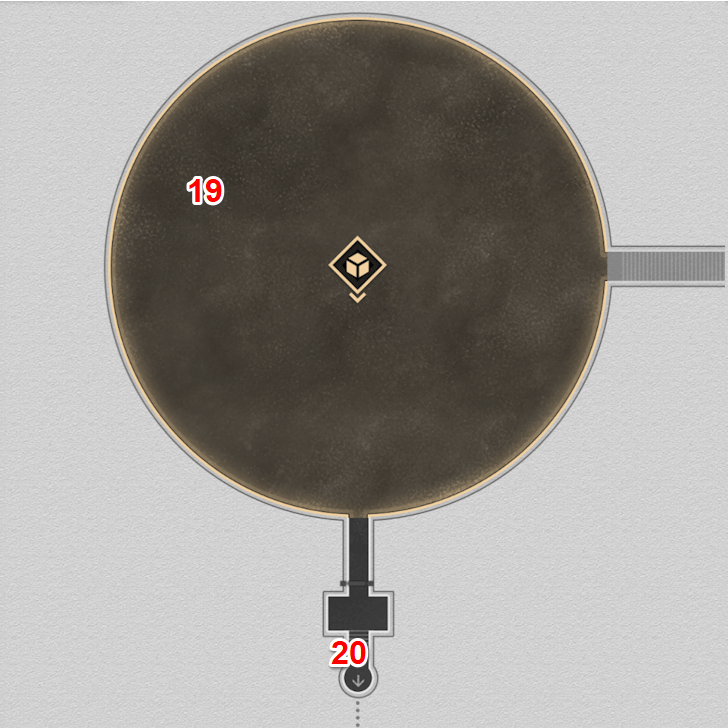
"Bloodbathed Battlefront" Soul-Forging Zone Creation Nymph Locations
| No. | Image | How to Find |
|---|---|---|
| 19 | 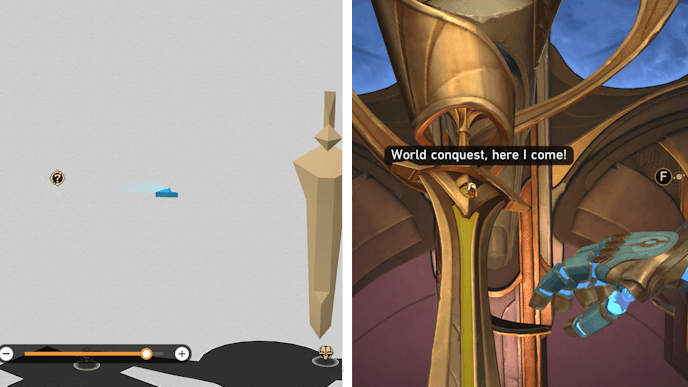 |
Control a Hand of Zagreus during Dawn and fly to the sword pointing towards the center. The Creation Nymph is on the hilt of the sword. |
| 20 | 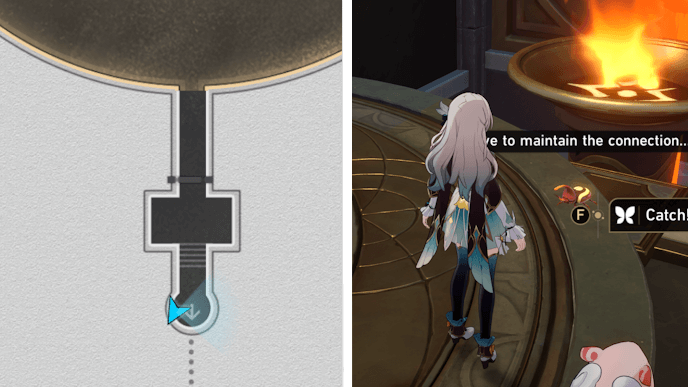 |
The Creation Nymph is on the floor near the lit brazier. |
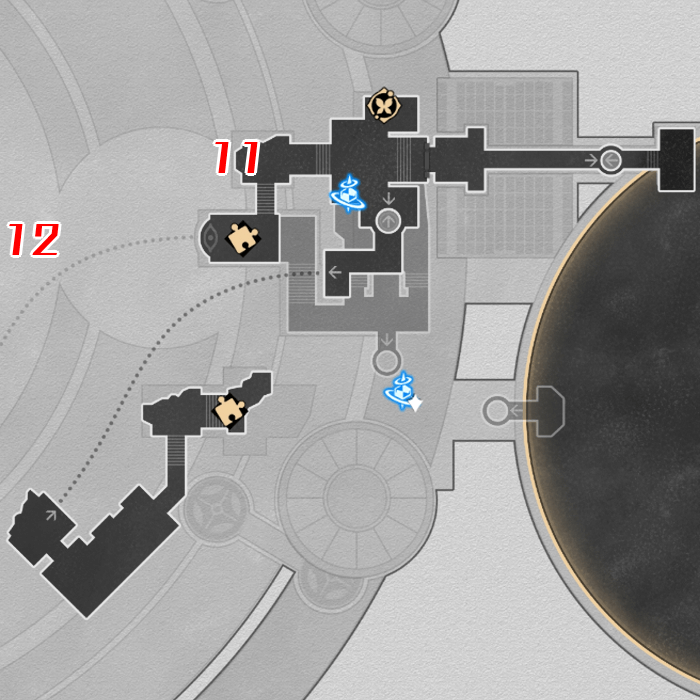
"Strife Ruins" Castrum Kremnos Creation Nymphs
| Strife Ruins Creation Nymphs Map | |||||||
|---|---|---|---|---|---|---|---|
 See Full Image |
 See Full Image |
||||||
 See Full Image |
 See Full Image |
||||||
 See Full Image |
|||||||
| Strife Ruins Nymph Locations | |||||||
| F1 Northeast | F1 Southwest | ||||||
| B1 | F2 | ||||||
| F3 | |||||||
Use the table above to jump to a floor in the "Strife Ruins" Castrum Kremnos!
There are a total of 20 Creation Nymphs that can be found in "Strife Ruins" Castrum Kremnos.
Strife Ruins
Castrum Kremnos Map Guide
Strife Ruins
Castrum Kremnos Northeast F1 Creation Nymph Locations
| No. | Image | How to Find |
|---|---|---|
| 1 |  |
Found beside the Space Anchor. |
| 2 | 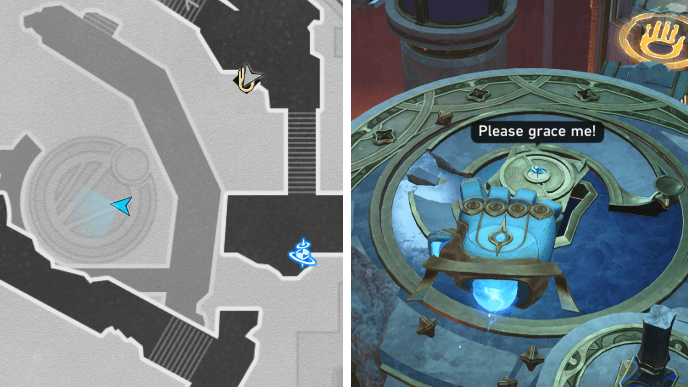 |
Found on the circular platform in the Silent Chisel Ground. Use the Hand of Zagreus in the area to get the Nymph. |
| 3 |  |
Found on top of the broken statue. |
| 4 | 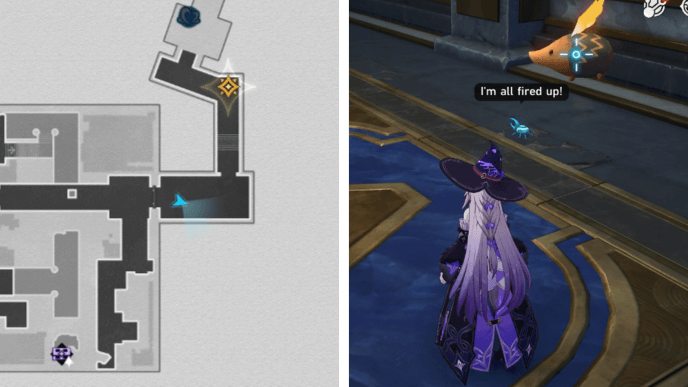 |
Found on the floor beside a Flying Amphora. |
| 5 |  |
Found on the air. To get this Creation Nymph, you have to use the Hand of Zagreus. |
| 6 | 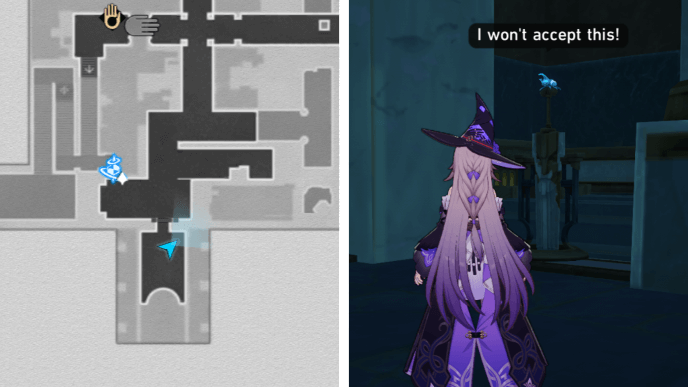 |
Found on top of the lone sword by the weapon rack. |
Strife Ruins
Castrum Kremnos Southwest F1 Creation Nymph Locations
| No. | Image | How to Find |
|---|---|---|
| 7 | 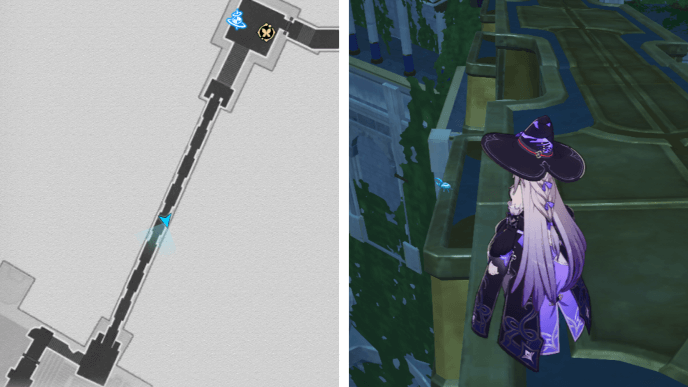 |
Found on the side of the golden chain path. |
| 8 | 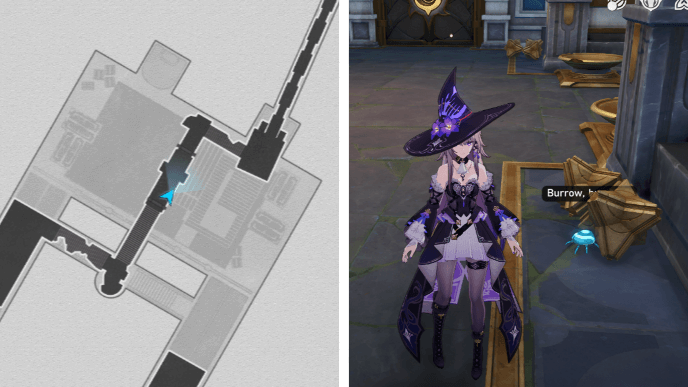 |
Found hiding in the rubble. |
| 9 |  |
Found on the wall with a dragon insignia. |
Strife Ruins
Castrum Kremnos B1 Creation Nymph Locations
| No. | Image | How to Find |
|---|---|---|
| 10 | 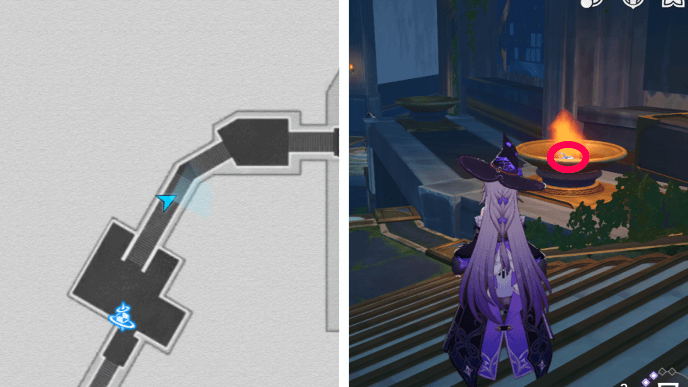 |
Found hanging by the burning brazier. |
| 11 | 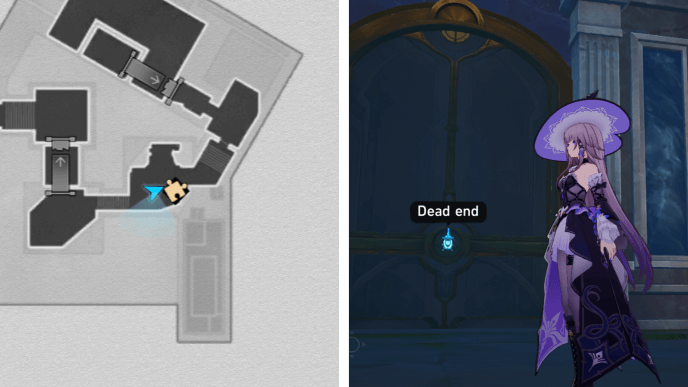 |
Found hanging on the middle of the door. |
| 12 | 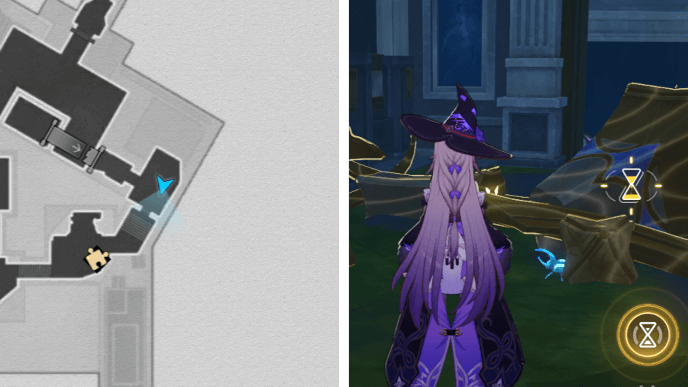 |
Trapped under the broken debris. Use Oronyx's Prayer to free it. |
| 13 | 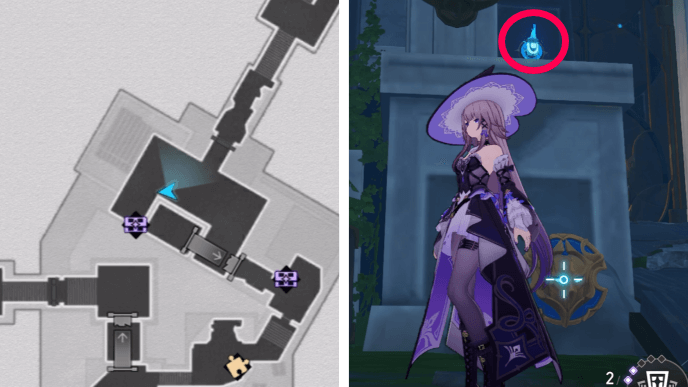 |
Found pretending to be a blue light. You have to break the destructible object to collect it. |
Strife Ruins
Castrum Kremnos F2 Creation Nymph Locations
| No. | Image | How to Find |
|---|---|---|
| 14 | 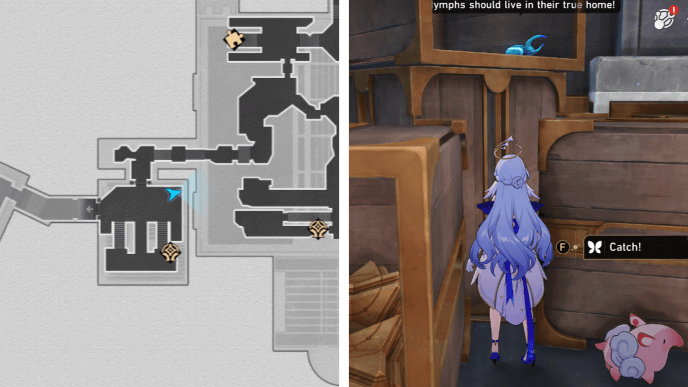 |
Found inside the upper boxes at the corner of the room. |
| 15 | 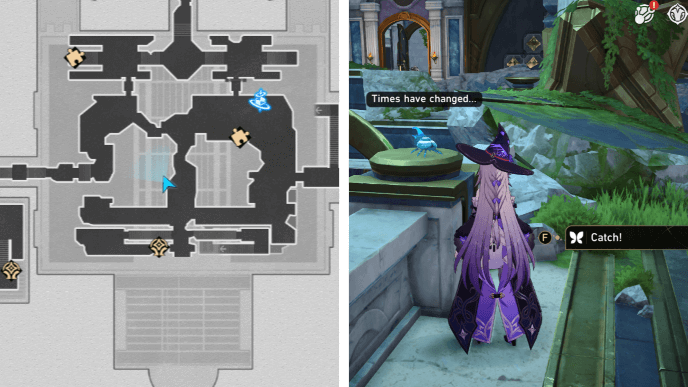 |
Found sitting on the edge of the handrail. |
| 16 | 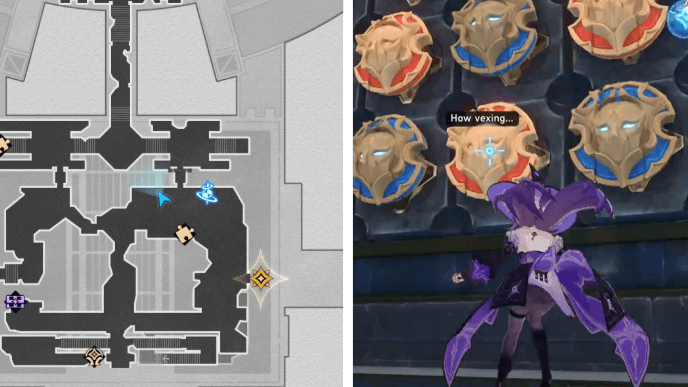 |
Hit the destructible object near the Space Anchor. |
| 17 | 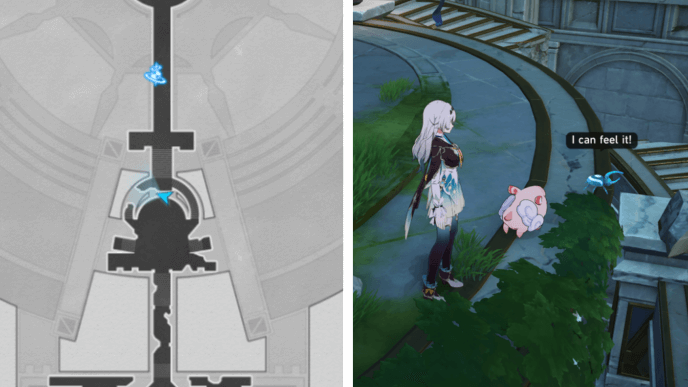 |
Found at the edge of the platform. |
| 18 | 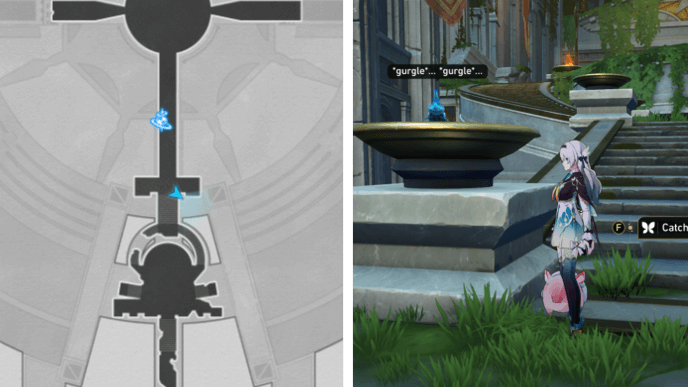 |
Found on top of the Brazier. |
| 19 | 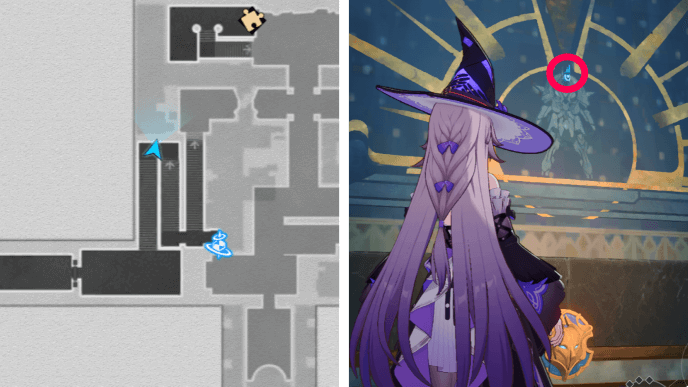 |
Found disguised as a guard's head on the mural in the middle of the stairs. |
Strife Ruins
Castrum Kremnos F3 Creation Nymph Location
| No. | Image | How to Find |
|---|---|---|
| 20 |  |
Found on the mural and sticking the light blue squares. |
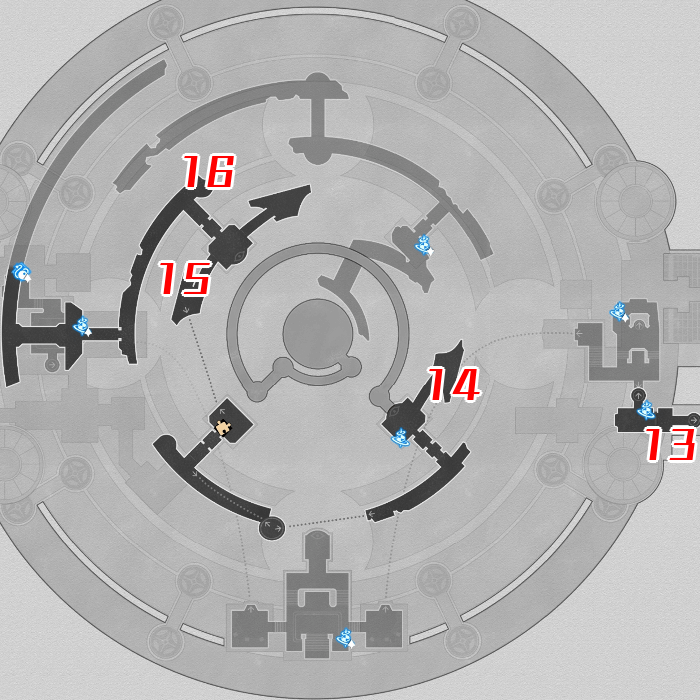
"Abyss of Fate" Janusopolis
| Janusopolis Creation Nymphs Map | |
|---|---|
 See Full Image |
 See Full Image |
| Janusopolis Locations | |
| Lower Area | Upper Area |
Use the table above to jump to a floor in the "Abyss of Fate" Janusopolis!
There are a total of 10 Creation Nymphs that can be found in "Abyss of Fate" Janusopolis.
Abyss of Fate Janusopolis Map Guide
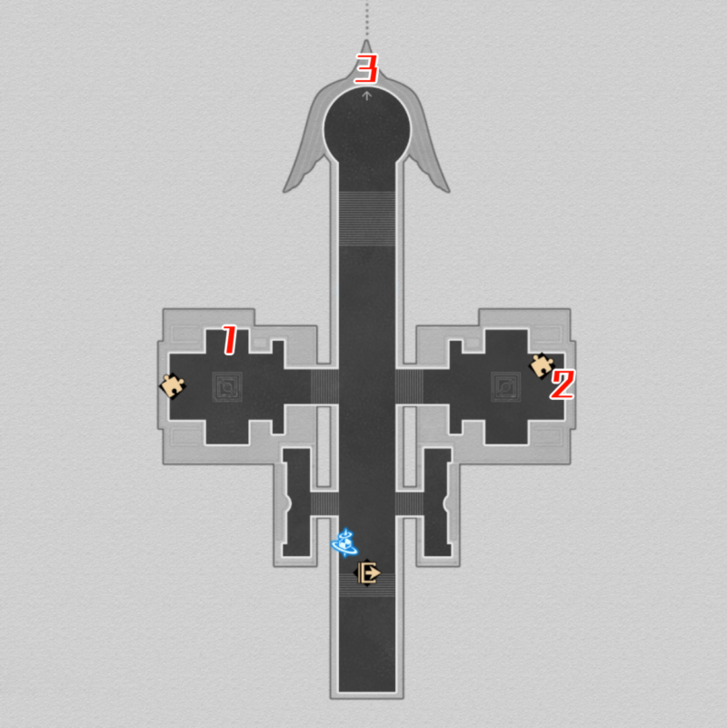
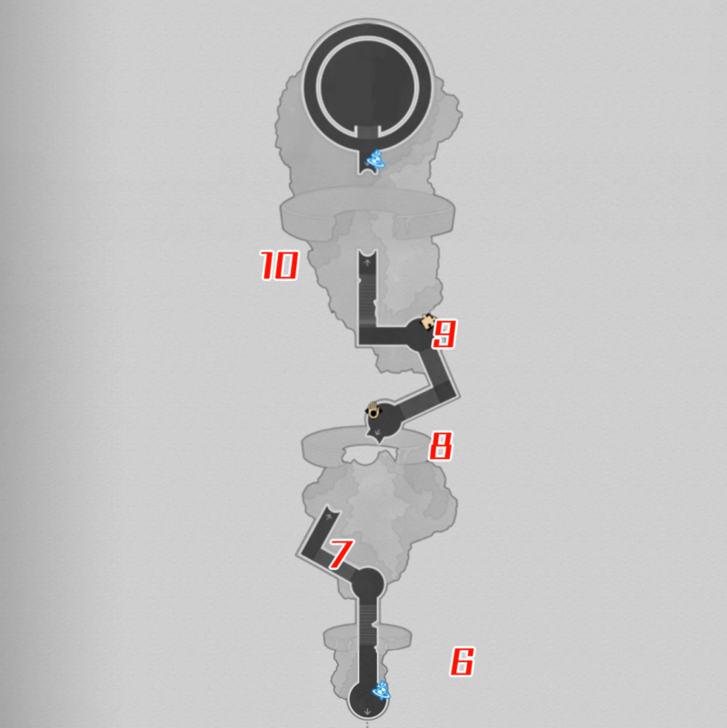
"Abyss of Fate" Janusopolis Lower Area Nymph Locations
| No. | Image | How to Find |
|---|---|---|
| 1 |  |
Found on the far edge at the left of the Space Anchor. |
| 2 | 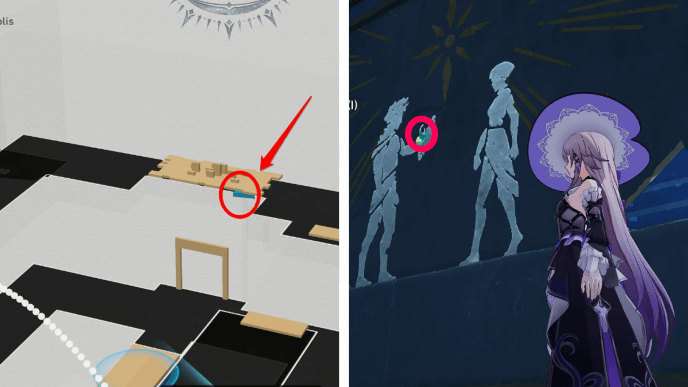 |
Found sticking on the mural at Evernight. Use the Tome of Miracles to switch the time if needed. |
| 3 | 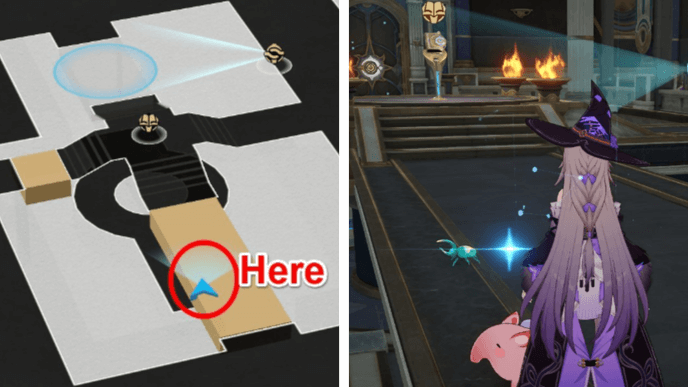 |
Found on the bridge during Dawn. Use the Tome of Miracles to switch the time if needed. |
| 4 | 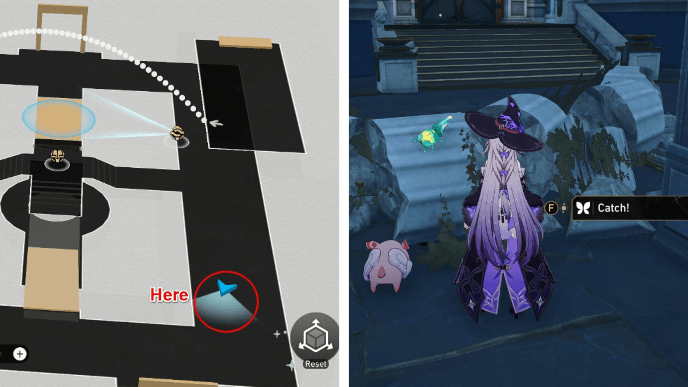 |
Found on the right side of hall during Evernight. Use the Tome of Miracles to switch the time if needed. |
| 5 | 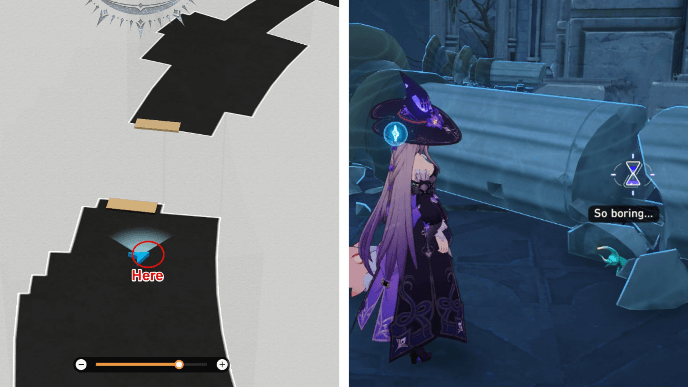 |
Found stuck on a broken pillar. Use Oronyx's Prayer to restore the pillar and catch the nymph before it crashes down on you. |
"Abyss of Fate" Janusopolis Upper Area Nymph Locations
| No. | Image | How to Find |
|---|---|---|
| 6 | 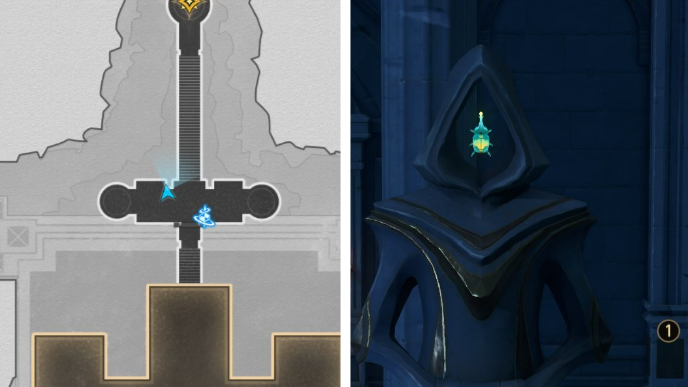 |
Found on the face of the statue near the Space Anchor. |
| 7 |  |
Found stuck to the middle piece of the giant scale. |
| 8 |  |
Found on the left part of the giant scale. |
| 9 | 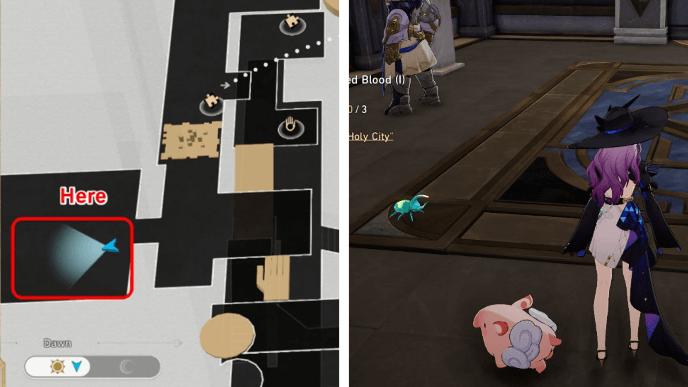 |
Found inside the room on the left with the Treasure Chest. |
| 10 | 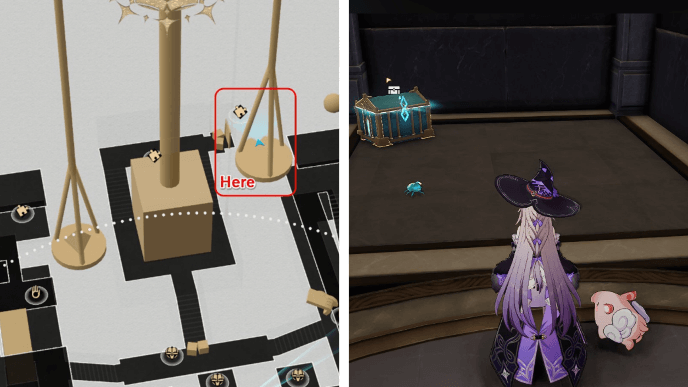 |
Use the Hand of Zagreus to pick up the triangle block and place it on the left scale. This will open up the path that leads to the nymph on the third floor. |
"Murmuring Woods" Grove of Epiphany
| Murmuring Woods Creation Nymphs Map | |
|---|---|
 See Full Image |
 See Full Image |
 See Full Image |
 See Full Image |
 See Full Image |
 See Full Image |
| Murmuring Woods Locations | |
| F1 North | F1 South |
| B1 | F2 |
| F3 | F4 |
Use the table above to jump to a floor in the "Murmuring Woods" Grove of Epiphany!
There are a total of 20 Creation Nymphs that can be found in "Murmuring Woods" Grove of Epiphany.
Murmuring Woods Grove of Epiphany
"Murmuring Woods" Grove of Epiphany F1 South Nymph Locations
| No. | Image | How to Find |
|---|---|---|
| 1 | 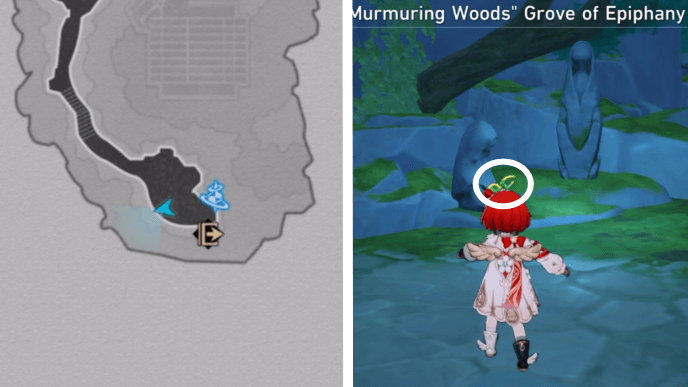 |
Found sitting on a statue near the Space Anchor. |
| 2 | 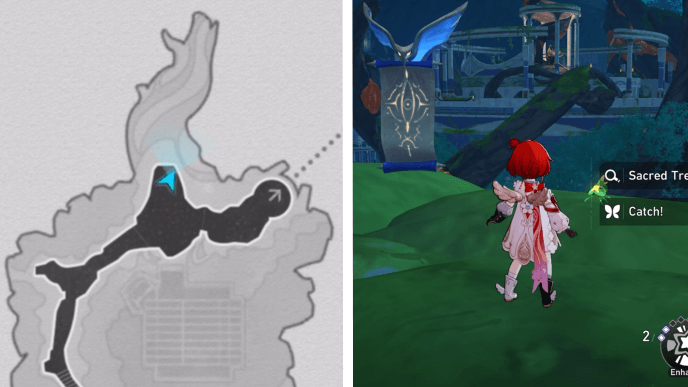 |
Found on the ledge beside a flying scroll. |
| 3 |  |
Found stuck on the outer wall at the edge of the circle. |
| 4 | 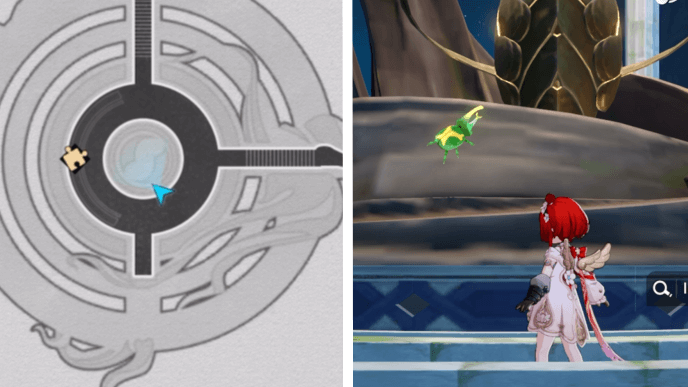 |
Found at the side of the golden Coccoon statue. |
"Murmuring Woods" Grove of Epiphany F1 North Nymph Locations
| No. | Image | How to Find |
|---|---|---|
| 5 | 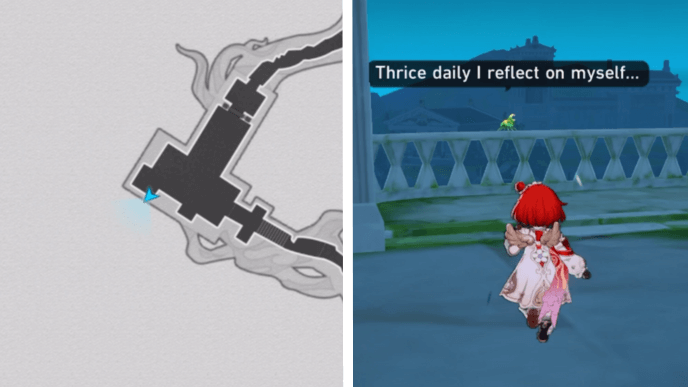 |
Found on the balcony rails. |
| 6 |  |
Found on the giant roots near the small statue. |
| 7 | 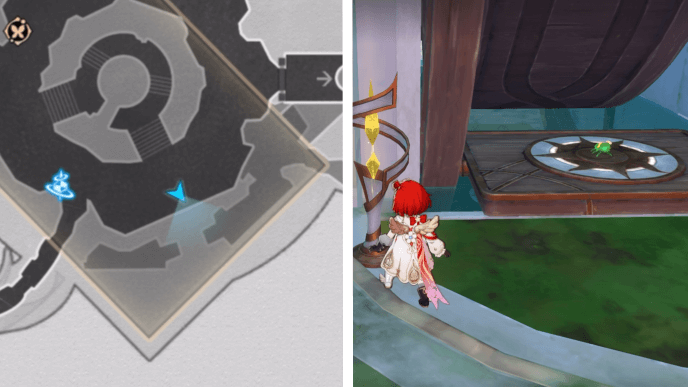 |
Found riding the waterwheel. You must stop the waterwheel the moment you see the Creaiton Nymph |
| 8 |  |
Found under the heart of the Grove. |
| 9 | 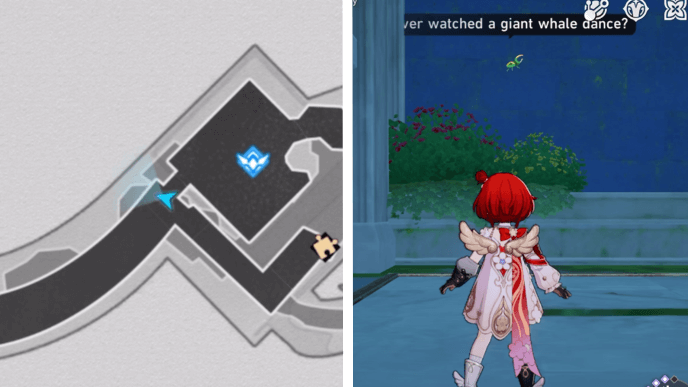 |
Found on the wall outside of the room with the Stagnant Shadow. |
"Murmuring Woods" Grove of Epiphany B1 Nymph Locations
| No. | Image | How to Find |
|---|---|---|
| 10 | 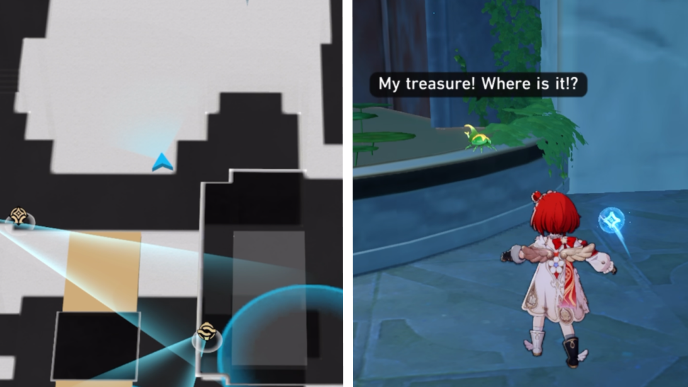 |
Found sitting by the mini pool looking for their treasure. |
"Murmuring Woods" Grove of Epiphany F2 Nymph Locations
| No. | Image | How to Find |
|---|---|---|
| 11 | 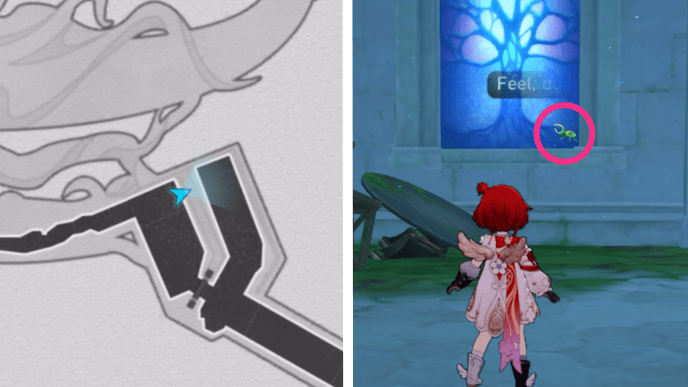 |
Found sticking on the colored glass pane. |
| 12 | 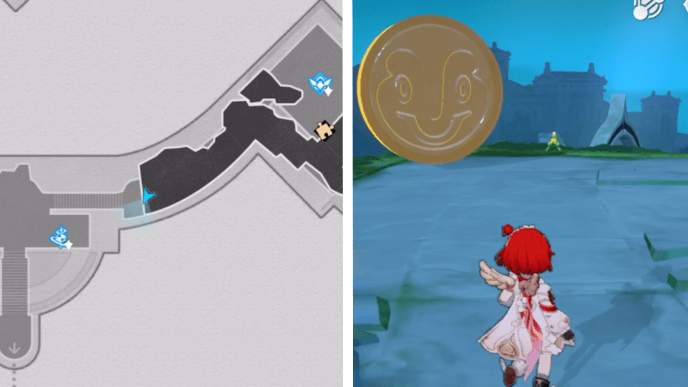 |
Found on the edge beside the Spirithief Bartholos. |
| 13 | 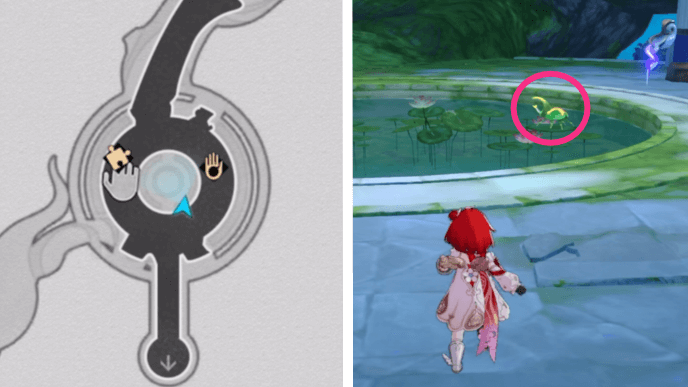 |
Found standing on the water lilies in the pool. |
| 14 | 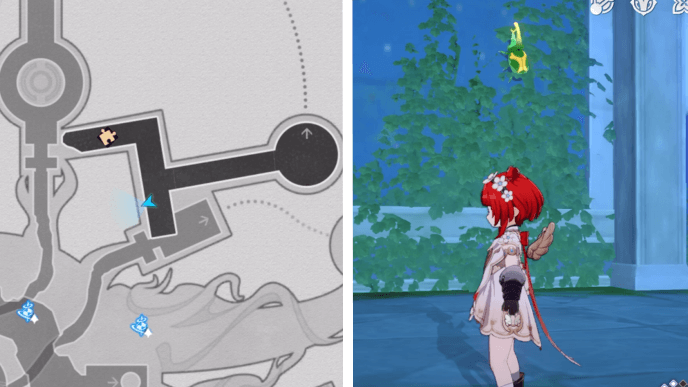 |
Found hanging on a wall with leaves. You can get to the location by using the Janus' Hidden Passage at F3. |
"Murmuring Woods" Grove of Epiphany F3 Nymph Locations
| No. | Image | How to Find |
|---|---|---|
| 15 | 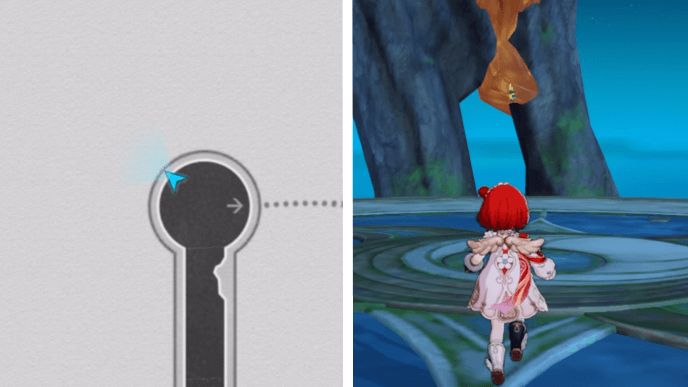 |
Found sticking on the amber-filled tree branch. |
| 16 | 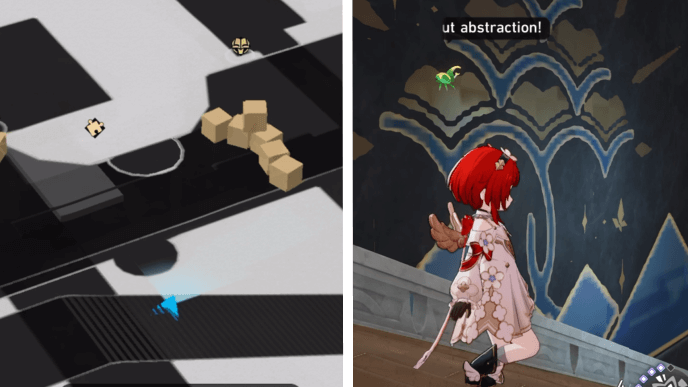 |
Found sticking on art of the right side of the stairs. |
| 17 | 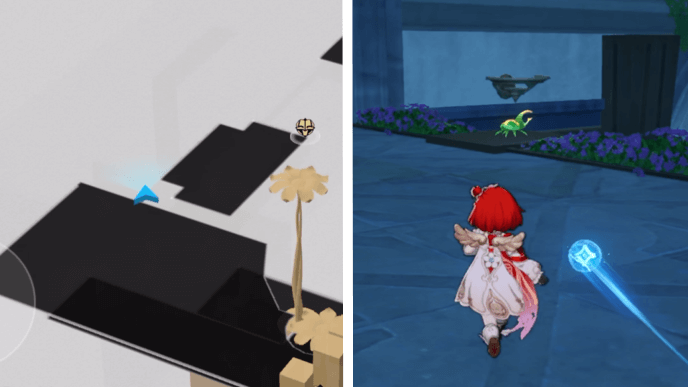 |
Found on the edge of the second floor and in between purple flowers during Evernight. |
| 18 |  |
Found on underneath the giant tree branch. |
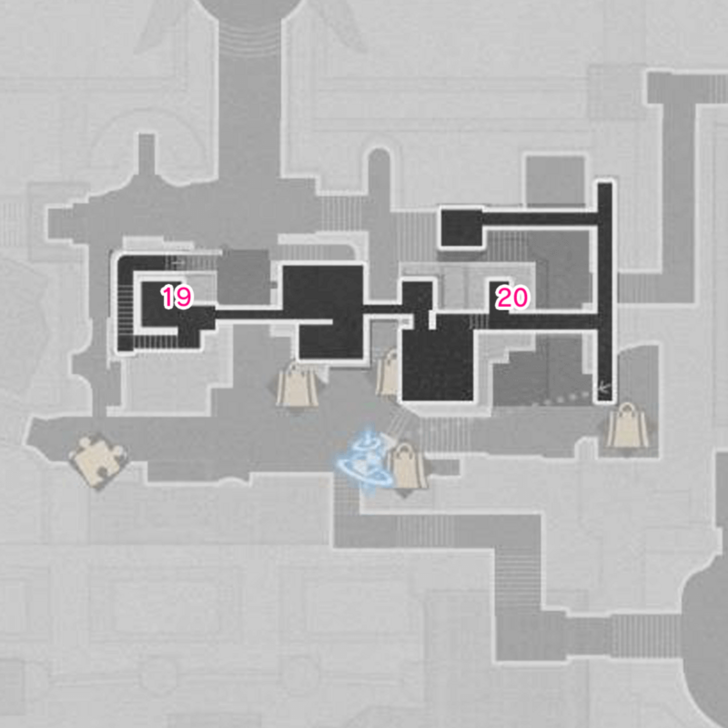
"Murmuring Woods" Grove of Epiphany F4 Nymph Locations
| No. | Image | How to Find |
|---|---|---|
| 19 | 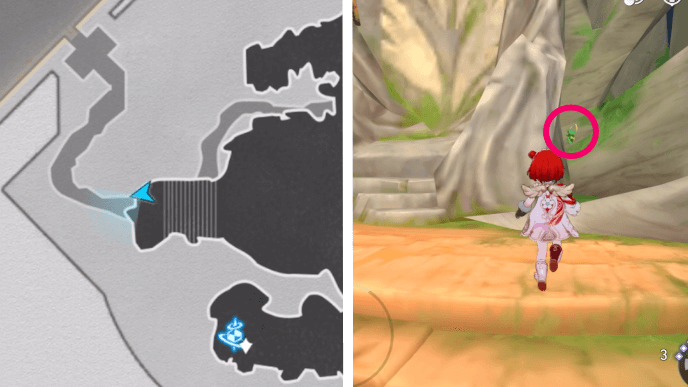 |
Found on the right side of the throne. |
| 20 | 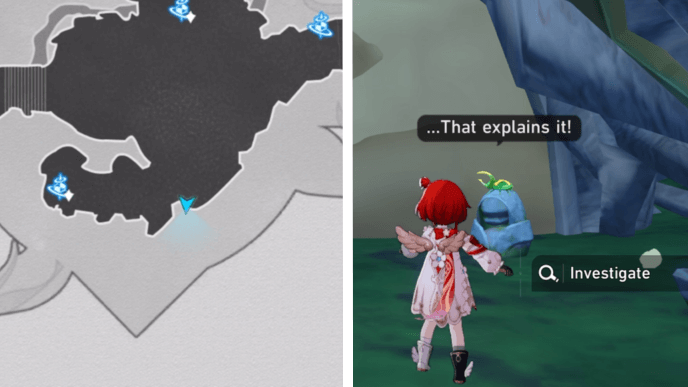 |
Found sitting on top of the small statue near the mural. |
"Sanctum of Prophecy" Janusopolis Creation Nymphs
| Sanctum of Prophecy Creation Nymphs Map | |||||||||
|---|---|---|---|---|---|---|---|---|---|
 See Full Image |
 See Full Image |
||||||||
 See Full Image |
 See Full Image |
||||||||
 See Full Image |
|||||||||
| Floors | |||||||||
| F1 North | F1 South | B1 | B2 | B3 | |||||
Use the table above to jump to a floor in the "Sanctum of Prophecy" Janusopolis!
There are a total of 10 Creation Nymphs that can be found in "Sanctum of Prophecy" Janusopolis.
Sanctum of Prophecy Janusopolis Map Guide
Sanctum of Prophecy F1 North Creation Nymph Locations
| No. | Image | How to Find |
|---|---|---|
| 1 | 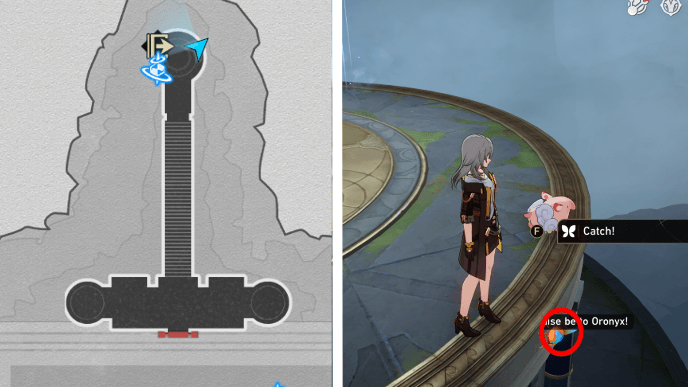 |
Use the Theophany Altar Space Anchor and look around the edge of the platform. You'll see the nymph sticking to the edge. |
| 2 | 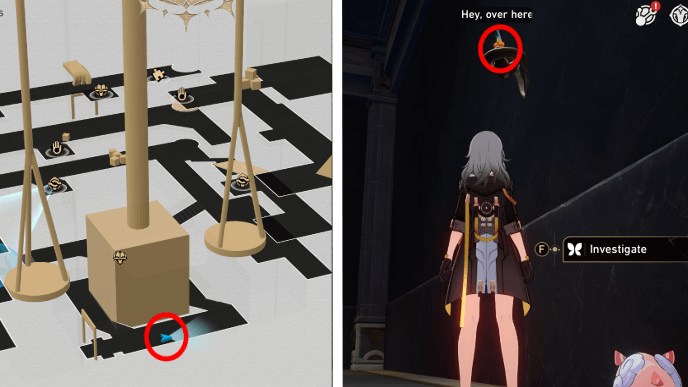 |
Use the Hidden Passage of Contemplation Space Anchor and head into the hallway. You'll see the nymph on one of the fire braziers on the wall. |
| 3 | 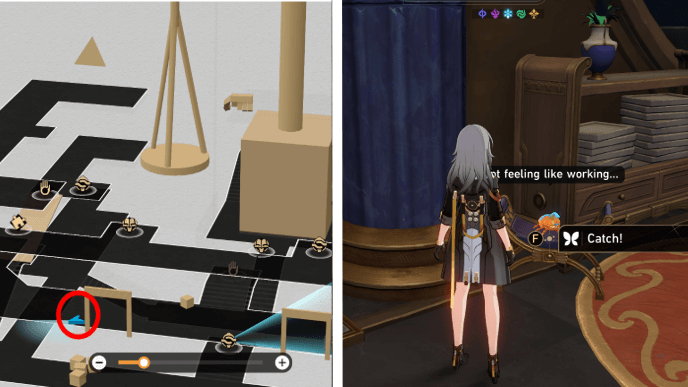 |
Use the Destiny's Gate Space Anchor and head to the room with the giant scales. Enter the door on the left and you'll see the nymph on a seat next to a shelf with stone slates. |
Sanctum of Prophecy F1 South Creation Nymph Locations
| No. | Image | How to Find |
|---|---|---|
| 4 | 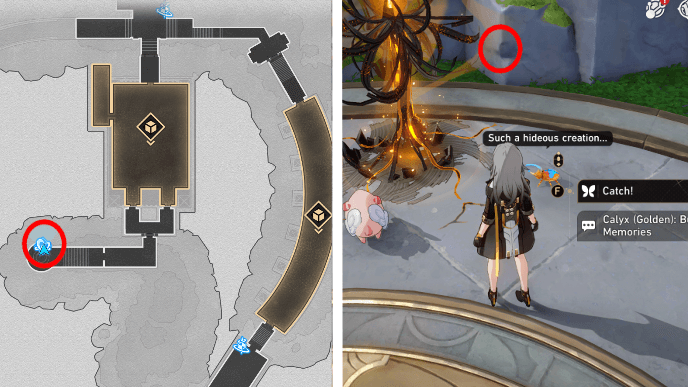 |
Teleport to the Bud of Memories Calyx and you'll see the nymph next to it. |
| 5 | 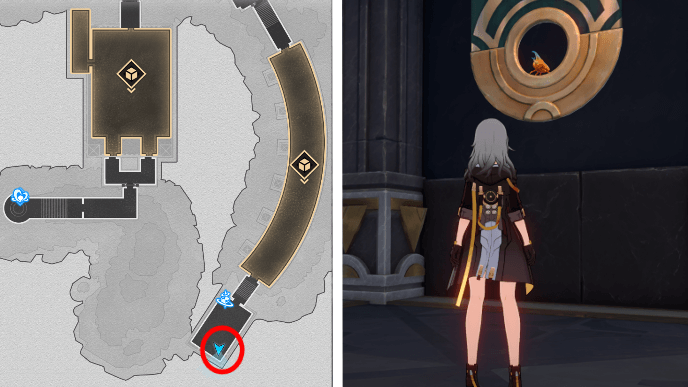 |
Use the End of the Gate Space Anchor and head to the southeast corner of the room. You'll see the nymph on a banner. |
| 6 |  |
Use the Worshipper's Footpath Space Anchor and head to the big room south of it. Head to the right and go up the stairs to the second floor. You'll see the nymph on one of the hanging drapes on the edge. |
Sanctum of Prophecy B1 Creation Nymph Locations
| No. | Image | How to Find |
|---|---|---|
| 7 | 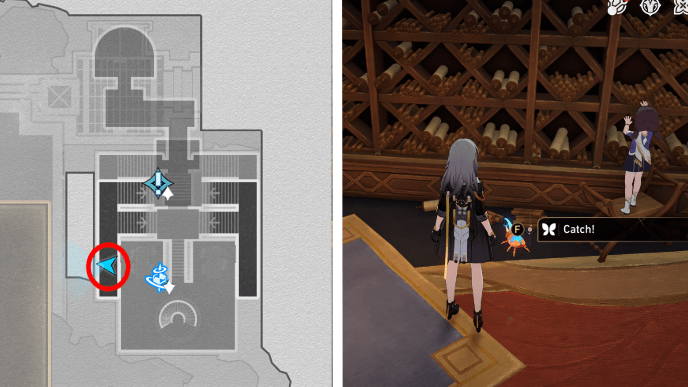 |
Use the Archive of Prophecies Space Anchor and climb the left stairs. You'll see the nymph near one of the shelves with scrolls on the ground. |
Sanctum of Prophecy B2 Creation Nymph Locations
| No. | Image | How to Find |
|---|---|---|
| 8 | 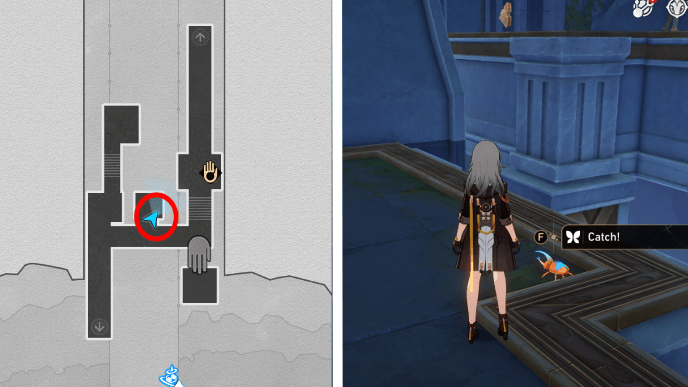 |
Use the Worshipper's Footpath Space Anchor and the elevator on the left to go down to B2. In B2, go to the middle platform and see the nymph by the edge. |
| 9 |  |
Use the Hand of Zagreus and fly through the middle arch on the left. You'll see the nymph on one of its stone edges. |
Sanctum of Prophecy B3 Creation Nymph Locations
| No. | Image | How to Find |
|---|---|---|
| 10 | 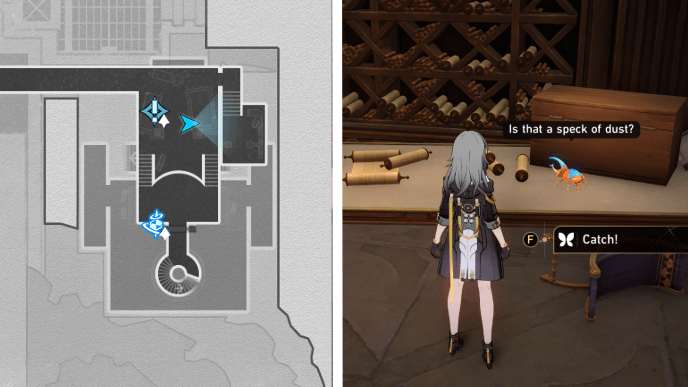 |
Use the Archive of Prophecies and head down the circular stairs to B3. You'll see the nymph on one of the tables with scrolls on the right. |
"Demigod Council" Dawncloud Creation Nymphs
| Dawncloud Creation Nymphs Map | |||||||||||
|---|---|---|---|---|---|---|---|---|---|---|---|
 See Full Image |
 See Full Image |
||||||||||
 See Full Image |
|||||||||||
| Dawncloud Locations | |||||||||||
| South | Center | North | |||||||||
Use the table above to jump to a floor in the "Demigod Council" Dawncloud!
There are a total of 10 Creation Nymphs that can be found in "Demigod Council" Dawncloud. For "Lightless Chapel" Dawncloud, all 10 Creation Nymphs are in the same locations as the ones in "Demigod Council" Dawncloud.
If you've already collected Creation Nymphs in "Demigod Council" Dawncloud, you can talk to the Garmentmaker in "Lightless Chapel" Dawncloud to instantly gather the ones you've collected in the previous Dawncloud.
Demigod Council Dawncloud Map Guide
"Demigod Council" Dawncloud South
| No. | Image | How to Find |
|---|---|---|
| 1 |  |
Go inside the large room on the left and go to a podium in front of the table. |
| 2 |  |
Go inside the large room on the right to find it sticking in the middle of the mural. |
| 3 | 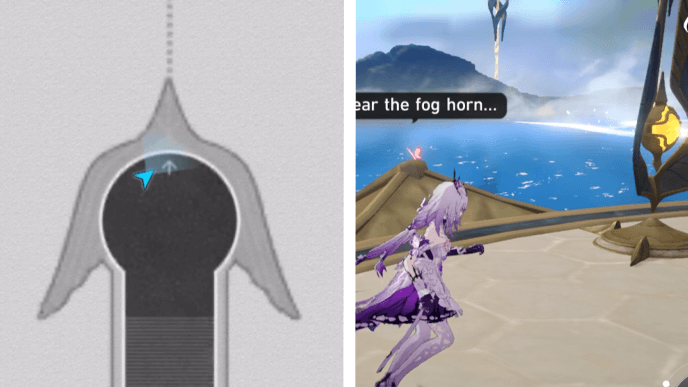 |
Found in front of the Janus mechanism. |
"Demigod Council" Dawncloud Center
| No. | Image | How to Find |
|---|---|---|
| 4 | 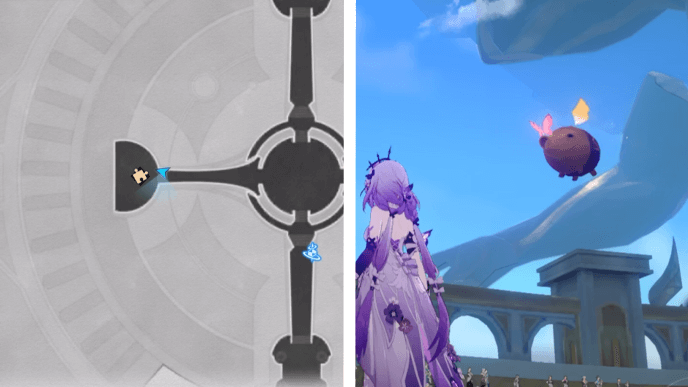 |
Found floating on a Flying Amphora. You must hit it to catch the Nymph. |
| 5 |  |
Found sticking on a pillar before the North Area. |
"Demigod Council" Dawncloud North
| No. | Image | How to Find |
|---|---|---|
| 6 | 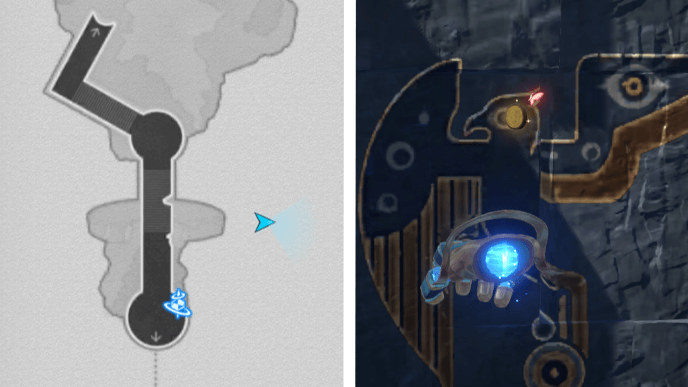 |
Found on a bird mural behind the Coin of Whimsy. You need to use the Hand of Zagreus to reach it. |
| 7 | 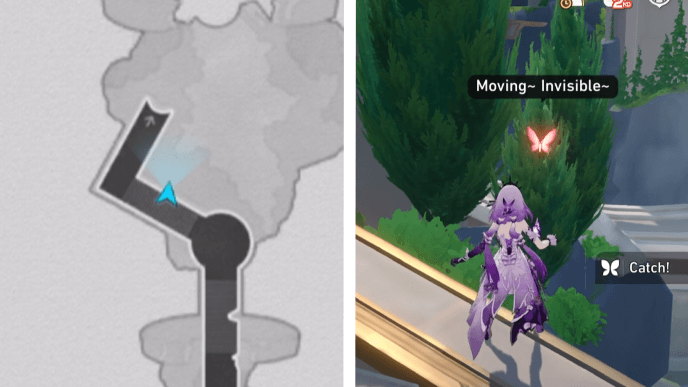 |
Found on a tree beside the stairs. |
| 8 | 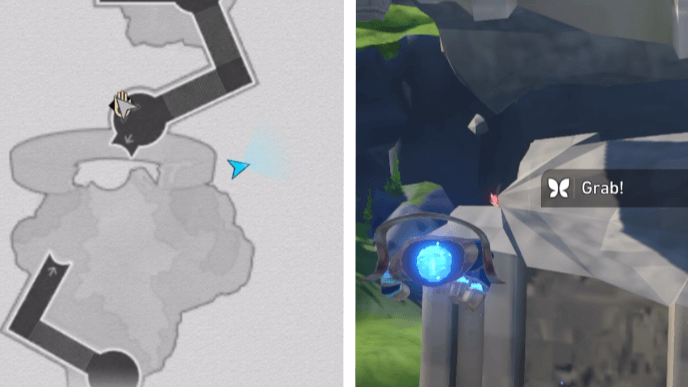 |
Found on top of a broken Pillar. You need to use the Hand of Zagreus to reach it. |
| 9 | 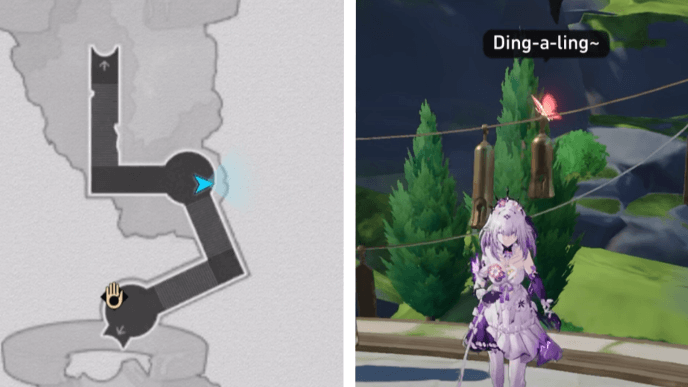 |
Found sitting on the bells. |
| 10 |  |
Found hanging by the rocky wall with a grass patch beside the stairs. You need to use the Hand of Zagreus to reach it. |
"Dragonbone City" Styxia Creation Nymphs
| Dragonbone City Creation Nymphs Map | |||||
|---|---|---|---|---|---|
 See Full Image |
 See Full Image |
||||
 See Full Image |
|||||
| Floors | |||||
| F1 | F2 | F3 | |||
Use the table above to jump to a floor in the "Dragonbone City" Styxia!
There are a total of 10 Creation Nymphs that can be found in "Dragonbone City" Styxia.
Dragonbone City Styxia Map Guide
Dragonbone City F1 Creation Nymph Locations
| No. | Image | How to Find |
|---|---|---|
| 1 | 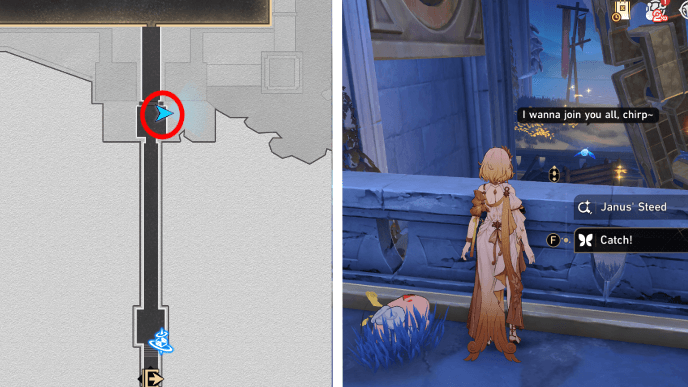 |
Use the Ancient City Main Gate Space Anchor and move forward until you see a Janus Steed. To its left, you'll see it near some butterflies. |
| 2 |  |
Use the Ancient City Market Space Anchor and then the Miracle Beacon in front of you. Head right and then move forward until you see two shields. The nymph is in between the shields. |
| 3 | 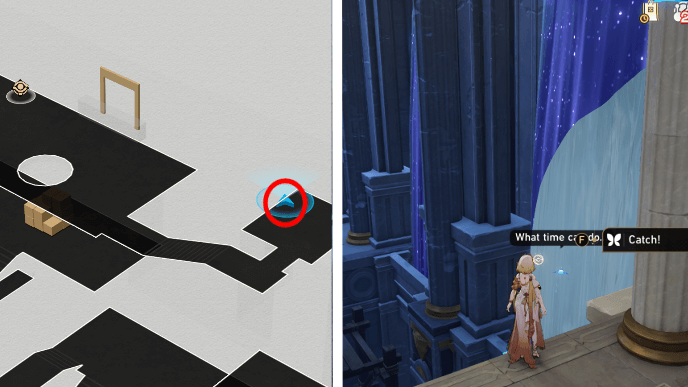 |
Use the Royal Palace Ruins Space Anchor in F2 and head left to use the elevator to F1. Enter the big room and use the Miracle Beacon on the right. Go past the elevator and up the wooden ramp to see the nymph near the waterfall. |
Dragonbone City F2 Creation Nymph Locations
| No. | Image | How to Find |
|---|---|---|
| 4 | 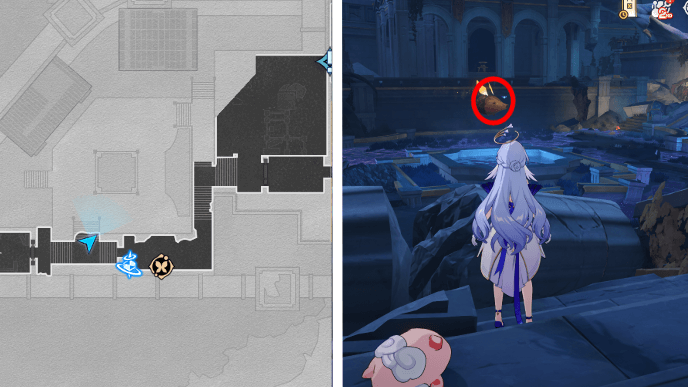 |
Use the Royal Palace Ruins Space Anchor and head up the stairs to the left. Next to a fallen pillar, you'll see the nymph riding a Janus pig. You'll have to use a ranged character to hit it and get it. |
| 5 | 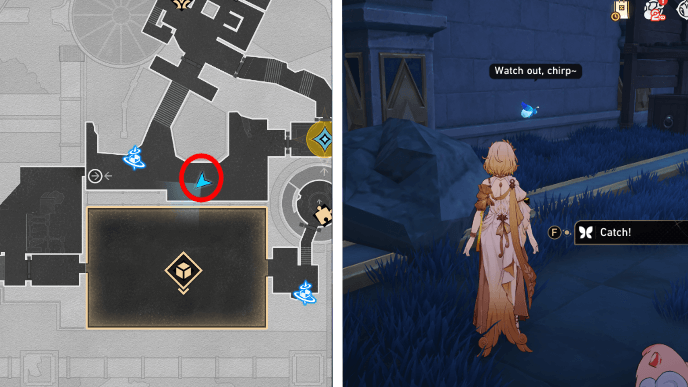 |
Use the Temple of Ages Space Anchor and go up the stairs. Go inside the room and you'll have to do the first puzzle of the Chirping Secret Treasure? Adventure Mission to unlock the other area. Once you're done, proceed and you'll see a corrupted area near the Space Anchor where the nymph is. |
| 6 | 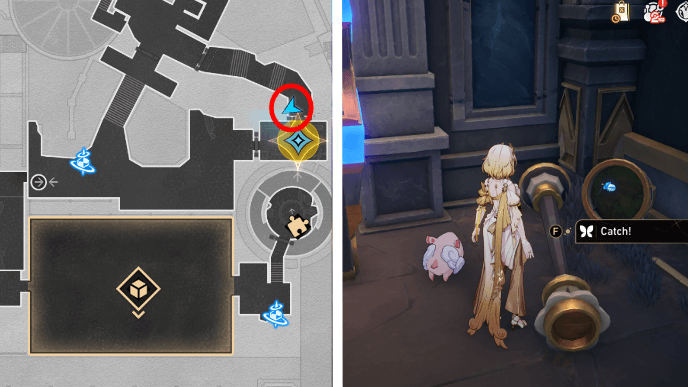 |
From Creation Nymph 5, go back to the room you came from earlier. Near the stairs and just before the door, you'll see a fallen torchpost where the nymph is. |
| 7 | 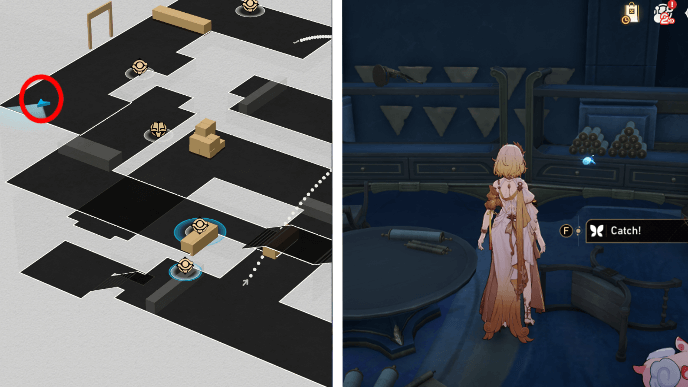 |
Use the Treasure Vault Secret Passage Space Anchor and head to the big room left of it. Head to the right and you'll see the nymph near some scrolls on a wooden shelf. |
| 8 | 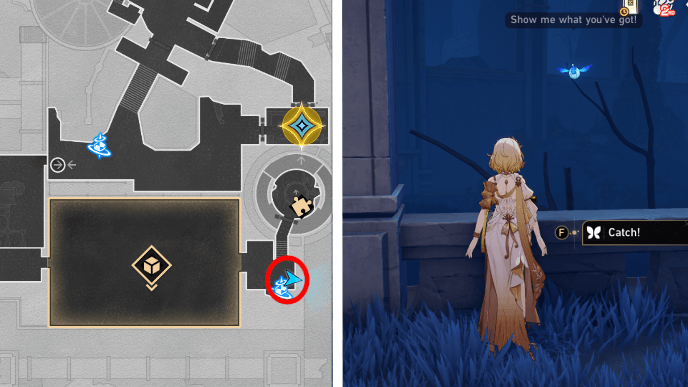 |
Use the Treasure Vault Secret Passage Space Anchor and to the right of it, you'll see the nymph near a wooden crate and stone railing. |
Dragonbone City F3 Creation Nymph Locations
| No. | Image | How to Find |
|---|---|---|
| 9 | 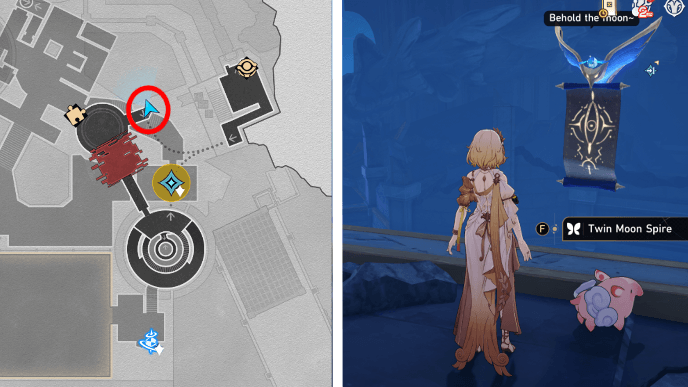 |
Use the Twin Moon Spire Space Anchor and go out of the room. Use the Miracle Beacon and cross the giant chain. On the other side, use the Miracle Beacon again to get rid of the rune and turn the Janus Passage below, then use it. You'll see the nymph on a floating scroll next to the Janus Passage. |
| 10 | 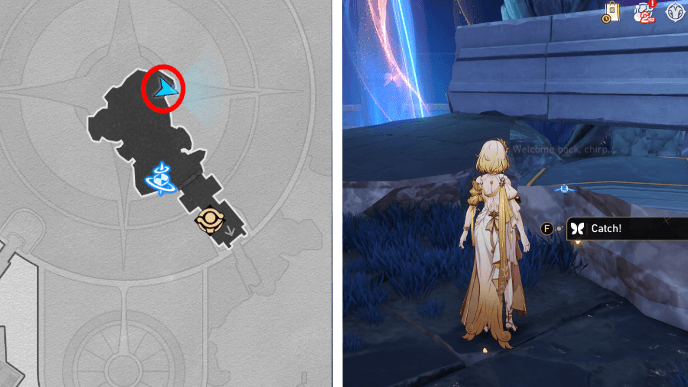 |
Use the Twin Moon Spire Space Anchor and move forward then go to the right. You'll see the nymph near a huge slab of fallen stone. |
"Fortress of Dome" Eye of Twilight Creation Nymphs
| Fortress of Dome Creation Nymphs Map | |||||||||
|---|---|---|---|---|---|---|---|---|---|
 See Full Image |
 See Full Image |
||||||||
 See Full Image |
 See Full Image |
||||||||
| Floors | |||||||||
| F1 | F2 West | ||||||||
| F2 East | F3 | ||||||||
Use the table above to jump to a floor in the "Fortress of Dome" Eye of Twilight!
There are a total of 10 Creation Nymphs that can be found in "Fortress of Dome" Eye of Twilight.
Fortress of Dome Eye of Twilight Map Guide
Fortress of Dome Eye of Twilight F1 Creation Nymph Locations
| No. | Image | How to Find |
|---|---|---|
| 1 |  |
Use the End of Neon Space Anchor and look behind you to find the Nymph on the floating debris. |
| 2 |  |
Use the Celestial Mural Space Anchor and enter the left area. You'll see the nymph on the edge. |
Fortress of Dome Eye of Twilight F2 West Creation Nymph Locations
| No. | Image | How to Find |
|---|---|---|
| 3 | 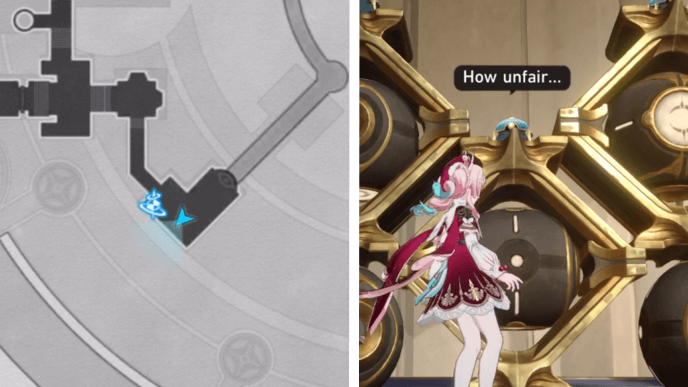 |
Use the Arching BoneMech Space Anchor and go to the large shelf with the giant spheres to find the Nymph on top of it. |
| 4 | 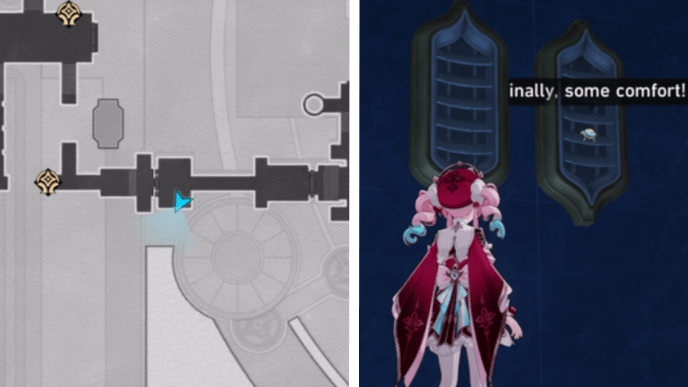 |
Go inside the room to find the Nymph on sitting by the window. |
| 5 | 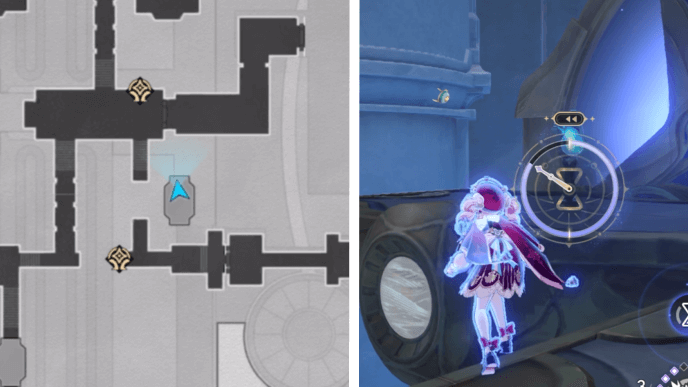 |
Use Oronyx's Prayer on the bridge and turn it off while on the bridge to find the Nymph on the pillar. |
| 6 | 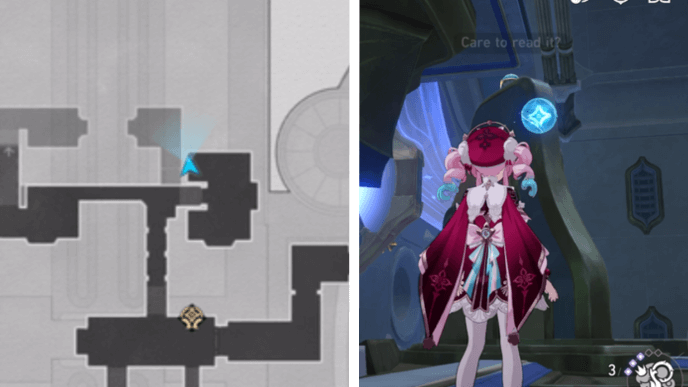 |
Go to the topmost area with the Blacktide enemies and find the nymph on top of the pillar. |
| 7 |  |
Found sitting on the edge after defeating the Blacktide enemies. |
| 8 |  |
Found on the mural on the wall sticking on the hammer. |
Fortress of Dome Eye of Twilight F2 East Creation Nymph Locations
| No. | Image | How to Find |
|---|---|---|
| 9 |  |
Use the Arching BoneMech Space Anchor and go to the elevator to find the nymph in between the two spheres on the walls. |
Fortress of Dome Eye of Twilight F3 Creation Nymph Locations
| No. | Image | How to Find |
|---|---|---|
| 10 |  |
Teleport to the Frontier Roof Space Anchor and turn right to find the Nymph on the Golden Circle. |
"Cloudedge Bastion Ruins" Eye of Twilight Creation Nymphs
| Cloudedge Bastion Ruins Creation Nymphs Map | |||||||||
|---|---|---|---|---|---|---|---|---|---|
 See Full Image |
 See Full Image |
||||||||
 See Full Image |
 See Full Image |
||||||||
 See Full Image |
 See Full Image |
||||||||
 See Full Image |
|||||||||
| Floors | |||||||||
| F3 Center | F3 West | ||||||||
| F3 East | F4 West | ||||||||
| F4 East | F2 | ||||||||
| F1 | |||||||||
Use the table above to jump to a floor in the "Cloudedge Bastion Ruins" Eye of Twilight!
There are a total of 20 Creation Nymphs that can be found in "Cloudedge Bastion Ruins" Eye of Twilight.
Cloudedge Bastion Ruins Eye of Twilight
Cloudedge Bastion Ruins Eye of Twilight F3 Center Creation Nymph Locations
| No. | Image | How to Find |
|---|---|---|
| 1 |  |
Use the Nightwail Ruins Space Anchor and move to the center where the weather device is. You'll see the nymph on the device itself. |
| 2 |  |
From the first nymph, go to the left and you'll see the second nymph next to the Janus Passage. |
| 3 |  |
Use the Nightwail Ruins Space Anchor and to its left, you'll see a staircase. You'll see the nymph placed on the left side of the staircase. |
Cloudedge Bastion Ruins Eye of Twilight F3 West Creation Nymph Locations
| No. | Image | How to Find |
|---|---|---|
| 4 |  |
Use the Nightspire BoneMech Space Anchor and follow the path to the right until you reach the intersection on the map. Then, go to the right and you'll see a Janus Passage. Use it and you'll see the nymph near the edge. |
Cloudedge Bastion Ruins Eye of Twilight F3 East Creation Nymph Locations
| No. | Image | How to Find |
|---|---|---|
| 5 |  |
Use the Bastion Well Space Anchor in F4 and go down to F3 using the lift. Go down the staircase and to the right, you'll see the nymph on one of the walls past the edge. |
Cloudedge Bastion Ruins Eye of Twilight F4 West Nymph Locations
| No. | Image | How to Find |
|---|---|---|
| 6 | 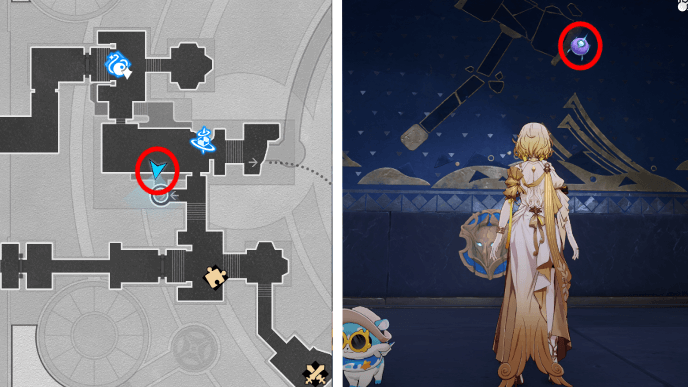 |
Use the Nightspire BoneMech Space Anchor and look at the mural on the left to see the nymph on it. |
| 7 | 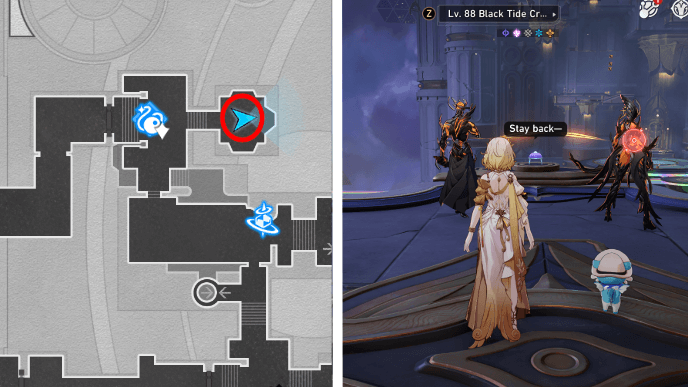 |
From the sixth nymph, go down the stairs on the right and make another right. You'll see the nymph being looked at by two enemies. |
| 8 | 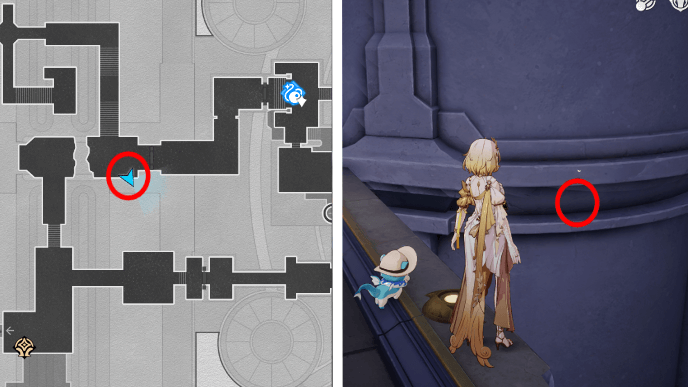 |
From the seventh nymph, go west and climb up the stairs. Once you reach the broken path, you'll see the nymph on a gap in the wall on the left side. |
| 9 |  |
Use the Nightspire BoneMech Space Anchor and head south. You'll see some debris blocking the way, so you'll have to clear it by going around. This requires you to traverse to F3 and go back to F4 on the other side. Past the debris, head west until you see the nymph on the vents on the wall. |
| 10 | 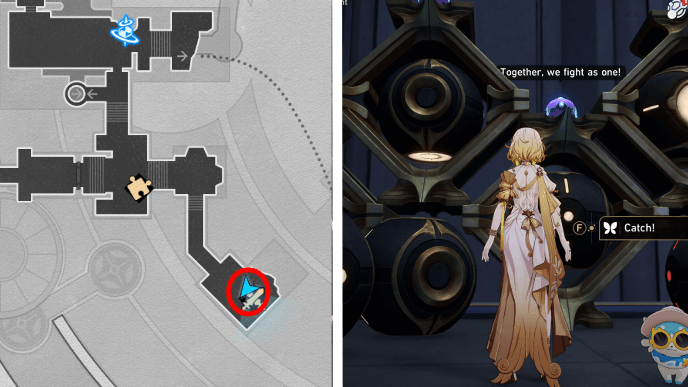 |
Teleport to the Nightspire BoneMech Space Anchor and head south until you see the Formidable Foe and some orbs on the right side. The nymph is on top of the orbs. |
Cloudedge Bastion Ruins Eye of Twilight F4 East Creation Nymph Locations
| No. | Image | How to Find |
|---|---|---|
| 11 | 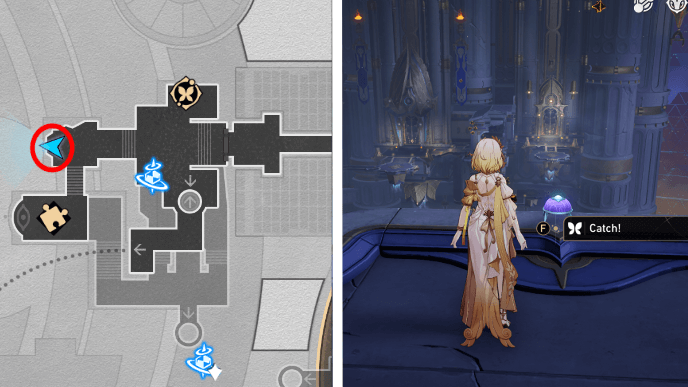 |
Use the Bastion Well Space Anchor and head west. You'll see the nymph near the edge. |
| 12 |  |
Use the West Wind Compass and make a rainbow path. Cross the path and you'll see the nymph in the middle platform by the edge. |
Cloudedge Bastion Ruins Eye of Twilight F2 Creation Nymph Locations
| No. | Image | How to Find |
|---|---|---|
| 13 |  |
Use the Bastion Depth Space Anchor and head east. You'll see the nymph between two orbs on the wall, just past the lift. |
| 14 |  |
Use the Aurous Perch Space Anchor and head northwest. After crossing the bridge, you'll see the nymph on the ceiling near a Treasure Chest. |
| 15 |  |
Use the Aurous Perch Space Anchor and head west. You have to use the Janus Passages to get to the west side of F2. Continue moving until you come across another blue bridge, where you'll see the nymph. |
| 16 | 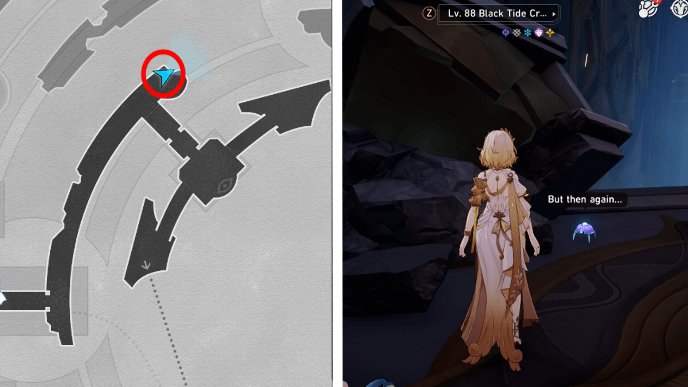 |
From Nymph 15, continue forward then make a left, then go to the right. You'll see the nymph near some rubble and an enemy. |
Cloudedge Bastion Ruins Eye of Twilight F1 Creation Nymph Locations
| No. | Image | How to Find |
|---|---|---|
| 17 | 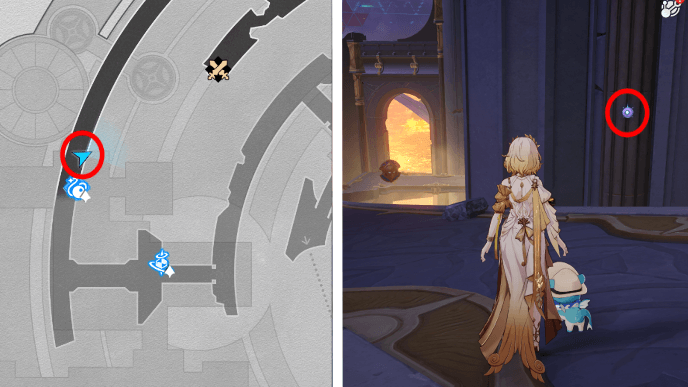 |
From Nymph 16, follow the path south and then head west to continue moving towards F1. On the long path down, you'll see the nymph on one of the big stone pillars on the right side of the path. |
| 18 | 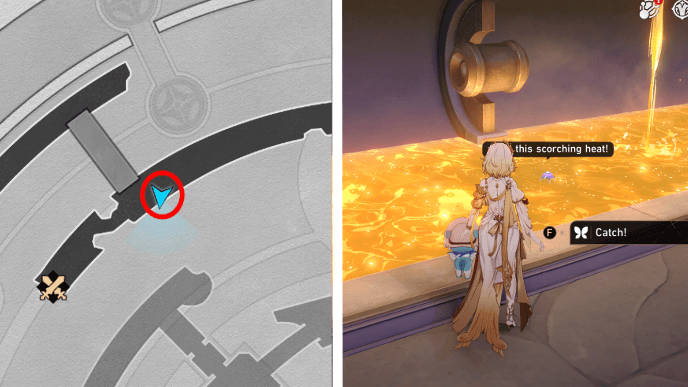 |
From Nymph 17, follow the path down and cross the bridge. Just before the Formidable Foe, you'll see the nymph on the molten gold. |
| 19 |  |
Keep moving until you come across the Aurous Pool Space Anchor. You'll see the nymph just past it, near one of the molten gold dispensers. |
| 20 | 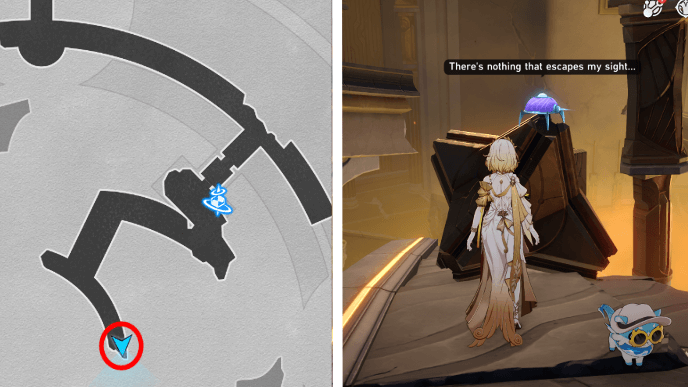 |
From Nymph 19, cross the blue bridge and head to the left. You'll see the nymph on top of some rubble. |
Aedes Elysiae Creation Nymphs
| Aedes Elysiae Creation Nymphs Map |
|---|
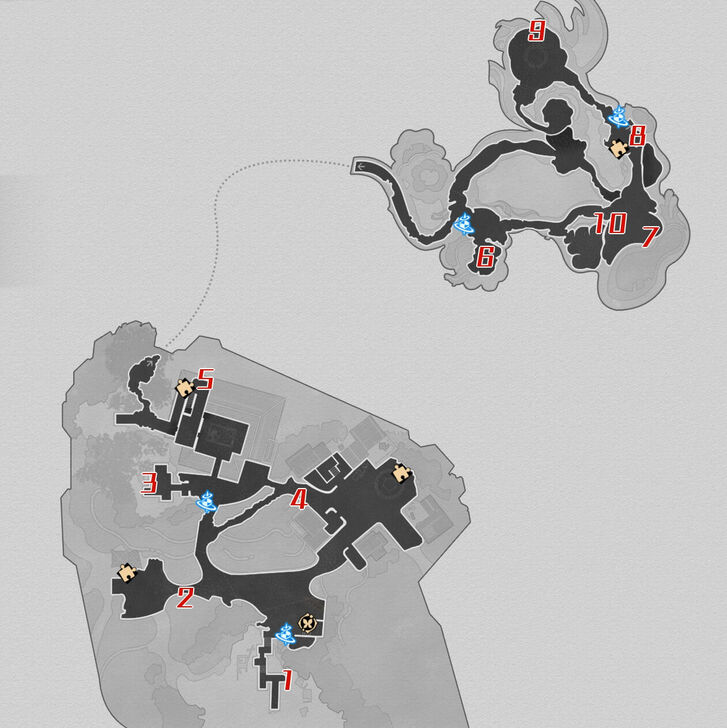 See Full Image |
There are a total of 10 Creation Nymphs that can be found in Aedes Elysiae.
Aedes Elysiae Creation Nymph Locations
| No. | Image | How to Find |
|---|---|---|
| 1 | 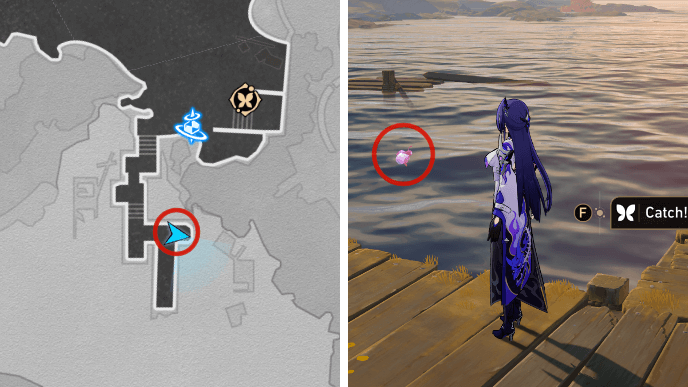 |
From the Voyager's Wharf Space Anchor, head down the pier to the south and you'll see the nymph near the edge to the left. |
| 2 | 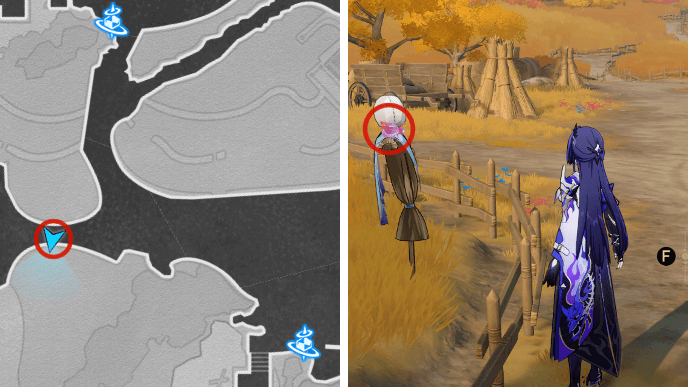 |
From the Voyager's Wharf Space Anchor, follow the path to the west until you come across a scarecrow. The nymph should be on its shoulder. |
| 3 |  |
From the Sacrament Courtyard Space Anchor, head towards the left and head past where Cyrene is on the swing. The nymph should be on the base of the tree. |
| 4 | 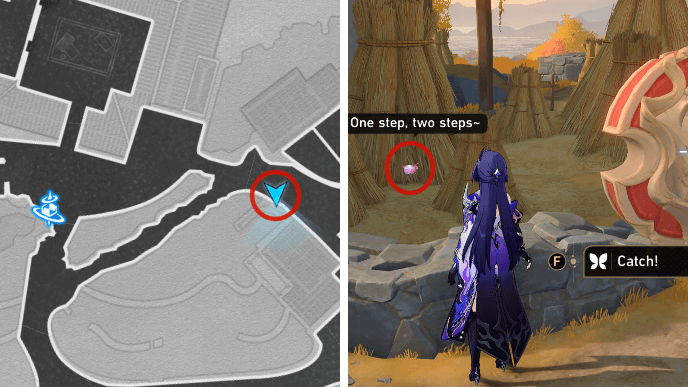 |
From the Sacrament Courtyard Space Anchor, follow the path to the right until you come across a shield. The nymph should be behind it near some bales of hay. |
| 5 |  |
From the Sacrament Courtyard Space Anchor, enter the building in front of you and head to the second floor. The nymph can be found floating on a Flying Amphora near the balcony. You must hit it to catch the nymph. |
| 6 | 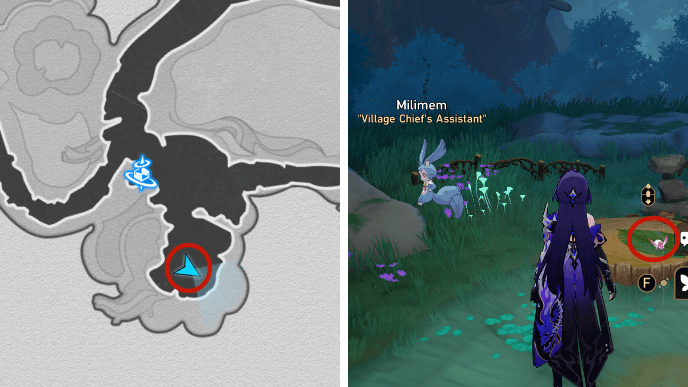 |
From the Membrance Maze Space Anchor, follow the rightmost path until you reach the small area where Dolimem and Milimem are. The nymph should be on the table behind Milimem. |
| 7 | 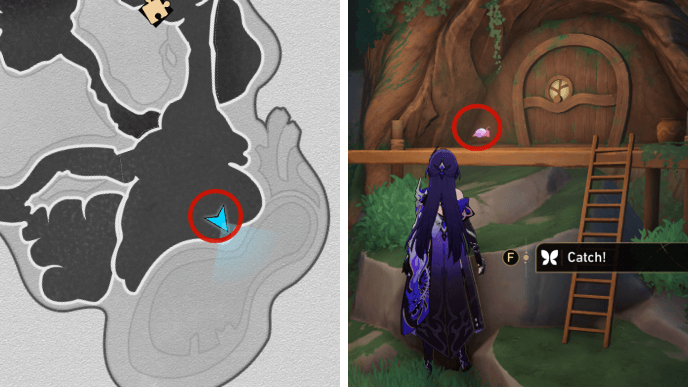 |
From the Membrance Maze Space Anchor, take the path to the right that leads to the upper level. The nymph should be near a door and a ladder at the highest level. |
| 8 | 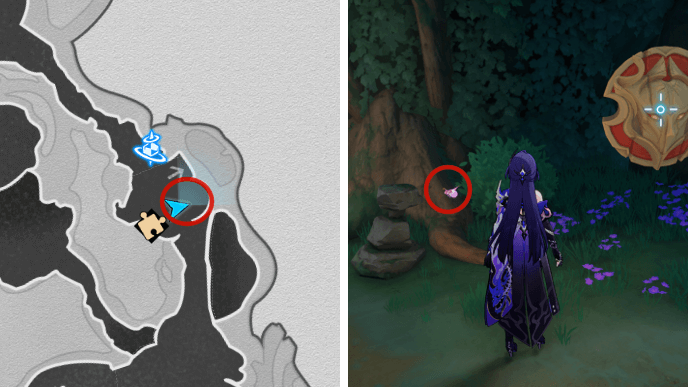 |
The nymph should be by a cairn and a shield near the Wondrous Woods Space Anchor. |
| 9 |  |
From the Wondrous Woods Space Anchor, follow the path to the right until you reach the area with the giant table. The nymph should be near some rocks on the edge of the area. |
| 10 |  |
From the Membrance Maze Space Anchor, follow the path to the left until you reach the area past the farm. The nymph should be hidden behind some rocks. |
"Warbling Shores" Styxia Creation Nymphs
| Warbling Shores Creation Nymphs Map | |||||||
|---|---|---|---|---|---|---|---|
 See Full Image |
 See Full Image |
||||||
There are a total of 10 Creation Nymphs that can be found in "Warbling Shores" Styxia.
Warbling Shores Styxia Map Guide
"Warbling Shores" Styxia Creation Nymph Locations
| No. | Image | How to Find |
|---|---|---|
| 1 |  |
From the Revelry's Keep Space Anchor, go to the rainbow bridge. The nymph should be at the right side of the bridge. |
| 2 |  |
From the Passage of Treasures Space Anchor, enter the room and then turn right. The nymph should be on top of the podium. |
| 3 |  |
In the same room as the one in number 2, head to the bottom floor to find the nymph beside antiques. |
| 4 | 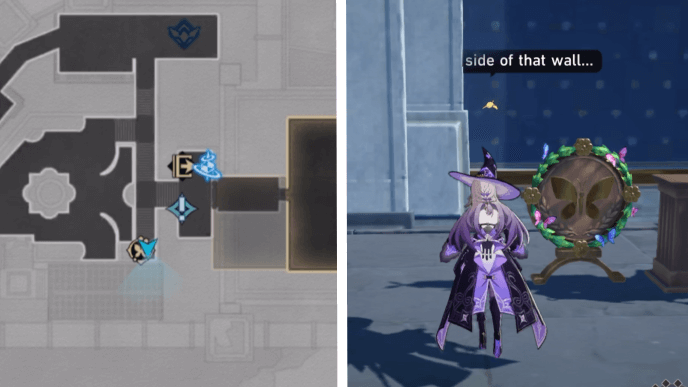 |
From the Ariose Fountain Courtyard Space Anchor, head over to where the Garmentmaker is located. The nymph should be in the wall. |
| 5 | 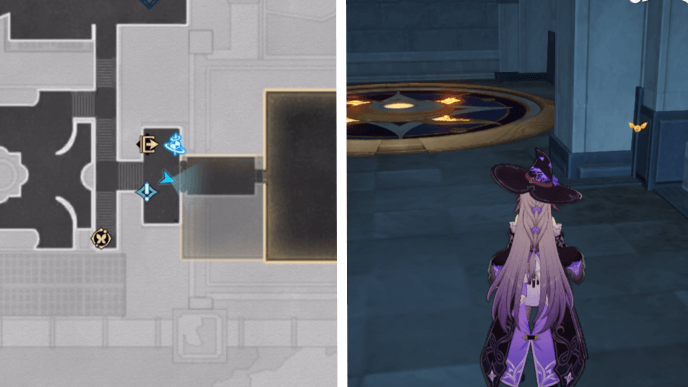 |
From the Ariose Fountain Courtyard Space Anchor, enter the room with the elevator in it with the nymph nearby. |
| 6 | 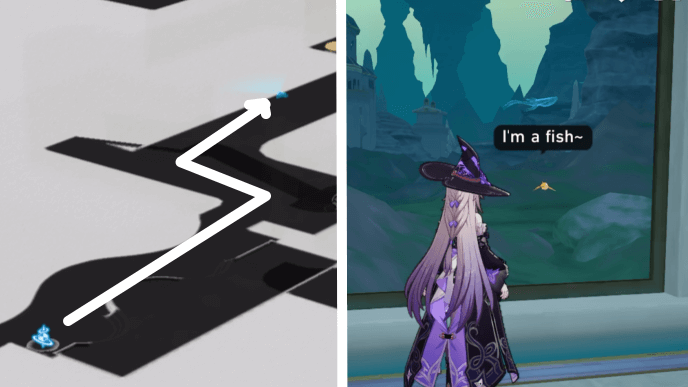 |
From the Slumbering Palace Corridor Space Anchor, enter the large area and go to the large windows on the left to find the nymph outside. |
| 7 | 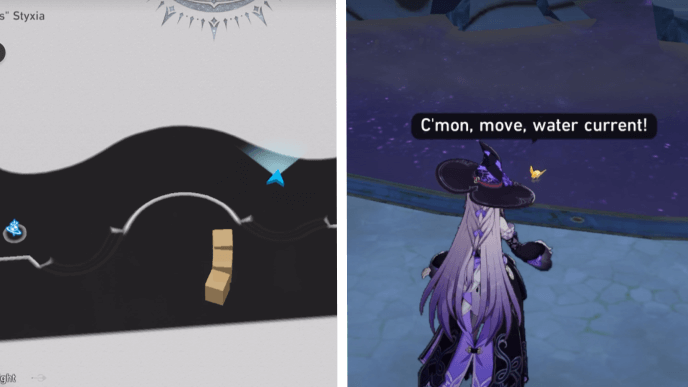 |
From the Slumbering Palace Corridor Space Anchor, go to the pond nearby to look for the nymph. The room must be set in Evernight. |
| 8 | 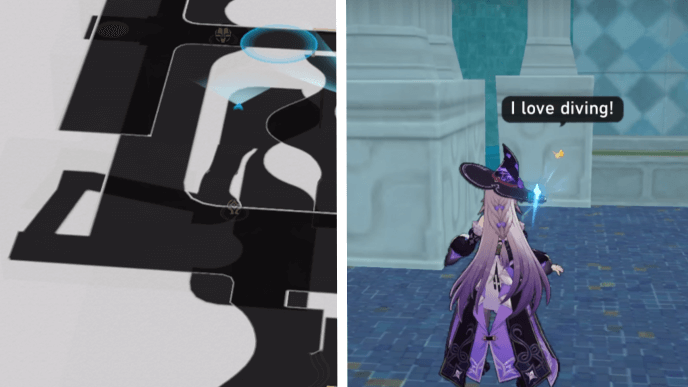 |
From the Slumbering Palace Corridor Space Anchor, enter the large area and go to the left path that leads to the stairs. Activate the device and use it on the large statue on the left to open up a path. You will find the nymph on the wall. |
| 9 | 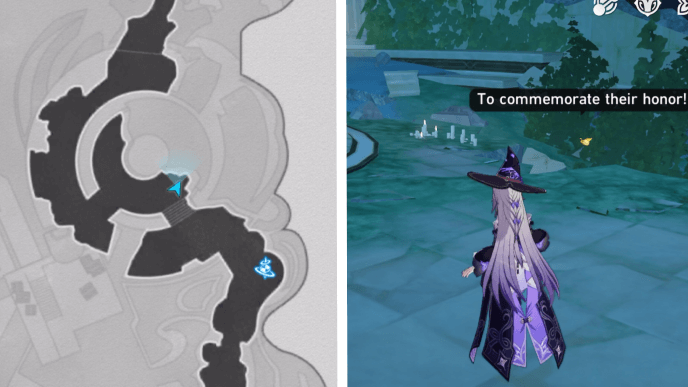 |
From the Somber Altar of Candles Space Anchor, head north to find the nymph at the end of the stairs. |
| 10 |  |
From the Seabed of Luminous Remains Space Anchor, head north to the circular room and go to the left side to find the nymph. |
"Radiant Scarwood" Grove of Epiphany Creation Nymphs
| Radiant Scarwood Creation Nymphs Map | |||||||||
|---|---|---|---|---|---|---|---|---|---|
 See Full Image |
 See Full Image |
||||||||
 See Full Image |
 See Full Image |
||||||||
 See Full Image |
 See Full Image |
||||||||
| Floors | |||||||||
| F4 | F3 | ||||||||
| F2 | F1 North | ||||||||
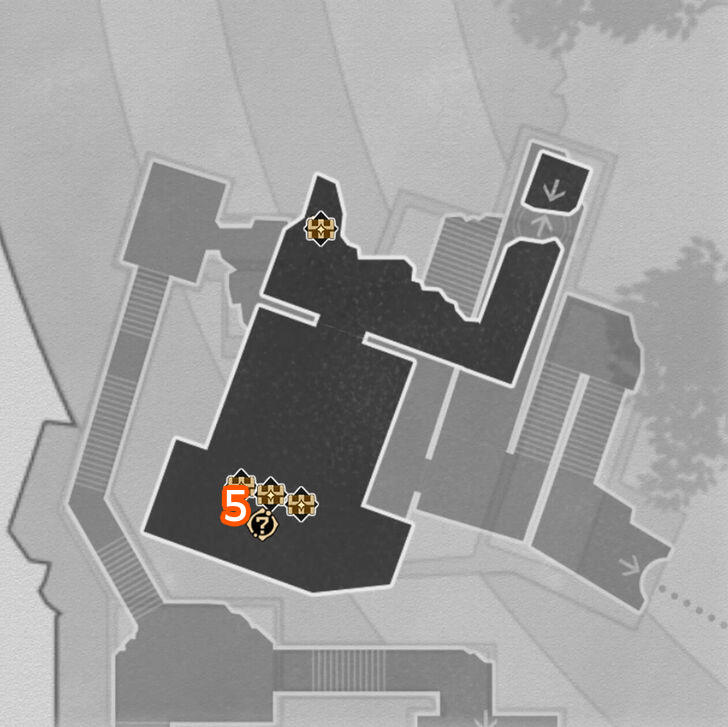
| F1 South | B1 | ||||||||
There are a total of 20 Creation Nymphs that can be found in "Radiant Scarwood" Grove of Epiphany.
Radiant Scarwood Grove of Epiphany
Radiant Scarwood Grove of Epiphany F4 Nymph Locations
| No. | Image | How to Find |
|---|---|---|
| 1 | 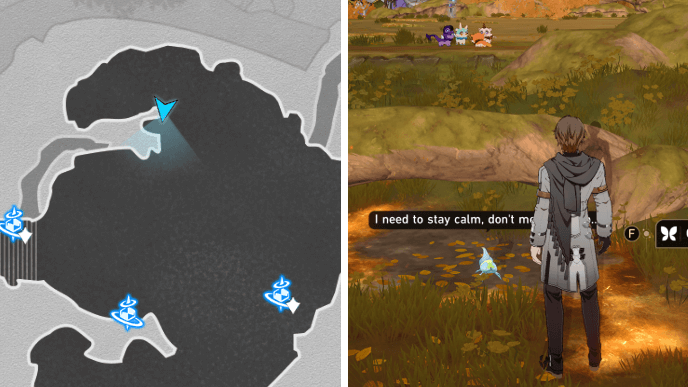 |
From the Ashen Throne Space Anchor, head north until you see a big branch past the group of manticores. The nymph is located under the branch. |
| 2 |  |
From the Ashen Throne Space Anchor, head to the right and follow the path until you see a two small statues and a gold spirit. The nymph will be just beside them. |
Radiant Scarwood Grove of Epiphany F3 Nymph Locations
| No. | Image | How to Find |
|---|---|---|
| 3 |  |
From the Butterfly Husk Embers Space Anchor, you'll see a nymph just nearby facing the heart of the Grove. |
| 4 |  |
From the Butterfly Husk Embers Space Anchor, follow the path to the left and use Bartholos POV. Rise up and go to the right where you'll see the nymph on a big box. |
Radiant Scarwood Grove of Epiphany F2 Nymph Locations
| No. | Image | How to Find |
|---|---|---|
| 5 | 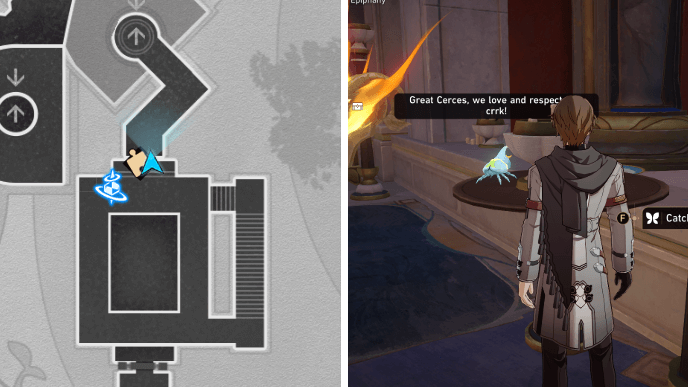 |
From the Golden Bough of Gnosis Space Anchor, climb up the stairs and you'll see the nymph on a small table near a stone statue and a person. |
| 6 |  |
From the Golden Bough of Gnosis Space Anchor, head south and go through the door. The nymph will be on the stone railing near a treasure chest. |
| 7 |  |
From the sixth nymph, follow the path to the left and head down the elevator. You'll see the nymph on a giant burned vine just after you exit the elevator. |
| 8 | 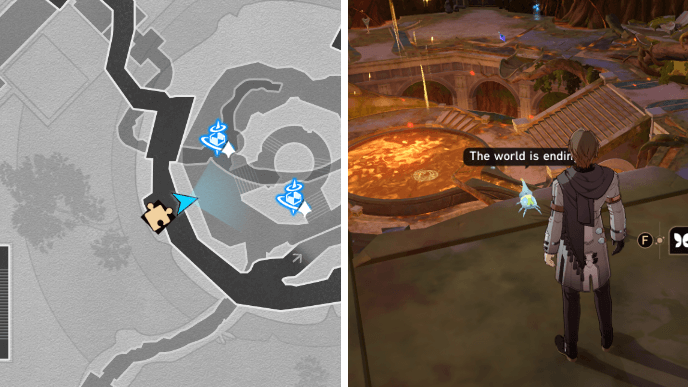 |
From the seventh nymph, follow the path to the right and until you go back inside the Grove. You'll see a Golden Short Spear and the nymph just in front of it. |
| 9 | 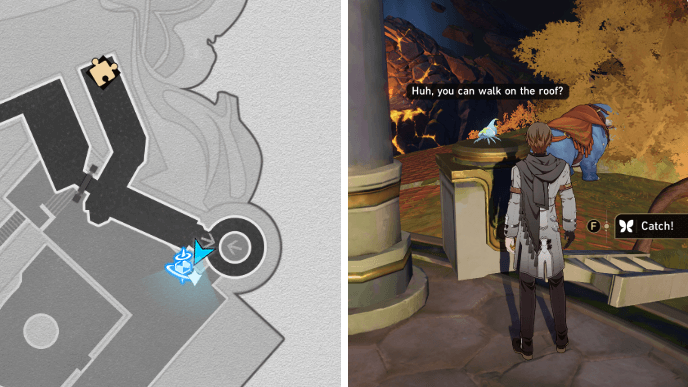 |
From the Teary Court Ruins Space Anchor, use the elevator to its right and you'll see the nymph on a broken pillar watching a Dromas after you exit the elevator. |
Radiant Scarwood Grove of Epiphany F1 North Nymph Locations
| No. | Image | How to Find |
|---|---|---|
| 10 | 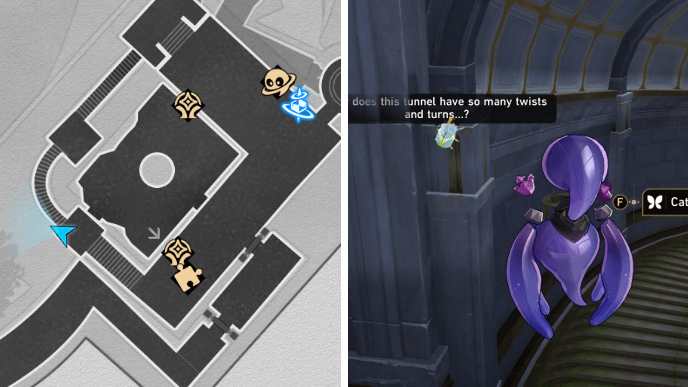 |
Use the Teary Court Ruins Space Anchor and do the Bartholos's Troubles Adventure Mission to gain access to its POV. Use it and drain the water, then you'll see the nymph on the left wall of the tunnel. |
| 11 |  |
From the tenth nymph, follow the tunnel using Bartholos after you drain the water and you'll see the nymph on a big box on the ceiling. |
| 12 | 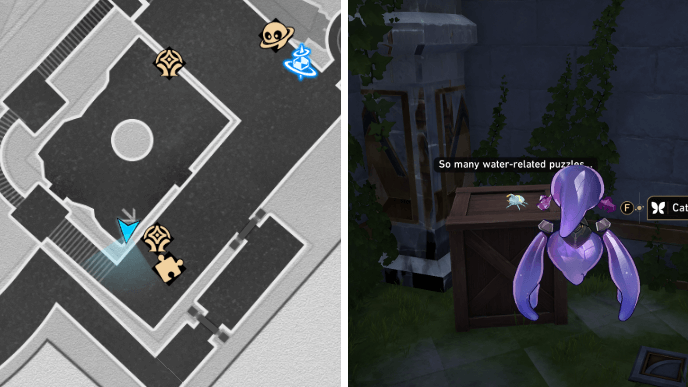 |
From the eleventh nymph, head back to the room where the giant statue is and you'll see the nymph on one of the wooden crates in the corner. |
| 13 | 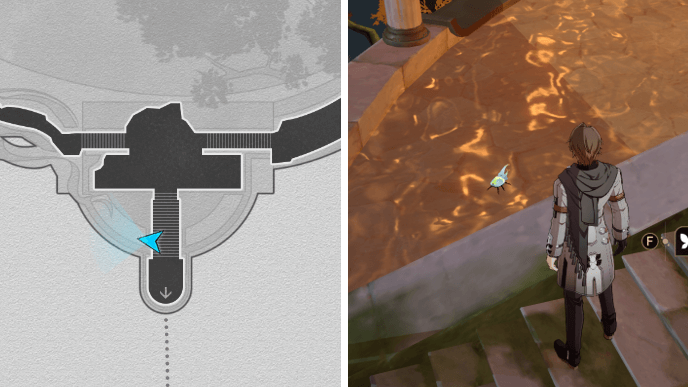 |
From the Chasmic Geocore Space Anchor, use the Janus Passage and cross to the other side. Climb the stairs and look at the pool of gold to the left. You'll see the nymph in the pool of gold. |
| 14 |  |
From the thirteenth nymph, head to the left and follow the big branch until you see two small statues to the right. You'll see the nymph just beside the small statues. |
| 15 | 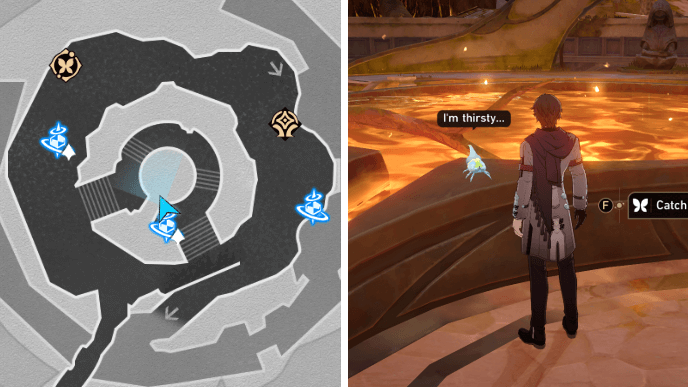 |
From the Heartburn Wound Space Anchor, go down to the pool of gold in the center and you'll see the nymph just next to it. |
| 16 |  |
From the Heartburn Wound Space Anchor, head to the left of the pool of gold and you'll see the nymph near the broken waterwheel. |
Radiant Scarwood Grove of Epiphany F1 South Nymph Locations
| No. | Image | How to Find |
|---|---|---|
| 17 | 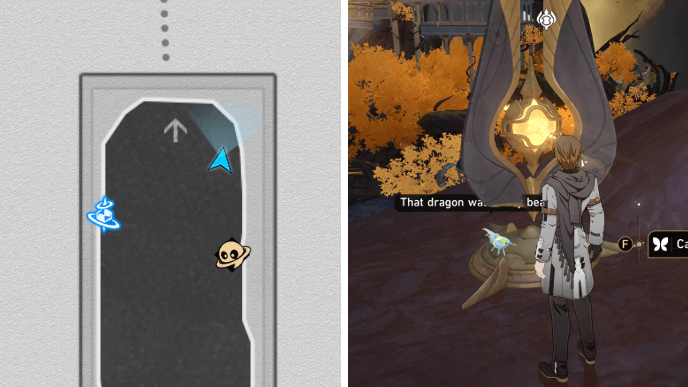 |
Use the Chasmic Geocore Space Anchor and approach the Janus Passage. You'll see the nymph by the base of the Janus Passage. |
| 18 | 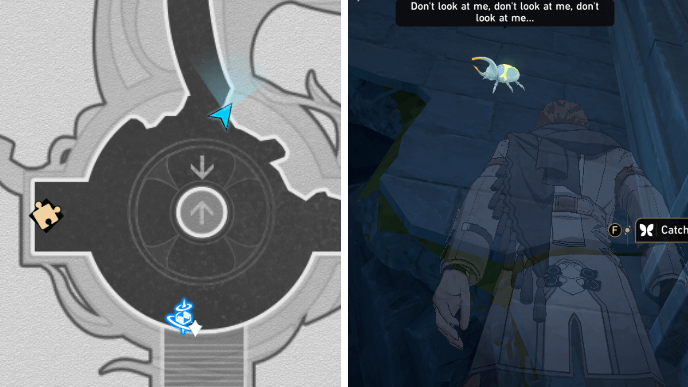 |
Use the Sealed Chamber Space Anchor and use the elevator to go down. After exiting the elevator, you'll see the nymph near on the wall just before the tunnel. |
Radiant Scarwood Grove of Epiphany B1 Nymph Locations
| No. | Image | How to Find |
|---|---|---|
| 19 | 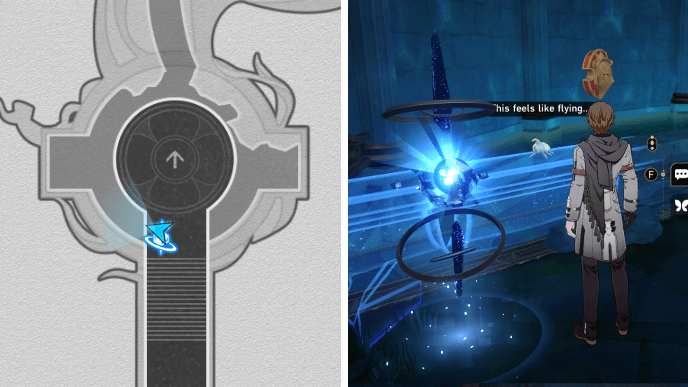 |
Use the Sealed Chamber Space Anchor and you'll see the nymph just beside it, on the holographic railing. |
| 20 | 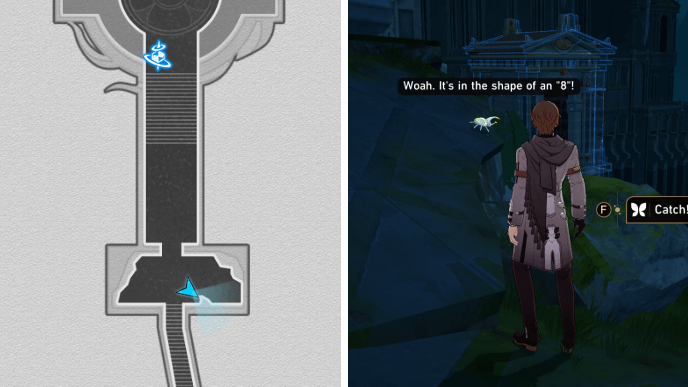 |
Use the Sealed Chamber Space Anchor and head south. Just before the stairs, head left and you'll see the nymph just by the edge. |
"Universal Matrix" Great Tomb of the Nameless Titan Creation Nymphs
| Universal Matrix Creation Nymphs Map | |
|---|---|
 See Full Image |
 See Full Image |
 See Full Image |
 See Full Image |
 See Full Image |
 See Full Image |
 See Full Image |
 See Full Image |
There are 10 Creation Nymphs to collect in Universal Matrix Great Tomb of the Nameless Titan.
"Universal Matrix" Great Tomb of the Nameless Titan Nymph Locations
| No. | Image | How to Find |
|---|---|---|
| 1 | 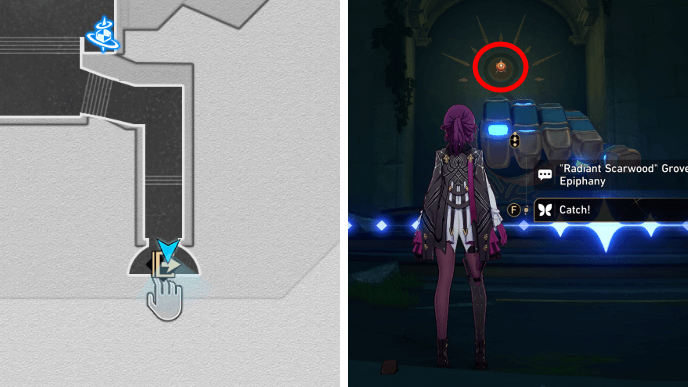 |
Use the Tranquil Tomb Gate Space Anchor and go back towards the Radiant Scarwood Grove of Epiphany area. The nymph should be on the wall of the exit. |
| 2 | 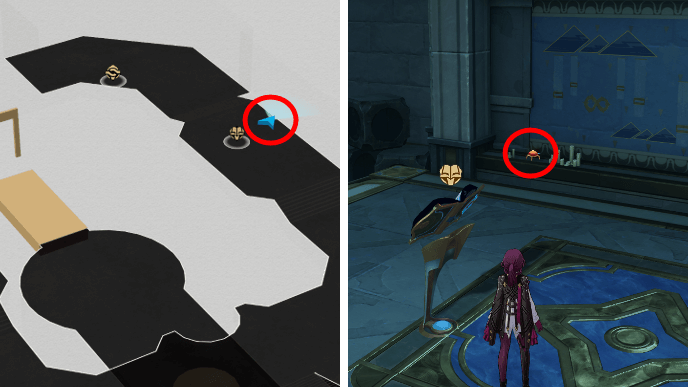 |
Use the Tranquil Tomb Gate Space Anchor and enter the 3D puzzle room. The nymph will be on the wall near the Tome of Miracles on the right. |
| 3 |  |
In the 3D puzzle room, change the time to Evernight. Go down to the sandy area and the nymph should be on the wall behind the three spinning shields. |
| 4 | 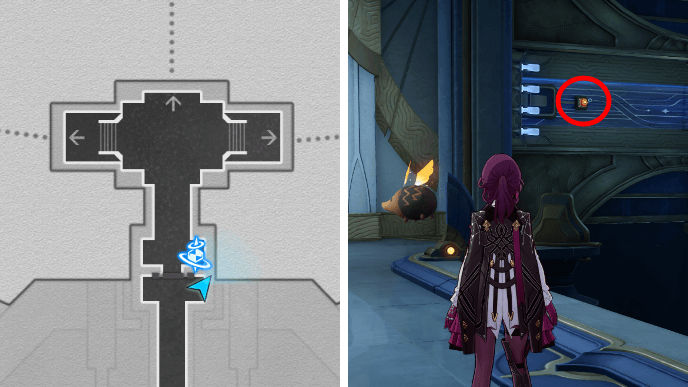 |
Use the Central Access Platform Space Anchor and return to the corridor behind. The nymph will be on the wall to the right of the door. |
| 5 | 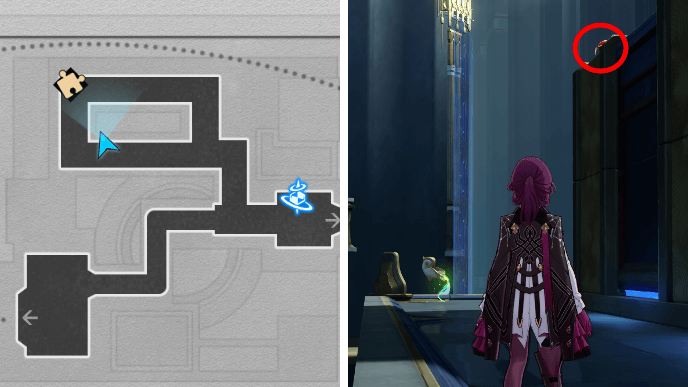 |
Use the Data Advection Sector: Entrance Space Anchor and turn right. The nymph can be found on top of a corner of the wall. |
| 6 | 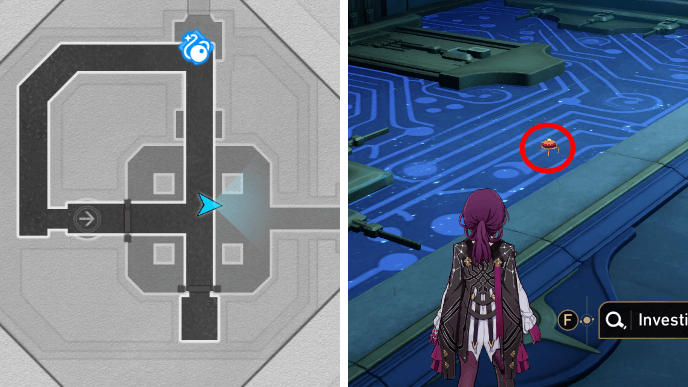 |
Teleport to the Cavern of Corrosion: Path of Hidden Salvation and go to the room with the circuits. The nymph should be on the floor with the circuits to the east. |
| 7 | 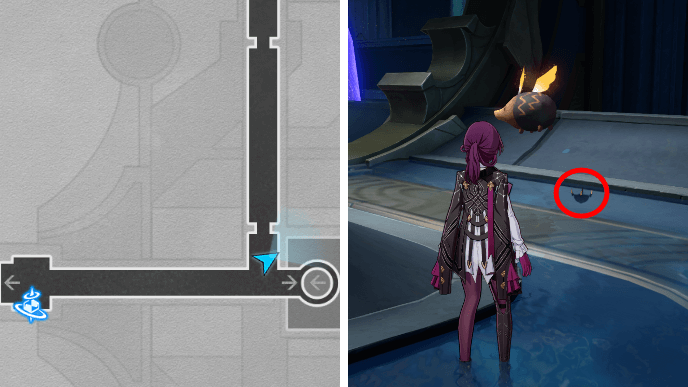 |
Found near a flying amphora a bit past the Tidal Cooling Sector: Entrance Space Anchor. |
| 8 | 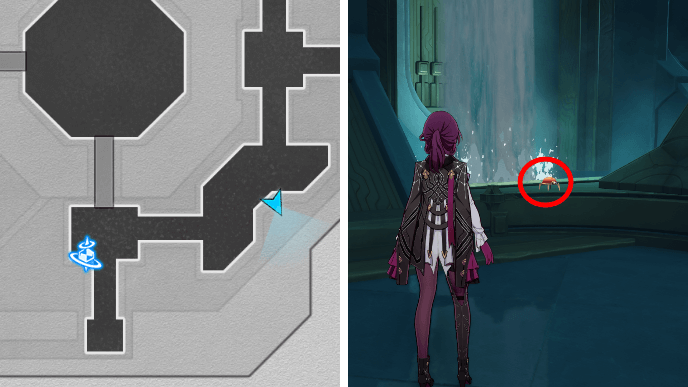 |
Use the Tidal Cooling Sector: Entrance and turn right. The nymph can be found on a ledge near the waterfall and some ichor memosprites. |
| 9 | 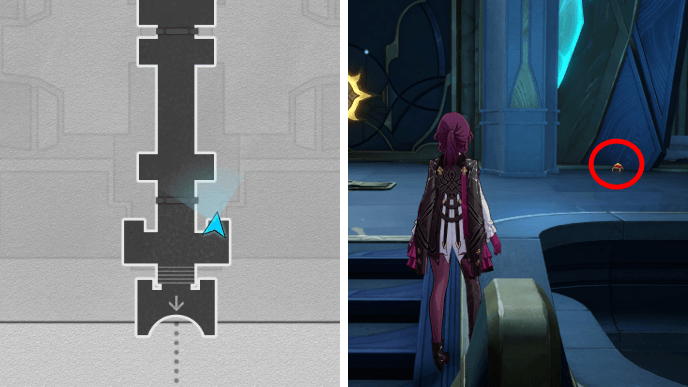 |
Found to the right of the door going to the Demiurge Matrix. |
| 10 |  |
Found on the left edge of the platform in the Demiurge Matrix. |
"Memortis Shore" Ruins of Time Creation Nymphs
| Memortis Shore Creation Nymphs Map | |
|---|---|
 See Full Image |
 See Full Image |
 See Full Image |
 See Full Image |
 See Full Image |
 See Full Image |
There are 20 Creation Nymphs to collect in "Memortis Shore" Ruins of Time.
Memortis Shore Ruins of Time Map Guide
"Memortis Shore" Ruins of Time Nymph F1 Locations
| No. | Image | How to Find |
|---|---|---|
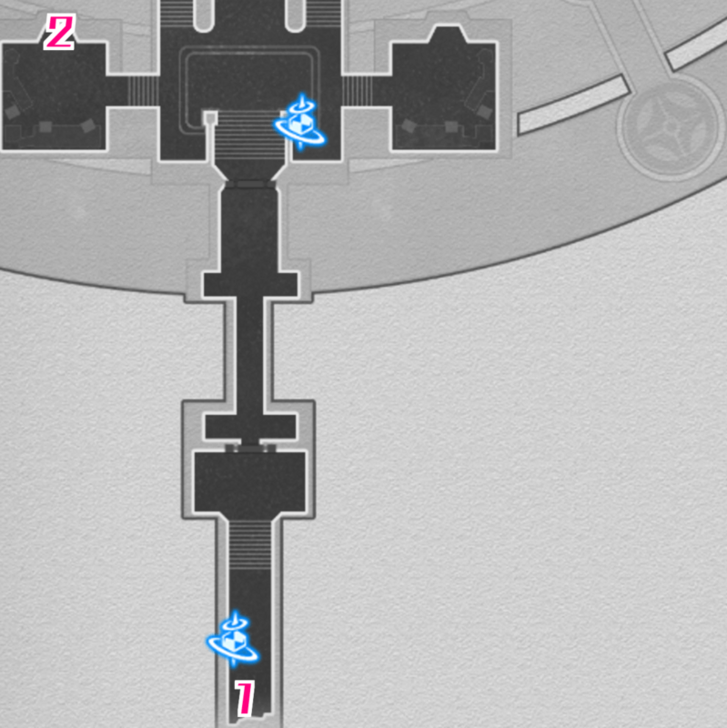
| 1 | 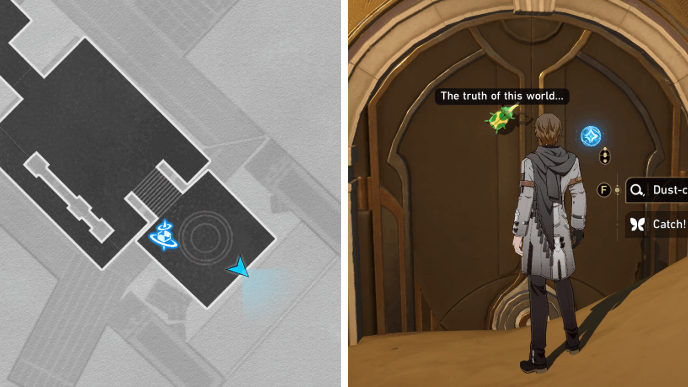 |
In front of the door near the Space Anchor. |
| 2 |  |
Found on top of the broken building in the middle of the bridge. |
| 3 |  |
Inside the room with the Golden Scapegoat puzzle inside. There is a breakable red shield that's blocking the room. |
| 4 |  |
Beside a tree with purple flowers and a pot of gold nearby. |
"Memortis Shore" Ruins of Time Nymph B1 Locations
| No. | Image | How to Find |
|---|---|---|
| 5 |  |
Found on the skeleton-like branch surrounded by blue grass. |
"Memortis Shore" Ruins of Time Nymph B2 Locations
| No. | Image | How to Find |
|---|---|---|
| 6 |  |
Found near Strife Crystallite and surrounded by red crystals. |
| 7 | 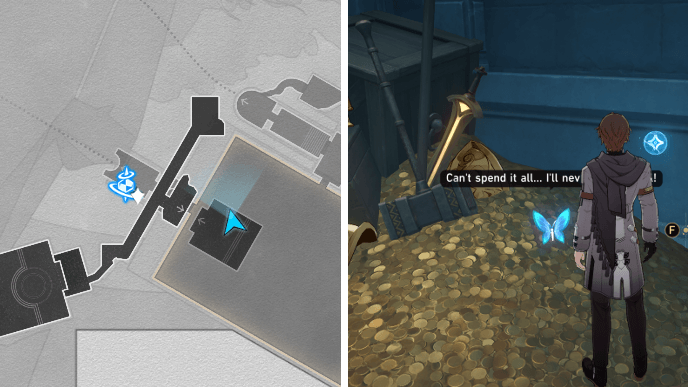 |
Surrounded by treasure and gold coins inside the room. |
| 8 | 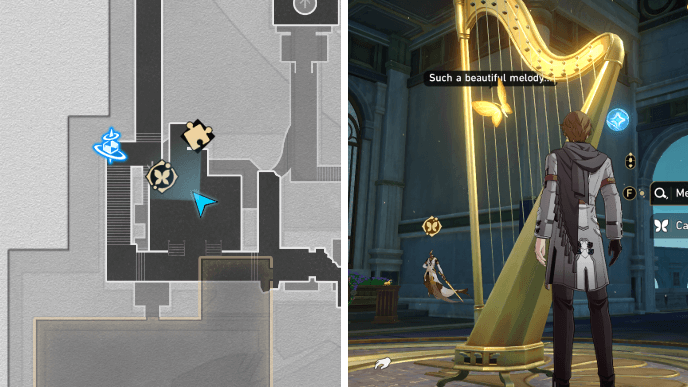 |
Found playing the harp near the Garmentmaker. |
| 9 | 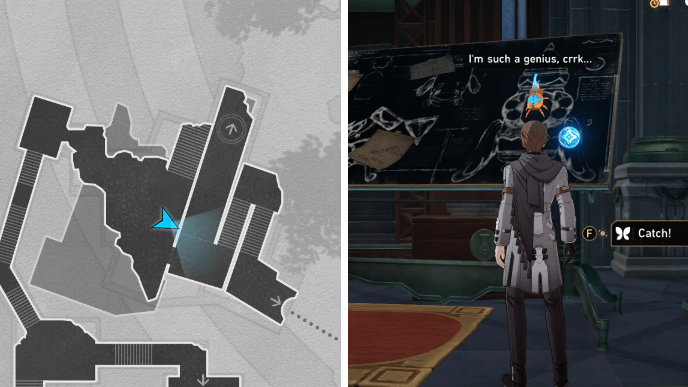 |
Found reading the blueprints. |
| 10 |  |
Near the stairs floating in the air. |
"Memortis Shore" Ruins of Time Nymph B3 Locations
| No. | Image | How to Find |
|---|---|---|
| 11 | 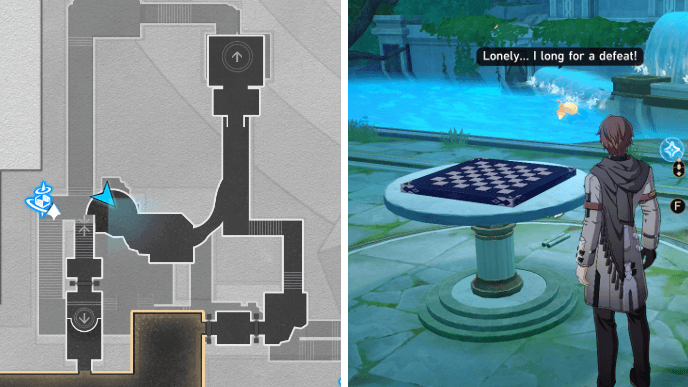 |
On top of the chessboard near the Space Anchor. |
| 12 | 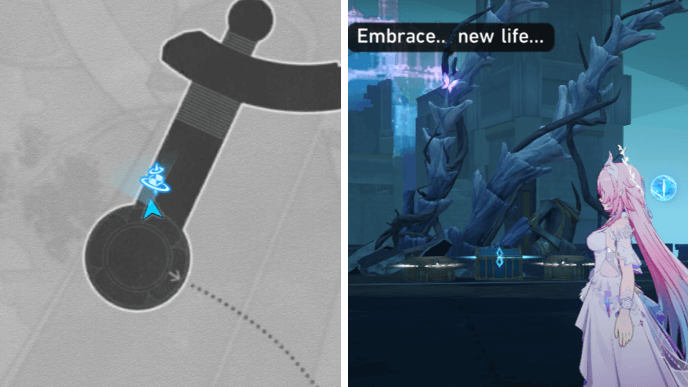 |
On the giant root near the Space Anchor. |
| 13 | 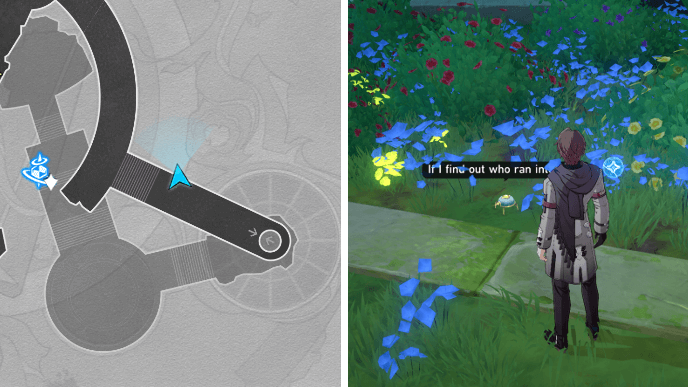 |
Beside the plants near the stairs on the path with shields. |
| 14 | 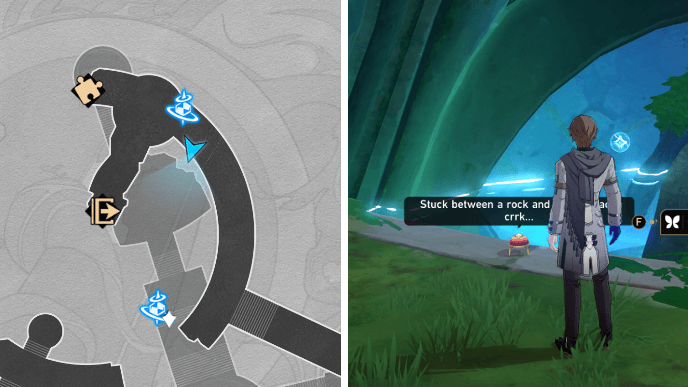 |
Near the Space Anchor area. Teleport to it, then turn left where the shields are. |
| 15 | 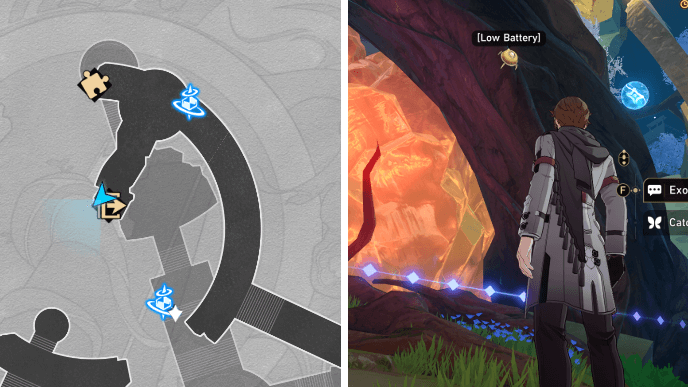 |
Found on the tree root with the giant crystal underneath. |
"Memortis Shore" Ruins of Time Nymph B4 Locations
| No. | Image | How to Find |
|---|---|---|
| 16 | 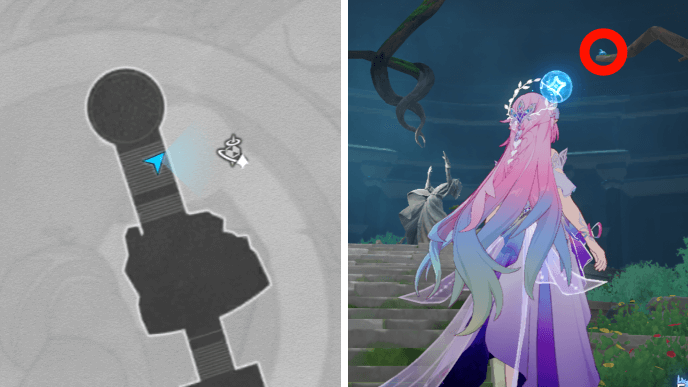 |
On top of the branch near the Phainon statue. |
| 17 |  |
On top of a rock near the elevator. |
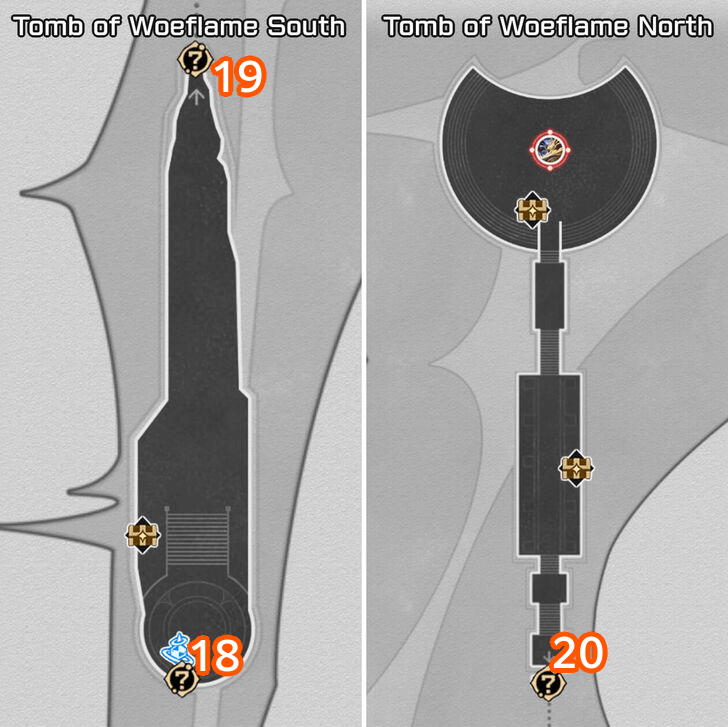
"Memortis Shore" Ruins of Time Nymph One Tomb of Woeflame Locations
| No. | Image | How to Find |
|---|---|---|
| 18 | 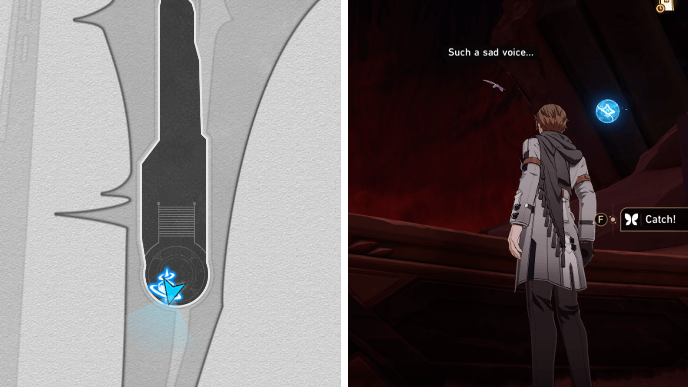 |
Behind the Space Anchor in the One Tomb of Woeflame. |
| 19 | 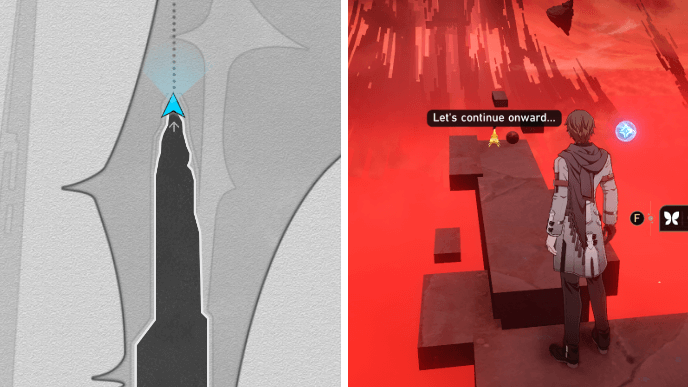 |
Found on the edge of the platform behind the Hidden Passage. |
| 20 | 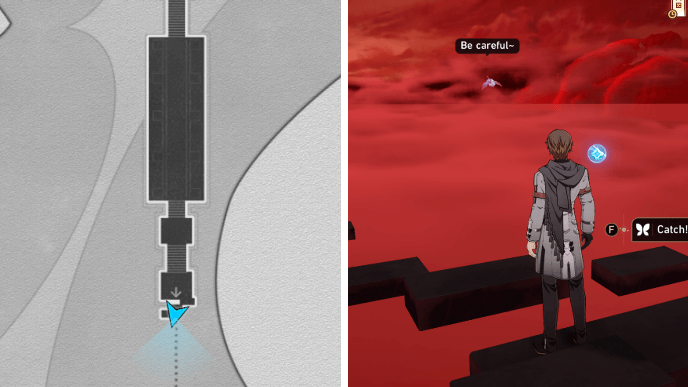 |
Also on the edge of the platform behind the Hidden Passage. |
"Nightmare's Echo" Great Tomb of the Nameless Titan Creation Nymphs
| Nightmare's Echo Creation Nymphs Map |
|---|
 See Full Image |
There are 10 Creation Nymphs to collect in "Nightmare's Echo" Great Tomb of the Nameless Titan.
"Nightmare's Echo" Great Tomb of the Nameless Titan Nymph Locations
| No. | Image | How to Find |
|---|---|---|
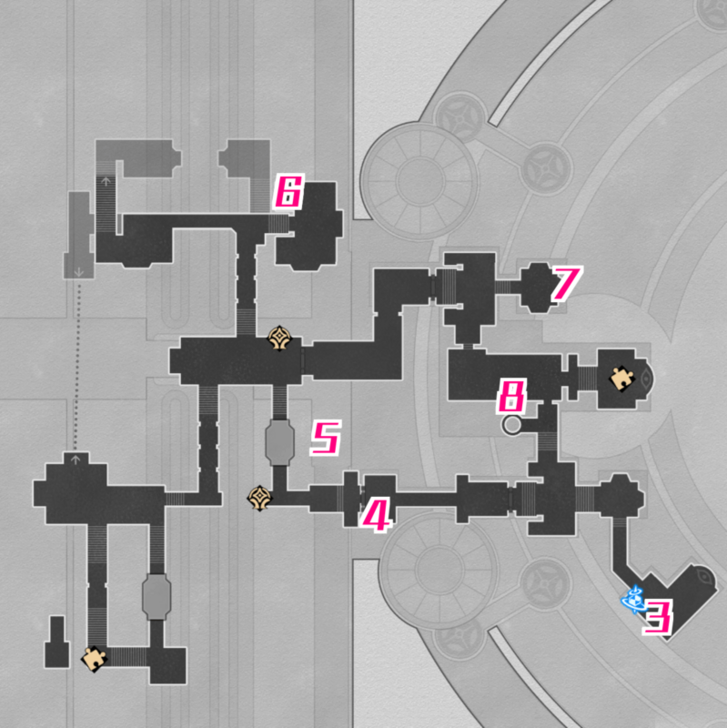
| 1 |  |
On top of the ledge behind the rubble. |
| 2 |  |
On the floor near a giant fan. |
| 3 | 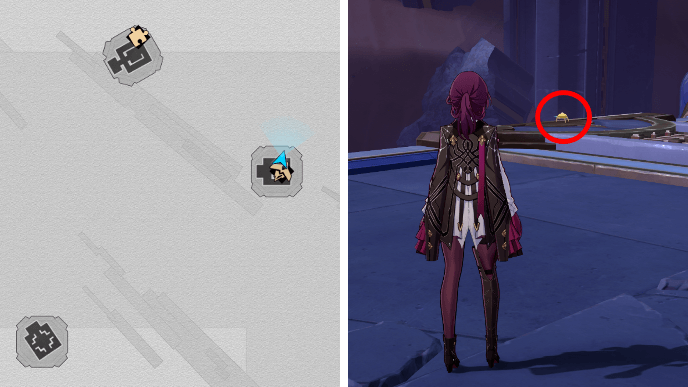 |
On the floor in the northern part of the platform. |
| 4 | 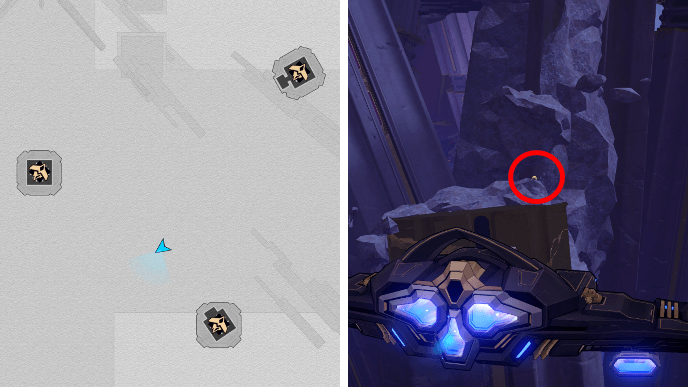 |
While using the Mistletoe, this Nymph can be found near an acceleration gate. |
| 5 |  |
On top of the broken pillar northwest of the platform. |
| 6 |  |
Can be found on a ramp near the blacktide-corroded wall. |
| 7 |  |
Ascend while using the Mistletoe. This Nymph can be found on the wall. |
| 8 |  |
Found on the ledge behind the Mistletoe's landing spot. |
| 9 |  |
On the circuit board below. It be caught when standing at the edge of the Mistletoe's landing platform. |
| 10 | 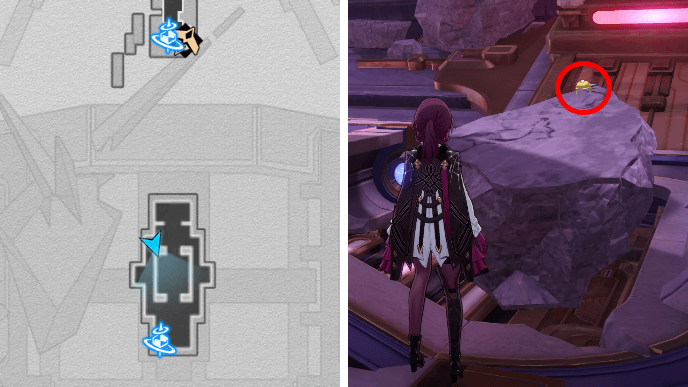 |
On top of a rubble on the northwest side of the platform. |
Creation Nymph Rewards
Get Stellar Jades and Ambrosia
For every ten Creation Nymphs collected, you get 30 Stellar Jades and 100 Ambrosia. You can claim the rewards from the Garmentmakers in their respective locations.
Hymn Tablets
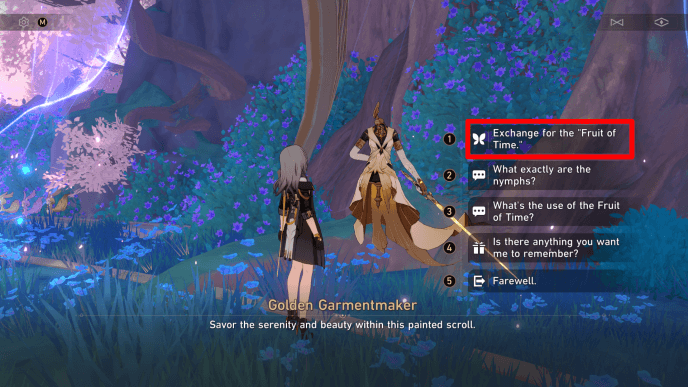
Hymn Tablets can be obtained through the Garmentmaker after collecting all Creation Nymphs within a map and by completing Chirping Secret puzzles.
You can give these Hymn Tablets to the Golden Garmentmaker at An Eternal Page in exchange for one Fruit of Time. These Fruits of Time can be used as gifts to a Chrysos Heir in An Eternal Page in exchange for Room Decorations.
Creation Nymph Information
Shape-Shifting Creatures Hidden in Amphoreus
Similar to the Origami Birds in Penacony, Creation Nymphs are special creatures you can find across Amphoreus. Capturing a certain number of Creation Nymphs will allow you to receive rewards from the Titans' blessings.
Get Help from the Garmentmaker
Creation Nymphs may be a bit difficult to spot since they have the ability to take on different forms. If you want to get hints on the locations of Creation Nymphs in an area, you can submit Memory Crystal Shards to the Garmentmaker, a golden mannequin who can provide clues.
Memory Crystal Shard Locations
Honkai: Star Rail Related Guides

All Tips and Tricks Guides
Author

All Creation Nymph Locations and Rewards
Please participate in our site
improvement survey
03/2026
improvement survey
03/2026
Would you assist in
improving Game8's site?
improving Game8's site?

×
We are listening to our users' valuable opinions and discussing how to act on them.
The information collected through this survey will be used for the purpose of improving our services. In addition, the information will only be disclosed a part of a statistic in a format that will not allow identification of personal information.
Begin Survey
Not Now
×
Please rate each item regarding Game8.co's Advertisements.
Amount of Ads
Very Dissatisfied
Somewhat Dissatisfied
Fine
Somewhat Satisfied
Highly Satisfied
Placement of Ads
Timing of Ad Display
Ad Loading Speed
Safeness of Ads
Content of Ads
×
Please rate each item regarding Game8.co's Quality of Articles.
Amount of information
Very Dissatisfied
Somewhat Dissatisfied
Fine
Somewhat Satisfied
Highly Satisfied
Frequency of updates
Speed of new information
Accuracy of articles
Understandibility of articles
Readability of sentences
×
Please rate each item regarding Game8.co's Usability of the Site.
Ease of finding information
Very Dissatisfied
Somewhat Dissatisfied
Fine
Somewhat Satisfied
Highly Satisfied
Loading Speed
Use of Color
Font Size
Visibility of Images
Easy to Understand Layout
×
Please rate each item regarding Game8.co's Message Boards, Comments.
Ease of Writing
Very Dissatisfied
Somewhat Dissatisfied
Fine
Somewhat Satisfied
Highly Satisfied
Readability
Ease in Finding Information
Comment Quality
Comment Quantity
Admin Response
×
Please rate each item regarding Game8.co's Site's new design.
Please rate our site's new design
Very Dissatisfied
Somewhat Dissatisfied
Fine
Somewhat Satisfied
Highly Satisfied
Do you think that the website's design change makes the site easier to use?
Has the new design made it easier for you to find information on the site?
Has the new design improved the overall visual appeal of the site?
How would you rate your overall satisfaction with the new design of the site?
×
How likely are you to recommend Game8 to someone you know?
Very Unlikely
0
1
2
3
4
5
6
7
8
9
10
Very Likely
If you have other opinions regarding potential improvement to the website, please share them with us. We would appreciate your honest opinion.
Note: This is a free response section, so you can proceed without entering anything.
Note: Please be sure not to enter any kind of personal information into your response.
Note: Please be sure not to enter any kind of personal information into your response.
×
Thank You
×
Thank you for participating in our survey! Your answers will help us to improve the quality of our website and services.
We hope you continue to make use of Game8.
We hope you continue to make use of Game8.
Close
Premium Articles

Rankings
Gaming News


![Monster Hunter Stories 3 Review [First Impressions] | Simply Rejuvenating](https://img.game8.co/4438641/2a31b7702bd70e78ec8efd24661dacda.jpeg/thumb)
Popular Games

Genshin Impact Walkthrough & Guides Wiki
Honkai: Star Rail Walkthrough & Guides Wiki
Umamusume: Pretty Derby Walkthrough & Guides Wiki
Pokemon Pokopia Walkthrough & Guides Wiki
Resident Evil Requiem (RE9) Walkthrough & Guides Wiki
Monster Hunter Wilds Walkthrough & Guides Wiki
Wuthering Waves Walkthrough & Guides Wiki
Arknights: Endfield Walkthrough & Guides Wiki
Pokemon FireRed and LeafGreen (FRLG) Walkthrough & Guides Wiki
Pokemon TCG Pocket (PTCGP) Strategies & Guides Wiki


Recommended Games
Diablo 4: Vessel of Hatred Walkthrough & Guides Wiki
Cyberpunk 2077: Ultimate Edition Walkthrough & Guides Wiki
Fire Emblem Heroes (FEH) Walkthrough & Guides Wiki
Yu-Gi-Oh! Master Duel Walkthrough & Guides Wiki
Super Smash Bros. Ultimate Walkthrough & Guides Wiki
Pokemon Brilliant Diamond and Shining Pearl (BDSP) Walkthrough & Guides Wiki
Elden Ring Shadow of the Erdtree Walkthrough & Guides Wiki
Monster Hunter World Walkthrough & Guides Wiki
The Legend of Zelda: Tears of the Kingdom Walkthrough & Guides Wiki
Persona 3 Reload Walkthrough & Guides Wiki


All rights reserved
Copyright © 2024 HoYoverse, COGNOSPHERE. All Rights Reserved.
The copyrights of videos of games used in our content and other intellectual property rights belong to the provider of the game.
The contents we provide on this site were created personally by members of the Game8 editorial department.
We refuse the right to reuse or repost content taken without our permission such as data or images to other sites.
You write lightless chapel as lightless council. Its just my suggestion that you should rename it. Thank you