Interplanar Jump Puzzle and Solutions
★ Exclusive: Check out the State of Meta in 4.0!
♦ Latest: 4.1 Banners and Events
♦ Phase 1: Ashveil and Hyacine
♦ Phase 2: Boothill
♦ Upcoming: Silver Wolf Lv.999, Evanescia, Elation Trailblazer
♦ Events: Wispae War Saga and Divergent Universe

Honkai: Star Rail's Interplanar Jump puzzles are 2D platforming minigames where you need to platform across a level collecting coins to reach the end. See all Interplanar Jump locations in Version 4.1 and their solutions in this guide!
List of Contents
Interplanar Jump Difficulties
Interplanar Jump Difficulty 1
| All Difficulty 1 Interplanar Jumps | |
|---|---|
| Duomension City 1 | Graphia Academy 4 |
| "World's End" Tavern 3 | "World's End" Tavern 4 |
| Lookout Cloud Station 11 | - |
Click here to jump to a specific Interplanar Jump with this difficulty.
Interplanar Jump Difficulty 2
Click here to jump to a specific Interplanar Jump with this difficulty.
Interplanar Jump Difficulty 3
Click here to jump to a specific Interplanar Jump with this difficulty.
Interplanar Jump Difficulty 4
Click here to jump to a specific Interplanar Jump with this difficulty.
Interplanar Jump Difficulty 5
Click here to jump to a specific Interplanar Jump with this difficulty.
4.1 Interplanar Jump Locations
| All 4.1 Locations | ||
|---|---|---|
| Pearluxe Tower | Lookout Cloud Station | |
Click to jump to an area.
Pearluxe Tower
| Pearluxe Tower | |||
|---|---|---|---|
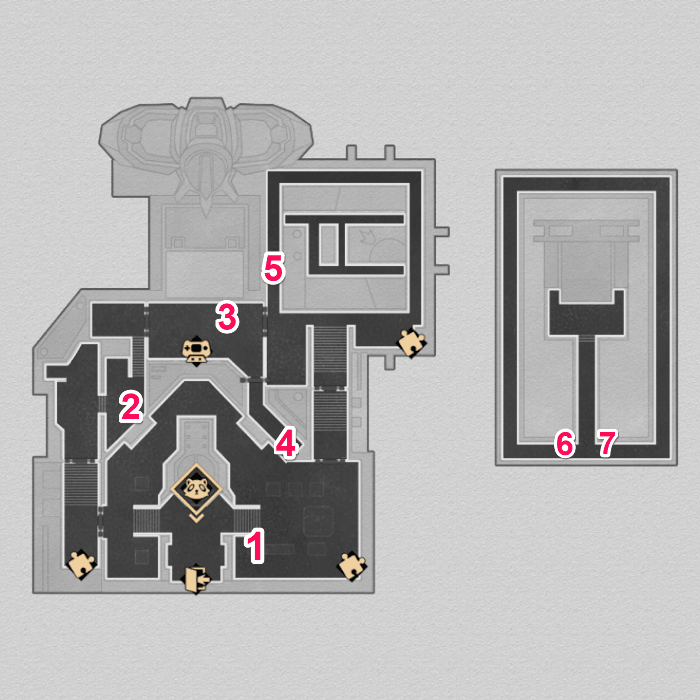 See Full Image |
|||
| Pearluxe Tower Puzzle Solutions | |||
| Puzzle 1 | Puzzle 2 | Puzzle 3 | Puzzle 4 |
| Puzzle 5 | Puzzle 6 | Puzzle 7 | - |
There are a total of 7 Interplanar Jump Puzzles in Pearluxe Tower.
Pearluxe Tower Interplanar Jump 1
This stage has a Nameless Wispae!
Crouch so you can avoid the spiky blocks and get to the next area. Once you're there, use the jumps pads get to the button. You can collect the coins if you wish, but they're optional. Jump on the button and turn it into a yellow triangle, then pull the lever to proceed to the next area.
Next, use window control and swap the platforms. Get to the top and turn the buttons into green circles to get a Wispae. Lastly, turn them into a green circle and yellow triangle to get to the next area.
Here, you can use the buttons and turn them in the following combination (Green Circle, Green Circle, Orange Square, Pink Rectangle) to get a Treasure Chest. Then, go to the right and input the combination of buttons to get to an area with a Furbo and collect the coins.
Once you're done, go back to the previous area and exit the puzzle to complete it.
▲ Back to All Pearluxe Tower Puzzles
Pearluxe Tower Interplanar Jump 2
This stage has a Nameless Wispae!
Use the lever and then use the jump pads to proceed to the right, while stepping on the red buttons along the way. Collecting the coins are optional. Next, use the rising platforms to get to the very top and go to the next area.
Here, you can use the doors with specific colored icons to teleport below. Time yourself so you can get the Treasure Chest. Step on the buttons and use levers to unlock the doors along the way. In the next area, collect the coins from the cat to get an Achievement.
Next, go to the left and follow the path until you reach a door you can use to teleport. Step on the button and then climb up to the right to go to another path which will lead you to a Wispae. Lastly, use the lever and just follow the path until the end of the puzzle.
▲ Back to All Pearluxe Tower Puzzles
Pearluxe Tower Interplanar Jump 3
Head to the right until you reach the moving platforms that have coins. They're optional, but you can keep collecting all the coins. Keep heading right until you see a desk with a Treasure Chest under it which you can get. Keep following the path until you reach the end, where there's another chest.
▲ Back to All Pearluxe Tower Puzzles
Pearluxe Tower Interplanar Jump 4
Head to the left and just jump through the gaps using the green orbs. You can collect the coins, but they're not necessary. At the very end of the puzzle, step on the button to unlock the exit and also grab a Treasure Chest.
▲ Back to All Pearluxe Tower Puzzles
Pearluxe Tower Interplanar Jump 5
You'll be chased by a monster so keep heading right until you reach the end, then step on the red button to eliminate it. Collect the Treasure Chest before leaving to finish the puzzle.
▲ Back to All Pearluxe Tower Puzzles
Pearluxe Tower Interplanar Jump 6
This stage has a Nameless Wispae!
Head to the right while collecting the coins you pass by, but it's optional. Step on the red button and keep following the path to invert the puzzle. Jump on the platforms until you reach two Hedgehogae and a lever. Pull the lever at the right time to separate them, then head to the portal on the right.
Just follow the path and enter the portals until you get to the final platform, where a chest and a Wispae is waiting for you before the exit.
▲ Back to All Pearluxe Tower Puzzles
Pearluxe Tower Interplanar Jump 7
This stage has a Nameless Wispae!
Head to the left and press or hit the buttons to get additional coins and make the platforms appear. Once you get to the furthermost platform on the right, you'll see a Wispae. To get it, turn the blocks to blue so the barrier gets removed.
Next, head to the left and just follow the path. Hit the block at the end continuously to get an Achievement. Don't forget to get the chest before exiting the puzzle.
▲ Back to All Pearluxe Tower Puzzles
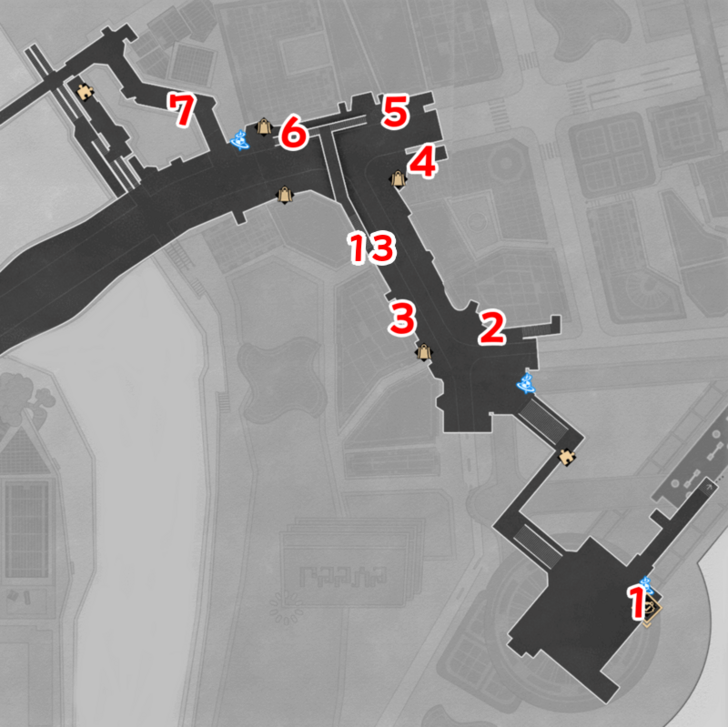
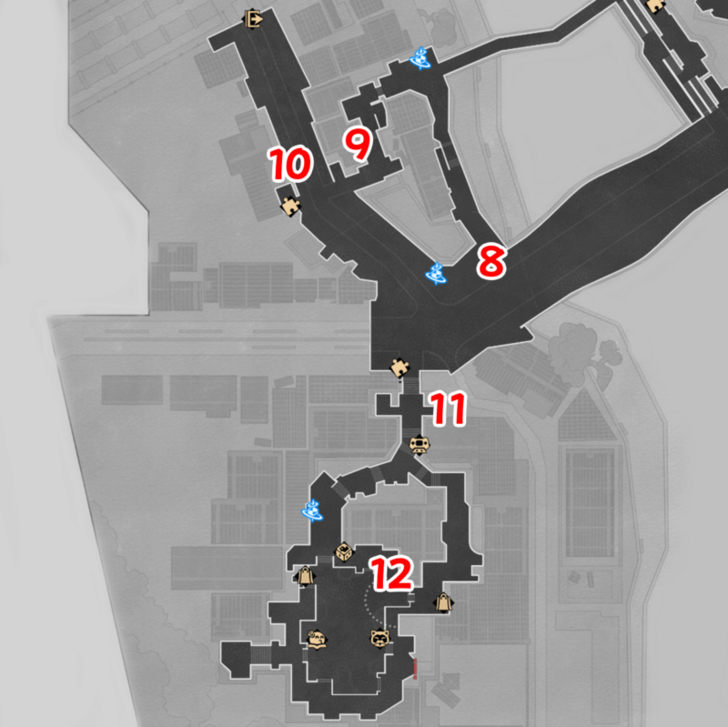
Lookout Cloud Station
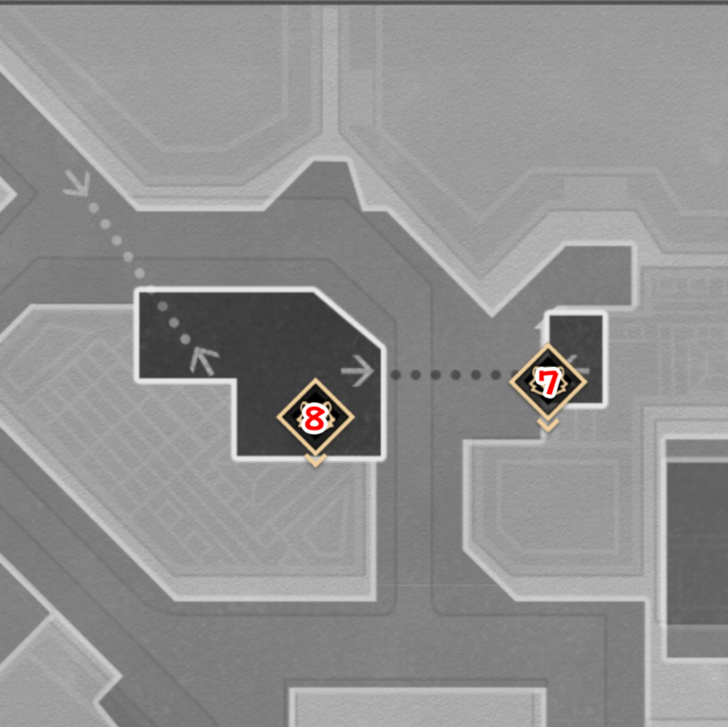
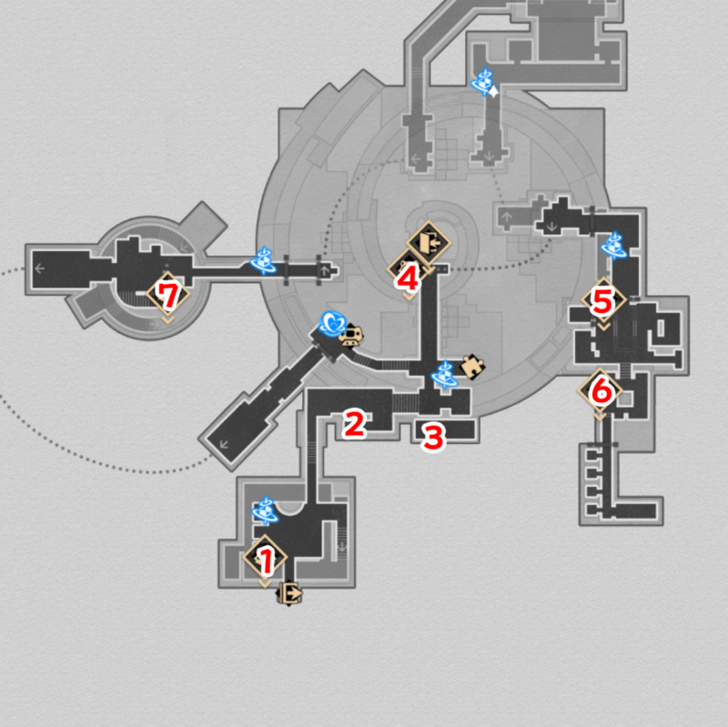
| Pearluxe Tower | |||
|---|---|---|---|
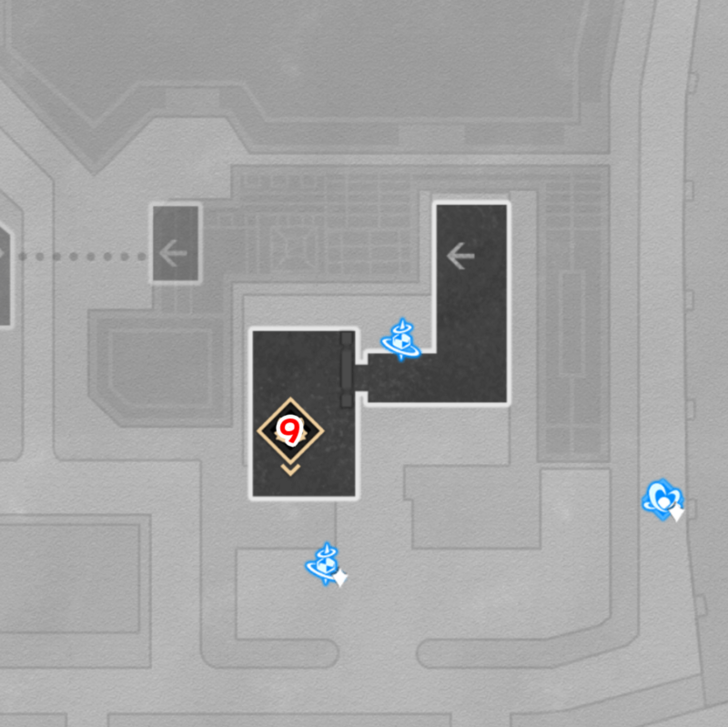
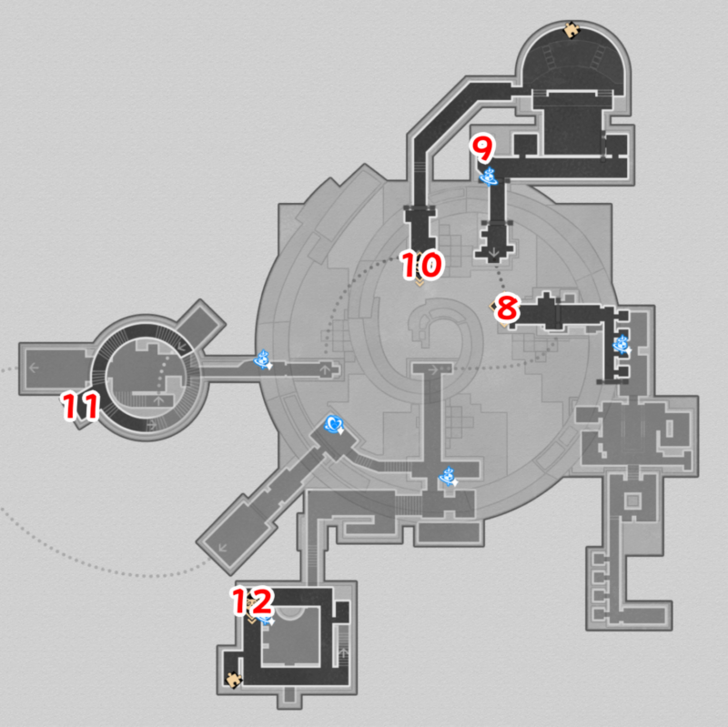
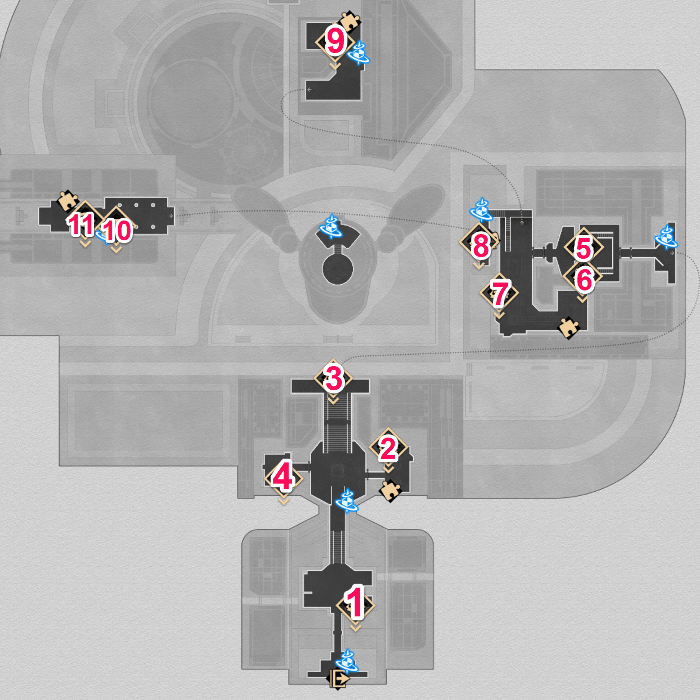 See Full Image |
|||
| Lookout Cloud Station Puzzle Solutions | |||
| Puzzle 1 | Puzzle 2 | Puzzle 3 | Puzzle 4 |
| Puzzle 5 | Puzzle 6 | Puzzle 7 | Puzzle 8 |
| Puzzle 9 | Puzzle 10 | Puzzle 11 | - |
There are a total of 11 Interplanar Jump Puzzles in Lookout Cloud Station.
Lookout Cloud Station Interplanar Jump 1
This stage has a Nameless Wispae!
For this puzzle, use your arrows to activate levers and make certain walls disappear to progress. Once you're at the last one, go to the right of the portal and shoot an arrow through the invisible wall. This will lead you to the Wispae.
Take the portal and then claim the chest just before the exit to finish the puzzle.
▲ Back to All Lookout Cloud Station Puzzles
Lookout Cloud Station Interplanar Jump 2
This stage has a Nameless Wispae!
First, head to the right and use your arrows to flip the switch and get the chest. Next, follow the path to the left until you pass the red wall. Stand on the edge and jump, then use your arrows to flip the switch and get another chest.
Keep following the path until you see the inflatables. Hit the button on the left to make the Engine of Creation inflatable win, then you can get the chest in the middle and a Wispae.
▲ Back to All Lookout Cloud Station Puzzles
Lookout Cloud Station Interplanar Jump 3
You will encounter this Interplanar Jump in the Simulacra or Simulation, or Even the Just Trailblaze Mission. Grab the thumbs up items to power up the train. You can jump on the trashcans and knock them into each other to get rid of them.
Grab the chest before the exit to complete the puzzle.
▲ Back to All Lookout Cloud Station Puzzles
Lookout Cloud Station Interplanar Jump 4
This stage has a Nameless Wispae!
Step on the buttons to raise the walls up and block the incoming missiles as you make your way to the right. When you get up on the platform, use it to jump to the Wispae in the middle. Keep following the path until you reach the portal, then grab the chest before the exit.
▲ Back to All Lookout Cloud Station Puzzles
Lookout Cloud Station Interplanar Jump 5
This stage has a Nameless Wispae!
Follow the path to the right until you come across the first portal door. Go past it, and head to the right until you see the exit. From there, triple jump onto the platform above and you'll see switches you can flip with arrows.
Flip them and you'll spawn a Furbo. Get the Furbo to the top and press the button to complete this area. Go through the portal then follow the path to collect the chest. Then, from the first portal earlier, jump on the up blocks next to a pipe.
Follow the path and you'll get a Wispae. From there, jump to the pipe above and follow the path to get to the last chest.
▲ Back to All Lookout Cloud Station Puzzles
Lookout Cloud Station Interplanar Jump 6
This stage has a Nameless Wispae!
First, jump on the platforms to the left while avoiding the flaming balls to get to the Wispae. Next, use the portal to get to the other area. You'll have to shoot multiple arrows at Phantylia while avoiding the flaming balls to finish this area.
Once you're done, head to the exit and get the chest to complete the puzzle.
▲ Back to All Lookout Cloud Station Puzzles
Lookout Cloud Station Interplanar Jump 7
This stage has a Nameless Wispae!
Use the device and move the squares around to proceed. For the first one, just move the right square to the left square. For the second one, move the square with the enemy to the leftmost area to activate the switch. Then, bring it back to the rightmost area.
You can then claim the Wispae on the top platform. Lastly, move the square you're on to the leftmost area so you can step on the red button and free the chest to finish the puzzle.
▲ Back to All Lookout Cloud Station Puzzles
Lookout Cloud Station Interplanar Jump 8
You will encounter this Interplanar Jump in the Simulacra or Simulation, or Even the Just Trailblaze Mission. Grab the thumbs up items to power up the train while avoidin the flaming balls. You'll also have to jump to avoid the rockets that some enemies fire at you.
You can jump on the trashcans and knock them into each other to get rid of them. Grab the chest at the end just before the exit to complete the puzzle.
Grab the chest before the exit to complete the puzzle.
▲ Back to All Lookout Cloud Station Puzzles
Lookout Cloud Station Interplanar Jump 9
This stage has a Nameless Wispae!
First, jump on the platforms on the left and keep going up until you get the Wispae. You can then use the moving platform to get further up, and reach the tunnel that lets you get to the next area. Don't forget to collect the chest before entering the tunnel.
In the next area, use the moving platform until you reach the topmost left edge of the room where you can get another chest. Lastly, head to the exit to complete the puzzle.
▲ Back to All Lookout Cloud Station Puzzles
Lookout Cloud Station Interplanar Jump 10
This stage has a Nameless Wispae!
Head to the right to get a Wispae, and continue down the path to get to the portal. You have to fight a paper version of the Harmonious Choir, so hit it with arrows while avoiding the missiles being thrown at you by the enemies.
Once it is defeated, head to the middle platform and claim the chest to complete the puzzle.
▲ Back to All Lookout Cloud Station Puzzles
Lookout Cloud Station Interplanar Jump 11
You will encounter this Interplanar Jump in the Simulacra or Simulation, or Even the Just Trailblaze Mission. Follow the path to the left and utilize the jump pads to get to the higher platforms. Since you're invincible, just run through the enemies and other obstacles until you reach the end.
▲ Back to All Lookout Cloud Station Puzzles
4.0 Interplanar Jump Locations
| All 4.0 Locations | ||
|---|---|---|
| Duomension City | Graphia Academy | |
| Dovebrook District | "World's End" Tavern | |
Click to jump to an area.
Duomension City
| Duomension City | |||
|---|---|---|---|
 F1 East |
 F1 West |
||
| Duomension City Puzzle Solutions | |||
| Puzzle 1 | Puzzle 2 | Puzzle 3 | Puzzle 4 |
| Puzzle 5 | Puzzle 6 | Puzzle 7 | Puzzle 8 |
| Puzzle 9 | Puzzle 10 | Puzzle 11 | Puzzle 12 |
| Puzzle 13 | |||
There are a total of 13 Interplanar Jump Puzzles in Duomension City. The first Interplanar Jump is found in the metro station and is accessed through the main story, serving as the tutorial for the minigame.
Duomension City Interplanar Jump 1
Duomension City Interplanar Jump 1 will serve as your tutorial stage. Learn how to jump, collect Pixcoins, and use the rainbow ramps for traversal here.
The second portion of the stage will have moving platforms that go in tandem with the music.
▲ Back to All Duomension City Puzzles
Duomension City Interplanar Jump 2
This stage will introduce you to buttons and conveyor belts. Hold onto the conveyor belts to move in the direction indicated.
This stage has a mini challenge game. Interact with a switch to manipulate walls and let the Hedgehogae press all buttons to gain access to the Treasure Chest.
▲ Back to All Duomension City Puzzles
Duomension City Interplanar Jump 3
This stage has a Nameless Wispae!
This stage teaches you how to cling to walls by holding down a directional button. You will climb up to the top to finish the level.
Use the blue walls to head to the top. There are green orbs you can find on the way up that you can use for extra jumps. At the end of the level, you will find a Nameless Wispae.
▲ Back to All Duomension City Puzzles
Duomension City Interplanar Jump 4
| Video | |
|---|---|
| Invisible Wall | 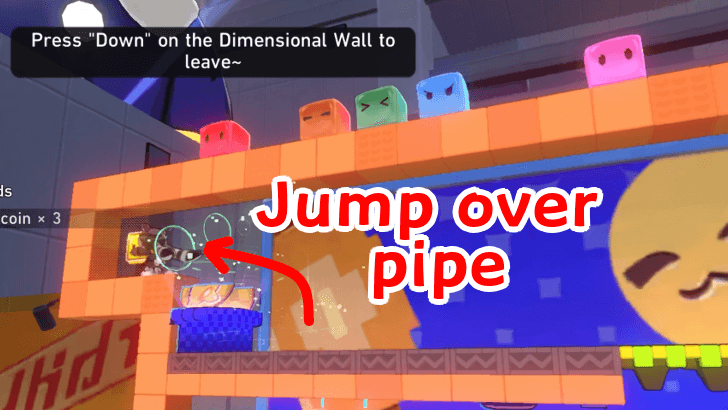 |
You must press all the buttons while avoiding the Hedgehogae. You can also have the Hedgehogae press all the buttons by manipulating the walls with the switches.
There is an invisible wall at the end of the stage. Jump over the blue pipe to access a hidden room with a Nameless Wispae in it.
▲ Back to All Duomension City Puzzles
Duomension City Interplanar Jump 5
Cross the moving platforms and flip the switch on each side to manipulate the walls. Use the green arrows as your directions on where you should go.
▲ Back to All Duomension City Puzzles
Duomension City Interplanar Jump 6
Red blocks will disappear in a few seconds after being touched, so be sure to move fast to avoid falling.
This stage has a mini challenge game involving the Hedgehogae. Complete it to gain access to the treasure chest.
▲ Back to All Duomension City Puzzles
Duomension City Interplanar Jump 7
| Video | |
|---|---|
| Invisible Wall | 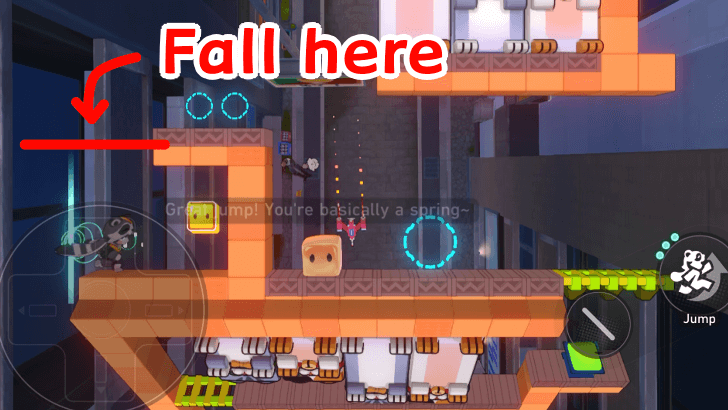 |
This stage features cat platforms that will pop in and out for you to climb up. Be careful, as they can crush you if you're not careful. There will be a chest at the end of this stage.
There is an invisible wall you can find after the stage rotates the second time. You can find it beside the two coins to access a Nameless Wispae.
▲ Back to All Duomension City Puzzles
Duomension City Interplanar Jump 8
This stage has a Nameless Wispae!
Run through the Ice Blocks to build up momentum and jump a longer distance. Do be careful since these blocks are slippery and can make you fall. There is a Nameless Wispae in the middle of the stage.
▲ Back to All Duomension City Puzzles
Duomension City Interplanar Jump 9
This stage has a Nameless Wispae!
For the first part, use the springs to go to the portal. In the second part, avoid the Hedgehogae and make your way to the mini challenge game. There will be a Nameless Wispae at the end of the stage.
▲ Back to All Duomension City Puzzles
Duomension City Interplanar Jump 10
This stage has the Fake Furbo challenge. Simply touch the Fake Furbo by having it use the spring. The second part has an invisible bridge with a trail of coins.
▲ Back to All Duomension City Puzzles
Duomension City Interplanar Jump 11
This stage has a Nameless Wispae!
There is a portal in the middle of the stage. Make sure to collect all the coins and one Nameless Wispae on the floating platforms surrounding it.
There is also a treasure chest at the end of the stage.
▲ Back to All Duomension City Puzzles
Duomension City Interplanar Jump 12
For the Bizarre Melody Puzzle, Input the following commands: ⭡, ⭧, ⭩, ⭨, ⭢, ⭦, ⭣, ⭦. By the time you exit the stage, you will enter a locked room.
Duomension City Interplanar Jump 13
This stage has two Nameless Wispaes!
You can find Nameless Wispaes and a Treasure Chest underneath the red blocks, which can be accessed by stepping on them.
Graphia Academy
| Graphia Academy | |||
|---|---|---|---|
 F1 |
 F2 |
||
| Graphia Academy Puzzle Solutions | |||
| Puzzle 1 | Puzzle 2 | Puzzle 3 | Puzzle 4 |
| Puzzle 5 | Puzzle 6 | Puzzle 7 | Puzzle 8 |
| Puzzle 9 | Puzzle 10 | Puzzle 11 | Puzzle 12 |
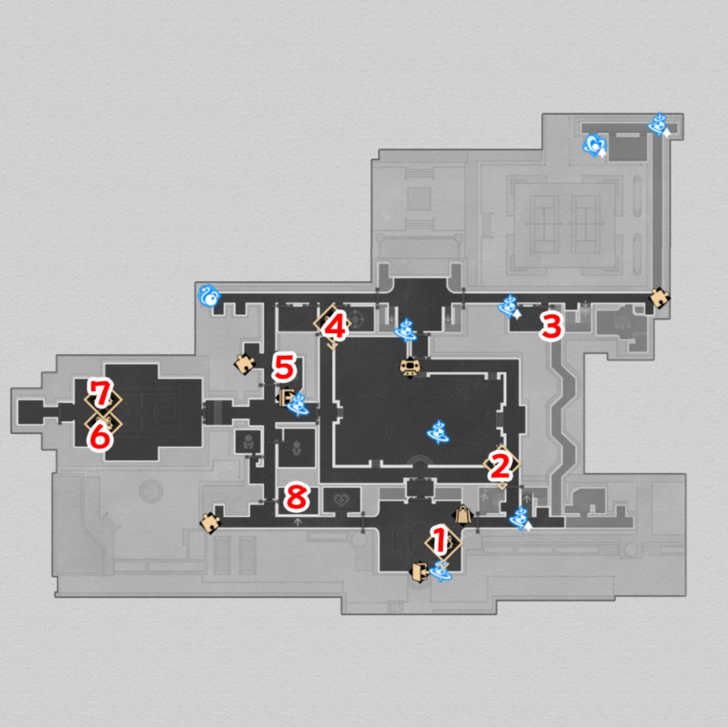
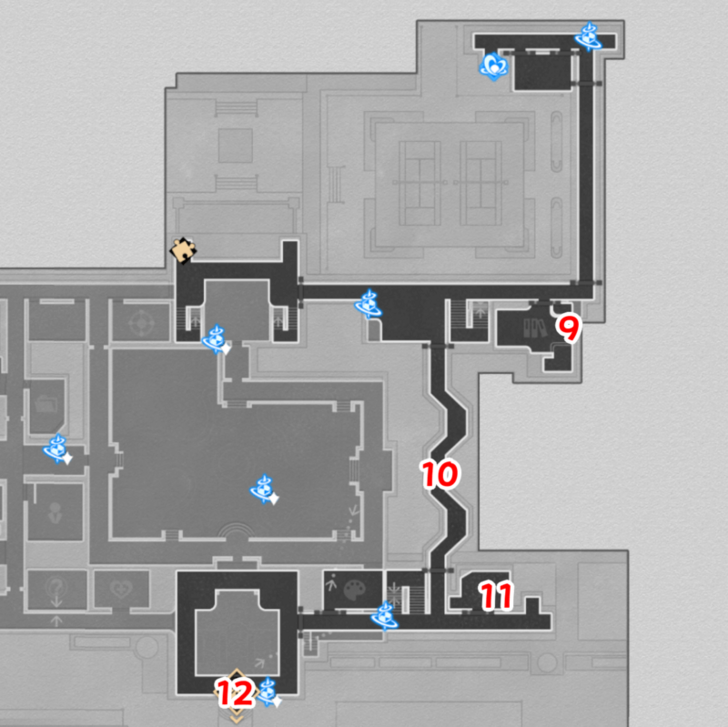
There are a total of 12 Interplanar Jump Puzzles in Duomension City. The first Interplanar Jump can be accessed through the main story.
Graphia Academy Interplanar Jump 1
This stage has two Nameless Wispaes!
The first time you will use this during the Fundamentals of Imagenesis mission, go to the left path to reach the rooftop. You will unlock access to a third jump.
For your second playthrough after entering the portal, jump up to the path on the right to get two Nameless Wispaes and one Treasure Chest.
▲ Back to All Graphia Academy Puzzles
Graphia Academy Interplanar Jump 2
This stage has two Nameless Wispaes!
You will access this for the first time during The Discreet Charm of a Streamer Girl mission. This stage will teach you how Aesthetic Windows work. Use it to unlock access to other paths by swapping windows.
You can find two Nameless Wispaes at each end of the top part of the stage. There is also a Treasure Chest in the middle of the stage, which you can access through Aesthetic Windows.
▲ Back to All Graphia Academy Puzzles
Graphia Academy Interplanar Jump 3
This stage has two Nameless Wispaes!
To solve the Aesthetic Windows puzzle, make it so it looks like 4 + 2 = 6. There is a Nameless Whispae resting on top of the number 4.
You can find another Nameless Whispae at the top of the rotating Blue Blocks near the exit.
▲ Back to All Graphia Academy Puzzles
Graphia Academy Interplanar Jump 4
This stage has a Nameless Wispae!
This stage introduces Bomb Buttons that you can use to open up new paths. There is a Nameless Wispae at the far left part of the stage, which can be found by falling.
▲ Back to All Graphia Academy Puzzles
Graphia Academy Interplanar Jump 5
This stage has a Nameless Wispae!
After entering the Pink Portal, use the Hedgehogae to press the buttons and open up a path. Once you've entered the portal, head left to find a Nameless Wispae.
You will find a Bountiful Treasure near the end of the stage.
▲ Back to All Graphia Academy Puzzles
Graphia Academy Interplanar Jump 6
This stage can be access during The Discreet Charm of a Streamer Girl mission. Use the switches to open up new paths.
▲ Back to All Graphia Academy Puzzles
Graphia Academy Interplanar Jump 7
This stage has a Nameless Wispae!
The Blue Blocks will sink when you stand on them and will resurface when you're not standing on them. There is a Treasure Chest at the topmost part of the first area.
You can find a Nameless Wispae in the middle of the stage on top of the blue blocks. Interacting with the switch at the end will open up the storage area that leads to a Treasure Chest.
▲ Back to All Graphia Academy Puzzles
Graphia Academy Interplanar Jump 8
This stage uses invisible blocks. These blocks can be seen when up close and will glow orange when stepped on.
At the end of the stage, use Aesthetic Windows to form an angry face to unlock the Treasure Chest and gain access to a Nameless Wispae after exiting.
▲ Back to All Graphia Academy Puzzles
Graphia Academy Interplanar Jump 9
This stage has two Nameless Wispaes!
After entering each floor, make sure to go to the left path first to collect a Treasure Chest and Nameless Wispae respectively. On the second set of moving blue blocks, use them to reach the second Nameless Wispae.
At the end of the stage, you will find a Treasure Chest blocking the exit.
▲ Back to All Graphia Academy Puzzles
Graphia Academy Interplanar Jump 10
This stage has three Nameless Wispaes!
Use the arrows to flip the switches and open up paths. You will have access to the plunger, which turns your arrows into steppable platforms.
There are three Nameless Wispaes. You can find one near the beginning of the stage, one at the middle after getting the Plunger Arrow, and one at the very top near the exit.
▲ Back to All Graphia Academy Puzzles
Graphia Academy Interplanar Jump 11
Move around the Aesthetic Windows to access the button that will open up the path. For the rest of the stage, you will have to bounce on springs to reach the end.
Use Aesthetic Windows again to make a shape of a flower in a vase to open up the exit.
▲ Back to All Graphia Academy Puzzles
Graphia Academy Interplanar Jump 12
This stage has the Fake Furbo challenge. Use the Aesthetic Windows to adjust the stage, which will help you reach the Fake Furbo.
Once you've touched the Fake Furbo, you will receive Stellar Jades.
▲ Back to All Graphia Academy Puzzles
Dovebrook District
| Dovebrook District | |||||||||||
|---|---|---|---|---|---|---|---|---|---|---|---|
 F1 |
 F2 |
||||||||||
 F3 |
|||||||||||
| Dovebrook District Puzzle Solutions | |||||||||||
| Puzzle 1 | Puzzle 2 | Puzzle 3 | |||||||||
| Puzzle 4 | Puzzle 5 | Puzzle 6 | |||||||||
| Puzzle 7 | Puzzle 8 | Puzzle 9 | |||||||||
Dovebrook District Interplanar Jump 1
Collect all the coins and avoid the spiky spinning platform. Once you get to the other side, climb up to get the Treasure Chest.
▲ Back to All Dovebrook District Puzzles
Dovebrook District Interplanar Jump 2
This stage has a Nameless Wispae!
Collect all the coins and use the ice blocks to get a running start and launch yourself into two of the hidden areas, both of which have chests. There is also a Wispae at the start, just follow the path upwards, which leads into another hidden area.
▲ Back to All Dovebrook District Puzzles
Dovebrook District Interplanar Jump 3
This stage has a Nameless Wispae!
Use the portal at the start to transition to the next area, where most of the coins and chests are located. Some parts of this puzzle will require you to lead the Hedgehogae as well. Once you get to the part where you'll have a clone, just time your jump on the moving platform to clear it.
There's also a Nameless Wispae behind a hidden wall in the Hedgehogae stage as well.
▲ Back to All Dovebrook District Puzzles
Dovebrook District Interplanar Jump 4
This stage has a Nameless Wispae!
Collect the coins, and at the end of the stage, there will be a treasure chest just past the exit portal. There's also a Nameless Wispae behind a hidden wall to the right after you transfer to the next area.
▲ Back to All Dovebrook District Puzzles
Dovebrook District Interplanar Jump 5
This stage has a Nameless Wispae!
At the start of the stage, jump down on the right underwater platform to get the Nameless Wispae in the hidden area. Then, collect all the coins until the end.
You can use the platform to climb to the very top of the screen and go to another area by heading left, where you can collect two Treasure Chests. Avoid the spikes and the Hedgehogae as well while going through the stage.
▲ Back to All Dovebrook District Puzzles
Dovebrook District Interplanar Jump 6
At the start of the stage, jump down to the left to get a Treasure Chest. Proceed with the stage and fix the broken heart to get to the next area. Here, just collect the coins until you reach the very end. Use the jump pad to get to the high platform and exit the level.
▲ Back to All Dovebrook District Puzzles
Dovebrook District Interplanar Jump 7
For this stage, just ride the platform down while collecting the coins. You can also collect a Bountiful Chest just before the exit.
▲ Back to All Dovebrook District Puzzles
Dovebrook District Interplanar Jump 8
This stage has a Nameless Wispae!
At the start of the stage, go to the right and jump on the moving platform to remove the spikes. Collect the coins and keep riding platforms to get to the top. Use the Plunger Arrows to climb the walls and proceed to the next stage. Once you're on the green bridge, drop down to reveal a secret area where the Wispae is.
▲ Back to All Dovebrook District Puzzles
Dovebrook District Interplanar Jump 9
This stage has a Nameless Wispae!
Go to the right and fix the platforms by dragging the one with the switch near you and placing the spiky platform below. You'll also see the Wispae near the spikes, so grab it once you descend. Follow the path to the right and continue until you reach the elevator. Ride it to the top to get to the exit. There will be a Treasure Chest nearby as well.
▲ Back to All Dovebrook District Puzzles
"World's End" Tavern
| "World's End" Tavern | |||||||||||
|---|---|---|---|---|---|---|---|---|---|---|---|
 F1 |
 F2 |
||||||||||
 F3 |
|||||||||||
| World's End Tavern Puzzle Solutions | |||||||||||
| Puzzle 1 | Puzzle 2 | Puzzle 3 | |||||||||
| Puzzle 4 | Puzzle 5 | Puzzle 6 | |||||||||
| Puzzle 7 | Puzzle 8 | Puzzle 9 | |||||||||
| Puzzle 10 | Puzzle 11 | Puzzle 12 | |||||||||
| Puzzle 13 | Puzzle 14 | - | |||||||||
World's End Tavern Interplanar Jump 1
Collect all the coins, and once you see a shelf you can hop on, jump on it to get to the Wispae. After that, just collect all the coins and the Treasure Chest on one of the platforms at the end before exiting.
▲ Back to All World's End Tavern Puzzles
World's End Tavern Interplanar Jump 2
Collect all the coins until you reach the puzzle where you have to flip switches. Flip all the switches on the bottom to fill up the squares, then flip the topmost switch to complete the puzzle.
For the next part of the stage, you have to shoot arrows to activate the switches. The last switch will need you to shoot the arrow from the previous side so that the arrow connects. After that, just head out of the level to complete it.
▲ Back to All World's End Tavern Puzzles
World's End Tavern Interplanar Jump 3
This stage has a Nameless Wispae!
Here, just collect the coins and use the portal to get to the next area. You'll also see a Wispae in this area, which you can collect.
▲ Back to All World's End Tavern Puzzles
World's End Tavern Interplanar Jump 4
First, collect the coins and make your way to the end to claim a chest. After that, go back to the start and play the music but reversed (Right Right, Left, Left, Down, Down, Up, Up) to trigger the mechanism and unlock the next area.
In the next area, just time your jumps, and you'll make it to the very end, where you get another chest and some achievements.
World's End Tavern Interplanar Jump 5
Collect all the coins and use the plunger arrows to make platforms that help you cross the spikes.
▲ Back to All World's End Tavern Puzzles
World's End Tavern Interplanar Jump 6
This stage has a Nameless Wispae!
First, make the Hedgehogae fall on the button by flipping the switch at the right time to proceed. In the next area, you'll have to fire arrows at the Hedgehogae right as the other one is about to press the button on their side to fully open the wall on the right.
You will also see a Wispae you can claim once you proceed down the pipe, just before the exit.
▲ Back to All World's End Tavern Puzzles
World's End Tavern Interplanar Jump 7
This stage has a Nameless Wispae!
Just collect the coins until you get to the next area. From here, use your arrow to shoot at the switch on the top to bring the other platform down and remove the stone below, which gives you a chest.
In the next area, shoot the switch with your arrow again to make the Hedgehogae fall and collect a Wispae. In the last area, there's a chest at the top platform, so use the green orbs to continue jumping until you reach the top.
▲ Back to All World's End Tavern Puzzles
World's End Tavern Interplanar Jump 8
Collect the coins and use the switches to get down to the very bottom, where a treasure chest is. Claim it, and go to the right side of the stage to climb back up and head to the exit.
▲ Back to All World's End Tavern Puzzles
World's End Tavern Interplanar Jump 9
This stage has a Nameless Wispae!
Collect the coins and time activating the switches to make the ghosts pass through and hit the switches on the other side. For the next ones, you have to use your arrows to flip the switches instead. You'll also get a Wispae in one of the switch rooms.
There will also be a Treasure Chest at the last area, before the stage's exit.
▲ Back to All World's End Tavern Puzzles
World's End Tavern Interplanar Jump 10
For this stage, just collect all the coins and make your way down to the exit.
▲ Back to All World's End Tavern Puzzles
World's End Tavern Interplanar Jump 11
Follow the path to the right and use the green orbs to restore your jumps. Make your way across and get all the coins. For the next area, just step on or hit the switches to blow up the rock and get the chest.
▲ Back to All World's End Tavern Puzzles
World's End Tavern Interplanar Jump 12
For this stage, time your jumps on the platforms so you don't fall on the spikes. You can also use the plunger arrows to make platforms for you to hop onto. In the last part of the stage, you have to use your plunger arrows to shoot the switches on the other side.
▲ Back to All World's End Tavern Puzzles
World's End Tavern Interplanar Jump 13
This stage has a Nameless Wispae!
For this stage, follow the right side until you see a giant picture frame. Hop on the platform and use the teleporter to get into it. Jump on the platforms until you meet your counterpart, then exit the frame.
Follow the left side and collect the coins until you see a Wispae in the picture frame. Keep going left and use the teleporter at the top platform to collect another Wispae in another picture frame. Exit the frame and use the teleporter below the platforms to get to the exit.
▲ Back to All World's End Tavern Puzzles
World's End Tavern Interplanar Jump 14
In this stage, cling to the walls as you go down to avoid landing on the spikes while collecting all the coins. At the very bottom, you can use a plunger arrow to get to the treasure chest. Exit the stage and ride a platform all the way down to finish the puzzle.
▲ Back to All World's End Tavern Puzzles
Interplanar Jump Information
Explore a 2D Platforming Minigame

In Interplanar Jump, the Trailblazer transforms into Trailblazemon to navigate and explore a 2D Platforming Level while collecting coins. There are different rewards for each stage, such as Treasure Chests and Nameless Wispaes.
Each stage has different mechanics where you'll need to use multi-jumps, form switching, and other special mechanics to explore each stage and reach the end.
Honkai: Star Rail Related Guides

All Tips and Tricks Guides
Comment
There's 13 puzzle instead of 12 in duomension city
Author

Interplanar Jump Puzzle and Solutions
Premium Articles

Rankings
Gaming News


Popular Games

Genshin Impact Walkthrough & Guides Wiki
Umamusume: Pretty Derby Walkthrough & Guides Wiki
Crimson Desert Walkthrough & Guides Wiki
Monster Hunter Stories 3: Twisted Reflection Walkthrough & Guides Wiki
Honkai: Star Rail Walkthrough & Guides Wiki
Pokemon Pokopia Walkthrough & Guides Wiki
The Seven Deadly Sins: Origin Walkthrough & Guides Wiki
Wuthering Waves Walkthrough & Guides Wiki
Zenless Zone Zero Walkthrough & Guides Wiki
Arknights: Endfield Walkthrough & Guides Wiki


Recommended Games
Fire Emblem Heroes (FEH) Walkthrough & Guides Wiki
Diablo 4: Vessel of Hatred Walkthrough & Guides Wiki
Cyberpunk 2077: Ultimate Edition Walkthrough & Guides Wiki
Yu-Gi-Oh! Master Duel Walkthrough & Guides Wiki
Super Smash Bros. Ultimate Walkthrough & Guides Wiki
Pokemon Brilliant Diamond and Shining Pearl (BDSP) Walkthrough & Guides Wiki
Elden Ring Shadow of the Erdtree Walkthrough & Guides Wiki
Monster Hunter World Walkthrough & Guides Wiki
The Legend of Zelda: Tears of the Kingdom Walkthrough & Guides Wiki
Persona 3 Reload Walkthrough & Guides Wiki


All rights reserved
Copyright © 2024 HoYoverse, COGNOSPHERE. All Rights Reserved.
The copyrights of videos of games used in our content and other intellectual property rights belong to the provider of the game.
The contents we provide on this site were created personally by members of the Game8 editorial department.
We refuse the right to reuse or repost content taken without our permission such as data or images to other sites.
In Dovebrook District Interplanar Jump 4, there is a cut in the video that makes it impossible for me to understand how you went to get the Wispea? I have been showing the video down and trying my best to understand how tf your wall has disappeared but I don't have a single clue or what happened?