All Prophecy Tablet Puzzle Solutions
★ Exclusive: Check out the State of Meta in 4.0!
♦ Latest: 4.1 Livestream Redeem Codes
♦ Phase 2: Sparkxie, Sparkle, Cerydra, Rappa
♦ Upcoming: Ashveil, Silver Wolf Lv.999, Evanescia
♦ Events: Cosmicon, Roll On!, Ding! Arcadia Fun-Time Clock-In Essentials
There are 44 Prophecy Tablet puzzles found in Honkai: Star Rail's Amphoreus. Check out all Prophecy Tablet locations and their solutions in this guide, as well as the one for the CRRK Prophecy Tablet!
List of Contents
- All Prophecy Tablet Puzzles
- "Strife Ruins"
- "Abyss of Fate"
- "Bloodbathed Battlefront"
- "Murmuring Woods"
- "Sanctum of Prophecy"
- "Demigod Council"
- "Dragonbone City"
- "Fortress of Dome"
- "Cloudedge Bastion Ruins"
- "Lightless Chapel"
- "Fallen Twilight City"
- Aedes Elysiae
- "Warbling Shores"
- "Radiant Scarwood"
- "Universal Matrix"
- "Nightmare's Echo"
- "Memortis Shore"
- Puzzle Information
- Related Guides
All Prophecy Tablet Puzzles
Click the links to jump to an area's puzzles!
Strife Ruins Castrum Kremnos Prophecy Tablets
| Strife Ruins Castrum Kremnos Prophecy Tablets Location | |
|---|---|
 |
 |
| "Strife Ruins" Puzzle Solutions | |
| Puzzle 1 | Puzzle 2 |
| Puzzle 3 | Puzzle 4 |
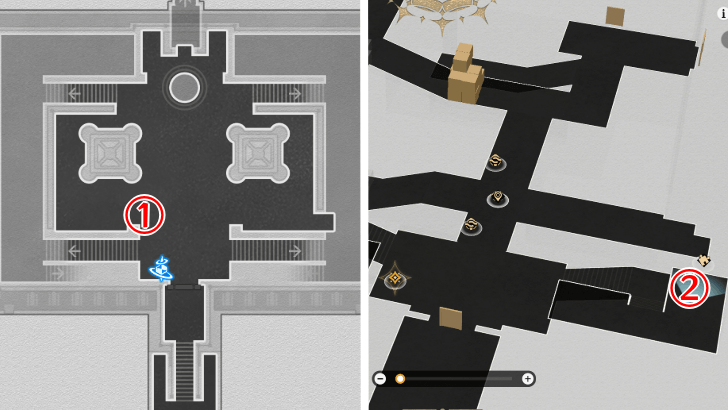
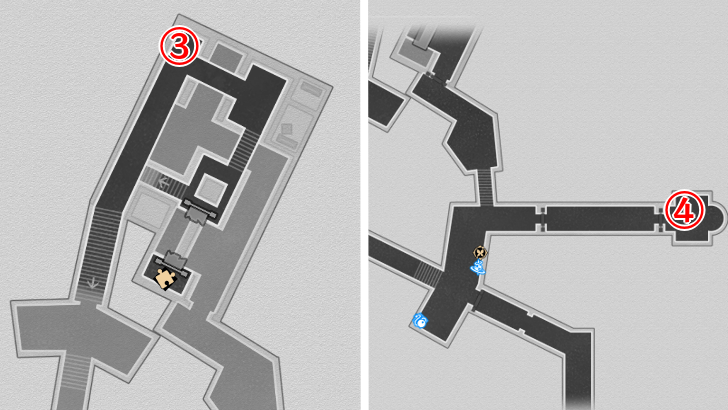
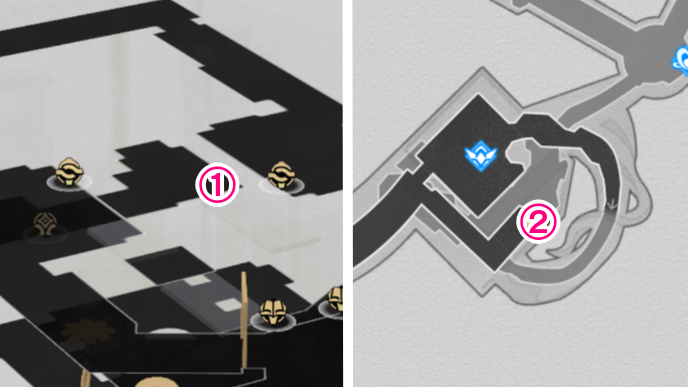
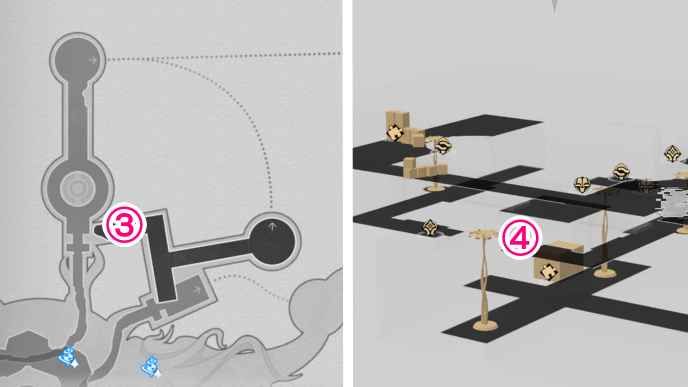
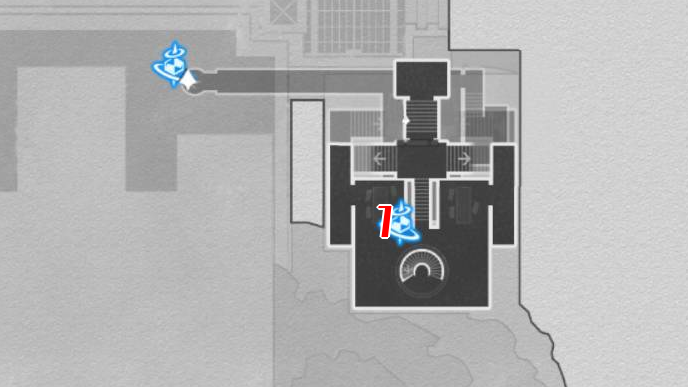
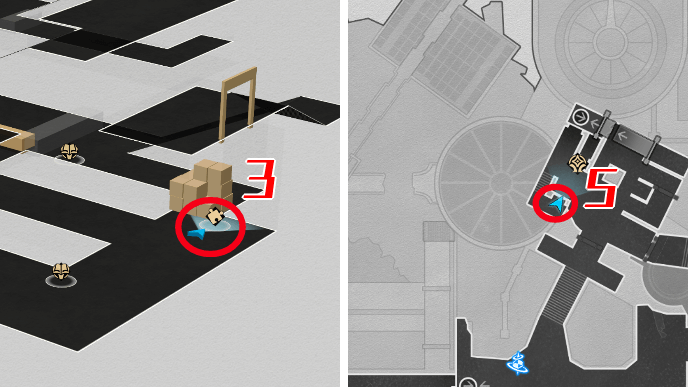
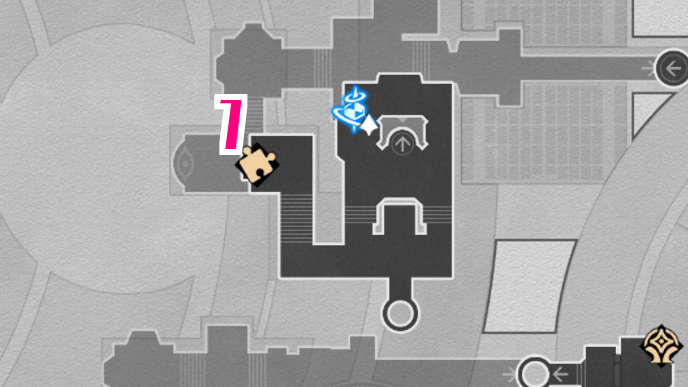
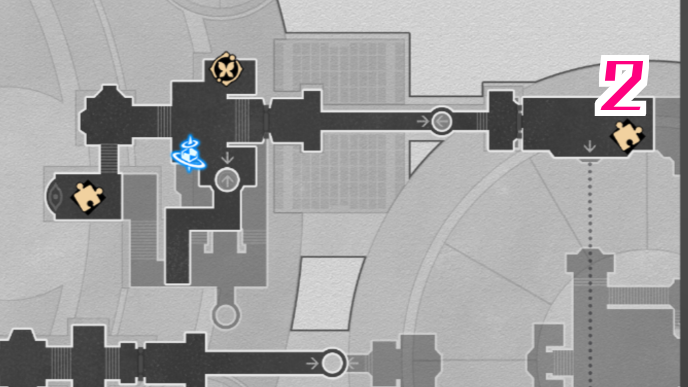
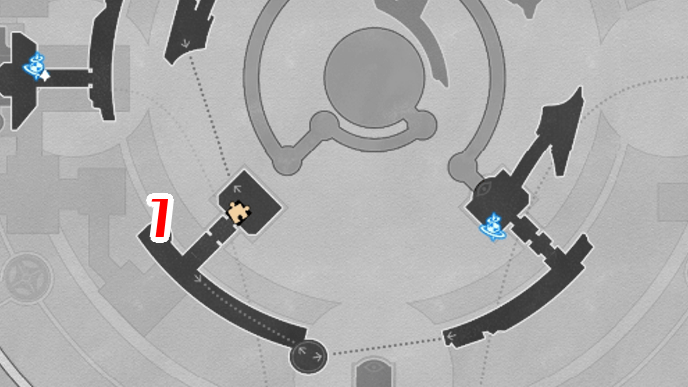
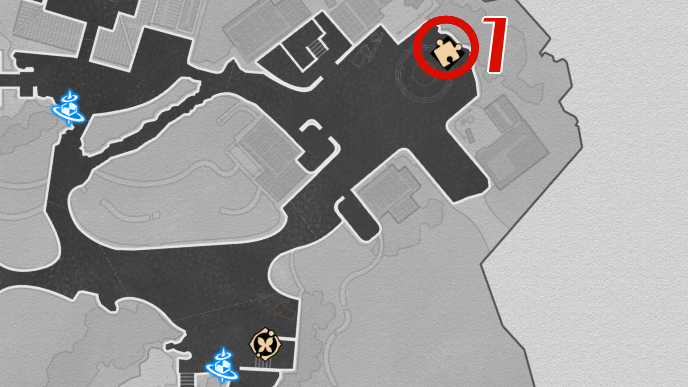
The first two Prophecy Tablets in Strife Ruins can be found as long you progress the Main Story! The third Prophecy Tablet is on F2. It is on the edge of a platform, after you climb some stairs.
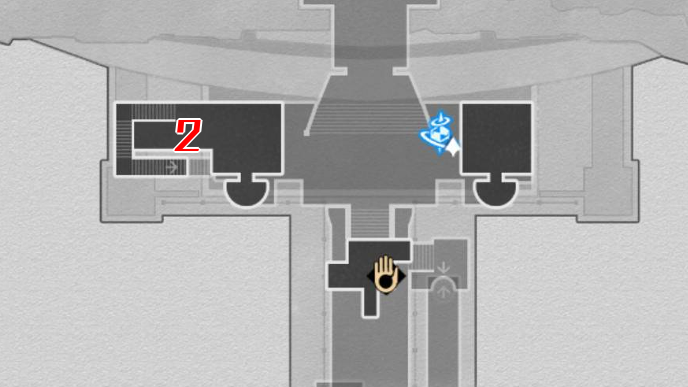
You'll encounter the final Prophecy Tablet during the Wasteland, Hark Back Glory of Old quest. You have to go right of the hall, after you place the Hand of Zagreus to create a bridge.
▲ Back to All Amphoreus Locations
Strife Ruins Prophecy Tablet 1
| Strife Ruins Prophecy Tablet 1 Solution | |
|---|---|
| 1 |  Put the square in the center. |
| 2 | 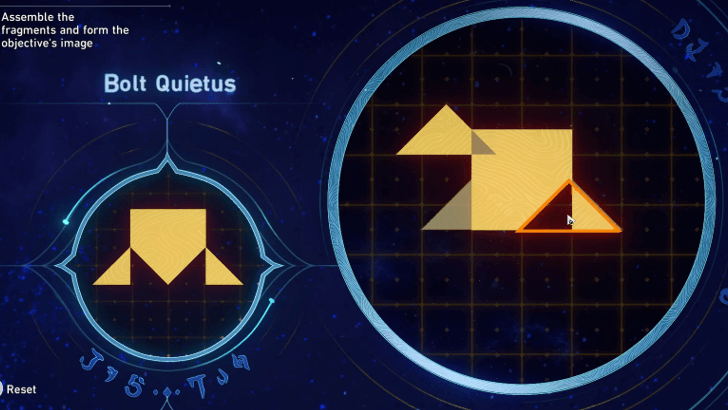 Place one of the small triangles at the right sharp corner of the projected image. |
| 3 | 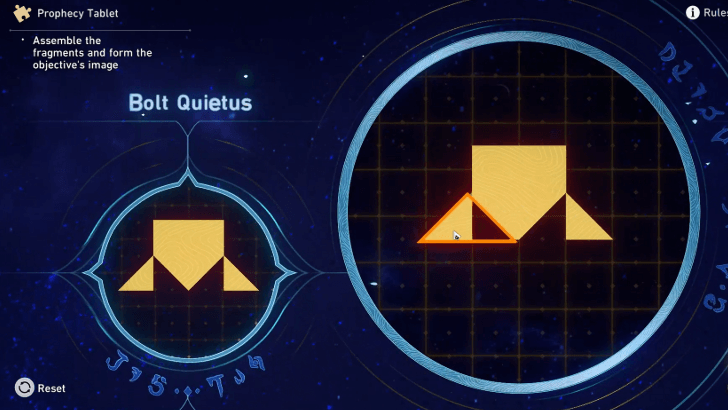 Place the last small triangle at the left sharp corner of the projected image. |
▲ Back to All Amphoreus Locations
Strife Ruins Prophecy Tablet 2
| Strife Ruins Prophecy Tablet 2 Solution | |
|---|---|
| 1 |  Put the right triangle at the bottom of the highlighted shape. |
| 2 |  Put the other right triangle on the opposite side. |
| 3 | 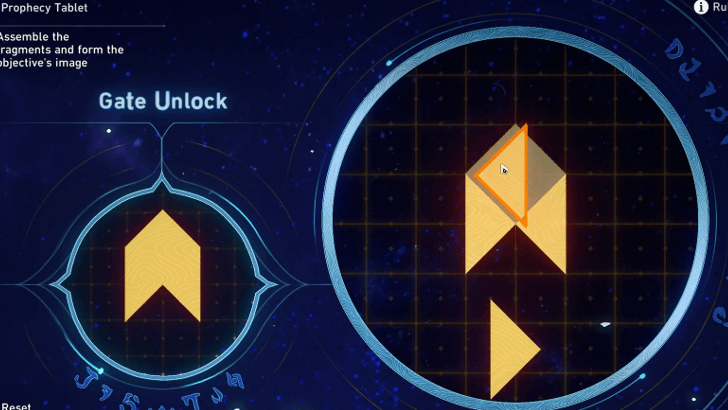 Place one of the small triangles on the top left. |
| 4 | 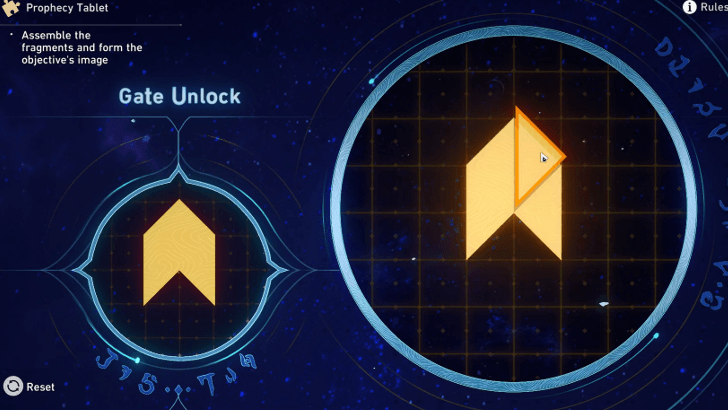 Place the last small triangle to the top right. |
▲ Back to All Amphoreus Locations
Strife Ruins Prophecy Tablet 3
| Strife Ruins Prophecy Tablet 3 Solution | |
|---|---|
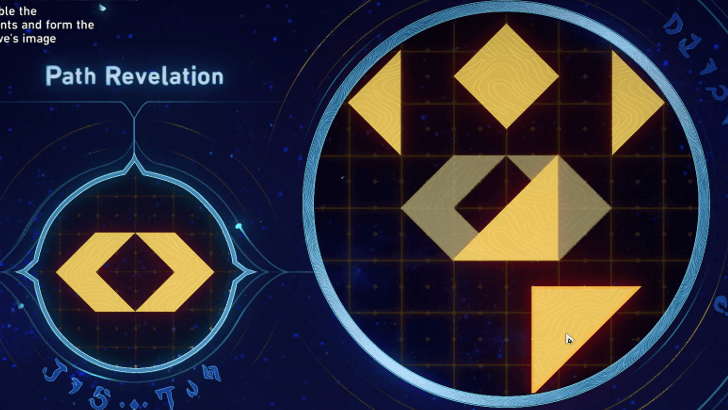
| 1 | 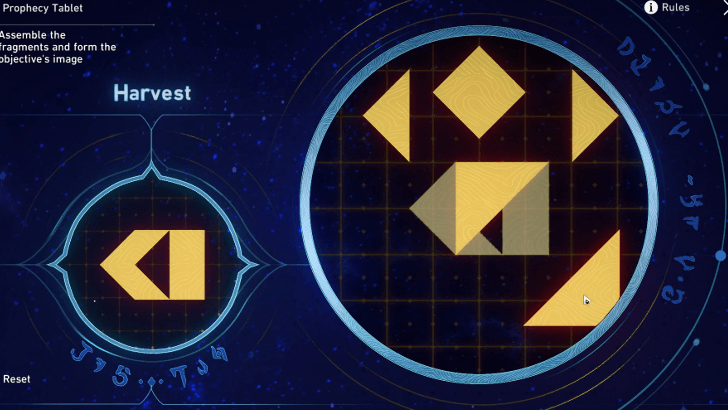 Use one of the right triangles to create half of a square in the far right side of the projected image. |
| 2 | 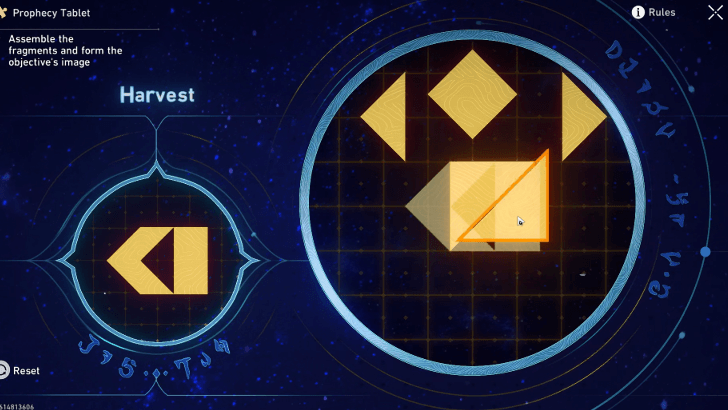 Use the second right triangle to create the other half of the sqaure. |
| 3 | 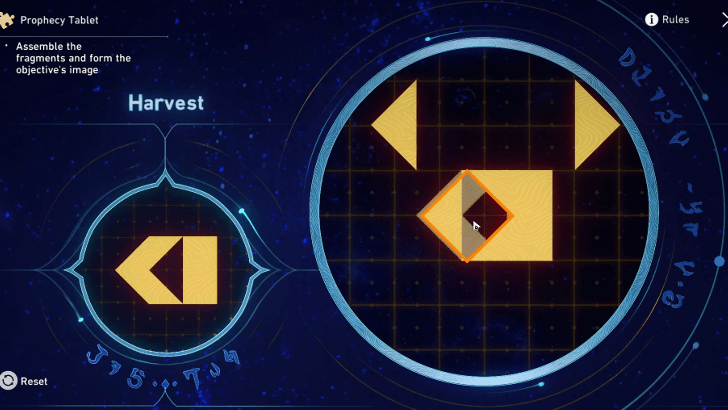 Place the diamond on the far left side of the projected image. |
| 4 | 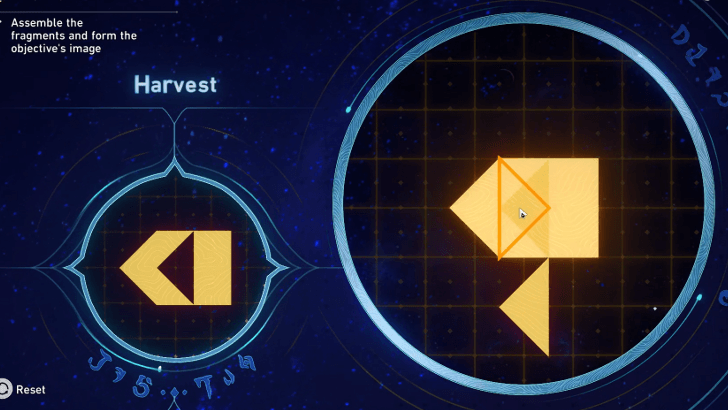 Put the small triangle on the right-half of the diamond. |
| 5 | 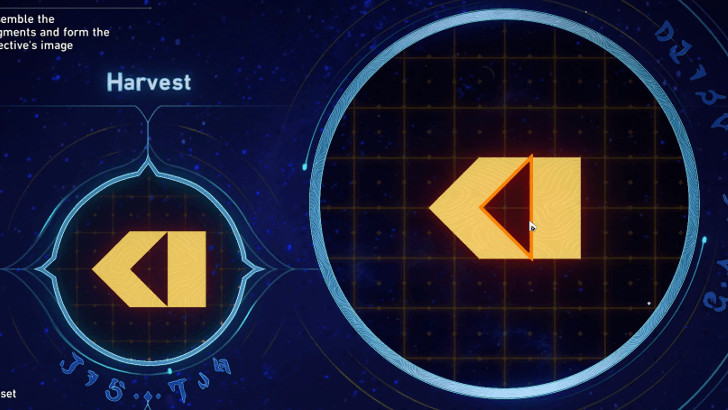 Use the last small triangle to create a triangle-shaped hole in the middle. |
▲ Back to All Amphoreus Locations
Strife Ruins Prophecy Tablet 4
| Strife Ruins Prophecy Tablet 4 Solution | |
|---|---|
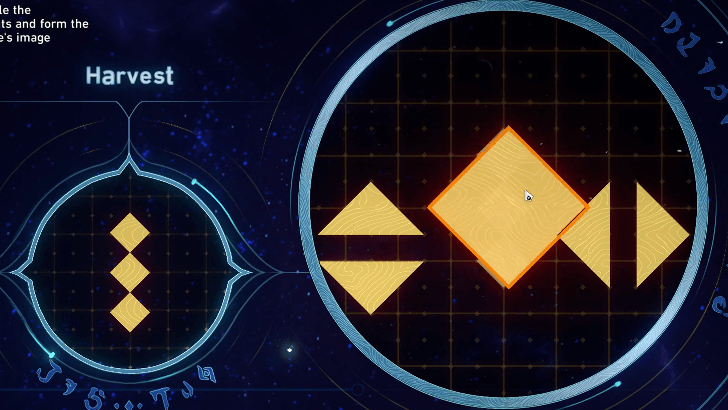
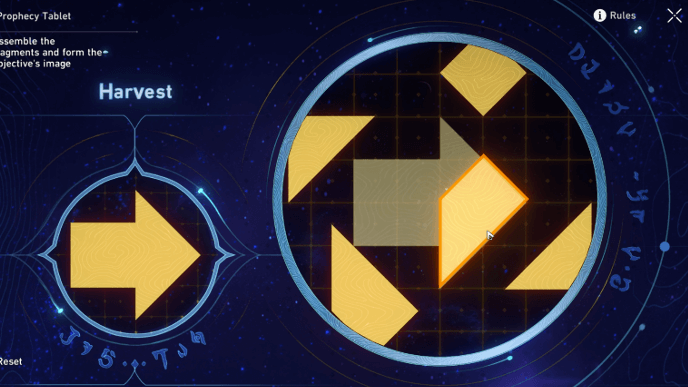
| 1 | 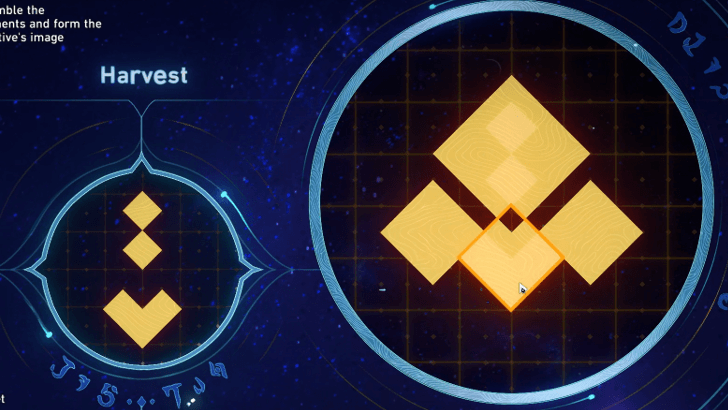 Place a diamond at the bottom, where there is an arrow-looking shape. |
| 2 | 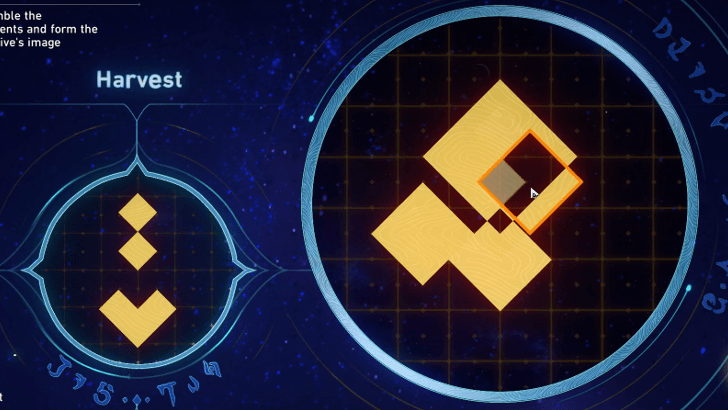 Place another diamond on top-right of the diamond you used in step 1. |
| 3 | 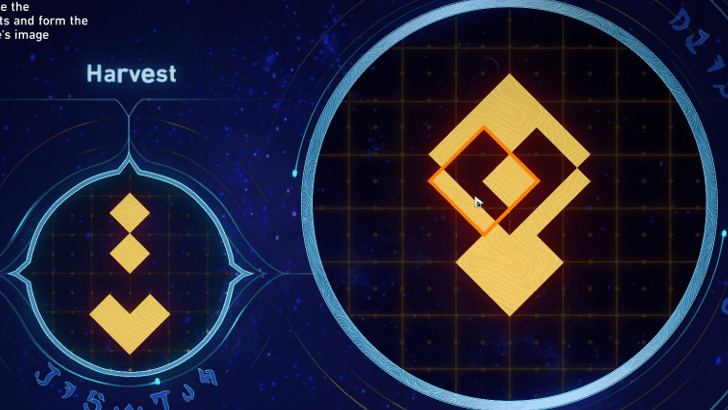 Use another diamond to overlap with the diamond you used in step 2. This should create a small diamond in the middle. |
| 4 |  Use the big diamond to overlap with the three small diamonds you used in the previous steps. This should create the shape you need! |
▲ Back to All Amphoreus Locations
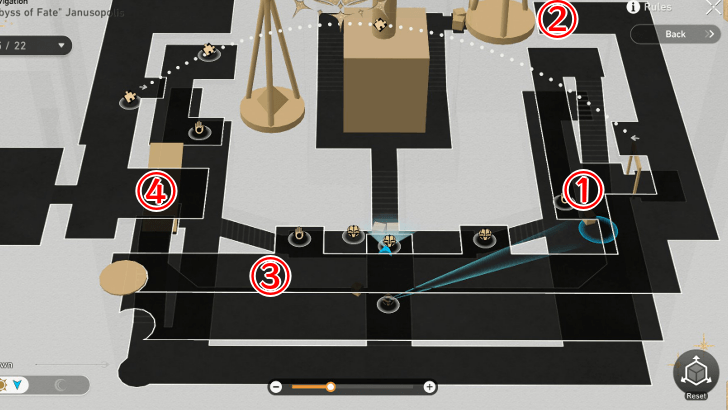
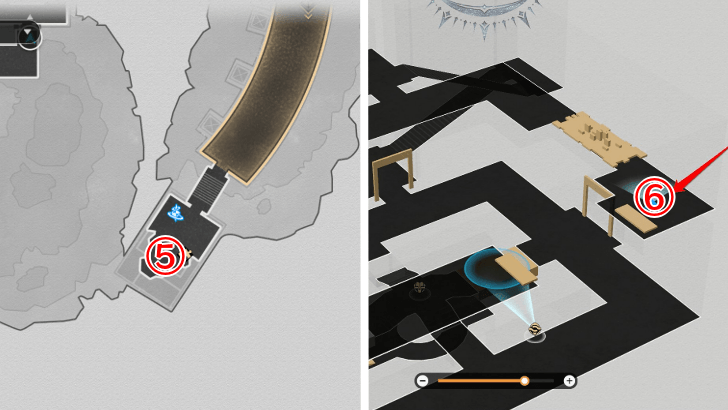
Abyss of Fate Janusopolis Prophecy Tablets
| Janusopolis Prophecy Tablet Locations | |
|---|---|
 |
 |
| "Abyss of Fate" Janusopolis Puzzle Solutions | |
| Puzzle 1 | Puzzle 2 |
| Puzzle 3 | Puzzle 4 |
| Puzzle 5 | Puzzle 6 |
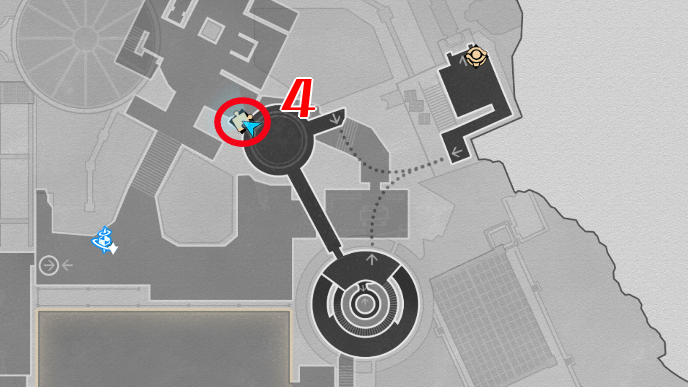
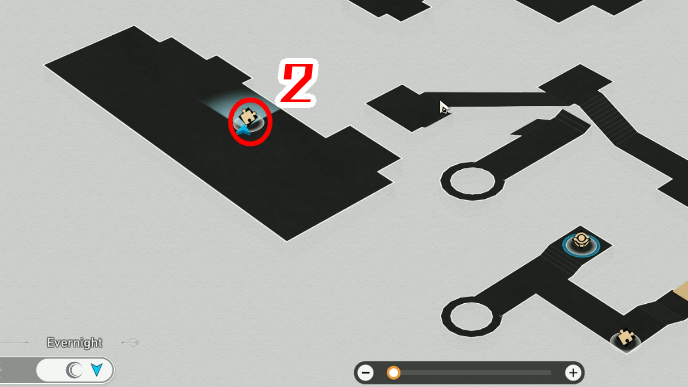
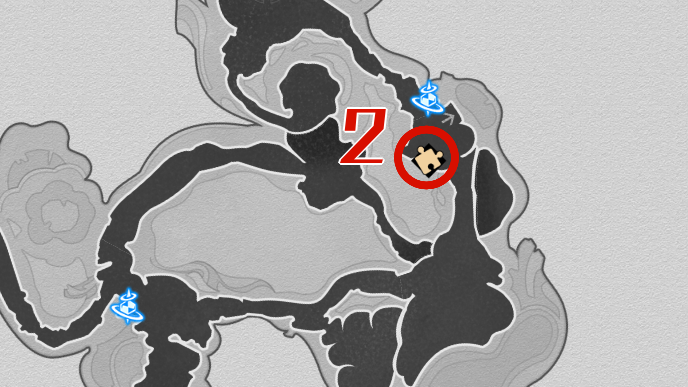
You'll encounter the first tablet during the Night Veil, Shroud the Silent Past quest. As for the second, third and fourth tablets you must reach the third floor of the room with scales. The fifth tablet is located in an isolated room, while the last one is at third floor of another room, where the time must be Evernight.
To reach the third floor of the room with scales, first it must be dawn. Then you have to use the Zagreus Hand to grab the sphere in the room and place it at the right scale. Then, head for the left scale to reach the second floor. Use the Janus Hidden Passage to reach the opposite side.
▲ Back to All Amphoreus Locations
Abyss of Fate Janusopolis Prophecy Tablet 1
| Abyss of Fate Janusopolis Tablet 1 Solution | |
|---|---|
| 1 |
 Drag the biggest triangle to cover the two small triangles in the projected image. |
| 2 |  Place the downward triangle on the center, and let its tip cover the small triangle found in the bottom of the projected image. |
| 3 | 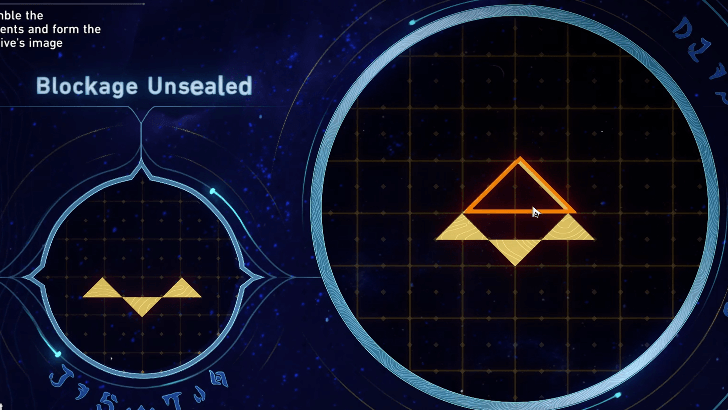 Drag the last triangle on the top. |
▲ Back to All Janusopolis Puzzles
Abyss of Fate Janusopolis Prophecy Tablet 2
| Abyss of Fate Janusopolis Tablet 2 Solution | |
|---|---|
| 1 | 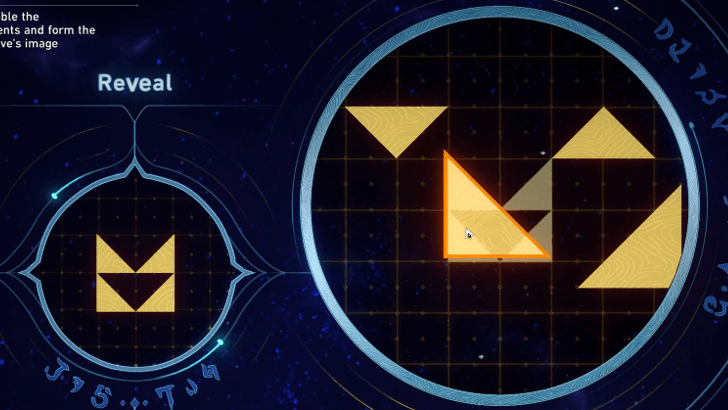 Place a right triangle on the left side of the projected image. Make sure it covers the top and bottom of left side. |
| 2 | 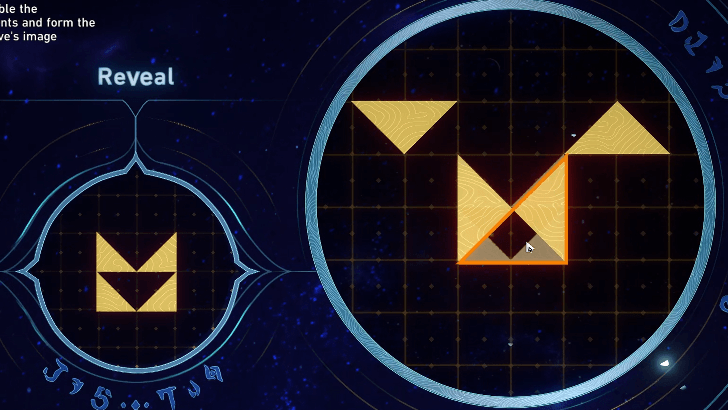 Place another right triangle on the opposite side. At this point, there should be a triangle-shaped hole in the bottom. |
| 3 | 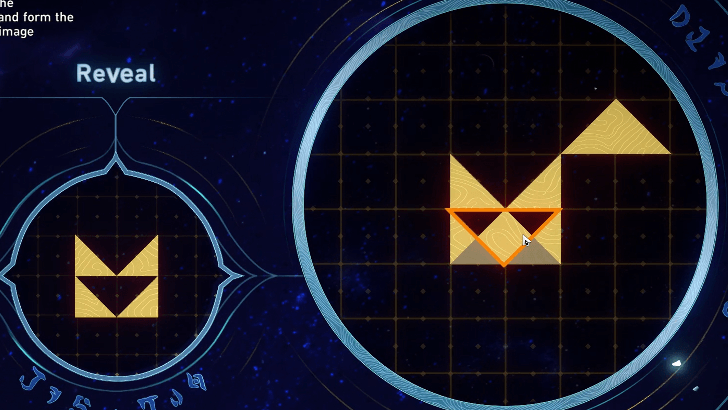 Drag the triangle that's facing down to the center of the projected image. |
| 4 | 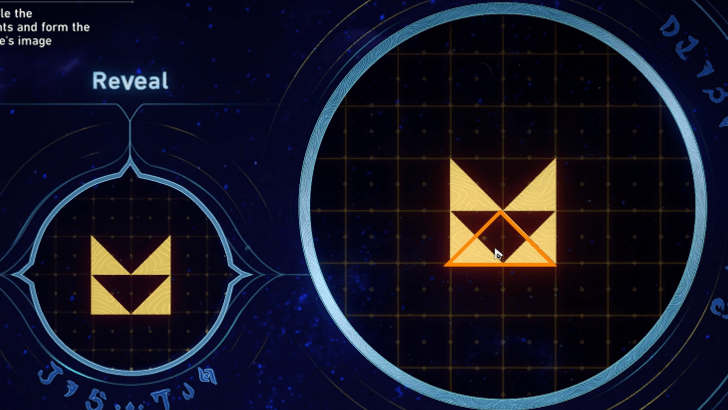 Put the last triangle in the bottom center. |
▲ Back to All Janusopolis Puzzles
Abyss of Fate Janusopolis Prophecy Tablet 3
| Abyss of Fate Janusopolis Tablet 3 Solution | |
|---|---|
| 1 |  Place the right triangle at the left half of the projected image. |
| 2 | 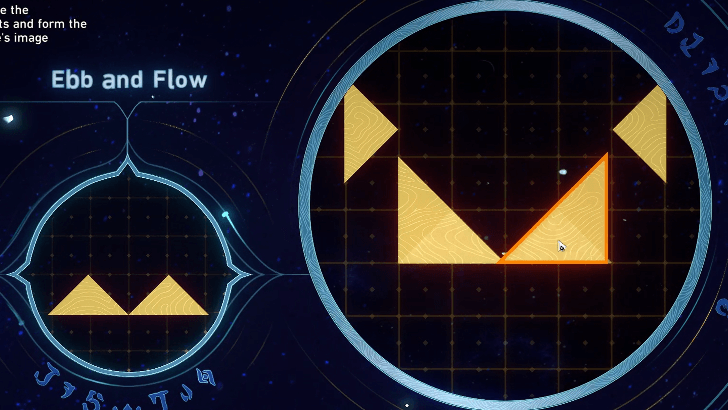 Place the other right triangle on the opposite side. |
| 3 | 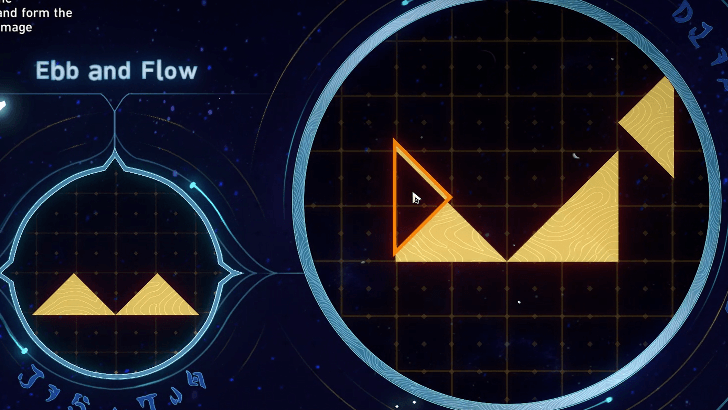 Drag the triangle that looks like a play button to the left most part of the projected image. |
| 4 |  Drag the last triangle to the right most part of the projected image. |
▲ Back to All Janusopolis Puzzles
Abyss of Fate Janusopolis Prophecy Tablet 4
| Abyss of Fate Janusopolis Tablet 4 Solution | |
|---|---|
| 1 | 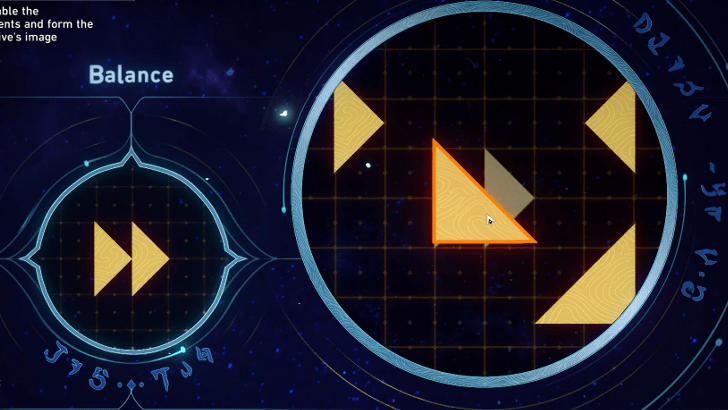 Place the right triangle facing the right on the left half of the projected image. |
| 2 | 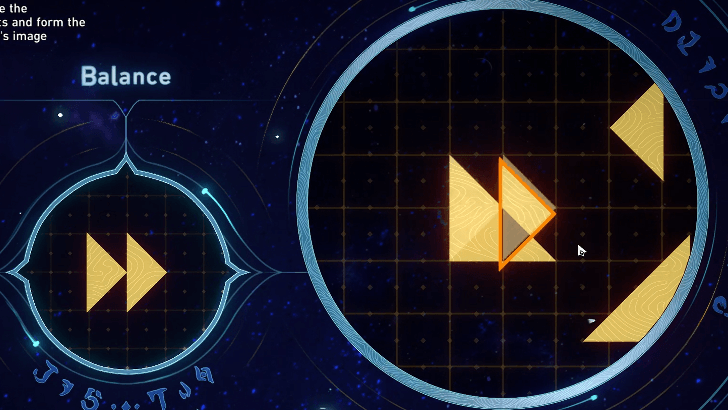 Place the triangle that looks like a play button on top of the triangle in step 1. |
| 3 |  Place the other right triangle on the right half of the projected image. |
| 4 | 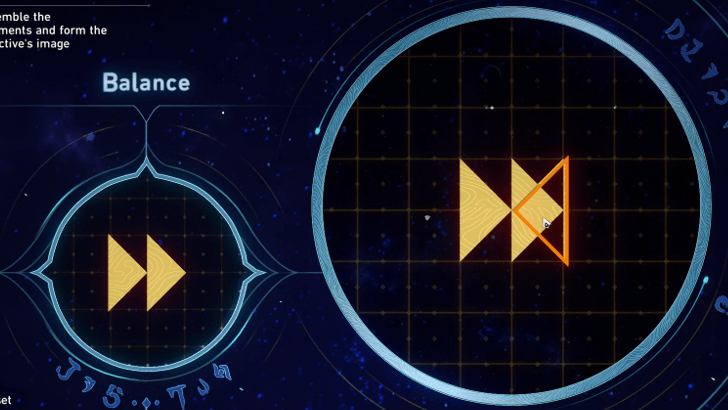 Place the last triangle at the right side. |
▲ Back to All Janusopolis Puzzles
Abyss of Fate Janusopolis Prophecy Tablet 5 : CRRK?
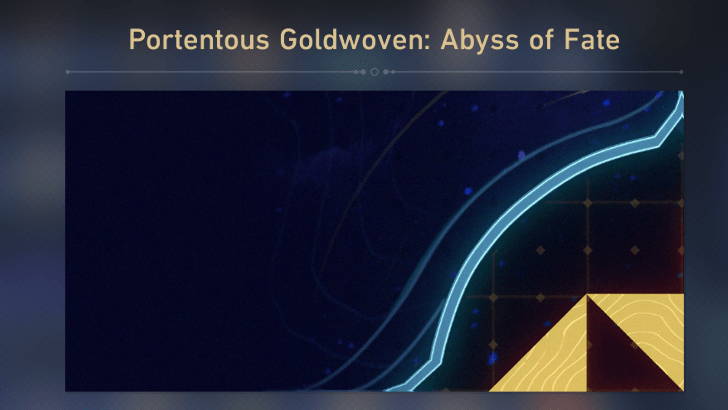
This Prophecy Tablet doesn't have a projected image once you discover it. You must first get the Portentous Goldwoven: Abyss of Fate mission item. To do this, you must unlock the 10 Creation Nymphs in Abyss of Fate. This will give you a random quarter of the solution.
You must then look for the rest of the puzzle by asking help from other players, as the hint you receive is random per player. You can also check out the solution to the puzzle below:
| Abyss of Fate Janusopolis Tablet 5 Solution | |
|---|---|
| 1 | 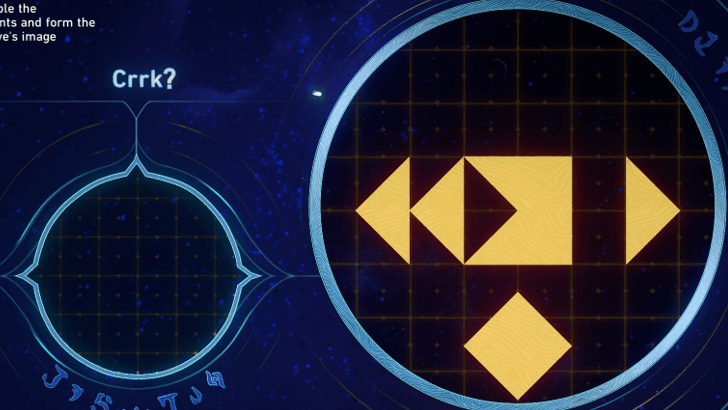 Place the half of the diamond on top of the left part of the square. |
| 2 | 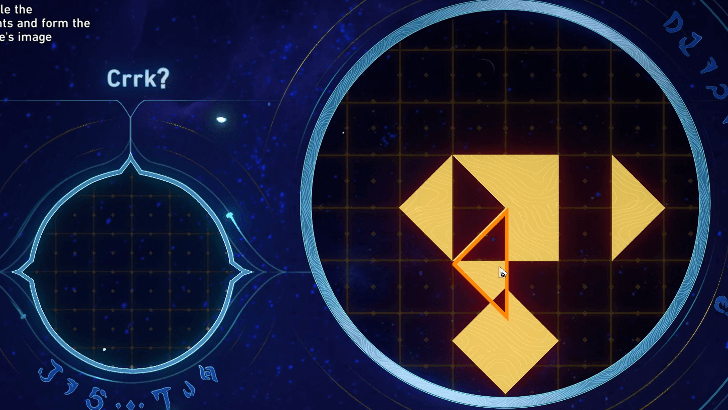 Place the triangle that looks like an inverted play button directly below the diamond from step 1. |
| 3 |  Grab the small triangle and place it on top of the bottom half of the square. |
| 4 | 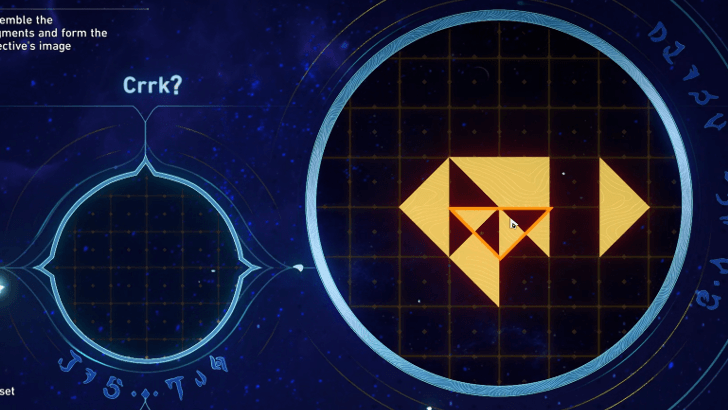 Grab the small downward triangle and place it on top of the bottom half of the square as well. |
| 5 | 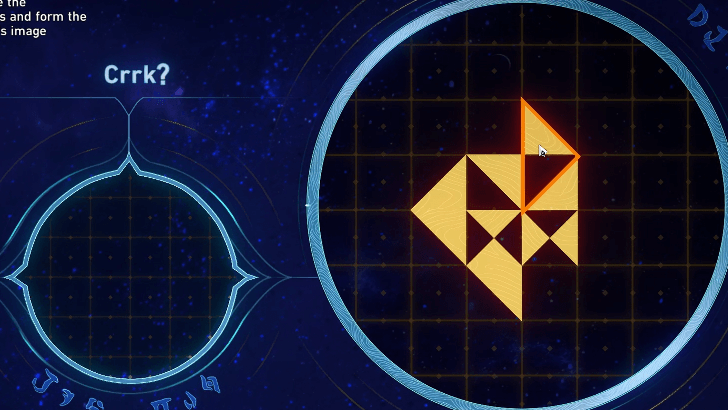 Grab the triangle shaped like a play button and put it on the upper-right quadrant of the square from step 1. |
▲ Back to All Janusopolis Puzzles
Abyss of Fate Janusopolis Prophecy Tablet 6
| Abyss of Fate Janusopolis Tablet 6 Solution | |
|---|---|
| 1 |  Put all the shapes to the side to get a clearer image of the projected image. Then, place the square on the center. |
| 2 |  Drag the shape that looks like a play button to the left side of the projected image. |
| 3 |  Place the inverted play button on the right side. You should have a shape that looks like a candy. |
| 4 | 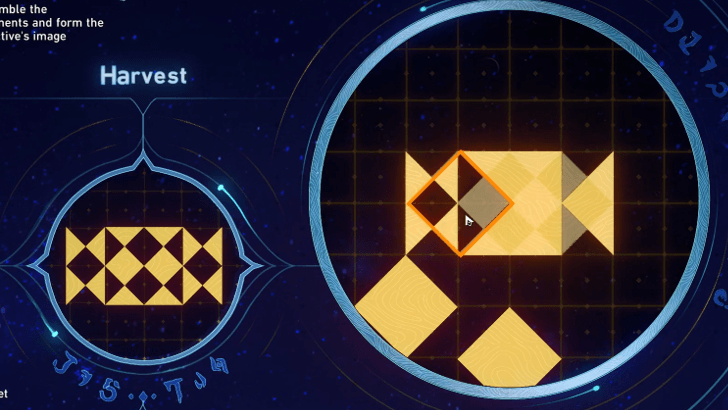 Get one of the diamonds and place it at the left side. |
| 5 |  Place another diamond on the right side. |
| 6 | 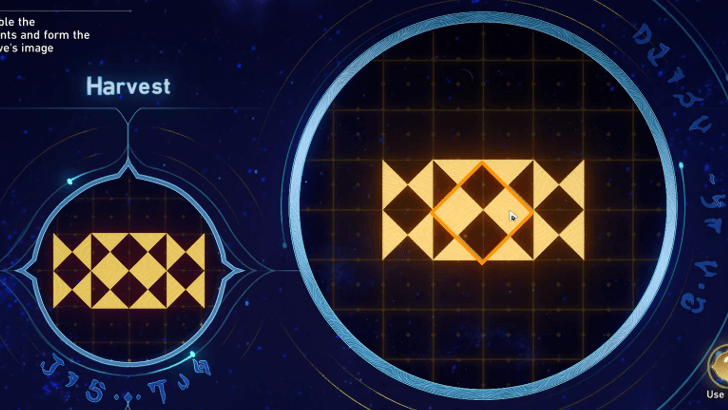 Place last diamond on the very center of the projected image. |
▲ Back to All Janusopolis Puzzles
Bloodbathed Battlefront Castrum Kremnos Prophecy Tablets
| Castrum Kremnos Prophecy Tablets Locations | |
|---|---|
 |
 |
| "Bloodbathed Battlefront" Puzzle Solutions | |
| Puzzle 1 | Puzzle 2 |
| Puzzle 3 | Puzzle 4 |
Most of the Prophecy Tablets in Bloodbathed Battlefront Castrum Kremnos can be encountered during the Main Story. During the Kremnos, Cleanse Thy Rusted Blood quest, you must solve the first puzzle. Then, you can only interact with the second one during the Kremnos, Cleanse Thy Rusted Blood II quest.
As for the third puzzle, its in the corner of the room in front of some blue statues on the second floor. The fourth puzzle can easily be missed as its located at the end of an isolated hall on the first floor.
▲ Back to All Amphoreus Locations
Bloodbathed Battlefront Prophecy Tablet 1
| Bloodbathed Battlefront Tablet 1 Solution | |
|---|---|
| 1 |  Use the huge downward triangle to cover the entire projected image. |
| 2 | 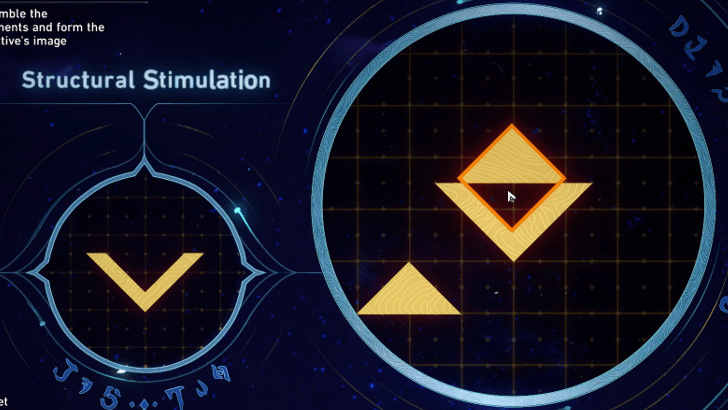 Use the diamond to cover the triangle you used in step 1. This will create an arrow shape. |
| 3 | 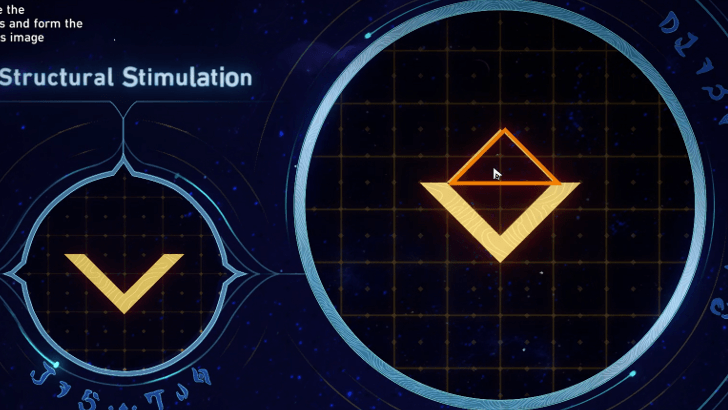 Place the last triangle on the top. |
▲ Back to All Bloodbathed Battlefront Puzzles
Bloodbathed Battlefront Prophecy Tablet 2
| Bloodbathed Battlefront Tablet 2 Solution | |
|---|---|
| 1 |  Put one of the small diamonds on the left side of the projected image. |
| 2 | 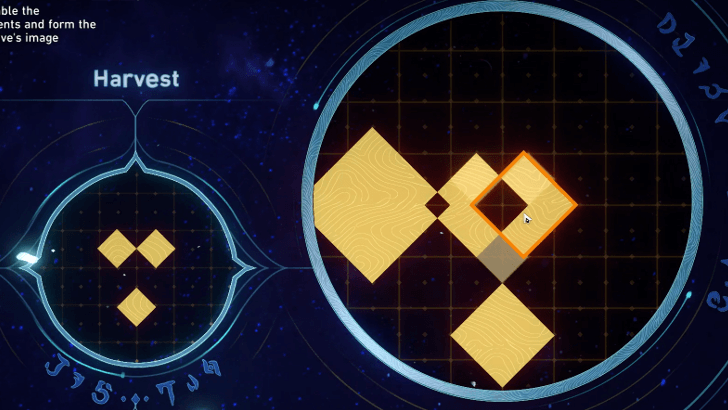 Place one of the small diamonds on the opposite side. Make sure its left tip is overlapping with the right tip of the triangle from step 1. |
| 3 |  Place the huge diamond in front of everything. Make sure it covers the entire projected image and the diamonds from step 1 and 2. |
| 4 | 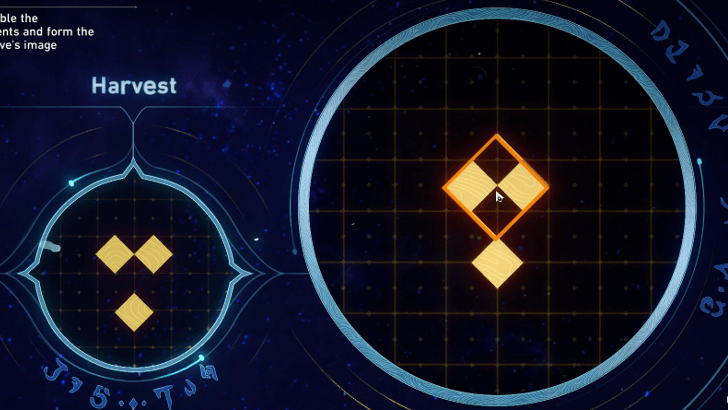 Put the last diamond on the very top. |
▲ Back to All Bloodbathed Battlefront Puzzles
Bloodbathed Battlefront Prophecy Tablet 3
| Bloodbathed Battlefront Tablet 3 Solution | |
|---|---|
| 1 |
 Use one of the right triangles to create half of a square in the center of the projected image. |
| 2 | 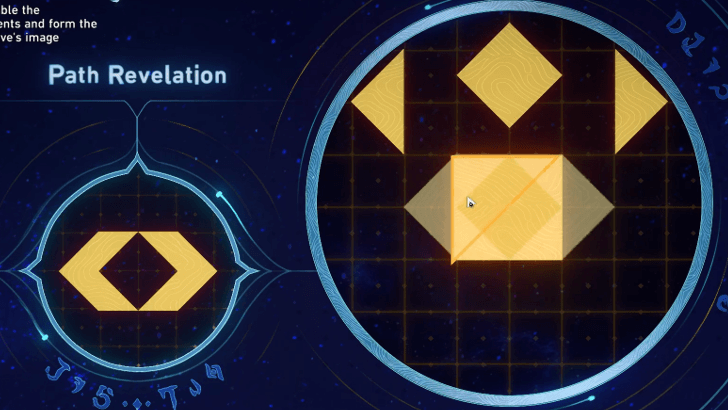 Use the other right triangle to complete the square in the center. |
| 3 | 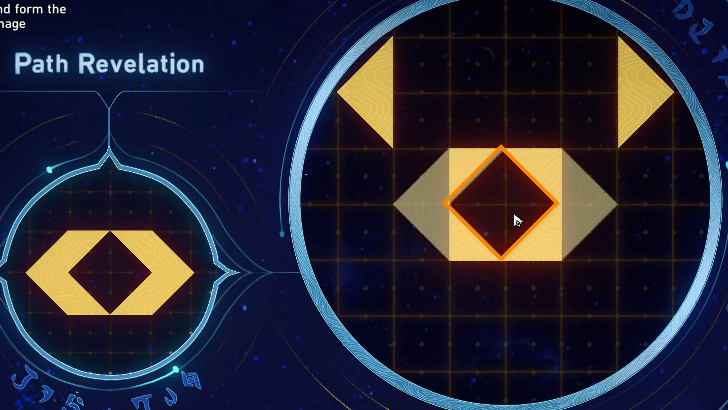 Place the diamond on the center of the square you created. |
| 4 | 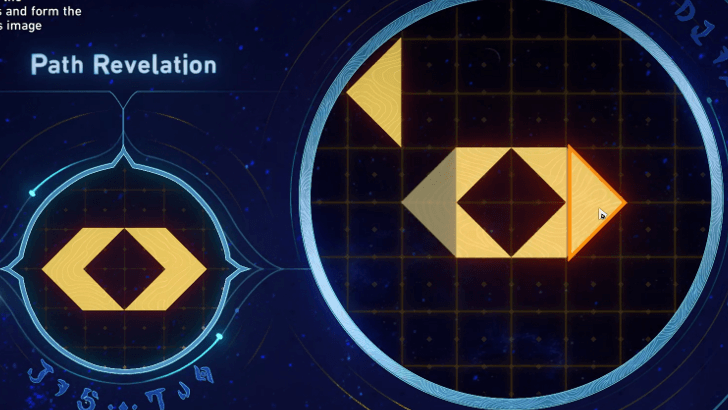 Grab the triangle that looks like a play button and place it at the far right side. |
| 5 | 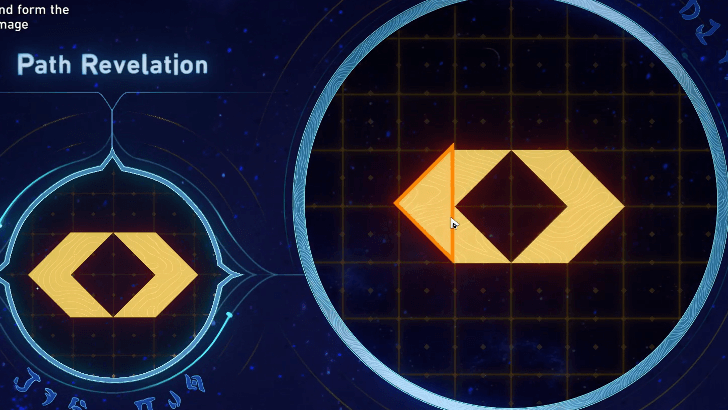 Place the last piece on the far left side. |
▲ Back to All Bloodbathed Battlefront Puzzles
Bloodbathed Battlefront Prophecy Tablet 4
| Bloodbathed Battlefront Tablet 4 Solution | |
|---|---|
| 1 |
 Put the huge diamond on the center. Make sure it covers the entire projected image. |
| 2 | 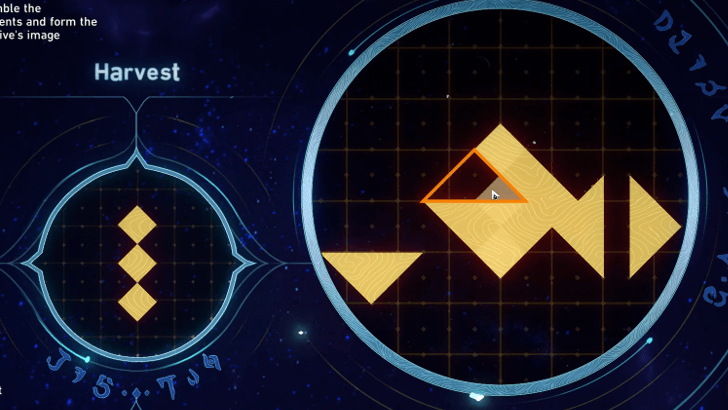 Place the small triangle on the upper-left quadrant of the diamond. |
| 3 | 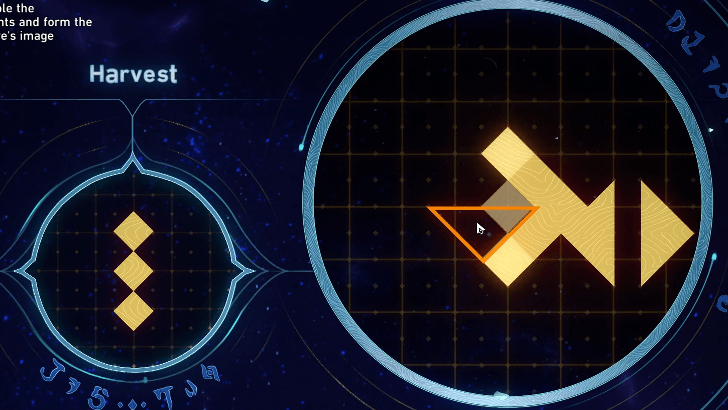 Put the downward triangle below the triangle you used in step 2. |
| 4 | 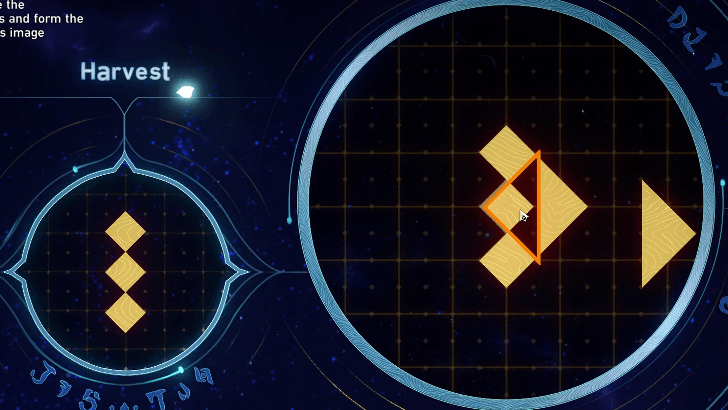 Drag the shape that looks like an inverted play button to the right side of the huge diamond you placed in step 1. |
| 5 | 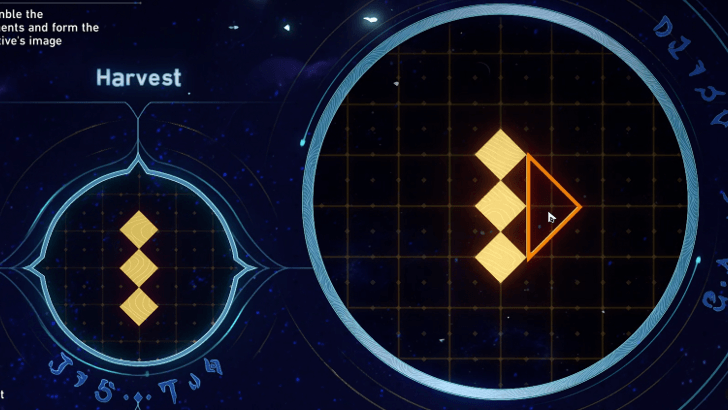 Place the last triangle that looks like play button on the far right of the diamond in step 1. |
▲ Back to All Bloodbathed Battlefront Puzzles
Murmuring Woods Grove of Epiphany Prophecy Tablets
| Murmuring Woods Prophecy Tablets Location | |
|---|---|
 |
 |
| Murmuring Woods Puzzle Solutions | |
| Puzzle 1 | Puzzle 2 |
| Puzzle 3 | Puzzle 4 |
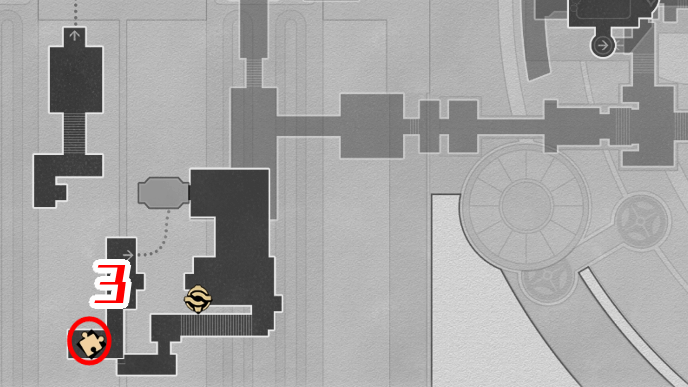
Puzzle 1 can be found inside B1. You can find Puzzle 2 near the Stagnant Shadow area.
You can get to Puzzle 3 by using the Janus' Hidden Passage at F3. Puzzle 4 is located inside the room in F3.
▲ Back to All Amphoreus Locations
Murmuring Woods Prophecy Tablet 1
| Murmuring Woods Prophecy Tablet 1 Solution | |
|---|---|
| 1 | 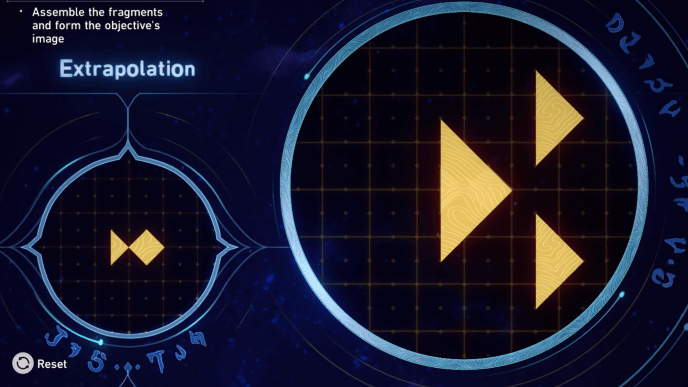 Put the large triangle in the center. |
| 2 | 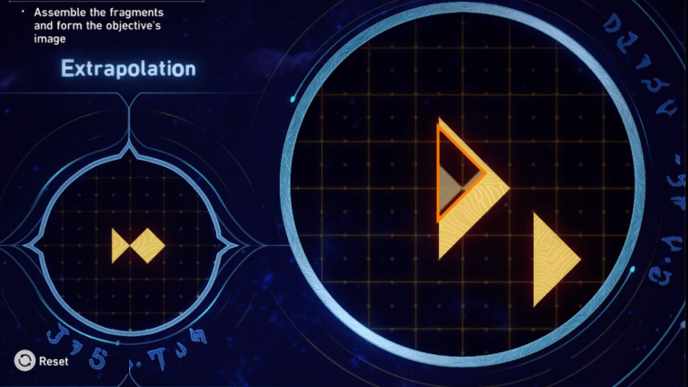 Place one of the small triangles at the top corner of the larger triangle. |
| 3 | 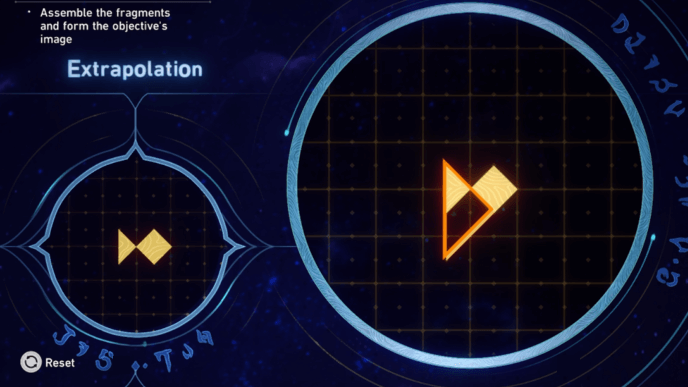 Place the other small triangle at the bottom corner corner of the larger triangle. |
▲ Back to All Murmuring Woods Puzzles
Murmuring Woods Prophecy Tablet 2
| Murmuring Woods Prophecy Tablet 2 Solution | |
|---|---|
| 1 |  Put the left triangle at the left side of the highlighted shape. |
| 2 | 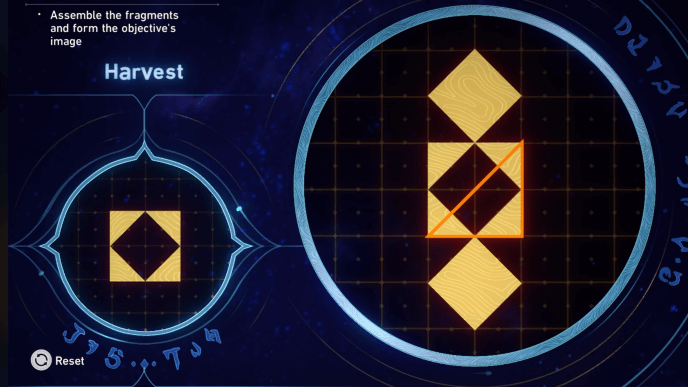 Put the right triangle on the right side. |
| 3 | 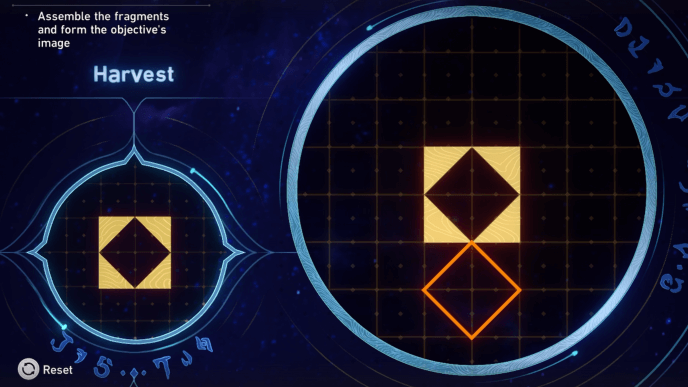 Place the top diamond on the bottom diamond. |
▲ Back to All Murmuring Woods Puzzles
Murmuring Woods Prophecy Tablet 3
| Murmuring Woods Prophecy Tablet 3 Solution | |
|---|---|
| 1 | 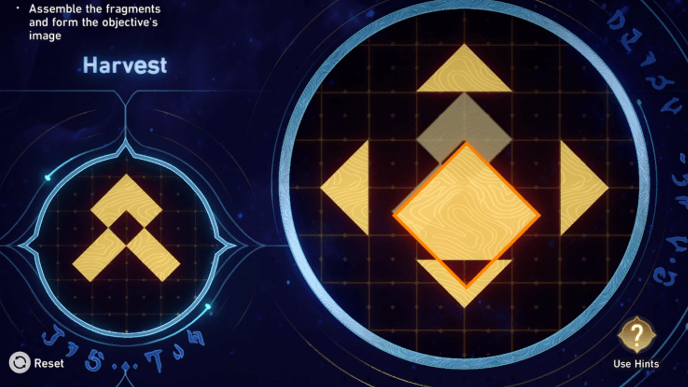 Move the large diamond and align it to the shape below. |
| 2 |  Place the left and right triangles on the smaller diamond above. |
| 3 | 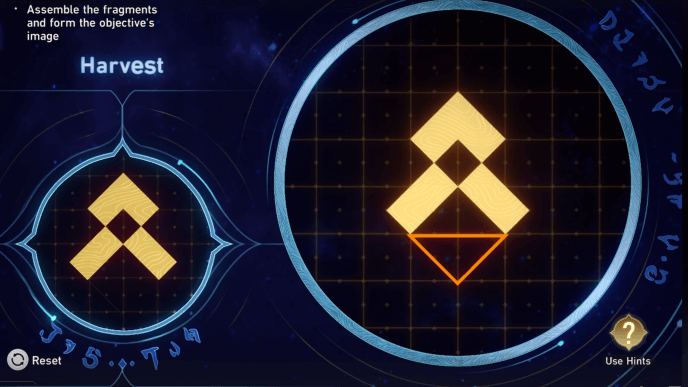 Place the north and south triangles at the bottom part of the large diamond to create an empty space. |
▲ Back to All Murmuring Woods Puzzles
Murmuring Woods Prophecy Tablet 4
| Murmuring Woods Prophecy Tablet 4 Solution | |
|---|---|
| 1 |  Place the upside down triangle at the bottom. |
| 2 |  Place the small triangle on top of the upside down triangle. |
| 3 | 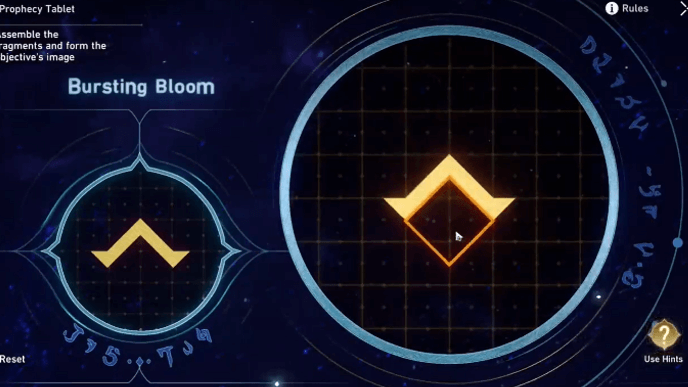 Place the diamond on the bottom part of the upside down triangle. |
▲ Back to All Murmuring Woods Puzzles
Sanctum of Prophecy Janusopolis Prophecy Tablets
| Sanctum of Prophecy Prophecy Tablet Locations | |
|---|---|
 |
 |
 |
|
| "Sanctum of Prophecy" Puzzle Solutions | |
| Puzzle 1 | Puzzle 2 |
| Puzzle 3 | |
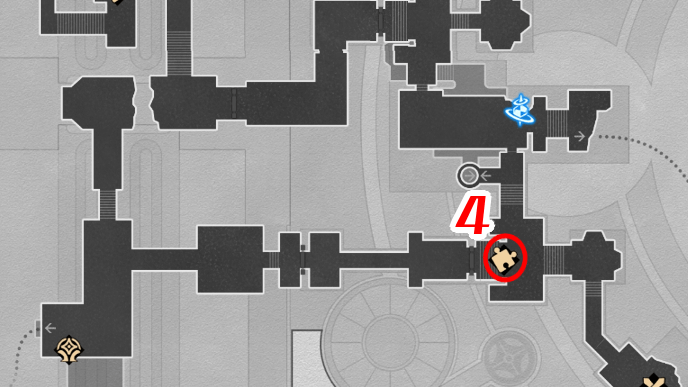
The Prophecy Tablets in Sanctum of Prophecy of Janusopolis are in B2, B1, and F1. For the B2 Prophecy Tablet, use the Archive of Prophecies Space Anchor and it will be right next to it.
For the B1 Prophecy Tablet, use the Destiny's Gate Space Anchor and head left, then go down the stairs. It will be right next to the stairs in a small gap.
Lastly, use the Hidden Passage of Contemplation Space Anchor and go to the room with the scale. Use a miracle and make it Evernight then go up the stairs to the right. The tablet will be near the broken scale.
▲ Back to All Amphoreus Locations
Sanctum of Prophecy Prophecy Tablet 1
| Sanctum of Prophecy Tablet 1 Solution | |
|---|---|
| 1 |  Place the first trapezoid on the upper left side of the image. |
| 2 | 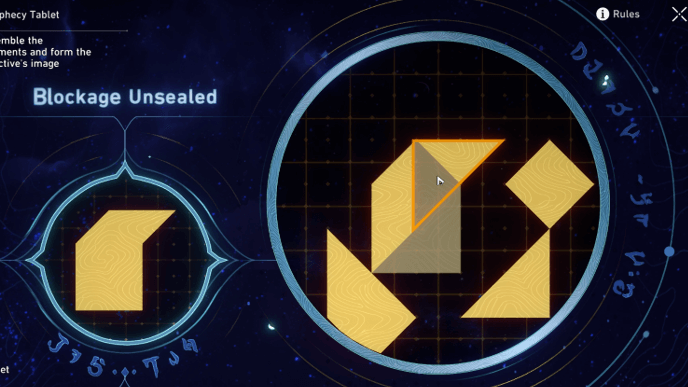 Place a triangle on the upper right side and cover a part of the trapezoid. |
| 3 | 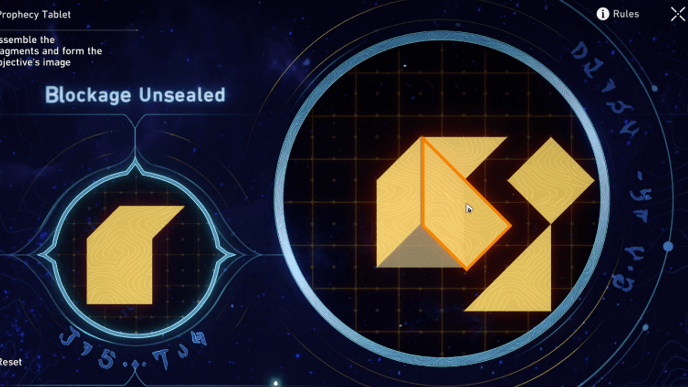 Place the second trapezoid to the right of the first trapezoid while overlapping a part of the triangle. |
| 4 | 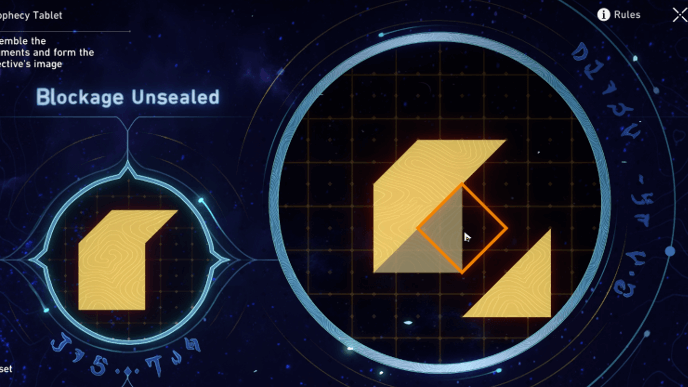 Place the square to the right, overlapping a part of the second trapezoid. |
| 5 |  Place the last triangle on the lower right of the shape to complete it. |
▲ Back to All Sanctum of Prophecy Puzzles
Sanctum of Prophecy Prophecy Tablet 2
| Sanctum of Prophecy Tablet 2 Solution | |
|---|---|
| 1 | 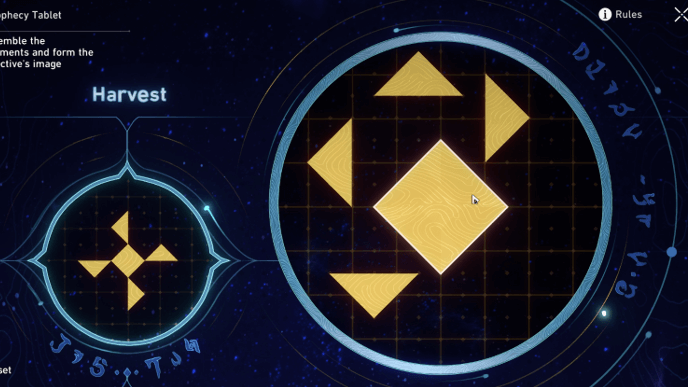 Put the square in the middle of the shape. |
| 2 | 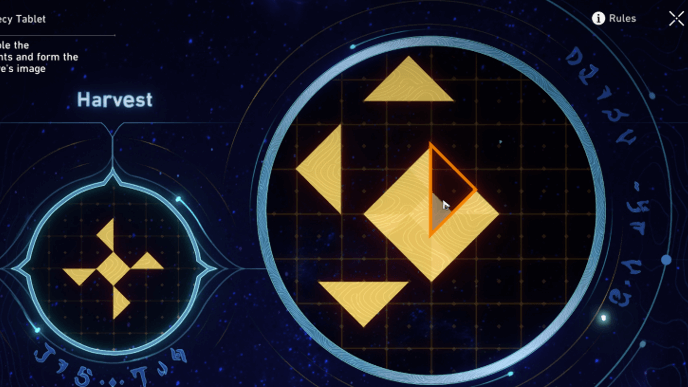 Place the triangle pointing right on the upper right part of the square. |
| 3 | 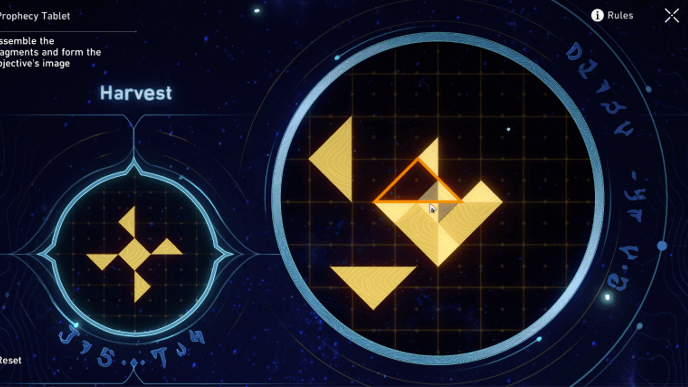 Place the triangle pointing up on the upper left part of the square. |
| 4 | 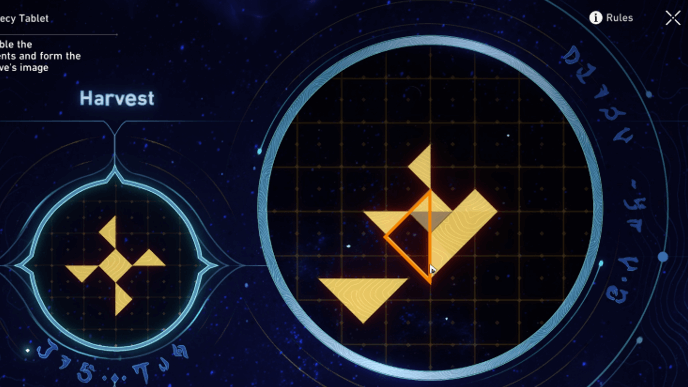 Place the triangle pointing left on the lower left part of the square. |
| 5 | 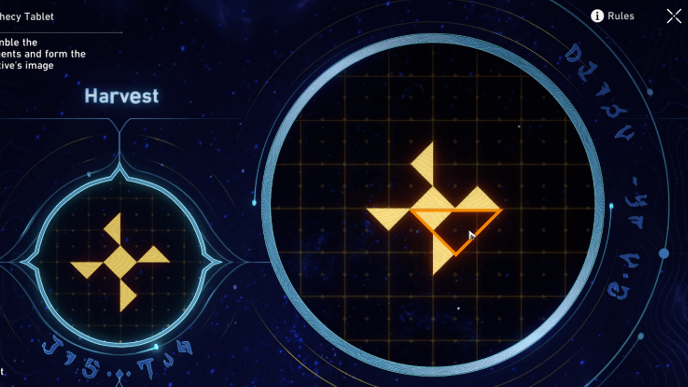 Lastly, place the triangle pointing down on the lower right part of the square. This completes the image. |
▲ Back to All Sanctum of Prophecy Puzzles
Sanctum of Prophecy Prophecy Tablet 3
| Sanctum of Prophecy Tablet 3 Solution | |
|---|---|
| 1 |
 Place the first trapezoid on the lower right part of the image. |
| 2 | 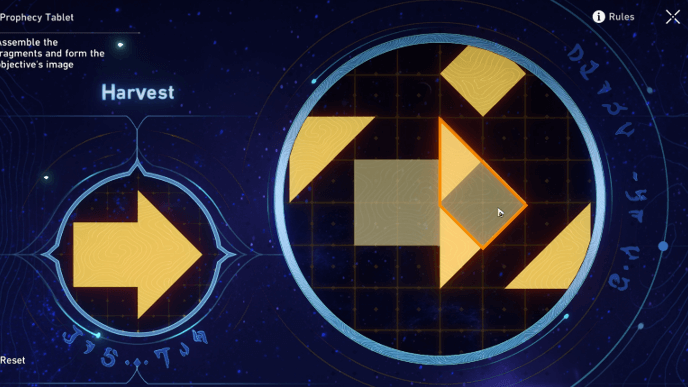 Place the second trapezoid on the upper right part of the image. This allows it to overlap with the first trapezoid. |
| 3 | 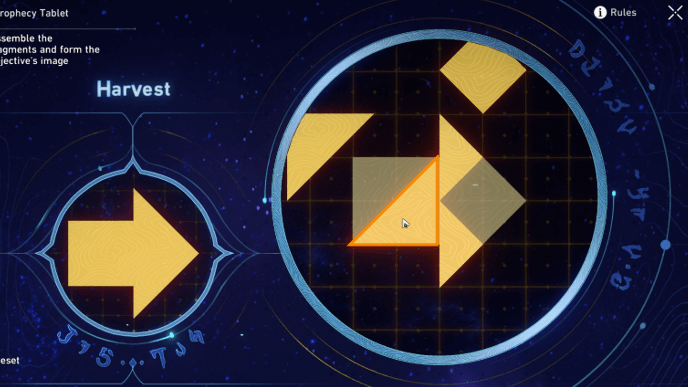 Place the first triangle on the left of the two trapezoids. |
| 4 | 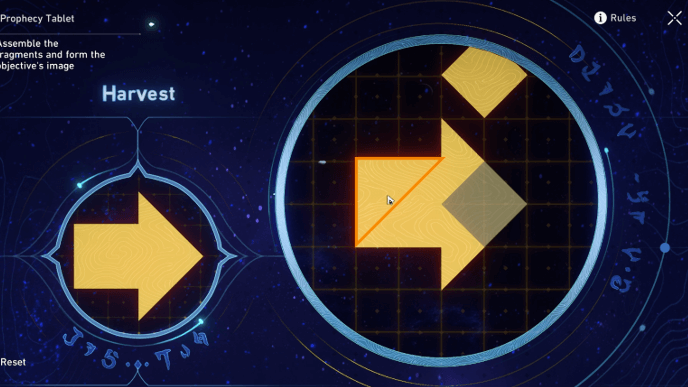 Place the second triangle on top of the first triangle. |
| 5 | 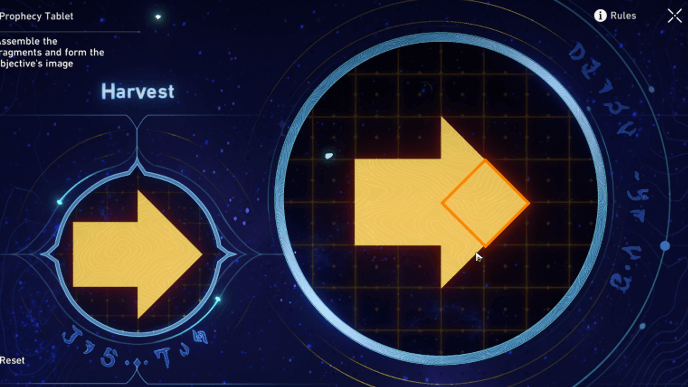 Finally, place the square on the right side to complete the image. |
▲ Back to All Sanctum of Prophecy Puzzles
Demigod Council Dawncloud Prophecy Tablets
| Demigod Council Dawncloud Prophecy Tablet Locations | |
|---|---|
 |
 |
| "Demigod Council" Puzzle Solutions | |
| Puzzle 1 | Puzzle 2 |
The two Prophecy Tablets in Dawncloud can be found in the south and central areas. The first one can be found near the Sacred Path of Dawncloud Space Anchor in the large room on the right.
The second one can be found near the Demigod Council Space Anchor on the left side of the platform.
▲ Back to All Amphoreus Locations
Demigod Council Prophecy Tablet 1
| Demigod Council Tablet 1 Solution | |
|---|---|
| 1 |  Place the lower left shape on the left side of the image. |
| 2 | 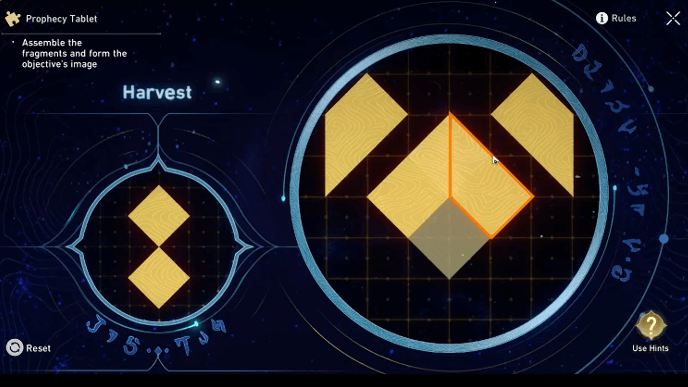 Connect the lower right shape to the previous one. |
| 3 | 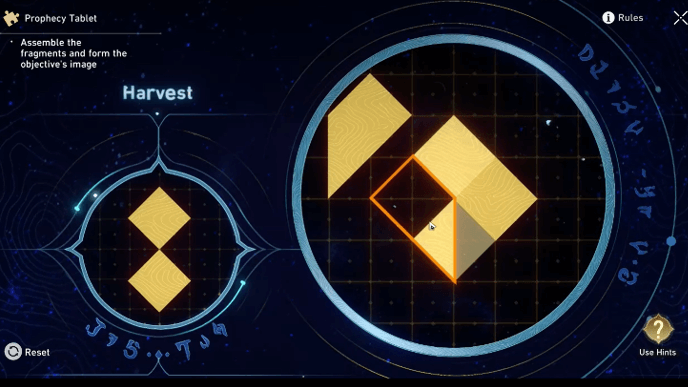 Place the upper right shape on the lower left side of the image. |
| 4 |  Place the upper left shape on the other side to complete it. |
▲ Back to All Demigod Council Puzzles
Demigod Council Prophecy Tablet 2
| Demigod Council Tablet 2 Solution | |
|---|---|
| 1 |  Put the large square in the lower part of the shape. |
| 2 |  Place the two squares on the top of the larger square. |
| 3 |  Place the last square at the bottom part to complete the puzzle. |
▲ Back to All Demigod Council Puzzles
Dragonbone City Styxia Prophecy Tablets
| Dragonbone City Prophecy Tablet Locations | |
|---|---|
 |
 |
 |
|
| "Dragonbone City" Puzzle Solutions | |
| Puzzle 1 | Puzzle 2 |
| Puzzle 3 | Puzzle 4 |
| Puzzle 5 | |
Use the Ancient City Market Space Anchor and climb up the stairs on the right. Go into the room and past the monsters, you'll see the first Prophecy Tablet near some rock debris.
From the first Prophecy Tablet, use the Miracle Beacon and cross the room until you reach an elevator platform that only works during dawn. Use it to go up a level and go to the nearby nook. The Miracle Beacon should reveal the second prophecy tablet near the hand rails.
For the third Prophecy Tablet, use the Treasure Vault Secret Passage Space Anchor and head into the room to the left. From there, use the Miracle Beacon and head left. Use the Miracle Beacon again to get rid of the rune and then use the Janus Passage.
When you arrive on the stairs, turn the Janus Passage to point it to the lower area. Use it and then head left to see a Tome of Miracles. Use it to see the third Prophecy Tablet.
Use the Twin Moon Spire Space Anchor and go out of the room. Use the Miracle Beacon and cross the giant chain. On the other side, turn the Janus Passage below then use it. You'll see the fourth Prophecy Tablet near some debris.
After completing Through the Petals in the Land of Repose, you can unlock and start the Chirping Secret Treasure? Adventure Mission by approaching the elevator blocked by a large ball just before the 3D puzzle room in F2. The nymph will guide you inside the Temple of Ages, where the fifth Prophecy Tablet can be found.
▲ Back to All Amphoreus Locations
Dragonbone City Prophecy Tablet 1
| Dragonbone City Tablet 1 Solution | |
|---|---|
| 1 | 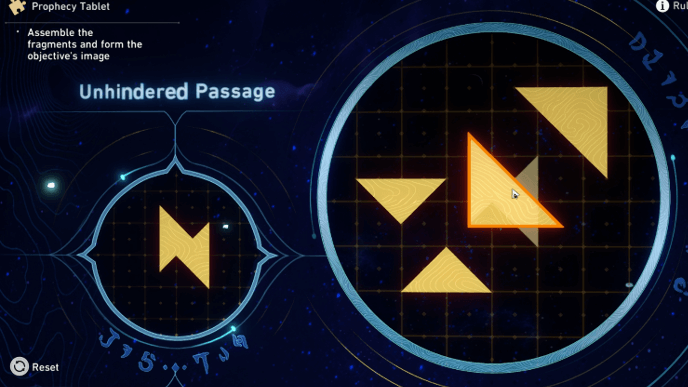 Place one of the big triangles on the left side of the image. |
| 2 | 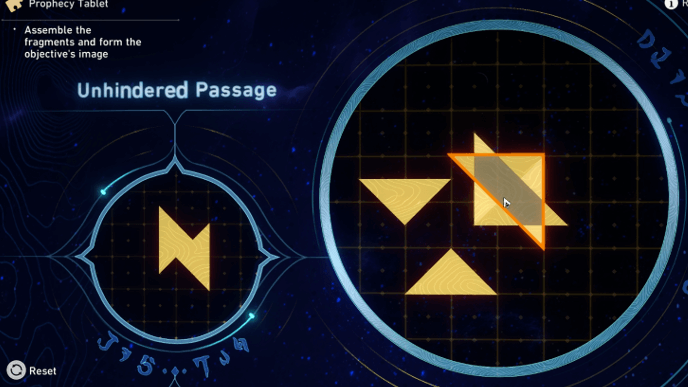 Place the other big triangle on the other side of the image, overlapping the first big triangle. |
| 3 | 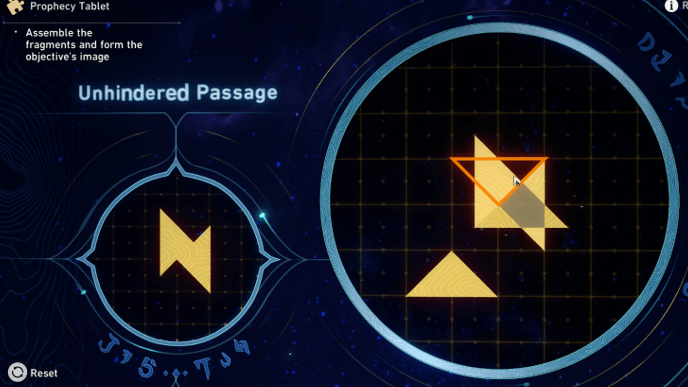 Place one of the small triangles on the upper left of the image, overlapping the tip of the first big triangle. |
| 4 | 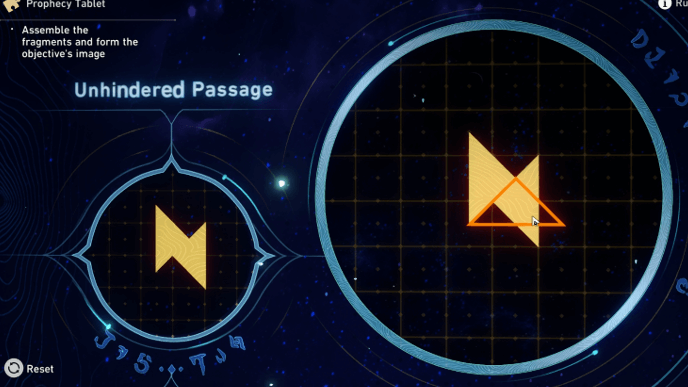 Place the other small triangle to the lower right of the image, overlapping a part of the second big triangle that completes the image. |
▲ Back to All Dragonbone City Puzzles
Dragonbone City Prophecy Tablet 2
| Dragonbone City Tablet 2 Solution | |
|---|---|
| 1 | 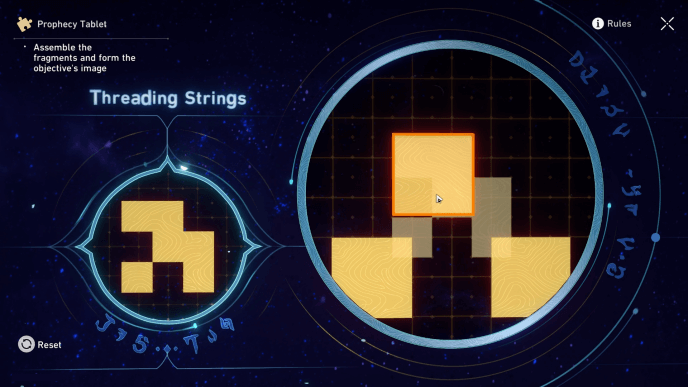 Place one of the squares on the upper left side of the image. |
| 2 | 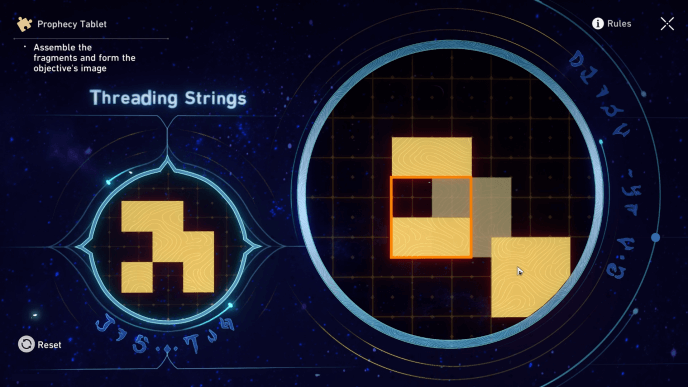 Place another square on the lower left side of the image, overlapping the first square. |
| 3 | 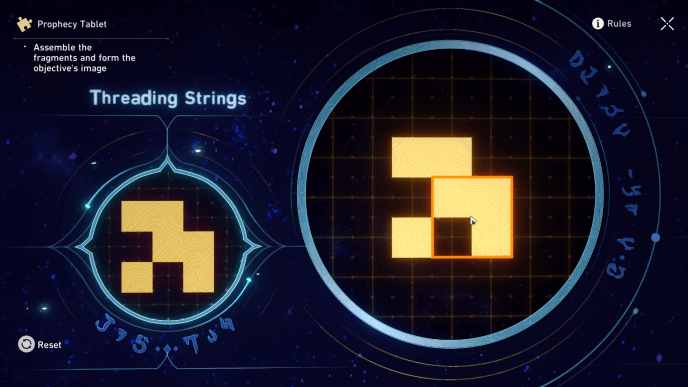 Place the last square on the lower right of the image, overlapping the squares placed beforehand. |
▲ Back to All Dragonbone City Puzzles
Dragonbone City Prophecy Tablet 3
| Dragonbone City Tablet 3 Solution | |
|---|---|
| 1 |  Place one of the small squares on the upper right side of the image. |
| 2 |  Place another small square on the lower right side of the image, next to the square earlier. |
| 3 | 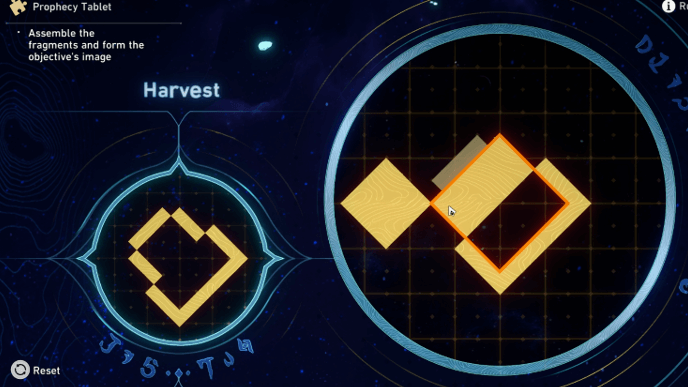 Place the big square between the two smaller squares, overlapping them. |
| 4 | 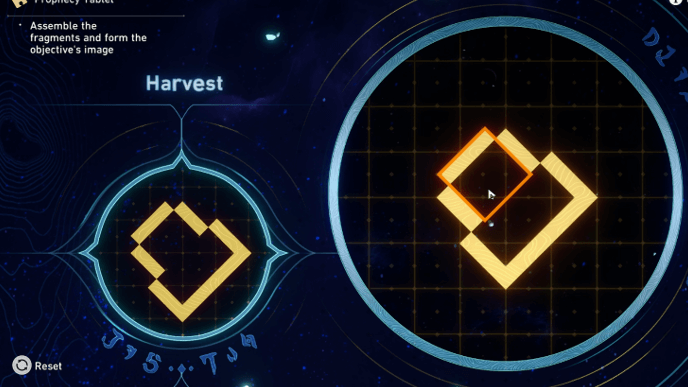 Place the last small square on the upper left of the image, overlapping a part of the big square which completes the image. |
▲ Back to All Dragonbone City Puzzles
Dragonbone City Prophecy Tablet 4
| Dragonbone City Tablet 4 Solution | |
|---|---|
| 1 |  Place one of the trapezoids on the upper right side of the image. |
| 2 |  Place another trapezoid on the upper left side of the image, overlapping a part of the trapezoid from earlier. |
| 3 | 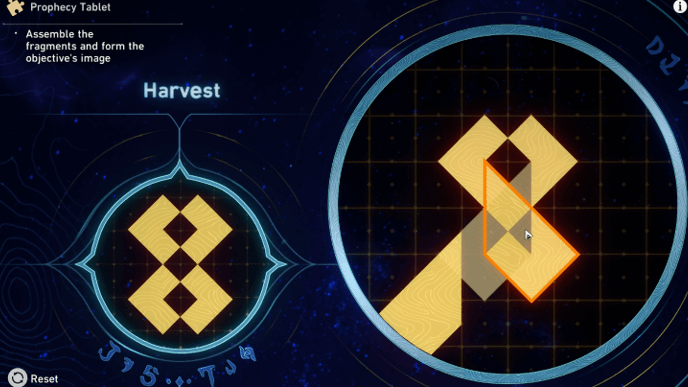 Place another trapezoid on the lower right side of the image, overlapping both of the trapezoids from earlier. |
| 4 | 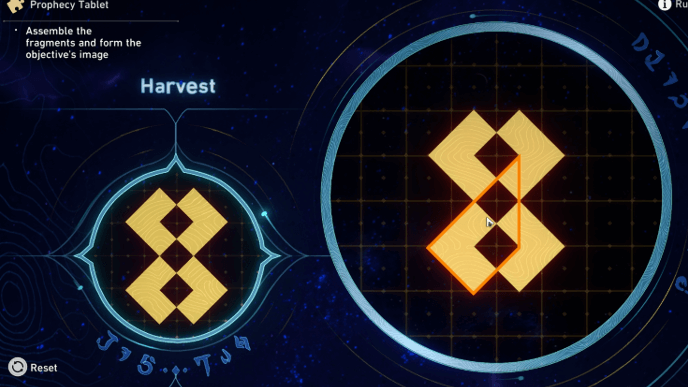 Place the last trapezoid on the lower left of the image to complete it. |
▲ Back to All Dragonbone City Puzzles
Dragonbone City Prophecy Tablet 5
To access the fifth Prophecy Tablet in "Dragonbone City" Styxia, the player must finish the Through the Petals in the Land of Repose Trailblaze Mission first and start the Chirping Secret Treasure? Adventure Mission.
| Dragonbone City Tablet 5 Solution | |
|---|---|
| 1 |  Place one of the trapezoids on the upper right side of the image. |
| 2 |  Place another trapezoid on the lower left side of the image, overlapping a part of the trapezoid from earlier. |
| 3 |  Place another trapezoid on the lower right side of the image, overlapping both of the trapezoids from earlier. |
| 4 |  Place the last trapezoid on the upper left of the image to complete it. |
▲ Back to All Dragonbone City Puzzles
Fortress of Dome Eye of Twilight Tablets
| Fortress of Dome Eye of Twilight Tablet Locations | |
|---|---|
 |
 |
| "Fortress of Dome" Puzzle Solutions | |
| Puzzle 1 | Puzzle 2 |
The two Prophecy Tablets in the Fortress of Dome can be found in F1 and F2. The first one can be found by teleporting to the Frontier Corridor Space Anchor and using the elevator on the right.
The second one can only be accessed after completing the Poet, Speak of the Sky Through Me Part II Trailblaze mission in the The Fall at Dawn's Rise. You must use the Hand of Zagreus inside the room to destroy the box that contains the puzzle.
▲ Back to All Amphoreus Locations
Fortress of Dome Eye of Twilight Tablet 1
| Fortress of Dome Tablet 1 Solution | |
|---|---|
| 1 | 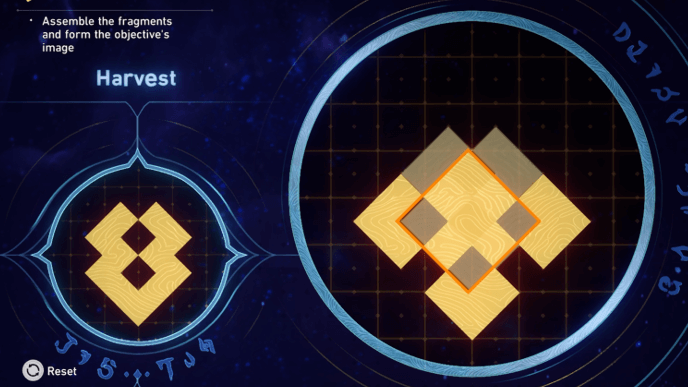 Place the large diamond at the bottom of the shape. |
| 2 | 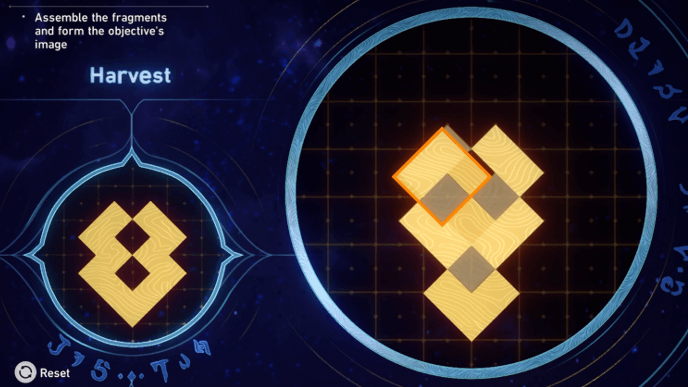 Use small two diamonds to connect with the shapes on top. |
| 3 |  Finally, place the third small diamond in the middle of the shape to complete the puzzle. |
▲ Back to All Fortress of Dome Puzzles
Fortress of Dome Eye of Twilight Tablet 2
| Fortress of Dome Tablet 2 Solution | |
|---|---|
| 1 | 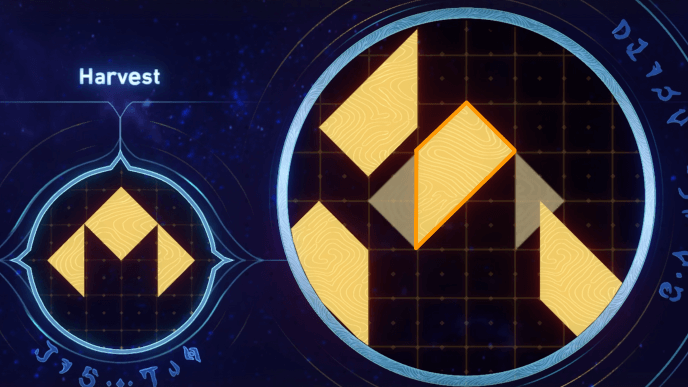 Put the trapezoid pointing southwest in the middle of the shape. |
| 2 | 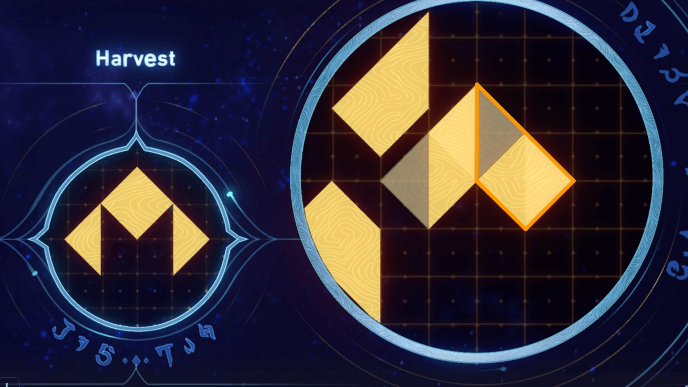 Place the trapezoid pointing northwest at the right side of the shape. |
| 3 | 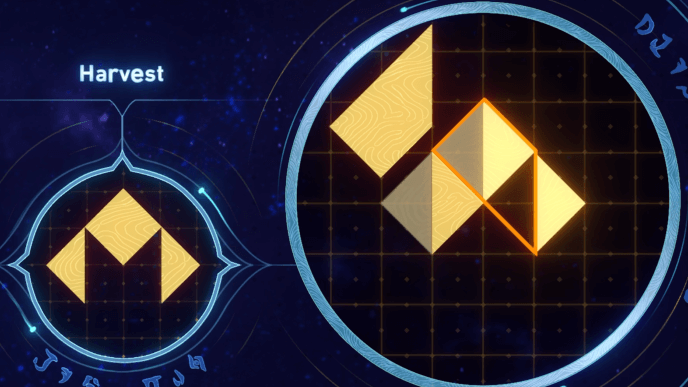 Place the trapezoid pointing southeast in the middle of the shape. |
| 4 | 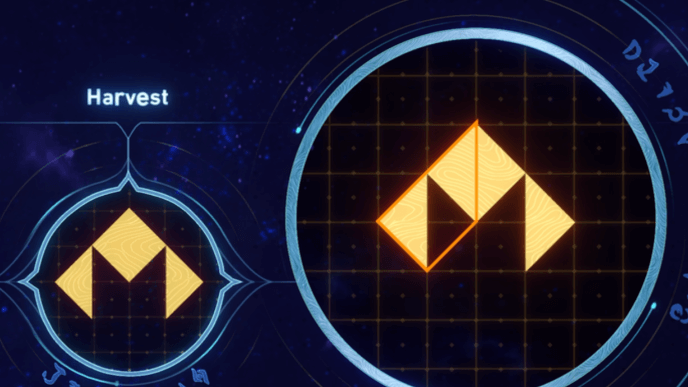 Place the trapezoid pointing northeast at the left side of the shape to complete the puzzle. |
▲ Back to All Fortress of Dome Puzzles
Cloudedge Bastion Ruins Eye of Twilight Prophecy Tablets
| Cloudedge Bastion Ruins Prophecy Tablet Locations | |
|---|---|
 |
 |
 |
 |
| "Cloudedge Bastion Ruins" Puzzle Solutions | |
| Puzzle 1 | Puzzle 2 |
| Puzzle 3 | Puzzle 4 |
Use the Aurous Perch Space Anchor and use the Janus Passage to go to the left side. Follow the path to the left and at the very end, you'll see the first Prophecy Tablet.
For the second Prophecy Tablet, use the Bastion Depth Space Anchor and use the lift to go to the large room on the right. You'll see the tablet on the right side, so you'll have to use the Janus Passages to get to it.
Use the Nightspire BoneMech Space Anchor and follow the path to the right. You'll have to use the Janus Passages and moving platforms which will bring you back to F3. At the very left side after using the moving platforms, you'll see the tablet near the edge.
You'll get to the last Prophecy Tablet by heading to the right and using the Janus Passage to get to F4. Follow the path to the right and you'll find yourself on the other side of the debris where the tablet is.
▲ Back to All Amphoreus Locations
Cloudedge Bastion Ruins Prophecy Tablet 1
| Cloudedge Bastion Ruins Tablet 1 Solution | |
|---|---|
| 1 | 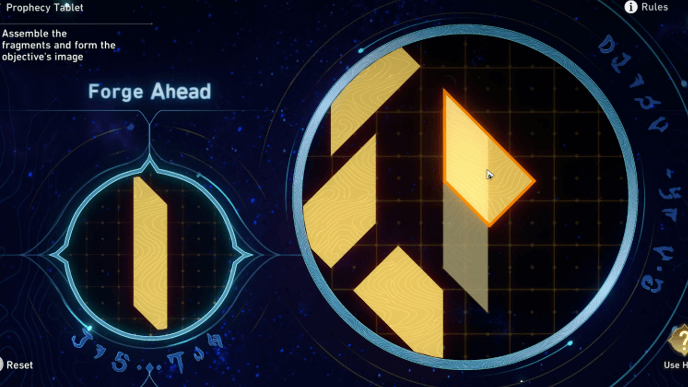 Place one of the trapezoids on the upper part of the image. |
| 2 | 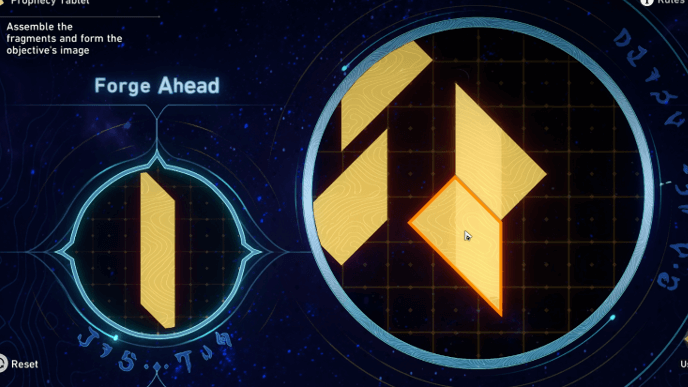 Place another trapezoid below the first one. |
| 3 | 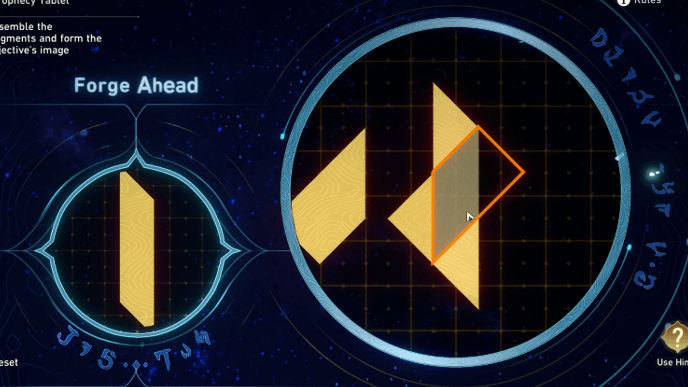 Place another trapezoid in the middle, overlapping both of the earlier trapezoids. |
| 4 |  Place the last trapezoid in the middle again, just below the third one so it overlaps and completes the image. |
▲ Back to All Cloudedge Bastion Ruins Puzzles
Cloudedge Bastion Ruins Prophecy Tablet 2
| Cloudedge Bastion Ruins Tablet 2 Solution | |
|---|---|
| 1 | 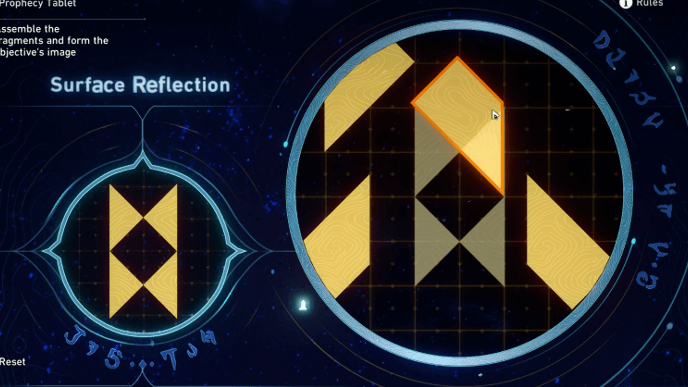 Place one of the trapezoids on the upper right side of the image. |
| 2 | 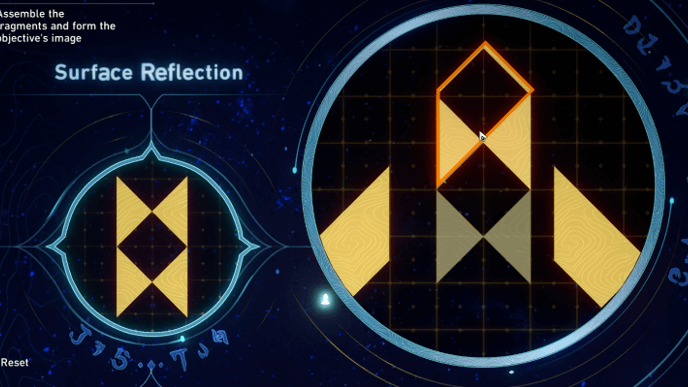 Place another trapezoid on the upper left side of the image, overlapping the first one. |
| 3 | 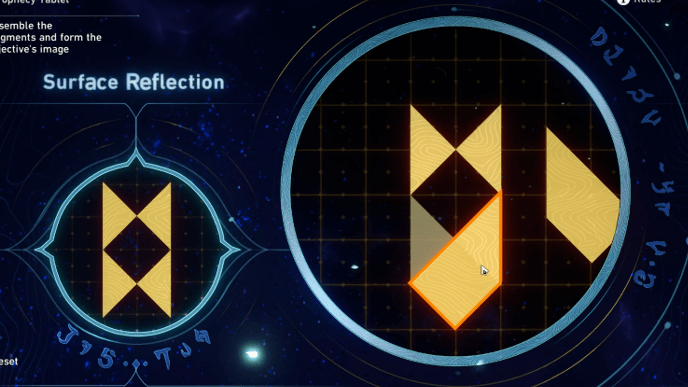 Place another trapezoid on the lower right side of the image. |
| 4 | 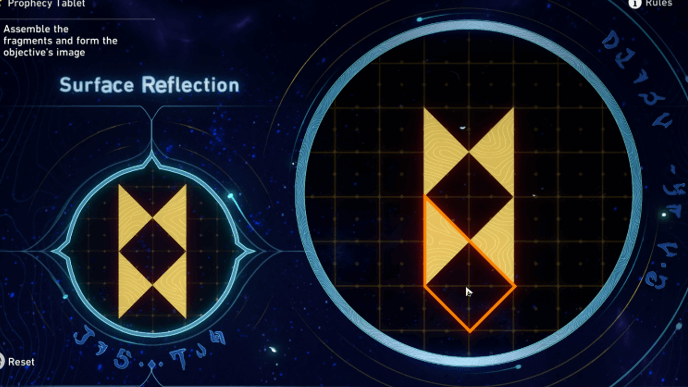 Place the last trapezoid on the lower left side, overlapping the third one and completing the image. |
▲ Back to All Cloudedge Bastion Ruins Puzzles
Cloudedge Bastion Ruins Prophecy Tablet 3
| Cloudedge Bastion Ruins Tablet 3 Solution | |
|---|---|
| 1 |  Place the big square in the upper middle part of the image. |
| 2 | 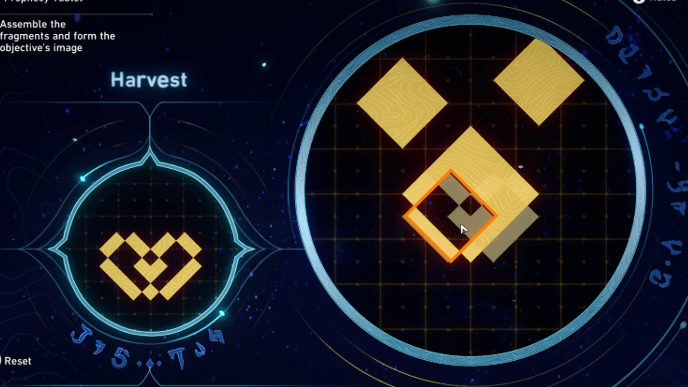 Place a smaller square on the lower left side of the image, overlapping the big square. |
| 3 | 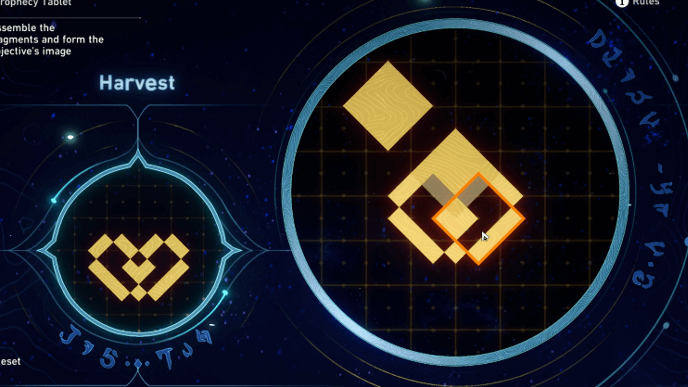 Place another smaller square on the lower right side of the image, overlapping the two squares. |
| 4 | 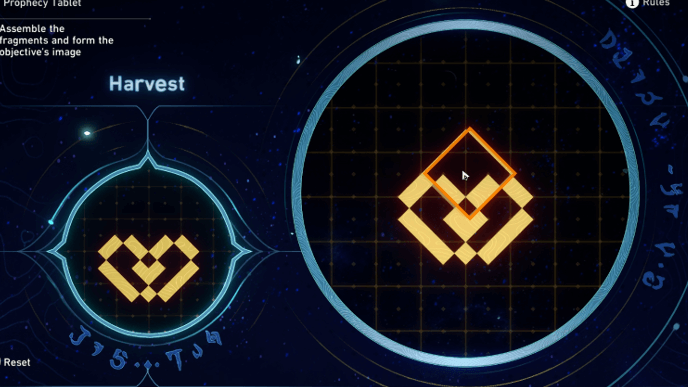 Place the last square on the upper middle part of the image, overlapping a part of the big square which completes the image. |
▲ Back to All Cloudedge Bastion Ruins Puzzles
Cloudedge Bastion Ruins Prophecy Tablet 4
| Cloudedge Bastion Ruins Tablet 4 Solution | |
|---|---|
| 1 | 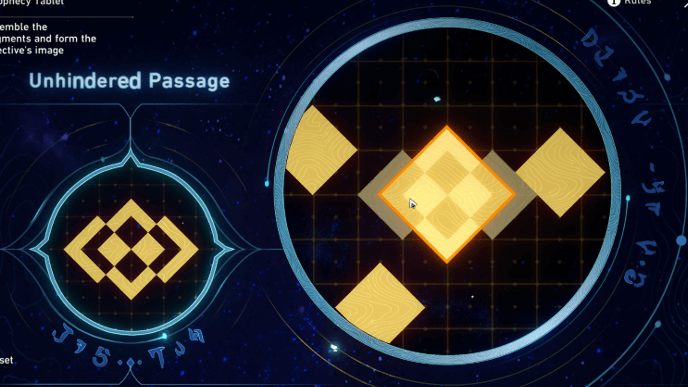 Place the big square in the middle of the image. |
| 2 | 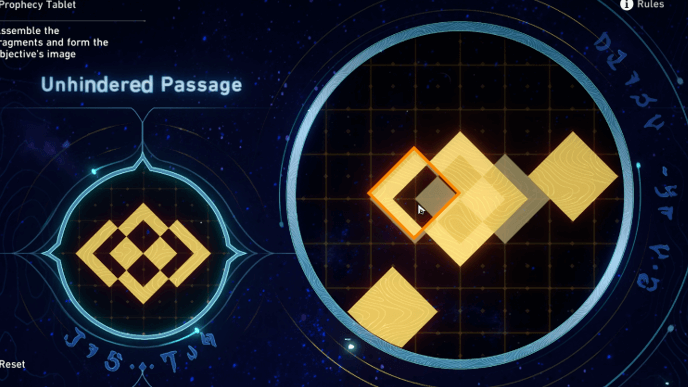 Place a smaller square on the left side of the image, overlapping a part of the big square from earlier. |
| 3 | 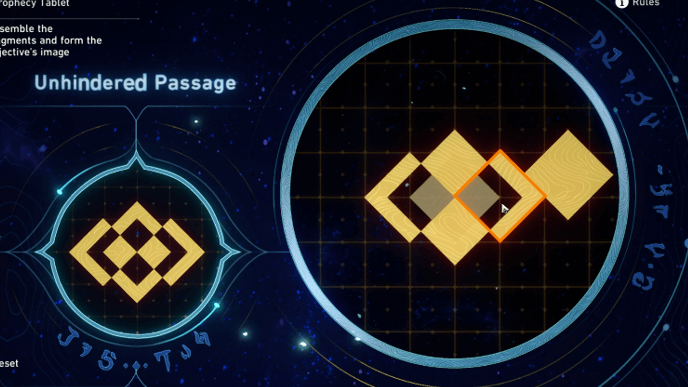 Place another small square on the right side of the image, overlapping another part of the big square from earlier. |
| 4 | 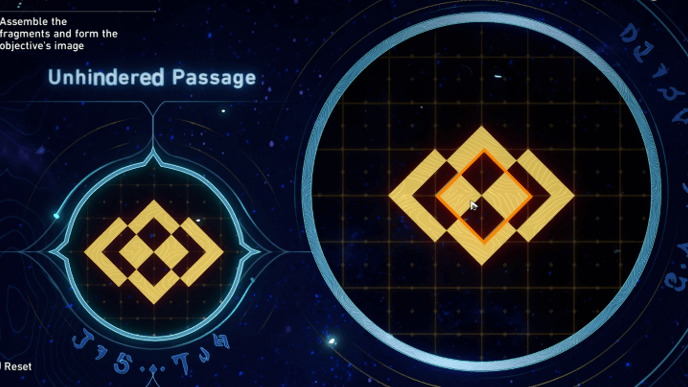 Place the last square in the middle of the image to complete it. |
▲ Back to All Cloudedge Bastion Ruins Puzzles
Lightless Chapel Dawncloud Prophecy Tablets
There's only one Prophecy Tablet in "Lightless Chapel" Dawncloud. Use the Eve's Holy Pass Space Anchor and go inside the westward room to find the Prophecy Tablet
▲ Back to All Amphoreus Locations
Lightless Chapel Dawncloud Prophecy Tablet
| Lightless Chapel Dawncloud Tablet Solution | |
|---|---|
| 1 |  Place the trapezoid facing southwest in the middle of the image. |
| 2 | 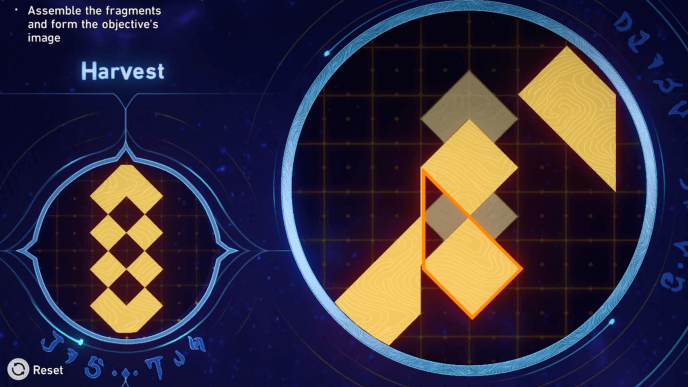 Place the trapezoid facing northwest at the bottom. |
| 3 | 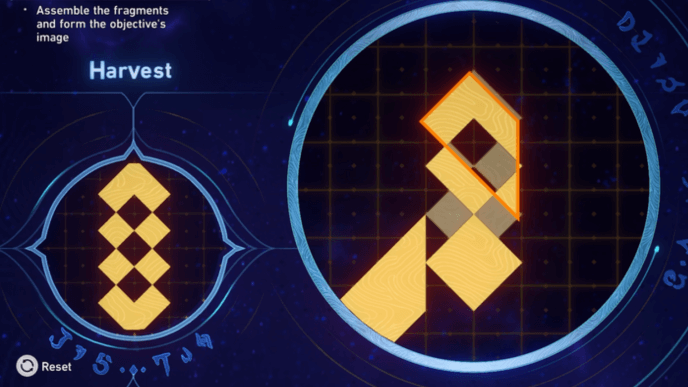 Place the trapezoid facing southeast at the upper part of the shape. |
| 4 |  Place the trapezoid facing northeast in the middle to complete the image. |
Fallen Twilight City Okhema Prophecy Tablets
There's only one Prophecy Tablet in "Fallen Twilight City" Okhema. Use the Frostlight Bath Chamber Space Anchor and go southeast to find the Prophecy Tablet.
▲ Back to All Amphoreus Locations
Fallen Twilight City Okhema Prophecy Tablet
| Fallen Twilight City Okhema Tablet Solution | |
|---|---|
| 1 | 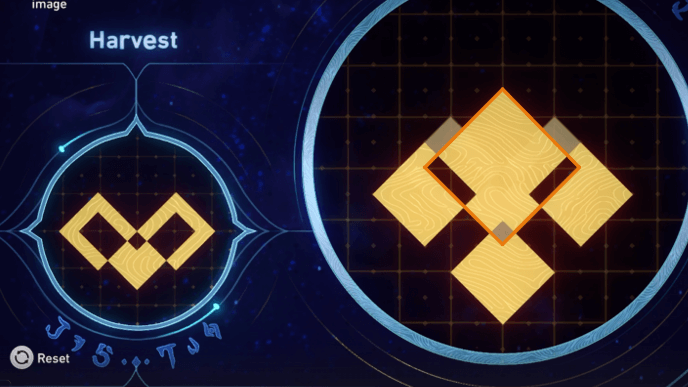 Place the large square in the middle of the image. |
| 2 | 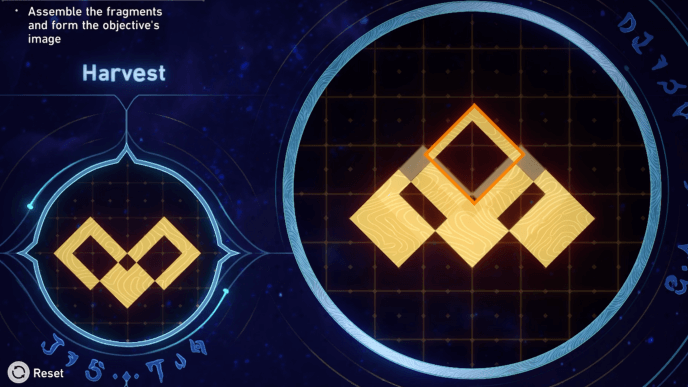 Place a small square on top of the large square. |
| 3 |  Place the two small squares in the middle of the shapes and beside each other to complete the puzzle. |
Aedes Elysiae Prophecy Tablets
| Aedes Elysiae Prophecy Tablet Locations | |
|---|---|
 |
 |
| Aedes Elysiae Puzzle Solutions | |
| Puzzle 1 | Puzzle 2 |
Use the Sacrament Courtyard Space Anchor and follow the path to the right side until you reach the town plaza. The first prophecy tablet can be found behind the statue.
The second prophecy tablet can be found near the Wondrous Woods Space Anchor.
▲ Back to All Amphoreus Locations
Aedes Elysiae Prophecy Tablet 1
| Aedes Elysiae Prophecy Tablet 1 Solution | |
|---|---|
| 1 | 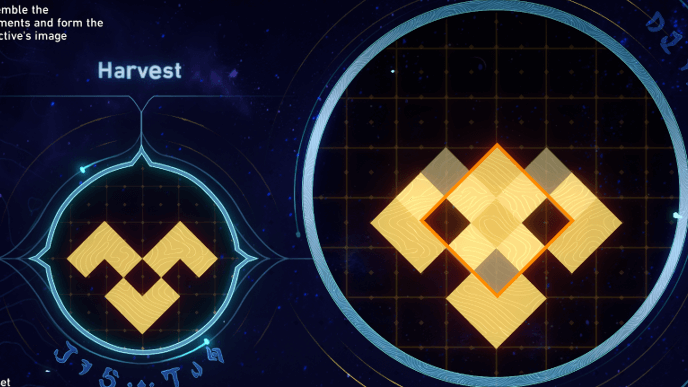 Place the large diamond at the bottom of the image. |
| 2 |  Place a small diamond on the left side of the image, with its lower right half overlapping with the large diamond. |
| 3 | 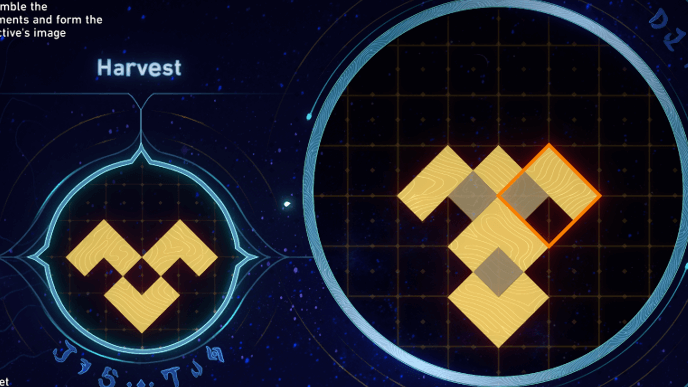 Place another small diamond on the right side of the image, with its lower left half overlapping with the large diamond. |
| 4 | 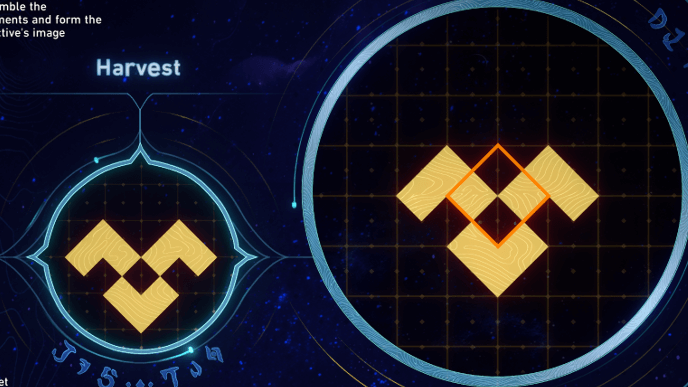 Place the last small diamond in the middle of the image to complete it. |
Aedes Elysiae Prophecy Tablet 2
| Aedes Elysiae Prophecy Tablet 2 Solution | |
|---|---|
| 1 | 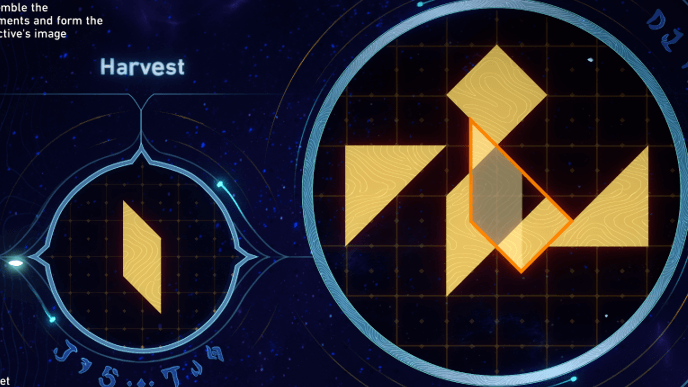 Align the trapezoid facing northwest with the top of the image. |
| 2 | 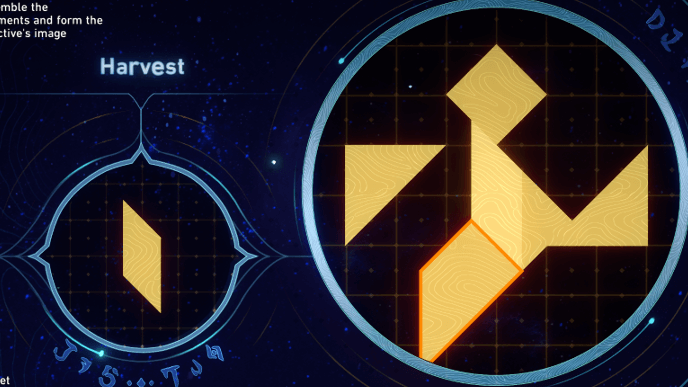 Place the trapezoid facing southwest below the trapezoid from Step 1. |
| 3 | 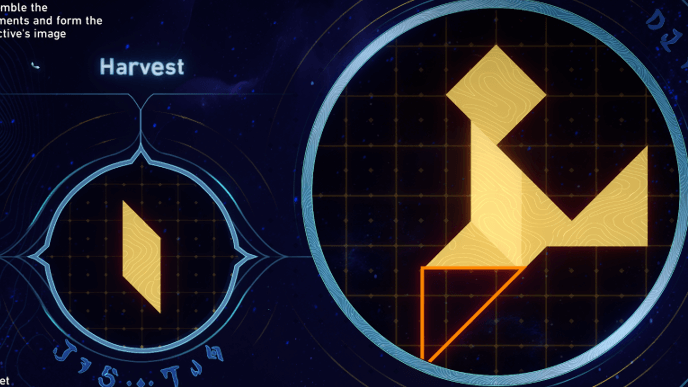 Cover the bottom half of the trapezoid from Step 2 with a right triangle. |
| 4 | 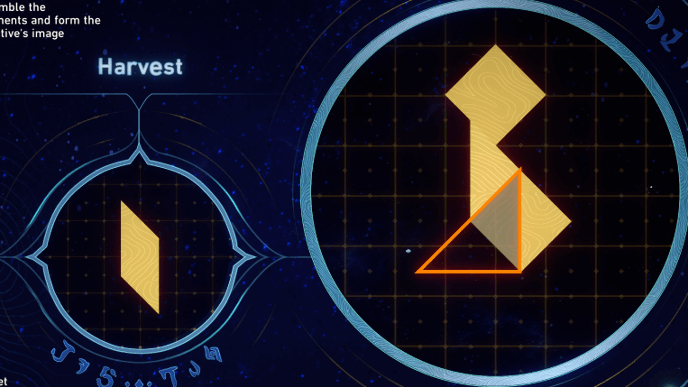 Place the other right triangle on top of the remaining visible part of the trapezoid from Step 2 as well as the bottom half of the projected image. |
| 5 | 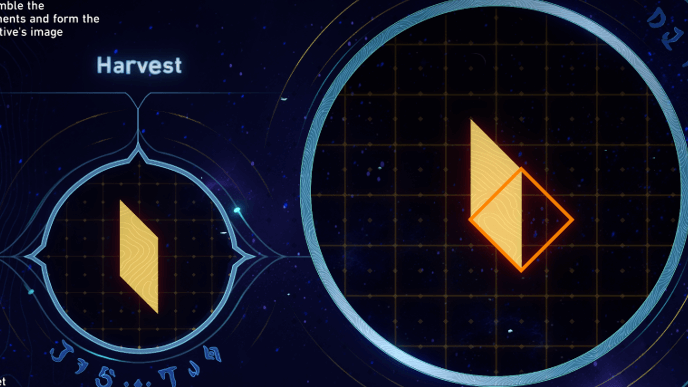 Make the diamond overlap with the bottom half of the trapezoid from Step 1 to complete the image. |
▲ Back to All Aedes Elysiae Puzzles
Warbling Shores Styxia Prophecy Tablets

Use the Passage of Treasures Space Anchor and go to the big room to the left. Next, cross the bridge and head down the stairs to the right. Follow the path to the very end and you'll see the Prophecy Tablet.
▲ Back to All Amphoreus Locations
Warbling Shores Prophecy Tablet
| Warbling Shores Prophecy Tablet Solution | |
|---|---|
| 1 | 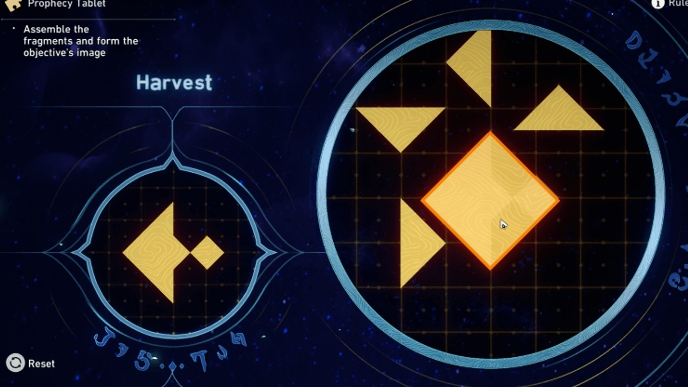 Place the large square in the middle of the image. |
| 2 |  Place the small triangle pointing up on the top of the image. |
| 3 | 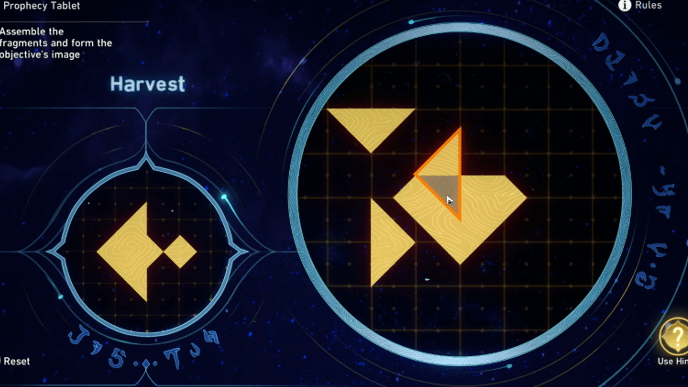 Place the small triangle pointing to the left on the left side of the smaller triangle earlier, with its upper half overlapping it. |
| 4 |  Place the small triangle pointing down just below the small triangle pointing up and overlapping the lower half of the other small triangle. |
5 | 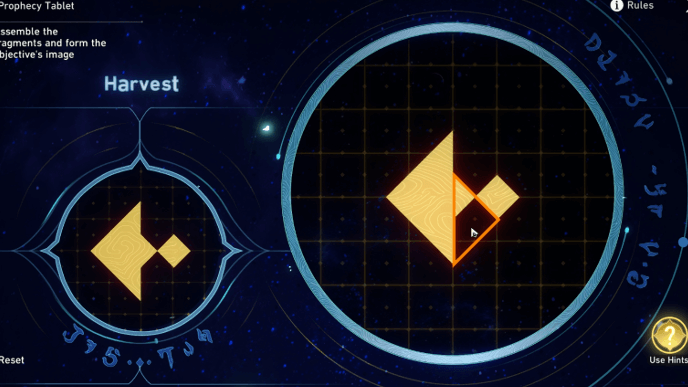 Place the last small triangle pointing to the right in the lower right part of the image to complete it. |
Radiant Scarwood Grove of Epiphany Prophecy Tablets
Use the Teary Court Ruins Space Anchor and ride the elevator up. From the elevator, head to the right and you'll see the Prophecy Tablet at the very end of the path.
▲ Back to All Amphoreus Locations
Radiant Scarwood Grove of Epiphany Prophecy Tablet
| Radiant Scarwood Prophecy Tablet Solution | |
|---|---|
| 1 | 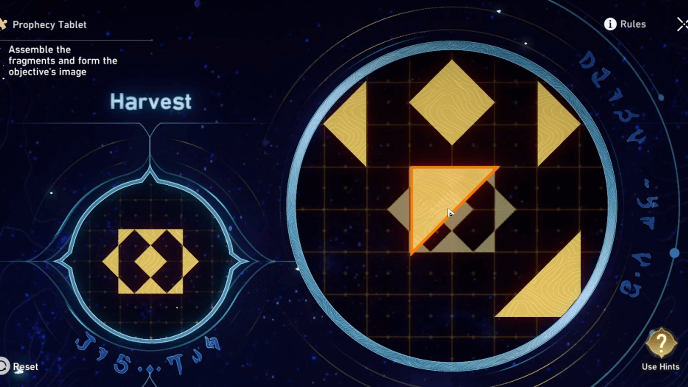 Place the triangle piece from the bottom left at the center of the image. |
| 2 | 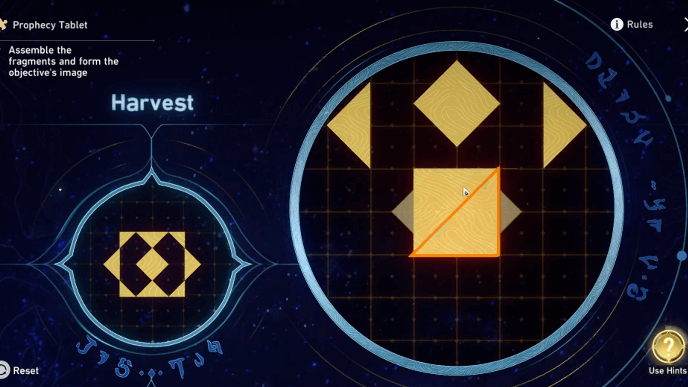 Place the triangle piece from the bottom right next to the previous piece to form a square in the middle. |
| 3 | 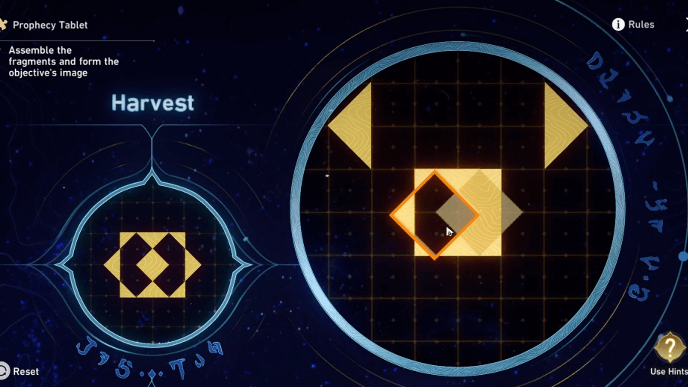 Make the diamond piece overlap with the left half of the square. |
| 4 |  Make the left-facing triangle overlap the right half of the square so that it forms a smaller diamond in the middle of the image. |
| 5 | 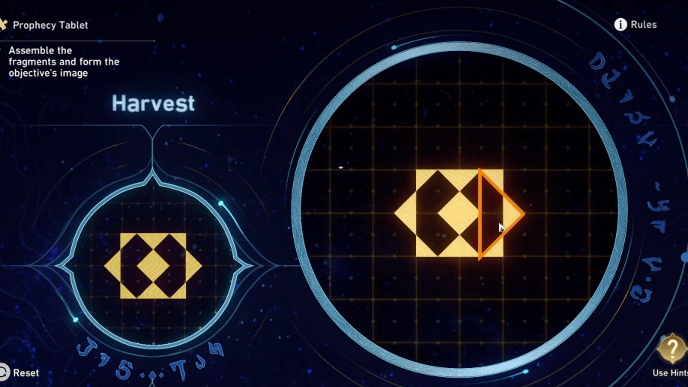 Place the right-facing triangle next to the previous piece to complete the image. |
Universal Matrix Great Tomb of the Nameless Titan Prophecy Tablets
Use the Tranquil Tomb Gate Space Anchor and go into the F2 puzzle room. Use the book to shift the time to Evernight and you'll see the Prophecy Tablet near the book.
▲ Back to All Amphoreus Locations
Universal Matrix Great Tomb of the Nameless Titan Prophecy Tablet
| Universal Matrix Prophecy Tablet Solution | |
|---|---|
| 1 | 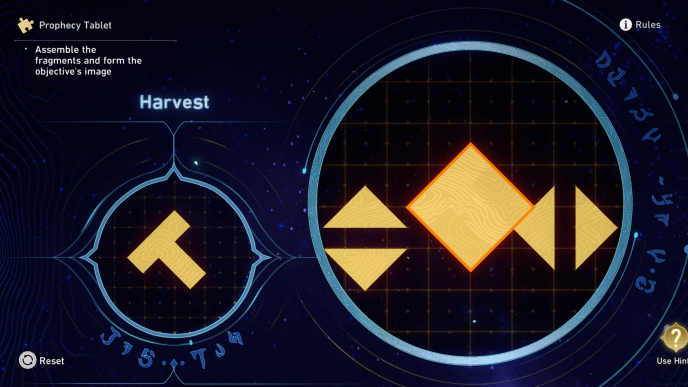 Place the diamond in the center. |
| 2 | 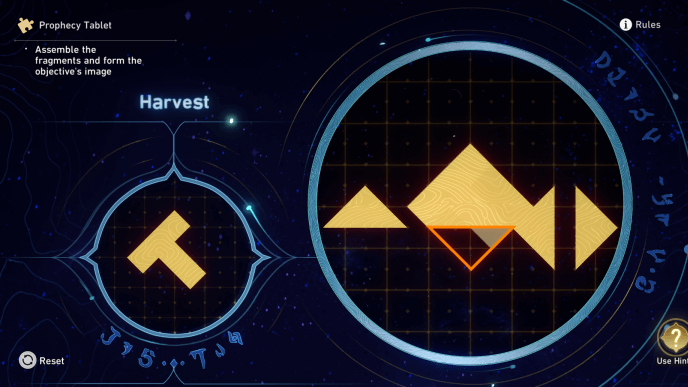 Place the triangle facing downwards at the bottom of the diamond. |
| 3 | 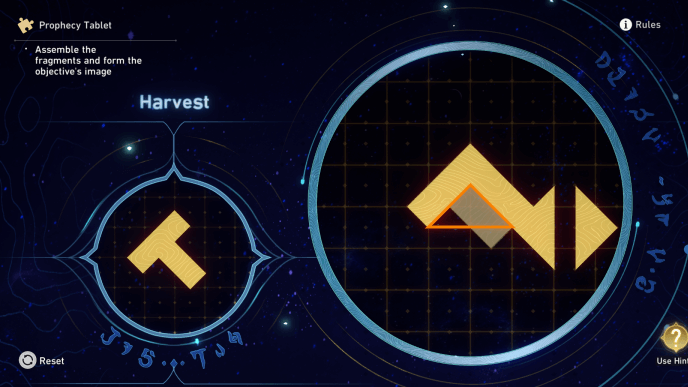 Place the triangle facing up above where you put the previous triangle. |
| 4 | 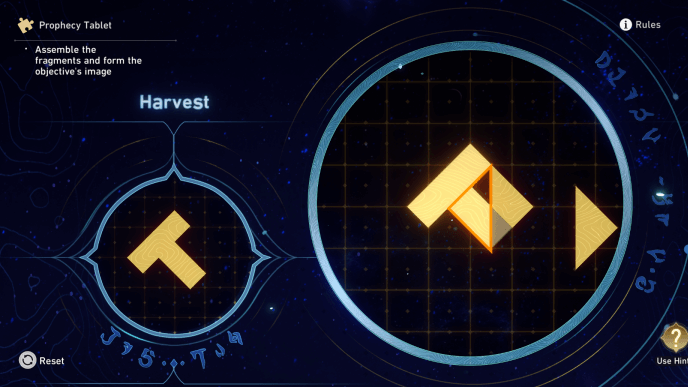 Align the bottom of the triangle facing left with the bottom of the outline. |
| 5 | 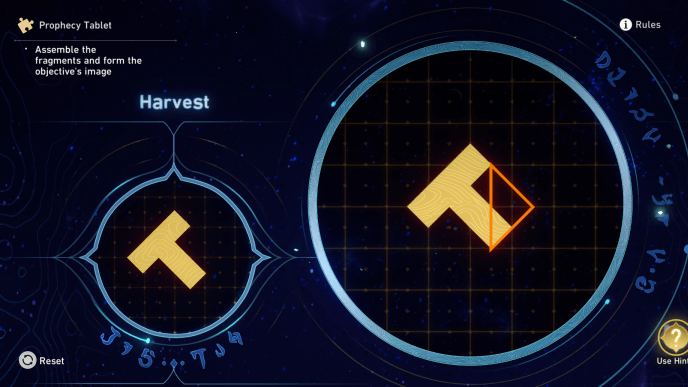 Align the bottom of the triangle facing right with the bottom of the outline. |
Nightmare's Echo Great Tomb of the Nameless Titan Prophecy Tablets
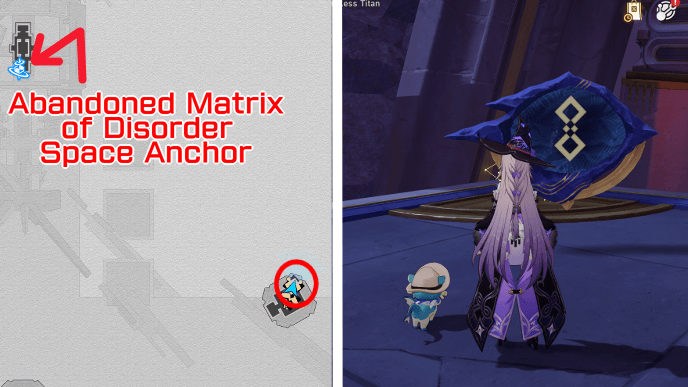
Use the Abandoned Matrix of Disorder Space Anchor and use the Mistletoe to fly southeast. You'll see a platform with the Prophecy Tablet on it.
▲ Back to All Amphoreus Locations
Nightmare's Echo Great Tomb of the Nameless Titan Prophecy Tablet
| Nightmare's Echo Prophecy Tablet Solution | |
|---|---|
| 1 |  Place a small diamond at the top of the large diamond. |
| 2 |  Place a small diamond at the bottom of the large diamond. |
| 3 | 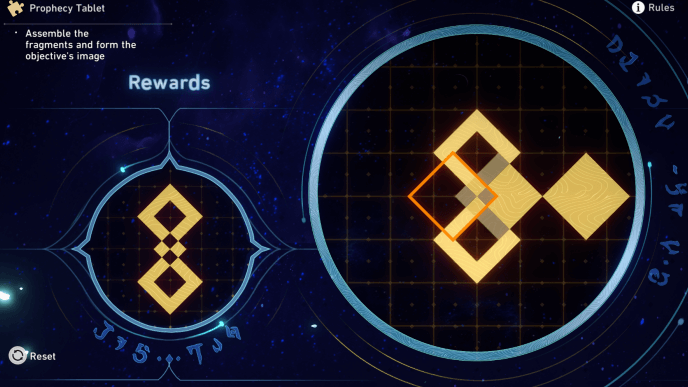 Place a small diamond on the left of the large diamond. |
| 4 | 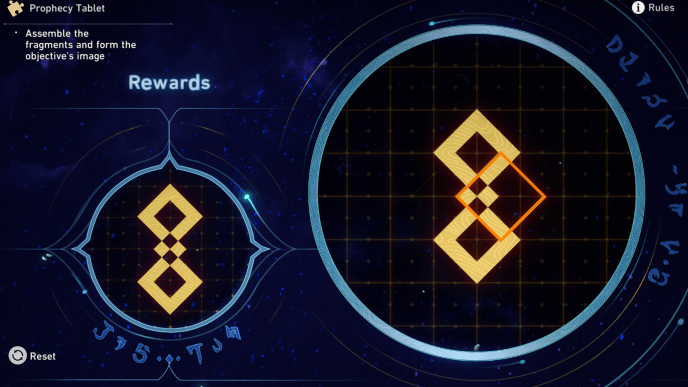 Place the last small diamond on the right of the large diamond. |
Memortis Shore Ruins of Time Prophecy Tablets
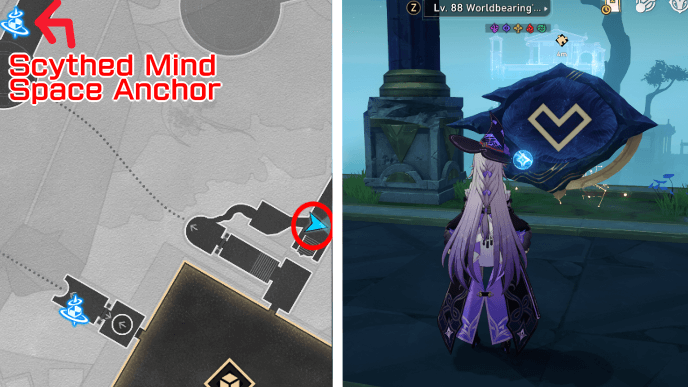
Use the Sanctuary of Scythed Mind Space Anchor and go through the Janus Passage behind you. On the other side, you'll see a branch just in front of a Janus Pig. Cross the branch and go up the ruins to see the Prophecy Tablet.
▲ Back to All Amphoreus Locations
Memortis Shore Ruins of Time Prophecy Tablet
| Memortis Shore Prophecy Tablet Solution | |
|---|---|
| 1 | 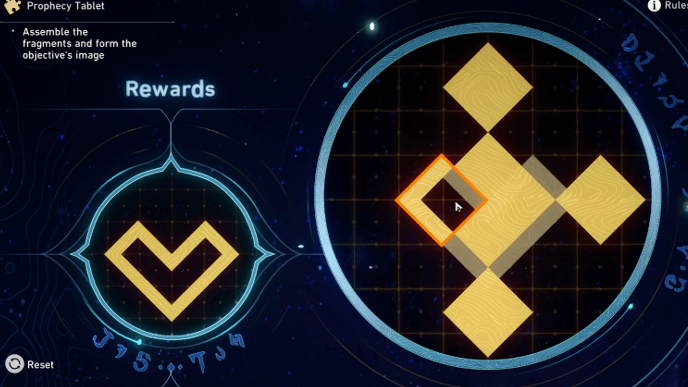 Place a small diamond on the left side of the image. |
| 2 | 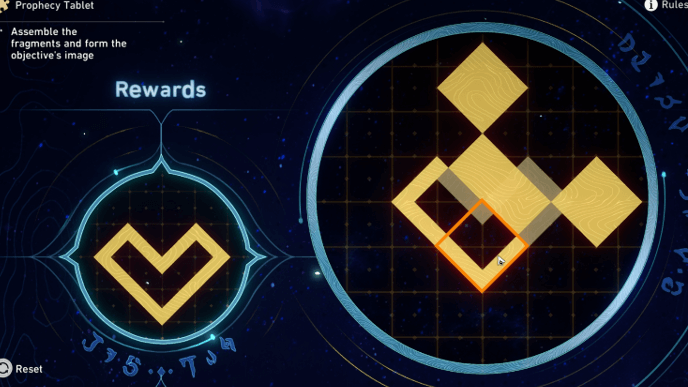 Place another small diamond at the bottom of the image. |
| 3 | 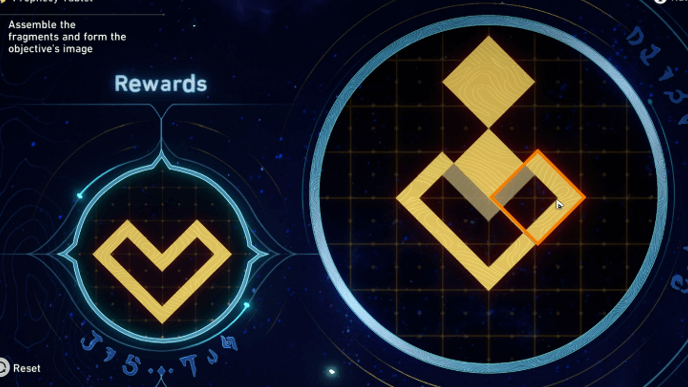 Place another small diamond on the right side of the image. |
| 4 | 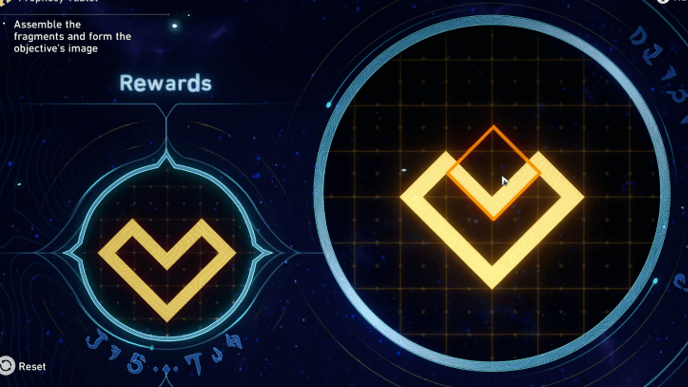 Lastly, place another small diamond at the top part of the image to complete it. |
Prophecy Tablet Information
Form the Image with the Given Shapes

Prophecy Tablets are puzzles wherein you need to arrange the fragments to form the given image. Overlapping shapes will cancel each other out, allowing you to essentially cut holes within the image.
Honkai: Star Rail Related Guides

All Tips and Tricks Guides
Comment
Author

All Prophecy Tablet Puzzle Solutions
Premium Articles

Rankings
Gaming News

![Monster Hunter Stories 3 Review [First Impressions] | Simply Rejuvenating](https://img.game8.co/4438641/2a31b7702bd70e78ec8efd24661dacda.jpeg/show)


![Monster Hunter Stories 3 Review [First Impressions] | Simply Rejuvenating](https://img.game8.co/4438641/2a31b7702bd70e78ec8efd24661dacda.jpeg/thumb)
Popular Games

Genshin Impact Walkthrough & Guides Wiki
Honkai: Star Rail Walkthrough & Guides Wiki
Umamusume: Pretty Derby Walkthrough & Guides Wiki
Pokemon Pokopia Walkthrough & Guides Wiki
Resident Evil Requiem (RE9) Walkthrough & Guides Wiki
Monster Hunter Wilds Walkthrough & Guides Wiki
Wuthering Waves Walkthrough & Guides Wiki
Arknights: Endfield Walkthrough & Guides Wiki
Pokemon FireRed and LeafGreen (FRLG) Walkthrough & Guides Wiki
Pokemon TCG Pocket (PTCGP) Strategies & Guides Wiki


Recommended Games
Diablo 4: Vessel of Hatred Walkthrough & Guides Wiki
Cyberpunk 2077: Ultimate Edition Walkthrough & Guides Wiki
Fire Emblem Heroes (FEH) Walkthrough & Guides Wiki
Yu-Gi-Oh! Master Duel Walkthrough & Guides Wiki
Super Smash Bros. Ultimate Walkthrough & Guides Wiki
Pokemon Brilliant Diamond and Shining Pearl (BDSP) Walkthrough & Guides Wiki
Elden Ring Shadow of the Erdtree Walkthrough & Guides Wiki
Monster Hunter World Walkthrough & Guides Wiki
The Legend of Zelda: Tears of the Kingdom Walkthrough & Guides Wiki
Persona 3 Reload Walkthrough & Guides Wiki


All rights reserved
Copyright © 2024 HoYoverse, COGNOSPHERE. All Rights Reserved.
The copyrights of videos of games used in our content and other intellectual property rights belong to the provider of the game.
The contents we provide on this site were created personally by members of the Game8 editorial department.
We refuse the right to reuse or repost content taken without our permission such as data or images to other sites.