This survey will take about 1 minute.
Your answers will help us to improve our website.
Honkai: Star Rail
“Abyss of Fate” Janusopolis Treasure Chest Locations
★ Exclusive: Check out the State of Meta in 4.0!
♦ Latest: 4.0 Redeem Codes
♦ Phase 2: Sparkxie, Sparkle, Cerydra, Rappa
♦ Upcoming: Ashveil, Silver Wolf Lv.999, Evanescia
♦ Events: Cosmicon, Roll On!, Ding! Arcadia Fun-Time Clock-In Essentials
There are 34 “Abyss of Fate” Janusopolis chests to collect in Honkai: Star Rail's Amphoreus. Check out our interactive map for all Janusopolis chests, puzzles, and Spirithief locations!
| Amphoreus Map Guide | |
|---|---|
| Abyss of Fate Janusopolis Chests | Abyss of Fate Janusopolis Puzzles |
List of Contents
“Abyss of Fate” Janusopolis Chest Locations
Select icons to toggle them on/off
| Space Anchor | Treasure Chest | ||
| Spirithief | - | ||
Abyss of Fate Janusopolis Chests
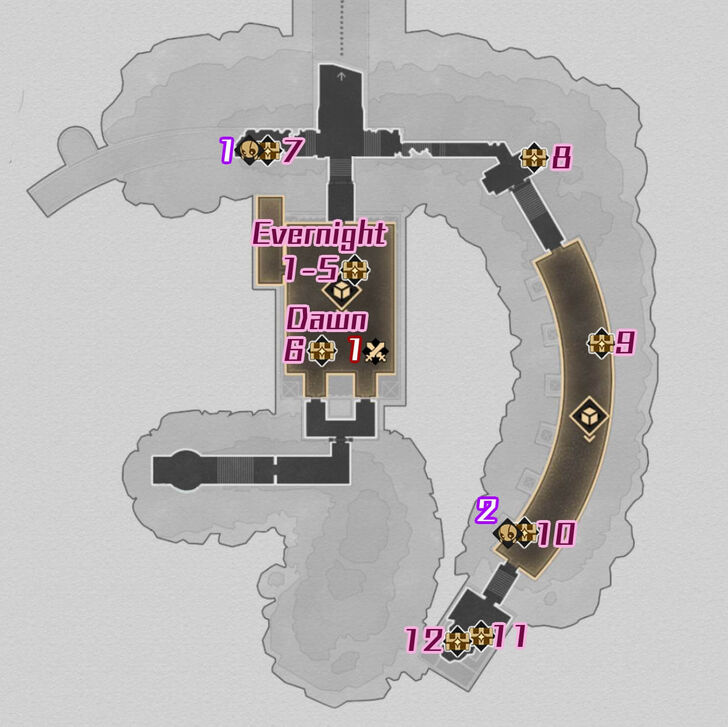
| “Abyss of Fate” Janusopolis Treasure Map | |||||||||||
|---|---|---|---|---|---|---|---|---|---|---|---|
 See Full Image |
 See Full Image |
||||||||||
 See Full Image |
|||||||||||
| Janusopolis Treasure Chests | |||||||||||
| Chest 1 | Chest 2 | Chest 3 | Chest 4 | ||||||||
| Chest 5 | Chest 6 | Chest 7 | Chest 8 | ||||||||
| Chest 9 | Chest 10 | Chest 11 | Chest 12 | ||||||||
| Chest 13 | Chest 14 | Chest 15 | Chest 16 | ||||||||
| Chest 17 | Chest 18 | Chest 19 | Chest 20 | ||||||||
| Chest 21 | Chest 22 | Chest 23 | Chest 24 | ||||||||
| Chest 25 | Chest 26 | Chest 27 | Chest 28 | ||||||||
| Chest 29 | Chest 30 | Chest 31 | |||||||||
| Janusopolis Spirithief Locations | |||||||||||
| Spirithief 1 | Spirithief 2 | ||||||||||
| Janusopolis Formidable Foes | |||||||||||
| Foe 1 | |||||||||||
How to Get “Abyss of Fate” Janusopolis Chests
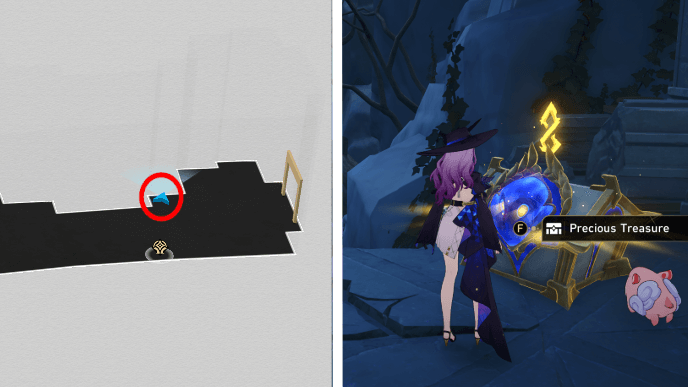
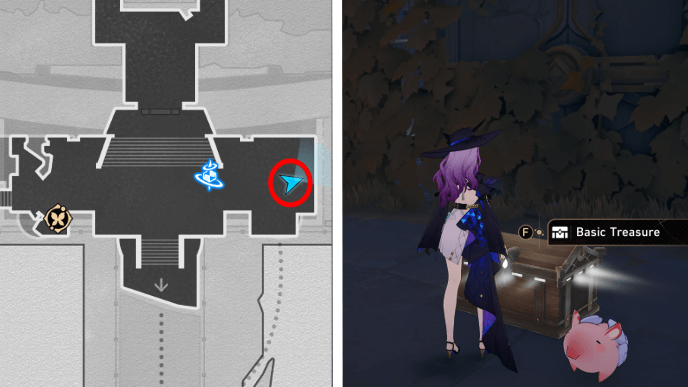
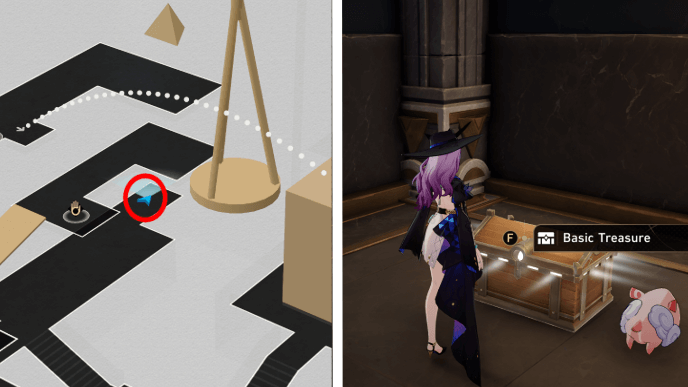
“Abyss of Fate” Janusopolis Chest 1
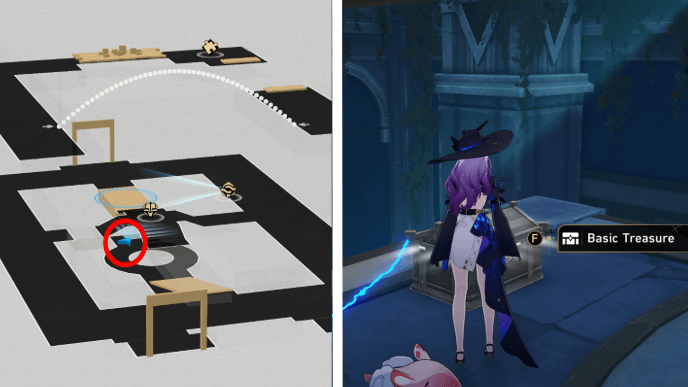
The first Treasure Chest can be found at the center of the first room past the Destiny's Desolation space anchor. Head down the broken bridge to get to the chest.
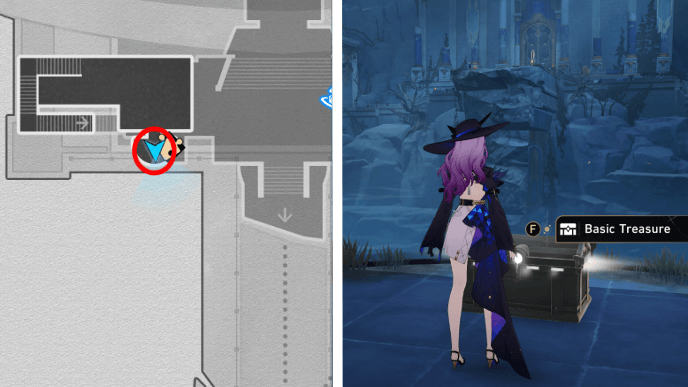
“Abyss of Fate” Janusopolis Chest 2
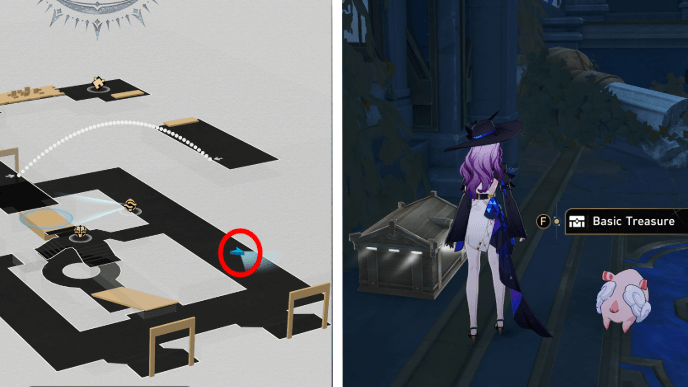
From the first Treasure Chest, head back to the bridge and fix it. Cross the bridge then head right and follow the path to the right to get to the Treasure Chest.
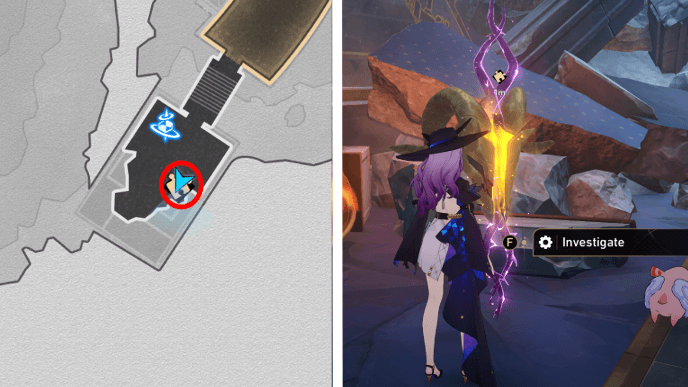
“Abyss of Fate” Janusopolis Chest 3
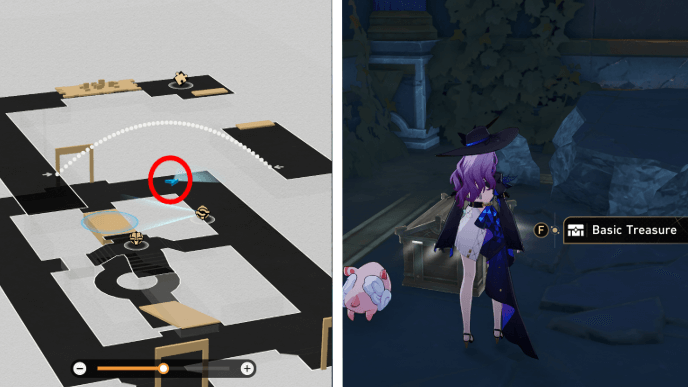
From the same area, head to the center and perform a miracle to engage the Miracle Orb. Once engaged, head back to the center and perform another miracle then head to the place the orb is aiming at to get the 3rd Treasure Chest.
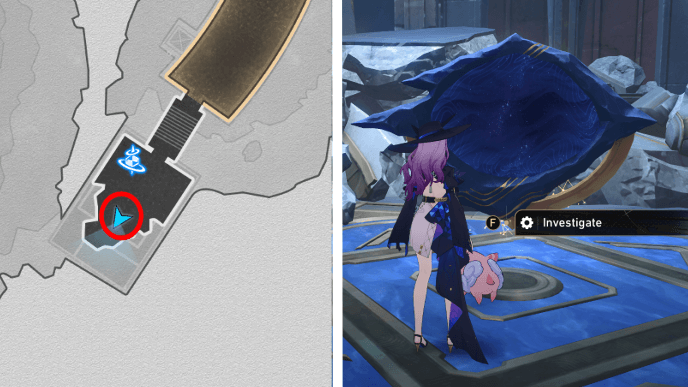
“Abyss of Fate” Janusopolis Chest 4

The fourth treasure chest can be found on the opposite path of the third Treasure Chest.
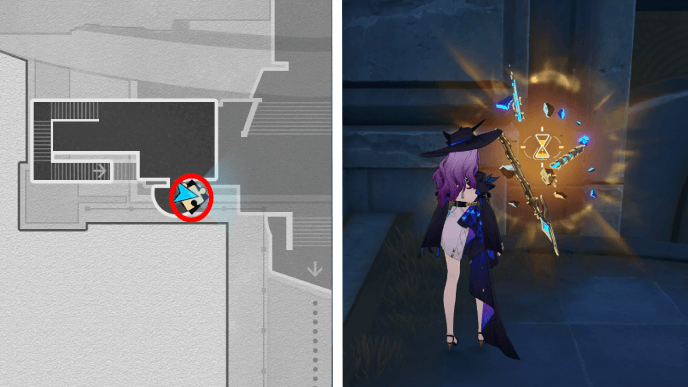
“Abyss of Fate” Janusopolis Chest 5
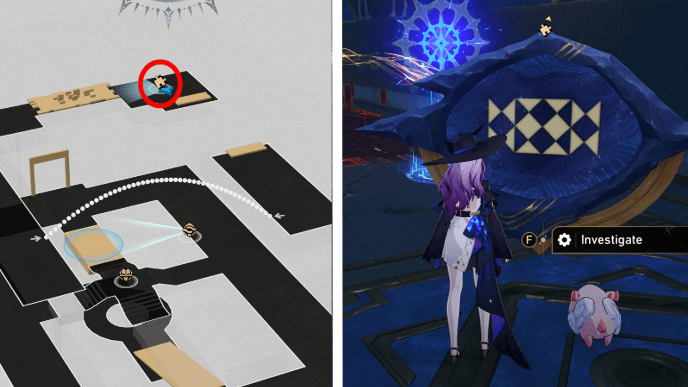
From Chest 4, head up to the second floor of that area. From there, take the hidden passage to get across and you'll be able to find the Prophecy Tablet.
Abyss of Fate Prophecy Tablet 1 Solution
Follow the steps shown above to solve the Prophecy Tablet puzzle and claim your treasure!
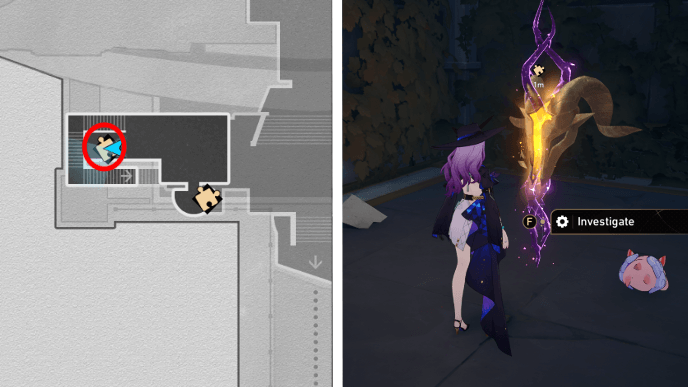
“Abyss of Fate” Janusopolis Chest 6
From the first room after the Destiny's Desolation space anchor, change the area to the past. Then from the left where you would exit, you can find the Golden Scapegoat.
Abyss of Fate Golden Scapegoat 1 Solution
Follow the steps shown above to solve the Golden Scapegoat puzzle and claim your treasure!
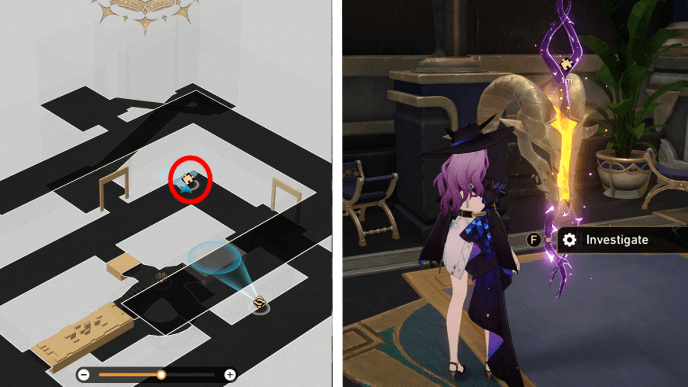
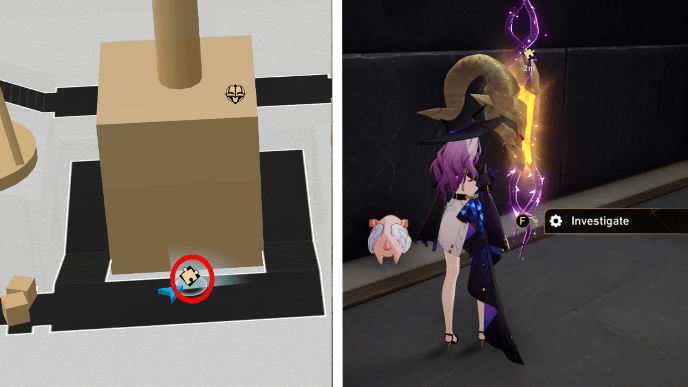
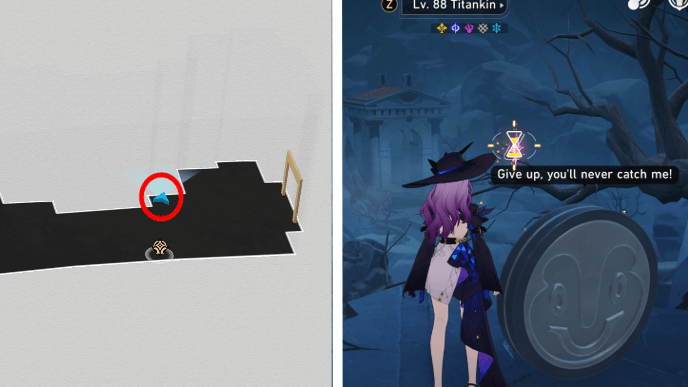
“Abyss of Fate” Janusopolis Chest 7
From the Silent Shroud space anchor, head west. You can find the chest near some rubbles. Interacting with the Treasure Chest will trigger a Spirithief event.
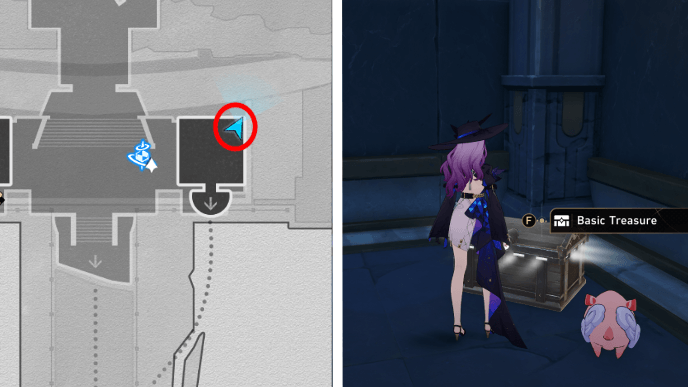
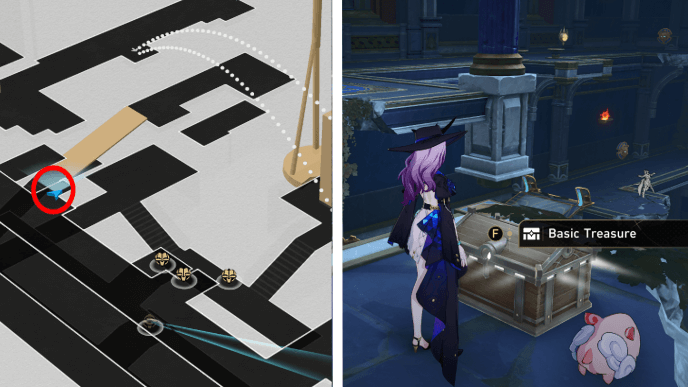
“Abyss of Fate” Janusopolis Chest 8
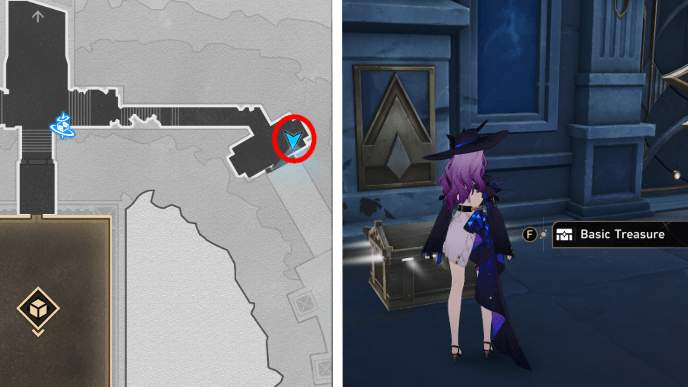
From the Silent Shroud space anchor, head east. You'll be able to find the treasure chest beside the door.
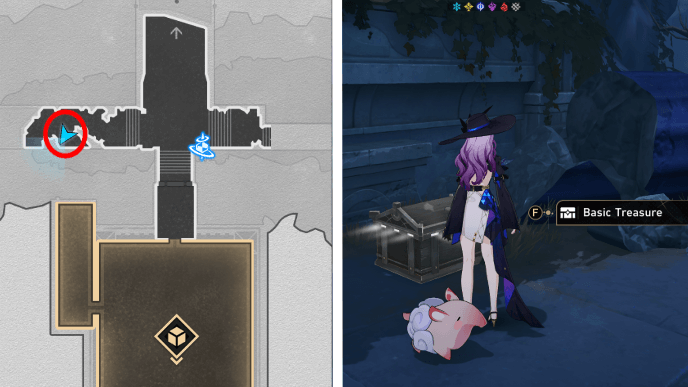
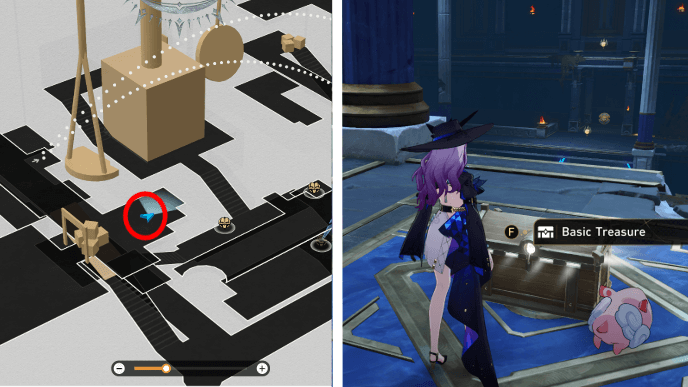
“Abyss of Fate” Janusopolis Chest 9
Enter the door by Chest 8. From there, fix the bridge and cross it. You'll find Chest 9 to the left.
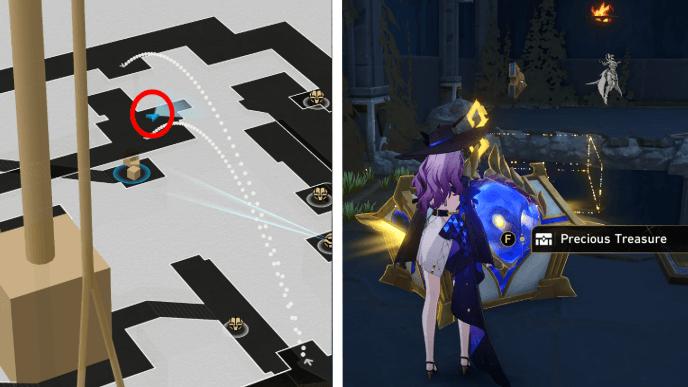
“Abyss of Fate” Janusopolis Chest 10
From Chest 9, keep heading south and you'll find another chest. Interact with it and a Spirithief Event will trigger. Complete the event to obtain the chest.
“Abyss of Fate” Janusopolis Chest 11
Chest 11 comes from the Golden Scapegoat puzzle near the Dreamshroud Mausoleum space anchor.
Abyss of Fate Golden Scapegoat 2 Solution
Follow the steps shown above to solve the Golden Scapegoat puzzle and claim your treasure!
“Abyss of Fate” Janusopolis Chest 12
This Prophecy Tablet can be found south of the Dreamshroud Mausoleum space anchor. This Prophecy Tablet is different from other Tablet as it has no pattern.
Abyss of Fate Prophecy Tablet 2 Solution
To solve this Prophecy Tablet with no pattern, you need to get all the Portentous Goldwoven from the Garmentmakers. They can be obtained by unlocking all 50 Creation Nymphs in Abyss of Fate, Strife Ruins, and Bloodbathed Battlefront.
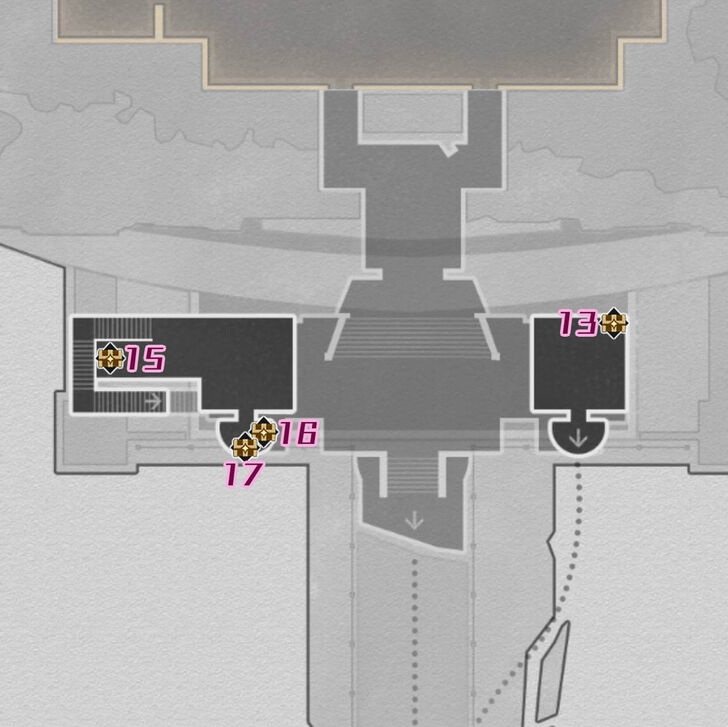
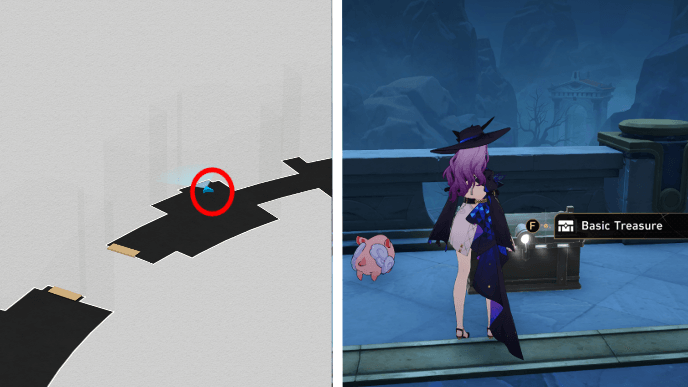
“Abyss of Fate” Janusopolis Chest 13
From the Destiny's Desolation space anchor, Use the Hidden Passage to cross to the next area. From the corner, you'll be able to find the Treasure Chest.
“Abyss of Fate” Janusopolis Chest 14
You can find this chest just east of the Everdream Gate space anchor.
“Abyss of Fate” Janusopolis Chest 15
Head down the stairs west of the Everdream Gate space anchor. You'll be able to find the Golden Scapegoat at the bottom of the stairs.
Abyss of Fate Golden Scapegoat 3 Solution
Follow the steps shown above to solve the Golden Scapegoat puzzle and claim your treasure!
“Abyss of Fate” Janusopolis Chest 16
Head west from the Everdream Gate space anchor and head down the stairs. You'll be able to find the Golden Short Spear on the balcony. You can also find a chest and a Golden Scapegoat in the same area.
“Abyss of Fate” Janusopolis Chest 17
Head west from the Everdream Gate space anchor and head down the stairs. You'll be able to find the chest on the balcony. You can also find Golden Scapegoat and a Golden Short Spear.
“Abyss of Fate” Janusopolis Chest 18

Enter the area north of Everdream Gate, and use the Tome of Miracles to set the time to Dawn. Go along the walkway on the left side of the area and use the bridge to reach the Golden Scapegoat found left of the Weighing Scale.
Abyss of Fate Golden Scapegoat 4 Solution
Follow the steps shown above to solve the Golden Scapegoat puzzle and claim your treasure!
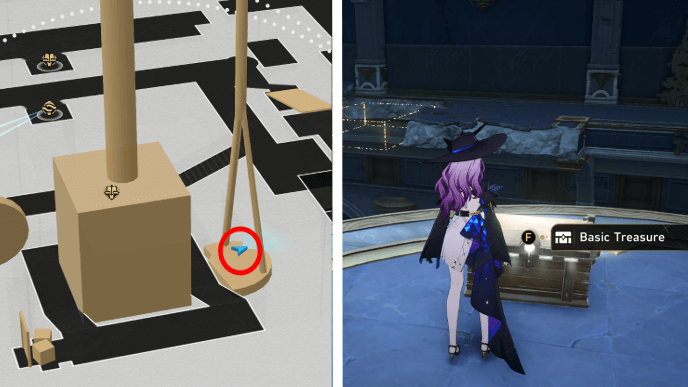
“Abyss of Fate” Janusopolis Chest 19
After getting Chest 18, use the collapsed bridge to go down to the bottom floor of the room. Chest 19 can be found in the corner spot that's left of the Weighing Scale.
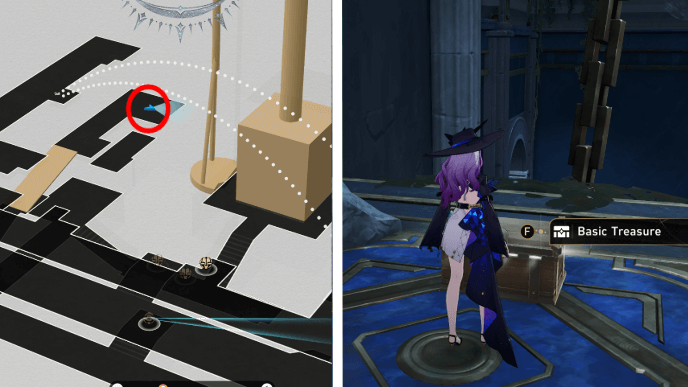
“Abyss of Fate” Janusopolis Chest 20
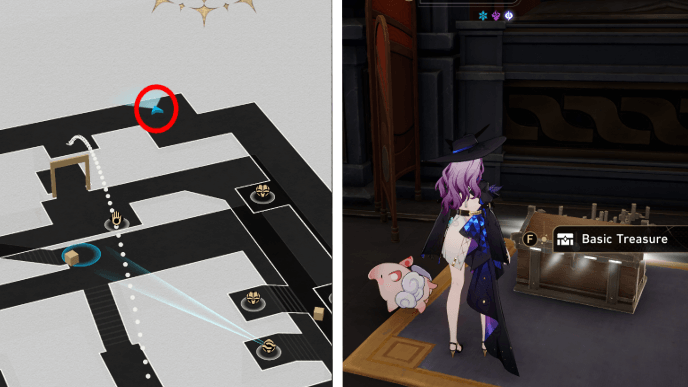
Use the Hand of Zagreus near Chest 18's Golden Scapegoat puzzle to move the ball-shaped weight onto the right tray of the Weighing Scale. This will allow you to use the left tray of the scale as an elevator to the 3rd floor of the area.
On the 3rd floor, jump to the other side with the Hidden Passage. Here, you'll find Chest 20 on a rug next to some floor cushions.
“Abyss of Fate” Janusopolis Chest 21
From the Chest 20, head directly west and use the Hand of Zagreus to reach the room with Chest 21.
“Abyss of Fate” Janusopolis Chest 22
This chest is hidden inside a room behind the Weighing Scale. You need to solve a series of Prophecy Tablets to access it.
Abyss of Fate Prophecy Tablet 2-4 Solution
| Abyss of Fate Chest 22 Walkthrough | |
|---|---|
| 1 | 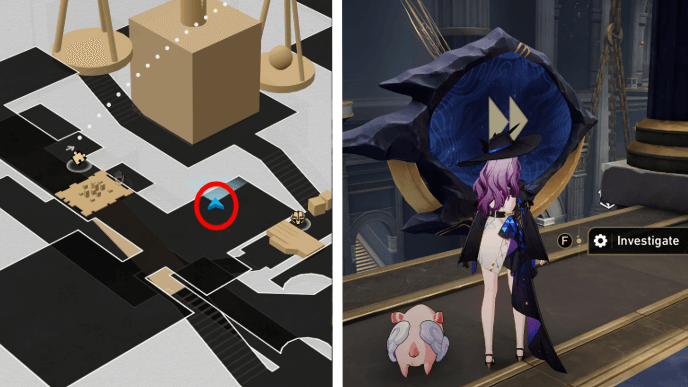 Look for the Balance Prophecy Tablet just outside of the room where Chest 20 is. |
| 2 | Solve the Prophecy Tablet by following the steps shown. This will restore a pyramid-shaped weight to the room. |
| 3 | 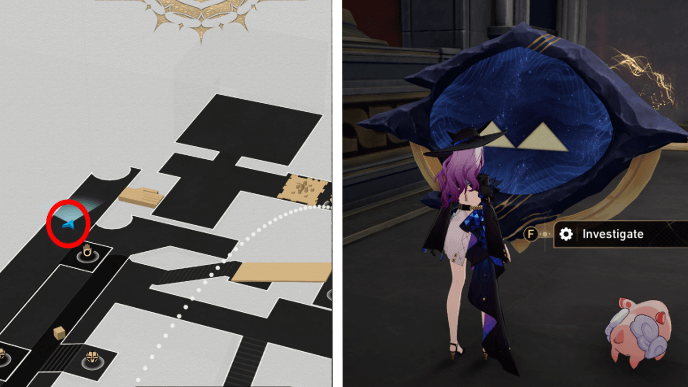 Look for the Ebb and Flow Prophecy Tablet near the Hand of Zagreus control point. |
| 4 | Solve the Prophecy Tablet by following the steps shown. This allows you to use the elevator and reach other floors easily. |
| 5 | 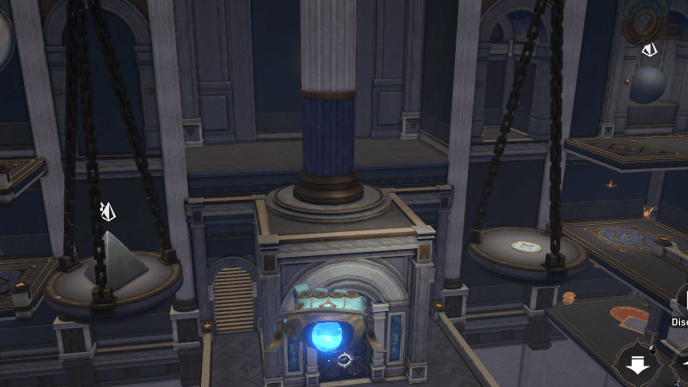 Use the Hand of Zagreus to put the pyramid-shaped weight onto the left tray and take off the ball-shaped weight from the scale. |
| 6 | 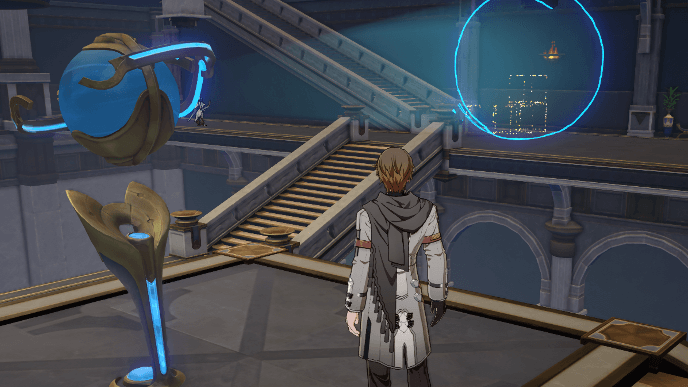 Take the elevator to go to the lower floor and use the Miracle Orb to remove the boxes blocking the stairs to the right tray of the Weighing Scale. Then, simply get onto the right tray to reach Chest 21! |
“Abyss of Fate” Janusopolis Chest 23

This Golden Short Spear can be found on the top floor, left of the Weighing Scale. After freeing the spear, it will go into the same hidden room where Chest 22 is.
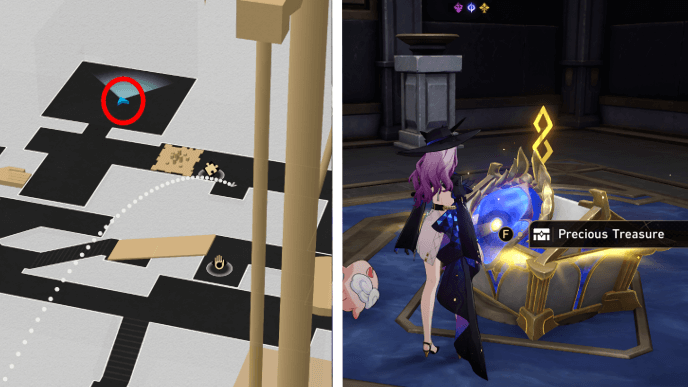
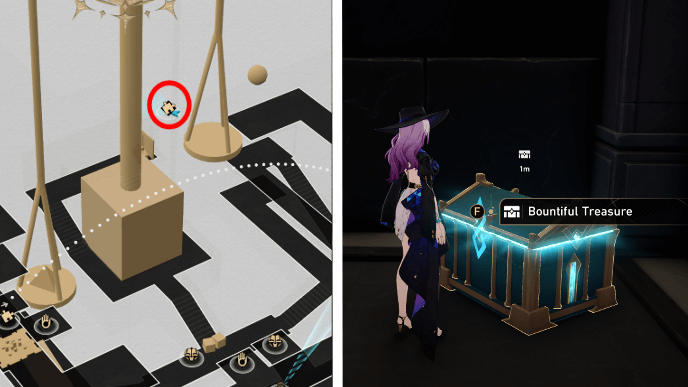
“Abyss of Fate” Janusopolis Chest 24

Collect all the Coins of Whimsy with the Hand of Zagreus to make the Bountiful Treasure Chest appear. Use the Miracle Orb to remove the obstacles blocking the stairs and get the chest.
“Abyss of Fate” Janusopolis Chest 25
This Golden Scapegoat can be found in the area behind the giant Weighing Scale.
Abyss of Fate Golden Scapegoat 5 Solution
Follow the steps shown above to solve the Golden Scapegoat puzzle and claim your treasure!
“Abyss of Fate” Janusopolis Chest 26
Take the elevator back to the top floor and set the room to Evernight. This treasure chest can also be found on the top floor of the Weighing Scale room, left of the Tome of Miracles.
“Abyss of Fate” Janusopolis Chest 27
After getting Chest 26, use the Hidden Passage to reach the platform on the left of the Weighing Scale.
“Abyss of Fate” Janusopolis Chest 28
From the Chest 27, change the direction of the Hidden Passage to reach the platform on the middle floor. You'll find the chest to the right.
“Abyss of Fate” Janusopolis Chest 29
Switch the time back to Dawn and head to the Tome of Miracles on the lower floor. Make sure the Miracle Orb is no longer pointed at the boxes. Then, use the Tome of Miracles to switch to Evernight again.
Go up the stairs behind the door at the Weighing Scale base. This will lead you to the left tray of the Weighing Scale, where Chest 29 is.
“Abyss of Fate” Janusopolis Chest 30
After getting Chest 29, go up the stairs west of the Tome of Miracles and use the collapsed bridge as a ramp to reach Chest 30 on the second floor.
“Abyss of Fate” Janusopolis Chest 31
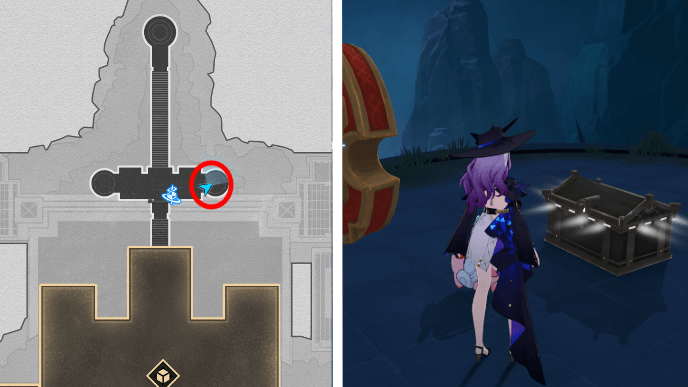
This treasure chest can be found east of the Theophany Chamber space anchor.
“Abyss of Fate” Janusopolis Spirithief Locations
Abyss of Fate Janusopolis Spirithief 1
From the Silent Shroud space anchor, Head west and interact with the chest to trigger the Spirithief event.
Abyss of Fate Janusopolis Spirithief 2
From Treasure Chest 7, keep heading south and you'll find another chest. Interact with it to trigger the Spirithief Event. Complete the puzzle to get the rewards.
“Abyss of Fate” Janusopolis Formidable Foe Challenges
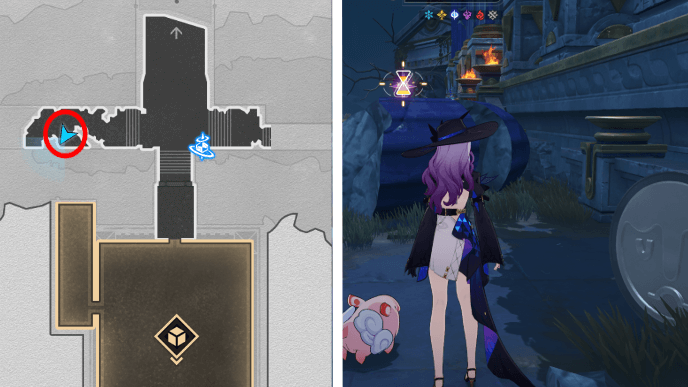
Abyss of Fate Janusopolis Foe
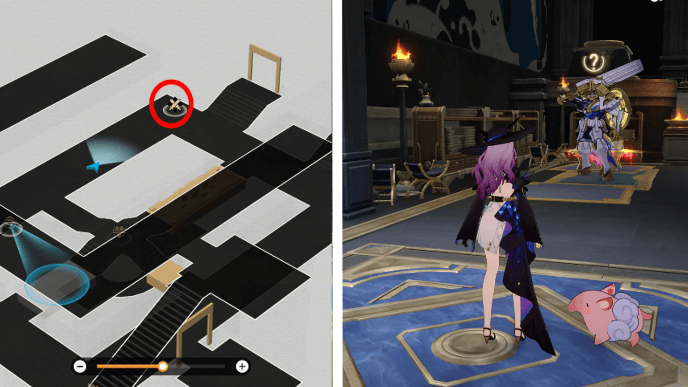
In the first room past the Destiny's Desolation space anchor, you will be able to find a formidable foe in the corner of the area, near the two entrances. You'll have to switch the area to the past to get to the Formidable foe.
How to Unlock “Abyss of Fate” Janusopolis
Progress Night Veil, Shroud the Silent Past
You can unlock the “Abyss of Fate” Janusopolis by progressing through the Night Veil, Shroud the Silent Past mission! This is a part of the Heroic Saga of Flame-Chase Trailblaze Mission!
Night Veil, Shroud the Silent Past Mission
Honkai: Star Rail Related Guides
List of All Maps
| List of Maps | |
|---|---|
| Herta Space Station | Jarilo-VI |
| The Xianzhou Luofu | Penacony |
| Amphoreus | Planarcadia |
Treasure Chest Locations
Author

“Abyss of Fate” Janusopolis Treasure Chest Locations
Please participate in our site
improvement survey
03/2026
improvement survey
03/2026
Would you assist in
improving Game8's site?
improving Game8's site?

×
We are listening to our users' valuable opinions and discussing how to act on them.
The information collected through this survey will be used for the purpose of improving our services. In addition, the information will only be disclosed a part of a statistic in a format that will not allow identification of personal information.
Begin Survey
Not Now
×
Please rate each item regarding Game8.co's Advertisements.
Amount of Ads
Very Dissatisfied
Somewhat Dissatisfied
Fine
Somewhat Satisfied
Highly Satisfied
Placement of Ads
Timing of Ad Display
Ad Loading Speed
Safeness of Ads
Content of Ads
×
Please rate each item regarding Game8.co's Quality of Articles.
Amount of information
Very Dissatisfied
Somewhat Dissatisfied
Fine
Somewhat Satisfied
Highly Satisfied
Frequency of updates
Speed of new information
Accuracy of articles
Understandibility of articles
Readability of sentences
×
Please rate each item regarding Game8.co's Usability of the Site.
Ease of finding information
Very Dissatisfied
Somewhat Dissatisfied
Fine
Somewhat Satisfied
Highly Satisfied
Loading Speed
Use of Color
Font Size
Visibility of Images
Easy to Understand Layout
×
Please rate each item regarding Game8.co's Message Boards, Comments.
Ease of Writing
Very Dissatisfied
Somewhat Dissatisfied
Fine
Somewhat Satisfied
Highly Satisfied
Readability
Ease in Finding Information
Comment Quality
Comment Quantity
Admin Response
×
Please rate each item regarding Game8.co's Site's new design.
Please rate our site's new design
Very Dissatisfied
Somewhat Dissatisfied
Fine
Somewhat Satisfied
Highly Satisfied
Do you think that the website's design change makes the site easier to use?
Has the new design made it easier for you to find information on the site?
Has the new design improved the overall visual appeal of the site?
How would you rate your overall satisfaction with the new design of the site?
×
How likely are you to recommend Game8 to someone you know?
Very Unlikely
0
1
2
3
4
5
6
7
8
9
10
Very Likely
If you have other opinions regarding potential improvement to the website, please share them with us. We would appreciate your honest opinion.
Note: This is a free response section, so you can proceed without entering anything.
Note: Please be sure not to enter any kind of personal information into your response.
Note: Please be sure not to enter any kind of personal information into your response.
×
Thank You
×
Thank you for participating in our survey! Your answers will help us to improve the quality of our website and services.
We hope you continue to make use of Game8.
We hope you continue to make use of Game8.
Close
Premium Articles

Rankings
- We could not find the message board you were looking for.
Gaming News


![Monster Hunter Stories 3 Review [First Impressions] | Simply Rejuvenating](https://img.game8.co/4438641/2a31b7702bd70e78ec8efd24661dacda.jpeg/thumb)


Popular Games

Genshin Impact Walkthrough & Guides Wiki
Honkai: Star Rail Walkthrough & Guides Wiki
Umamusume: Pretty Derby Walkthrough & Guides Wiki
Pokemon Pokopia Walkthrough & Guides Wiki
Resident Evil Requiem (RE9) Walkthrough & Guides Wiki
Monster Hunter Wilds Walkthrough & Guides Wiki
Wuthering Waves Walkthrough & Guides Wiki
Arknights: Endfield Walkthrough & Guides Wiki
Pokemon FireRed and LeafGreen (FRLG) Walkthrough & Guides Wiki
Pokemon TCG Pocket (PTCGP) Strategies & Guides Wiki


Recommended Games
Diablo 4: Vessel of Hatred Walkthrough & Guides Wiki
Fire Emblem Heroes (FEH) Walkthrough & Guides Wiki
Yu-Gi-Oh! Master Duel Walkthrough & Guides Wiki
Super Smash Bros. Ultimate Walkthrough & Guides Wiki
Pokemon Brilliant Diamond and Shining Pearl (BDSP) Walkthrough & Guides Wiki
Elden Ring Shadow of the Erdtree Walkthrough & Guides Wiki
Monster Hunter World Walkthrough & Guides Wiki
The Legend of Zelda: Tears of the Kingdom Walkthrough & Guides Wiki
Persona 3 Reload Walkthrough & Guides Wiki
Cyberpunk 2077: Ultimate Edition Walkthrough & Guides Wiki


All rights reserved
Copyright © 2024 HoYoverse, COGNOSPHERE. All Rights Reserved.
The copyrights of videos of games used in our content and other intellectual property rights belong to the provider of the game.
The contents we provide on this site were created personally by members of the Game8 editorial department.
We refuse the right to reuse or repost content taken without our permission such as data or images to other sites.
Number 13 is Silent Shroud Anchor, not Destiny's Desolation