"Strife Ruins" Castrum Kremnos Treasure Chest Locations
★ Exclusive: Check out the State of Meta in 4.0!
♦ Latest: 4.1 Livestream Redeem Codes
♦ Phase 2: Sparkxie, Sparkle, Cerydra, Rappa
♦ Upcoming: Ashveil, Silver Wolf Lv.999, Evanescia
♦ Events: Cosmicon, Roll On!, Ding! Arcadia Fun-Time Clock-In Essentials
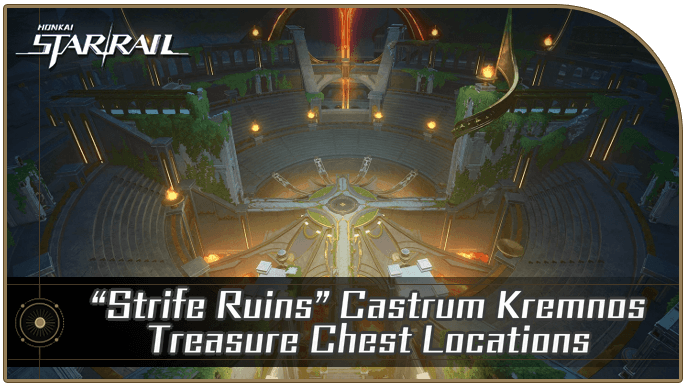
There are 39 “Strife Ruins” Castrum Kremnos chests to collect in Honkai: Star Rail's Amphoreus. Check out our interactive map for all Strife Ruins chests and Spirithief locations!
| Amphoreus Map Guide | |
|---|---|
| Strife Ruins Castrum Kremnos Chests | Strife Ruins Castrum Kremnos Puzzles |
List of Contents
“Strife Ruins” Castrum Kremnos Chest Locations
Strife Ruins Castrum Kremnos Interactive Map
Select icons to toggle them on/off
| Space Anchor | Treasure Chest | ||
| Spirithief | - | ||
Strife Ruins Castrum Kremnos Chests
| Strife Ruins Treasure Chest Map | |||||||||||
|---|---|---|---|---|---|---|---|---|---|---|---|
 See Full Image |
 See Full Image |
||||||||||
 See Full Image |
 See Full Image |
||||||||||
 See Full Image |
 See Full Image |
||||||||||
| Strife Ruins Treasure Chests | |||||||||||
| Chest 1 | Chest 2 | Chest 3 | Chest 4 | ||||||||
| Chest 5 | Chest 6 | Chest 7 | Chest 8 | ||||||||
| Chest 9 | Chest 10 | Chest 11 | Chest 12 | ||||||||
| Chest 13 | Chest 14 | Chest 15 | Chest 16 | ||||||||
| Chest 17 | Chest 18 | Chest 19 | Chest 20 | ||||||||
| Chest 21 | Chest 22 | Chest 23 | Chest 24 | ||||||||
| Chest 25 | Chest 26 | Chest 27 | Chest 28 | ||||||||
| Chest 29 | Chest 30 | Chest 31 | Chest 32 | ||||||||
| Chest 33 | Chest 34 | Chest 35 | Chest 36 | ||||||||
| Strife Ruins Spirithief Locations | |||||||||||
| Spirithief 1 | Spirithief 2 | ||||||||||
| Strife Ruins Formidable Foe | |||||||||||
| Formidable Foe Challenge | |||||||||||
How to Get “Strife Ruins” Castrum Kremnos Chests
“Strife Ruins” Castrum Kremnos Chest 1
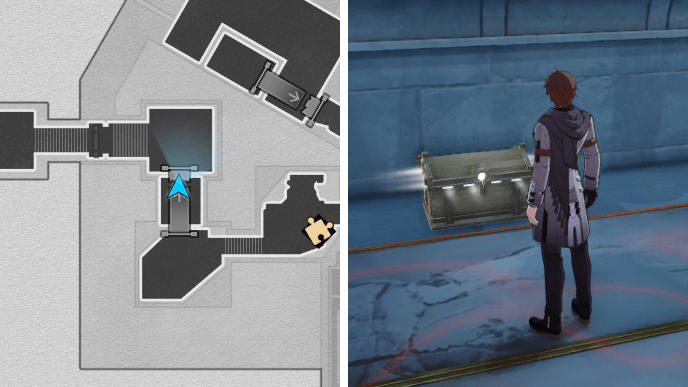
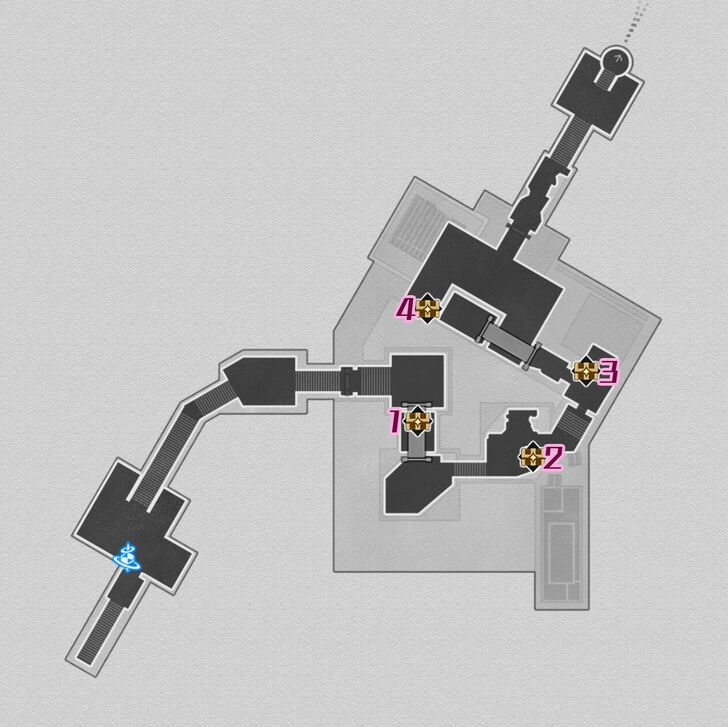
The first Strife Ruins chest can be found under the unstable bridge in the southwest area of B1. You'll need to cross over the bridge to make it collapse first. This way, you can use it as a ramp to reach Chest 1.
“Strife Ruins” Castrum Kremnos Chest 2
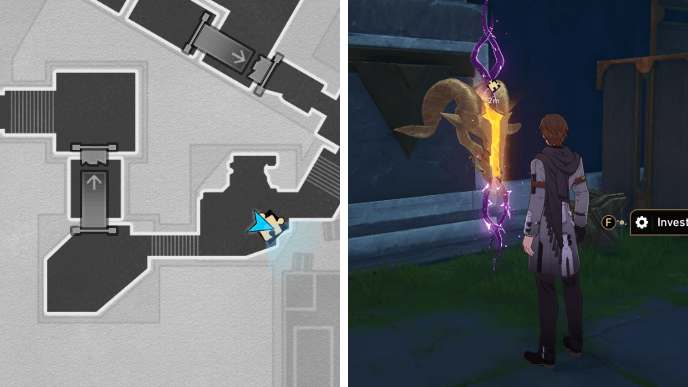
From Chest 1, continue following the path forward and you'll come across a Golden Scapegoat puzzle. Solve it to get Chest 2.
Strife Ruins Golden Scapegoat 1 Solution
Follow the steps shown above to solve the Golden Scapegoat puzzle and claim your treasure!
“Strife Ruins” Castrum Kremnos Chest 3
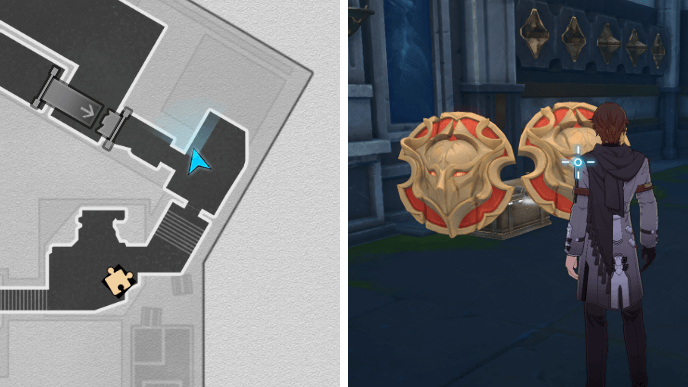
Go up the stairs near Chest 2's location and you'll easily spot two desctructible shields hiding Chest 3 behind them.
“Strife Ruins” Castrum Kremnos Chest 4
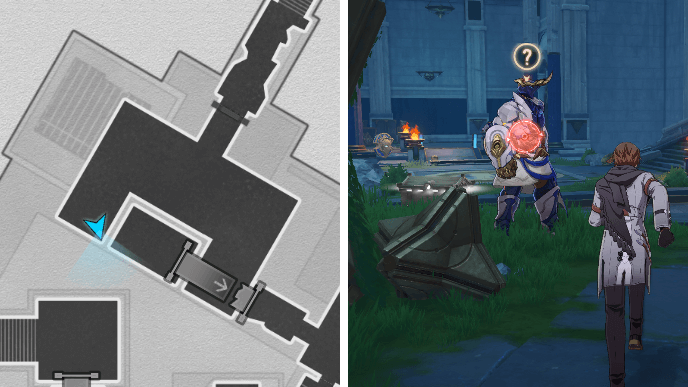
After getting Chest 3, continue onwards and cross over the next bridge to make it collapse. Go down to the lower area and head towards the western corner space to find Chest 4 being guarded by an enemy.
“Strife Ruins” Castrum Kremnos Chest 5
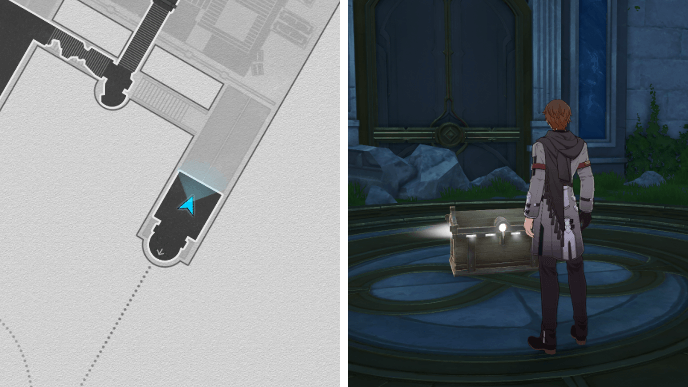
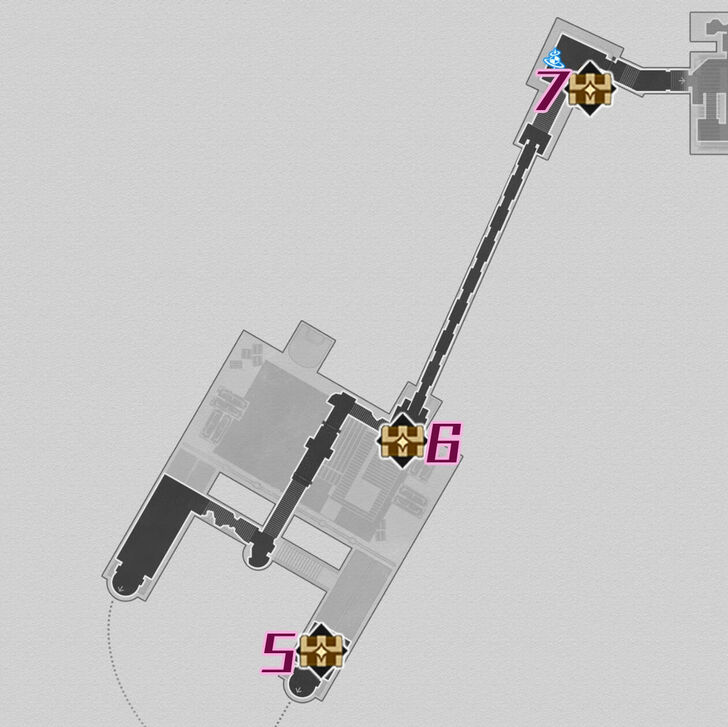
Head to the southwest area of B1 and turn the Janus' Hidden Passage towards the right. This will take you to the area where Chest 5 is.
“Strife Ruins” Castrum Kremnos Chest 6
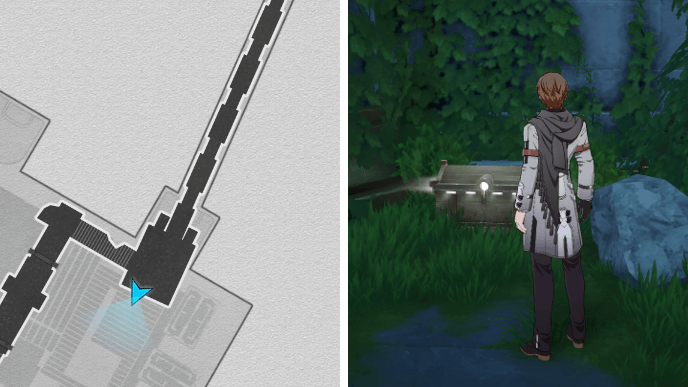
Use the Janus' Hidden Passage in B1 to jump to the left side of the building. Just follow the path forward and you'll come across Chest 6 in a patch of grass just before reaching the long chain bridge.
“Strife Ruins” Castrum Kremnos Chest 7
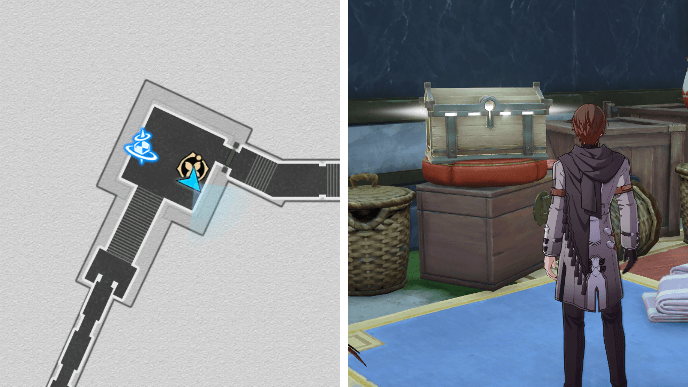
Teleport to the Remnant Hall of Truce Space Anchor and you'll find Chest 7 on top of a box next to the Garmentmaker.
“Strife Ruins” Castrum Kremnos Chest 8
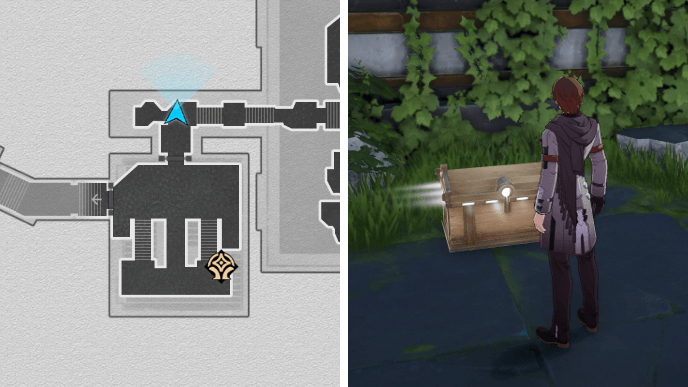
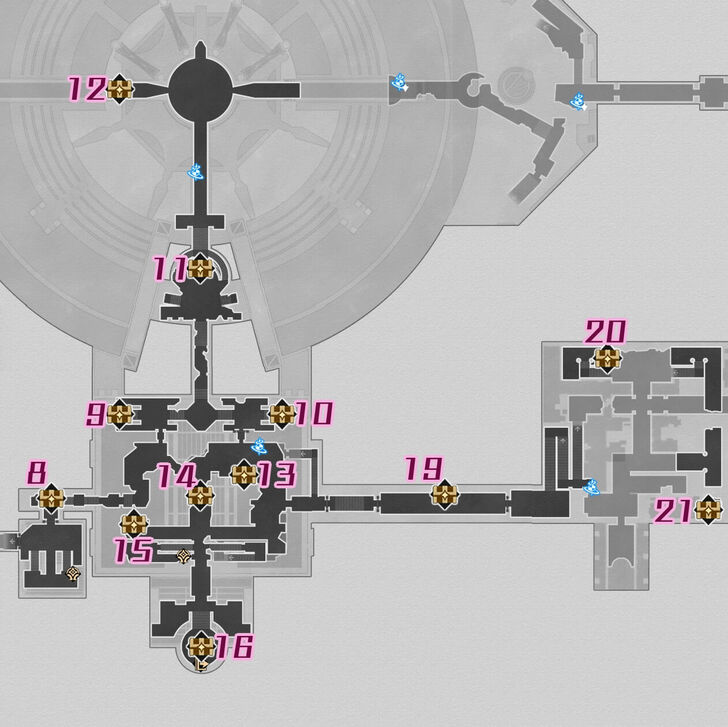
Head east from the Remnant Hall of Truce Space Anchor and go into the corridor past the room with the first Shrine of Prayers. Chest 8 can be found next to the stairs.
“Strife Ruins” Castrum Kremnos Chest 9
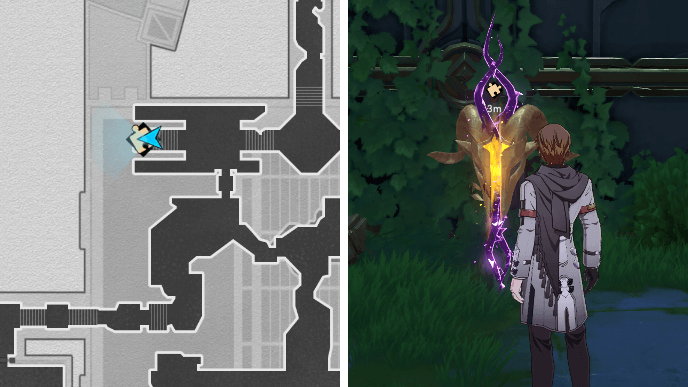
Chest 9 comes from a Golden Scapegoat puzzle located northeast of the Conquered Outlands Space Anchor.
Strife Ruins Golden Scapegoat 2 Solution
Follow the steps shown above to solve the Golden Scapegoat puzzle and claim your treasure!
“Strife Ruins” Castrum Kremnos Chest 10
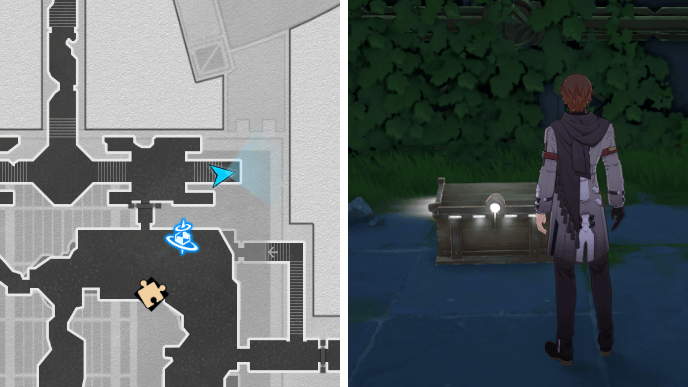
Go into the area north of the Conquered Outlands Space Anchor to find Chest 10. An enemy will be guarding the chest.
“Strife Ruins” Castrum Kremnos Chest 11
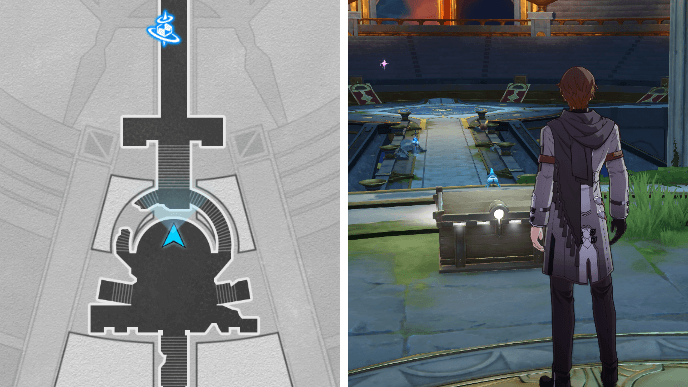
Chest 11 can be found in the raised area located south of the Kremnos Arena Space Anchor.
“Strife Ruins” Castrum Kremnos Chest 12
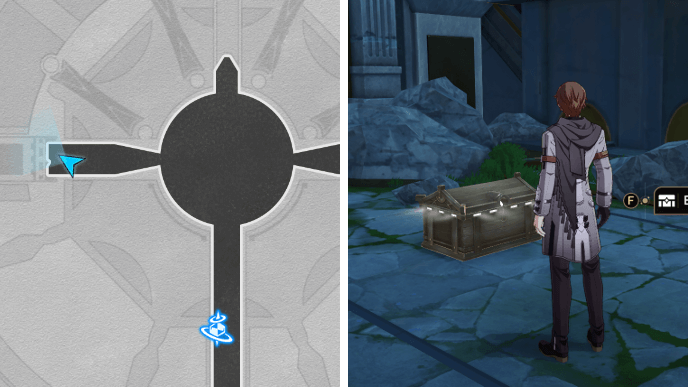
Teleport to the Kremnos Arena Space Anchor and go to the space that's west of the arena. You'll find Chest 12 in front of a door blocked by rubble. A Spirithief will also try to steal the chest, so you'll need to get it back!
“Strife Ruins” Castrum Kremnos Chest 13
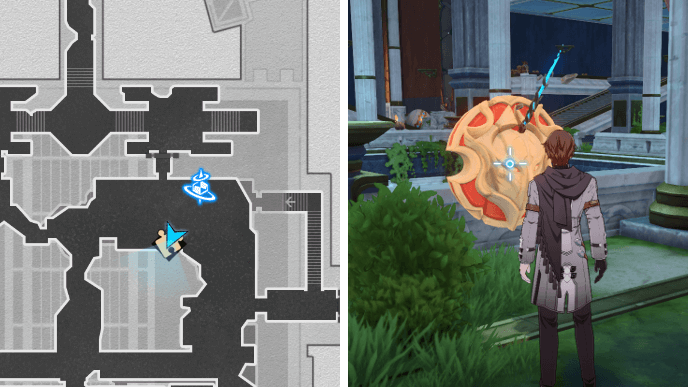
Chest 13 comes from the Golden Short Spear near the Conquered Outlands Space Anchor. Free the spear from the shield and follow it until the chest spawns.
“Strife Ruins” Castrum Kremnos Chest 14
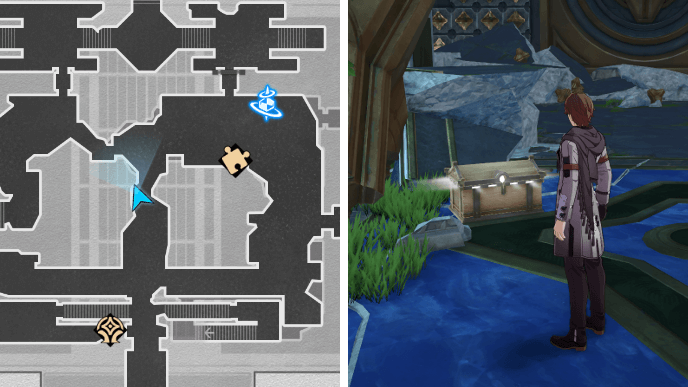
Chest 14 can be found near a pile of debris in the middle of the Conquered Outlands area.
“Strife Ruins” Castrum Kremnos Chest 15
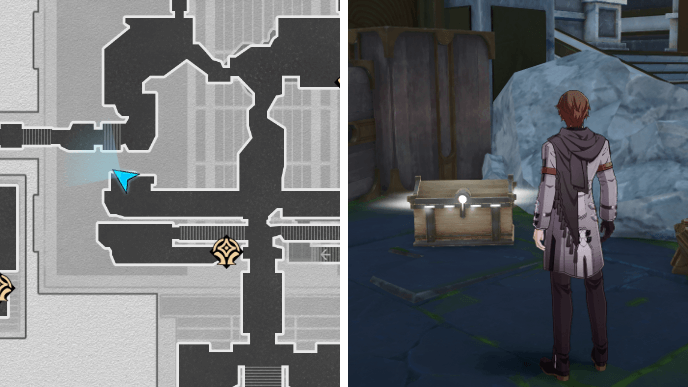
After getting Chest 14, head into the southwest area of the Conquered Outlands to find Chest 15. There'll be an enemy guarding the chest.
“Strife Ruins” Castrum Kremnos Chest 16
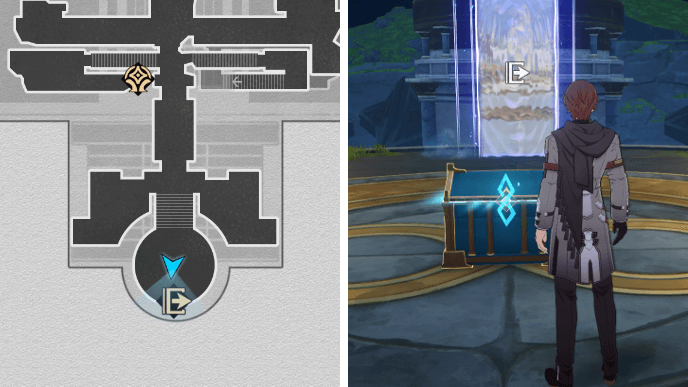
Chest 16 can be found in the area with the exit leading to “Bloodbathed Battlefront” Castrum Kremnos. To get rid of the obstacles blocking the area, you'll need to roll down the ball from F3.
“Strife Ruins” Castrum Kremnos Chest 17
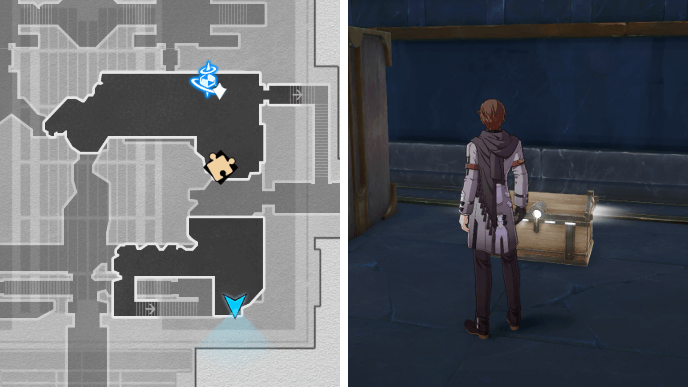
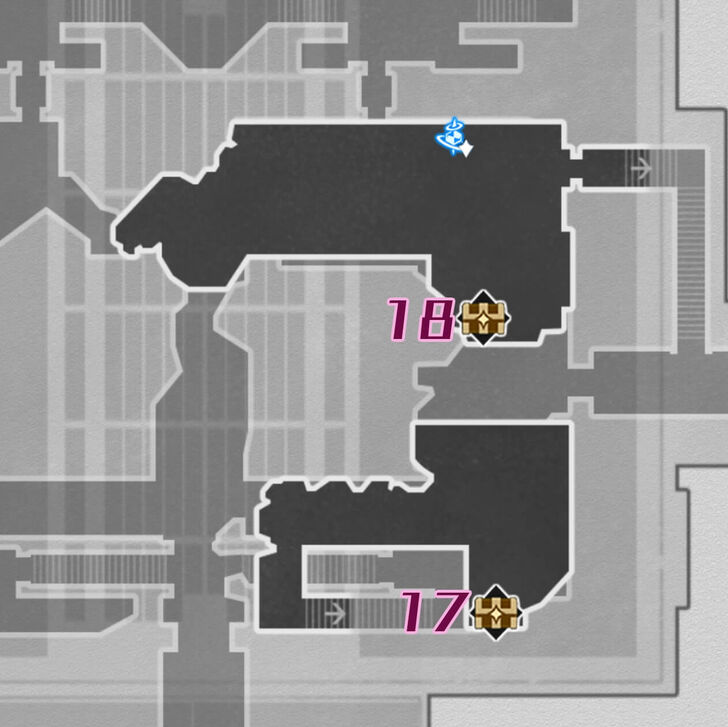
Go up the stairs located south of the Conquered Outlands Space Anchor on F2. In the area, you'll find Chest 17 by a pile of wooden crates.
“Strife Ruins” Castrum Kremnos Chest 18
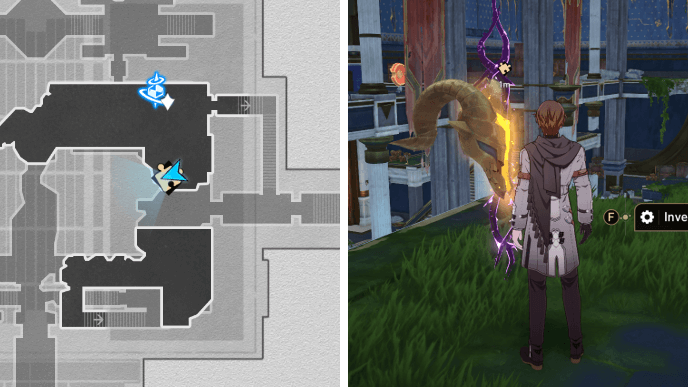
Exit through the door southeast of the Conquered Outlands Space Anchor. Once you're in the corridor, go up the stairs by the Flying Amphora. You'll find a Golden Scapegoat puzzle.
Strife Ruins Golden Scapegoat 3 Solution
Follow the steps shown above to solve the Golden Scapegoat puzzle and claim your treasure!
“Strife Ruins” Castrum Kremnos Chest 19
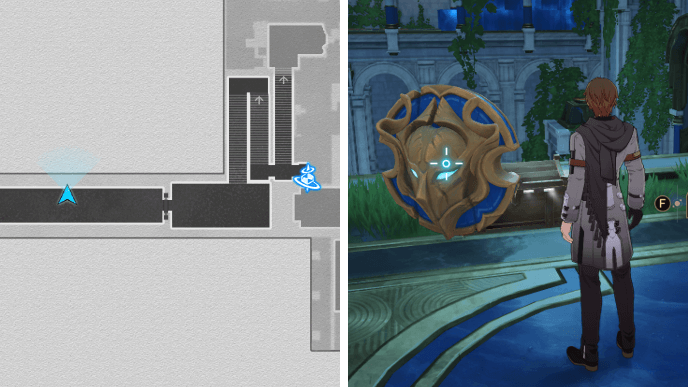
You can find Chest 19 hidden behind some destructible shields along the walkway located west of the Old Quarry Ground Space Anchor. A Spirithief will try to steal the chest, so you'll need to get it back.
“Strife Ruins” Castrum Kremnos Chest 20
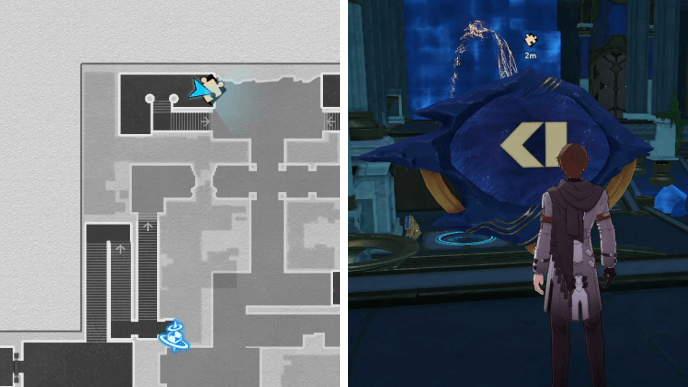
Chest 20 comes from a Prophecy Tablet located north of the Old Quarry Ground Space Anchor. Solve the puzzle to get the chest.
Strife Ruins Prophecy Tablet 1 Solution
Follow the steps shown above to solve the Prophecy Tablet and get the treasure!
“Strife Ruins” Castrum Kremnos Chest 21
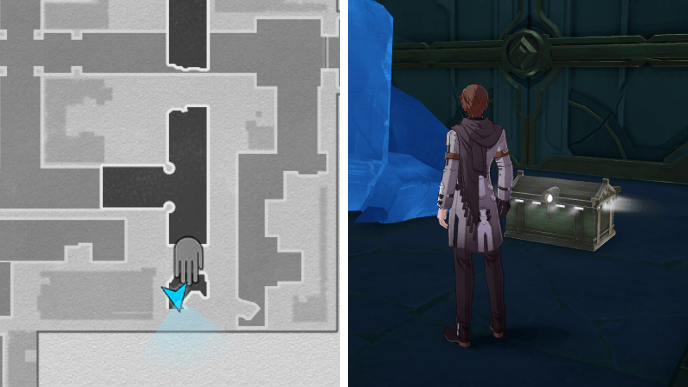
Use the Hand of Zagreus on the raised platform in the Old Quarry Ground area to form a bridge. Then, you can cross it to get Chest 21.
“Strife Ruins” Castrum Kremnos Chest 22
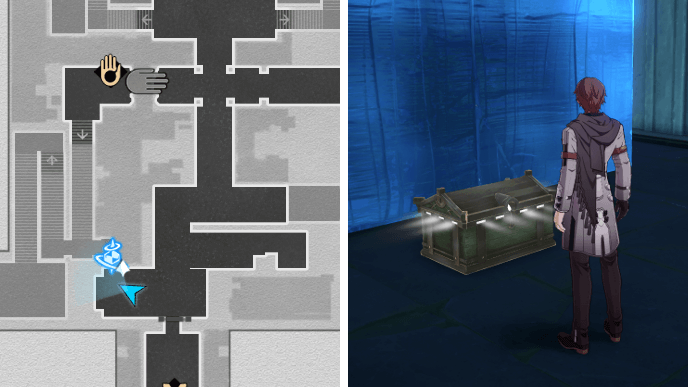
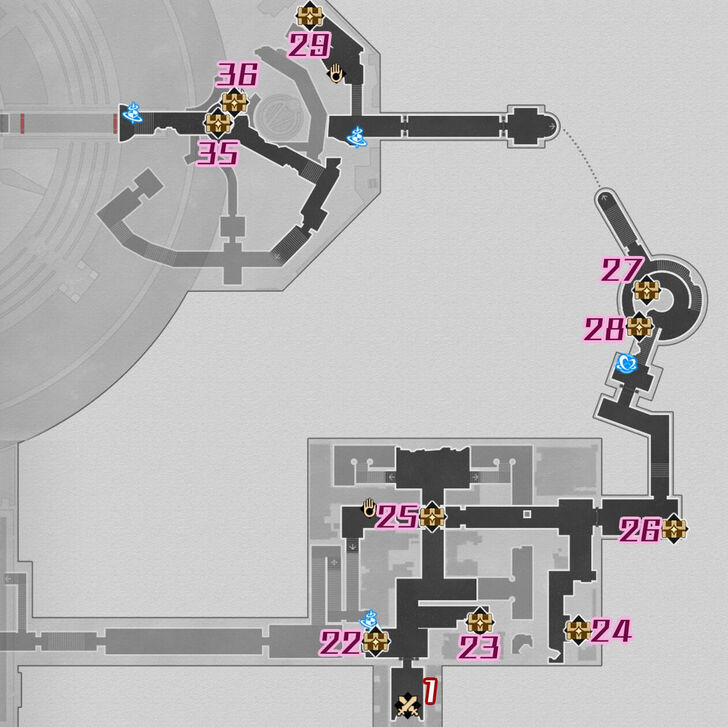
Go down the stairs by the Old Quarry Ground Space Anchor on F2 and use the Hand of Zagreus to reach the center of the area. Head southwest and you'll spot Chest 22 by a pile of large cubes.
“Strife Ruins” Castrum Kremnos Chest 23
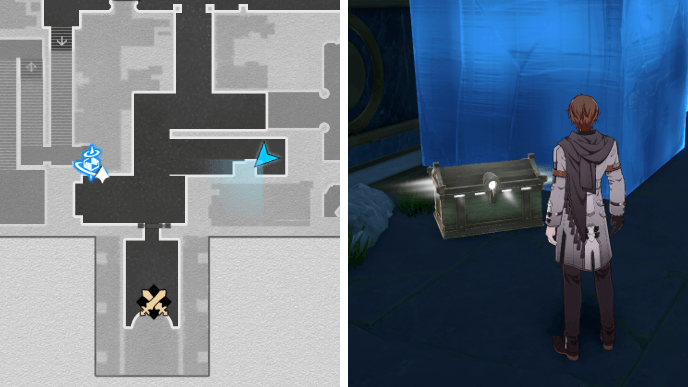
To get Chest 23, you'll need to break the base of the Ball Statue found northeast of Chest 22. Once the ball rolls down and destroys the obstacles blocking the path, you can get Chest 23.
“Strife Ruins” Castrum Kremnos Chest 24
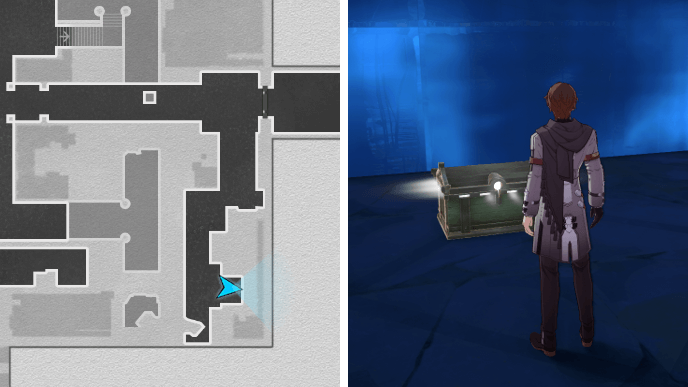
From the Hand of Zagreus control point, head east and turn right just before the door to the next area. Continue along the path until you spot Chest 24 in a space surrounded by large cubes.
“Strife Ruins” Castrum Kremnos Chest 25
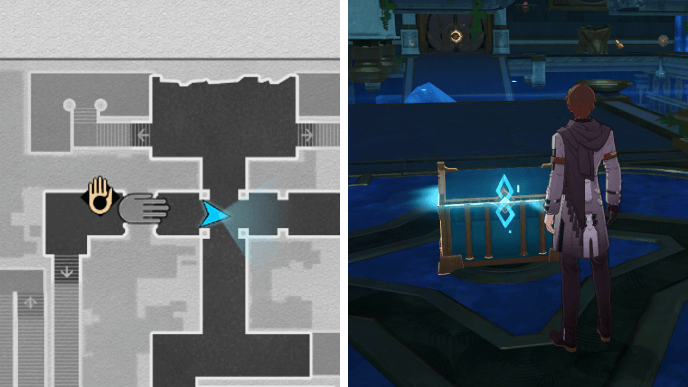
Chest 25 will only appear once you've collected 3 Coins of Whimsy in the area using the Hand of Zagreus.
“Strife Ruins” Castrum Kremnos Chest 26
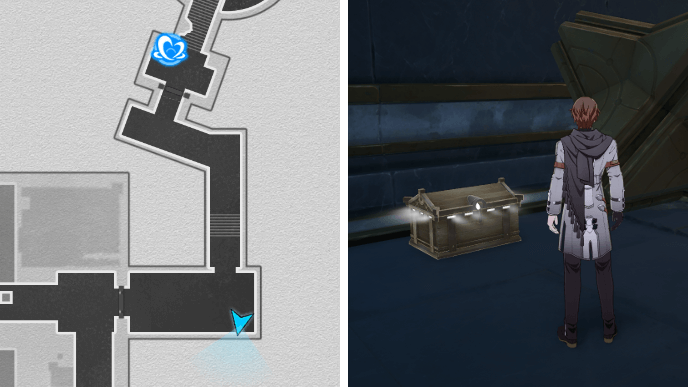
Go through the door directly east of the Hand of Zagreus control point. In the room, you'll find Chest 26 behind a broken wall decoration.
“Strife Ruins” Castrum Kremnos Chest 27
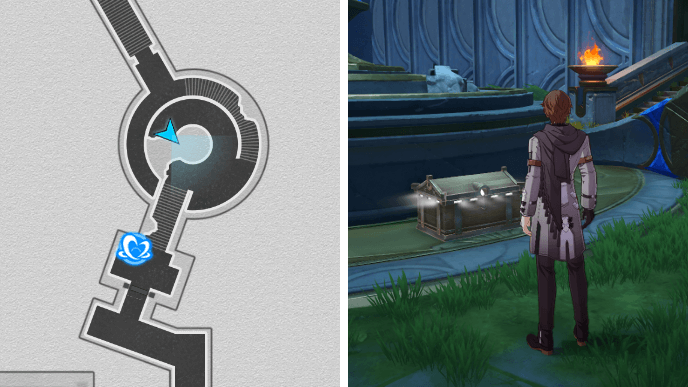
Teleport to the Bud of Remembrance calyx and walk down the nearby stairs. Go around the statue and you'll find Chest 27.
“Strife Ruins” Castrum Kremnos Chest 28
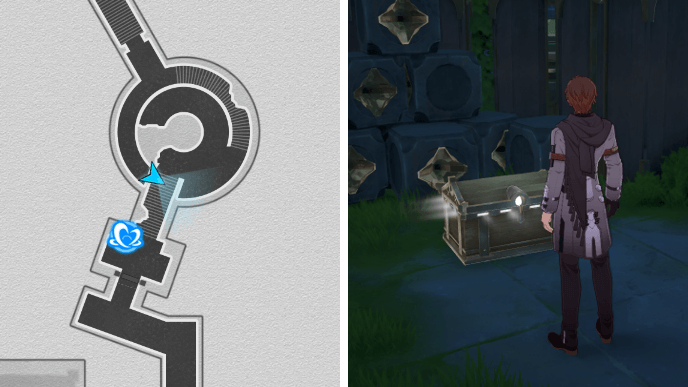
After getting Chest 27, go down the other set of stairs nearby and circle around the path until you find Chest 28 by a pile of cargo.
“Strife Ruins” Castrum Kremnos Chest 29
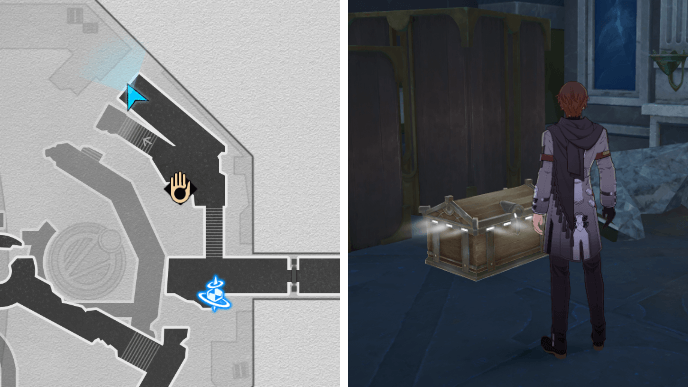
Teleport to the Silent Chisel Ground Space Anchor and head northwest into the space surrounded by large crates. There will be several enemies guarding Chest 29.
“Strife Ruins” Castrum Kremnos Chest 30
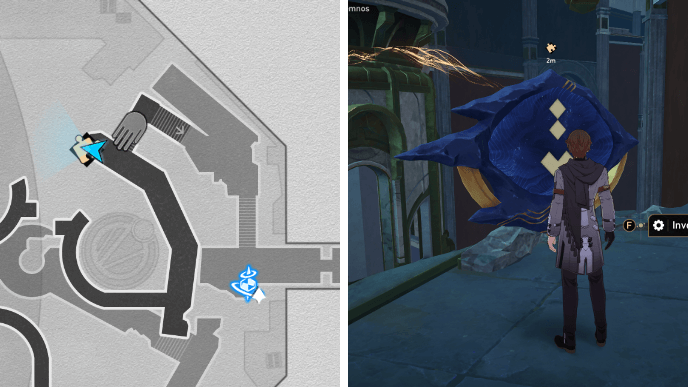
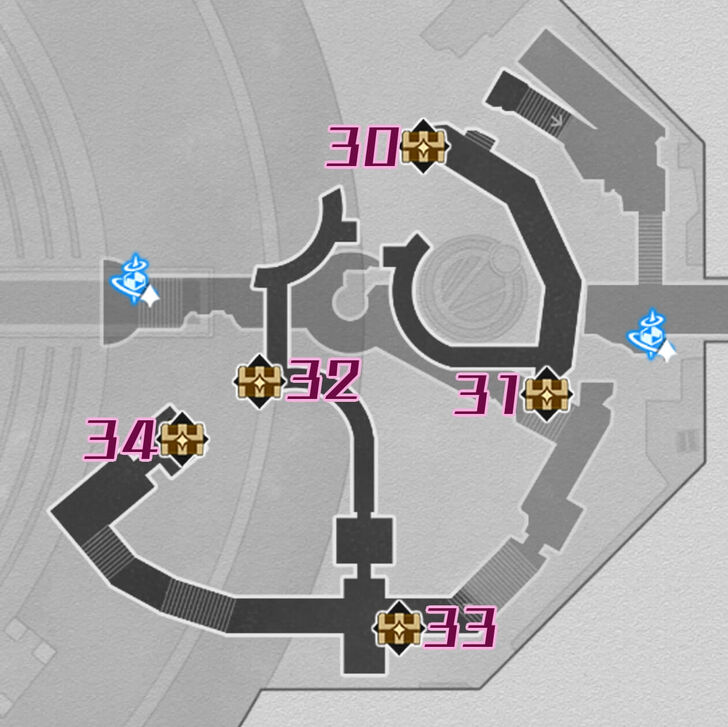
Chest 30 is located in the northeastern area of B1. Use the Hand of Zagreus near the Silent Chisel Ground Space Anchor to lay down a bridge leading to the next platform. After crossing over the hand, there'll be a Prophecy Tablet on your right. Solve the puzzle to get Chest 30.
Strife Ruins Prophecy Tablet 2 Solution
Follow the steps shown above to solve the Prophecy Tablet and get the treasure!
“Strife Ruins” Castrum Kremnos Chest 31
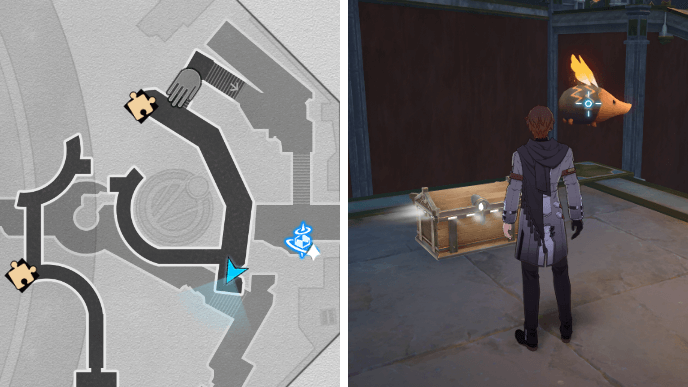
From the original location of Chest 30's Prophecy Tablet, simply follow the path forward and you'll eventually spot Chest 31 near a Flying Amphora along the way.
“Strife Ruins” Castrum Kremnos Chest 32
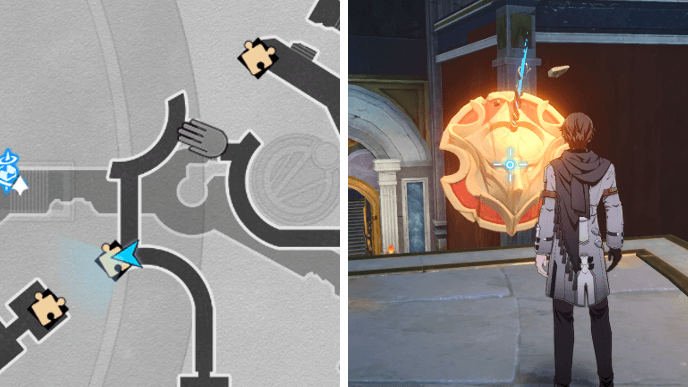
Chest 32 comes from a Golden Short Spear found just a bit past the second Hand of Zagreus bridge point in the northeastern area of B1. After freeing the spear, follow it until it spawns the chest.
“Strife Ruins” Castrum Kremnos Chest 33
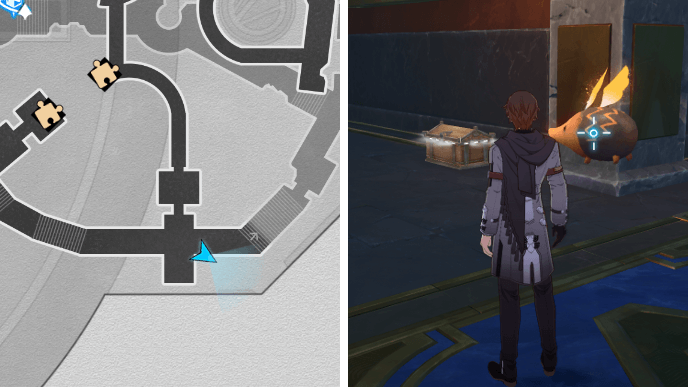
From the initial location of Chest 32's spear, head south and go into the corridor. You'll immediately spot a Flying Amphora pointing in the direction of Chest 33.
“Strife Ruins” Castrum Kremnos Chest 34
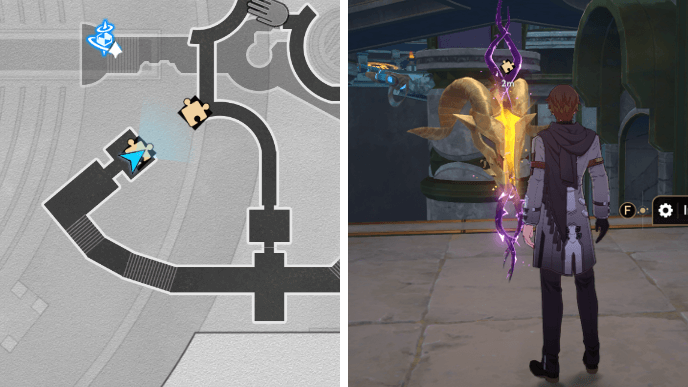
After getting Chest 33, head west until you reach the end of the corridor. You'll find a Golden Scapegoat puzzle, which gives Chest 34.
Strife Ruins Golden Scapegoat 4 Solution
Follow the steps shown above to solve the Golden Scapegoat puzzle and claim your treasure!
“Strife Ruins” Castrum Kremnos Chest 35
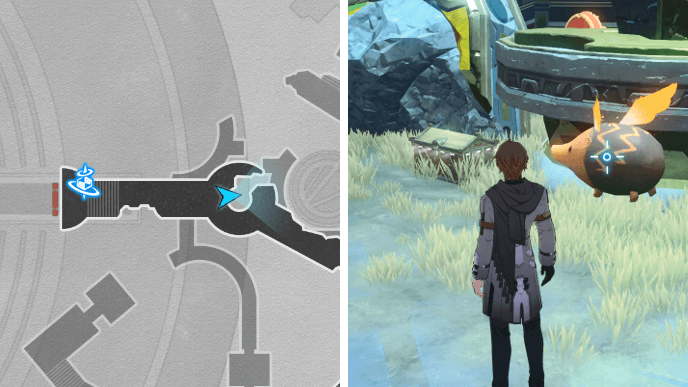
Head east from the Soul-Forging Ruins Space Anchor. You'll find a Flying Amphora pointing in the direction of Chest 35.
“Strife Ruins” Castrum Kremnos Chest 36
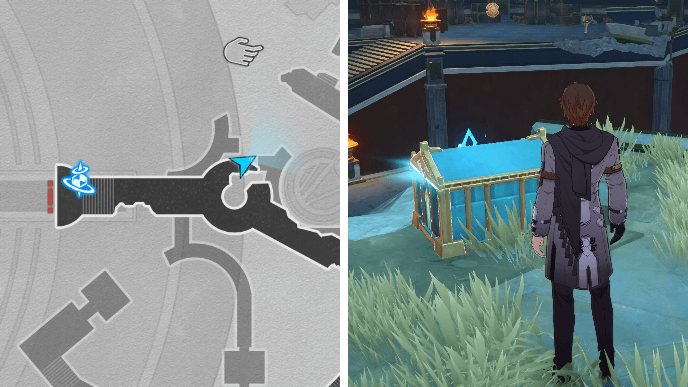
Chest 36 will only appear once you've collected 3 Coins of Whimsy in the area using the Hand of Zagreus.
“Strife Ruins” Castrum Kremnos Spirithief Locations
Strife Ruins Castrum Kremnos Spirithief 1
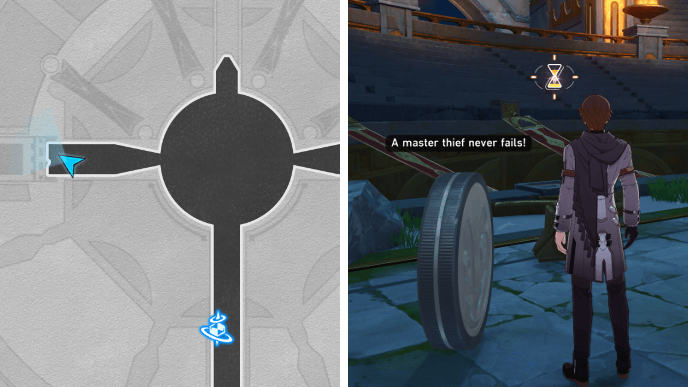
The first Strife Ruins Spirithief can be encountered when trying to get Chest 12. Once the Spirithief makes its escape, put the audience seats of the arena in view to activate Oronyx's Prayer and get your treasure back!
Strife Ruins Castrum Kremnos Spirithief 2
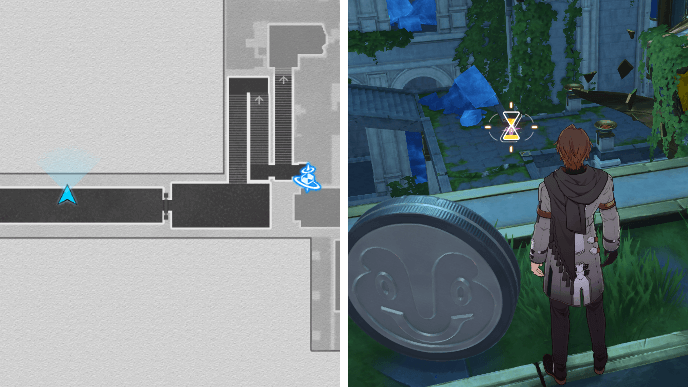
You can find the other Strife Ruins Spirithief along with Chest 19. To capture the Spirithief, you'll need to aim the camera towards the debris down below and use Oronyx's Prayer.
“Strife Ruins” Castrum Kremnos Formidable Foe Challenge
Strife Ruins Formidable Foe
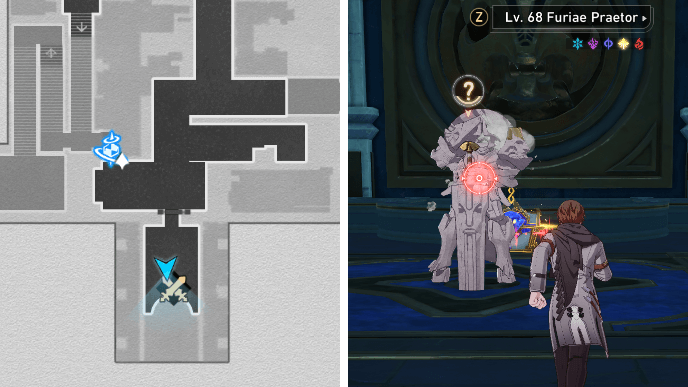
The Formidable Foe challenge in Strife Ruins can be found near Chest 22's location in the northeastern area of F1. It's recommended that you bring Ice, Lightning, and Quantum characters to make the battle easier!
How to Unlock “Strife Ruins” Castrum Kremnos
Progress Wasteland, Hark Back Glory of Old
You can unlock “Strife Ruins” Castrum Kremnos by progressing through Wasteland, Hark Back Glory of Old. This is part of the Heroic Saga of Flame-Chase Trailblaze Mission!
Wasteland, Hark Back Glory of Old Mission
Honkai: Star Rail Related Guides
List of All Maps
| List of Maps | |
|---|---|
| Herta Space Station | Jarilo-VI |
| The Xianzhou Luofu | Penacony |
| Amphoreus | Planarcadia |
Treasure Chest Locations
Comment
Fucking hell what kind of guide is this, makes you run around all over the place. The next chest is within the area just fucking 10 steps away but nope you'll get there later
Author
"Strife Ruins" Castrum Kremnos Treasure Chest Locations
improvement survey
03/2026
improving Game8's site?

Your answers will help us to improve our website.
Note: Please be sure not to enter any kind of personal information into your response.

We hope you continue to make use of Game8.
Premium Articles
Rankings
Gaming News
Popular Games

Genshin Impact Walkthrough & Guides Wiki

Honkai: Star Rail Walkthrough & Guides Wiki

Umamusume: Pretty Derby Walkthrough & Guides Wiki

Pokemon Pokopia Walkthrough & Guides Wiki

Resident Evil Requiem (RE9) Walkthrough & Guides Wiki

Monster Hunter Wilds Walkthrough & Guides Wiki

Wuthering Waves Walkthrough & Guides Wiki

Arknights: Endfield Walkthrough & Guides Wiki

Pokemon FireRed and LeafGreen (FRLG) Walkthrough & Guides Wiki

Pokemon TCG Pocket (PTCGP) Strategies & Guides Wiki
Recommended Games

Diablo 4: Vessel of Hatred Walkthrough & Guides Wiki

Fire Emblem Heroes (FEH) Walkthrough & Guides Wiki

Yu-Gi-Oh! Master Duel Walkthrough & Guides Wiki

Super Smash Bros. Ultimate Walkthrough & Guides Wiki

Pokemon Brilliant Diamond and Shining Pearl (BDSP) Walkthrough & Guides Wiki

Elden Ring Shadow of the Erdtree Walkthrough & Guides Wiki

Monster Hunter World Walkthrough & Guides Wiki

The Legend of Zelda: Tears of the Kingdom Walkthrough & Guides Wiki

Persona 3 Reload Walkthrough & Guides Wiki

Cyberpunk 2077: Ultimate Edition Walkthrough & Guides Wiki
All rights reserved
Copyright © 2024 HoYoverse, COGNOSPHERE. All Rights Reserved.
The copyrights of videos of games used in our content and other intellectual property rights belong to the provider of the game.
The contents we provide on this site were created personally by members of the Game8 editorial department.
We refuse the right to reuse or repost content taken without our permission such as data or images to other sites.


![Everwind Review [Early Access] | The Shaky First Step to A Very Long Journey](https://img.game8.co/4440226/ab079b1153298a042633dd1ef51e878e.png/thumb)

![Monster Hunter Stories 3 Review [First Impressions] | Simply Rejuvenating](https://img.game8.co/4438641/2a31b7702bd70e78ec8efd24661dacda.jpeg/thumb)


how to 18th chest?