Cloudedge Bastion Ruins - Eye of Twilight Chests and Spirithief Locations
★ Exclusive: Check out the State of Meta in 4.0!
♦ Latest: 4.0 Redeem Codes
♦ Phase 2: Sparkxie, Sparkle, Cerydra, Rappa
♦ Upcoming: Ashveil, Silver Wolf Lv.999, Evanescia
♦ Events: Cosmicon, Roll On!, Ding! Arcadia Fun-Time Clock-In Essentials

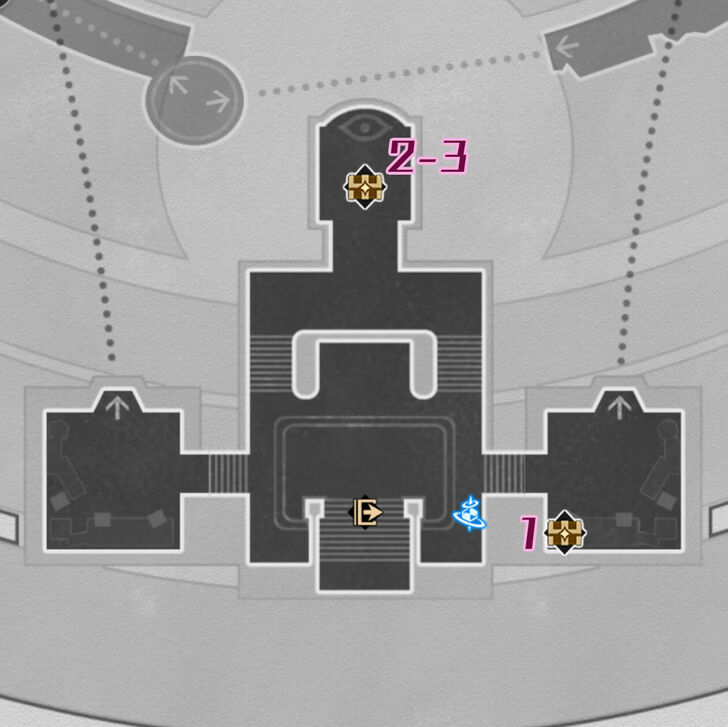
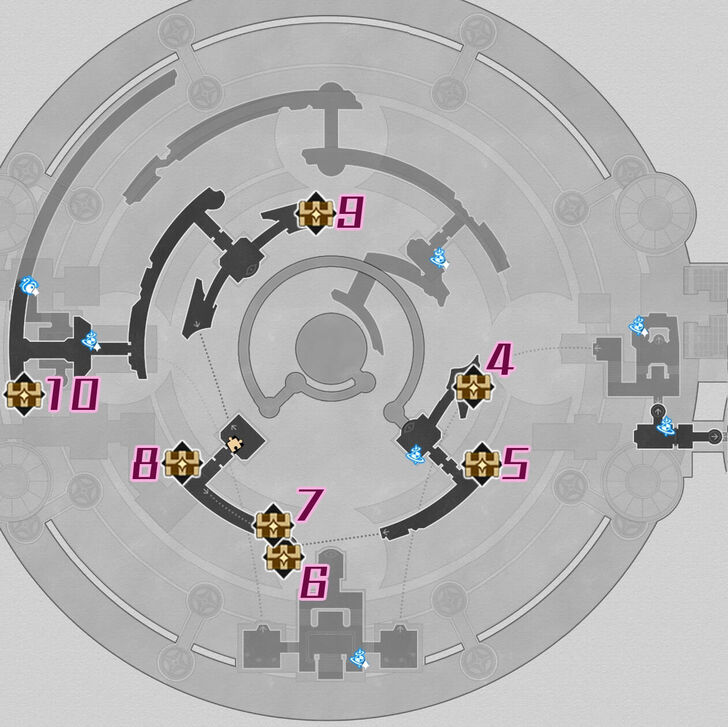
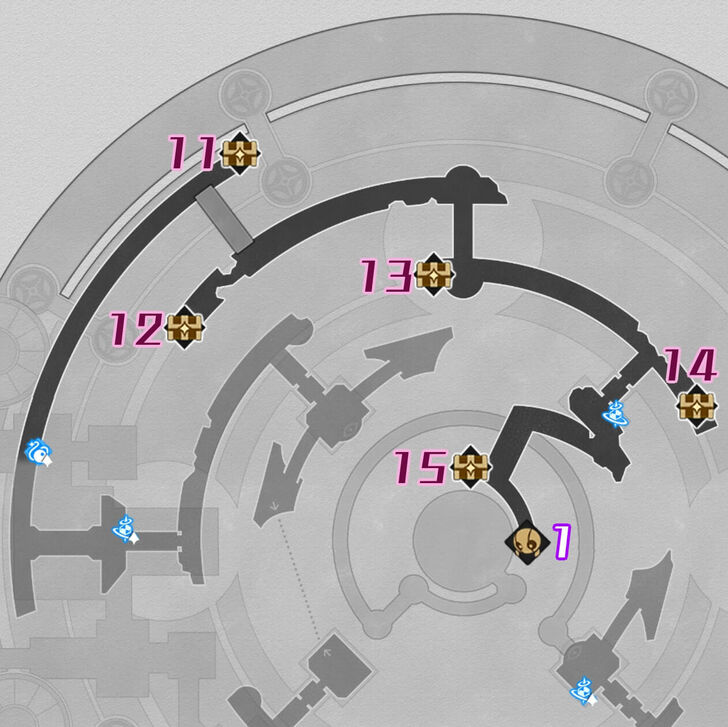
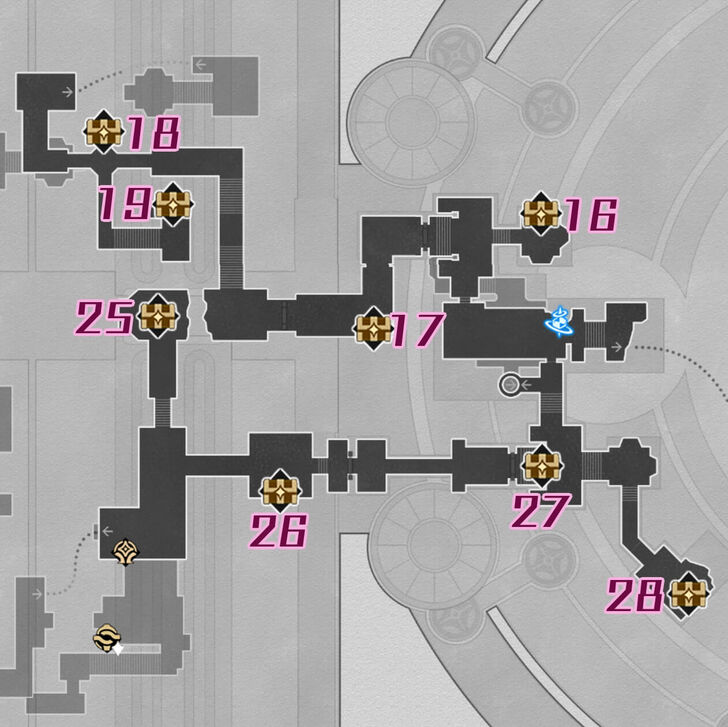
There are 52 Cloudedge Bastion Ruins Eye of Twilight chests to collect in Honkai: Star Rail. Check out our map guide for all Cloudedge Bastion Ruins chests and Spirithief locations!
| Amphoreus Map Guide | |
|---|---|
| Cloudedge Bastion Ruins Chests | Cloudedge Bastion Ruins Puzzles |
List of Contents
“Cloudedge Bastion Ruins” Eye of Twilight Chest Locations
Cloudedge Bastion Ruins Interactive Map
Select icons to toggle them on/off
| Space Anchor | Treasure Chest | ||
| Spirithief | Bookshelf Readable |
Cloudedge Bastion Ruins Chests
| Cloudedge Bastion Ruins Chest Map | |||||||||||
|---|---|---|---|---|---|---|---|---|---|---|---|
 See Full Image |
 See Full Image |
||||||||||
 See Full Image |
 See Full Image |
||||||||||
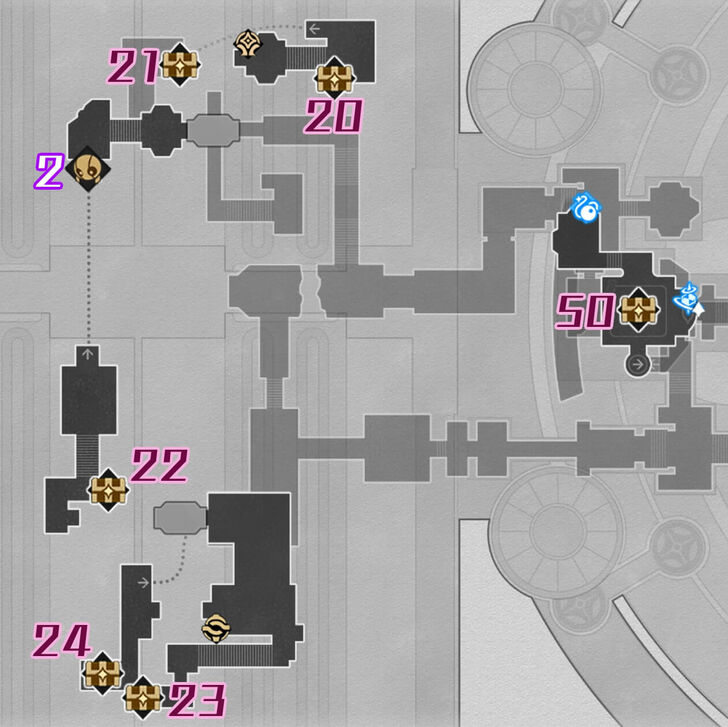 See Full Image |
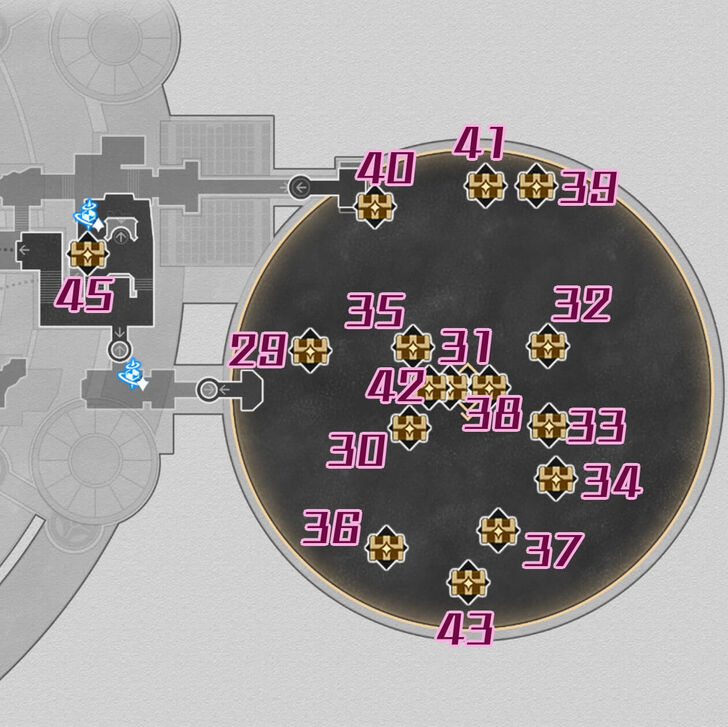 See Full Image |
||||||||||
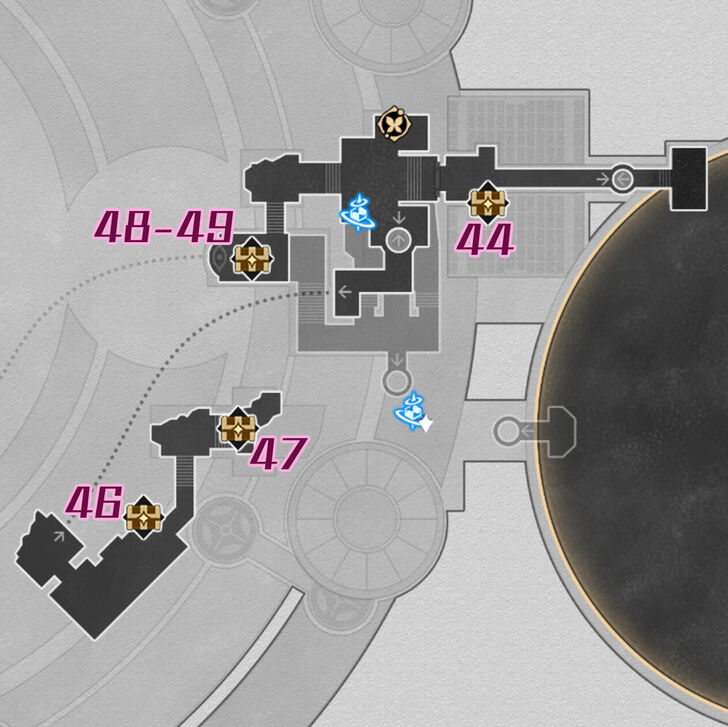 See Full Image |
|||||||||||
| Cloudedge Bastion Ruins Treasure Chests | |||||||||||
| Chest 1 | Chest 2-3 | Chest 4 | Chest 5 | ||||||||
| Chest 6 | Chest 7 | Chest 8 | Chest 9 | ||||||||
| Chest 10 | Chest 11 | Chest 12 | Chest 13 | ||||||||
| Chest 14 | Chest 15 | Chest 16 | Chest 17 | ||||||||
| Chest 18 | Chest 19 | Chest 20 | Chest 21 | ||||||||
| Chest 22 | Chest 23 | Chest 24 | Chest 25 | ||||||||
| Chest 26 | Chest 27 | Chest 28 | Chest 29 | ||||||||
| Chest 30 | Chest 31 | Chest 32 | Chest 33 | ||||||||
| Chest 34 | Chest 35 | Chest 36 | Chest 37 | ||||||||
| Chest 38 | Chest 39 | Chest 40 | Chest 41 | ||||||||
| Chest 42 | Chest 43 | Chest 44 | Chest 45 | ||||||||
| Chest 46 | Chest 47 | Chest 48-49 | Chest 50 | ||||||||
| Cloudedge Bastion Ruins Spirithief Locations | |||||||||||
| Spirithief 1 | Spirithief 2 | ||||||||||
How to Get “Cloudedge Bastion Ruins” Eye of Twilight Chests
Cloudedge Bastion Ruins Chest 1
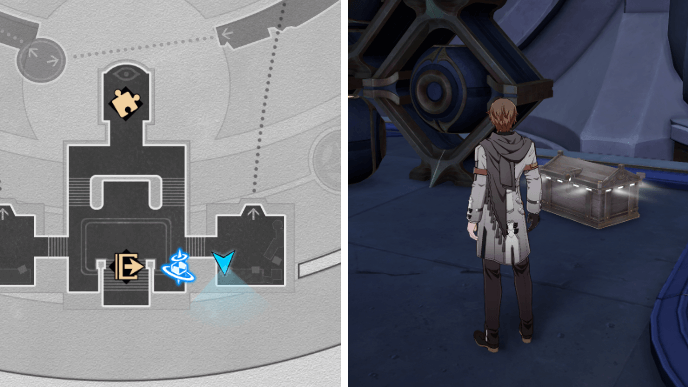
Teleport to the Nightwail Ruins Space Anchor and go down to the area east of it. The first chest in Cloudedge Bastion Ruins will be tucked away in the corner.
Cloudedge Bastion Ruins Chests 2-3
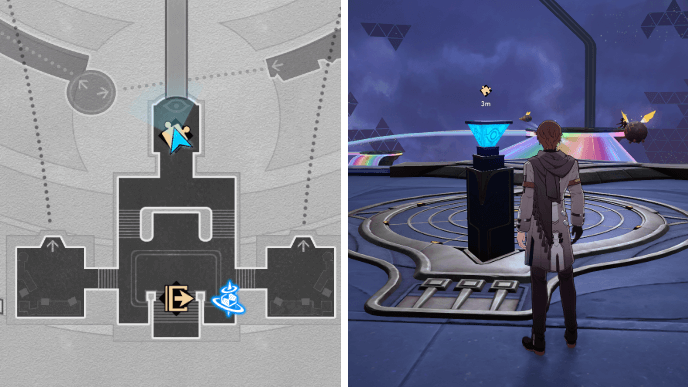
Go down the stairs north of the Nightwail Ruins Space Anchor and interact with the West Wind Compass. You'll need to solve the puzzle to create paths that passes through the treasure before reaching the end points.
Upon successfully setting up the paths, you'll encounter both Chest 2 and Chest 3 as you go through the rainbow bridges down to F2.
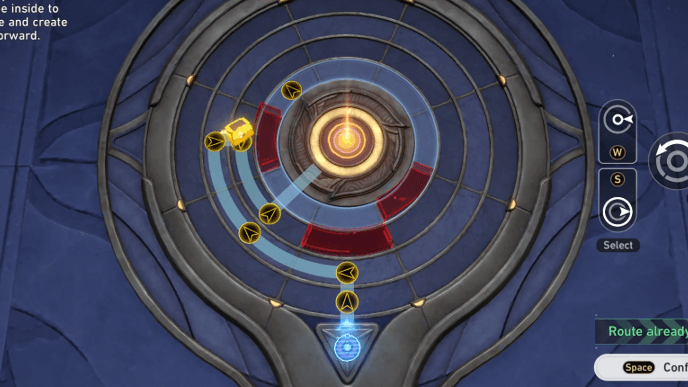
West Wind Compass Chests 2-3 Solution
| Path 1 | Path 2 |
|---|---|
 |
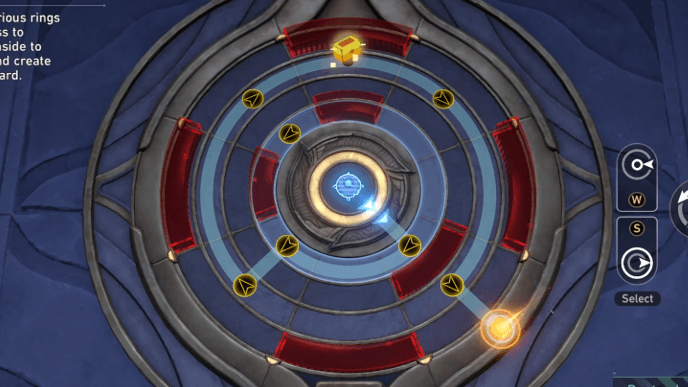 |
The West Wind Compass will ask you to set up two paths. Following the solutions shown above will allow you to get Chest 2 and Chest 3 along the rainbow bridge!
Cloudedge Bastion Ruins Chest 4
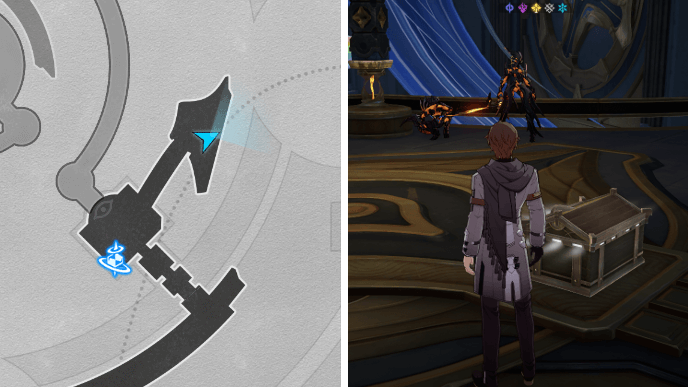
Once you've used the rainbow bridge to reach F2, you'll find Chest 4 in the area northeast of the Aurous Perch Space Anchor. Cross over the glowing drapes and you should spot the chest at the side near some enemies.
Cloudedge Bastion Ruins Chest 5

Head to the area southeast of the Aurous Perch Space Anchor and you should find Chest 5 hidden behind 3 shields at the end of the broken path.
Cloudedge Bastion Ruins Chest 6

From Chest 5, continue heading southwest along the path and use the Hidden Passage to jump to the next area. Chest 6 will be on the circular platform with the next Hidden Passage that leads forward.
Cloudedge Bastion Ruins Chest 7
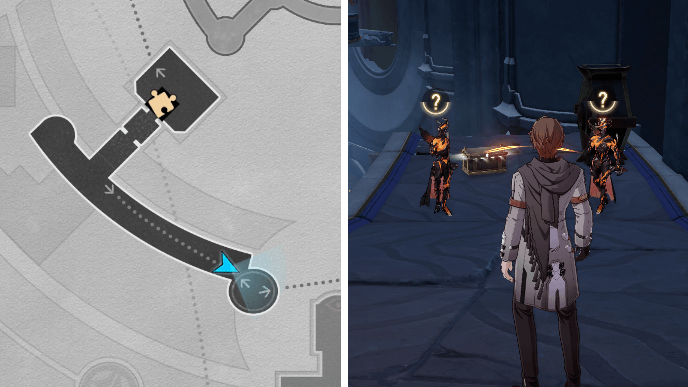
After getting Chest 6, switch the direction of the Hidden Passage so it leads west. Jump to the next area and head southeast along the path with several shields. At the end, you'll find Chest 7 guarded by some enemies.
Cloudedge Bastion Ruins Chest 8
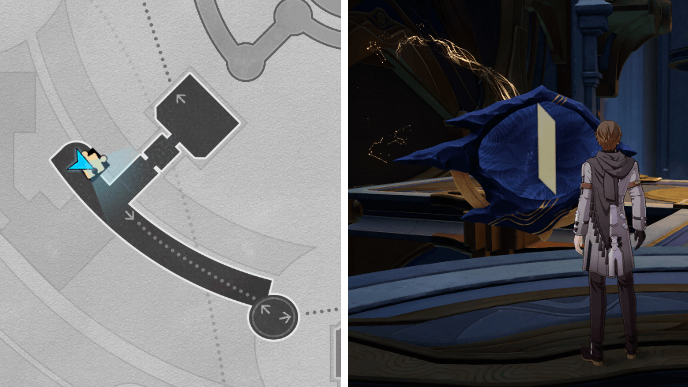
From Chest 7, walk back up the ramp and go to the Prophecy Tablet near the Hidden Passage. You'll need to solve the puzzle to open up the path leading to Chest 8 and F1.
Cloudedge Bastion Ruins Prophecy Tablet 1
You can solve the Prophecy Tablet that gives the chest by following the steps shown above!
Cloudedge Bastion Ruins Chest 9
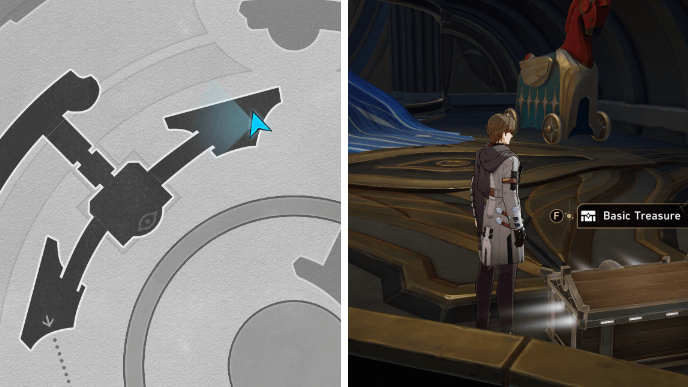
After getting Chest 8, use the next Hidden Passage to reach the northeast area of F2. Cross over all the glowing drapes to reach Chest 9 near a Janus' Steed.
Cloudedge Bastion Ruins Chest 10

From Chest 9, follow the path leading southwest and you'll eventually come across Chest 10 at the end of a broken path.
Cloudedge Bastion Ruins Chest 11

Chest 11 is located northeast of Chest 10, at the end of the long, curved path.
Cloudedge Bastion Ruins Chest 12
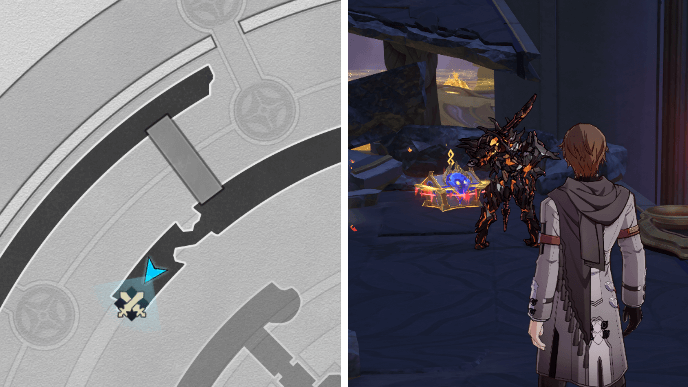
After getting Chest 11, use Oronyx's Prayer to repair the broken path and proceed onward. Turn right at the splitting paths and pass through the shields to encounter a Formidable Foe. You'll get Chest 12 after defeating it.
Cloudedge Bastion Ruins Chest 13

Head north from Chest 12 and continue following the path forward. Eventually, you'll come across Chest 13 near a shield on the floor.
Cloudedge Bastion Ruins Chest 14
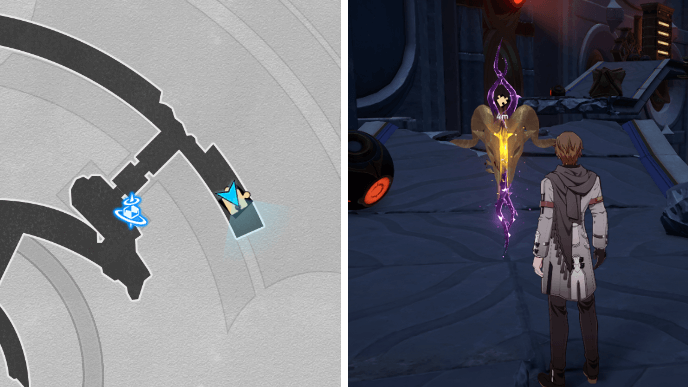
Continue following the path leading eastward and you'll also encounter a Golden Scapegoat at the end. Solve the puzzle to get Chest 14.
Cloudedge Bastion Ruins Golden Scapegoat 1
You can solve the Golden Scapegoat that gives the chest by following the steps shown above!
Cloudedge Bastion Ruins Chest 15
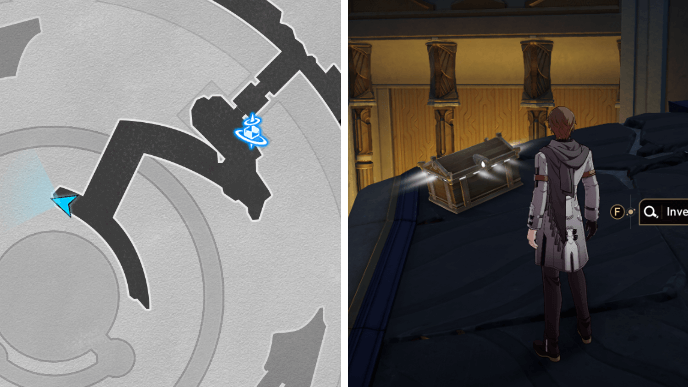
Go down the ramp southwest of the Aurous Pool Space Anchor and you'll find Chest 15 on your right.
Cloudedge Bastion Ruins Chest 16
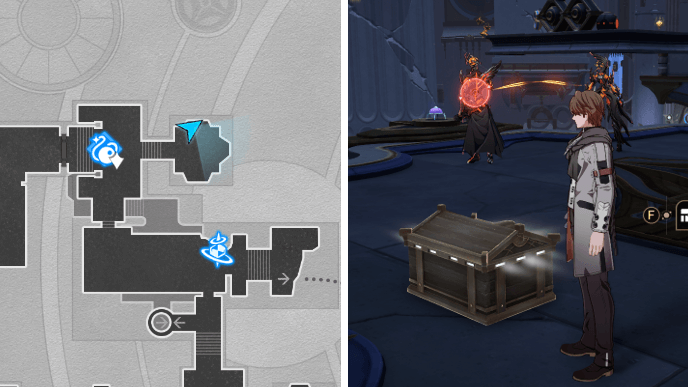
Teleport back to the Nightwail Ruins Space Anchor and use the Hidden Passage located west of it. You should now be at the west side of F4. Follow the path west of the Nightspire BoneMech Space Anchor and continue onwards.
Once you see the door on your left, head into the area on the right side. Chest 16 will be on a platform near some enemies.
Cloudedge Bastion Ruins Chest 17
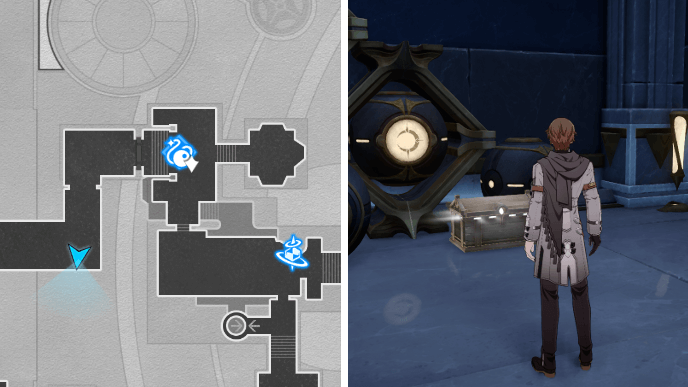
Chest 17 can be found in a hallway by a pile of black spheres.
Cloudedge Bastion Ruins Chest 18
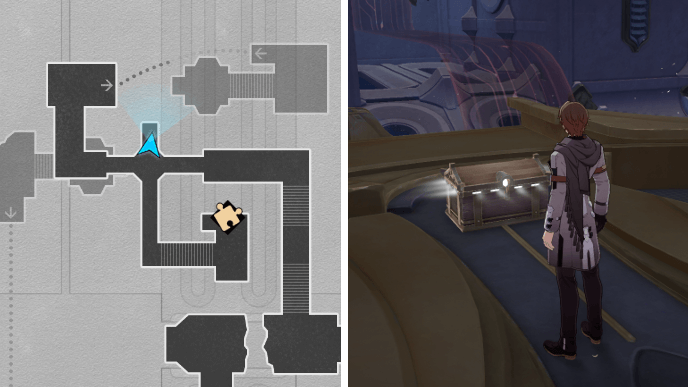
Chest 18 can be found on the narrow plus-shaped platfom in F4.
Cloudedge Bastion Ruins Chest 19
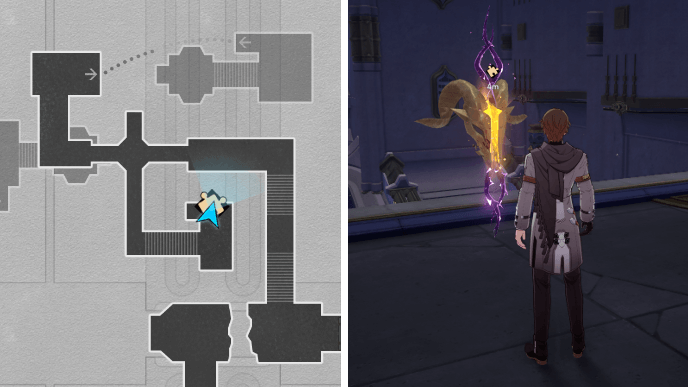
Follow the path south of Chest 18 to find a Golden Scapegoat puzzle. After solving it, you'll get Chest 19.
Cloudedge Bastion Ruins Golden Scapegoat 2
You can solve the Golden Scapegoat that gives the chest by following the steps shown above!
Cloudedge Bastion Ruins Chest 20
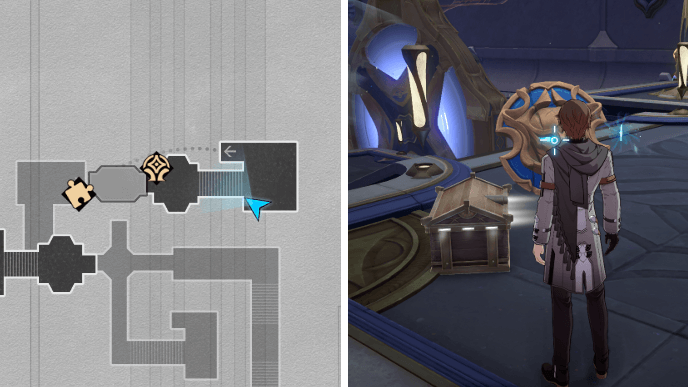
Go through the path west of Chest 18 and use the Hidden Passage to reach the next platform down on F3. Chest 20 will be next to a shield by the stairs.
Cloudedge Bastion Ruins Chest 21
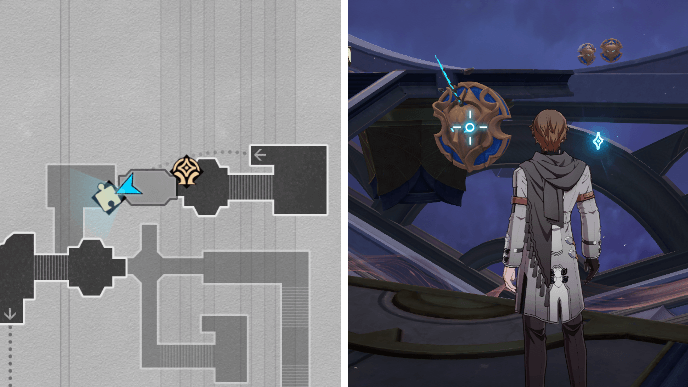
Go down the stairs by Chest 20 and activate Oronyx's Shrine. Rewind time on the platform nearby to get closer to the Golden Short Spear. After capturing the spear, you'll get Chest 21.
Cloudedge Bastion Ruins Chest 22
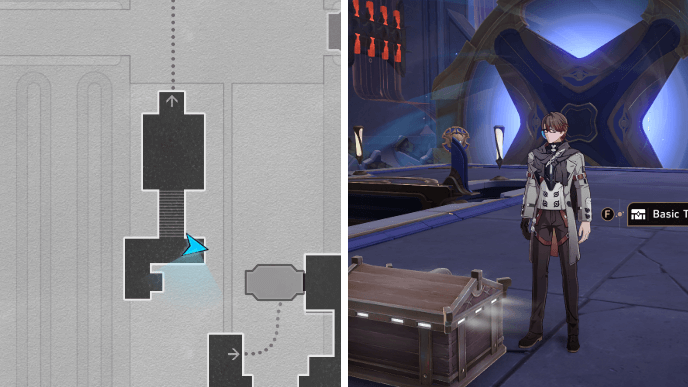
Chest 22 is in the southwestern area of F3. After using the Hidden Passage to get there, you should find the chest just before the large turbine causing the wind current.
Cloudedge Bastion Ruins Chest 23
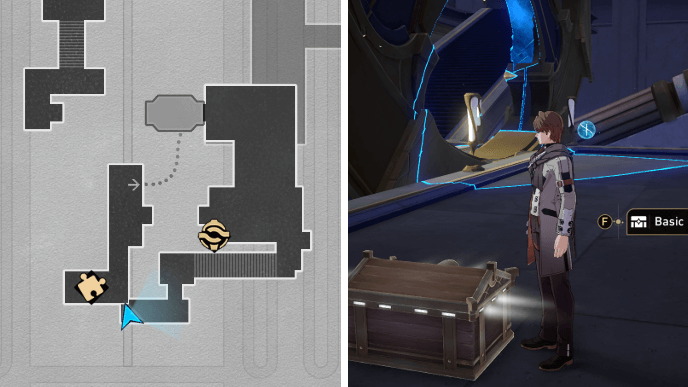
From Chest 22, rewind time on the nearby platform to reach the other side. Look for the Miracle Orb and turn it to the left. Chest 23 should be down in the area that's been opened up thanks to the orb's light.
Cloudedge Bastion Ruins Chest 24
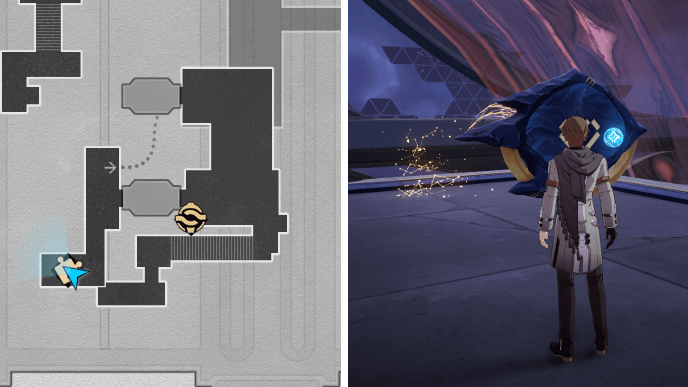
Return to the Miracle Orb and point it to the right this time. There should now be a bridge leading to the other platform where you can find a Prophecy Tablet. Solve it to get Chest 24.
Cloudedge Bastion Ruins Prophecy Tablet 2
You can solve the Prophecy Tablet that gives the chest by following the steps shown above!
Cloudedge Bastion Ruins Chest 25
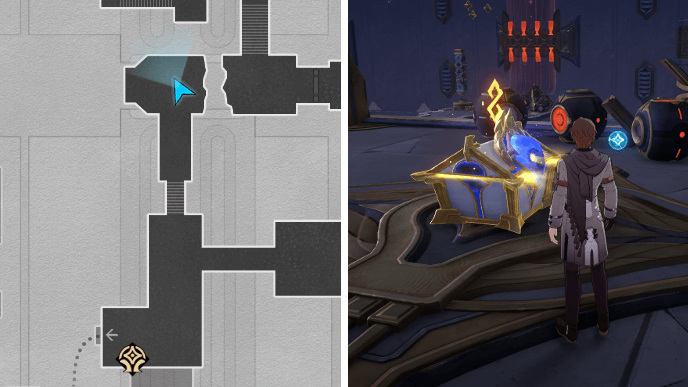
Use the Hidden Passage near Chest 24 to go back up to F4. At the end of the path north of the Oronyx's Shrine, you should find Chest 25.
Cloudedge Bastion Ruins Chest 26

Go to the area southeast of Chest 25 and you'll find Chest 26 on your right, just before the door leading outside.
Cloudedge Bastion Ruins Chest 27

From Chest 26, continue heading eastward through all the doors and you'll eventually come across another Prophecy Tablet. Solve it to remove the pillar that's blocking the way and get Chest 27.
Cloudedge Bastion Ruins Prophecy Tablet 3
You can solve the Prophecy Tablet that gives the chest by following the steps shown above!
Cloudedge Bastion Ruins Chest 28
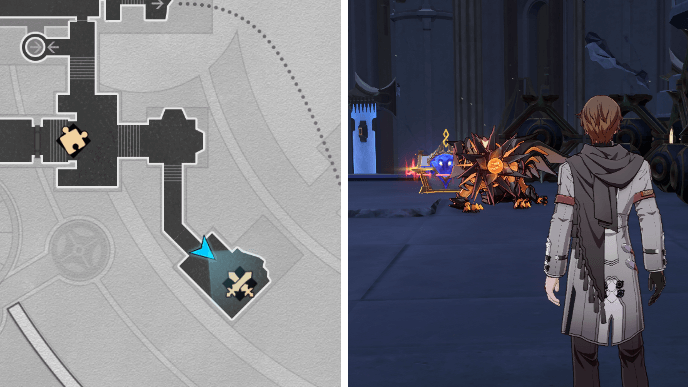
Chest 28 is found in the area southwest of Chest 27. It's guarded by a Formidable Foe, so you need to defeat it first to get the chest.
Cloudedge Bastion Ruins Chest 29

Use the Hidden Passage located east of the Nightwail Ruins Space Anchor to reach the east side of F3. Use the next few elevators in the area to make your way to the circular puzzle room.
Pick up the rune and walk onto the plus-shaped platform. On the left side, you should find Chest 29.
Cloudedge Bastion Ruins Chest 30
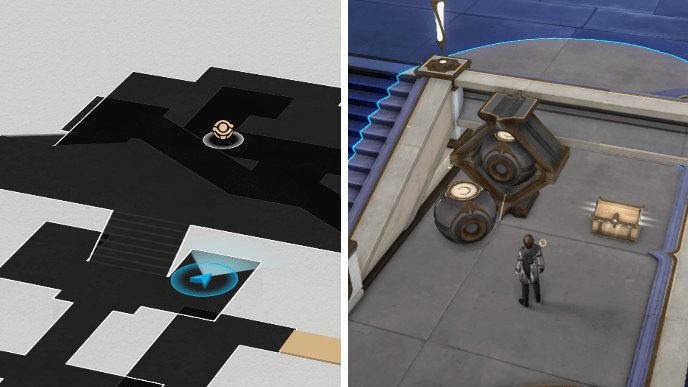
From Chest 29, cross over the plus-shaped platform and go into the space on the right side of the nearby stairs. There, you'll find Chest 30.
Cloudedge Bastion Ruins Chest 31
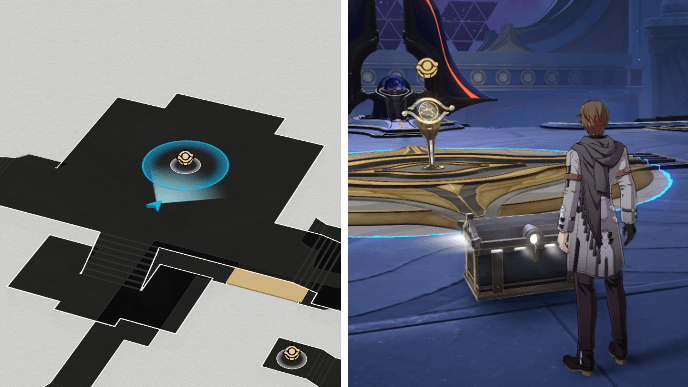
Go to the center area of the puzzle room and put down the rune on the nearby stand. With this, you can open Chest 31 in front of it.
Cloudedge Bastion Ruins Chest 32
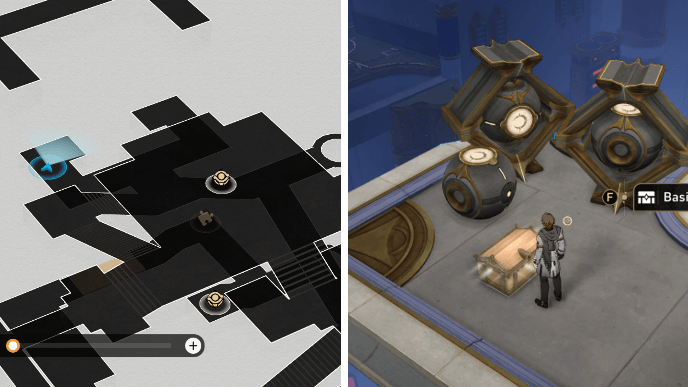
After getting Chest 31, pick up the rune again and go down the long set of stairs on the left side of the central platform. After the second staircase, turn left. Take the left path again on the splitting paths. Chest 32 will be at the end of the path.
Cloudedge Bastion Ruins Chest 33

Take the path opposite of the one leading to Chest 32 and you'll find a Golden Scapegoat at the end. Solve the puzzle to get Chest 33.
Cloudedge Bastion Ruins Golden Scapegoat 3
You can solve the Golden Scapegoat that gives the chest by following the steps shown above!
Cloudedge Bastion Ruins Chest 34

After getting Chest 33, return to the staircases and go down the next one to reach an elevator. Go down to the lower area and leave the rune at the stand. Continue onward along the path and you'll encounter a Golden Short Spear. Capture it to get Chest 34.
Cloudedge Bastion Ruins Chest 35
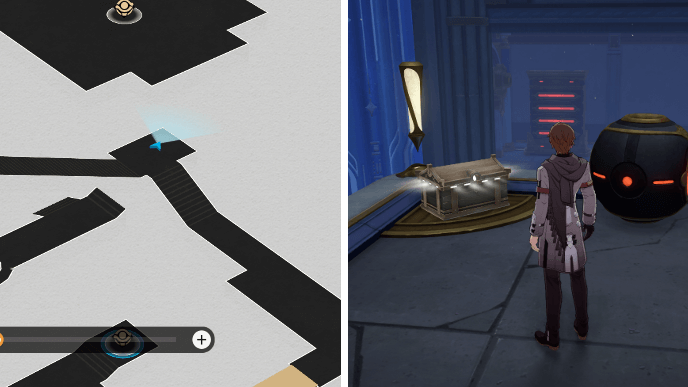
From Chest 34, continue forward along the path and you'll come across Chest 35 near some large spheres that are glowing red.
Cloudedge Bastion Ruins Chest 36
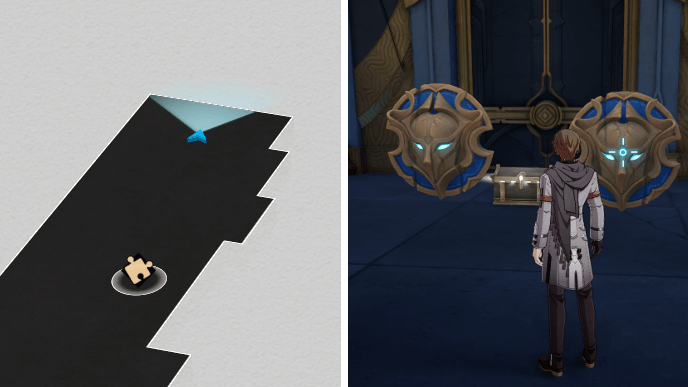
Go up the stairs near Chest 35 and use the Hidden Passage to go up to the next area. Chest 36 will be behind two shields.
Cloudedge Bastion Ruins Chest 37
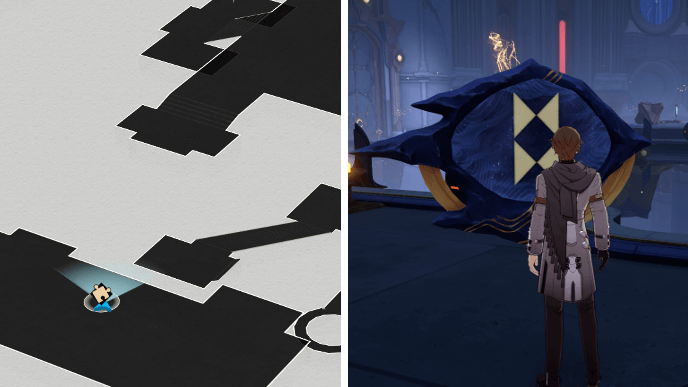
In the same area as Chest 36, there will also be a Prophecy Tablet. Solve it to make a platform with Chest 37 appear.
Cloudedge Bastion Ruins Prophecy Tablet 4
You can solve the Prophecy Tablet that gives the chest by following the steps shown above!
Cloudedge Bastion Ruins Chest 38
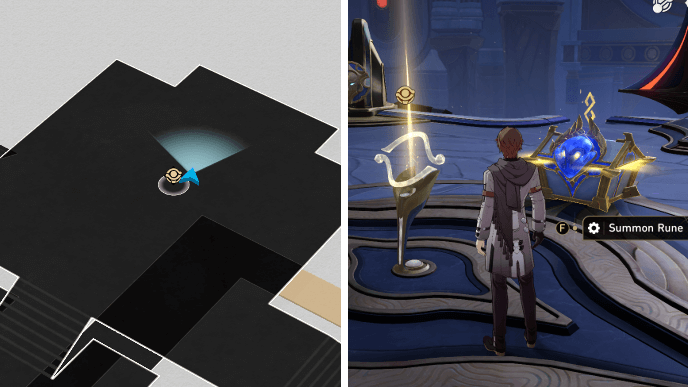
After getting Chest 37, cross over the platform and make your way back to the center area. You'll now be able to open Chest 38 since the rune was left on a different stand.
Cloudedge Bastion Ruins Chest 39
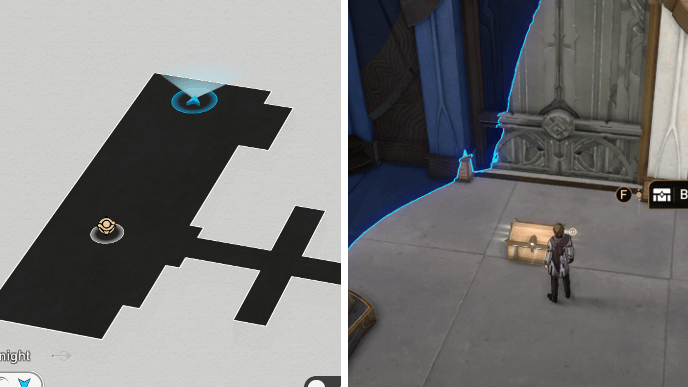
From the center area, summon a rune again and walk along the path leading towards the north side of the puzzle room. Once you see the rune stand, turn right and you'll find Chest 39 at the end of the path.
Cloudedge Bastion Ruins Chest 40
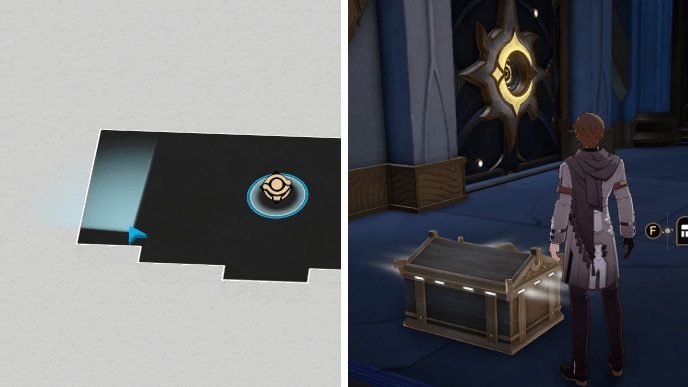
After getting Chest 39, leave the rune at the stand again so that you can get Chest 40 by the door leading out of the puzzle room.
Cloudedge Bastion Ruins Chest 41
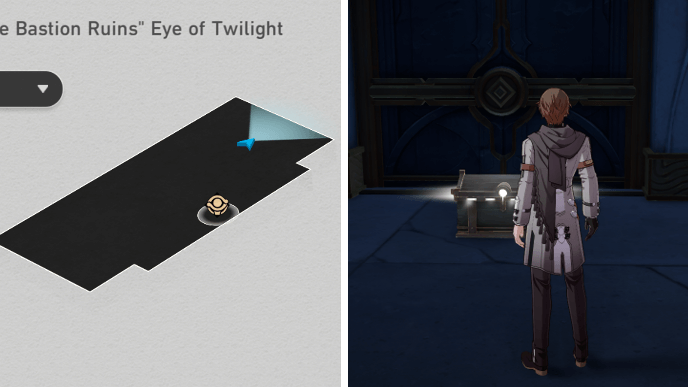
From Chest 40, exit the puzzle room and take the elevator up. Then, head east to go back into the puzzle room, but at its upper floor. You'll see Chest 41 on the other side as soon as you enter.
Cloudedge Bastion Ruins Chest 42
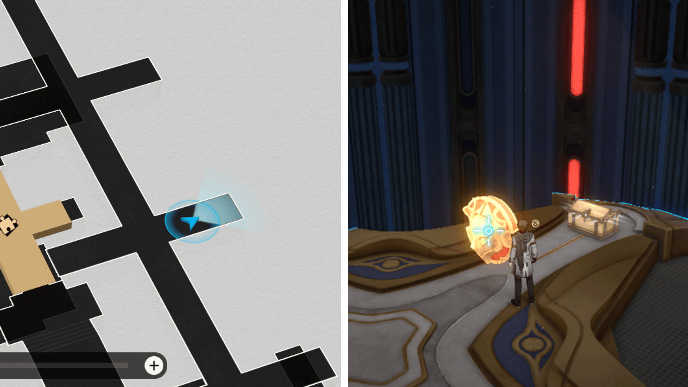
There will be a rune stand in the same area as Chest 41. Summon a rune and walk along the narrow path in front of it. Eventually, you should spot Chest 42 behind a shield on your right.
Cloudedge Bastion Ruins Chest 43
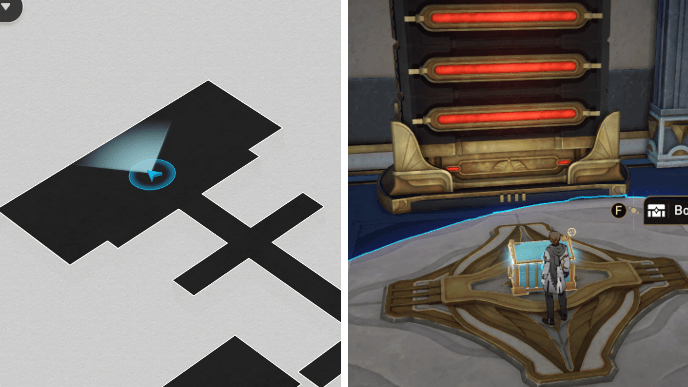
From Chest 42, continue making your way across the narrow walkway. At the end of the path, you'll find Chest 43.
Cloudedge Bastion Ruins Chest 44
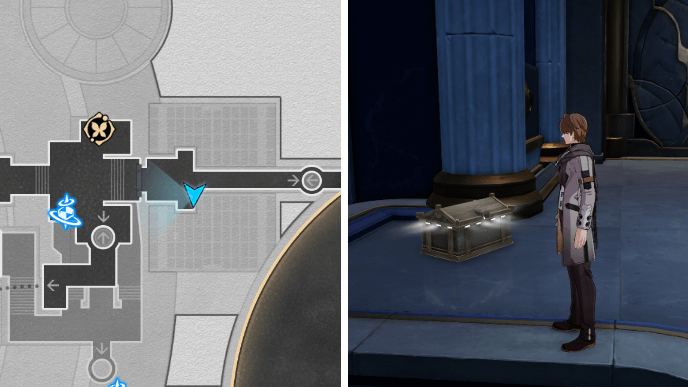
After getting Chest 43, leave the rune at the stand and exit the puzzle room. Make your way past the elevator and you should eventually see Chest 44 on your left, just before the next door.
Cloudedge Bastion Ruins Chest 45
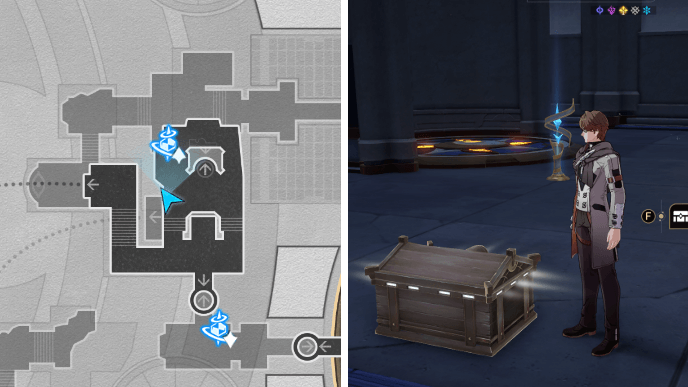
Take elevator near the Bastion Well Space Anchor back down to F3 to reach Chest 45 behind the corruption.
Cloudedge Bastion Ruins Chest 46
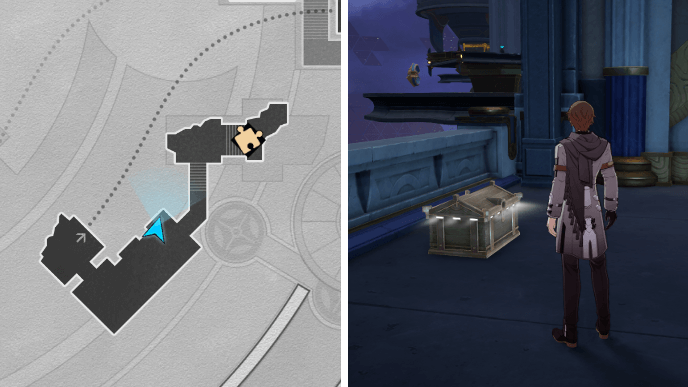
Return to the Bastion Well Space Anchor and walk past the elevator platform to reach the Hidden Passage leading to the next area. After jumping, continue walking through the area until you spot Chest 46 on your left, just before the archway.
Cloudedge Bastion Ruins Chest 47
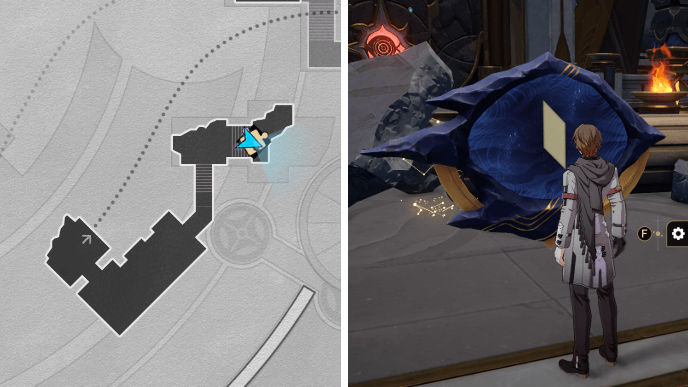
From Chest 46, just continue going deeper into the area and you should find a Prophecy Tablet at the end of the path. Solve it to get Chest 47.
Cloudedge Bastion Ruins Prophecy Tablet 5
You can solve the Prophecy Tablet that gives the chest by following the steps shown above!
Cloudedge Bastion Ruins Chest 48-49
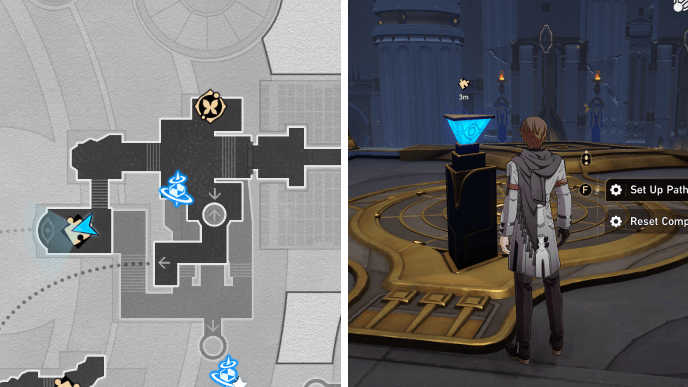
Go to the area southwest of the Bastion Well Space Anchor and interact with the West Wind Compass. You'll need to solve the puzzle to create paths that passes through the treasure before reaching the end points.
Upon successfully setting up the paths, you'll encounter both Chest 48 and Chest 49 as you go through the rainbow bridges down to another part of F3.
West Wind Compass Chests 48-49 Solution
| Path 1 | Path 2 |
|---|---|
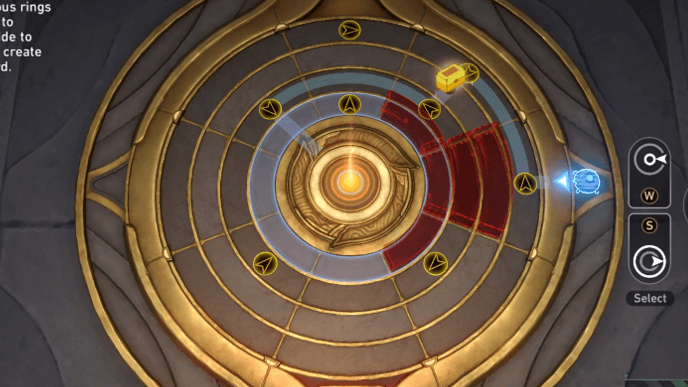 |
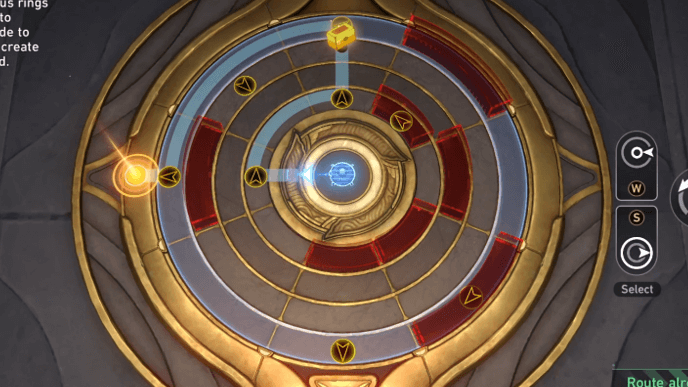 |
The West Wind Compass will ask you to set up two paths. Following the solutions shown above will allow you to get Chest 48 and Chest 49 along the rainbow bridge!
Cloudedge Bastion Ruins Chest 50
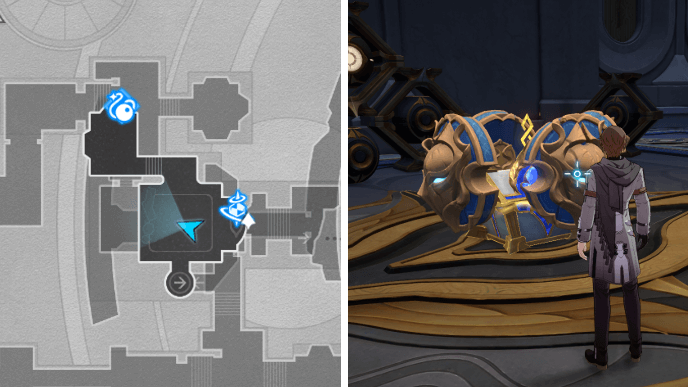
After reaching the end of the rainbow bridge from the previous chests, you'll reach an isolated part of F3 where the Path of Thundersurge Cavern is. Chest 50 will also be right in the middle of the area, blocked by numerous shields.
“Cloudedge Bastion Ruins” Eye of Twilight Spirithief Locations
Cloudedge Bastion Ruins Spirithief 1
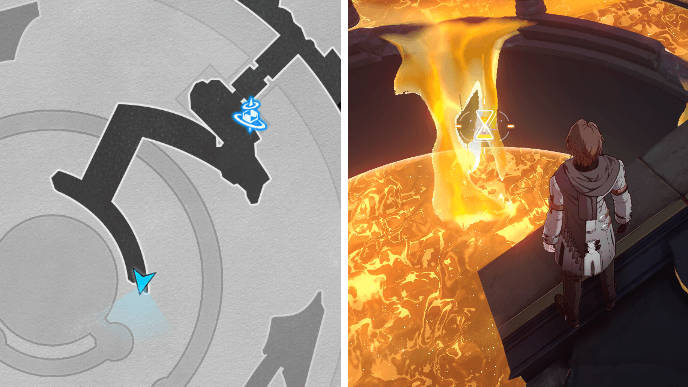
Cloudedge Bastion Ruins's first Spirithief can be found southwest of Chest 15. Interacting with the Creation Nymph will make the Spirithief appear and steal it away. Rewind time while focusing on the pool of gold below to bring it back!
Cloudedge Bastion Ruins Spirithief 2
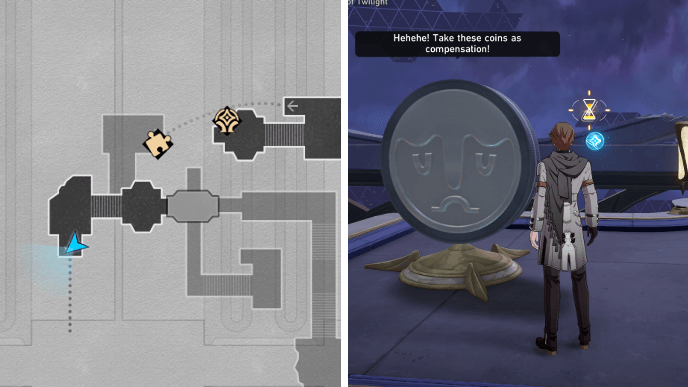
Cloudedge Bastion Ruins's second Spirithief can be encountered when interacting with the Hidden Passage in the northwestern area of F3. Focus on the screen in the distance while rewinding time to bring it back.
How to Unlock “Cloudedge Bastion Ruins” Eye of Twilight
Progress Through The Fall at Dawn's Rise Mission

You can unlock “Cloudedge Bastion Ruins” Eye of Twilight by progressing through the The Fall at Dawn's Rise mission!
The Fall at Dawn's Rise Mission Guide
Honkai: Star Rail Related Guides
List of All Maps
| List of Maps | |
|---|---|
| Herta Space Station | Jarilo-VI |
| The Xianzhou Luofu | Penacony |
| Amphoreus | Planarcadia |
Treasure Chest Locations
Comment
Author
Cloudedge Bastion Ruins - Eye of Twilight Chests and Spirithief Locations
improvement survey
03/2026
improving Game8's site?

Your answers will help us to improve our website.
Note: Please be sure not to enter any kind of personal information into your response.

We hope you continue to make use of Game8.
Premium Articles
Rankings
Gaming News
Popular Games

Genshin Impact Walkthrough & Guides Wiki

Honkai: Star Rail Walkthrough & Guides Wiki

Umamusume: Pretty Derby Walkthrough & Guides Wiki

Pokemon Pokopia Walkthrough & Guides Wiki

Resident Evil Requiem (RE9) Walkthrough & Guides Wiki

Monster Hunter Wilds Walkthrough & Guides Wiki

Wuthering Waves Walkthrough & Guides Wiki

Arknights: Endfield Walkthrough & Guides Wiki

Pokemon FireRed and LeafGreen (FRLG) Walkthrough & Guides Wiki

Pokemon TCG Pocket (PTCGP) Strategies & Guides Wiki
Recommended Games

Fire Emblem Heroes (FEH) Walkthrough & Guides Wiki

Diablo 4: Vessel of Hatred Walkthrough & Guides Wiki

Yu-Gi-Oh! Master Duel Walkthrough & Guides Wiki

Super Smash Bros. Ultimate Walkthrough & Guides Wiki

Pokemon Brilliant Diamond and Shining Pearl (BDSP) Walkthrough & Guides Wiki

Elden Ring Shadow of the Erdtree Walkthrough & Guides Wiki

Monster Hunter World Walkthrough & Guides Wiki

The Legend of Zelda: Tears of the Kingdom Walkthrough & Guides Wiki

Persona 3 Reload Walkthrough & Guides Wiki

Cyberpunk 2077: Ultimate Edition Walkthrough & Guides Wiki
All rights reserved
Copyright © 2024 HoYoverse, COGNOSPHERE. All Rights Reserved.
The copyrights of videos of games used in our content and other intellectual property rights belong to the provider of the game.
The contents we provide on this site were created personally by members of the Game8 editorial department.
We refuse the right to reuse or repost content taken without our permission such as data or images to other sites.


![Slay the Spire 2 Review [Early Access] | Still the Deckbuilder to Beat](https://img.game8.co/4433115/44e19e1fb0b4755466b9e516ec7ffb1e.png/thumb)

![Resident Evil Village Review [Switch 2] | Almost Flawless Port](https://img.game8.co/4432790/e1859f64830960ce4248d898f8cd38d9.jpeg/thumb)


