Murmuring Woods Grove of Epiphany Treasure Chest Locations
★ Exclusive: Check out the State of Meta in 4.0!
♦ Latest: 4.1 Livestream Redeem Codes
♦ Phase 2: Sparkxie, Sparkle, Cerydra, Rappa
♦ Upcoming: Ashveil, Silver Wolf Lv.999, Evanescia
♦ Events: Cosmicon, Roll On!, Ding! Arcadia Fun-Time Clock-In Essentials
There are 35 Murmuring Woods Grove of Epiphany chests to collect in Honkai: Star Rail. Check out our map guide for all Murmuring Woods chests and Spirithief locations!
| Amphoreus Map Guide | |
|---|---|
| Murmuring Woods Chests | Murmuring Woods Puzzles |
List of Contents
“Murmuring Woods” Grove of Epiphany Chest Locations
Murmuring Woods Grove of Epiphany Interactive Map
Select icons to toggle them on/off
| Space Anchor | Treasure Chest | ||
| Spirithief | - | ||
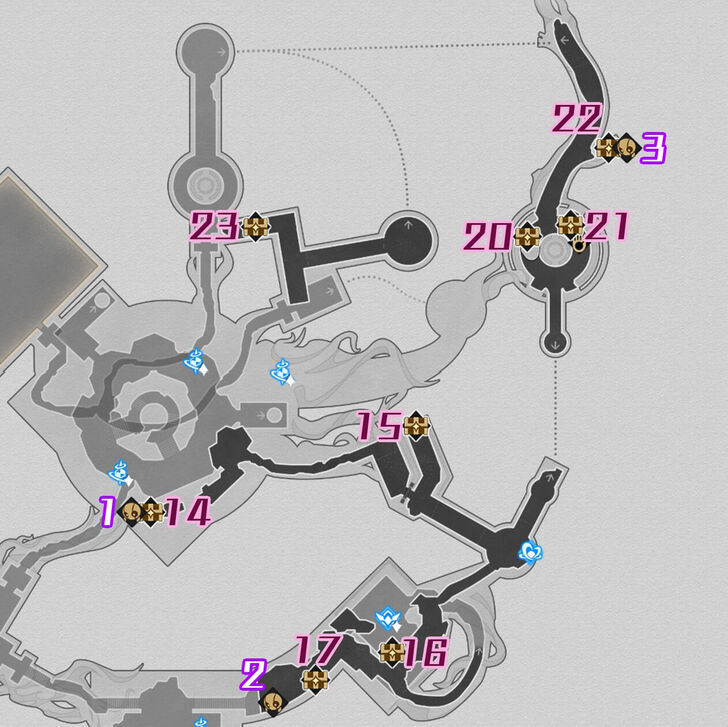
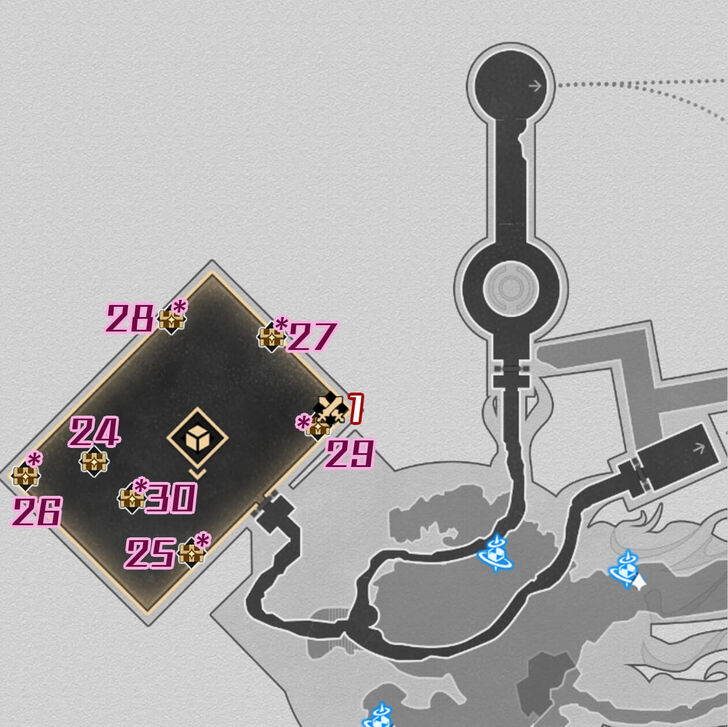
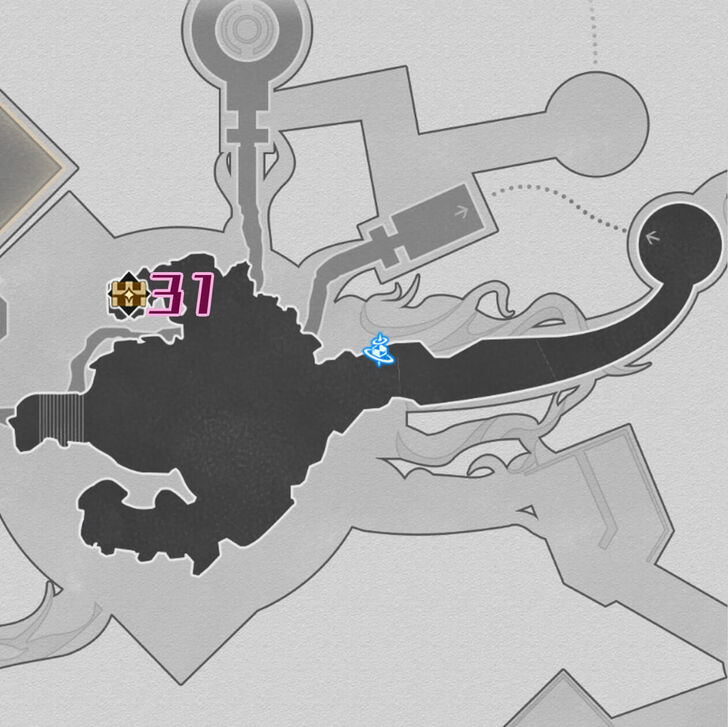
Murmuring Woods Grove of Epiphany Chests
| Murmuring Woods Treasure Chest Map | |||||||||||
|---|---|---|---|---|---|---|---|---|---|---|---|
 See Full Image |
 See Full Image |
||||||||||
 See Full Image |
 See Full Image |
||||||||||
 See Full Image |
 See Full Image |
||||||||||
| Murmuring Woods Treasure Chests | |||||||||||
| Chest 1 | Chest 2 | Chest 3 | Chest 4 | ||||||||
| Chest 5 | Chest 6 | Chest 7 | Chest 8 | ||||||||
| Chest 9 | Chest 10 | Chest 11 | Chest 12 | ||||||||
| Chest 13 | Chest 14 | Chest 15 | Chest 16 | ||||||||
| Chest 17 | Chest 18 | Chest 19 | Chest 20 | ||||||||
| Chest 21 | Chest 22 | Chest 23 | Chest 24 | ||||||||
| Chest 25 | Chest 26 | Chest 27 | Chest 28 | ||||||||
| Chest 29 | Chest 30 | Chest 31 | |||||||||
| Murmuring Woods Spirithief Locations | |||||||||||
| Spirithief 1 | Spirithief 2 | Spirithief 3 | |||||||||
| Murmuring Woods Formidable Foe | |||||||||||
| Formidable Foe Chest | |||||||||||
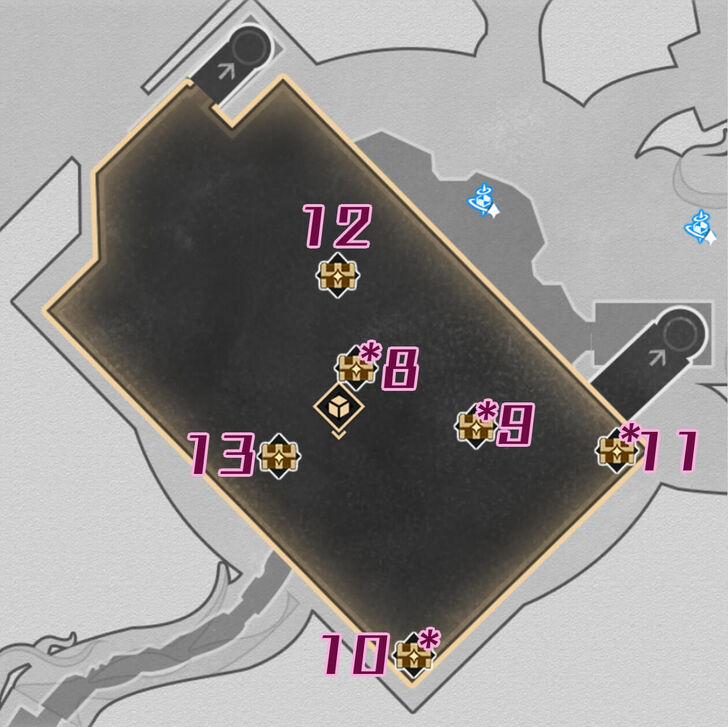
Chests marked with asterisks appear during Evernight.
How to Get “Murmuring Woods” Grove of Epiphany Chests
Murmuring Woods Grove of Epiphany Chest 1
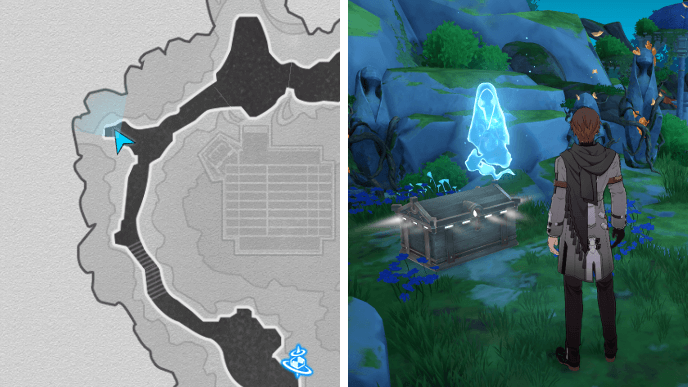
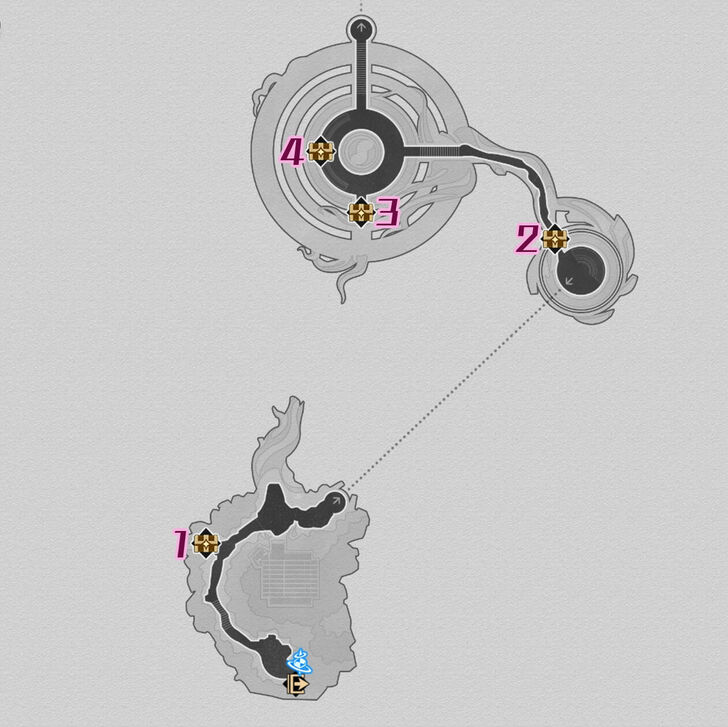
From the Woven Trail Space Anchor, follow the path leading north and you'll spot Chest 1 on your left after reaching the top of the stairs. A floating spirit will also be near the chest.
Murmuring Woods Grove of Epiphany Chest 2
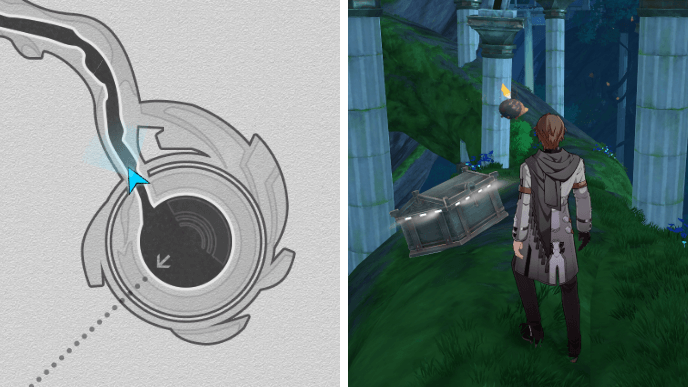
After getting Chest 1, take the Janus' Hidden Passage to reach the next area and continue walking forward. You'll find Chest 2 along the branch path.
Murmuring Woods Grove of Epiphany Chest 3

Chest 3 is behind a shield on the small platform at the south side of the Courtyard of Storge.
Murmuring Woods Grove of Epiphany Chest 4

Chest 4 comes from a Golden Scapegoat puzzle by the sitting area in the Courtyard of Storge.
Murmuring Woods Golden Scapegoat 1
You can solve the Golden Scapegoat puzzle by following the steps shown above!
Murmuring Woods Grove of Epiphany Chest 5

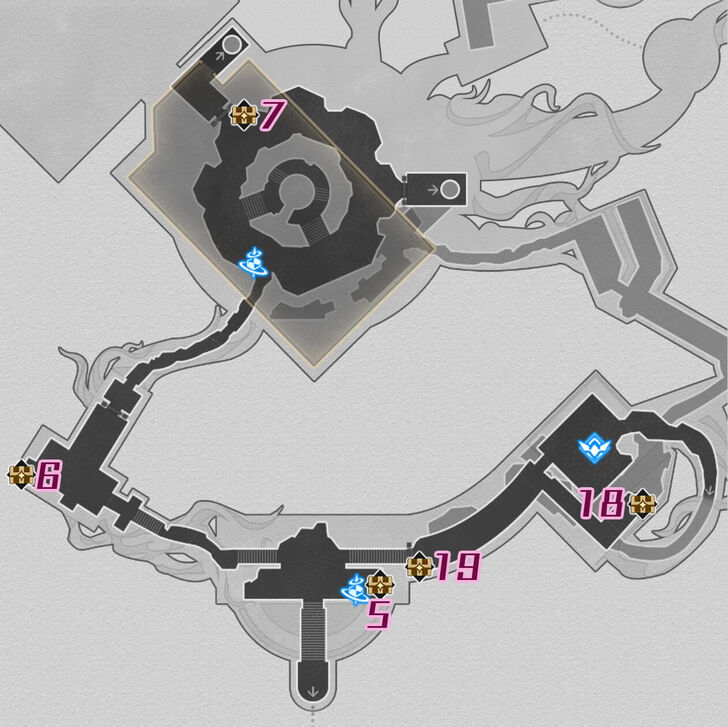
Chest 5 is a few steps east of the Serene Court of Learning Space Anchor. There'll be a couple of old statues near the chest as well.
Murmuring Woods Grove of Epiphany Chest 6

Go up the stairs west of the Serene Court of Learning Space Anchor. You'll find Chest 6 hidden behind two shields in the corner of the balcony area.
Murmuring Woods Grove of Epiphany Chest 7
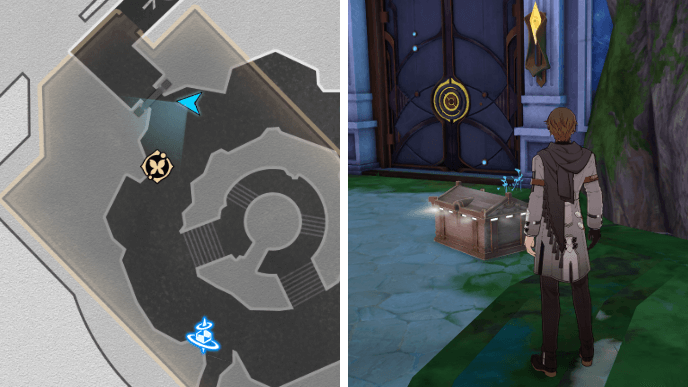
Chest 7 is near the Garmentmaker in the Library of Philia. It's also next to the door that leads to the elevator going to B1.
Murmuring Woods Grove of Epiphany Chest 8

Go through the door next to Chest 7 and take the elevator down to B1. Set the time to Dawn with the Tome of Miracles and activate the Shrine of Prayers. Then, you can go down to the lower area by rewinding time while standing on the Cognos Bloom flower.
There'll be another Tome of Miracles at the lower area. Use it to switch to Evernight and cross the lilypads to reach Chest 8 on the central platform.
Murmuring Woods Grove of Epiphany Chest 9
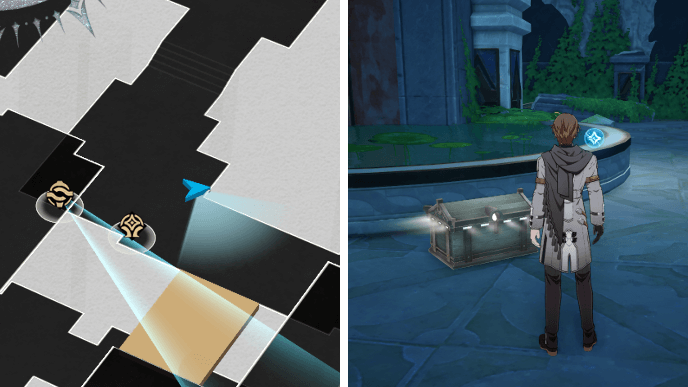
Chest 9 can be found by the fountain in the area past Chest 8. You'll need to activate the Miracle Orb on the left side of the room's topmost floor to form a path leading to the other side.
How to Get Murmuring Woods Chest 9
| How to Get Murmuring Woods Chest 9 | |
|---|---|
| 1 | 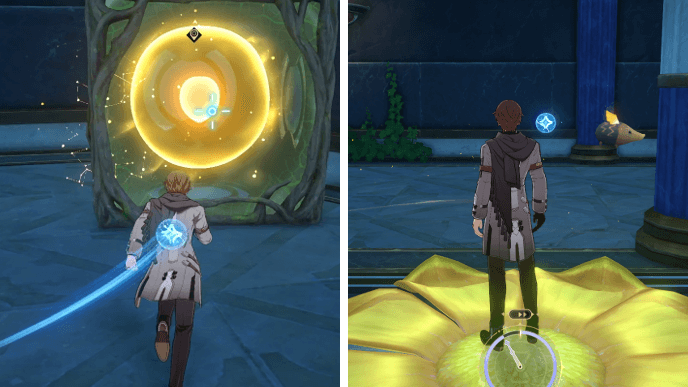 Break the Ichor Vessel to grow a Cognos Bloom on the left side of the Tome of Miracles. Step onto the flower to go up and reach the left side of the room's topmost floor. |
| 2 |  On the left side of the topmost floor, turn on the Miracle Orb so that it makes more lilypads appear on the lower floor. |
| 3 | 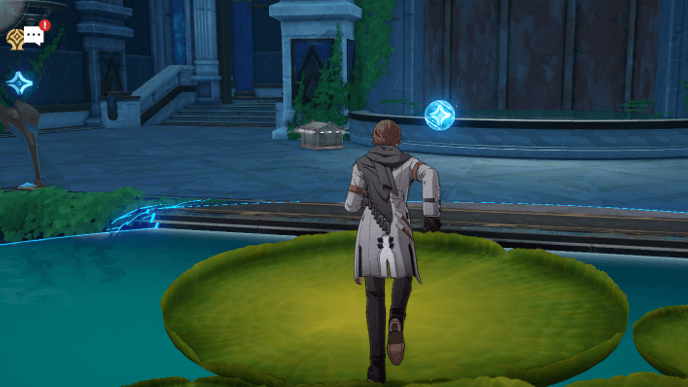 Go back to the lower floor by rewinding the Cognos Bloom you just used. This will also repair the Ichor Vessel. Cross over the lilypads to reach the chest. |
Murmuring Woods Grove of Epiphany Chest 10
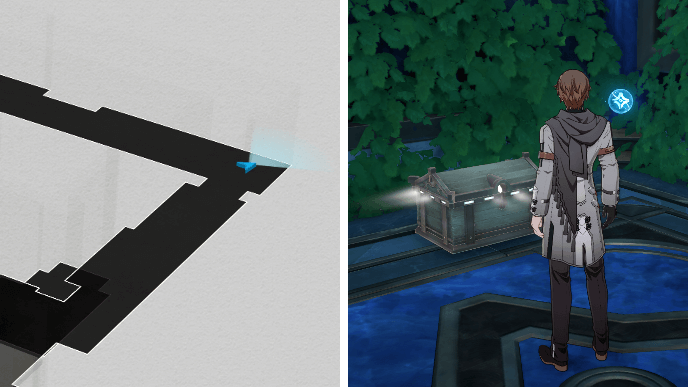
Chest 10 can be found in the right corner at the backmost area of the room's topmost floor. You'll need to solve the Prophecy Tablet to allow the Ichor Vessel to grow a Cognos Bloom leading to to the area.
How to Get Murmuring Woods Chest 10
| How to Get Murmuring Woods Chest 10 | |
|---|---|
| 1 | After getting Chest 9, solve the nearby Prophecy Tablet to unlock the other side of the Ichor Vessel. |
| 2 | 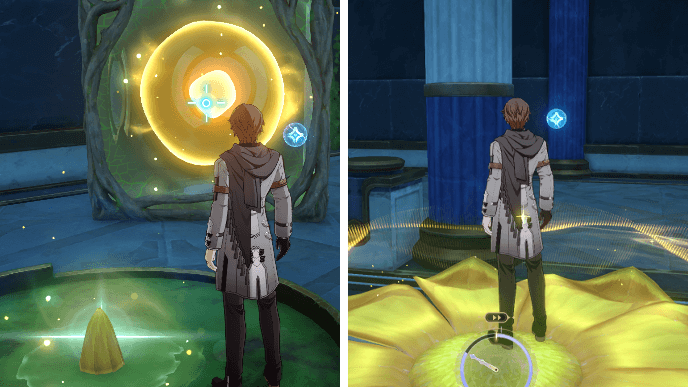 Break the Ichor Vessel from the side that has a flower bed right next to it. The Cognos Bloom that grows will take you to the right side of the topmost floor. |
Murmuring Woods Grove of Epiphany Chest 11

From Chest 10, just continue following the path forward until you reach a Golden Scapegoat puzzle. Solve it to get the Chest 11.
Murmuring Woods Golden Scapegoat 2
You can solve the Golden Scapegoat puzzle by following the steps shown above!
Murmuring Woods Grove of Epiphany Chest 12
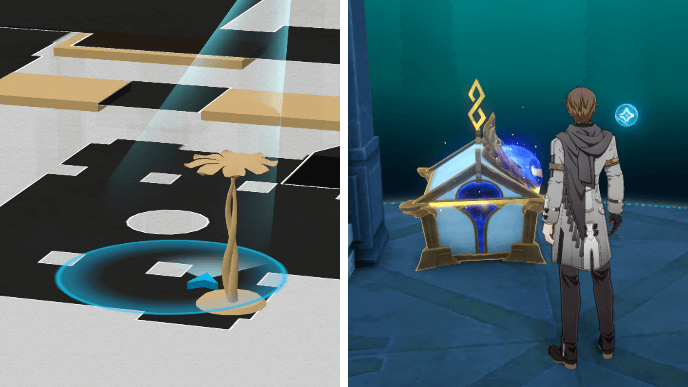
After getting Chest 11, direct the Miracle Orb on the right side of the room away from the center. Then, turn off Miracle Orb on the left side.
When you change the time to Dawn with the Tome of Miracles, a Cognos Bloom leading to the bottom floor should appear. Use the flower to reach Chest 12.
Murmuring Woods Grove of Epiphany Chest 13
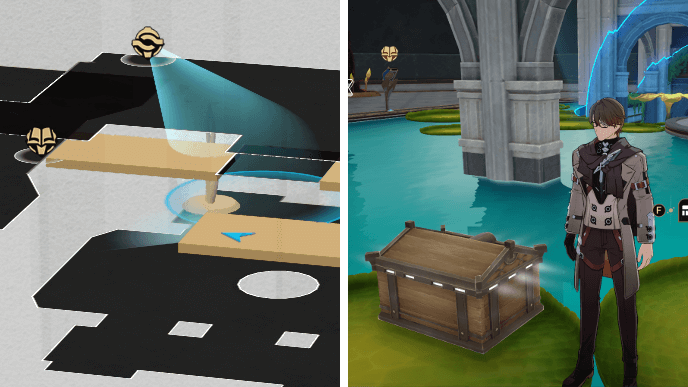
From Chest 12, go back up with the Cognos Bloom and cross all the lilypads to reach Chest 13.
Murmuring Woods Grove of Epiphany Chest 14
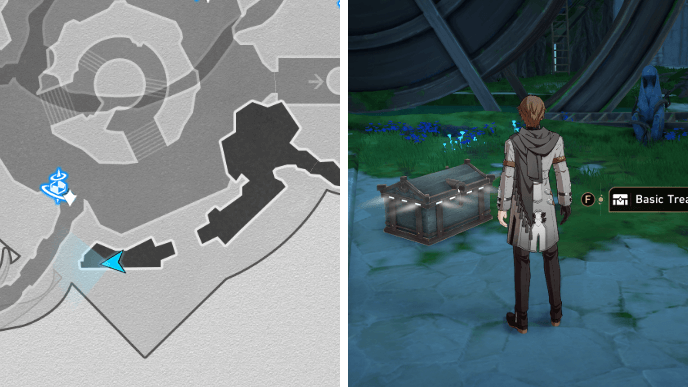
Return to the Library of Philia and use the water wheel to go up to F2. Go into the small area on your right and you'll find Chest 14. A Spirithief will steal the chest, so you'll need to get it back.
Murmuring Woods Grove of Epiphany Chest 15

From Chest 14, cross over the water wheel to head into the area on the other side. Continue following the path forward and exit the room with broken shelves and tables. Once you're outdoors again, go into the area on your left to find Chest 15 guarded by some enemies.
Murmuring Woods Grove of Epiphany Chest 16
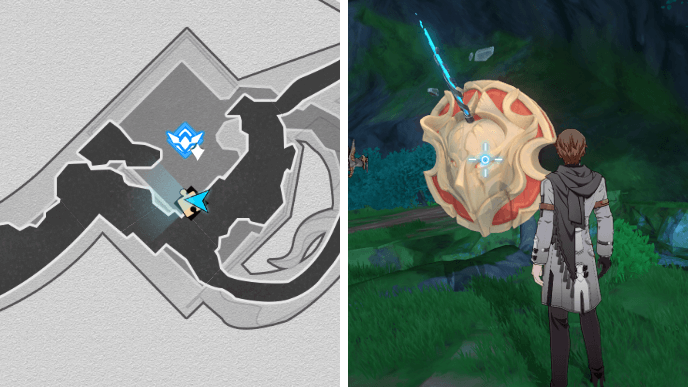
Head southwest from the Bud of Treasures Golden Calyx to find a Golden Short Spear. Free the spear and capture it to get Chest 16.
Murmuring Woods Grove of Epiphany Chest 17

After getting Chest 16, head further west and you'll find Chest 17 along the edge of the walkway, just before an Ichor Vessel.
Approaching the Ichor Vessel will cause a Spirithief to take it away. It's recommended that you capture this Spirithief so that you can unblock the path leading to Chest 19.
Murmuring Woods Grove of Epiphany Chest 18
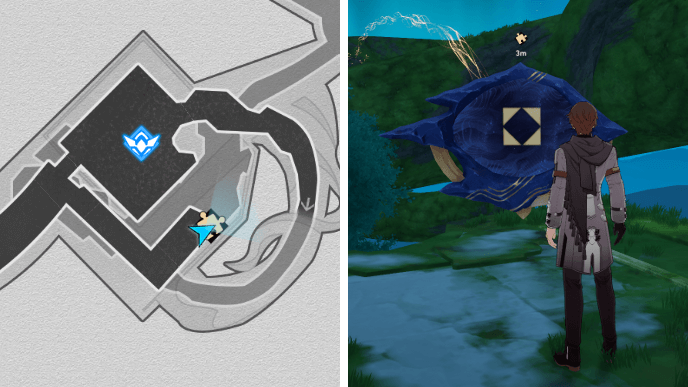
Chest 18 can be found in the L-shaped area outside of the room with the Shape of Gelidmoon Stagnant Shadow. Solve the Prophecy Tablet to get Chest 18.
Murmuring Woods Prophecy Tablet 2
You can solve the Prophecy Tablet puzzle by following the steps shown above!
Murmuring Woods Grove of Epiphany Chest 19
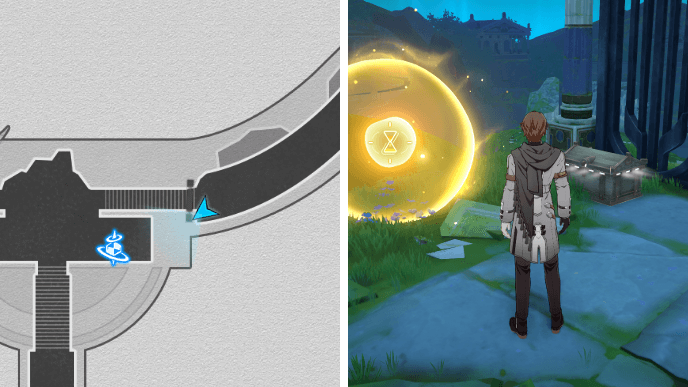
Chest 19 is blocked by a pile of crates. You need to capture the Spirithief near Chest 17 to make it give the Ichor Vessel back. Then, you can break it to make the Ichor drop down and destroy the crates. This will allow you to get Chest 19 and unlock the nearby gate.
Murmuring Woods Grove of Epiphany Chest 20
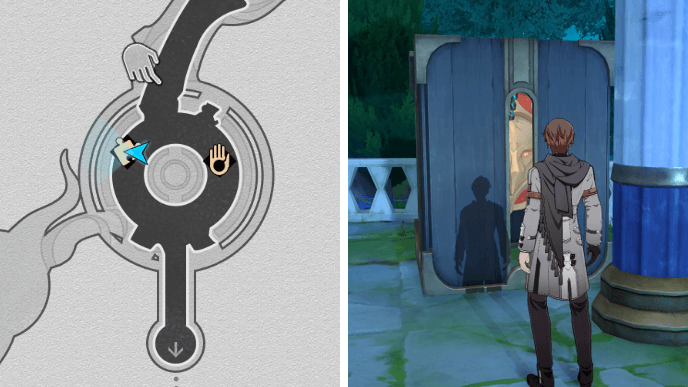
Use the Janus' Hidden Passage near the Golden Calyx to reach an area with a small pond. A Golden Short Spear will be trapped inside a crate. Use the nearby Hand of Zagreus to destroy the crate and free the spear. After capturing it, you'll get Chest 20.
Murmuring Woods Grove of Epiphany Chest 21
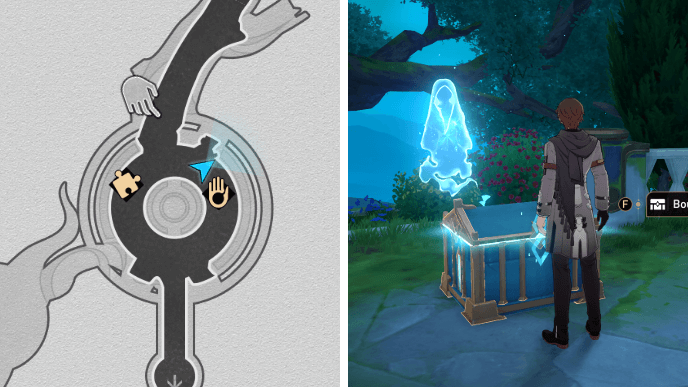
Chest 21 will spawn near the floating spirit once you've collected 3 Coins of Whimsy with the Hand of Zagreus.
Murmuring Woods Grove of Epiphany Chest 22

After getting Chest 21, head north you'll eventually spot Chest 22 along the right side of the branch path. You'll need to get the chest back from a Spirithief.
Murmuring Woods Grove of Epiphany Chest 23

Head north from Chest 22 and use the Janus' Hidden Passage. After jumping to the next area, change the direction of the Hidden Passage to reach the L-shaped platform on F2.
Murmuring Woods Prophecy Tablet 3
You can solve the Prophecy Tablet puzzle by following the steps shown above!
Murmuring Woods Grove of Epiphany Chest 24
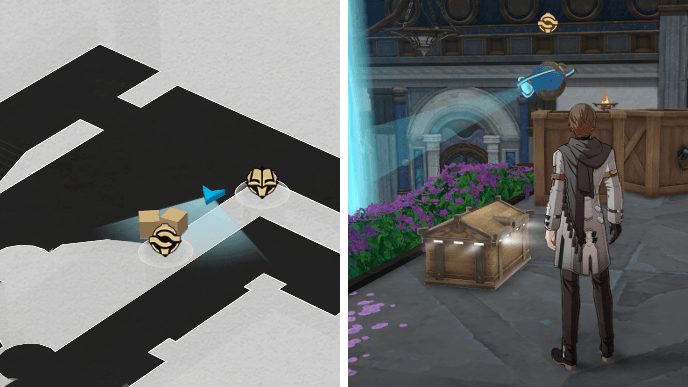
Enter the 3D puzzle room west of the Dome of Devotion Space Anchor. Use the Tome of Miracles to switch to Dawn, cross over the lilypads, and go up the stairs to reach Chest 24 on the topmost floor near a Miracle Orb and some boxes.
Murmuring Woods Grove of Epiphany Chest 25
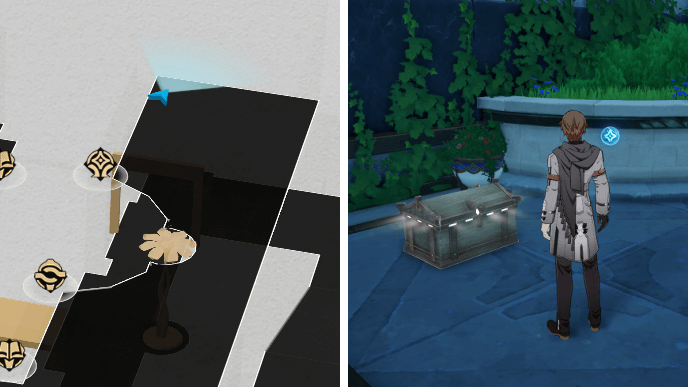
After getting Chest 24, switch back to Evernight and you'll find Chest 25 at the same side of the top floor, just past the Cognos Bloom.
Murmuring Woods Grove of Epiphany Chest 26
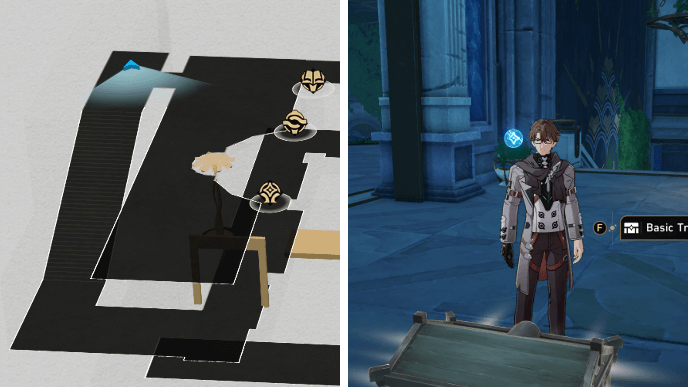
During Evernight, turn on the Miracle Orb at the top floor and shine it towards the center. Then, active the Shrine of Prayers and use the Cognos Bloom to go down to the middle floor. Follow the path on your right and you should reach Chest 26 after going up the stairs.
Murmuring Woods Grove of Epiphany Chest 27

After getting Chest 26, you can use the Titan Mark to clear the path and quickly reach the nearby Prophecy Tablet. Solving it will make a Cognos Bloom appear on the middle floor and allow you to reach the other side of the top floor, where there's a Golden Scapegoat puzzle.
How to Get Murmuring Woods Chest 27
| How to Get Murmuring Woods Chest 27 | |
|---|---|
| 1 | Solve the nearby Prophecy Tablet to make another Cognos Bloom appear on the middle floor. |
| 2 |  Cross the lilypads and use the Cognos Bloom to reach the top floor. The Golden Scapegoat puzzle will be blocked by a pile of crates. |
| 3 | 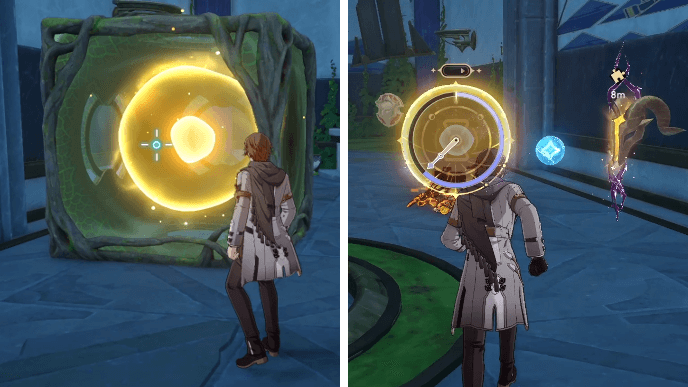 Break the nearby Ichor Vessel from the side facing the crates. The Ichor will destroy the pile, allowing you to access the puzzle. |
| 4 | Solve the Golden Scapegoat puzzle by following the steps shown above. |
Murmuring Woods Grove of Epiphany Chest 28
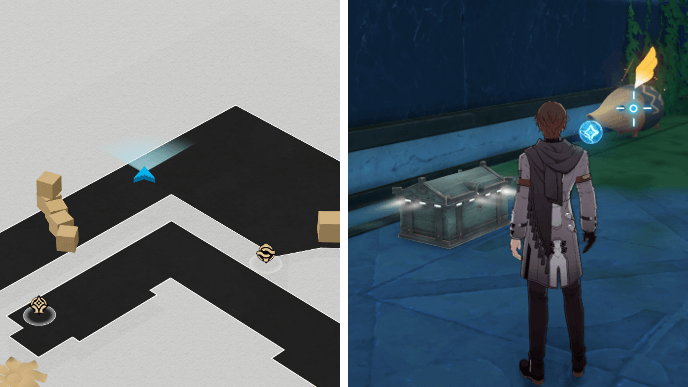
While still on the top floor during Evernight, head west from Chest 27 and you should find Chest 28 near a Flying Amphora.
Murmuring Woods Grove of Epiphany Chest 29
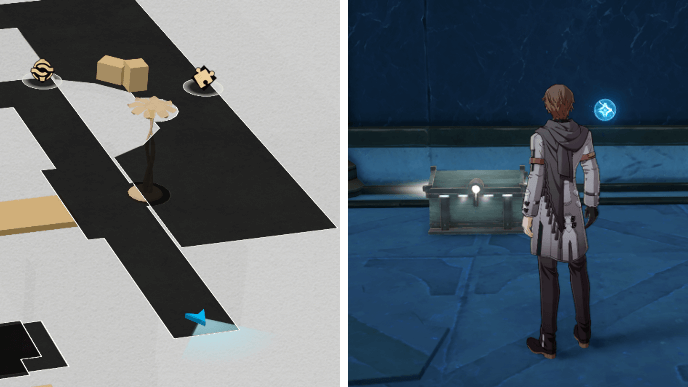
After getting Chest 28, use the Cognos Bloom to return to the middle floor and take the path on your left. Chest 29 will be at the end.
Murmuring Woods Grove of Epiphany Chest 30
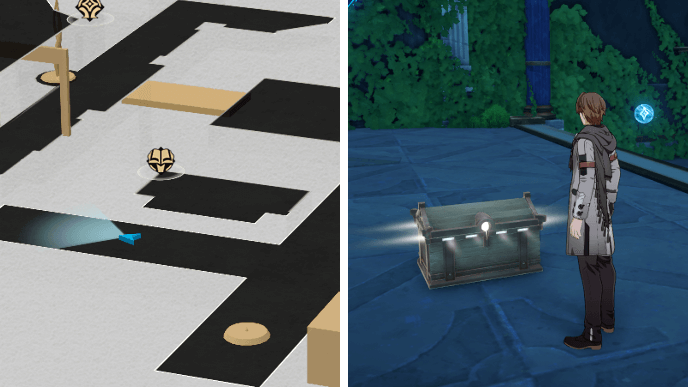
Use the Cognos Bloom near the Shrine of Prayers on the middle floor to go down to the bottom floor. Chest 30 will be on the right side of the center mechanism.
Murmuring Woods Grove of Epiphany Chest 31
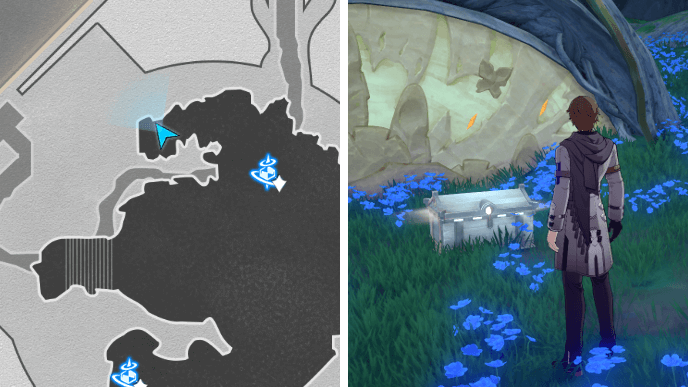
Chest 31 can be found in the area on the right side of the Luminary Throne.
“Murmuring Woods” Grove of Epiphany Spirithief Locations
Murmuring Woods Spirithief 1

The first Murmuring Woods Spirithief can be found when attempting to get Chest 14 in F2. Focus on the center mechanism in the Library of Philia to rewind time and bring back the chest.
Murmuring Woods Spirithief 2
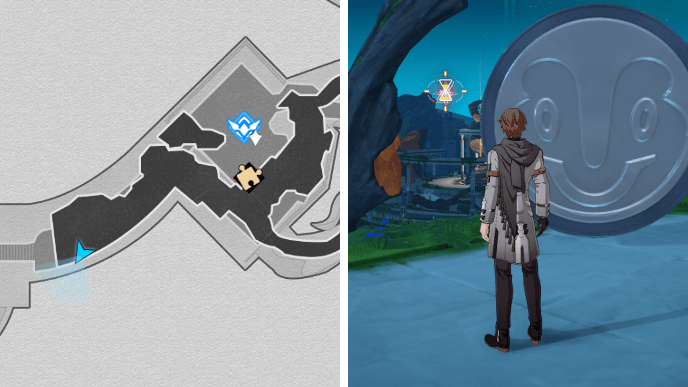
The next Murmuring Woods Spirithief can be encountered upon approaching the Ichor Vessel near Chest 17. The Spirithief will steal the Ichor Vessel away, so you'll need to focus on the courtyard in the distance to bring it back.
Murmuring Woods Spirithief 3

The last Murmuring Woods Spirithief can be found when getting Chest 22. Rewind time while focusing on the large branch above the pond area to capture the Spirithief.
“Murmuring Woods” Grove of Epiphany Formidable Foe Challenge
Murmuring Woods Formidable Foe
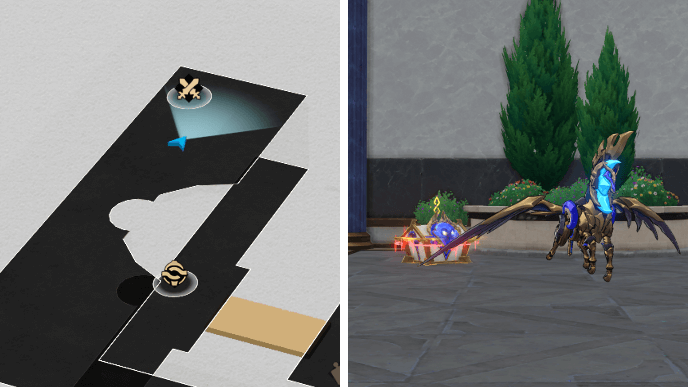
The Murmuring Woods Formidable Foe can be found in the 3D puzzle room on F3. Use the Tome of Miracles on the topmost floor to switch to Evernight and activate the nearby Miracle Orb.
Turn the Miracle Orb towards side of the room and the path to the foe should be cleared once the room's set back to Dawn. Imaginary and Quantum characters are recommended for this battle.
How to Unlock “Murmuring Woods” Grove of Epiphany
Progress Grove, Wherefore Are the Wise Silent Mission
You can unlock “Murmuring Woods” Grove of Epiphany by progressing through the Grove, Wherefore Are the Wise Silent mission! This is a Trailblaze Mission under the Light Slips the Gate, Shadow Greets the Throne series!
Light Slips the Gate, Shadow Greets the Throne Mission Guide
Honkai: Star Rail Related Guides
List of All Maps
| List of Maps | |
|---|---|
| Herta Space Station | Jarilo-VI |
| The Xianzhou Luofu | Penacony |
| Amphoreus | Planarcadia |
Treasure Chest Locations
Comment
Creation nymph 12 is on F2 near Spiritthief 2. I dont know why the hell its labeled in F1 North and is floating...
Author
Murmuring Woods Grove of Epiphany Treasure Chest Locations
improvement survey
03/2026
improving Game8's site?

Your answers will help us to improve our website.
Note: Please be sure not to enter any kind of personal information into your response.

We hope you continue to make use of Game8.
Premium Articles
Rankings
- We could not find the message board you were looking for.
Gaming News
Popular Games

Genshin Impact Walkthrough & Guides Wiki

Honkai: Star Rail Walkthrough & Guides Wiki

Umamusume: Pretty Derby Walkthrough & Guides Wiki

Pokemon Pokopia Walkthrough & Guides Wiki

Resident Evil Requiem (RE9) Walkthrough & Guides Wiki

Monster Hunter Wilds Walkthrough & Guides Wiki

Wuthering Waves Walkthrough & Guides Wiki

Arknights: Endfield Walkthrough & Guides Wiki

Pokemon FireRed and LeafGreen (FRLG) Walkthrough & Guides Wiki

Pokemon TCG Pocket (PTCGP) Strategies & Guides Wiki
Recommended Games

Diablo 4: Vessel of Hatred Walkthrough & Guides Wiki

Cyberpunk 2077: Ultimate Edition Walkthrough & Guides Wiki

Fire Emblem Heroes (FEH) Walkthrough & Guides Wiki

Yu-Gi-Oh! Master Duel Walkthrough & Guides Wiki

Super Smash Bros. Ultimate Walkthrough & Guides Wiki

Pokemon Brilliant Diamond and Shining Pearl (BDSP) Walkthrough & Guides Wiki

Elden Ring Shadow of the Erdtree Walkthrough & Guides Wiki

Monster Hunter World Walkthrough & Guides Wiki

The Legend of Zelda: Tears of the Kingdom Walkthrough & Guides Wiki

Persona 3 Reload Walkthrough & Guides Wiki
All rights reserved
Copyright © 2024 HoYoverse, COGNOSPHERE. All Rights Reserved.
The copyrights of videos of games used in our content and other intellectual property rights belong to the provider of the game.
The contents we provide on this site were created personally by members of the Game8 editorial department.
We refuse the right to reuse or repost content taken without our permission such as data or images to other sites.


![Monster Hunter Stories 3 Review [First Impressions] | Simply Rejuvenating](https://img.game8.co/4438641/2a31b7702bd70e78ec8efd24661dacda.jpeg/thumb)


Who made this