Memortis Shore Ruins of Time Chests and Spirithief Locations
★ Exclusive: Check out the State of Meta in 4.0!
♦ Latest: 4.1 Livestream Redeem Codes
♦ Phase 2: Sparxie, Sparkle, Cerydra, Rappa
♦ Upcoming: Ashveil, Silver Wolf Lv.999, Evanescia
♦ Events: Cosmicon, Roll On!, Ding! Arcadia Fun-Time Clock-In Essentials
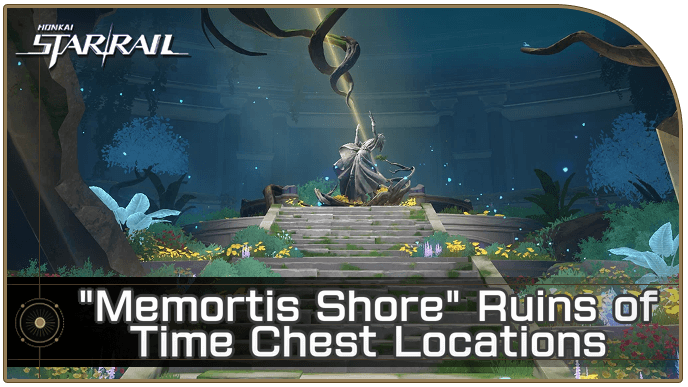
There are 46 Memortis Shore Ruins of Time chests to collect in Honkai: Star Rail. Check out our map guide for all Ruins of Time chests and Spirithief locations as well as where to find all the Feather-Shaped Amber!
| Amphoreus Map Guide | |
|---|---|
| Memortis Shore Ruins of Time Chests | Memortis Shore Ruins of Time Puzzles |
List of Contents
Memortis Shore Ruins of Time Chest Locations
Memortis Shore Ruins of Time Interactive Map
Select icons to toggle them on/off
| Space Anchor | Treasure Chest | ||
| Spirithief | - | ||
Memortis Shore Ruins of Time Chests
| Memortis Shore Ruins of Time Chest Map | |||||||||||
|---|---|---|---|---|---|---|---|---|---|---|---|
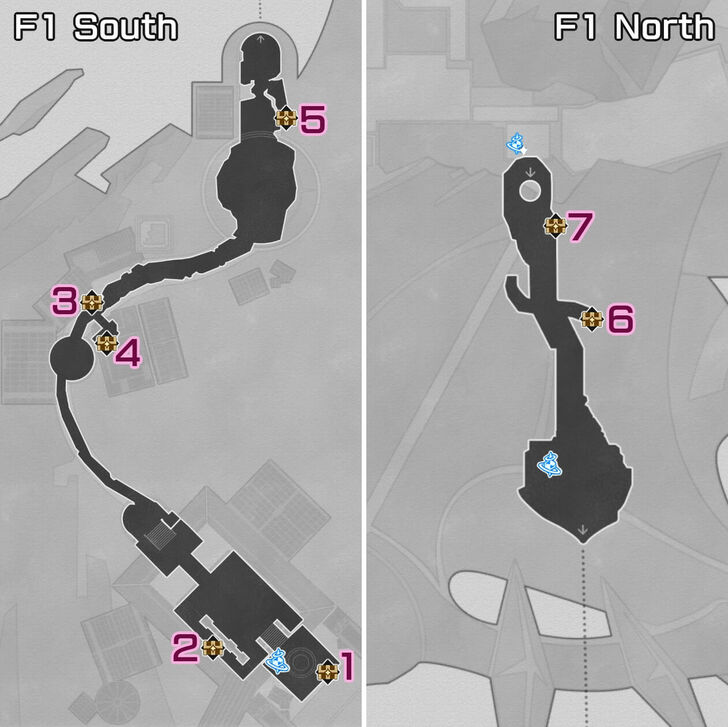 See Full Image |
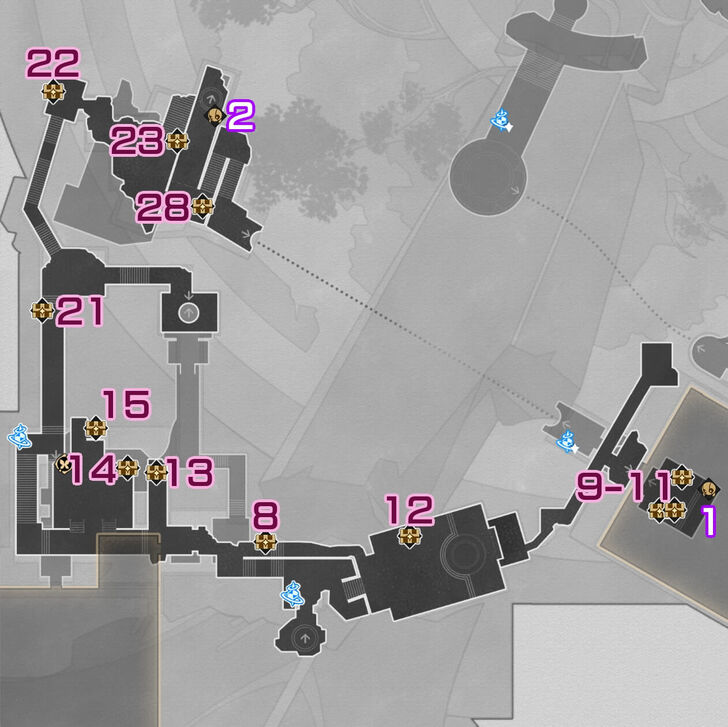 See Full Image |
||||||||||
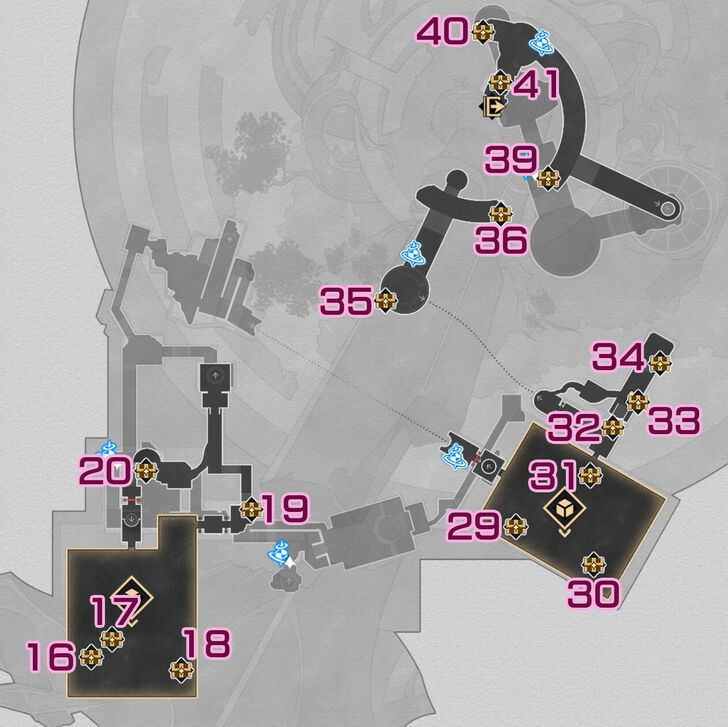 See Full Image |
 See Full Image |
||||||||||
 See Full Image |
 See Full Image |
||||||||||
| Ruins of Time Treasure Chests | |||||||||||
| Chest 1 | Chest 2 | Chest 3 | Chest 4 | ||||||||
| Chest 5 | Chest 6 | Chest 7 | Chest 8 | ||||||||
| Chest 9-11 | Chest 12 | Chest 13 | Chest 14 | ||||||||
| Chest 15 | Chest 16 | Chest 17 | Chest 18 | ||||||||
| Chest 19 | Chest 20 | Chest 21 | Chest 22 | ||||||||
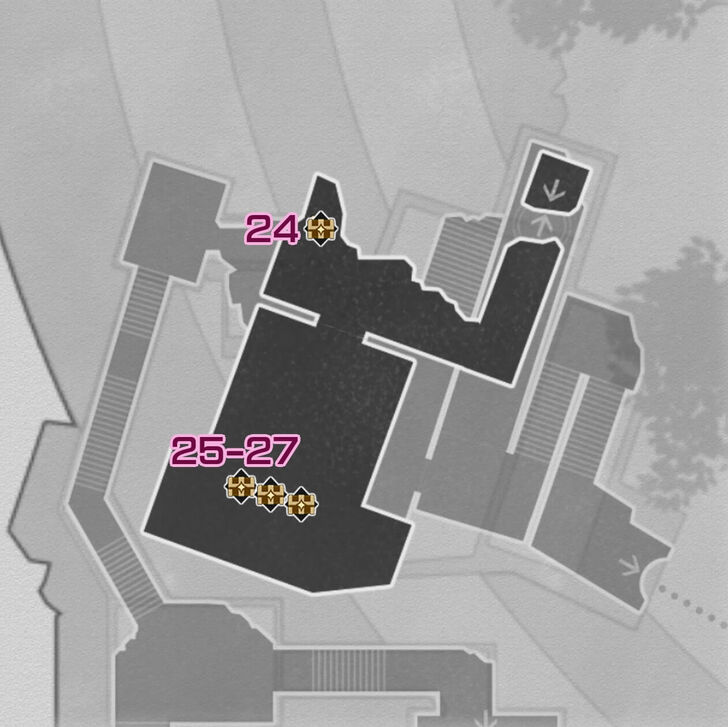
| Chest 23 | Chest 24 | Chest 25-27 | Chest 28 | ||||||||
| Chest 29 | Chest 30 | Chest 31 | Chest 32 | ||||||||
| Chest 33 | Chest 34 | Chest 35 | Chest 36 | ||||||||
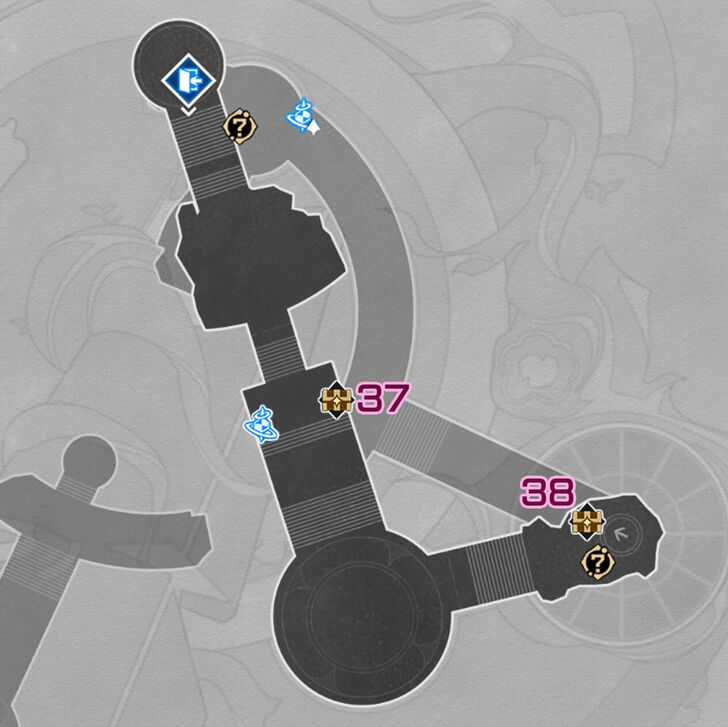
| Chest 37 | Chest 38 | Chest 39 | Chest 40 | ||||||||
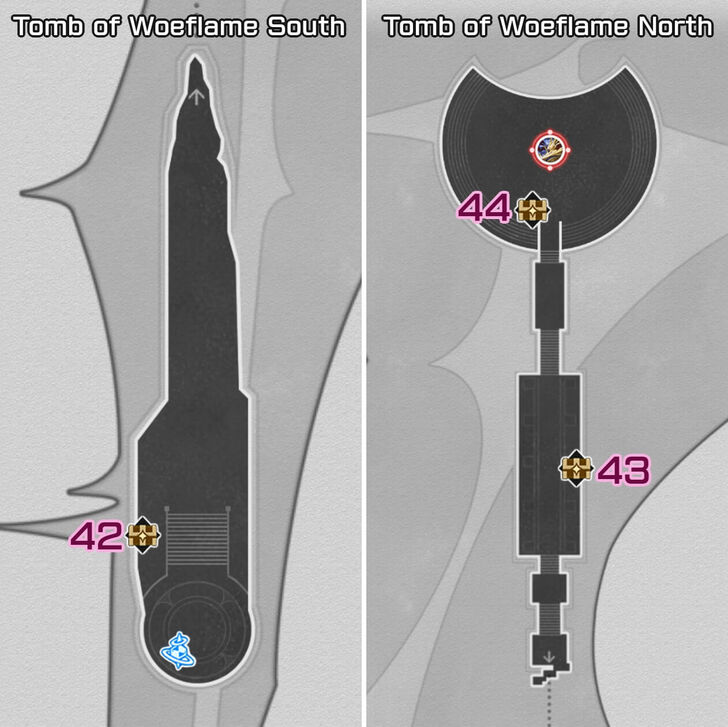
| Chest 41 | Chest 42 | Chest 43 | Chest 44 | ||||||||
| Ruins of Time Spirithief Locations | |||||||||||
| Spirithief 1 | Spirithief 2 | ||||||||||
How to Get Memortis Shore Ruins of Time Chests
Memortis Shore Ruins of Time Chest 1
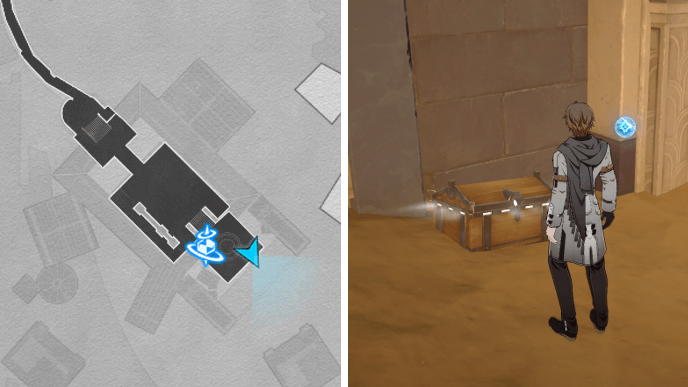
Chest 1 in Memortis Shore Ruins of Time is found behind the giant statue at The Ruins' Courtyard.
Memortis Shore Ruins of Time Chest 2
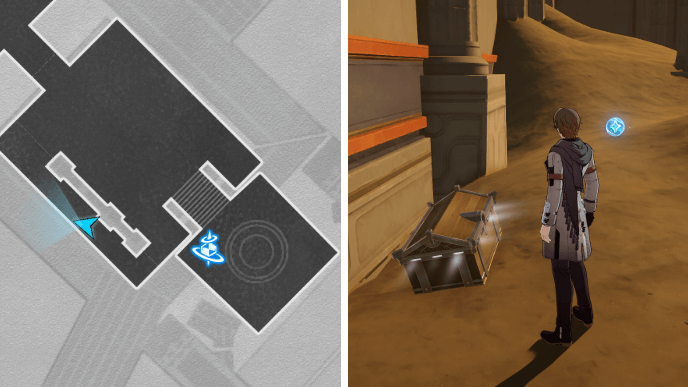
Chest 2 can be found in the narrow walkway a few steps northwest of The Ruins' Courtyard Space Anchor.
Memortis Shore Ruins of Time Chest 3
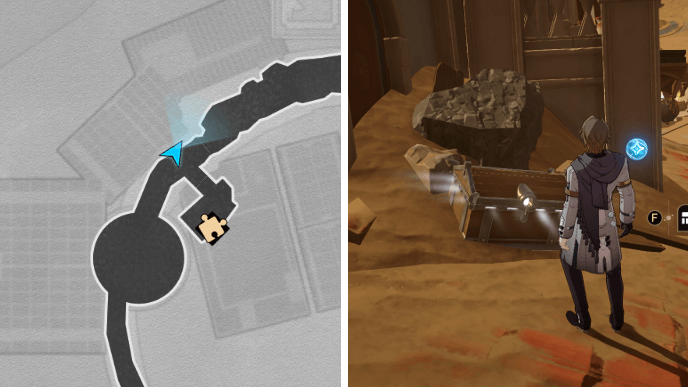
From Chest 2, head north and cross the long bridge to reach the rooftop where Chest 3 is.
Memortis Shore Ruins of Time Chest 4
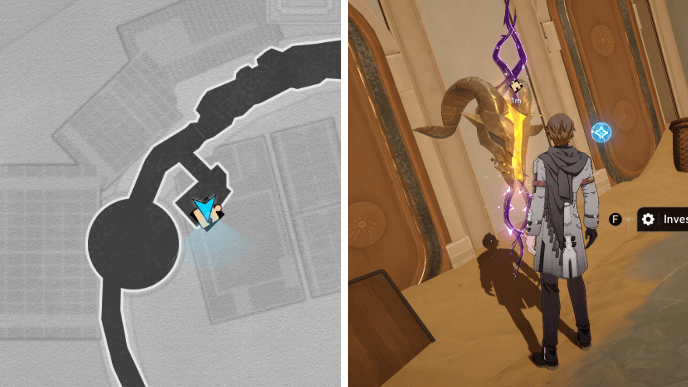
After getting Chest 3, cross over the red awning nearby and go into the room that's blocked by a wooden shield. Take note that destroying the wooden shield will reveal a Creation Nymph.
There'll be a Golden Scapegoat inside the room that gives Chest 4. Solve the puzzle to get the chest!
Ruins of Time Chest 4 Golden Scapegoat
Input the commands: Left, Left, Left, Left, Up, Right, Right. When your past self shows up, head to the right and enter the portal. Go left to press the blue button. Then, keep going right until you drop down to the altar.
Memortis Shore Ruins of Time Chest 5
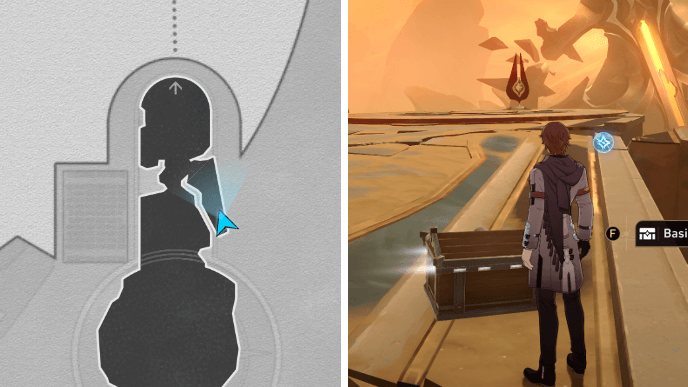
Chest 5 can be found south of the Janus' Hidden Passage that leads to the northern area of F1.
Memortis Shore Ruins of Time Chest 6

Head north from the Grave of Clarity Space Anchor and walk onto the giant branch on your right. You'll find Chest 6 at the top.
Memortis Shore Ruins of Time Chest 7
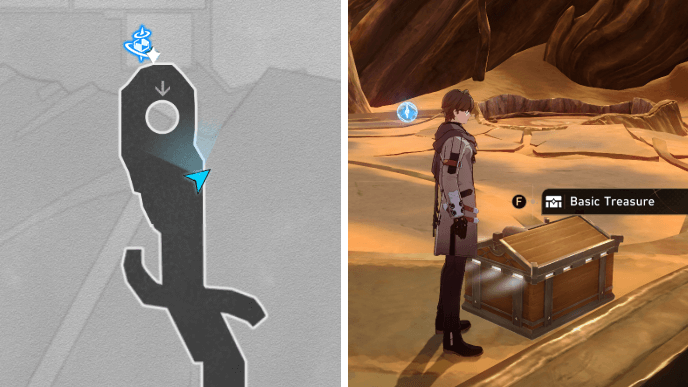
Chest 7 is found by the right side of the elevator that leads up to B2.
Memortis Shore Ruins of Time Chest 8
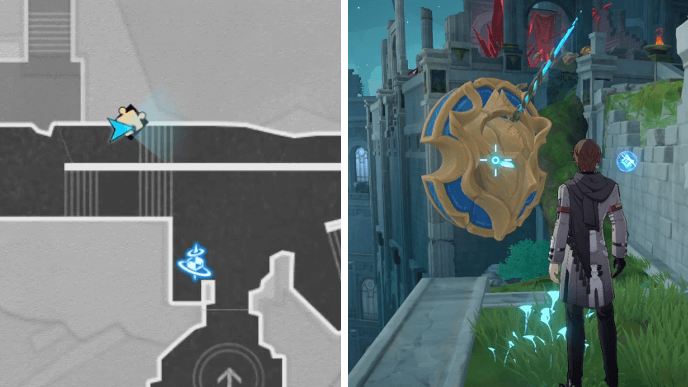
Go down the stairs west of the Falledge Terrace Space Anchor and make a right U-turn. There will be a Golden Short Spear on the side of the staircase. Release the spear and capture it to get Chest 8.
How to Return the Stolen Golden Short Spear
| How to Get the Stolen Golden Short Spear | |
|---|---|
| 1 | While following the spear, it'll open up the path to the eastern area of B2. Here, a Spirithief will steal the spear. To get it back, you need to go in through the window that the Spirithief used to escape. |
| 2 | The window will lead you to the Spirithief's hideout. Simply speak with the Spirithief again to get the spear back and continue following it to its destination. |
Memortis Shore Ruins of Time Chest 9-11
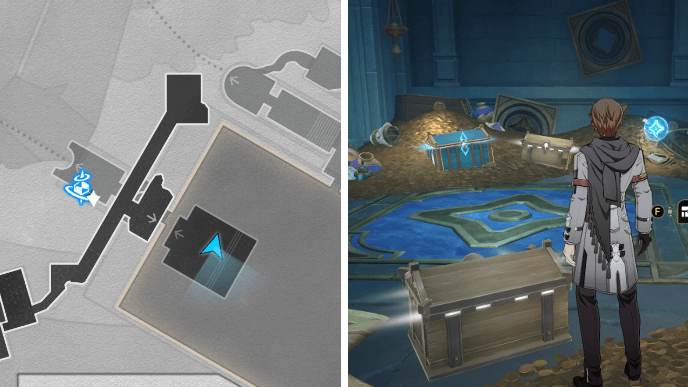
Chests 9 to 11 can be found inside the Spirithief's hideout at the eastern area of B2. There will be 1 Bountiful Treasure and 2 Basic Treasure.
Memortis Shore Ruins of Time Chest 12
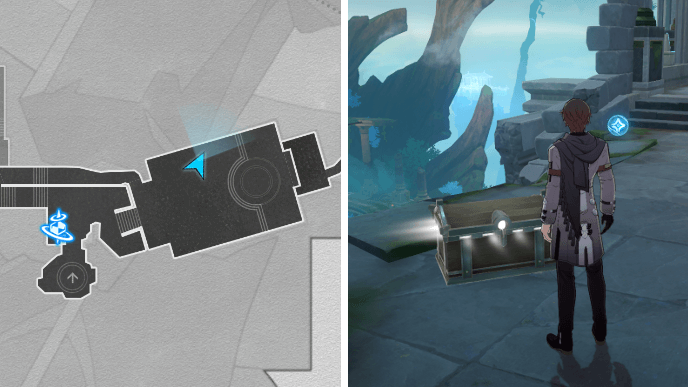
Chest 12 is located in the area blocked by corruption that's east of the Falledge Terrace Space Anchor. This chest can also be obtained while following Chest 8's Golden Short Spear.
Memortis Shore Ruins of Time Chest 13
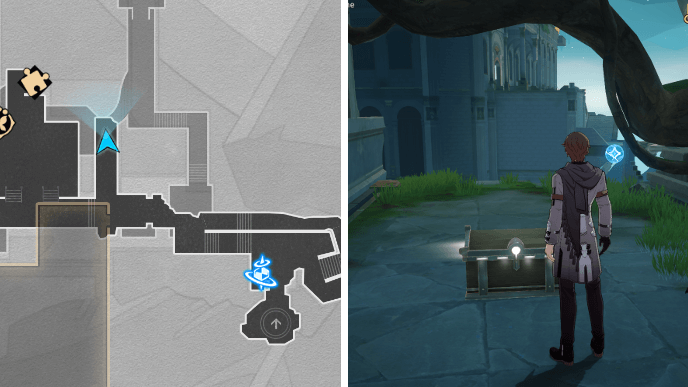
Head to the platform northwest of the Falledge Terrace Space Anchor to find Chest 13 under a long branch.
Memortis Shore Ruins of Time Chest 14
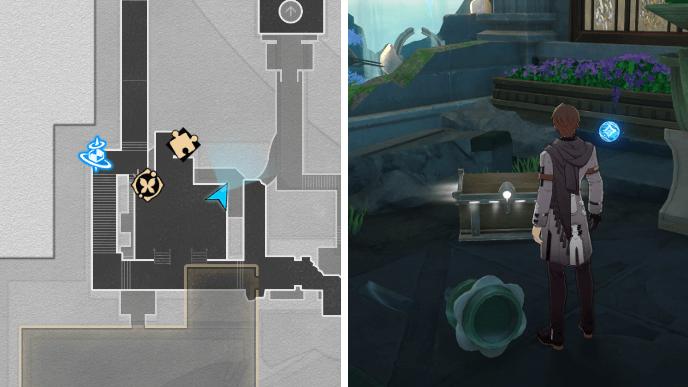
Chest 14 can be found next to a broken floor lamp east of the Ruins of Time Garmentmaker.
Memortis Shore Ruins of Time Chest 15
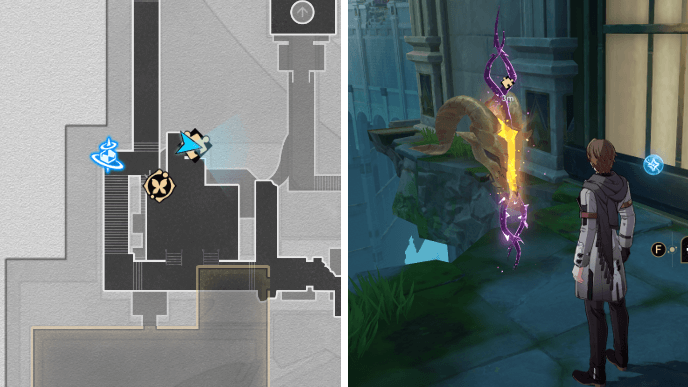
Chest 15 comes from a Golden Scapegoat that can be found on the balcony area north of the Garmentmaker.
Ruins of Time Chest 15 Golden Scapegoat
Input the commands: Left, Left, Left, Down, Right, Left, Right, Right, Up. When your past self shows up, go down and press the left blue button on your side.
Afterwards, press the right blue button and go up the ladder. Now you can make your way to the portal and drop down to the altar once you get to the other side.
Memortis Shore Ruins of Time Chest 16
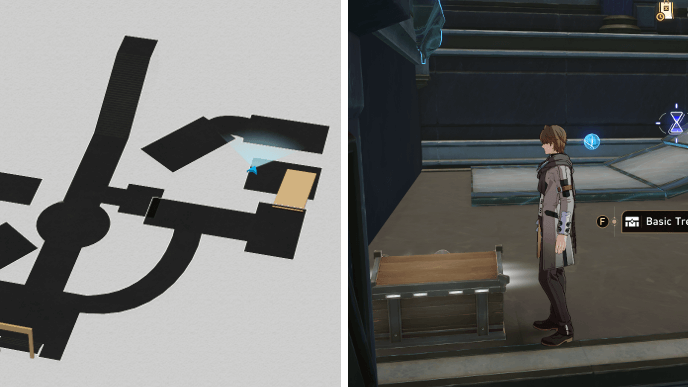
From the Penitentiary of Wishes Space Anchor, head a few steps east and go down the stairs leading to B3. Use the elevator to reach the first puzzle room.
From the entrance, take the curved path on your right to reach the upper platform. Go down the ramp formed by the broken bridge to reach Chest 16.
Memortis Shore Ruins of Time Chest 17
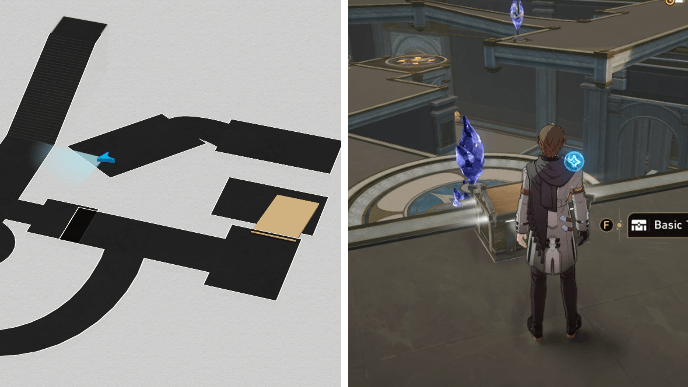
After getting Chest 16, climb back up and rewind time on the bridge to repair it. Then, you can cross over to the next platform and get Chest 17.
Memortis Shore Ruins of Time Chest 18
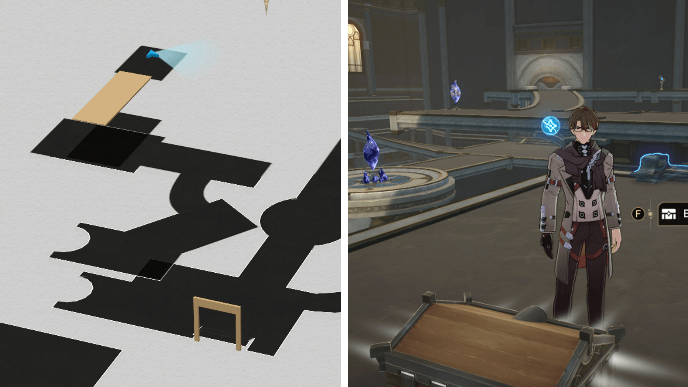
Return to the puzzle room entrance and use the elevator to go to the upper floor on the other side. Rewind time on the other broken bridge to repair it and reach Chest 18 at the end of the path.
Memortis Shore Ruins of Time Chest 19
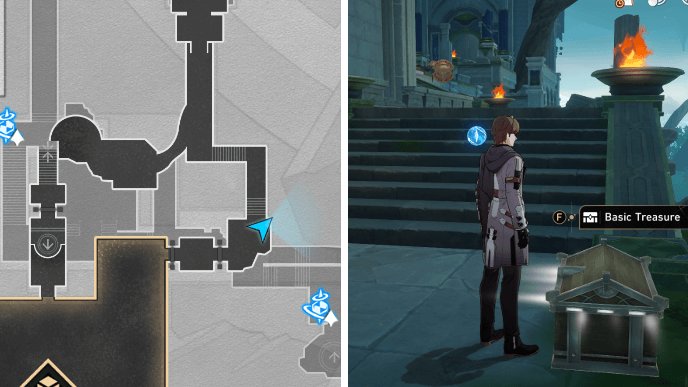
After exiting the puzzle room from its lower floor, you can find Chest 19 by the stairs outside.
Memortis Shore Ruins of Time Chest 20
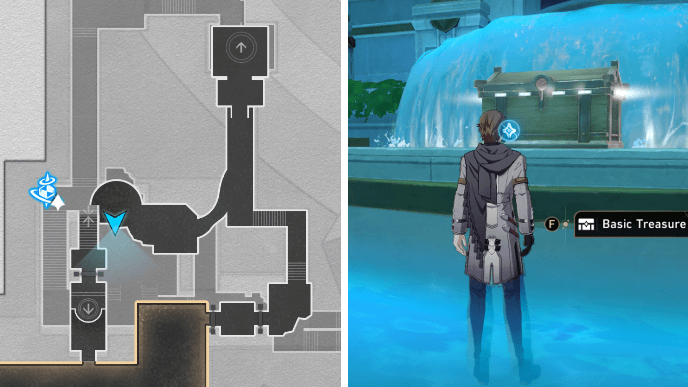
From Chest 19, continue heading northwest and go down the branch that leads to a pool area. Chest 20 can be found by the pool's fountain.
Memortis Shore Ruins of Time Chest 21

After getting Chest 21, climb the branch to return to the main path and use the Cognos Bloom to go back to B2. From here, you should be able to purify the corruption that's blocking Chest 21.
Memortis Shore Ruins of Time Chest 22

From Chest 22, head north and climb up the long set of stairs to reach Chest 22.
Memortis Shore Ruins of Time Chest 23
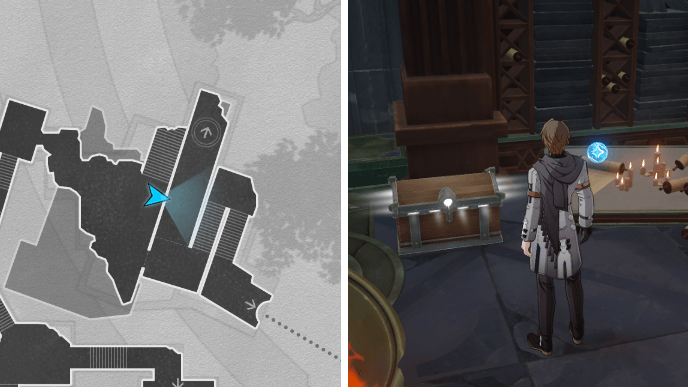
Chest 23 can be found next to the low table full of old scrolls in the study room on B2.
Memortis Shore Ruins of Time Chest 24
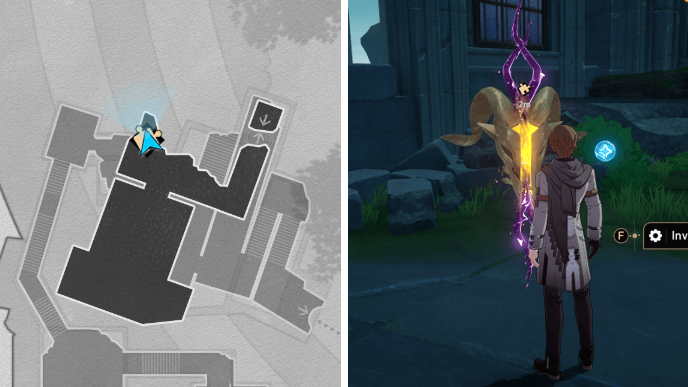
Exit the study room and turn left to reach a walkway full of wooden boxes. There'll be an Ichor Vessel at the end of the path. Interact with it and select Help me, Bartholos to summon a Spirithief. It will replace the vessel with a Cognos Bloom, allowing you to reach B1.
On B1, follow the path ahead to reach a Golden Scapegoat. Solving the puzzle will give you Chest 24!
Ruins of Time Chest 24 Golden Scapegoat
Input the commands: Right, Right, Right, Right, Left, Right. When your past self shows up, go left twice and go right twice. Go left again and through the portal that appears. Afterwards, you can go all the way right to reach the altar.
Memortis Shore Ruins of Time Chest 25-27
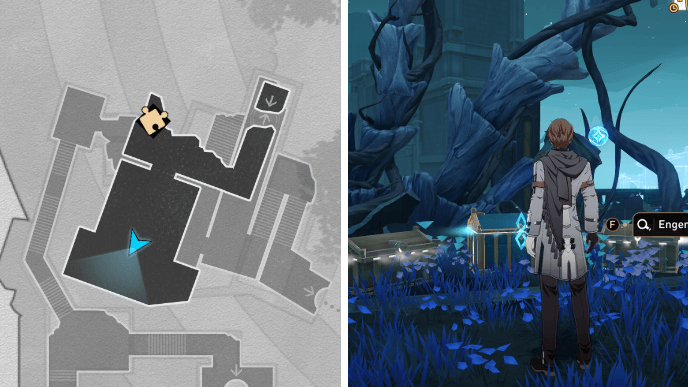
From Chest 24, head southwest to find Chests 25 to 27. They'll be in front of the engendered dragonbones.
Memortis Shore Ruins of Time Chest 28
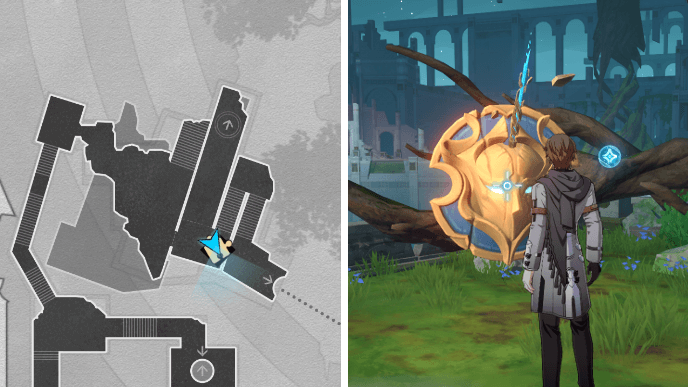
Use the Cognos Bloom to return back to B2 and head south to find a Golden Short Spear. The spear will fly to the southeastern area of B3, but you can capture it quickly by teleporting to the Sealed Prison of Despair Space Anchor.
Memortis Shore Ruins of Time Chest 29
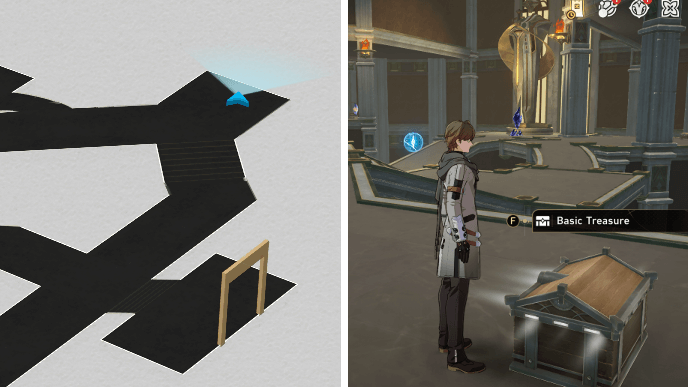
Teleport to the Sealed Prison of Despair Space Anchor and go into the second puzzle room. From the entrance, take the path on your right and go up the stairs to find Chest 29.
Memortis Shore Ruins of Time Chest 30
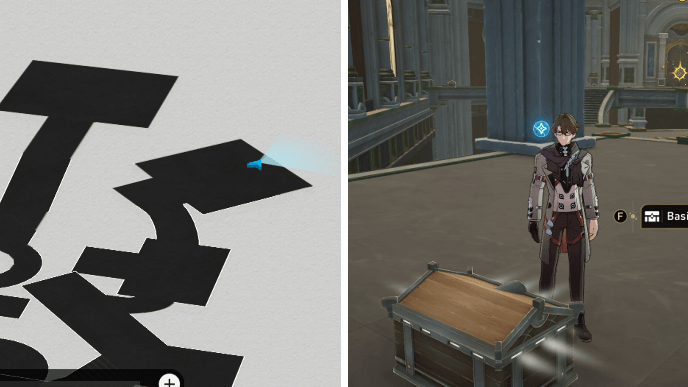
From Chest 29, continue following the path forward until you reach Chest 30 at the far end.
Memortis Shore Ruins of Time Chest 31
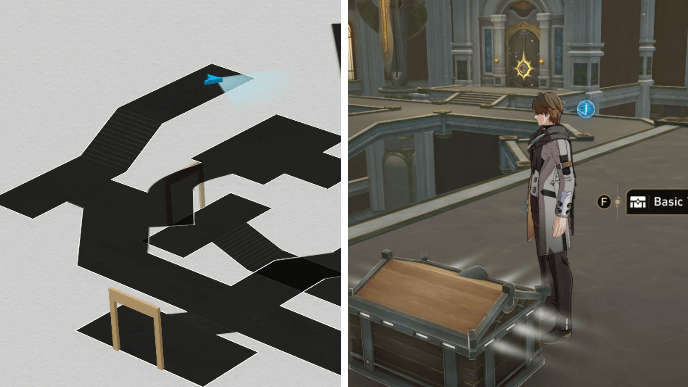
Return to the puzzle room entrance and take the path on the left side this time. Climb up the stairs on the leftmost side of the room to reach Chest 31 at the top.
Memortis Shore Ruins of Time Chest 32
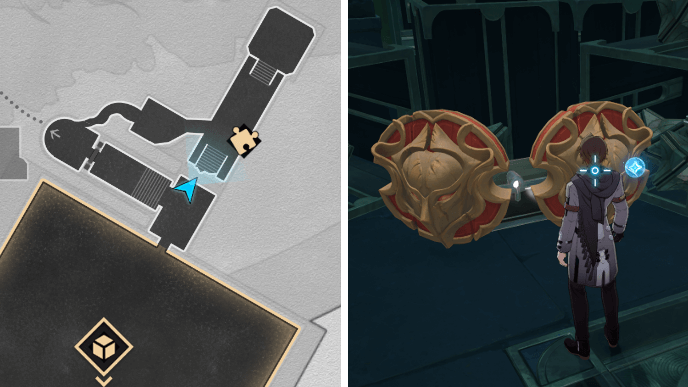
Use the central elevator in the puzzle room to go down and reach the exit. Outside the puzzle room, you should find Chest 32 hidden behind two shields.
Memortis Shore Ruins of Time Chest 33
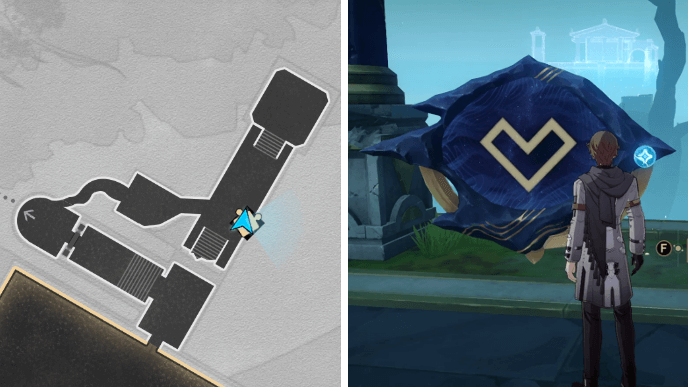
Follow the branch path near the Janus' Hidden Passage to reach a Prophecy Tablet. Solve the puzzle to get Chest 33!
Ruins of Time Chest 33 Prophecy Tablet
You can solve the Prophecy Tablet by following the steps shown above.
Memortis Shore Ruins of Time Chest 34
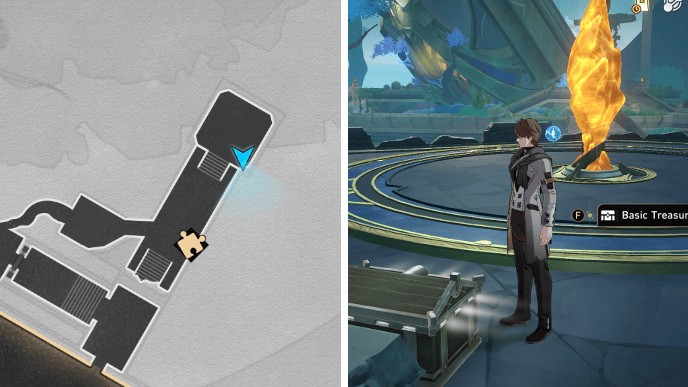
From Chest 33, head north to find Chest 34 near a feather-shaped amber.
Memortis Shore Ruins of Time Chest 35
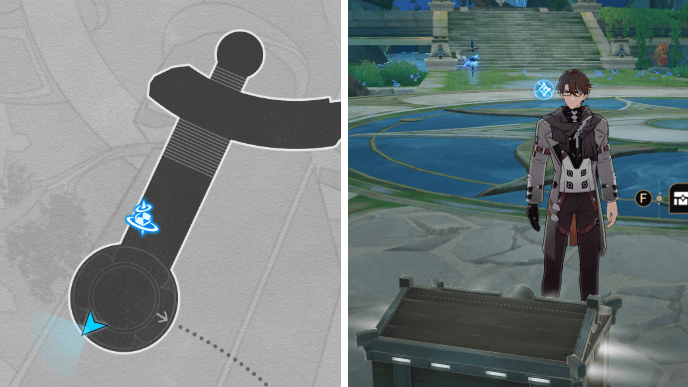
Chest 35 can be found southwest of the Sanctuary of Scythed Mind Space Anchor.
Memortis Shore Ruins of Time Chest 36
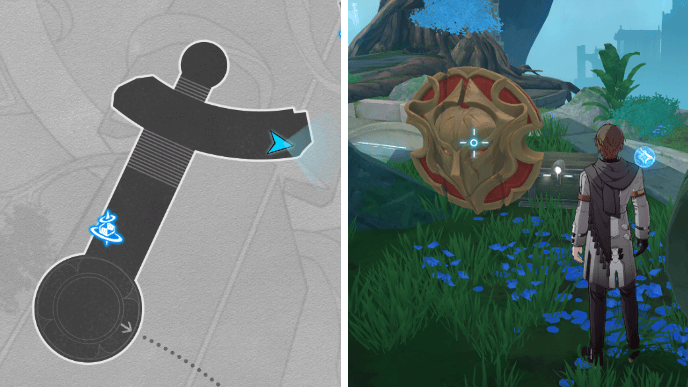
Before the prayer fountain that leads to B4, head right to find Chest 36 behind a shield.
Memortis Shore Ruins of Time Chest 37
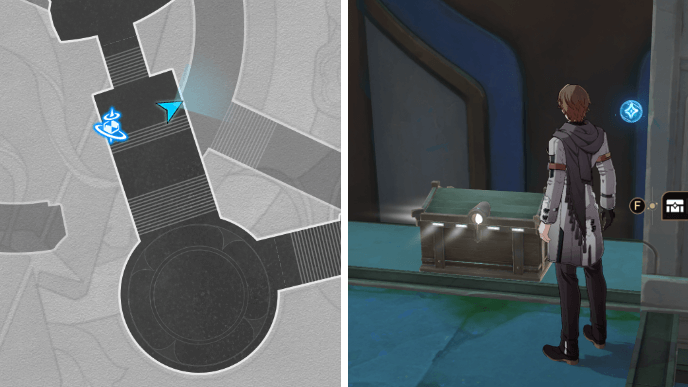
Chest 37 is located just a few steps east of the Worldbearing Statue Space Anchor on B4.
Memortis Shore Ruins of Time Chest 38
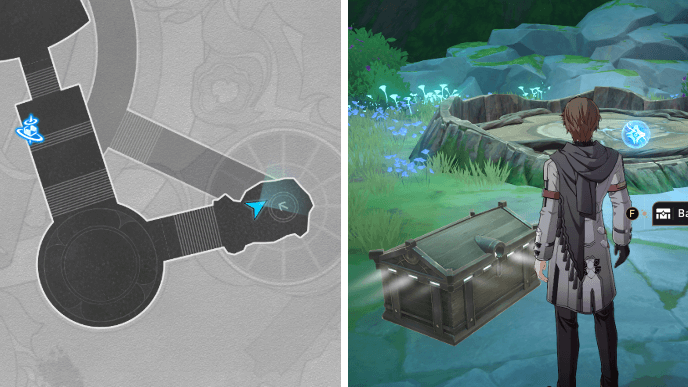
Chest 38 can be found next to the elevator that leads up to the northernmost area of B3.
Memortis Shore Ruins of Time Chest 39
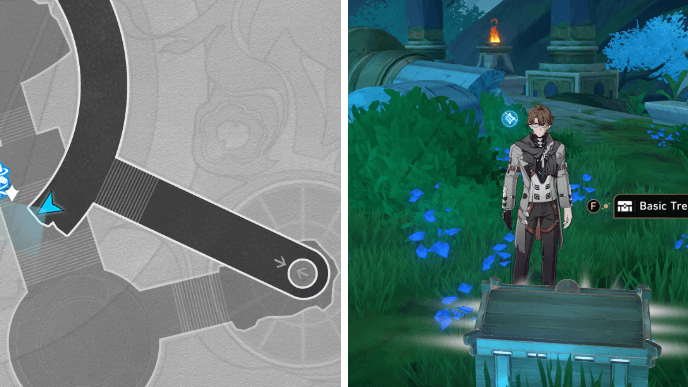
Take the elevator to the northernmost area of B3 and head northwest to find Chest 39 behind a broken pillar.
Memortis Shore Ruins of Time Chest 40
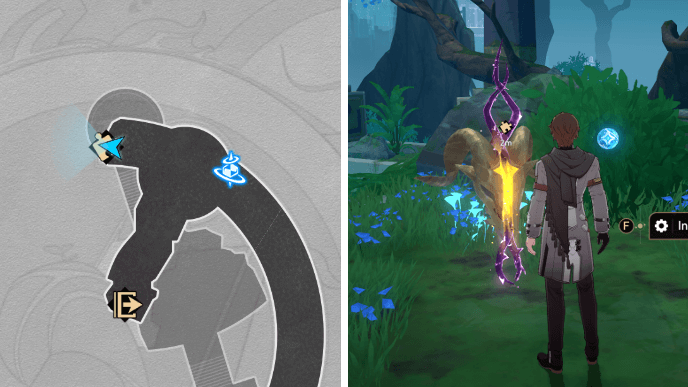
Chest 40 comes from a Golden Scapegoat located west of the Fissure in the Myth Space Anchor. To properly solve this puzzle, you'll need to submit the Golden Remains from the other Golden Scapegoats you've solved.
Ruins of Time Chest 40 Golden Scapegoat
Once you've gained 4 steps from the Golden Remains, input the commands: Right, Right, Right, Right. When your past self shows up, go left and press the orange button. Afterwards, you can climb up to reach the altar.
Memortis Shore Ruins of Time Chest 41

Chest 41 spawns once you've activated all 3 feather-shaped amber in the Ruins of Time.
Ruins of Time Feather-Shaped Amber Locations
| Image | Where to Find |
|---|---|
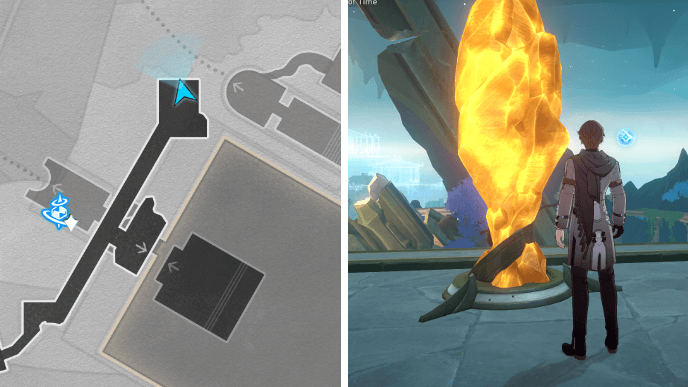 |
Located in B2. North of the Spirthief's hideout. |
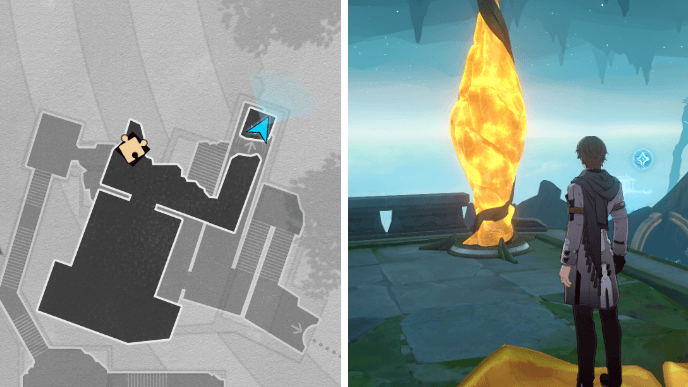 |
Located in B1. On the platform by the Cognos Bloom. |
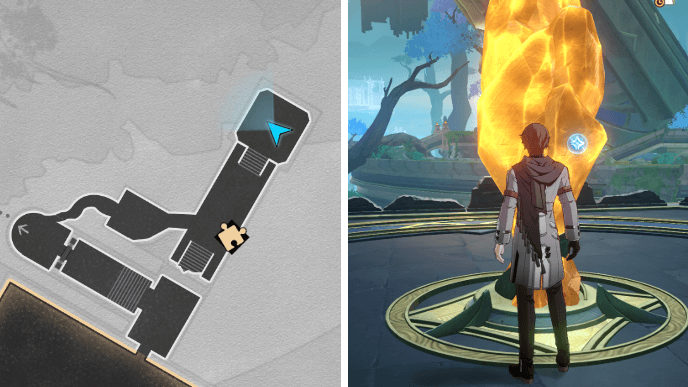 |
Located in B3. Northeast of the Janus' Hidden Passage that leads to the Sanctuary of the Scythed Mind. |
Memortis Shore Ruins of Time Chest 42
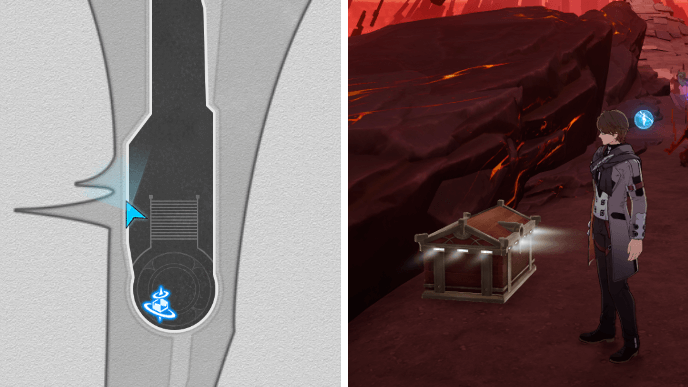
Enter the One Tomb of Woeflame from the Worldbearing Statue in B4. You'll find Chest 42 on the slope next to the stairs north of the Space Anchor.
Memortis Shore Ruins of Time Chest 43
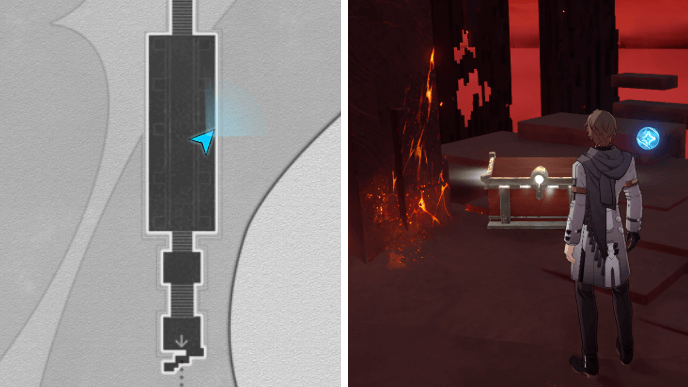
Take the Janus' Hidden Passage to reach the northern area of One Tomb of Woeflame. Keep heading straight and you'll come across Chest 43 on your right.
Memortis Shore Ruins of Time Chest 44
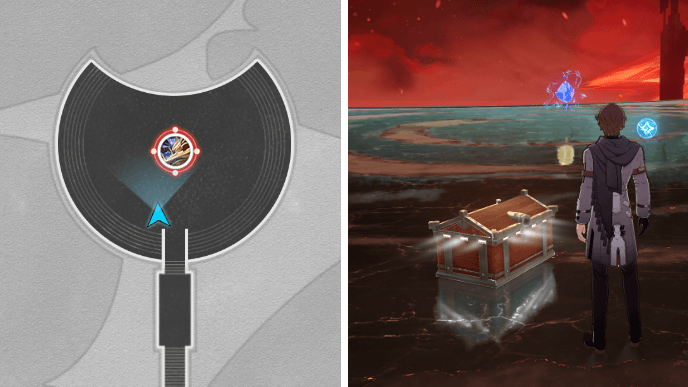
Chest 44 is located near the Echo of War: Rusted Crypt of the Iron Carcass.
Memortis Shore Ruins of Time Spirithief Locations
Memortis Shore Ruins of Time Spirithief 1
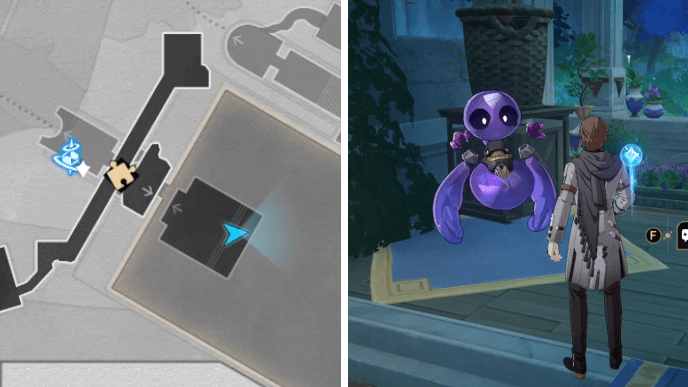
The first Ruins of Time Spirithief can be encountered when trying to capture Chest 8's Golden Short Spear. The Spirithief will appear and steal it, so you'll need to follow it through the window.
Once you've entered the Spirithief's hideout, just talk to it to get your rewards along with the spear!
Memortis Shore Ruins of Time Spirithief 2
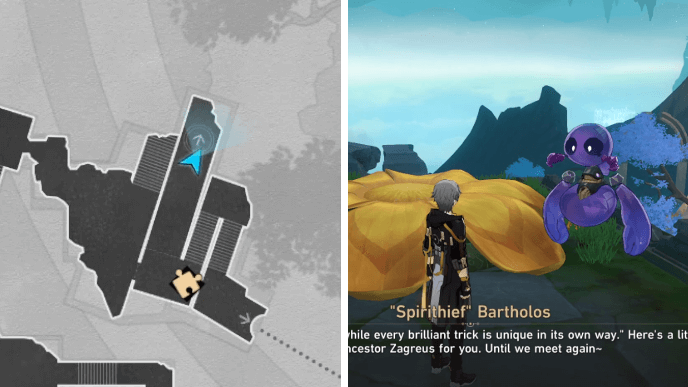
The last Ruins of Time Spirithief can be found by trying to gain access to the Cognos Bloom that leads up to B1. Interact with the Ichor Vessel and select Help me, Bartholos to make it appear and give your rewards!
How to Unlock Memortis Shore Ruins of Time
Progress Through As Tomorrow Became Yesterday Mission

You can unlock Memortis Shore Ruins of Time by progressing through the As Tomorrow Became Yesterday mission!
As Tomorrow Became Yesterday Mission
Honkai: Star Rail Related Guides
List of All Maps
| List of Maps | |
|---|---|
| Herta Space Station | Jarilo-VI |
| The Xianzhou Luofu | Penacony |
| Amphoreus | Planarcadia |
Treasure Chest Locations
Comment
Author
Memortis Shore Ruins of Time Chests and Spirithief Locations
Premium Articles
Rankings
- We could not find the message board you were looking for.
Gaming News
Popular Games

Genshin Impact Walkthrough & Guides Wiki

Umamusume: Pretty Derby Walkthrough & Guides Wiki

Pokemon Pokopia Walkthrough & Guides Wiki

Honkai: Star Rail Walkthrough & Guides Wiki

Monster Hunter Stories 3: Twisted Reflection Walkthrough & Guides Wiki

Arknights: Endfield Walkthrough & Guides Wiki

Wuthering Waves Walkthrough & Guides Wiki

Zenless Zone Zero Walkthrough & Guides Wiki

Pokemon TCG Pocket (PTCGP) Strategies & Guides Wiki

Monster Hunter Wilds Walkthrough & Guides Wiki
Recommended Games

Fire Emblem Heroes (FEH) Walkthrough & Guides Wiki

Diablo 4: Vessel of Hatred Walkthrough & Guides Wiki

Cyberpunk 2077: Ultimate Edition Walkthrough & Guides Wiki

Yu-Gi-Oh! Master Duel Walkthrough & Guides Wiki

Super Smash Bros. Ultimate Walkthrough & Guides Wiki

Pokemon Brilliant Diamond and Shining Pearl (BDSP) Walkthrough & Guides Wiki

Elden Ring Shadow of the Erdtree Walkthrough & Guides Wiki

Monster Hunter World Walkthrough & Guides Wiki

The Legend of Zelda: Tears of the Kingdom Walkthrough & Guides Wiki

Persona 3 Reload Walkthrough & Guides Wiki
All rights reserved
Copyright © 2024 HoYoverse, COGNOSPHERE. All Rights Reserved.
The copyrights of videos of games used in our content and other intellectual property rights belong to the provider of the game.
The contents we provide on this site were created personally by members of the Game8 editorial department.
We refuse the right to reuse or repost content taken without our permission such as data or images to other sites.


![Star Savior Review [First Impressions] | Engaging, Entertaining, and Expensive](https://img.game8.co/4447603/8f500e9bf666bdb8adb1af478e9dfdbd.png/thumb)
![Death Stranding 2: On The Beach [PC] Review | A Port That Delivers](https://img.game8.co/4447392/15310a0c9aa1b6843bb713b2ea216930.jpeg/thumb)


