Warbling Shores Styxia Chests and Spirithief Locations
★ Exclusive: Check out the State of Meta in 4.0!
♦ Latest: 4.1 Livestream Redeem Codes
♦ Phase 2: Sparxie, Sparkle, Cerydra, Rappa
♦ Upcoming: Ashveil, Silver Wolf Lv.999, Evanescia
♦ Events: Cosmicon, Roll On!, Ding! Arcadia Fun-Time Clock-In Essentials
There are 47 Warbling Shores Styxia chests to collect in Honkai: Star Rail. Check out our map guide for all Warbling Shores Styxia chests and Spirithief locations!
| Amphoreus Map Guide | |
|---|---|
| Warbling Shores Styxia Chests | Warbling Shores Styxia Puzzles |
List of Contents
Warbling Shores Styxia Chest Locations
Warbling Shores Styxia Interactive Map
Select icons to toggle them on/off
| Space Anchor | Treasure Chest | ||
| Spirithief | - | ||
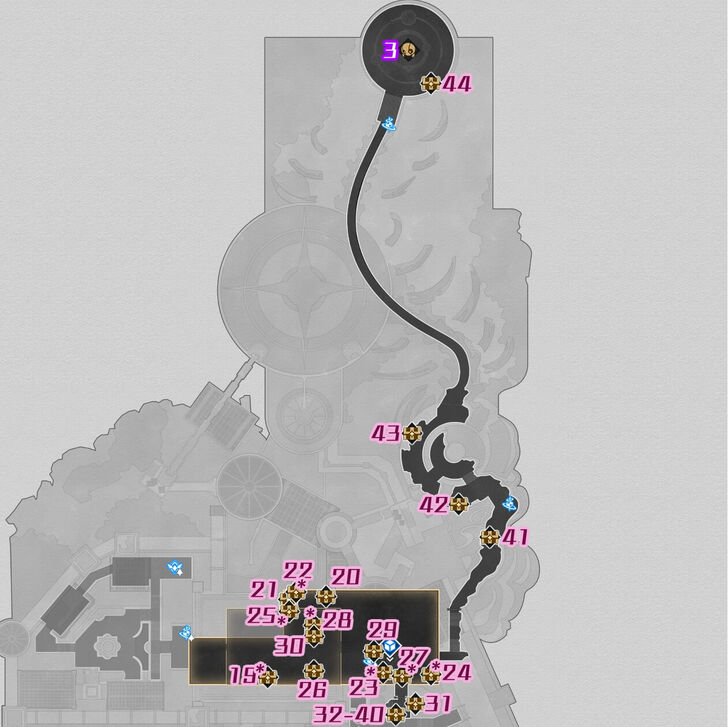
Warbling Shores Styxia Chests
| Warbling Shores Styxia Chest Map | |||||||||||
|---|---|---|---|---|---|---|---|---|---|---|---|
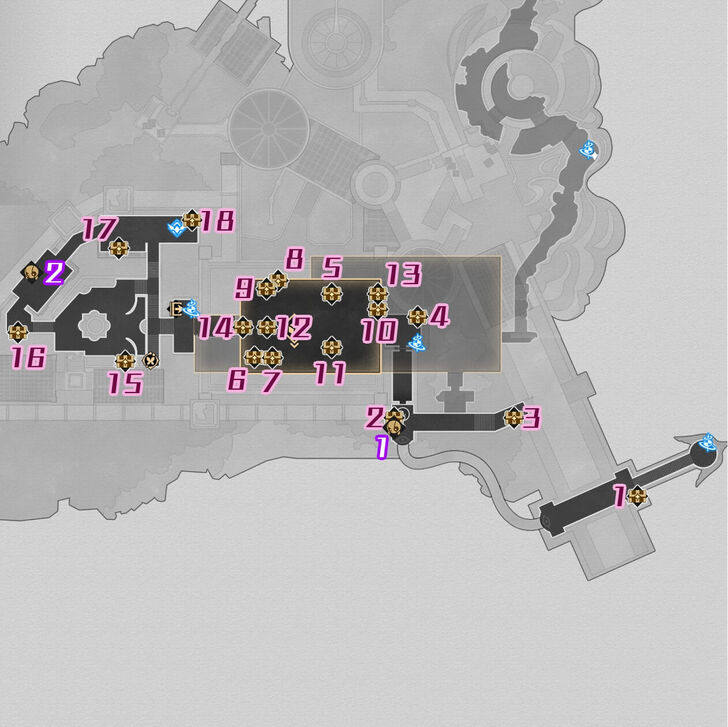 See Full Image |
 See Full Image |
||||||||||
| Warbling Shores Styxia Treasure Chests | |||||||||||
| Chest 1 | Chest 2 | Chest 3 | Chest 4 | ||||||||
| Chest 5 | Chest 6 | Chest 7 | Chest 8 | ||||||||
| Chest 9 | Chest 10 | Chest 11 | Chest 12 | ||||||||
| Chest 13 | Chest 14 | Chest 15 | Chest 16 | ||||||||
| Chest 17 | Chest 18 | Chest 19 | Chest 20 | ||||||||
| Chest 21 | Chest 22 | Chest 23 | Chest 24 | ||||||||
| Chest 25 | Chest 26 | Chest 27 | Chest 28 | ||||||||
| Chest 29 | Chest 30 | Chest 31 | Chest 32-40 | ||||||||
| Chest 41 | Chest 42 | Chest 43 | Chest 44 | ||||||||
| Warbling Shores Styxia Spirithief Locations | |||||||||||
| Spirithief 1 | Spirithief 2 | Spirithief 3 | |||||||||
How to Get Warbling Shores Styxia Chests
Warbling Shores Styxia Chest 1
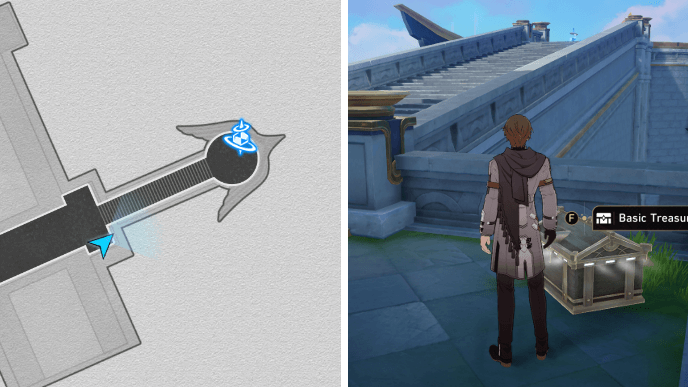
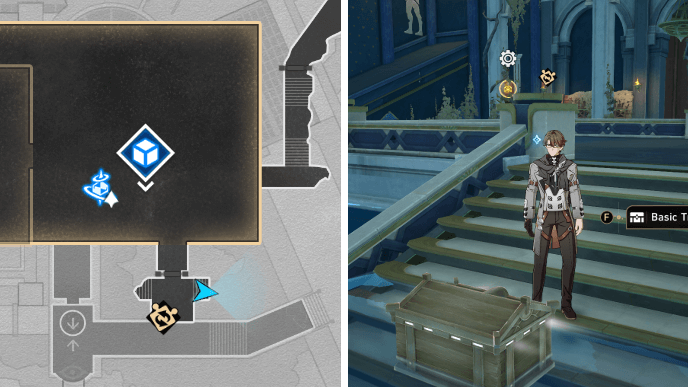
Chest 1 of Warbling Shores Styxia is at the bottom of the stairs leading southwest from the Revelry's Keep Space Anchor.
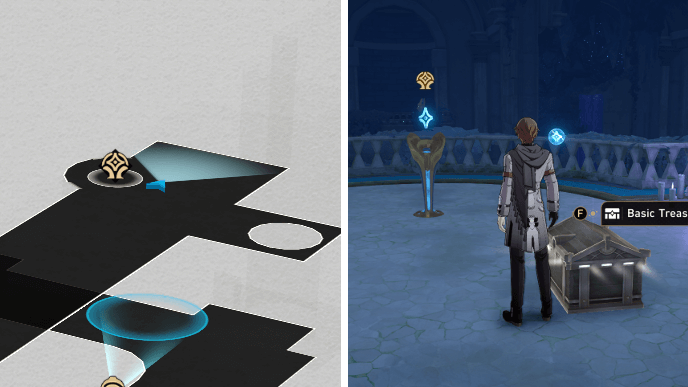
Warbling Shores Styxia Chest 2
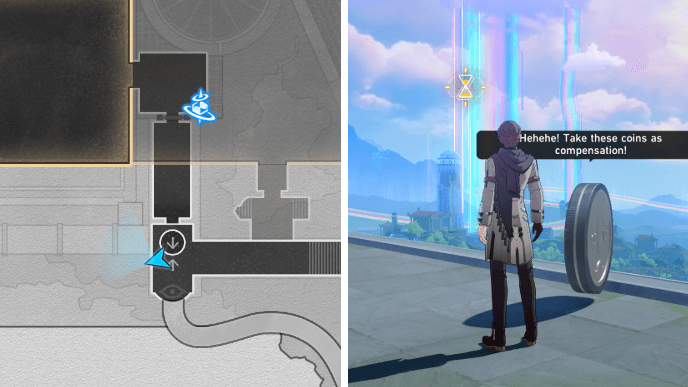
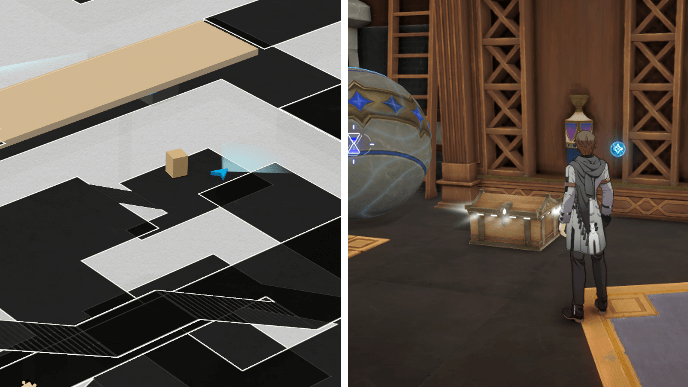
From Chest 1, take the rainbow bridge to the next platform and you'll find a Coin of Whimsy left by a Spirithief. Focus on the glitching rainbow in the distance while rewinding time to spawn Chest 2.
Warbling Shores Styxia Chest 3

After picking up Chest 2, take the path leading east and you'll find a Golden Scapegoat at the end. Solve the puzzle to get the chest!
Warbling Shores Styxia Chest 4
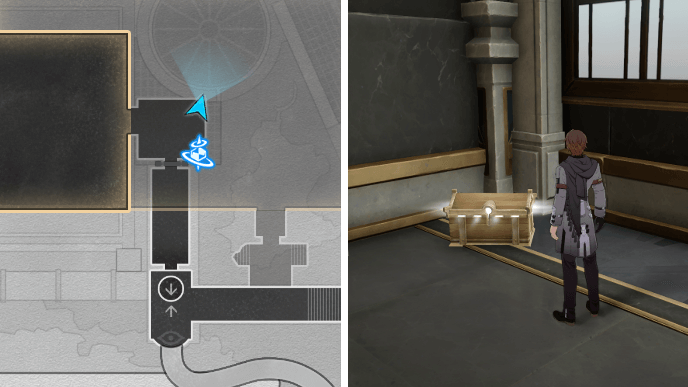
Chest 4 is found in the corner of the room just across the Passage of Treasures Space Anchor.
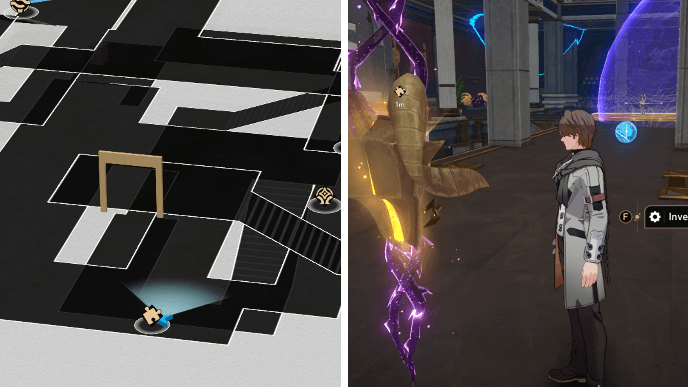
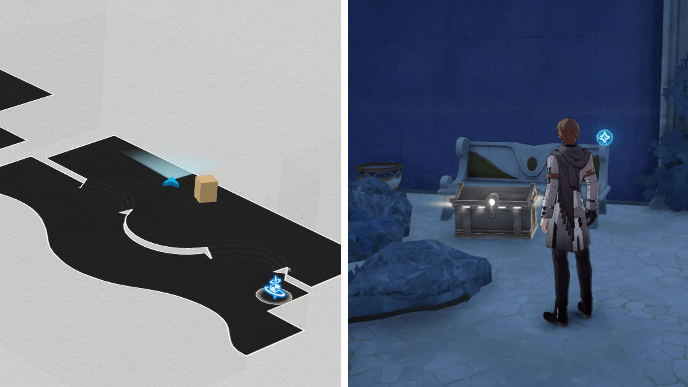
Warbling Shores Styxia Chest 5

Enter 3D puzzle room west of the Passage of Treasures Space Anchor. Go to the small area on the right of the Shrine of Prayers to find Chest 5 at the end.
Warbling Shores Styxia Chest 6

Chest 6 can be found by the Verax Leo statue on the other side of the bridge at the uppermost floor of the 3D puzzle room. This chest will be blocked during the Nectar, Saturate the Hollow Treecore mission, but you'll be able to reach it afterwards.
Warbling Shores Styxia Chest 7

Similar to Chest 6, you can reach Chest 7 once the Black Tide corruption is cleared up after the Nectar, Saturate the Hollow Treecore mission.
Go down the stairs near Chest 6's location and make a U-turn to reach the side area next to the staircase. There'll be a Prophecy Tablet that you can solve to get Chest 7.
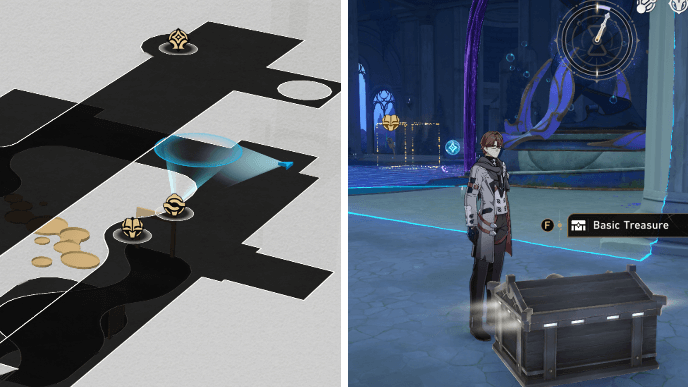
Warbling Shores Styxia Chest 8

Return to the uppermost floor of the 3D puzzle room and take the path opposite of Chest 6's location. As you go down the stairs, you'll find a Golden Short Spear next to a Miracle Orb. Free the spear and capture it to get Chest 8!
Warbling Shores Styxia Chest 9
From Chest 8, head to the bottom of the stairs and make a U-turn to reach the area underneath the staircase. There, you'll find a chest behind two shields.
Warbling Shores Styxia Chest 10

After picking up Chest 9, return to the main walkway and go through the area that's been cleared up by the Miracle Orb. Chest 10 will be along the path before the elevator.
Warbling Shores Styxia Chest 11
Take the elevator down to the lower floor of the puzzle room and destroy the two ball statues in the area. This will clear out the wooden crates blocking certain chests.
Afterwards, go down the stairs nearest to the elevator to reach the bottom floor. You'll find Chest 11 between two benches in the lounge area.
Warbling Shores Styxia Chest 12

From Chest 11, go through the arched hallway by the Flying Amphora and walk past the artifact display. If you destroyed all the ball statues correctly, you should be able to reach Chest 12 in the walkway that was previously blocked.
Warbling Shores Styxia Chest 13
After getting Chest 12, continue going forward and go up the nearest staircase. Turn left and walk past the basin at the center. Then, turn right and go down the stairs past the two shields to reach Chest 13.
Like with the previous chest, you need to make sure that the obstacles have already been destroyed by one of the ball statues.
Warbling Shores Styxia Chest 14
Return to the basin at the middle of the lower floor and you should spot a Golden Scapegoat at the end of one of the paths connected to the basin's platform. Solve the puzzle to get Chest 14!
Warbling Shores Styxia Chest 15

From the Ariose Fountain Courtyard Space Anchor, head to the area southeast of the fountain. Chest 15 will be near a pile of barrels next to a blocked staircase by the Garmentmaker.
Warbling Shores Styxia Chest 16
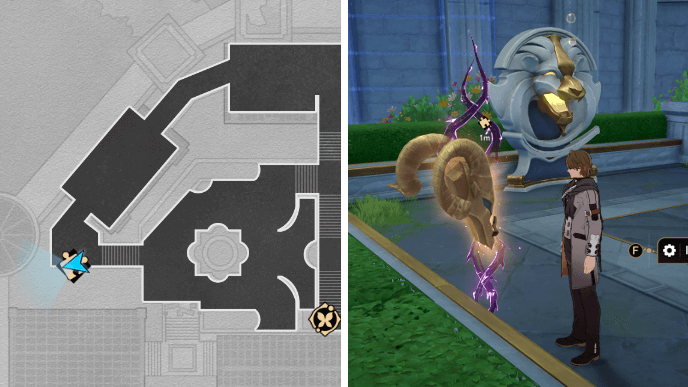
Go up the stairs west of the fountain at the Ariose Fountain Courtyard to find a Golden Scapegoat near a Verax Leo statue. You can get Chest 16 by solving the puzzle.
Warbling Shores Styxia Chest 17
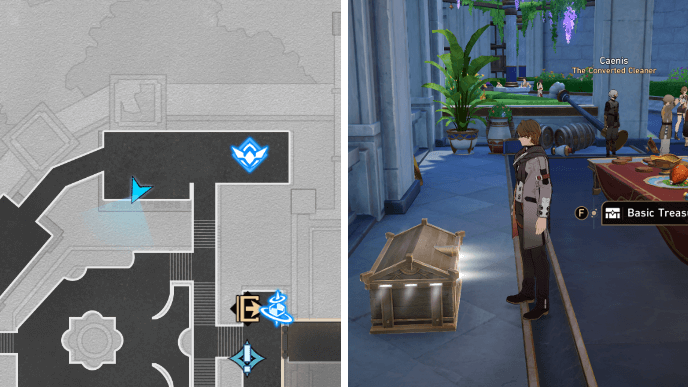
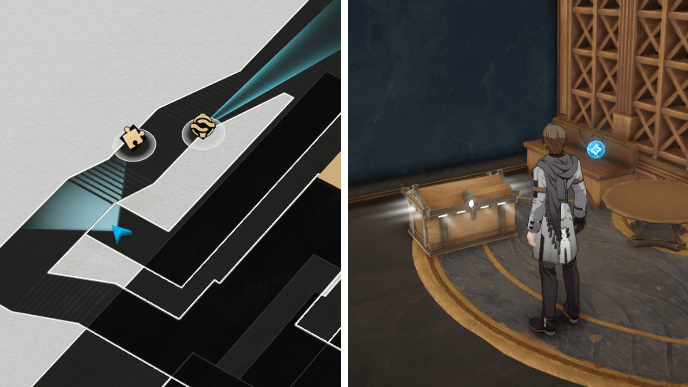
Head west from the Stagnant Shadow at the Ariose Fountain Courtyard to reach the banquet area. You'll find Chest 17 behind the table near Caenis.
Warbling Shores Styxia Chest 18
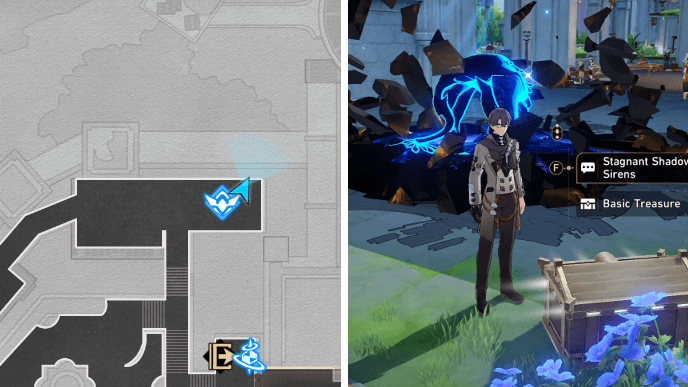
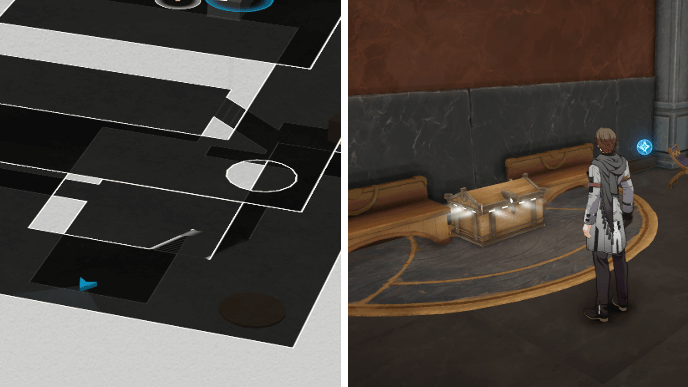
Chest 18 is just behind the Shape of Sirens Stagnant Shadow at the Ariose Fountain Courtyard.
Warbling Shores Styxia Chest 19
Head to the Slumbering Palace Corridor puzzle room on B1. During the Sea, Bury the Wine-Dark Dreams mission, the room will automatically switch to Evernight upon approaching Apollonius and Verginia.
After the fight, you can reach Chest 19 by going through the gap by the nearby fallen pillar. However, if you're getting this chest after the mission, you'll need to set the room to Evernight with the Tome of Miracles on the right side of the giant chalice.
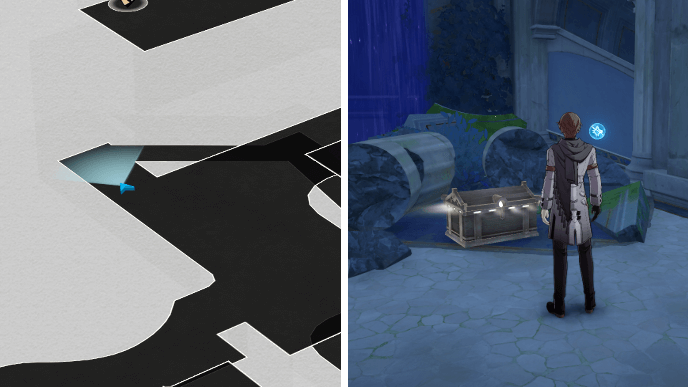
Warbling Shores Styxia Chest 20

With the puzzle room set back to Dawn, go into the main hall area and go all the way left. In the corner of the room, there'll be a walkway leading downwards. Go down the ramp to get Chest 20, and continue onwards to also activate the Shrine of Prayers for later.
Warbling Shores Styxia Chest 21
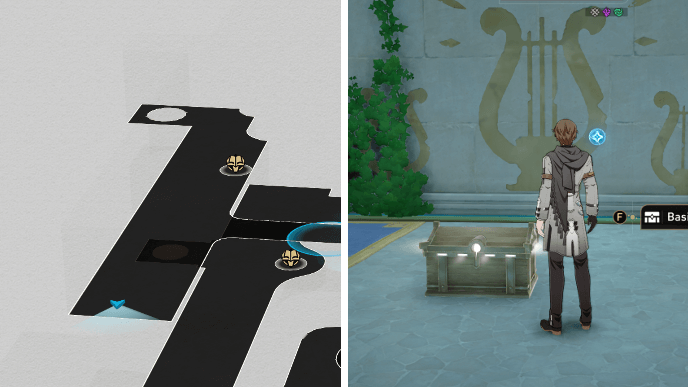
Return to the main hall area and take the elevator on the left side of the giant chalice. On the left side of the top level, you'll find Chest 21 at the far end in front of a harp mural.
Warbling Shores Styxia Chest 22
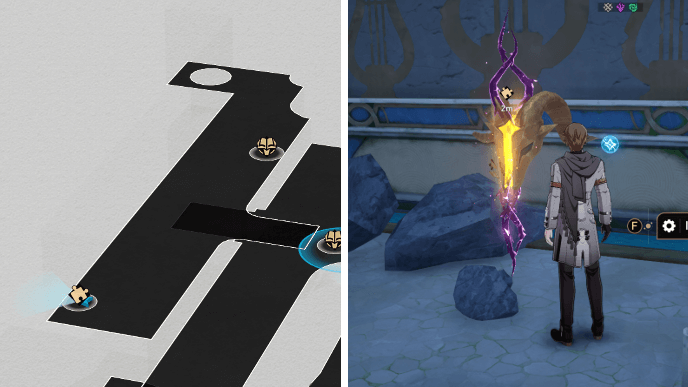
After getting Chest 21, use the Tome of Miracles to switch to Evernight. A Golden Scapegoat will appear near Chest 21's location. Solve the puzzle to get Chest 22!
Warbling Shores Styxia Chest 23
While the room is still set to Evernight, cross the bridge to reach the right side of the top floor and turn left. You'll find Chest 23 near a Shrine of Prayers at the far end of the area.
Warbling Shores Styxia Chest 24
Return to the left side of the top floor and use the Tome of Miracles to switch to Dawn. Go down to the main hall area and use the other Tome of Miracles to switch back to Evernight. Then, cross over the lilypad bridge to reach Chest 24 on the right side of the giant chalice.
Warbling Shores Styxia Chest 25
From Chest 24, head past the lilypad bridge and go around the pool towards the same corner where you can find a ramp leading to the lower level. Although the ramp is blocked by debris in Evernight, you'll find Chest 25 in front of it.
Warbling Shores Styxia Chest 26

Return to the Tome of Miracles on the right side of the giant chalice to set the room to Dawn. Then, you can use the elevator to go up to the right side of the top floor. There, you'll find a Golden Short Spear, which you can capture to get Chest 26.
Warbling Shores Styxia Chest 27

From Chest 26, go back down with the elevator you came from and switch to Evernight with the Tome of Miracles. Make sure that the nearby Miracle Orb is turned off to remove the Chrono Vessel.
Walk onto the lilypad bridge and stay on the leaves towards the right side. Then, face your camera towards the giant chalice to rewind time. This should lower the water level and allow you to reach Chest 27 on the middle platform inside the pool.
Warbling Shores Styxia Chest 28

After getting Chest 27, walk back onto the lilypad bridge and start moving time forward on the giant chalice. With the pool filling up with water again, go onto the leaf that rises up to you.
Once you get onto the leaf, you can rewind time on the chalice again until the pool is completely empty again. This lets you reach Chest 28 at the bottom of the pool.
Warbling Shores Styxia Chest 29

Return to the main hall area and use the Tome of Miracles to set the room back to Dawn. Then, you can rewind time on the giant chalice until the pool is completely empty again. Now you can go down the stairs on the right side of the pool to reach Chest 29 on the middle platform.
Warbling Shores Styxia Chest 30
After getting Chest 29, go back up and head towards the walkway where you found Chest 20. Take the ramp all the way down to the bottom of the pool to reach Chest 30.
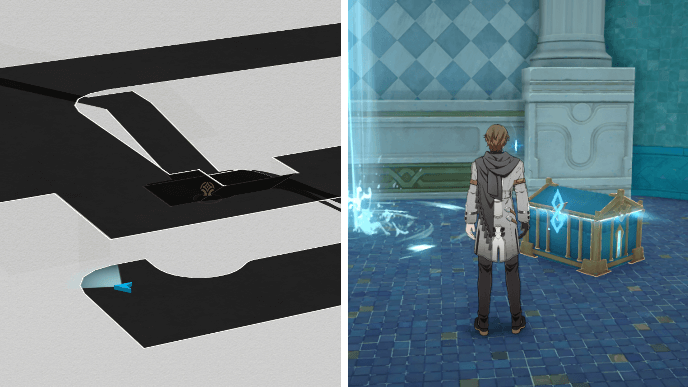
Warbling Shores Styxia Chest 31
From Chest 30, head to the other side of the bottom floor and you should find another door leading to a secret Janus' Maze room. On the stairs at the left side of the Janus' Maze mechanism, you'll find Chest 31.
Warbling Shores Styxia Chest 32-40
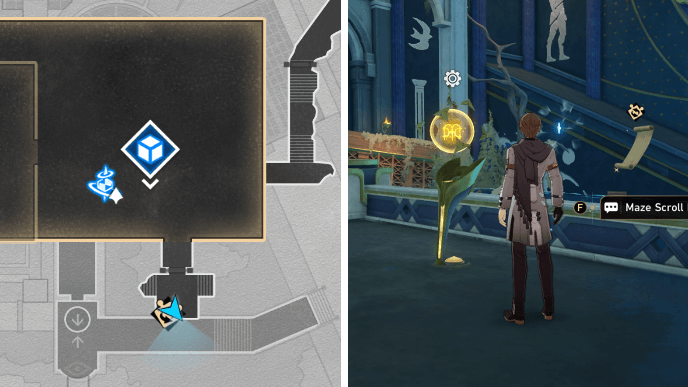
You can get 9 chests by solving the 9 different Janus' Maze puzzles in B1's secret room! Interact with the Maze Scroll Fragment to select which Janus' Maze puzzle you want to solve. After a puzzle has been completed, a chest will spawn in the room.
Warbling Shores Styxia Chest 41
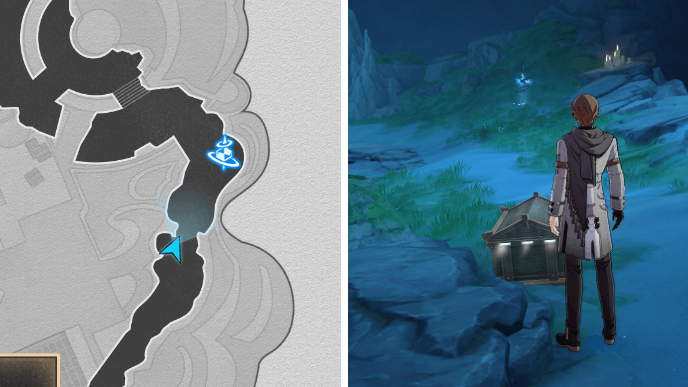
Chest 41 of Warbling Shores Styxia can be found by a broken pillar before the Somber Altar of Candles Space Anchor.
Warbling Shores Styxia Chest 42
Head to the area west of the Somber Altar of Candles Space Anchor to find Chest 42 by the stone railing.
Warbling Shores Styxia Chest 43
Go through the broken wall of the altar and continue following the path forward. You'll eventually spot Chest 43 on your left.
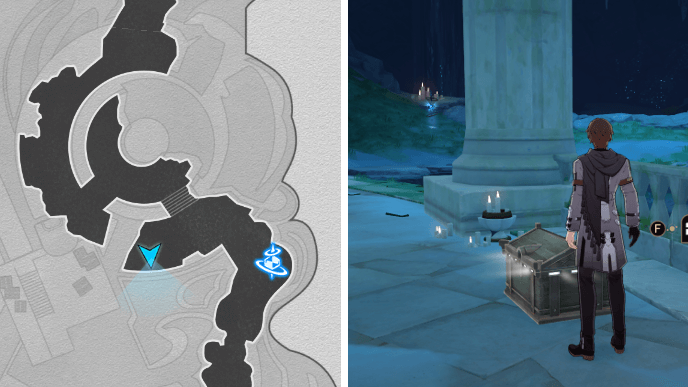
Warbling Shores Styxia Chest 44

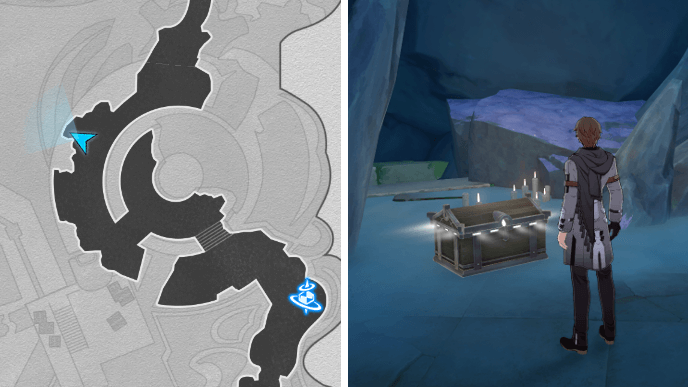
From the Seabed of Luminous Remains Space Anchor, walk to the southern area of the circular platform. You'll find Chest 44 in between some large, broken pillars.
Warbling Shores Styxia Spirithief Locations
Warbling Shores Styxia Spirithief 1
The first Spirithief in Warbling Shores Styxia gives Chest 2. Focus on the glitching rainbow in the distance while rewinding time to bring back the Spirithief.
Warbling Shores Styxia Spirithief 2
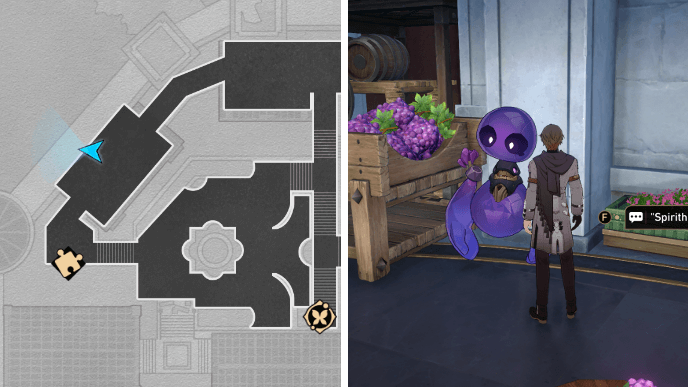
Warbling Shore's next Spirithief can be found in the winery area northwest of the fountain at the Ariose Fountain Courtyard. Just speak to the Spirithief and defeat it in battle to get its treasure!
Warbling Shores Styxia Spirithief 3

You can find the last Warbling Shores Styxia Spirithief at the center of the Seabed of Luminous Remains. Defeat the Spirithief in battle to get its treasure and bring back the basin leading to the Vortex of Genesis.
How to Unlock Warbling Shores Styxia
Progress Through Before Their Deaths Mission
You can unlock Warbling Shores Styxia by progressing through the Before Their Deaths mission!
Before Their Deaths Mission Guide
Honkai: Star Rail Related Guides
List of All Maps
| List of Maps | |
|---|---|
| Herta Space Station | Jarilo-VI |
| The Xianzhou Luofu | Penacony |
| Amphoreus | Planarcadia |
Treasure Chest Locations
Author

Warbling Shores Styxia Chests and Spirithief Locations
Premium Articles

Rankings
Gaming News


![Star Savior Review [First Impressions] | Engaging, Entertaining, and Expensive](https://img.game8.co/4447603/8f500e9bf666bdb8adb1af478e9dfdbd.png/thumb)
![Death Stranding 2: On The Beach [PC] Review | A Port That Delivers](https://img.game8.co/4447392/15310a0c9aa1b6843bb713b2ea216930.jpeg/thumb)
Popular Games

Genshin Impact Walkthrough & Guides Wiki
Umamusume: Pretty Derby Walkthrough & Guides Wiki
Pokemon Pokopia Walkthrough & Guides Wiki
Honkai: Star Rail Walkthrough & Guides Wiki
Monster Hunter Stories 3: Twisted Reflection Walkthrough & Guides Wiki
Arknights: Endfield Walkthrough & Guides Wiki
Wuthering Waves Walkthrough & Guides Wiki
Zenless Zone Zero Walkthrough & Guides Wiki
Pokemon TCG Pocket (PTCGP) Strategies & Guides Wiki
Monster Hunter Wilds Walkthrough & Guides Wiki


Recommended Games
Fire Emblem Heroes (FEH) Walkthrough & Guides Wiki
Diablo 4: Vessel of Hatred Walkthrough & Guides Wiki
Cyberpunk 2077: Ultimate Edition Walkthrough & Guides Wiki
Yu-Gi-Oh! Master Duel Walkthrough & Guides Wiki
Super Smash Bros. Ultimate Walkthrough & Guides Wiki
Pokemon Brilliant Diamond and Shining Pearl (BDSP) Walkthrough & Guides Wiki
Elden Ring Shadow of the Erdtree Walkthrough & Guides Wiki
Monster Hunter World Walkthrough & Guides Wiki
The Legend of Zelda: Tears of the Kingdom Walkthrough & Guides Wiki
Persona 3 Reload Walkthrough & Guides Wiki


All rights reserved
Copyright © 2024 HoYoverse, COGNOSPHERE. All Rights Reserved.
The copyrights of videos of games used in our content and other intellectual property rights belong to the provider of the game.
The contents we provide on this site were created personally by members of the Game8 editorial department.
We refuse the right to reuse or repost content taken without our permission such as data or images to other sites.
I cant rewind time on coin 2. there is no option. is there a quest that needs to be finished first?