The Great Rift Guide
NEW: Season 2 | Refinement | Arena
✪ Tiphera: Build | Cards | Banner
☆ Tiana: Partner Guide | Banner
✪ Nine: Build | Cards | Banner
See our Endgame Mode Tier List (Season 2 Updated!)
☆ Tier Lists: Character | Partner | Cards
Score as many points using two teams within a limited number of turns in The Great Rift, which is part of the Galactic Disaster's seasonal content in Chaos Zero Nightmare (CZN). Learn more about The Great Rift event, its mechanics, boss guide, recommended teams and cards, and release date here!
List of Contents
The Great Rift Mechanics
|
|
Amplify Effect List
| All Great Rift Round 2 Amplify Effect |
|---|
|
・ Increase Damage Amount of Instinct and Order Cards by 50% ・ Increase Damage Amount of Exhaust cards by 20% ・ Gain Combat Score based on the Damage Amount, and once you reach a certain threshhold of damage, the score you receive in this manner will gradually be reduced. |
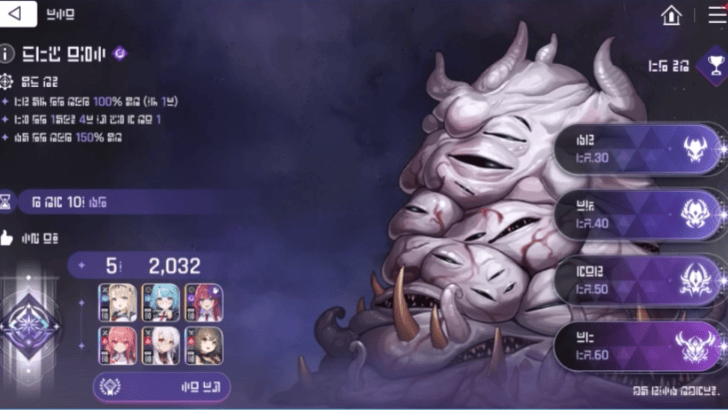
Vanguard Mechanics - Tyrant's Outcry
A global mechanic of the Colossus are its breakable parts. After hitting multiple times, the Colossi will inflict harmful effects or perform an attack action.
Once both arms are destroyed, you'll be able to use a few number of attacks on its main body. You'll have 10 turns to defeat the Colossi on the Vanguard Phase and left over turns will carry over to the Rearguard team.
Rearguard Mechanics - Counterfeit
Similar to the first phase, you'll need to destroy both arms first to open up an attack opportunity to the main body. However, unlike the first phase, its second phase can only take a single hit. It has an infinite amount of HP so ensure that your last attack will be the highest damaging attack you can use.
What is The Great Rift
Two Teams and Two-Phase Boss Fight
The Great Rift involves forming two teams to take on a two-phase boss fight. The goal of the event is to score as many points as you can within a limited number of turns. There will be obtainable effects during the fight, and the higher your points at the end, the higher your rewards can be!
It is imporant to note that there will also be cumulative rewards as you repeat the fights, but there will also be rewards based on the highest score you get.
Obtain Record Rewards Based on High Score
After dealing damage, the damage you deal will be converted to your run's score. Your score will determine the rewards you can get and weekly cumulative rewards will also progress based on the total score you get throughout the week.
Merit Ranking is the Leaderboard and Shows the Top Players
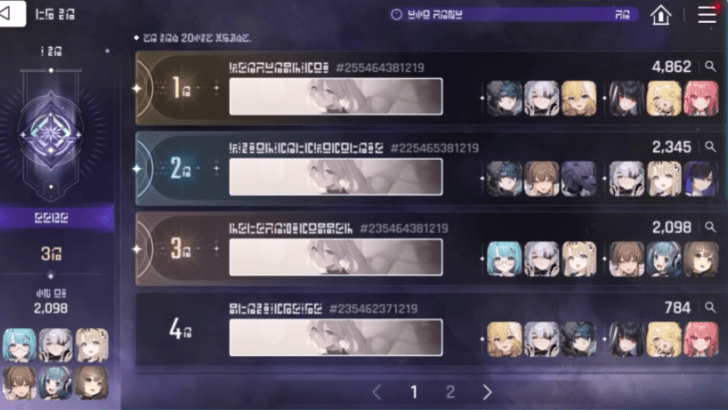
A unique addition to this event would be leaderboards showing the top players in The Great Rift. You can use this to copy their strategies and further improve your scores! The ranking will display the top 1000 players and will have separate calculations for the first and second half of the season.
Merit Ranking List
| Grade | Percentage |
|---|---|
| Master Ⅰ | Top 0.1% |
| Master Ⅱ | 0.5% |
| Master Ⅲ | 1% |
| Master Ⅳ | 1.5% |
| Master Ⅴ | 2% |
| Diamond Ⅰ | 5% |
| Diamond Ⅱ | 7% |
| Diamond Ⅲ | 8% |
| Diamond Ⅳ | 9% |
| Diamond Ⅴ | 10% |
| Platinum Ⅰ | 15% |
| Platinum Ⅱ | 19% |
| Platinum Ⅲ | 22% |
| Platinum Ⅳ | 24% |
| Platinum Ⅴ | 26% |
| Gold Ⅰ | 34% |
| Gold Ⅱ | 40% |
| Gold Ⅲ | 44% |
| Gold Ⅳ | 48% |
| Gold Ⅴ | 50% |
| Silver Ⅰ | 55% |
| Silver Ⅱ | 60% |
| Silver Ⅲ | 65% |
| Silver Ⅳ | 70% |
| Silver Ⅴ | 75% |
| Bronze Ⅰ | 80% |
| Bronze Ⅱ | 85% |
| Bronze III | 90% |
| Bronze IV | 95% |
| Bronze Ⅴ | 100% |
Regular Save Data Cant Be Used
For The Great Rift content, you'll only be able to use seasonal save data. This means you'll either need to run the burning life chaos zone or complete codice with the arena modifier and obtain season 2 specific cards and/or equipment on your save data.
The Great Rift Release Date
New Great Rift Challenge Released on February 25, 2026
New Great Rift challenges will be releasing during the middle of Season 2. Here are the following dates for the new challenges:
| Challenge | Duration |
|---|---|
| The Great Rift First Half | 02/25/2026 after the maintenance – 03/18/2026 before the maintenance |
| The Great Rift Second Half | 03/18/2026 after the maintenance – 04/08/2026 before the maintenance |
Season 2: Seed of Karmic Fire Release Date
Chaos Zero Nightmare (CZN) Related Guides
Seasonal Content
| All Seasons | |
|---|---|
| Season 2 | Season 1 |
Season 2: Seed of Karmic Fire Guides
| Spiral Tower of Screams | Distortion Adaptation Explained |
| Arena Explained | List of All Divine Interventions |
| Refinement and God's Hammer Explained | Burning Life Chaos Guide |
Season 1: Forbidden Catalyst Guides
| The Great Rift Guide | Nebula Distortion Guide |
| Supply Store Items | Laboratory 0 Guide |
| How to Reach Lab 0's Secret Boss | - |
Author

The Great Rift Guide
Premium Articles
Rankings

Gaming News


Popular Games

Genshin Impact Walkthrough & Guides Wiki
Umamusume: Pretty Derby Walkthrough & Guides Wiki
Pokemon Pokopia Walkthrough & Guides Wiki
Honkai: Star Rail Walkthrough & Guides Wiki
Monster Hunter Stories 3: Twisted Reflection Walkthrough & Guides Wiki
Arknights: Endfield Walkthrough & Guides Wiki
Wuthering Waves Walkthrough & Guides Wiki
Zenless Zone Zero Walkthrough & Guides Wiki
Pokemon TCG Pocket (PTCGP) Strategies & Guides Wiki
Monster Hunter Wilds Walkthrough & Guides Wiki


Recommended Games
Fire Emblem Heroes (FEH) Walkthrough & Guides Wiki
Diablo 4: Vessel of Hatred Walkthrough & Guides Wiki
Cyberpunk 2077: Ultimate Edition Walkthrough & Guides Wiki
Yu-Gi-Oh! Master Duel Walkthrough & Guides Wiki
Super Smash Bros. Ultimate Walkthrough & Guides Wiki
Pokemon Brilliant Diamond and Shining Pearl (BDSP) Walkthrough & Guides Wiki
Elden Ring Shadow of the Erdtree Walkthrough & Guides Wiki
Monster Hunter World Walkthrough & Guides Wiki
The Legend of Zelda: Tears of the Kingdom Walkthrough & Guides Wiki
Persona 3 Reload Walkthrough & Guides Wiki


All rights reserved
© Smilegate. All Rights Reserved.
The copyrights of videos of games used in our content and other intellectual property rights belong to the provider of the game.
The contents we provide on this site were created personally by members of the Game8 editorial department.
We refuse the right to reuse or repost content taken without our permission such as data or images to other sites.
You cannot use non seasonal save data on this mode